sensor BMW X3 3.0I 2004 E83 Owner's Manual
[x] Cancel search | Manufacturer: BMW, Model Year: 2004, Model line: X3 3.0I, Model: BMW X3 3.0I 2004 E83Pages: 132, PDF Size: 3.62 MB
Page 12 of 132
Cockpit
10
Cockpit
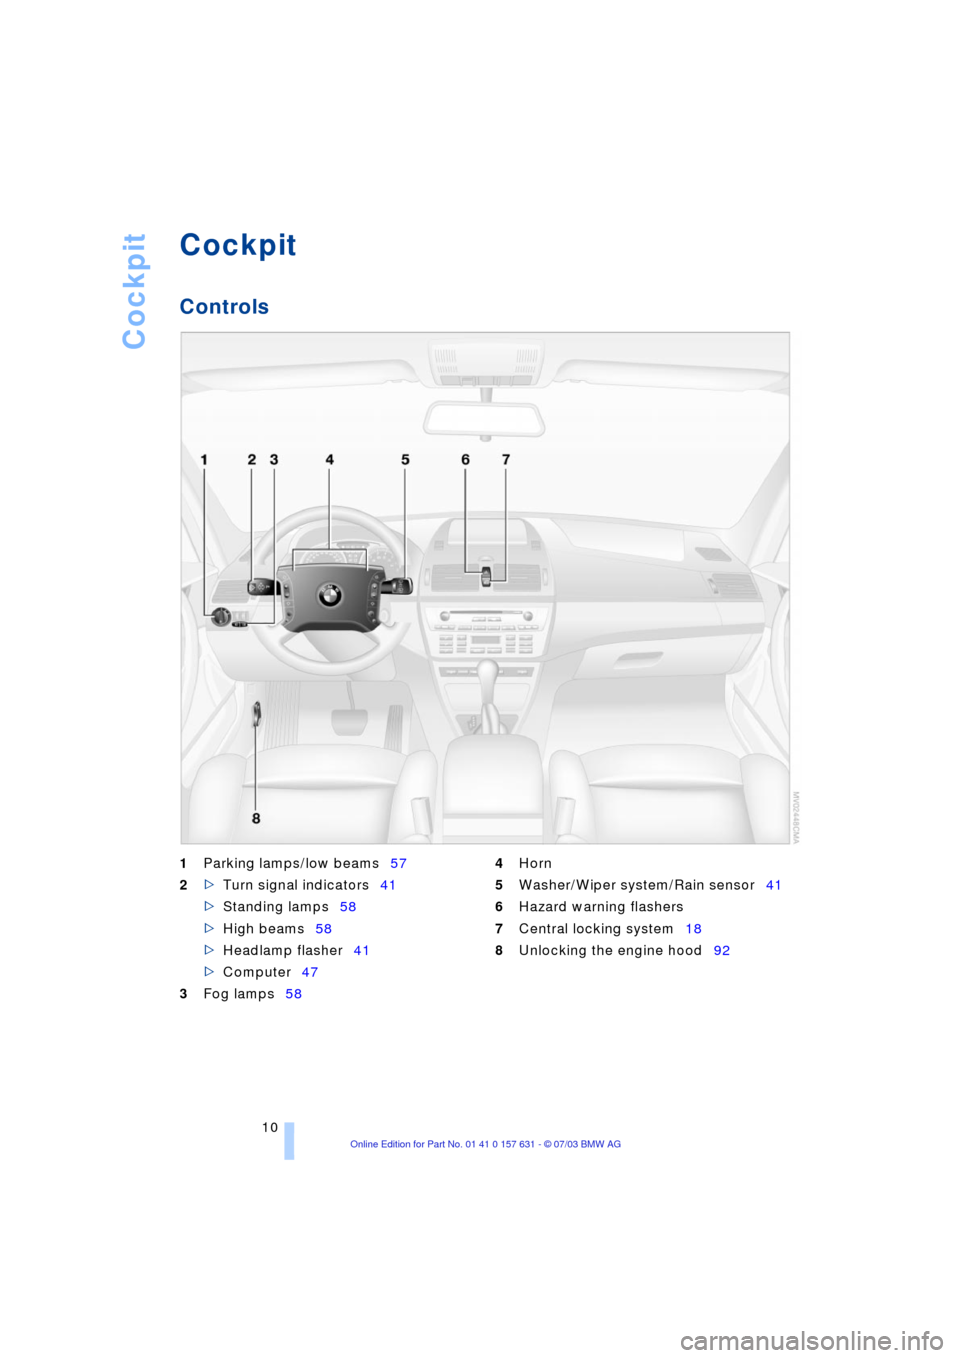
Controls
1
Parking lamps/low beams57
2
>
Turn signal indicators41
>
Standing lamps58
>
High beams58
>
Headlamp flasher41
>
Computer47
3
Fog lamps58
4
Horn
5
Washer/Wiper system/Rain sensor41
6
Hazard warning flashers
7
Central locking system18
8
Unlocking the engine hood92
Page 21 of 132
Reference
At a glance
Controls
Driving tips
Mobility
19
In addition, the remote control offers you
another function:
>Panic mode
In case of danger, you can trigger an
alarm.
When you engage/release the vehicle
locks, you simultaneously activate/deacti-
vate the anti-theft system, arm/disarm the
alarm system, and switch the interior lamps
on/off.
As a reminder that the ignition key is
still in the ignition lock after you open
the driver's door, you can have a sound sig-
nal set.<
Protect the remote control against
unauthorized use by handing over
only the spare key, for example when using
hotel valet parking.<
Because any persons or animals left
unattended in a parked vehicle could
lock the doors from the inside, you should
always take the vehicle's keys with you so
that the vehicle can be opened again from
the outside at any time.<
Unlocking
Press the button.
Press the button once to unlock the driverÕs
door only; press a second time to unlock all
remaining doors as well as the tailgate and
the fuel filler door.
Convenience opening mode
Press and hold the button. The windows
and the sliding panel of the panorama glass
roof are opened.
Press the button a second time and hold.
The panorama glass roof is opened.
If you desire, you can have this spe-
cial feature activated/deactivated on
a vehicle-specific basis.<
Locking and securing
Press the button.
If you desire, the vehicle locks auto-
matically if no door or lid is opened
after unlocking. You may have this function
set on a vehicle-specific basis if you wish.<
Switching off the tilt alarm sensor*
and interior motion sensor*
Press the button once again directly
after locking.
For details, refer to page 25.
Switching on the interior lamps
If the vehicle is locked, press the
button.
Panic mode*
By pressing and holding the button for
more than approx. two seconds, you can
trigger the alarm system in response to any
impending danger.
To switch off the alarm: press any of the
buttons.
Unlocking tailgate
Press the button.
The tailgate will open slightly, regardless of
whether it was previously locked or
unlocked.
Before and after a trip, ensure that the
tailgate has not been opened uninten-
tionally.
A previously locked tailgate is also locked
after closing.<
If you desire, the tailgate can only be
opened using the remote control if the
vehicle is unlocked. This can be adjusted.<
Malfunctions
The remote control system may be affected
by other units or equipment operating in
the immediate vicinity of your vehicle.
Should the remote control fail to operate
owing to interference of this kind, you can
respond by using the master key to unlock
your vehicle at one of the doors.
In case of faults, please contact your BMW
Sports Activity Vehicle Center. You can
also obtain replacement keys there.
If it is no longer possible to lock the vehicle
via the remote control, the battery is dis-
charged. Use this remote control during an
extended drive; this will recharge the bat-
tery, refer to page 18.
Page 26 of 132
Opening and closing
24 If the glass roof and sliding panel are
closed:
Press the switch once.<
Anti-trapping mechanism
If the glass roof and sliding panel encoun-
ter resistance when closing from roughly
one third of the roof opening or when clos-
ing from the raised position, the closing
action is interrupted and the glass roof and
sliding panel reopen a little.
Despite the anti-trapping mechanism
you should always inspect the roof's
travel path prior to closing it, as the safety
system might fail to detect certain kinds of
obstructions, such as very thin objects, and
the window would continue closing.
The anti-trapping mechanism for closing
the panorama glass roof is deactivated if
the switch is pressed beyond the resis-
tance point and held there. The closing
action is interrupted when you release the
switch.<
Following interruptions in electrical
power supply
Following interruptions in electrical power,
for instance, when the battery is discon-
nected, it is possible that the glass roof will
extend to its tilt-up position, but fail to
respond to other commands. For initializa-
tion, please contact your BMW Sports
Activity Vehicle Center.
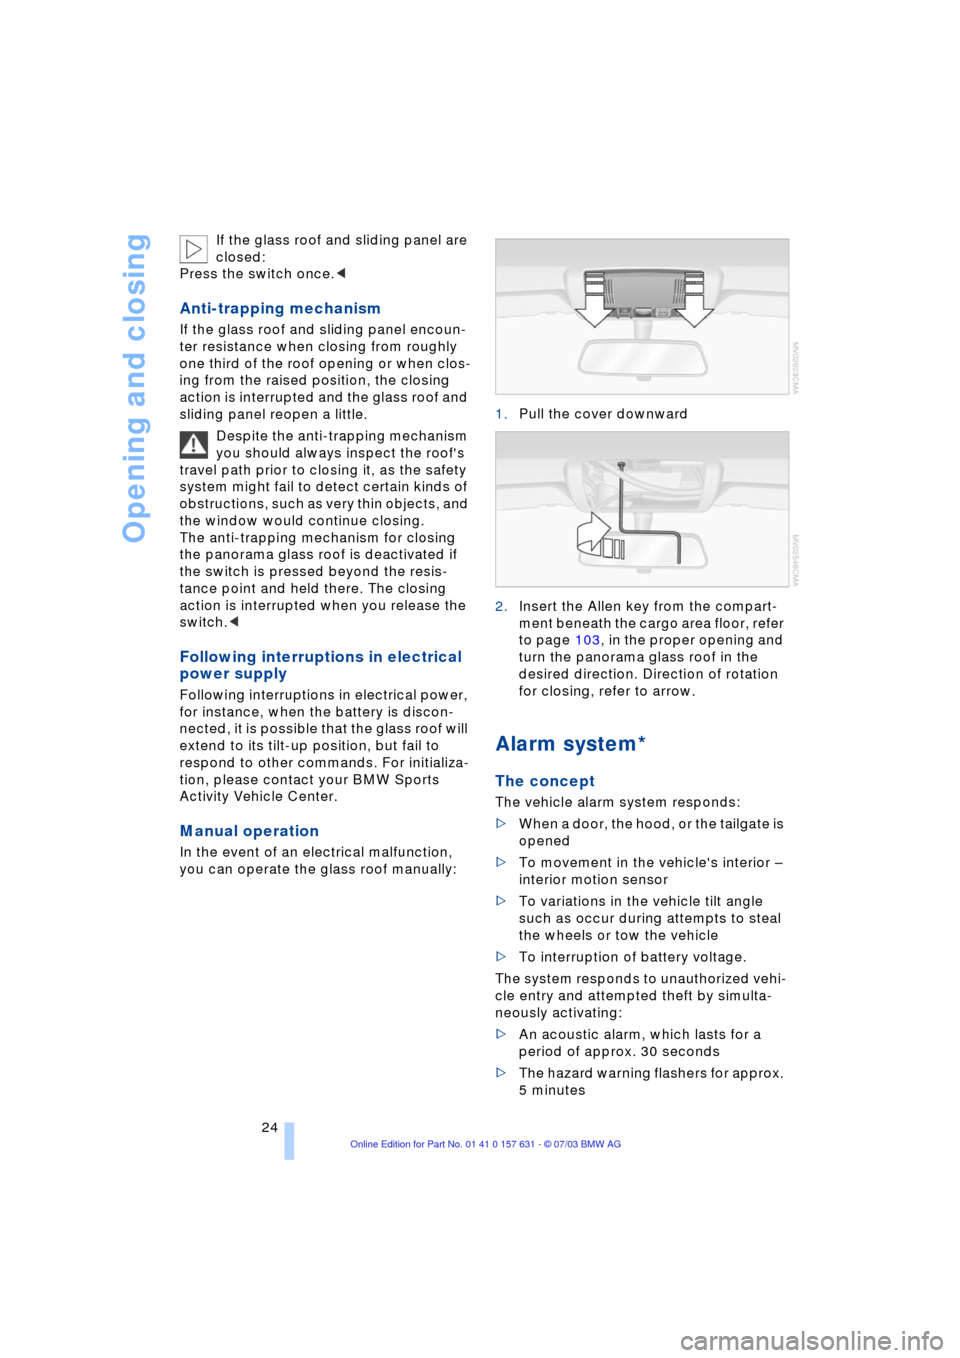
Manual operation
In the event of an electrical malfunction,
you can operate the glass roof manually:1.Pull the cover downward
2.Insert the Allen key from the compart-
ment beneath the cargo area floor, refer
to page 103, in the proper opening and
turn the panorama glass roof in the
desired direction. Direction of rotation
for closing, refer to arrow.
Alarm system*
The concept
The vehicle alarm system responds:
>When a door, the hood, or the tailgate is
opened
>To movement in the vehicle's interior Ð
interior motion sensor
>To variations in the vehicle tilt angle
such as occur during attempts to steal
the wheels or tow the vehicle
>To interruption of battery voltage.
The system responds to unauthorized vehi-
cle entry and attempted theft by simulta-
neously activating:
>An acoustic alarm, which lasts for a
period of approx. 30 seconds
>The hazard warning flashers for approx.
5 minutes
Page 27 of 132
Reference
At a glance
Controls
Driving tips
Mobility
25
>The high beams, which flash on and off
in the same rhythm.
Arming and disarming the alarm
system
When the vehicle is locked or unlocked
with the key or the remote control, the
alarm system is also simultaneously armed
or disarmed.
If the alarm system has been properly
armed, the hazard warning flashers light up
once.
You can have different acknowledg-
ment signals set to confirm arming
and disarming.<
You can also open the tailgate with the sys-
tem armed using the button on the
remote control, refer to page 19. When you
close the tailgate, the system is rearmed.<
Switching off the alarm
>Unlock the vehicle using the remote
control, refer to page 19
>Turn the ignition key to position 1.
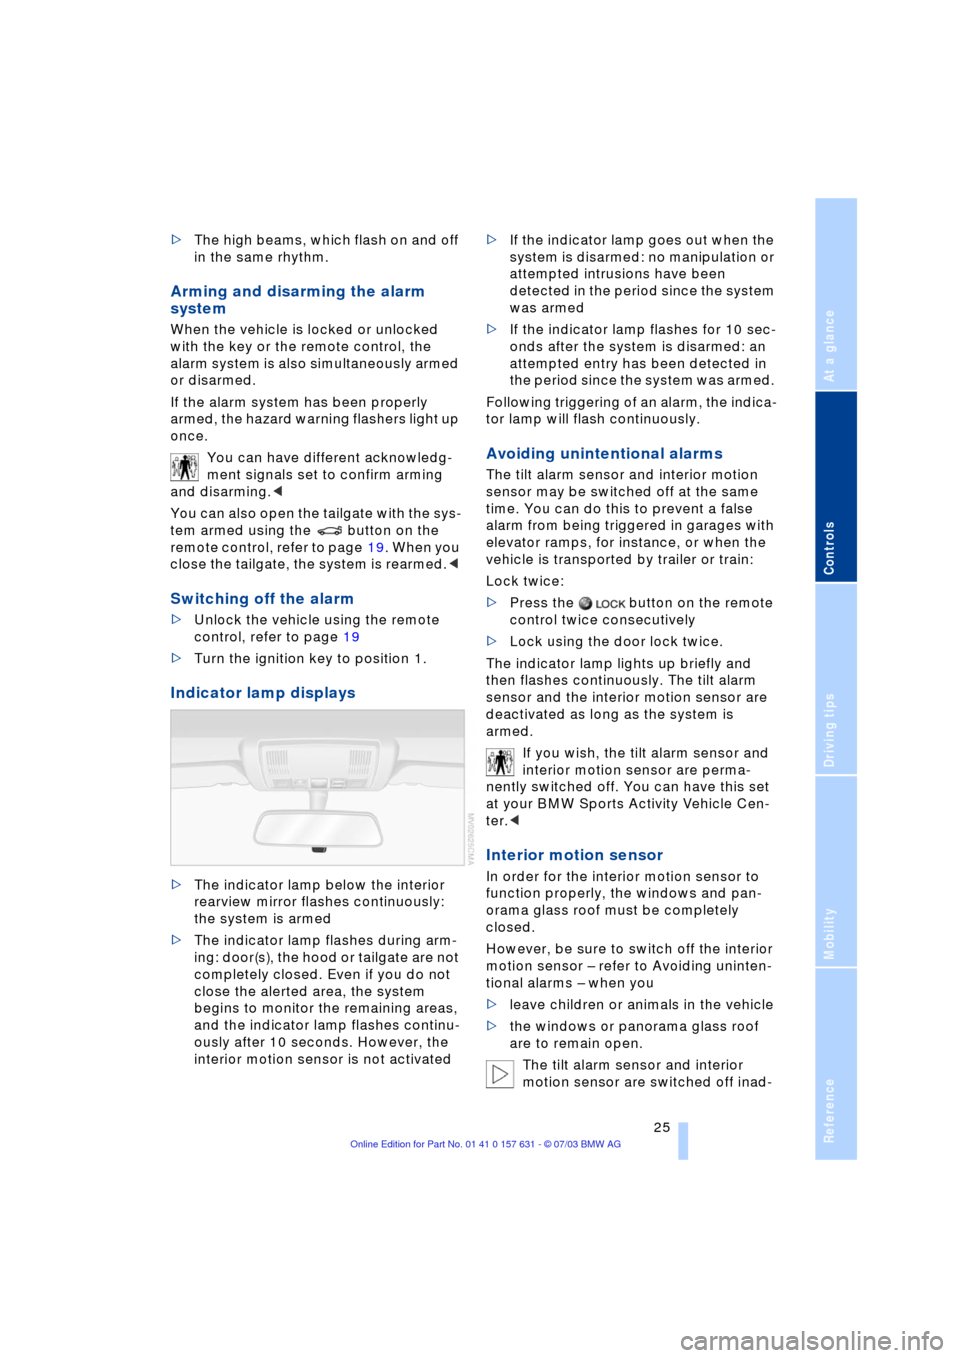
Indicator lamp displays
>The indicator lamp below the interior
rearview mirror flashes continuously:
the system is armed
>The indicator lamp flashes during arm-
ing: door(s), the hood or tailgate are not
completely closed. Even if you do not
close the alerted area, the system
begins to monitor the remaining areas,
and the indicator lamp flashes continu-
ously after 10 seconds. However, the
interior motion sensor is not activated >If the indicator lamp goes out when the
system is disarmed: no manipulation or
attempted intrusions have been
detected in the period since the system
was armed
>If the indicator lamp flashes for 10 sec-
onds after the system is disarmed: an
attempted entry has been detected in
the period since the system was armed.
Following triggering of an alarm, the indica-
tor lamp will flash continuously.
Avoiding unintentional alarms
The tilt alarm sensor and interior motion
sensor may be switched off at the same
time. You can do this to prevent a false
alarm from being triggered in garages with
elevator ramps, for instance, or when the
vehicle is transported by trailer or train:
Lock twice:
>Press the button on the remote
control twice consecutively
>Lock using the door lock twice.
The indicator lamp lights up briefly and
then flashes continuously. The tilt alarm
sensor and the interior motion sensor are
deactivated as long as the system is
armed.
If you wish, the tilt alarm sensor and
interior motion sensor are perma-
nently switched off. You can have this set
at your BMW Sports Activity Vehicle Cen-
ter.<
Interior motion sensor
In order for the interior motion sensor to
function properly, the windows and pan-
orama glass roof must be completely
closed.
However, be sure to switch off the interior
motion sensor Ð refer to Avoiding uninten-
tional alarms Ð when you
>leave children or animals in the vehicle
>the windows or panorama glass roof
are to remain open.
The tilt alarm sensor and interior
motion sensor are switched off inad-
Page 43 of 132
Reference
At a glance
Controls
Driving tips
Mobility
41
appear briefly in the instrument cluster fol-
lowed by the current gear.
To obtain maximum acceleration, for
passing maneuvers, etc., during
operation in the manual mode, use the
kickdown or downshift manually.<
Shifting from M/S to the selector-lever
positions P, R and N is only possible by
going through D.
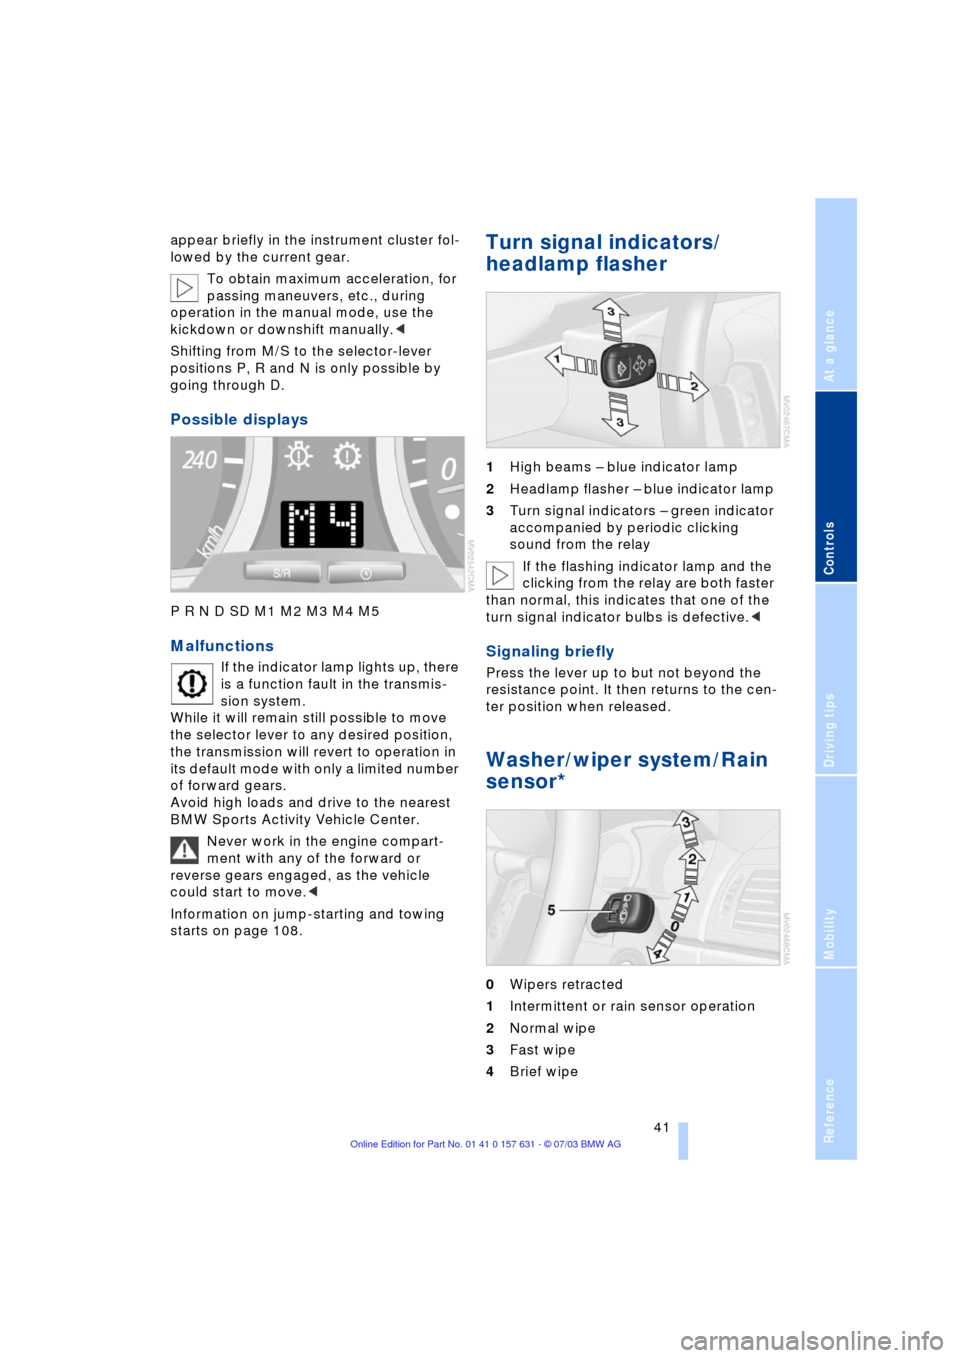
Possible displays
P R N D SD M1 M2 M3 M4 M5
Malfunctions
If the indicator lamp lights up, there
is a function fault in the transmis-
sion system.
While it will remain still possible to move
the selector lever to any desired position,
the transmission will revert to operation in
its default mode with only a limited number
of forward gears.
Avoid high loads and drive to the nearest
BMW Sports Activity Vehicle Center.
Never work in the engine compart-
ment with any of the forward or
reverse gears engaged, as the vehicle
could start to move.<
Information on jump-starting and towing
starts on page 108.
Turn signal indicators/
headlamp flasher
1High beams Ð blue indicator lamp
2Headlamp flasher Ð blue indicator lamp
3Turn signal indicators Ð green indicator
accompanied by periodic clicking
sound from the relay
If the flashing indicator lamp and the
clicking from the relay are both faster
than normal, this indicates that one of the
turn signal indicator bulbs is defective.<
Signaling briefly
Press the lever up to but not beyond the
resistance point. It then returns to the cen-
ter position when released.
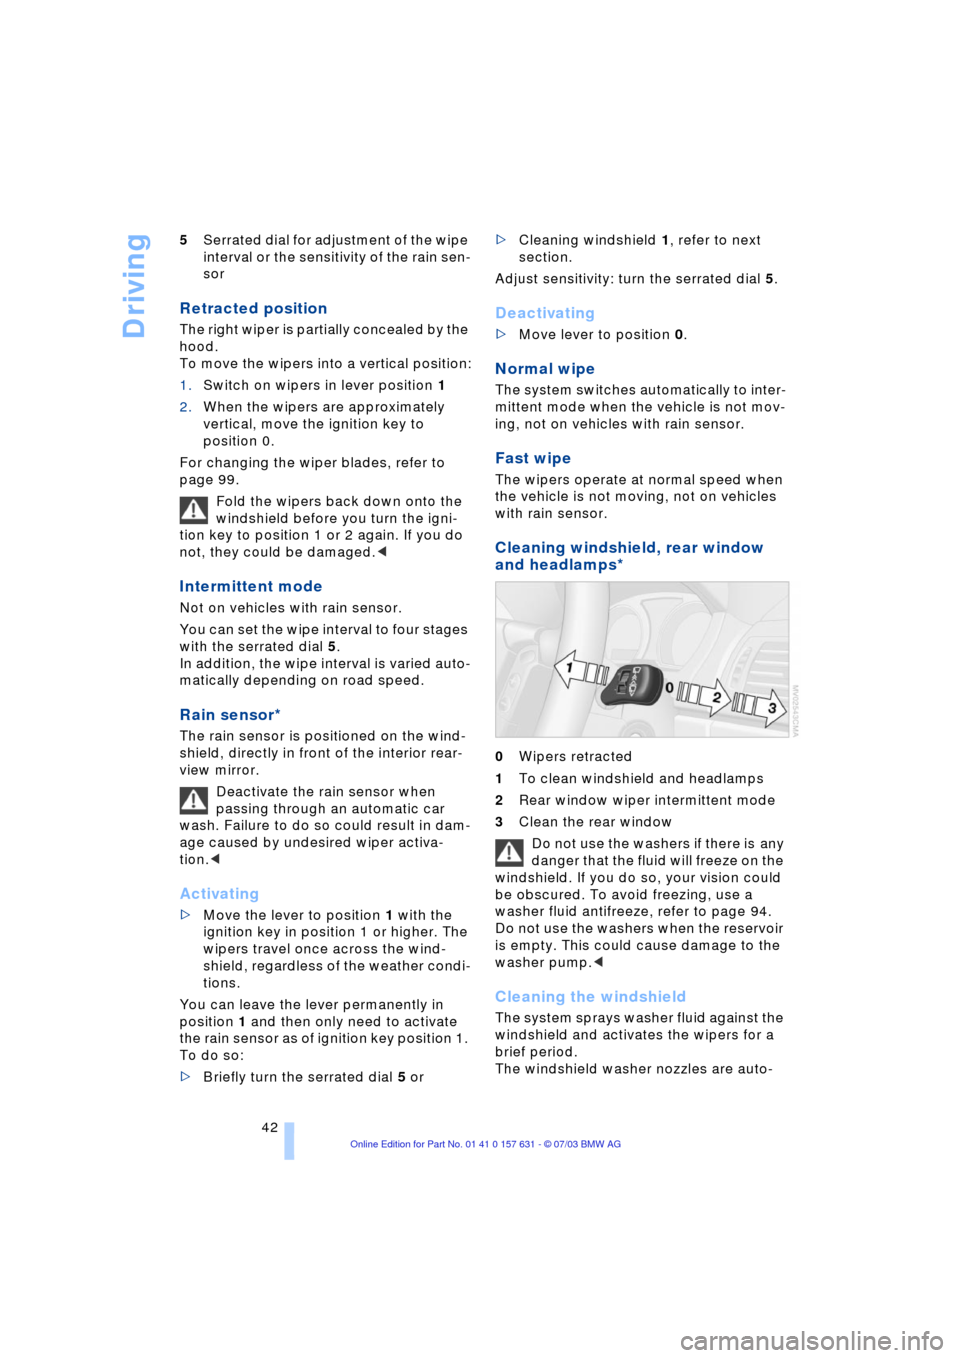
Washer/wiper system/Rain
sensor*
0Wipers retracted
1Intermittent or rain sensor operation
2Normal wipe
3Fast wipe
4Brief wipe
Page 44 of 132
Driving
42 5Serrated dial for adjustment of the wipe
interval or the sensitivity of the rain sen-
sor
Retracted position
The right wiper is partially concealed by the
hood.
To move the wipers into a vertical position:
1.Switch on wipers in lever position 1
2.When the wipers are approximately
vertical, move the ignition key to
position 0.
For changing the wiper blades, refer to
page 99.
Fold the wipers back down onto the
windshield before you turn the igni-
tion key to position 1 or 2 again. If you do
not, they could be damaged.<
Intermittent mode
Not on vehicles with rain sensor.
You can set the wipe interval to four stages
with the serrated dial 5.
In addition, the wipe interval is varied auto-
matically depending on road speed.
Rain sensor*
The rain sensor is positioned on the wind-
shield, directly in front of the interior rear-
view mirror.
Deactivate the rain sensor when
passing through an automatic car
wash. Failure to do so could result in dam-
age caused by undesired wiper activa-
tion.<
Activating
>Move the lever to position 1 with the
ignition key in position 1 or higher. The
wipers travel once across the wind-
shield, regardless of the weather condi-
tions.
You can leave the lever permanently in
position 1 and then only need to activate
the rain sensor as of ignition key position 1.
To do so:
>Briefly turn the serrated dial 5 or>Cleaning windshield 1, refer to next
section.
Adjust sensitivity: turn the serrated dial 5.
Deactivating
>Move lever to position 0.
Normal wipe
The system switches automatically to inter-
mittent mode when the vehicle is not mov-
ing, not on vehicles with rain sensor.
Fast wipe
The wipers operate at normal speed when
the vehicle is not moving, not on vehicles
with rain sensor.
Cleaning windshield, rear window
and headlamps*
0Wipers retracted
1To clean windshield and headlamps
2Rear window wiper intermittent mode
3Clean the rear window
Do not use the washers if there is any
danger that the fluid will freeze on the
windshield. If you do so, your vision could
be obscured. To avoid freezing, use a
washer fluid antifreeze, refer to page 94.
Do not use the washers when the reservoir
is empty. This could cause damage to the
washer pump.<
Cleaning the windshield
The system sprays washer fluid against the
windshield and activates the wipers for a
brief period.
The windshield washer nozzles are auto-
Page 51 of 132
Reference
At a glance
Controls
Driving tips
Mobility
49
Technology for comfort, convenience
and safety
Park Distance Control PDC*
The concept
PDC provides extra safety and conven-
ience during parking maneuvers. Signal
tones indicate the current distance to an
object behind or in front of your vehicle.
Four ultrasonic sensors in both the
bumpers monitor the distance to the near-
est object.
The front and rear sensors on the corners
have a range of approx. 2 ft/60 cm. The
two rear middle sensors have a range of
approx. 5 ft/1.50 m and the two front mid-
dle sensors of approx. 2.6 ft/80 cm.
PDC is a parking aid that can indicate
objects when they are approached
slowly, as is usually the case when parking.
Avoid approaching objects too fast, other-
wise the system may give warning of phys-
ical obstacles too late.<
If you are driving with a trailer, the rear sen-
sors are unable to make proper measure-
ments Ð so they do not switch on.
Automatic mode
As of ignition key position 2, the system
automatically assumes operational status
after a few seconds each time you engage
reverse gear or selector-lever position R.
Wait this short period before park-
ing.<
You can have a signal tone pro-
grammed into the system to verify
that the PDC is active.<
Automatic deactivation
After driving a distance of more than
approx. 160 ft/50 m or exceeding a speed
of approx. 20 mph/30 km/h, the system
switches off and the indicator lamp goes
out. You can reactivate the system manu-
ally as needed.
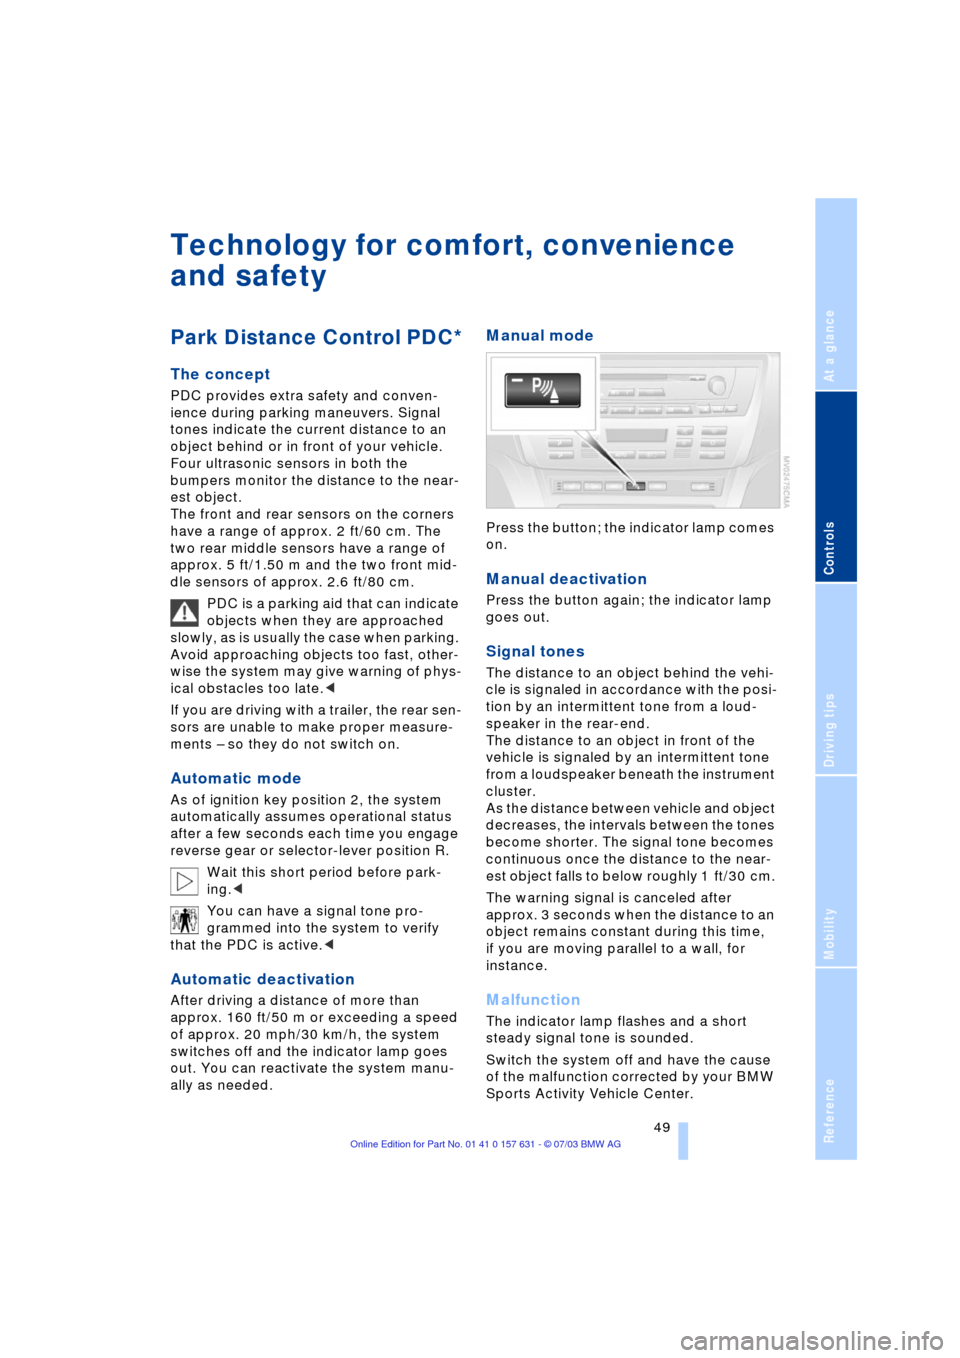
Manual mode
Press the button; the indicator lamp comes
on.
Manual deactivation
Press the button again; the indicator lamp
goes out.
Signal tones
The distance to an object behind the vehi-
cle is signaled in accordance with the posi-
tion by an intermittent tone from a loud-
speaker in the rear-end.
The distance to an object in front of the
vehicle is signaled by an intermittent tone
from a loudspeaker beneath the instrument
cluster.
As the distance between vehicle and object
decreases, the intervals between the tones
become shorter. The signal tone becomes
continuous once the distance to the near-
est object falls to below roughly 1 ft/30 cm.
The warning signal is canceled after
approx. 3 seconds when the distance to an
object remains constant during this time,
if you are moving parallel to a wall, for
instance.
Malfunction
The indicator lamp flashes and a short
steady signal tone is sounded.
Switch the system off and have the cause
of the malfunction corrected by your BMW
Sports Activity Vehicle Center.
Page 52 of 132
Technology for comfort, convenience and safety
50
Limits of the system
Even with PDC, final responsibility for
estimating the distance between the
vehicle and any obstructions always
remains with the driver. Even when sensors
are involved, there is a blind spot in which
objects cannot be detected. The system is
also subject to the physical limits that apply
to all forms of ultrasonic measurement,
such as those encountered with tow bars
and trailer couplings, or thin and wedge-
shaped objects etc. Low objects already
displayed, e.g. a curb, can also disappear
from the detection area of the sensors
again before a continuous tone sounds.
Loud sources of sound, inside and outside
the vehicle, could drown out the PDC sig-
nal tone.<
Keep the sensors clean and free of ice
or snow in order to ensure that they
will continue to operate effectively.
Do not apply high pressure spray to the
sensors for a prolonged period of time.
Keep the spray at least 4 in/10 cm away
from the sensors.<
Driving stability control
systems
Your BMW is equipped with an extended
array of systems designed to enhance and
maintain vehicle stability under extreme
conditions. The following section describes
these functions based on ABS, DSC, HDC
and xDrive.
Antilock Brake System ABS
ABS enhances active safety by preventing
the wheels from locking under braking. The
vehicle continues to be steerable during
hard braking.
ABS also includes Electronic brake-force
distribution EBV.
Safe braking, refer to page 77.
Electronic brake-force distribution
EBV
EBV controls the brake system's applica-
tion pressure at the rear wheels to ensure
stable deceleration.
Dynamic Brake Control DBC
The Dynamic Brake Control actively sup-
ports the driver in dangerous braking situa-
tions. Quickly pumping the brake pedal
increases the braking effect with low pedal
pressure so that the shortest possible
braking distance is achieved. This system
exploits all of the benefits provided by ABS.
Do not reduce the pressure on the brake
pedal for the duration of the brake applica-
tion. DBC is deactivated when you release
the brake pedal.
Dynamic Stability Control DSC
The concept
DSC maintains vehicle stability, even in
critical driving situations.
The DSC is operational every time you start
the engine.
The system optimizes the driving stability
during acceleration and when starting from
a standstill. The system recognizes any
tendency for the vehicle to assume an
unstable attitude such as oversteer or
understeer; it then counteracts this ten-
dency with a combination of graduated
reductions in engine torque and selective
braking intervention at individual wheels.
DSC provides optimal stability within the
limits defined by the laws of physics.
The laws of physics cannot be
repealed, even with DSC. An appro-
priate driving style always remains the
responsibility of the driver. Avoid using the
additional safety margin provided by the
system as an excuse for taking unneces-
sary risks.
Do not make any modifications to the DSC
system. Never allow anyone other than
authorized professional technicians to
carry out service or repairs on the system.<
Page 79 of 132
Reference
At a glance
Controls
Driving tips
Mobility
77
to a fire, and with it the risk of serious prop-
erty damage as well as personal injury.<
Parking the vehicle
Condensation forms in the air conditioner
system during operation, and then exits
under the vehicle. Traces of condensed
water under the vehicle are thus normal.
Before driving into the car wash
Fold in the exterior mirrors, refer to
page 31, as otherwise they could be dam-
aged due to the width of the vehicle.
Deactivate the rain sensor as otherwise
damage could result from undesired wiper
activation, refer to page 42.
Hydroplaning
When driving on wet or slushy roads,
reduce road speed. If you do not, a
wedge of water can form between tires and
road surface. This phenomenon is referred
to as hydroplaning, and is characterized by
a partial or complete loss of contact
between tires and road surface, ultimately
undermining your ability to steer and brake
the vehicle.<
Driving through water
Do not drive through water on the
road if it is deeper than 20 in/50 cm,
and then only at walking speed. Otherwise,
the vehicle's engine, the electrical systems
and the transmission may be damaged.<
Safe braking
Emergency stops
The best way to brake is to apply maximum
pressure to the brake pedal during emer-
gency Ð panic stops. Since the vehicle
maintains steering responsiveness, you
can nevertheless avoid possible obstacles
with a minimum of steering effort.
Pulsation at the brake pedal combined with
sounds from the hydraulic circuits indicates
to the driver that ABS is in its active mode. Do not drive with your foot resting on
the brake pedal. Otherwise, even light
but consistent pedal pressure can lead to
high temperatures, brake wear and possi-
bly even brake failure.<
Wet conditions
While driving in wet conditions and in
heavy rain, it is a good idea to apply light
pressure to the brake pedal every few
miles. Watch traffic conditions to ensure
that this maneuver does not endanger
other road users. The heat which is gener-
ated by the brake applications helps to dry
the brake pads and rotors. The required
braking force will then be available when
you need it.
On a grade
You can retain full and unimpaired braking
efficiency by downshifting to a gear in
which only minimal brake applications are
needed when descending long or steep
downhill stretches.
You can further enhance the engine's brak-
ing effect by selecting a lower gear in the
automatic transmission's manual mode,
downshifting as far as first gear on
extremely steep stretches, refer to
page 38. This strategy helps you avoid
placing excessive loads on the brake sys-
tem.
During slower downhill driving, use the Hill
Descent Control HDC, refer to page 51.
Never drive with the clutch pressed,
with the transmission in Neutral or
with the engine switched off, as otherwise
there is no engine braking when the trans-
mission is in Neutral, and no power-assist
for brakes and steering.
Never allow floor mats, carpets or any other
objects to protrude into the area around the
accelerator and brake pedals and obstruct
their movement.<
Corrosion
When the vehicle is driven only occasion-
ally, during extended periods when the
vehicle is not used at all, and in operating
conditions where brake applications are
Page 87 of 132

Reference
At a glance
Controls
Driving tips
Mobility
85
Never attempt to continue driving
until the tank is completely empty, as
engine functions could be affected, and the
vehicle could sustain damage as a result.<
Fuel specifications
The engine uses lead-free gasoline only.
Required fuel:
Premium Unleaded Gasoline,
minimum 91 AKI
AKI = Anti Knock Index.
Do not use leaded fuels. The use of
leaded fuels will cause permanent
damage to the system's oxygen sensor and
the catalytic converter.<