roof BMW X3 3.0I 2005 E83 Owner's Manual
[x] Cancel search | Manufacturer: BMW, Model Year: 2005, Model line: X3 3.0I, Model: BMW X3 3.0I 2005 E83Pages: 126, PDF Size: 4.65 MB
Page 18 of 126
Reference
At a glance
Controls
Driving tips
Mobility
17
Protect the remote control against unau-
thorized use by handing over only the
spare key, for example when using hotel valet
parking.<
For additional details on the alarm system, refer
to page22.
Because any persons or animals left unat-
tended in a parked vehicle could lock the
doors from the inside, you should always keep
the remote control with you; this precaution
ensures that you will remain able to unlock the
vehicle from the outside at all times.<
Unlocking
Press the button.
Press the button once to unlock the driver's
door only; press a second time to unlock all
remaining doors as well as the tailgate and the
fuel filler door.
Convenience opening mode
Press and hold the button. The windows and
the panorama glass sunroof open.
If you desire, you can have this special
feature activated/deactivated on a vehi-
cle-specific basis.<
Locking and securing
Press the button.
If you desire, the vehicle locks automati-
cally if no door or lid is opened after
unlocking. You may have this function set on a
vehicle-specific basis if you wish.<
As confirmation for the fact that the vehicle is
properly locked, the hazard warning flashers
light up.
If you wish, you can have this special fea-
ture deactivated on vehicles without an
alarm system.<
Switching off tilt alarm sensor* and
interior motion sensor
*
Press the button again directly after
locking.
For details, refer to page23.
Switching on interior lamps
Press the button if the vehicle is locked.
You can also use this function to locate your
vehicle in parking garages etc.
Panic mode*
By pressing and holding the button for more
than approx. two seconds, you can trigger the
alarm system
* in response to any impending
danger.
To switch off the alarm: press any of the but-
tons.
Unlocking tailgate
Press the button.
The tailgate will open slightly, regardless of
whether it was previously locked or unlocked.
Before and after a trip, ensure that the
tailgate has not been opened uninten-
tionally.
A previously locked tailgate is also locked again
after closing.<
If you desire, the tailgate can only be
opened using the remote control if the
vehicle is unlocked. This can be adjusted.<
Malfunctions
The remote control may malfunction due to
local radio waves.
Should the remote control fail to operate owing
to interference of this kind, unlock and lock the
vehicle via the door lock using the master key.
If it is no longer possible to lock the vehicle via
the remote control, the battery is discharged.
Use this remote control during an extended
drive; this will recharge the battery, refer to
page16.
For US owners only
The transmitter and receiver units comply with
part 15 of the FCC/Federal Communications
Commission regulations. Operation is gov-
erned by the following:
FCC ID: LX8EWS
LX8FZVS
Page 19 of 126
Opening and closing
18 LX8FZVE
Compliance statement:
This device complies with part 15 of the FCC
Rules. Operation is subject to the following two
conditions:
>This device may not cause harmful interfer-
ence.
and
>This device must accept any interference
received, including interference that may
cause undesired operation.
Any unauthorized modifications or
changes to these devices could void the
user's authority to operate the equipment.<
Using door lock
One turn of the key in the driver's door lock
unlocks the driver's door only.
Turning the key a second time unlocks all of the
remaining doors, the tailgate and the fuel filler
door.
As confirmation for the fact that the vehicle is
properly locked, the hazard warning flashers
light up.
If you wish, you can have this special fea-
ture deactivated on vehicles without an
alarm system.<
Convenience operation
You also have the option of operating the win-
dows and the panorama glass sunroof from the
driver's door lock.
>To open:
With the door closed, turn the key to the
Unlock position and hold it there. >To close:
With the door closed, turn the key to the
Lock position and hold it.
Watch during the closing process to be
sure that no one is injured. Releasing the
key stops the operation.<
Manual operation
If an electrical malfunction occurs, you can
unlock or lock the driver's door with the key in
the end positions of the door lock.
Opening and closing: from
inside
You can use this button to operate the central
locking system when the front doors are closed.
With this button, only the doors and the tailgate
are unlocked or locked. The anti-theft system is
not activated.
If only the driver's door was unlocked
from the outside and you press the but-
ton, then, with the driver's door still open, the
passenger-side door, the tailgate and the fuel
filler door will also unlock.
If the driver's door is closed, it will be locked.<
The central locking system locks auto-
matically after driving off. This can be
adjusted to be vehicle-specific or key-spe-
cific.<
Page 22 of 126
Reference
At a glance
Controls
Driving tips
Mobility
21
Panorama glass sunroof*
When leaving the vehicle, always remove
the key and close the doors, as otherwise
children could operate the sunroof and injure
themselves.<
The panorama glass sunroof is operational from
ignition key position 1.
After the ignition has been switched off:
You can operate the panorama glass sunroof for
up to 1 minute as long as neither of the doors
has been opened.
Raising, opening, closing
Press the switch or slide it in the desired direc-
tion up to the resistance point.
Release the switch to stop the motion.
The sliding visor is opened slightly when the
panorama glass sunroof is raised.
The panorama glass sunroof can be opened or
closed independently with the sliding visor
open.
Ventilation setting
The panorama glass sunroof is raised and the
sliding visor is opened slightly: Briefly press the
switch twice consecutively.
Automatic opening and closing
Briefly press the switch past the resistance
point and then release it.
Briefly pressing the switch again stops the
motion.
Opening and closing panorama glass
sunroof and sliding visor together
Briefly press the switch beyond the resistance
point twice consecutively.
Briefly pressing the switch again stops the
motion.
Comfort position
Each time the panorama glass sunroof is com-
pletely opened or closed, it stops in the comfort
position. If desired, continue the motion follow-
ing this with the switch.
In the comfort position the wind noise in the
interior is reduced.
Anti-trapping mechanism
If the panorama glass sunroof or sliding visor
encounter resistance when closing from
roughly one third of the sunroof opening or
when closing from the raised position, the clos-
ing action is interrupted and the panorama
glass sunroof and sliding visor reopen a little.
Despite the anti-trapping mechanism
inspect the sunroof's travel path prior to
closing it, as the safety system might fail to
detect certain kinds of obstructions, such as
very thin objects, and the sunroof would con-
tinue closing.
The anti-trapping mechanism for closing the
panorama glass sunroof is deactivated if the
switch is pressed beyond the resistance point
and held there. The closing action is interrupted
when you release the switch.<
Following interruptions in electrical
power supply
Following interruptions in electrical power, for
instance, when the battery is disconnected, it is
possible that the panorama glass sunroof will
extend to its tilt-up position, but fail to respond
to other commands. The system must be initial-
ized. BMW recommends having this work car-
ried out by your BMW Sports Activity Vehicle
Center.
Page 23 of 126
Opening and closing
22
Manual operation
In the event of an electrical malfunction, you can
operate the panorama glass sunroof manually.
1.Pull off the cover firmly downward.
2.Insert the Allen wrench from the compart-
ment beneath the cargo area floor, refer to
page99, into the proper opening and turn
the panorama glass sunroof in the desired
direction. Direction of rotation for closing,
refer to arrow.
Alarm system*
The concept
The vehicle alarm system responds:
>When a door, the hood, or the tailgate is
opened.
>To movements inside the vehicle: interior
motion sensor, refer to Tilt alarm sensor
and interior motion sensor.
>To changes in the vehicle tilt angle such as
occur during attempts to steal the wheels or
tow the vehicle.
>To interruptions in battery voltage.The system responds to unauthorized vehicle
entry and attempted theft by simultaneously
activating:
>The acoustic alarm for approx. 30 seconds.
>The hazard warning flashers for approx.
5minutes.
>The high beams, which flash on and off in
the same rhythm.
Arming and disarming alarm system
When you lock or unlock the vehicle, either with
the remote control or at the door lock, the alarm
system is armed or disarmed at the same time.
If the alarm system has been properly armed,
the hazard warning flashers light up once.
You can have different acknowledgment
signals set to confirm arming and disarm-
ing.<
You can also open the tailgate with the system
armed using the button on the remote con-
trol, refer to page17. When you close the tail-
gate, the system is rearmed.
Switching off alarm
>Unlock the vehicle using the remote control,
refer to page17.
or
>Turn the ignition key to position 1.
Indicator lamp displays
>The indicator lamp below the interior rear-
view mirror flashes continuously: the sys-
tem is armed.
Page 24 of 126
Reference
At a glance
Controls
Driving tips
Mobility
23
>The indicator lamp flashes when the vehicle
is locked: door(s) or tailgate are not com-
pletely closed. Even if you do not close the
alerted area, the system begins to monitor
the remaining areas, and the indicator lamp
flashes continuously after 10 seconds.
However, the interior motion sensor is not
activated.
>The indicator lamp goes out when the vehi-
cle is unlocked: no manipulation or
attempted intrusions have been detected in
the period since the system was armed.
>The indicator lamp flashes for 10 seconds
after the vehicle is unlocked: an attempted
entry has been detected in the period since
the system was armed.
Following triggering of an alarm, the indicator
lamp will flash continuously.
Tilt alarm sensor and interior motion
sensor
Tilt alarm sensor
The tilt of the vehicle is monitored. The alarm
system reacts, e.g. in case of an attempted
wheel theft or towing.
Interior motion sensor
In order for the interior motion sensor to func-
tion properly, the windows and panorama glass
sunroof must be completely closed.
Avoiding unintentional alarms
The tilt alarm sensor and interior motion sensor
may be switched off at the same time. This pre-
vents unintentional alarms, e.g. in the following
situations:
>In stacking garages
>When transporting on car-carrying trains
>When animals are to remain in the vehicle
Switching off tilt alarm sensor and
interior motion sensor
Press the button on the remote control
again directly after locking.
The indicator lamp lights up briefly and then
flashes continuously. The tilt alarm sensor and
the interior motion sensor are switched off until
the next time the vehicle is unlocked and subse-
quently locked again.
If you wish, the tilt alarm sensor and inte-
rior motion sensor are permanently
switched off. You can have this set at your
BMW Sports Activity Vehicle Center.<
If you interrupt the convenience closing of
the windows and panorama glass sunroof
within the first 10 seconds and then reinitiate
the action, this will unintentionally switch off the
tilt alarm sensor and interior motion sensor.
If this has occurred, the system must be dis-
armed and then rearmed.<
Page 52 of 126
Reference
At a glance
Controls
Driving tips
Mobility
51
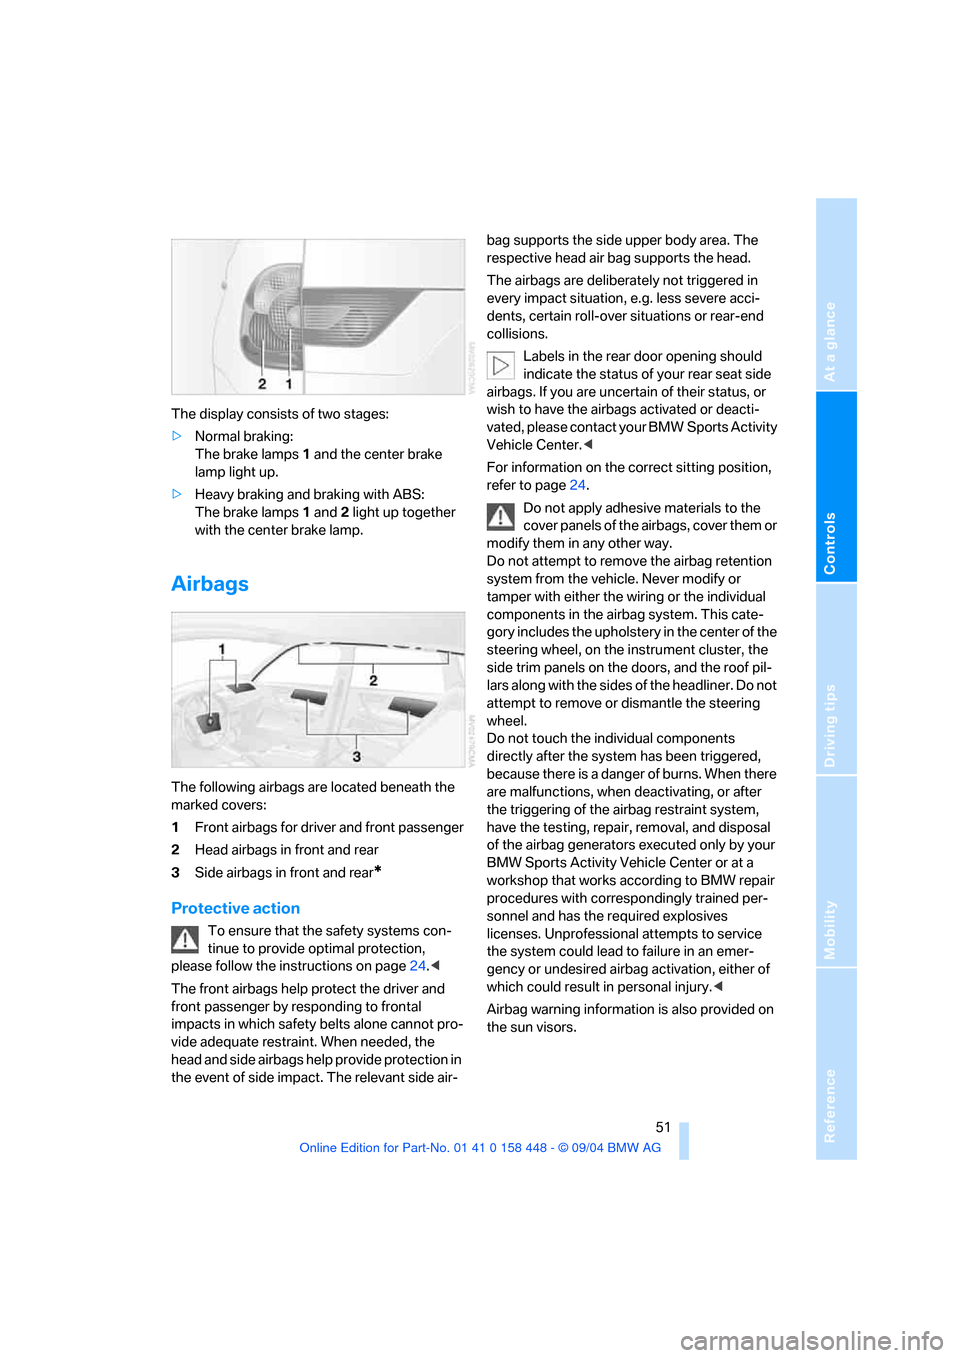
The display consists of two stages:
>Normal braking:
The brake lamps 1 and the center brake
lamp light up.
>Heavy braking and braking with ABS:
The brake lamps 1 and 2 light up together
with the center brake lamp.
Airbags
The following airbags are located beneath the
marked covers:
1Front airbags for driver and front passenger
2Head airbags in front and rear
3Side airbags in front and rear
*
Protective action
To ensure that the safety systems con-
tinue to provide optimal protection,
please follow the instructions on page24.<
The front airbags help protect the driver and
front passenger by responding to frontal
impacts in which safety belts alone cannot pro-
vide adequate restraint. When needed, the
head and side airbags help provide protection in
the event of side impact. The relevant side air-bag supports the side upper body area. The
respective head air bag supports the head.
The airbags are deliberately not triggered in
every impact situation, e.g. less severe acci-
dents, certain roll-over situations or rear-end
collisions.
Labels in the rear door opening should
indicate the status of your rear seat side
airbags. If you are uncertain of their status, or
wish to have the airbags activated or deacti-
vated, please contact your BMW Sports Activity
Vehicle Center.<
For information on the correct sitting position,
refer to page24.
Do not apply adhesive materials to the
cover panels of the airbags, cover them or
modify them in any other way.
Do not attempt to remove the airbag retention
system from the vehicle. Never modify or
tamper with either the wiring or the individual
components in the airbag system. This cate-
gory includes the upholstery in the center of the
steering wheel, on the instrument cluster, the
side trim panels on the doors, and the roof pil-
lars along with the sides of the headliner. Do not
attempt to remove or dismantle the steering
wheel.
Do not touch the individual components
directly after the system has been triggered,
because there is a danger of burns. When there
are malfunctions, when deactivating, or after
the triggering of the airbag restraint system,
have the testing, repair, removal, and disposal
of the airbag generators executed only by your
BMW Sports Activity Vehicle Center or at a
workshop that works according to BMW repair
procedures with correspondingly trained per-
sonnel and has the required explosives
licenses. Unprofessional attempts to service
the system could lead to failure in an emer-
gency or undesired airbag activation, either of
which could result in personal injury.<
Airbag warning information is also provided on
the sun visors.
Page 69 of 126
Practical interior accessories
68 Do not place heavy and hard objects on
the cover. If you do so, they could endan-
ger occupants during braking maneuvers. Do
not allow the cover to snap back into place, as
otherwise it could be damaged.<
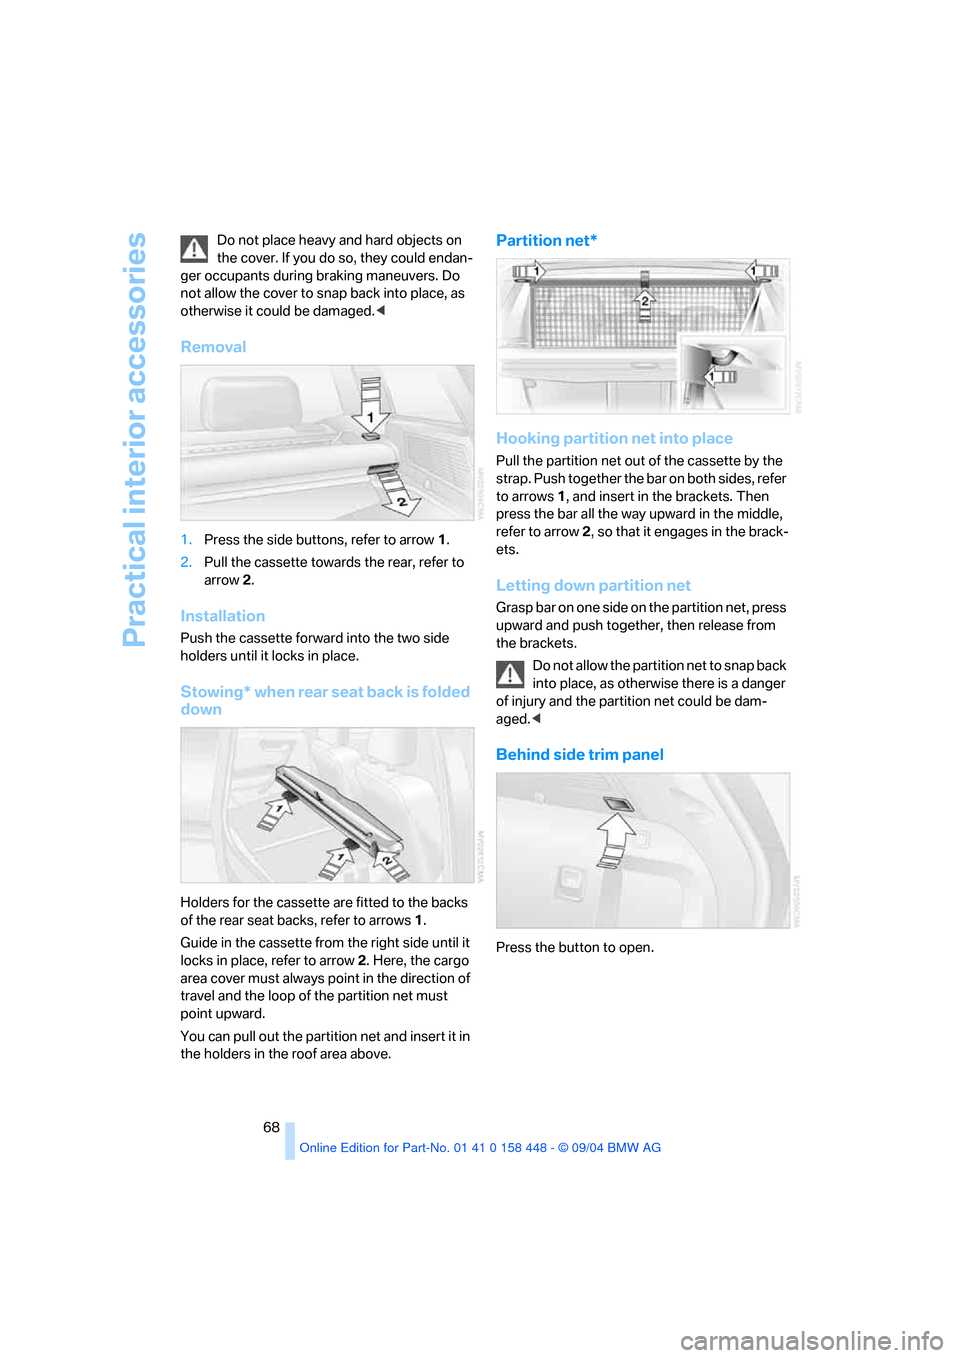
Removal
1.Press the side buttons, refer to arrow1.
2.Pull the cassette towards the rear, refer to
arrow2.
Installation
Push the cassette forward into the two side
holders until it locks in place.
Stowing* when rear seat back is folded
down
Holders for the cassette are fitted to the backs
of the rear seat backs, refer to arrows1.
Guide in the cassette from the right side until it
locks in place, refer to arrow 2. Here, the cargo
area cover must always point in the direction of
travel and the loop of the partition net must
point upward.
You can pull out the partition net and insert it in
the holders in the roof area above.
Partition net*
Hooking partition net into place
Pull the partition net out of the cassette by the
strap. Push together the bar on both sides, refer
to arrows 1, and insert in the brackets. Then
press the bar all the way upward in the middle,
refer to arrow 2, so that it engages in the brack-
ets.
Letting down partition net
Grasp bar on one side on the partition net, press
upward and push together, then release from
the brackets.
Do not allow the partition net to snap back
into place, as otherwise there is a danger
of injury and the partition net could be dam-
aged.<
Behind side trim panel
Press the button to open.
Page 73 of 126
Things to remember when driving
72
Things to remember when driving
Breaking-in
Moving parts should be allowed to adjust to one
another. To ensure that your vehicle provides
maximum economy throughout a long service
life, we request that you observe the following
instructions.
Engine and differential
Up to 1,200 miles/2,000 km:
Drive at varying engine and driving speeds,
however do not exceed 4,500 rpm or 100 mph/
160 km/h in the process:
Always obey all official speed limits.
Refrain from using full throttle and avoid press-
ing the accelerator beyond the kick-down point.
Once you have driven 1,200 miles/2,000 km,
the engine and vehicle speeds can be gradually
increased.
Tires
Due to technical factors associated with their
manufacture, tires do not achieve their full trac-
tion potential until after an initial break-in
period. For this reason, drive with extra care
during the initial 200 miles/300 km.
Obey your local and state maximum speed lim-
its.
When the vehicle is operated on wet or
slushy roads, a wedge of water may form
between the tire and the road surface. This phe-
nomenon is referred to as hydroplaning and can
lead to partial or complete loss of traction, vehi-
cle control and braking effectiveness. Reduce
your speed on wet roads.<
Brake system
Approx. 300 miles/500 km must elapse before
the brake pads and rotors achieve the optimal
pad-surface and wear patterns required for
trouble-free operation and long service life later
on. To break in the separate handbrake drums,
apply the handbrake lightly when coasting to a
stop – at a traffic signal, for instance; use cau-
tion to avoid posing a danger to other road
users.
To avoid corrosion, repeat this procedure from
time to time.
The brake lamps do not come on when the
handbrake is applied.
Vacuum for the brake system servo unit
on your BMW is available only when the
engine is running. When you move the vehicle
with the engine off – e.g. by towing – substan-
tially higher levels of pedal force will be required
to brake the vehicle.<
Clutch
The functio n of the clutch is als o only at its o pti-
mized level after a distance driven of approx.
300 miles/500 km. During this break-in period,
engage the clutch gently.
Following component replacements
Observe the break-in instructions again if previ-
ously addressed components must be replaced
again during driving later.
General driving notes
Closing tailgate
Operate the vehicle only when the tail-
gate is completely closed, as otherwise
exhaust fumes could enter the interior of the
vehicle.<
If special circumstances should make it abso-
lutely necessary to operate the vehicle with the
tailgate open:
1.Close all windows and the panorama glass
sunroof.
2.Greatly increase the air supply of the air
conditioner or automatic climate control,
refer to page56 or59.
Page 77 of 126
Things to remember when driving
76 >Read and comply with the information
enclosed with the heavy-duty cargo straps.
Always position and secure the load as
described above. If you do not, it can even
endanger the passengers during braking or
evasive maneuvers.
Never exceed either the approved gross vehicle
weight or either of the approved axle loads, refer
to page112, as excessive loads can pose a
safety hazard, and may also place you in viola-
tion of freeway safety laws.
You should never transport heavy or hard
objects unsecured in the passenger compart-
ment, as they could fly around and pose a safety
hazard to the vehicle's occupants during abrupt
braking or evasive maneuvers.<
Roof-mounted luggage rack*
A special rack system is available as a optional
accessory for your BMW. Please observe the
information contained in the installation instruc-
tions.
Loading luggage rack
Because roof racks raise the vehicle's center of
gravity when loaded, they have a major effect on
its handling and steering response. You should
therefore always remember not to exceed the
approved roof weight, the approved gross vehi-
cle weight or the axle loads when loading the
rack.
You can find the specified weights in the Tech-
nical data section on page112.
Make sure that the load is evenly distributed,
and that it does not extend outward to beyond
the limits of the loading surface. Always load the
heaviest pieces first – on the bottom. Be sure
that adequate clearance is maintained for rais-
ing the glass sunroof, and that objects do not
project into the opening path of the tailgate.
Secure roof-mounted cargo correctly and
securely to prevent it from shifting or being lost
during the trip.
Drive smoothly. Avoid sudden acceleration and
braking maneuvers. Take corners gently.
Driving on poor roads
Your X3 is at home on all paved and unpaved
roads. It combines all-wheel drive with the
advantages of a normal passenger car.
Driving on unpaved terrain can cause
damage to the vehicle.<
When you are driving on poor roads, there are a
few points which you should strictly observe –
for your own safety, for that of your passengers,
and for the safety of the vehicle:
>Familiarize yourself with the vehicle before
you begin driving. Do not take risks with the
vehicle under any circumstances.
>Always adapt the driving speed to the road
conditions. The more steep and uneven the
roadway is, the lower the speed should be.
>You can operate your vehicle on uphill and
downhill gradients with a maximum slope of
50 %. If you wish to drive on uphill and
downhill grades of this nature, make sure
beforehand that the engine oil and coolant
levels are near the MAX mark, refer to
pages90 and91.
>For very steep downhill driving, use HDC
Hill Descent Control, refer to page48. It is
possible to start off on upward inclines of up
to 32 %.
The permitted side tilt is 32 %.
>While driving, watch carefully for obstacles
such as rocks or holes. Try to avoid these
obstacles whenever possible.
>Avoid that the body makes contact with the
ground, e.g. on the crests of hills and bumpy
roads. The ground clearance of the vehicle
is a maximum of approx. 8.0 in/20 cm.
Please be aware that the ground clearance
can vary depending on the load and operat-
ing conditions of the vehicle.
>Do not drive in water that is deeper than
20 in/50 cm. If you must drive through water
up to that depth, drive at a walking speed
and do not stop.
After leaving the water, press on the foot-
brake gently several times while driving at a
low speed. The brake applications will help
Page 94 of 126
Reference
At a glance
Controls
Driving tips
Mobility
93
Maintenance
The BMW maintenance
system
The BMW maintenance system supports the
preservation of the traffic and operating safety
of your BMW.
Regular maintenance is not only required for
the safety of the vehicle, it also improves the
resale value.
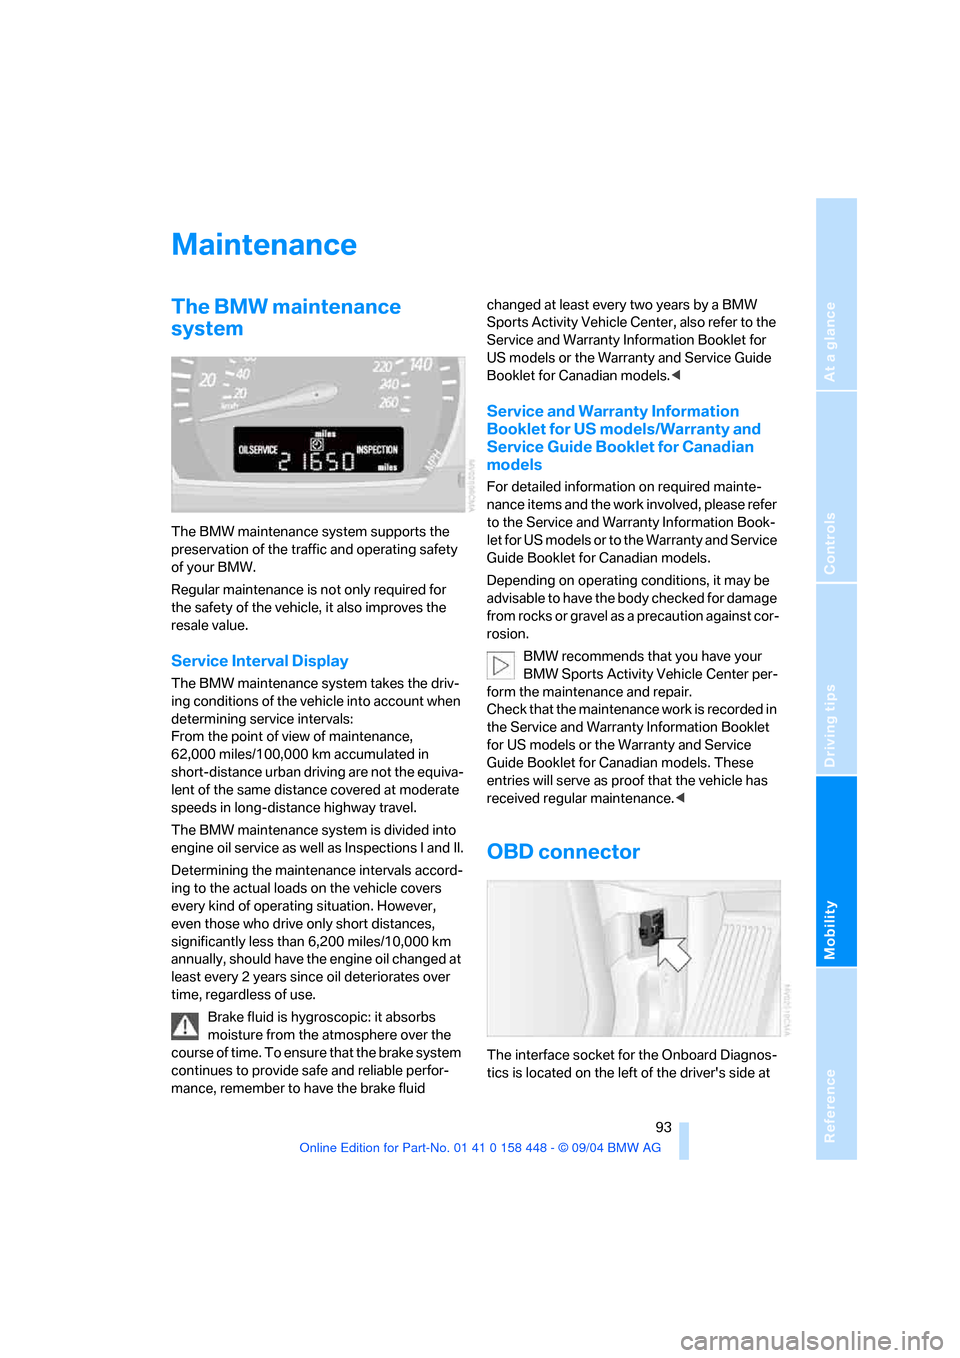
Service Interval Display
The BMW maintenance system takes the driv-
ing conditions of the vehicle into account when
determining service intervals:
From the point of view of maintenance,
62,000 miles/100,000 km accumulated in
short-distance urban driving are not the equiva-
lent of the same distance covered at moderate
speeds in long-distance highway travel.
The BMW maintenance system is divided into
engine oil service as well as Inspections I and II.
Determining the maintenance intervals accord-
ing to the actual loads on the vehicle covers
every kind of operating situation. However,
even those who drive only short distances,
significantly less than 6,200 miles/10,000 km
annually, should have the engine oil changed at
least every 2 years since oil deteriorates over
time, regardless of use.
Brake fluid is hygroscopic: it absorbs
moisture from the atmosphere over the
course of time. To ensure that the brake system
continues to provide safe and reliable perfor-
mance, remember to have the brake fluid changed at least every two years by a BMW
Sports Activity Vehicle Center, also refer to the
Service and Warranty Information Booklet for
US models or the Warranty and Service Guide
Booklet for Canadian models.<
Service and Warranty Information
Booklet for US models/Warranty and
Service Guide Booklet for Canadian
models
For detailed information on required mainte-
nance items and the work involved, please refer
to the Service and Warranty Information Book-
let for US models or to the Warranty and Service
Guide Booklet for Canadian models.
Depending on operating conditions, it may be
advisable to have the body checked for damage
from rocks or gravel as a precaution against cor-
rosion.
BMW recommends that you have your
BMW Sports Activity Vehicle Center per-
form the maintenance and repair.
Check that the maintenance work is recorded in
the Service and Warranty Information Booklet
for US models or the Warranty and Service
Guide Booklet for Canadian models. These
entries will serve as proof that the vehicle has
received regular maintenance.<
OBD connector
The interface socket for the Onboard Diagnos-
tics is located on the left of the driver's side at