check BMW X5 2009 E70 Service Manual
[x] Cancel search | Manufacturer: BMW, Model Year: 2009, Model line: X5, Model: BMW X5 2009 E70Pages: 317, PDF Size: 9.56 MB
Page 266 of 317
Maintenance
264
Socket for OBD Onboard
Diagnostics interface
Components which are decisive for the
exhaust-gas composition can be checked via
the OBD socket with a device.
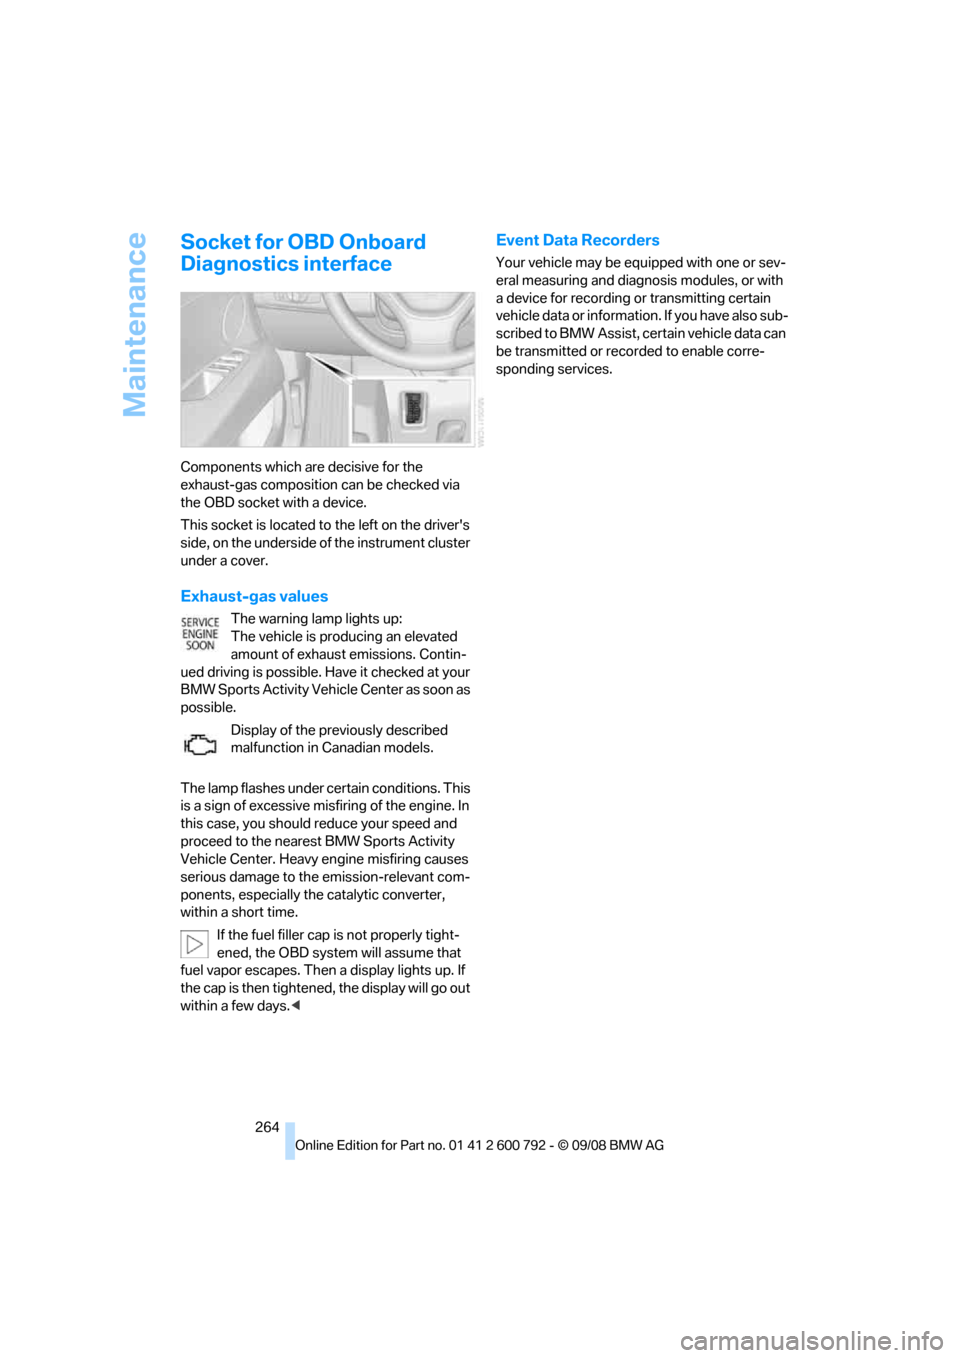
This socket is located to the left on the driver's
side, on the underside of the instrument cluster
under a cover.
Exhaust-gas values
The warning lamp lights up:
The vehicle is producing an elevated
amount of exhaust emissions. Contin-
ued driving is possible. Have it checked at your
BMW Sports Activity Vehicle Center as soon as
possible.
Display of the previously described
malfunction in Canadian models.
The lamp flashes under ce rtain conditions. This
is a sign of excessive misfiring of the engine. In
this case, you should reduce your speed and
proceed to the nearest BMW Sports Activity
Vehicle Center. Heavy engine misfiring causes
serious damage to the emission-relevant com-
ponents, especially th e catalytic converter,
within a short time.
If the fuel filler cap is not properly tight-
ened, the OBD system will assume that
fuel vapor escapes. Then a display lights up. If
the cap is then tightened, the display will go out
within a few days. <
Event Data Recorders
Your vehicle may be equipped with one or sev-
eral measuring and diagnosis modules, or with
a device for recording or transmitting certain
v e hi c l e d a t a o r i n f o r m a t i o n . I f y o u h a v e a l s o s u b -
scribed to BMW Assist, ce rtain vehicle data can
be transmitted or reco rded to enable corre-
sponding services.
Page 272 of 317
Replacing components
270
When performing care and maintenance on the
headlamps, please observe the information on
page
266.
For bulbs for which replacement is not
described and for checking and adjusting
headlamp aim, please contact your BMW
Sports Activity Vehicle Center. <
Light-emitting diodes LEDs
Light-emitting diodes installed behind translu-
cent lenses serve as the light source for many of
the controls and displays in your vehicle. These
light-emitting diodes, which operate using a
concept similar to that applied in conventional
lasers, are officially designated as Class 1 light-
emitting diodes.
Do not remove the covers, and never
stare into the unfilter ed light for several
hours, as irritation of the retina could result. <
BMW X5: changing lamps
Xenon light
These bulbs have a very long service life and
the probability of a failure is very low. If one of
these bulbs should nevertheless fail, it is possi-
ble to continue driving with great caution using
the fog lamps, provided traffic laws in your area
do not prohibit this.
Have work on the xenon light unit includ-
ing changing the bulb carried out only by
your BMW Sports Activity Vehicle Center or a
workshop that works according to BMW repair
procedures with correspondingly trained per-
sonnel. Due to the high voltage present in the
system, there is a danger of fatal injuries when
work is carried out improperly.<
Halogen bulbs:
Parking lamps and roadside parking
lamps, daytime driving lamps
35-Watt bulb, H8
The bulb is pressurized. Therefore, wear
safety glasses and protective gloves.
Otherwise there is a danger of injuries if the bulb is accidentally
damaged during replace-
ment. <
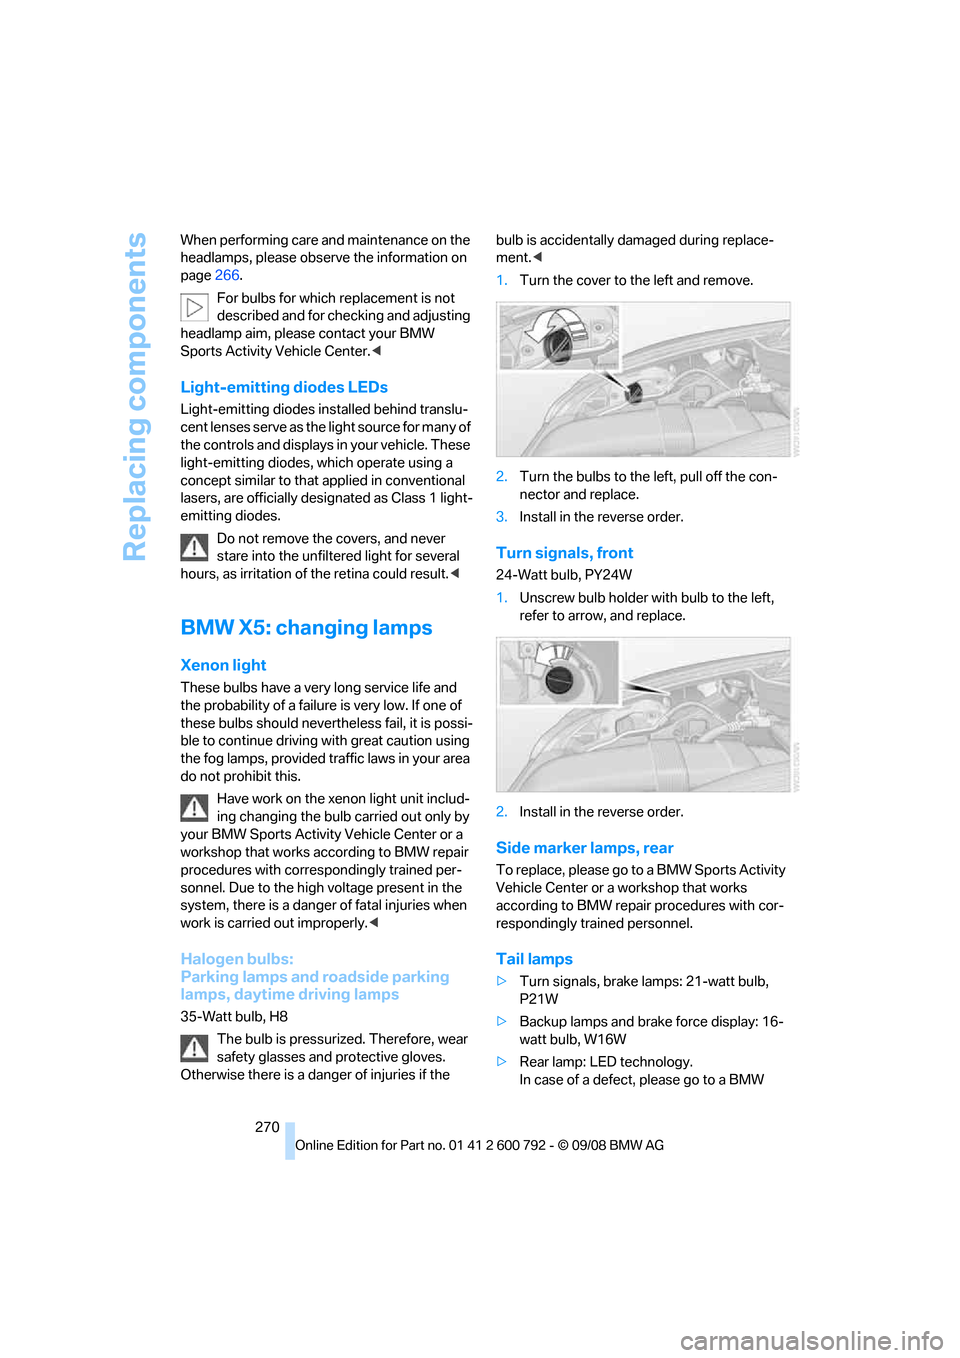
1. Turn the cover to the left and remove.
2. Turn the bulbs to the left, pull off the con-
nector and replace.
3. Install in the reverse order.
Turn signals, front
24-Watt bulb, PY24W
1.Unscrew bulb holder with bulb to the left,
refer to arrow, and replace.
2. Install in the reverse order.
Side marker lamps, rear
To replace, please go to a BMW Sports Activity
Vehicle Center or a workshop that works
according to BMW repair procedures with cor-
respondingly trained personnel.
Tail lamps
> Turn signals, brake lamps: 21-watt bulb,
P21W
> Backup lamps and brake force display: 16-
watt bulb, W16W
> Rear lamp: LE D technology.
In case of a defect, please go to a BMW
Page 279 of 317
Mobility
277Reference
At a glance
Controls
Driving tips
Communications
Navigation
Entertainment
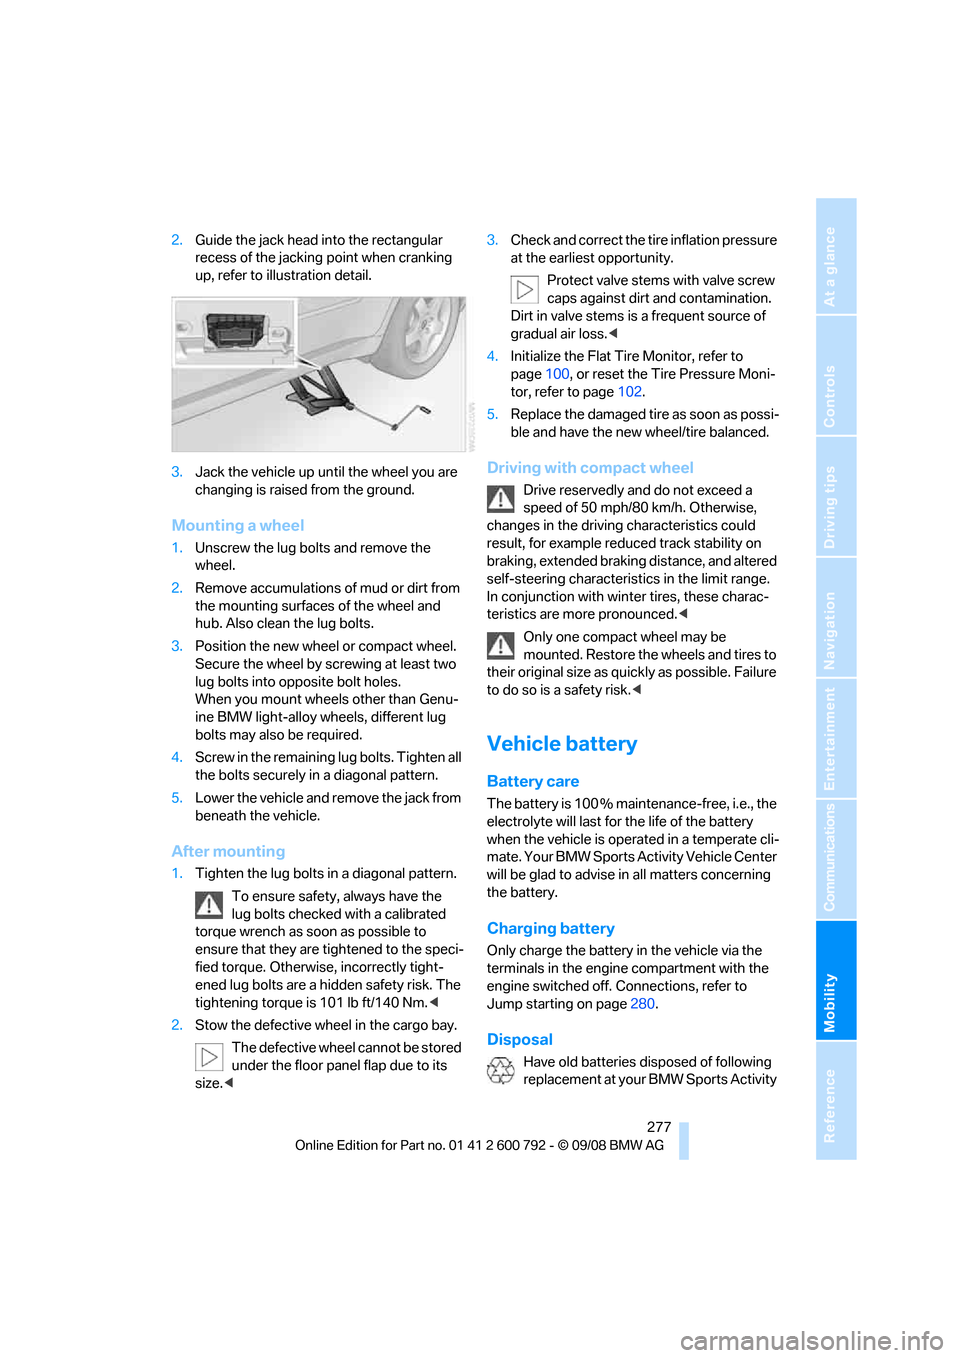
2.Guide the jack head into the rectangular
recess of the jacking point when cranking
up, refer to illustration detail.
3. Jack the vehicle up until the wheel you are
changing is raised from the ground.
Mounting a wheel
1.Unscrew the lug bolts and remove the
wheel.
2. Remove accumulations of mud or dirt from
the mounting surfaces of the wheel and
hub. Also clean the lug bolts.
3. Position the new wheel or compact wheel.
Secure the wheel by sc rewing at least two
lug bolts into opposite bolt holes.
When you mount wheels other than Genu-
ine BMW light-alloy wheels, different lug
bolts may also be required.
4. Screw in the remaining lug bolts. Tighten all
the bolts securely in a diagonal pattern.
5. Lower the vehicle and remove the jack from
beneath the vehicle.
After mounting
1.Tighten the lug bolts in a diagonal pattern.
To ensure safety, always have the
lug bolts checked with a calibrated
torque wrench as soon as possible to
ensure that they are tightened to the speci-
fied torque. Otherwis e, incorrectly tight-
ened lug bolts are a hidden safety risk. The
tightening torque is 101 lb ft/140 Nm. <
2. Stow the defective wheel in the cargo bay.
The defective wheel cannot be stored
under the floor panel flap due to its
size. < 3.
Check and correct the ti re inflation pressure
at the earliest opportunity.
Protect valve stems with valve screw
caps against dirt and contamination.
Dirt in valve stems is a frequent source of
gradual air loss. <
4. Initialize the Flat Tire Monitor, refer to
page 100, or reset the Tire Pressure Moni-
tor, refer to page 102.
5. Replace the damaged tire as soon as possi-
ble and have the new wheel/tire balanced.
Driving with compact wheel
Drive reservedly and do not exceed a
speed of 50 mph/80 km/h. Otherwise,
changes in the driving characteristics could
result, for example reduced track stability on
braking, extended brakin g distance, and altered
self-steering characterist ics in the limit range.
In conjunction with wint er tires, these charac-
teristics are more pronounced. <
Only one compact wheel may be
mounted. Restore the wheels and tires to
their original size as quickly as possible. Failure
to do so is a safety risk. <
Vehicle battery
Battery care
The battery is 100 % main tenance-free, i.e., the
electrolyte will last for the life of the battery
when the vehicle is operated in a temperate cli-
mate. Your BMW Sports Activity Vehicle Center
will be glad to advise in all matters concerning
the battery.
Charging battery
Only charge the battery in the vehicle via the
terminals in the engine compartment with the
engine switched off. Connections, refer to
Jump starting on page 280.
Disposal
Have old batteries disposed of following
replacement at your BMW Sports Activity
Page 281 of 317
Mobility
279Reference
At a glance
Controls
Driving tips
Communications
Navigation
Entertainment
Giving and receiving assistance
Emergency request
Conditions for an emergency request:
>Full preparation package mobile phone.
With this equipment, an emergency request
is still possible when no mobile phone is
paired in the vehicle.
> BMW Assist is activated.
Activating BMW Assist, refer to page 240.
> Radio readiness is switched on.
> The BMW Assist system is logged in on a
wireless communications network.
> The emergency request system is opera-
ble.
When the contract of participation with BMW
Assist expires, the BMW Assist system can be
deactivated by a BMW Sports Activity Vehicle
Center without having to visit a workshop. Once
the BMW Assist system has been deactivated,
emergency requests are not possible. The
BMW Assist system be reactivated by a BMW
Sports Activity Vehicle Center after signing a
new contract.
Initiating an emergency request
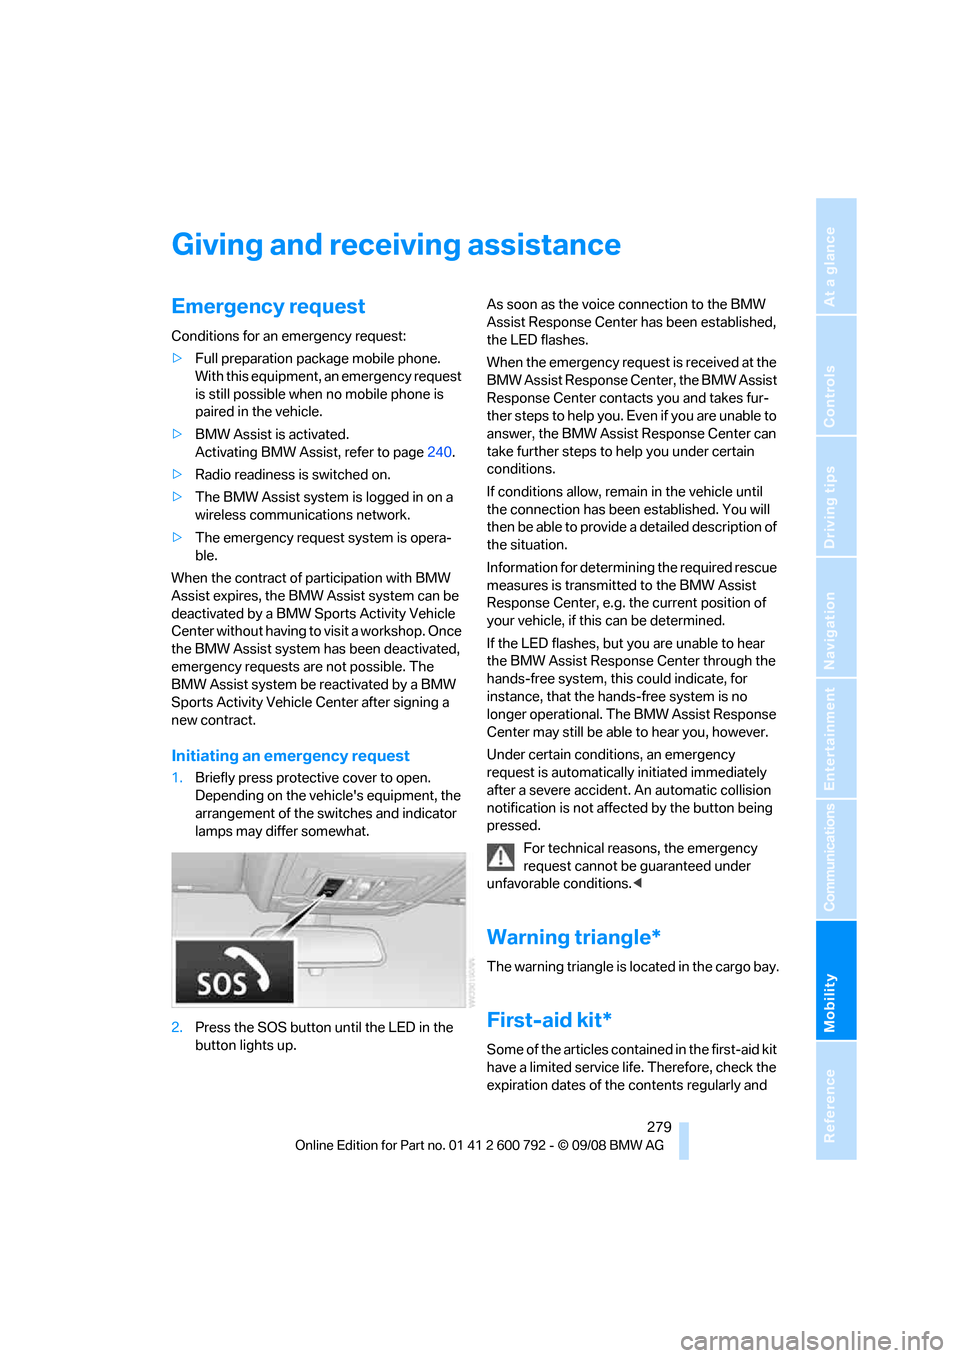
1. Briefly press protective cover to open.
Depending on the vehicle's equipment, the
arrangement of the switches and indicator
lamps may differ somewhat.
2. Press the SOS button until the LED in the
button lights up. As soon as the voice connection to the BMW
Assist Response Center has been established,
the LED flashes.
When the emergency request is received at the
BMW Assist Response Center, the BMW Assist
Response Center contacts you and takes fur-
ther steps to help you. Even if you are unable to
answer, the BMW Assist Response Center can
take further steps to help you under certain
conditions.
If conditions allow, remain in the vehicle until
the connection has been
established. You will
then be able to provide a detailed description of
the situation.
Information for determining the required rescue
measures is transmitted to the BMW Assist
Response Center, e.g. the current position of
your vehicle, if this can be determined.
If the LED flashes, but you are unable to hear
the BMW Assist Response Center through the
hands-free system, this could indicate, for
instance, that the hand s-free system is no
longer operational. The BMW Assist Response
Center may still be able to hear you, however.
Under certain conditions, an emergency
request is automatically initiated immediately
after a severe accident . An automatic collision
notification is not affected by the button being
pressed.
For technical reasons, the emergency
request cannot be guaranteed under
unfavorable conditions. <
Warning triangle*
The warning triangle is located in the cargo bay.
First-aid kit*
Some of the articles cont ained in the first-aid kit
have a limited service life. Therefore, check the
expiration dates of the contents regularly and
Page 282 of 317
Giving and receiving assistance
280
replace the contents conc
erned in good time if
necessary.
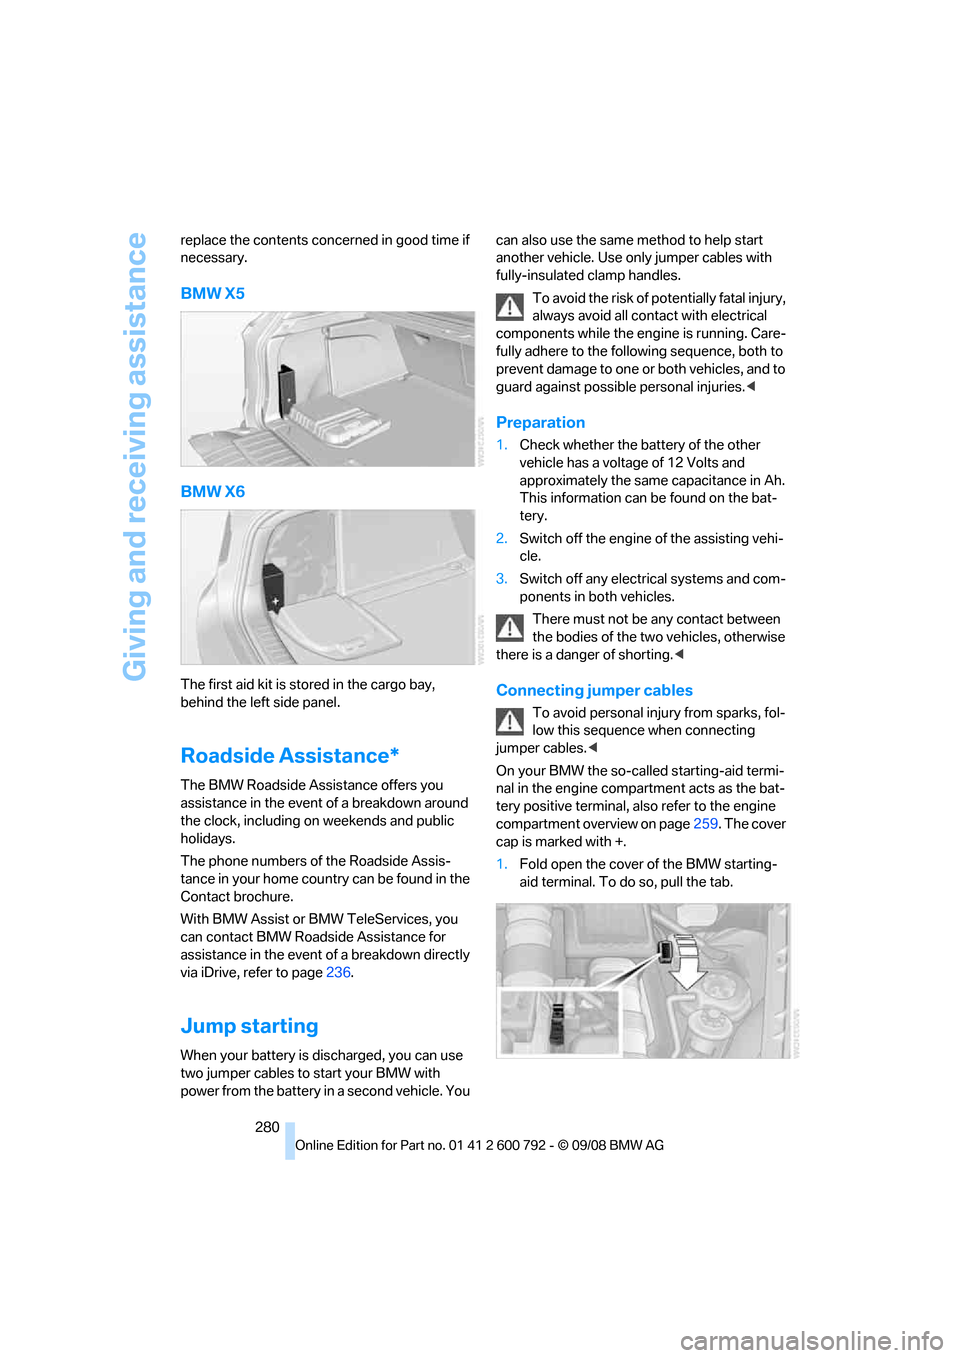
BMW X5
BMW X6
The first aid kit is stored in the cargo bay,
behind the left side panel.
Roadside Assistance*
The BMW Roadside Assistance offers you
assistance in the event of a breakdown around
the clock, including on weekends and public
holidays.
The phone numbers of the Roadside Assis-
tance in your home country can be found in the
Contact brochure.
With BMW Assist or BMW TeleServices, you
can contact BMW Roadside Assistance for
assistance in the event of a breakdown directly
via iDrive, refer to page 236.
Jump starting
When your battery is discharged, you can use
two jumper cables to start your BMW with
power from the battery in a second vehicle. You can also use the same
method to help start
another vehicle. Use only jumper cables with
fully-insulated clamp handles.
To avoid the risk of po tentially fatal injury,
always avoid all contact with electrical
components while the engine is running. Care-
fully adhere to the following sequence, both to
prevent damage to one or both vehicles, and to
guard against possible personal injuries.<
Preparation
1. Check whether the battery of the other
vehicle has a voltage of 12 Volts and
approximately the same capacitance in Ah.
This information can be found on the bat-
tery.
2. Switch off the engine of the assisting vehi-
cle.
3. Switch off any electrical systems and com-
ponents in both vehicles.
There must not be any contact between
the bodies of the tw o vehicles, otherwise
there is a danger of shorting. <
Connecting jumper cables
To avoid personal injury from sparks, fol-
low this sequence when connecting
jumper cables. <
On your BMW the so-called starting-aid termi-
nal in the engine compar tment acts as the bat-
tery positive terminal, al so refer to the engine
compartment overview on page 259. The cover
cap is marked with +.
1. Fold open the cover of the BMW starting-
aid terminal. To do so, pull the tab.
Page 283 of 317
Mobility
281Reference
At a glance
Controls
Driving tips
Communications
Navigation
Entertainment
2.Attach one end of the jumper cable plus/+
to the positive terminal of the battery or a
starting-aid terminal of the vehicle provid-
ing assistance.
3. Attach the second end of the cable to the
positive terminal of th e battery or to a start-
ing-aid terminal of the vehicle to be started.
4. Attach one end of the jumper cable minus/–
to the negative terminal of the battery or to
an engine or body ground of the assisting
vehicle.
Your BMW has a special nut as body ground
or negative pole.
5. Attach the second end of the cable to the
negative terminal of the battery or to the
engine or body ground of the vehicle to be
started.
Starting engine
1. Start the engine on the assisting vehicle
and allow it to run at idle for several minutes
at slightly increased speed.
2. Start the engine on the other vehicle in the
usual way.
If the first starting attempt is not successful,
wait a few minutes be fore another attempt
in order to allow the discharged battery to
recharge.
3. Let the engines run for a few minutes.
4. Disconnect the jumper cables by reversing
the connection sequence.
Check the battery and recharge if necessary.
Never use spray fluids to start the
engine. <
Tow-starting and towing
Observe applicable la ws and regulations
for tow-starting and towing. <
Do not transport any passengers other
than the driver in a vehicle that is being
towed. <
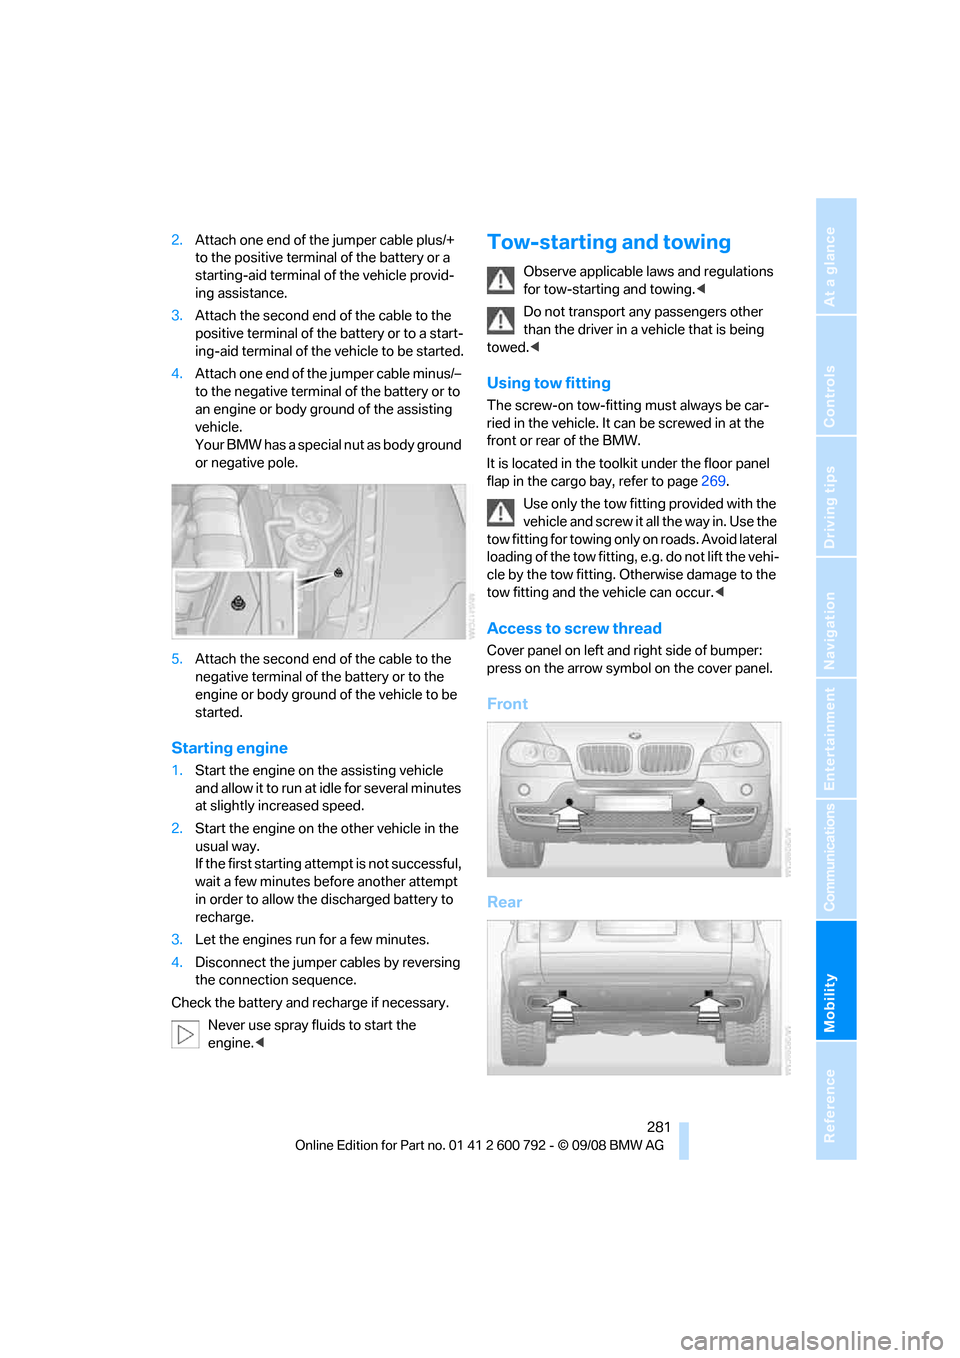
Using tow fitting
The screw-on tow-fitting must always be car-
ried in the vehicle. It can be screwed in at the
front or rear of the BMW.
It is located in the tool kit under the floor panel
flap in the cargo bay, refer to page 269.
Use only the tow fitting provided with the
vehicle and screw it all the way in. Use the
tow fitting for towing only on roads. Avoid lateral
loading of the tow fitting, e.g. do not lift the vehi-
cle by the tow fitting. Ot herwise damage to the
tow fitting and the vehicle can occur. <
Access to screw thread
Cover panel on left and right side of bumper:
press on the arrow symbol on the cover panel.
Front
Rear
Page 296 of 317
Short commands of voice activation system
294
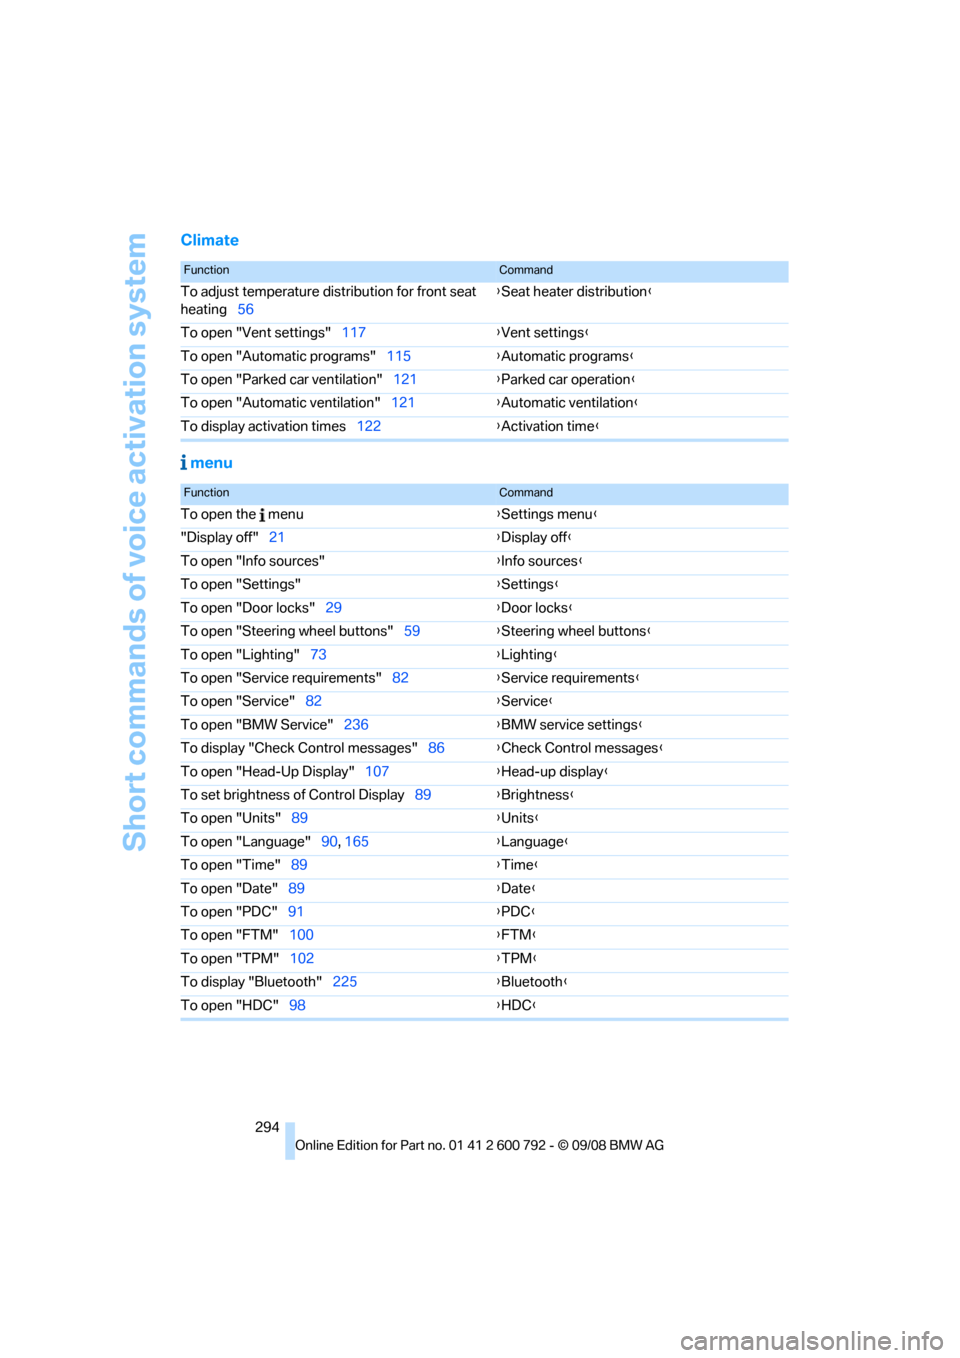
Climate menu
FunctionCommand
To adjust temperature distribution for front seat
heating 56 {
Seat heater distribution }
To open "Vent settings" 117{Vent settings }
To open "Automatic programs" 115{Automatic programs }
To open "Parked car ventilation" 121{Parked car operation }
To open "Automatic ventilation" 121{Automatic ventilation }
To display activation times 122{Activation time }
FunctionCommand
To open the menu {Settings menu }
"Display off" 21 {Display off }
To open "Info sources" {Info sources }
To open "Settings" {Settings }
To open "Door locks" 29 {Door locks }
To open "Steering wheel buttons" 59{Steering wheel buttons }
To open "Lighting" 73 {Lighting }
To open "Service requirements" 82{Service requirements }
To open "Service" 82 {Service }
To open "BMW Service" 236{BMW service settings }
To display "Check Control messages" 86{Check Control messages }
To open "Head-Up Display" 107{Head-up display }
To set brightness of Control Display 89{Brightness }
To open "Units" 89 {Units }
To open "Language" 90, 165 {Language }
To open "Time" 89 {Time }
To open "Date" 89 {Date }
To open "PDC" 91 {PDC }
To open "FTM" 100 {FTM }
To open "TPM" 102 {TPM }
To display "Bluetooth" 225 {B
luetooth}
To open "HDC" 98 {HDC }
Page 298 of 317
Everything from A to Z
296
Everything from A to Z
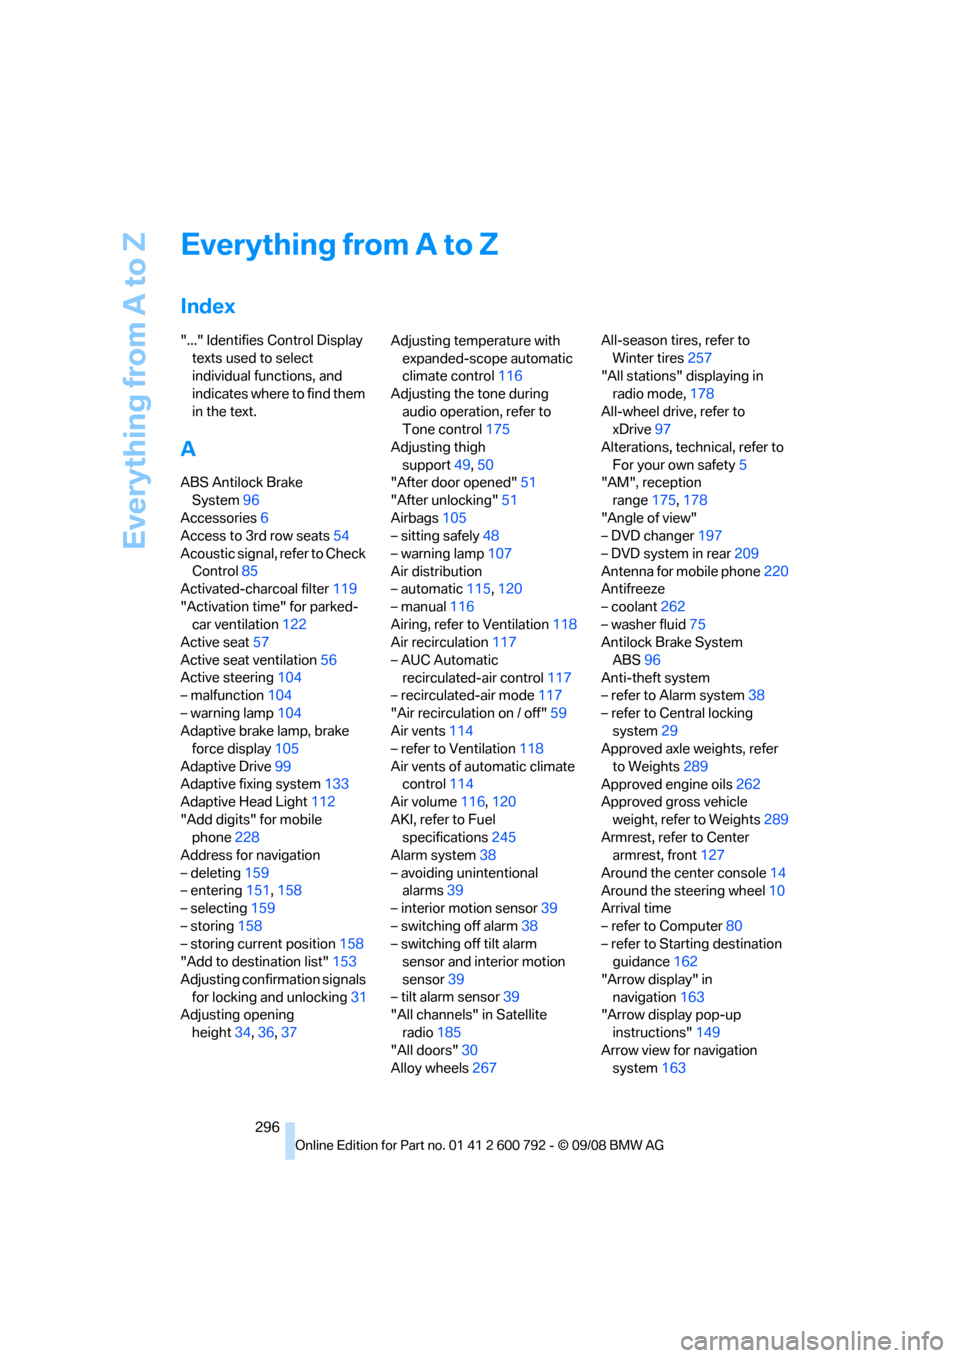
Index
"..." Identifies Control Display texts used to select
individual functions, and
indicates where to find them
in the text.
A
ABS Antilock Brake System 96
Accessories 6
Access to 3rd row seats 54
Acoustic signal, refer to Check Control 85
Activated-charcoal filter 119
"Activation time" for parked- car ventilation 122
Active seat 57
Active seat ventilation 56
Active steering 104
– malfunction 104
– warning lamp 104
Adaptive brake lamp, brake force display 105
Adaptive Drive 99
Adaptive fixing system 133
Adaptive Head Light 112
"Add digits" for mobile phone 228
Address for navigation
– deleting 159
– entering 151,158
– selecting 159
– storing 158
– storing current position 158
"Add to destination list" 153
Adjusting confirmation signals for locking and unlocking 31
Adjusting opening
height 34,36, 37 Adjusting temperature with
expanded-scope automatic
climate control 116
Adjusting the tone during audio operation, refer to
Tone control 175
Adjusting thigh support 49,50
"After door opened" 51
"After unlocking" 51
Airbags 105
– sitting safely 48
– warning lamp 107
Air distribution
– automatic 115,120
– manual 116
Airing, refer to Ventilation 118
Air recirculation 117
– AUC Automatic recirculated-air control 117
– recirculated-air mode 117
"Air recirculation on / off" 59
Air vents 11
4
– refer to Ventilation 118
Air vents of automatic climate control 114
Air volume 116,120
AKI, refer to Fuel specifications 245
Alarm system 38
– avoiding unintentional alarms 39
– interior motion sensor 39
– switching off alarm 38
– switching off tilt alarm sensor and interior motion
sensor 39
– tilt alarm sensor 39
"All channels" in Satellite
radio 185
"All doors" 30
Alloy wheels 267 All-season tires, refer to
Winter tires 257
"All stations" displaying in
radio mode, 178
All-wheel drive, refer to xDrive 97
Alterations, tech nical, refer to
For your own safety 5
"AM", reception
range 175,178
"Angle of view"
– DVD changer 197
– DVD system in rear 209
Antenna for mobile phone 220
Antifreeze
– coolant 262
– washer fluid 75
Antilock Brake System
ABS 96
Anti-theft system
– refer to Alarm system 38
– refer to Central locking system 29
Approved axle weights, refer
to Weights 289
Approved engine oils 262
Approved gross vehicle
weight, refer to Weights 289
Armrest, refer to Center armrest, front 127
Around the center console 14
Around the steering wheel 10
Arrival time
– refer to Computer 80
– refer to Starting destination guidance 162
"Arrow display" in navigation 163
"Arrow display pop-up
instructions" 149
Arrow view for navigation system 163
Page 301 of 317
Reference 299
At a glance
Controls
Driving tips
Communications
Navigation
Entertainment
Mobility
Cargo bay
– capacity289
– emergency operation, refer to Opening manually 33,36
– expanding 132
– opening/closing, refer to Liftgate 33,35
– opening/closing, refer to
Tailgate 35
– opening from inside 33,36
– opening from outside 33,36
– opening with remote control 30
Cargo bay cover, refer to Roll- up cover 130
Caring for the vehicle
finish 266
Car key, refer to Keys/remote control 28
Car phone 220
– installation location, refer to Center armrest, front 127
– refer to Mobile phone 220
– refer to separate operating instructions
Car radio, refer to Radio 178
Car wash 140,265
– before driving in 66
– with comfort access 41
Catalytic converter, refer to Hot exhaust system 139
"Categories" in Satellite radio 185
CBC Cornering Brake
Control 96
CBS Condition Based Service 263
"CD" 175,187
– for DVD system in rear 206
CD, refer to Playing audio
tracks, DVD system in
rear 210
CD/DVD player, DVD system
in rear 205 CD changer
187
– compressed audio files 187
– controls 174
– fast forward/reverse 190
– random sequence 190
– repeating a track 189
– sampling tracks 189
– selecting a CD 187
– selecting a track 188
– switching on/off 174
– ton
e control 175
– volume 175
CD player 187
– compressed audio files 187
– controls 174
– fast forward/reverse 190
– random sequence 190
– repeating a track 189
– sampling tracks 189
– selecting a track 188
– switching on/off 174
– tone control 175
– volume 175
Cell phone
– refer to Mobile phone
Center armrest
– front 127
– rear 130
Center brake lamp 272,275
Center console 14
Central locking system 29
– comfort access 39
– from inside vehicle 32
Changes, technical
– refer to For your own safety 5
– refer to Parts and
accessories 6
Changing gears using shift paddles 71
Changing language on Control Display 90
Changing tires 256
Changing units of measure on Control Display 89
Changing wheels 275
Check Control 85
"Check Control messages" 86 Checking the air pressure,
refer to Tire inflation
pressure 249
Children, transporting 61
Child restraint devices 61
Child restraint fixing system LATCH 62
Child restraint systems 61
Child-safety locks 64
Child seats 61
Chime, refer to Check
Control 85
Cigarette lighter, refer to
Lighter 129
Cleaning your BMW, refer to Care 265
"Climate" 56
Clock 78
– 12h/24h mode 89
– setting tim
e 88
Closing
– from inside 32
– using remote control 29
Closing fuel filler cap 244
Clothes hooks 127
Cockpit 10
Cold start, refer to Starting engine 66
"Color" in DVD system in rear 208
Comfort access 39
– observe in car wash 41
– replacing battery 41
Comfort area, refer to Around
the center console 14
Comfort start, refer to Starting engine 66
"Communication" 226 ,236, 237, 238,239
Compact Disc
– refer to CD changer 187
– refer to CD player 187
Compact wheel
– inflation pressure 251
– wheel change 275
Compartment for remote
control, refer to Ignition
lock 65
Page 302 of 317
Everything from A to Z
300
Compartments, refer to
Storage compartments 127
Compass, digital 124
Computer 80
– displays in instrument
panel 80
– displays on Control Display 80
– trip computer 81
"Concierge" 239
Concierge service 239
Condition Based Service CBS 263
"Confirmation" 31
Connecting car vacuum cleaner, refer to Connecting
electrical devices 129
Connecting headphones 205
Consumption, refer to
Average fuel
consumption 80
Consumption indicator,
energy control 79
Consumption statistics, refer to Average fuel
consumption 80
"Contrast"
– DVD changer 196
– DVD system in rear 208
Control Center, refer to iDrive 16
Control Display, refer to iDrive 16
– setting brightness 89
Controller, refer to iDrive 16
Controls
– DVD changer 193
– DVD system in rear 204
– refer to Cockpit 10
Convenience operation
– glass sunroof 30,32
– glass sunroof with comfort access 40
– windows 30,32
– windows with comfort access 40
– with comfort access 40Coolant
262
– checking level 262
– temperature 79
Cooling, maximum 117
Cornering Brake Control
CBC 96
Courtesy lamps, refer to Interior lamps 113
Cradle for telephone or mobile phone 127
Cruise control 75
Cruising range 80
Cup holders 127
Curb weight, refer to Wei
ghts 289
"Current position" 169
Current position
– displaying 169
– entering 158
– storing 158
"Customer Relations" 230,238
Cylinders, refer to Engine data 286
D
Data 286
– capacities 290
– dimensions 287
– engine 286
– technical data 286
– weights 289
"Date" 89
Date 78
– display format 89
– retrieving 78
– setting 89
"Date format" 89
Daytime driving lamps 111
"Deactivated" 51
Defrosting windows 116
Defrosting windows and
removing condensation 116
Defrost position, refer to Defrosting windows 116
"Delete all numbers" on the mobile phone 229 "Delete data" for
navigation 159
"Delete" for mobile phone 229
Destination address
– deleting 159
– entering 151,153
Destination for navigation
– destination list 157
– entering 150
– selecting from address
book 159
– selecting using
information 156
– selecting using voice 153
– storing 158
Destination guidance 162
– canceling voice instructions 60
– changing specified route 160
– displaying route 163
– distance and arrival 162
– ending/continuing 162
– starting 162
– voice instructions 165
– volume of voice instructions 166
Destination list for navigation system 157
Destinations recently driven
to 157
"Details"
– DVD system in the rear 212
– in audio mode 202
"Dial" for mobile phone 227
"Dial number" 227
"
Diamond button" 59
Diesel exhaust fluid
– at low temperatures 246
– at minimum 246
– refilling yourself 247
Diesel particulate filter 139
Digital clock 78
Digital compass 124
Digital radio, refer to High
Definition Radio 181