reverse BMW X5 2010 E70 User Guide
[x] Cancel search | Manufacturer: BMW, Model Year: 2010, Model line: X5, Model: BMW X5 2010 E70Pages: 300, PDF Size: 12.41 MB
Page 187 of 300
Navigation
Entertainment
Driving tips
185Reference
At a glance
Controls
Communications
Mobility
Track search
You can access the tracks via the playback lists
and information. With USB devices you can also
access the tracks via the file directory.
Selection is possible via:
>Playback lists
>Information: type of music, artist, album,
title
>Additionally for USB devices: file directory,
composer
Track titles are displayed if they have been
stored in the Latin alphabet.
Starting the track search
1."CD/Multimedia"
2."External devices"
3.Select the symbol.
The name of the audio device may appear.
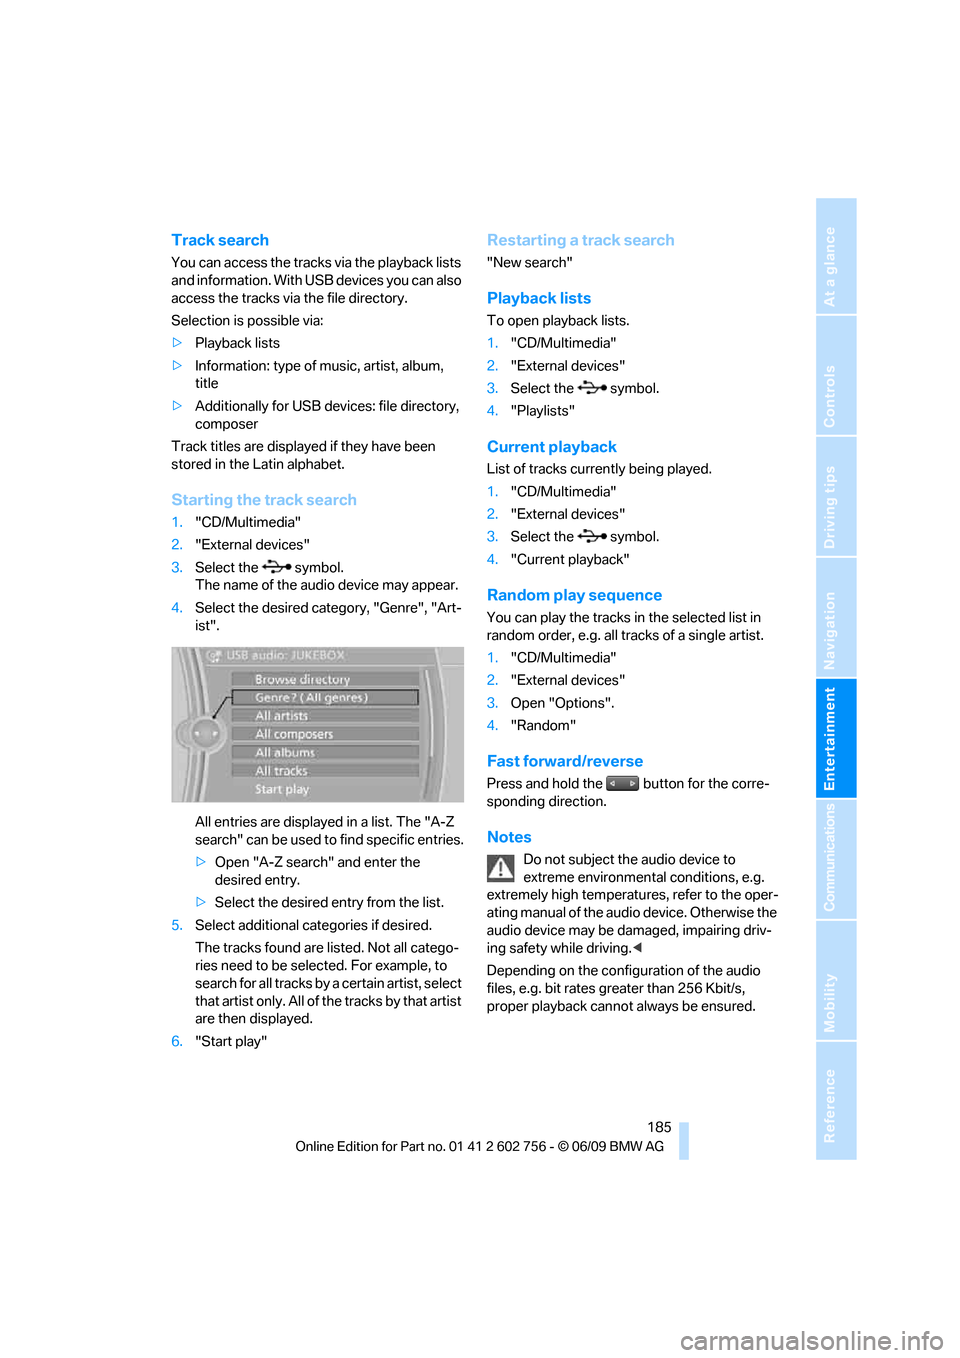
4.Select the desired category, "Genre", "Art-
ist".
All entries are displayed in a list. The "A-Z
search" can be used to find specific entries.
>Open "A-Z search" and enter the
desired entry.
>Select the desired entry from the list.
5.Select additional categories if desired.
The tracks found are listed. Not all catego-
ries need to be selected. For example, to
search for all tracks by a certain artist, select
that artist only. All of the tracks by that artist
are then displayed.
6."Start play"
Restarting a track search
"New search"
Playback lists
To open playback lists.
1."CD/Multimedia"
2."External devices"
3.Select the symbol.
4."Playlists"
Current playback
List of tracks currently being played.
1."CD/Multimedia"
2."External devices"
3.Select the symbol.
4."Current playback"
Random play sequence
You can play the tracks in the selected list in
random order, e.g. all tracks of a single artist.
1."CD/Multimedia"
2."External devices"
3.Open "Options".
4."Random"
Fast forward/reverse
Press and hold the button for the corre-
sponding direction.
Notes
Do not subject the audio device to
extreme environmental conditions, e.g.
extremely high temperatures, refer to the oper-
ating manual of the audio device. Otherwise the
audio device may be damaged, impairing driv-
ing safety while driving.<
Depending on the configuration of the audio
files, e.g. bit rates greater than 256 Kbit/s,
proper playback cannot always be ensured.
ba8_e70ag.book Seite 185 Freitag, 5. Juni 2009 11:42 11
Page 190 of 300
DVD system in rear
188 1.Turn display screen, arrow1.
The display screen switches off.
2.Fold in display screen, arrow2.
The display screen is folded out in the reverse
order.
CD/DVD player
Controls
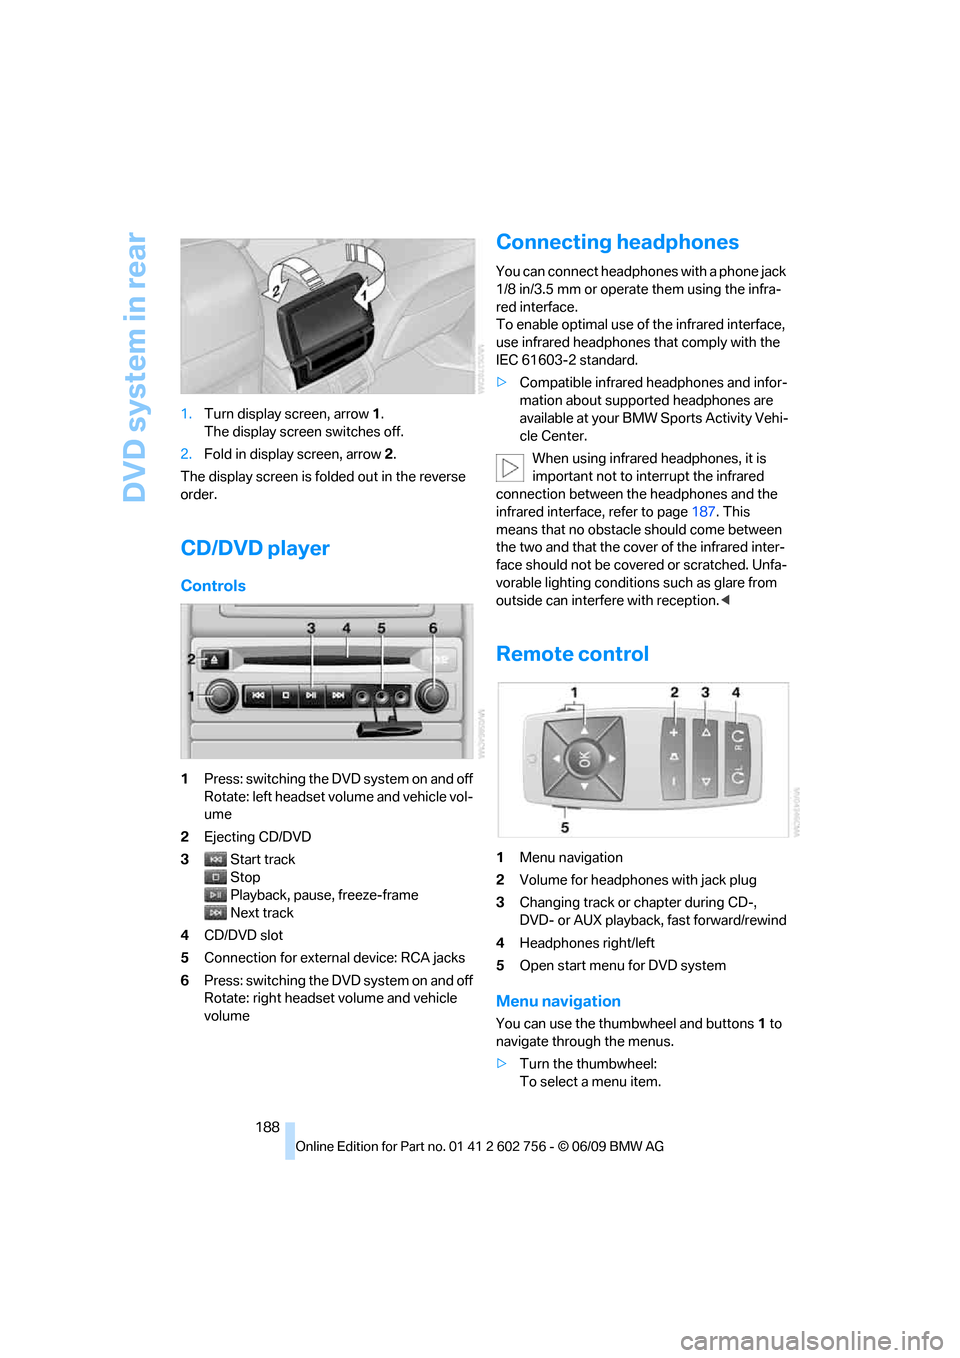
1Press: switching the DVD system on and off
Rotate: left headset volume and vehicle vol-
ume
2Ejecting CD/DVD
3Start track
Stop
Playback, pause, freeze-frame
Next track
4CD/DVD slot
5Connection for external device: RCA jacks
6Press: switching the DVD system on and off
Rotate: right headset volume and vehicle
volume
Connecting headphones
You can connect headphones with a phone jack
1/8 in/3.5 mm or operate them using the infra-
red interface.
To enable optimal use of the infrared interface,
use infrared headphones that comply with the
IEC 61603-2 standard.
>Compatible infrared headphones and infor-
mation about supported headphones are
available at your BMW Sports Activity Vehi-
cle Center.
When using infrared headphones, it is
important not to interrupt the infrared
connection between the headphones and the
infrared interface, refer to page187. This
means that no obstacle should come between
the two and that the cover of the infrared inter-
face should not be covered or scratched. Unfa-
vorable lighting conditions such as glare from
outside can interfere with reception.<
Remote control
1Menu navigation
2Volume for headphones with jack plug
3Changing track or chapter during CD-,
DVD- or AUX playback, fast forward/rewind
4Headphones right/left
5Open start menu for DVD system
Menu navigation
You can use the thumbwheel and buttons1 to
navigate through the menus.
>Turn the thumbwheel:
To select a menu item.
ba8_e70ag.book Seite 188 Freitag, 5. Juni 2009 11:42 11
Page 192 of 300
DVD system in rear
190
Playing videos from CDs/
DVDs
Country codes of DVDs
Your DVD player only plays DVDs with the cod-
ing of your home region, e.g. Europe = 2. The
country codes supported by your DVD are con-
tained in the information on your DVD.
An overview of the coding zones:
DVDs with the code 0 can be played on all
devices.<
Starting playback
1.Push the CD/DVD into the drive with the
labeled side facing upward.
The CD/DVD is automatically pulled in.
>Playback begins automatically after a
few seconds.
>If it does not:
Select "DVD".
Press the button.
2.If the DVD control or the DVD-specific
menu is displayed when a DVD is inserted,
use the remote control buttons for menu
navigation to select the desired option.
Or:
Press the button on the CD/DVD player.
You can control the playback with the buttons
on the CD/DVD player or the DVD control.
Video-CDs, VCDs, and Super-Video-
CDs, i.e. SVCDs, can only be played if
they do not have a DVD-specific menu.<
Ejecting CD/DVD
Press the button on the CD/DVD player.
The DVD emerges slightly from the drive.
DVD control
With the DVD control, you can select the title
and chapter, open the DVD-specific menu and
operate functions such as Language, Fast for-
ward and Reverse or Freeze frame.
A DVD can briefly deactivate functions of the
DVD control, under certain circumstances while
the entire DVD is being played. It is not possible
to operate the DVD control under these circum-
stances. In this case, try to make the selection
using the DVD-specific menu.
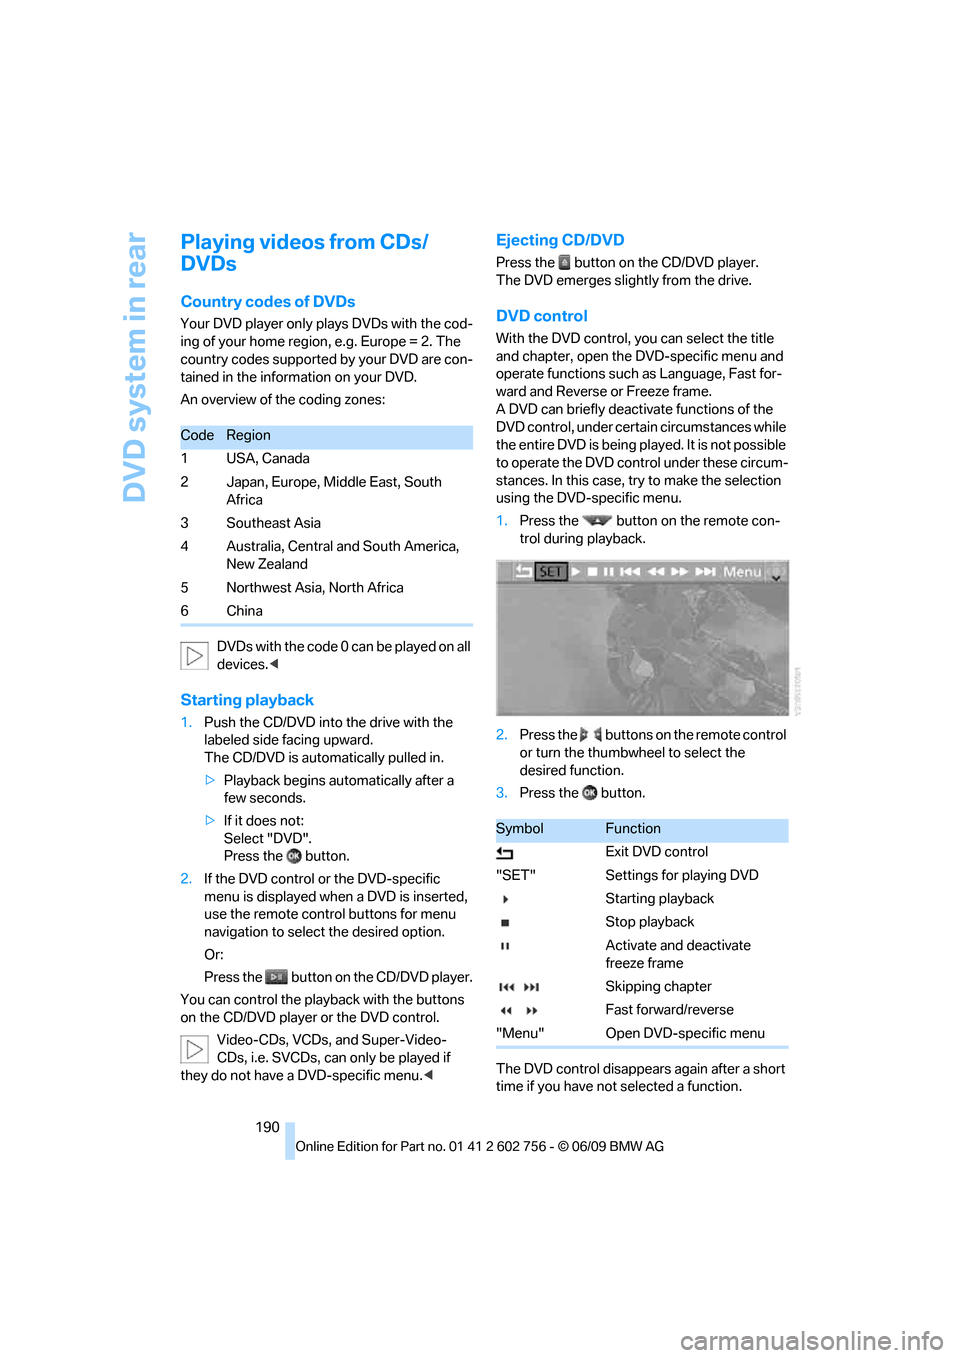
1.Press the button on the remote con-
trol during playback.
2.Press the buttons on the remote control
or turn the thumbwheel to select the
desired function.
3.Press the button.
The DVD control disappears again after a short
time if you have not selected a function.
CodeRegion
1USA, Canada
2 Japan, Europe, Middle East, South
Africa
3 Southeast Asia
4 Australia, Central and South America,
New Zealand
5 Northwest Asia, North Africa
6China
SymbolFunction
Exit DVD control
"SET" Settings for playing DVD
Starting playback
Stop playback
Activate and deactivate
freeze frame
Skipping chapter
Fast forward/reverse
"Menu" Open DVD-specific menu
ba8_e70ag.book Seite 190 Freitag, 5. Juni 2009 11:42 11
Page 193 of 300
Navigation
Entertainment
Driving tips
191Reference
At a glance
Controls
Communications
Mobility
Or:
Press the button on the remote control to
exit the DVD control.
Fast forward/reverse
Forward/reverse with DVD control
1.Press the button on the remote con-
trol during playback.
2.Select the symbol.
3.Press the button.
4.Press the button several times to
increase the fast forward/reverse speed.
The DVD playback will be distorted.
To cancel fast forward/reverse:
1.Select the symbol.
2.Press the button.
Or:
Press the button on the CD/DVD player.
The DVD will start play at the point selected.
Forward/reverse with remote control
Press and hold the button until you reach
the desired point.
Or:
1.During playback, turn the thumbwheel.
Fast forward/reverse is interrupted.
2.Continue to turn the thumbwheel.
The speed is increased.
3.Press the button on the CD/DVD player.
Fast forward/reverse is interrupted. The
DVD will start play at the point selected.
Skipping chapter
You can change to the next or previous chapter
during playback.
1.Press the button on the remote con-
trol during playback.
2.Select the symbol.
3.Press the button repeatedly, continuing
until you reach the desired chapter.Or:
Press the button on the left or right on the
remote control repeatedly until you reach the
desired chapter.
Freeze frame
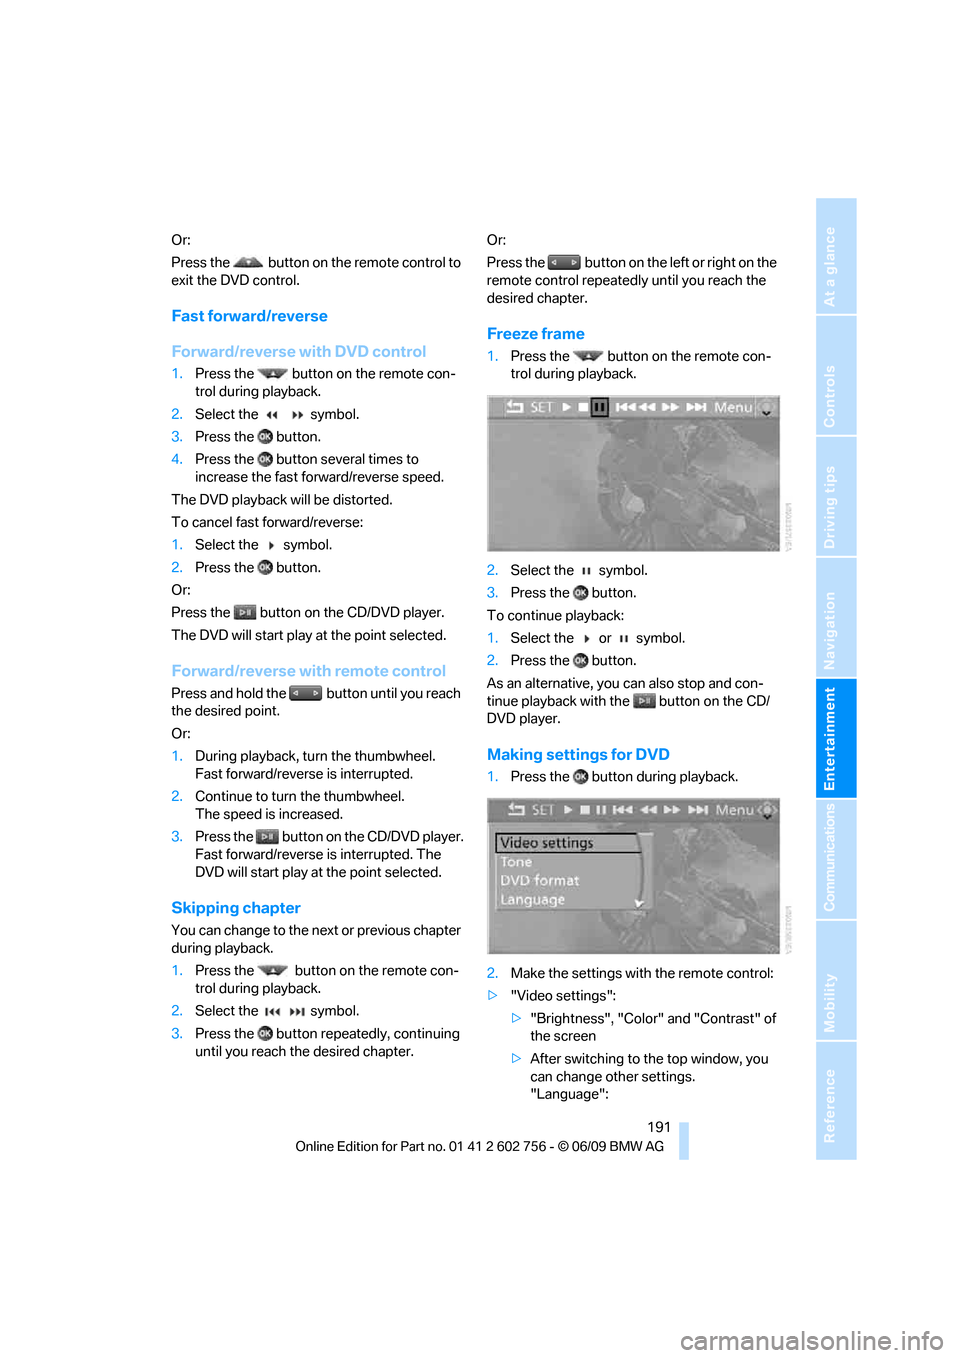
1.Press the button on the remote con-
trol during playback.
2.Select the symbol.
3.Press the button.
To continue playback:
1.Select the or symbol.
2.Press the button.
As an alternative, you can also stop and con-
tinue playback with the button on the CD/
DVD player.
Making settings for DVD
1.Press the button during playback.
2.Make the settings with the remote control:
>"Video settings":
>"Brightness", "Color" and "Contrast" of
the screen
>After switching to the top window, you
can change other settings.
"Language":
ba8_e70ag.book Seite 191 Freitag, 5. Juni 2009 11:42 11
Page 196 of 300
DVD system in rear
194
Using the remote control
Press the button for the corresponding
direction repeatedly or turn the thumbwheel
until you reach the desired track.
Playback begins at the start of the track.
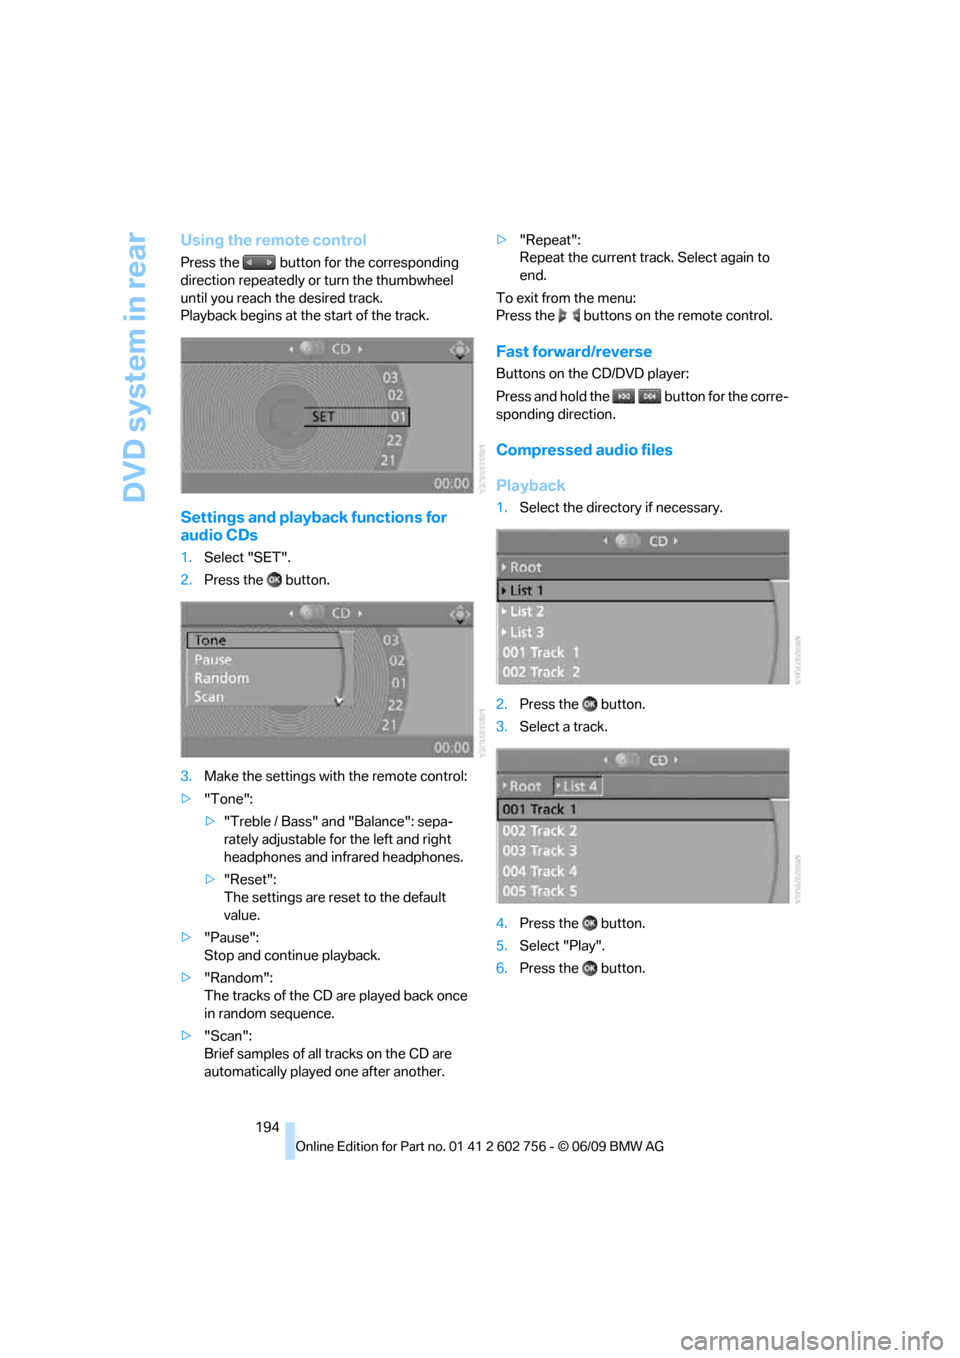
Settings and playback functions for
audio CDs
1.Select "SET".
2.Press the button.
3.Make the settings with the remote control:
>"Tone":
>"Treble / Bass" and "Balance": sepa-
rately adjustable for the left and right
headphones and infrared headphones.
>"Reset":
The settings are reset to the default
value.
>"Pause":
Stop and continue playback.
>"Random":
The tracks of the CD are played back once
in random sequence.
>"Scan":
Brief samples of all tracks on the CD are
automatically played one after another.>"Repeat":
Repeat the current track. Select again to
end.
To exit from the menu:
Press the buttons on the remote control.
Fast forward/reverse
Buttons on the CD/DVD player:
Press and hold the button for the corre-
sponding direction.
Compressed audio files
Playback
1.Select the directory if necessary.
2.Press the button.
3.Select a track.
4.Press the button.
5.Select "Play".
6.Press the button.
ba8_e70ag.book Seite 194 Freitag, 5. Juni 2009 11:42 11
Page 253 of 300
Mobility
251Reference
At a glance
Controls
Driving tips
Communications
Navigation
Entertainment
When performing care and maintenance on the
headlamps, please observe the information on
page247.
For bulbs for which replacement is not
described and for checking and adjusting
headlamp aim, please contact your BMW
Sports Activity Vehicle Center.<
Light-emitting diodes LEDs
Light-emitting diodes installed behind translu-
c e n t l e n s e s s e r v e a s t h e l i g h t s o u r c e f o r m a n y o f
the controls and displays in your vehicle. These
light-emitting diodes, which operate using a
concept similar to that applied in conventional
lasers, are officially designated as Class 1 light-
emitting diodes.
Do not remove the covers, and never
stare into the unfiltered light for several
hours, as irritation of the retina could result.<
BMW X5: changing lamps
Xenon lamps
These bulbs have a very long service life and
the probability of a failure is very low. If a lamp
should nevertheless fail, you can continue driv-
ing cautiously with fog lamps
* provided that
this is permitted by the country-specific laws.
Have work on the xenon light unit includ-
ing changing the bulb carried out only by
your BMW Sports Activity Vehicle Center or a
workshop that works according to BMW repair
procedures with correspondingly trained per-
sonnel. Due to the high voltage present in the
system, there is a danger of fatal injuries when
work is carried out improperly.<
Halogen bulbs:
Parking lamps and roadside parking
lamps, daytime driving lamps
35-Watt bulb, H8
The bulb is pressurized. Therefore, wear
safety glasses and protective gloves.
Otherwise there is a danger of injuries if the
bulb is accidentally damaged during replace-
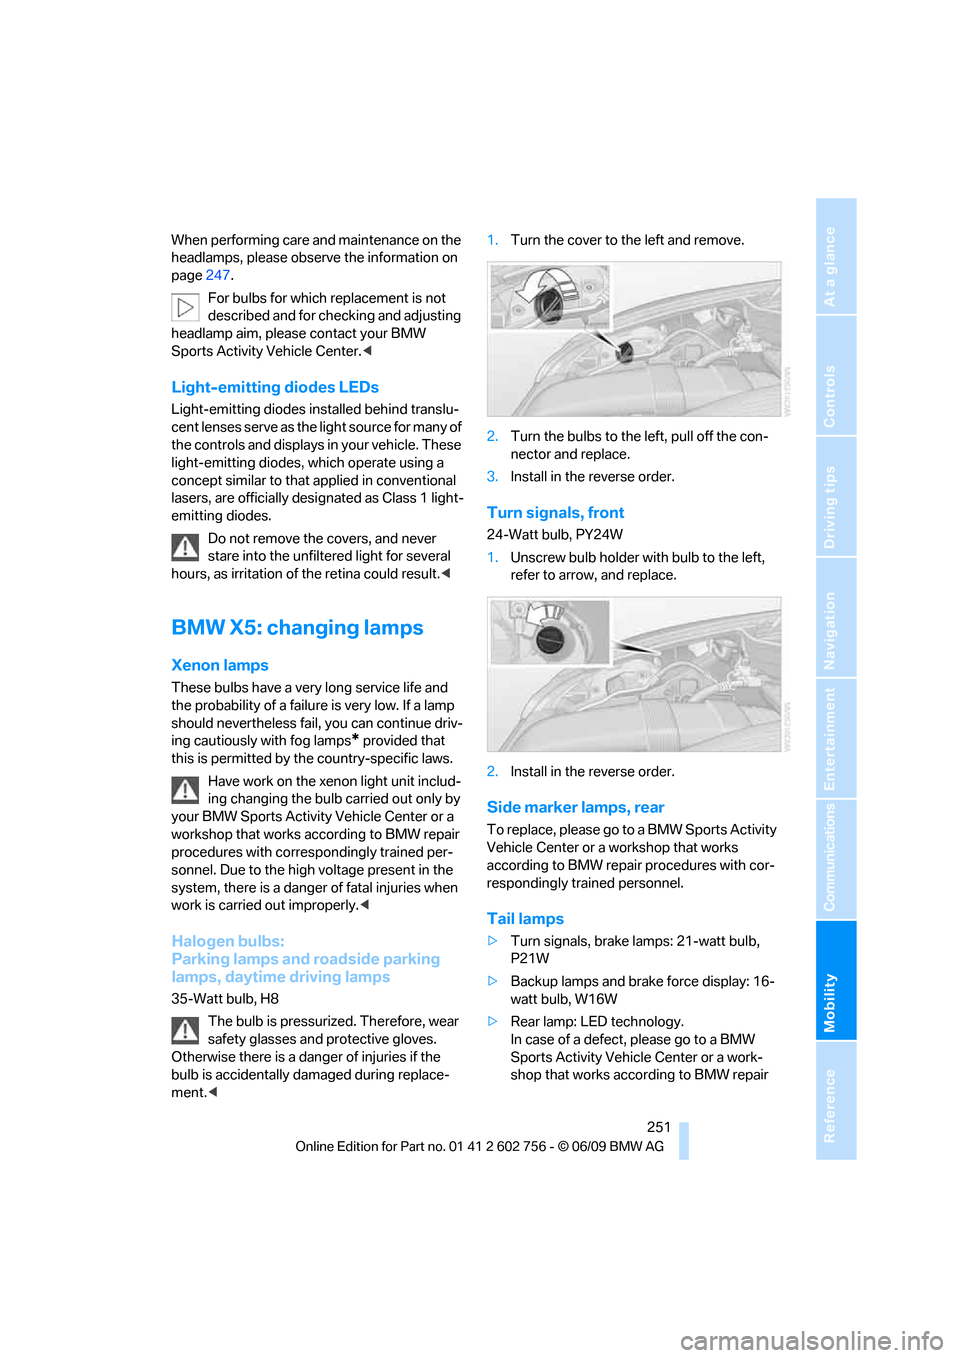
ment.<1.Turn the cover to the left and remove.
2.Turn the bulbs to the left, pull off the con-
nector and replace.
3.Install in the reverse order.
Turn signals, front
24-Watt bulb, PY24W
1.Unscrew bulb holder with bulb to the left,
refer to arrow, and replace.
2.Install in the reverse order.
Side marker lamps, rear
To replace, please go to a BMW Sports Activity
Vehicle Center or a workshop that works
according to BMW repair procedures with cor-
respondingly trained personnel.
Tail lamps
>Turn signals, brake lamps: 21-watt bulb,
P21W
>Backup lamps and brake force display: 16-
watt bulb, W16W
>Rear lamp: LED technology.
In case of a defect, please go to a BMW
Sports Activity Vehicle Center or a work-
shop that works according to BMW repair
ba8_e70ag.book Seite 251 Freitag, 5. Juni 2009 11:42 11
Page 256 of 300
Replacing components
254 Have work on the xenon light unit includ-
ing changing the bulb carried out only by
your BMW Sports Activity Vehicle Center or a
workshop that works according to BMW repair
procedures with correspondingly trained per-
sonnel. Due to the high voltage present in the
system, there is a danger of fatal injuries when
work is carried out improperly.<
Parking lamps and roadside parking
lamps, daytime driving lamps
35-Watt bulb, H8
The bulb is pressurized. Therefore, wear
safety glasses and protective gloves.
Otherwise there is a danger of injuries if the
bulb is accidentally damaged during replace-
ment.<
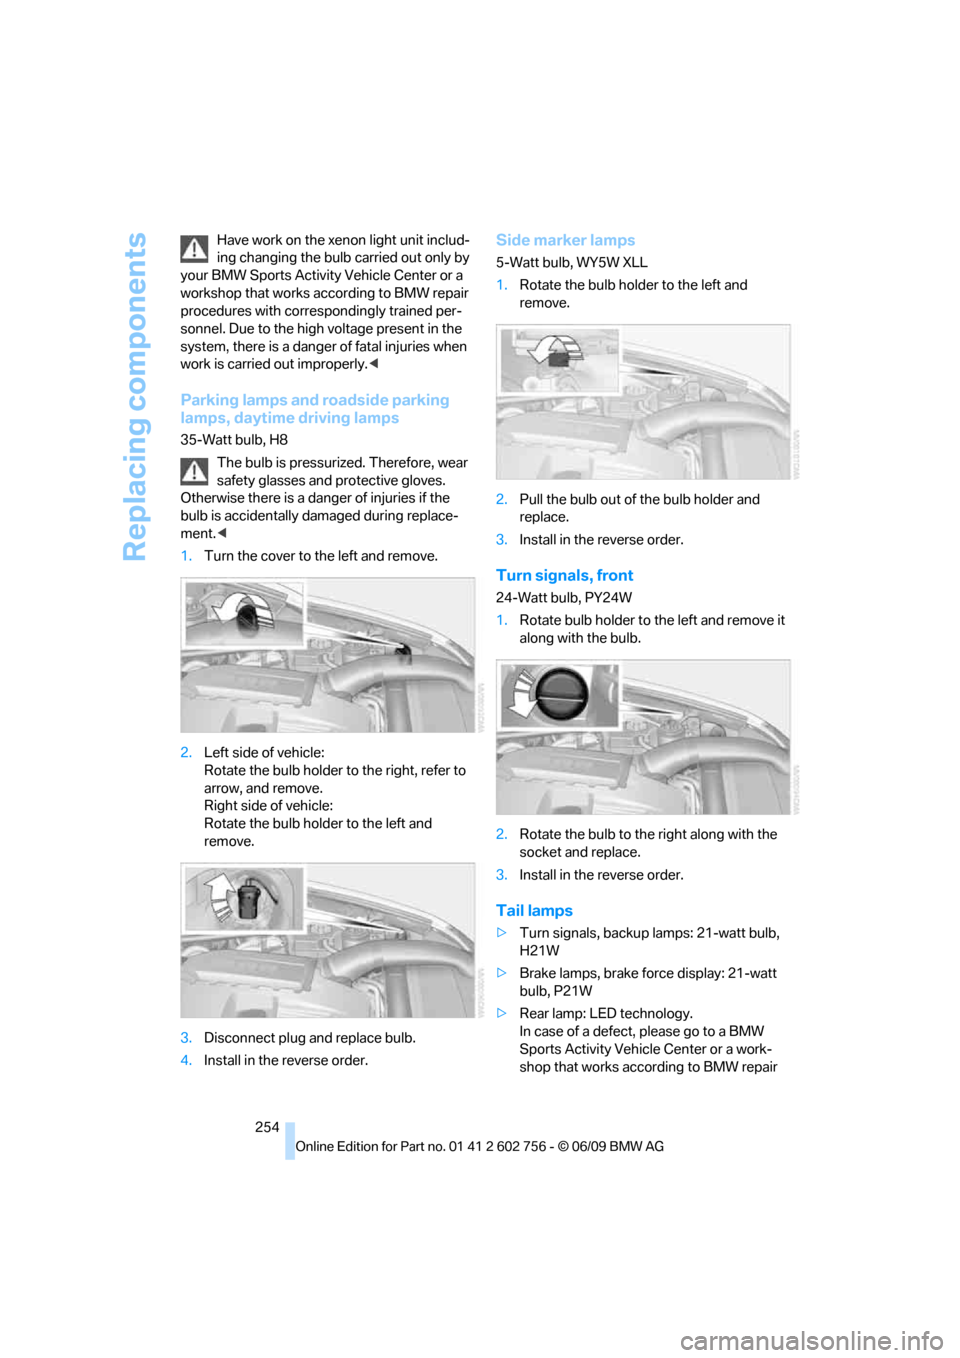
1.Turn the cover to the left and remove.
2.Left side of vehicle:
Rotate the bulb holder to the right, refer to
arrow, and remove.
Right side of vehicle:
Rotate the bulb holder to the left and
remove.
3.Disconnect plug and replace bulb.
4.Install in the reverse order.
Side marker lamps
5-Watt bulb, WY5W XLL
1.Rotate the bulb holder to the left and
remove.
2.Pull the bulb out of the bulb holder and
replace.
3.Install in the reverse order.
Turn signals, front
24-Watt bulb, PY24W
1.Rotate bulb holder to the left and remove it
along with the bulb.
2.Rotate the bulb to the right along with the
socket and replace.
3.Install in the reverse order.
Tail lamps
>Turn signals, backup lamps: 21-watt bulb,
H21W
>Brake lamps, brake force display: 21-watt
bulb, P21W
>Rear lamp: LED technology.
In case of a defect, please go to a BMW
Sports Activity Vehicle Center or a work-
shop that works according to BMW repair
ba8_e70ag.book Seite 254 Freitag, 5. Juni 2009 11:42 11
Page 257 of 300
Mobility
255Reference
At a glance
Controls
Driving tips
Communications
Navigation
Entertainment
procedures with correspondingly trained
personnel.
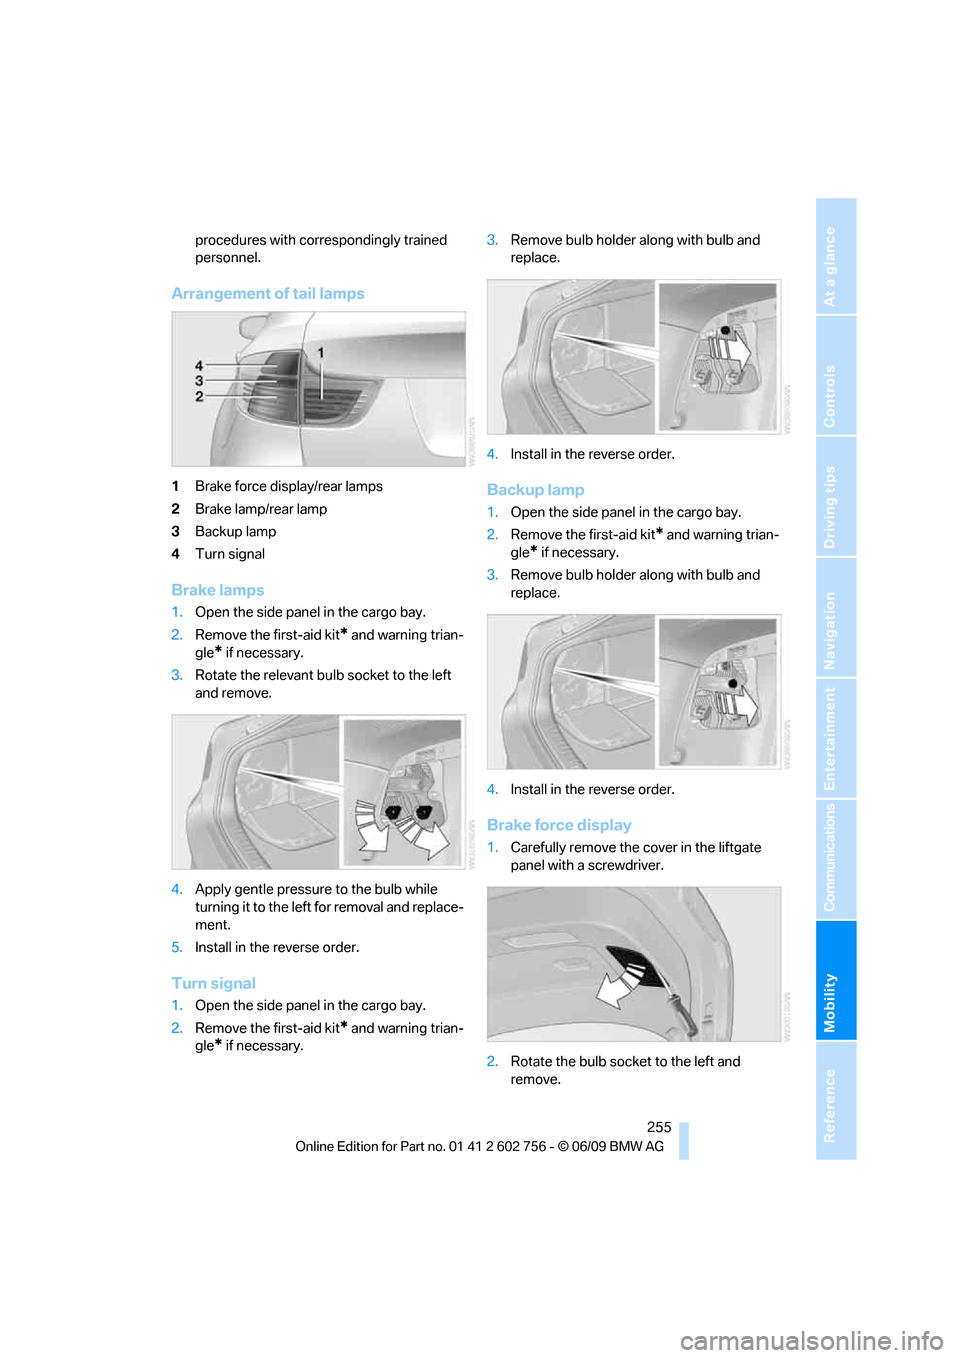
Arrangement of tail lamps
1Brake force display/rear lamps
2Brake lamp/rear lamp
3Backup lamp
4Turn signal
Brake lamps
1.Open the side panel in the cargo bay.
2.Remove the first-aid kit
* and warning trian-
gle
* if necessary.
3.Rotate the relevant bulb socket to the left
and remove.
4.Apply gentle pressure to the bulb while
turning it to the left for removal and replace-
ment.
5.Install in the reverse order.
Turn signal
1.Open the side panel in the cargo bay.
2.Remove the first-aid kit
* and warning trian-
gle
* if necessary.3.Remove bulb holder along with bulb and
replace.
4.Install in the reverse order.
Backup lamp
1.Open the side panel in the cargo bay.
2.Remove the first-aid kit
* and warning trian-
gle
* if necessary.
3.Remove bulb holder along with bulb and
replace.
4.Install in the reverse order.
Brake force display
1.Carefully remove the cover in the liftgate
panel with a screwdriver.
2.Rotate the bulb socket to the left and
remove.
ba8_e70ag.book Seite 255 Freitag, 5. Juni 2009 11:42 11
Page 261 of 300
Mobility
259Reference
At a glance
Controls
Driving tips
Communications
Navigation
Entertainment
Vehicle Center or bring them to a collection
point. Maintain the battery in an upright position
for transport and storage. Always restrain the
battery to prevent it from tipping over during
transport.<
Power failure
Following a temporary power failure, e.g. due to
a discharged battery, the use of some equip-
ment will be restricted, requiring its reinitializa-
tion. In the same way, individual settings are lost
and must be updated again:
>Seat, mirror and steering wheel memory
The positions must be stored again, refer to
page45.
>Time and Date
The values must be updated again, refer to
pages79, 80.
>Radio
Radio stations must be stored again, refer
to page164.
>Navigation system
You must wait until the system becomes
functional again, refer to page157.
>Glass sunroof/panorama glass sunroof
It may only be possible to raise the glass
sunroof/panorama glass sunroof The sys-
tem must be initialized, refer to page42.
>Digital compass
The system must be calibrated, refer to
page118.
>Active steering
The system automatically initializes for a
short time as you drive. During this time, the
system is deactivated, refer to page97.
>xDrive
The system automatically initializes as you
drive. During this time, indicator lamps light
up. If the lamps do not disappear during the
current trip, have the system checked.
Before removing the vehicle from stor-
age, consult your BMW Sports Activity
Vehicle Center.<
Fuses
Never attempt to repair a blown fuse and
do not replace a defective fuse with a sub-
stitute of another color or amperage rating, as
this could lead to a circuit overload, ultimately
resulting in a fire in the vehicle.<
A pair of plastic tweezers and instructions for
fuse allocation is stored with the fuses in the
cargo bay.
Spare fuses can be obtained from your BMW
Sports Activity Vehicle.
In interior
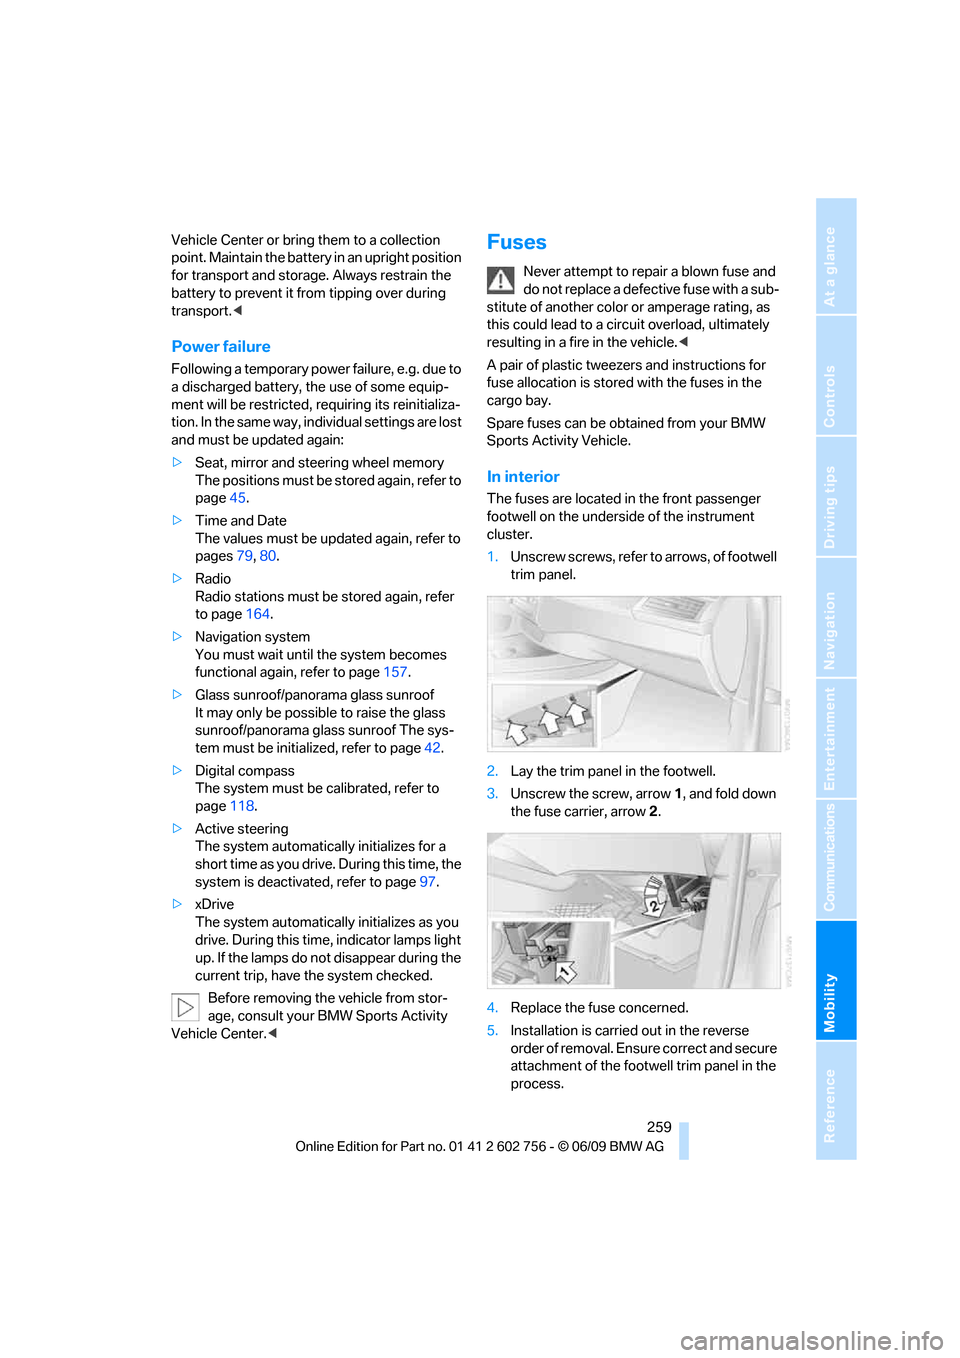
The fuses are located in the front passenger
footwell on the underside of the instrument
cluster.
1.Unscrew screws, refer to arrows, of footwell
trim panel.
2.Lay the trim panel in the footwell.
3.Unscrew the screw, arrow1, and fold down
the fuse carrier, arrow2.
4.Replace the fuse concerned.
5.Installation is carried out in the reverse
order of removal. Ensure correct and secure
attachment of the footwell trim panel in the
process.
ba8_e70ag.book Seite 259 Freitag, 5. Juni 2009 11:42 11
Page 283 of 300
Reference 281
At a glance
Controls
Driving tips
Communications
Navigation
Entertainment
Mobility
C
Calibrating driver's seat50
California Proposition 65
Warning6
Call
– accepting205
– ending205
– rejecting205
Calling, refer to Phone
numbers, dialing206
Calling, refer to telephone
operating instructions
Camera
– refer to Rear view camera86
– refer to Top View84
Can holder, refer to Cup
holders119
Capacities272
Capacity of cargo bay271
Car battery, refer to Vehicle
battery258
Care246
– car-care products246
– carpets248
– car washes246
– CD/DVD-player249
– chrome components247
– displays249
– exterior246
– fine wooden
components248
– hand washing247
– headlamps247
– high-pressure cleaning
jets247
– interior248
– leather248
– light-alloy wheels247
– paint247
– plastic components248
– rubber gaskets247
– running boards248
– safety belts248
– sensors and cameras248
– upholstery materials and
cloth-covered paneling248
– windows247Cargo
– refer to Loading133
– securing134
– securing with ski bag126
Cargo area, refer to Cargo
bay122
Cargo area cover, refer to Roll-
up cover122
Cargo bay
– capacity271
– emergency actuation, refer
to Manually opening or
closing
34
– emergency operation, refer
to Opening manually31
– expanding124
– opening33
– opening/closing, refer to
Liftgate30,33
– opening/closing, refer to
Tailgate33
– opening from inside31
– opening from outside31
– opening with remote
control28
Cargo bay cover, refer to Roll-
up cover122
Caring for the vehicle
finish247
Car key, refer to Keys/remote
control26
Car phone
– installation location, refer to
Center armrest, front119
– refer to separate operating
instructions
– refer to Telephone202
Car radio, refer to Radio163
Car wash246
– before driving in60
– with comfort access37
Catalytic converter, refer to
Hot exhaust system131
CBC Cornering Brake
Control88
CBS Condition Based
Service244CD
– audio playback172
– refer to Playing audio tracks,
DVD system in rear193
CD-/DVD player in rear188
CD changer171
– controls160
– fast forward/reverse173
– random play sequence172
– selecting a track172
– switching on/off160
– tone control160
– volume160
CD player171
– controls160
– fast forward/reverse173
– random play sequence172
– selecting a track172
– switching on/off160
– tone control160
– volume160
Cell phone, refer to Mobile
phone
Center armrest
– front119
– rear122
Center brake lamp253,256
Center console14
Central locking system27
– comfort access35
– from inside vehicle30
Changes, technical
– refer to For your own
safety5
– refer to Parts and
accessories5
Changing gears using shift
paddles65
Changing language on
Control Display81
Changing tires237
Changing trips149
Changing units of measure on
Control Display80
Changing wheels256
Check Control77
Checking the air pressure,
refer to Tire inflation
pressure229
ba8_e70ag.book Seite 281 Freitag, 5. Juni 2009 11:42 11