BMW X5 2011 E70 User Guide
Manufacturer: BMW, Model Year: 2011, Model line: X5, Model: BMW X5 2011 E70Pages: 312, PDF Size: 8.91 MB
Page 11 of 312
At a glance
This overview of buttons, switches and displays
is intended to familiarize you with your vehicle's
operating environment. The section will also
assist you in becoming acquainted with the
control concepts and options available
for operating the various systems.
At a glance
Page 12 of 312
Cockpit
10
Cockpit
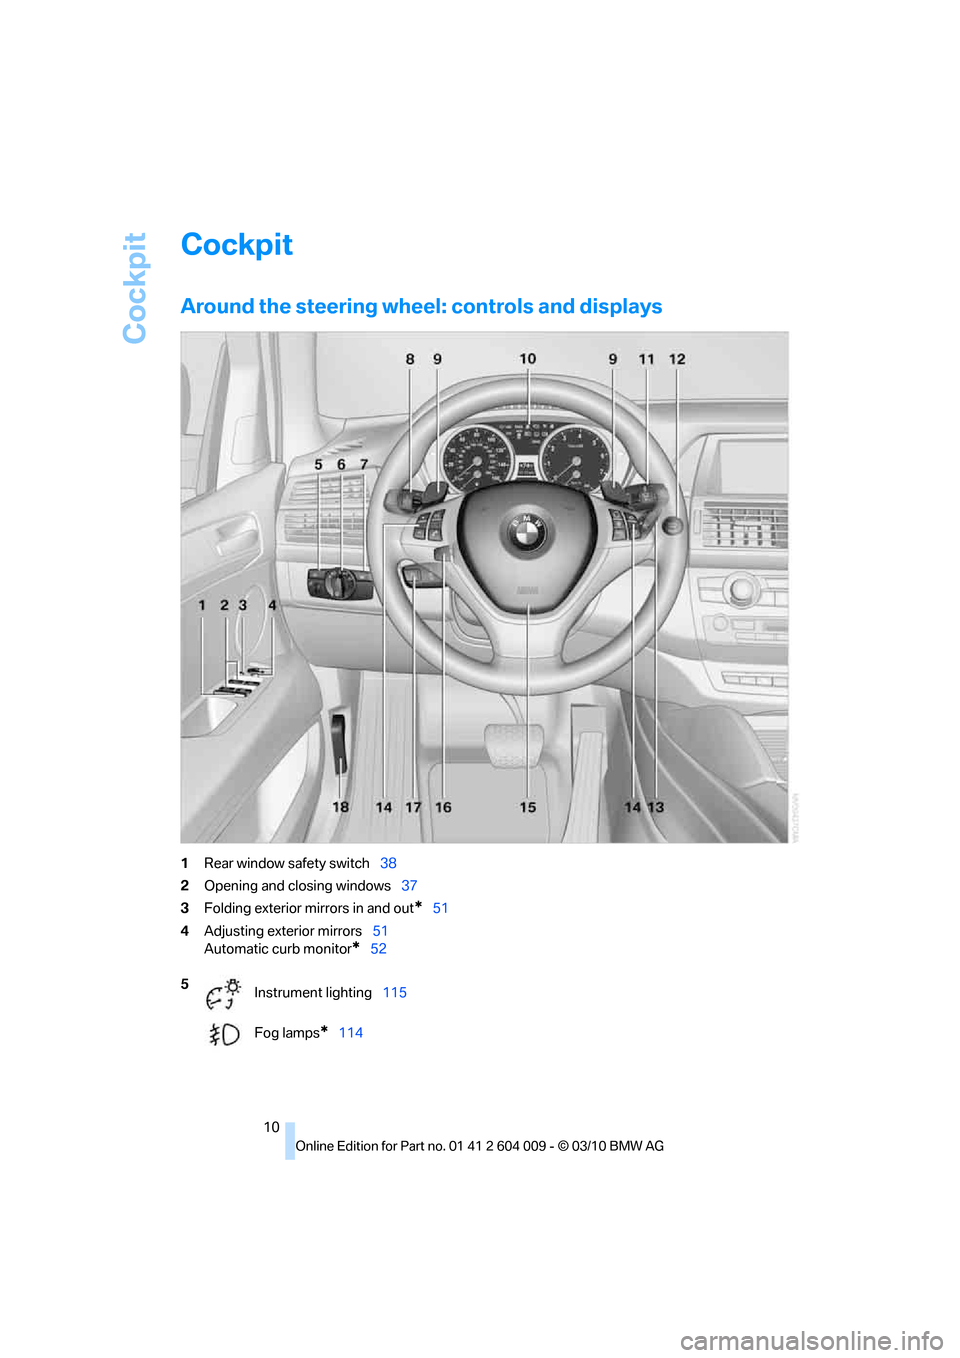
Around the steering wheel: controls and displays
1Rear window safety switch38
2Opening and closing windows37
3Folding exterior mirrors in and out
*51
4Adjusting exterior mirrors51
Automatic curb monitor
*52
5
Instrument lighting115
Fog lamps
*114
Page 13 of 312
At a glance
11Reference
Controls
Driving tips
Communications
Navigation
Entertainment
Mobility
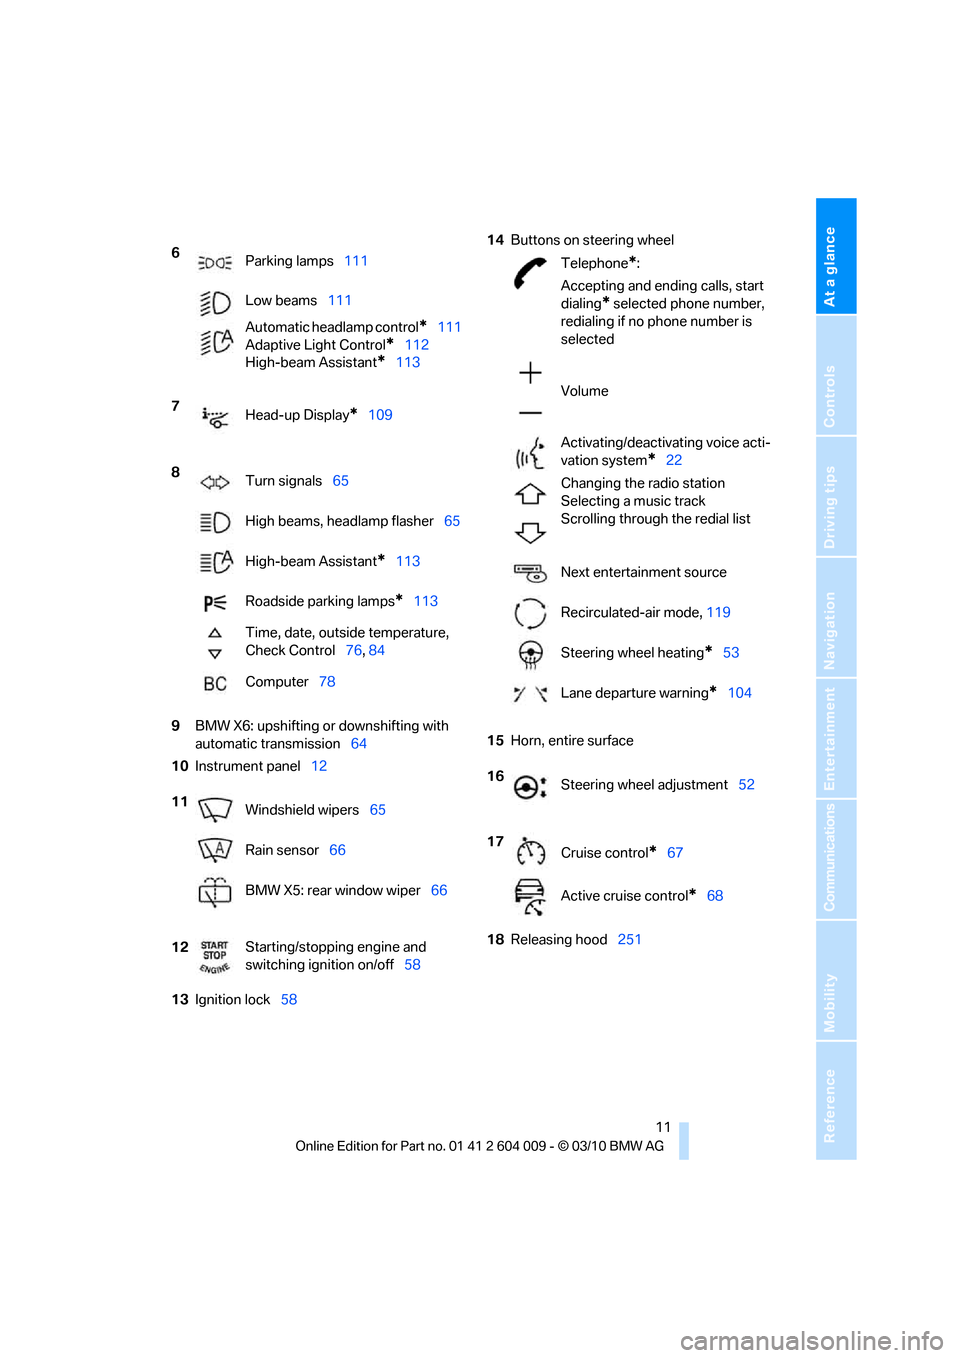
9BMW X6: upshifting or downshifting with
automatic transmission64
10Instrument panel12
13Ignition lock5814Buttons on steering wheel
15Horn, entire surface
18Releasing hood251 6
Parking lamps111
Low beams111
Automatic headlamp control
*111
Adaptive Light Control
*112
High-beam Assistant
*113
7
Head-up Display
*109
8
Turn signals65
High beams, headlamp flasher65
High-beam Assistant
*113
Roadside parking lamps
*113
Time, date, outside temperature,
Check Control76, 84
Computer78
11
Windshield wipers65
Rain sensor66
BMW X5: rear window wiper66
12Starting/stopping engine and
switching ignition on/off58
Telephone*:
Accepting and ending calls, start
dialing
* selected phone number,
redialing if no phone number is
selected
Volume
Activating/deactivating voice acti-
vation system
*22
Changing the radio station
Selecting a music track
Scrolling through the redial list
Next entertainment source
Recirculated-air mode, 119
Steering wheel heating
*53
Lane departure warning
*104
16
Steering wheel adjustment52
17
Cruise control
*67
Active cruise control
*68
Page 14 of 312
Cockpit
12
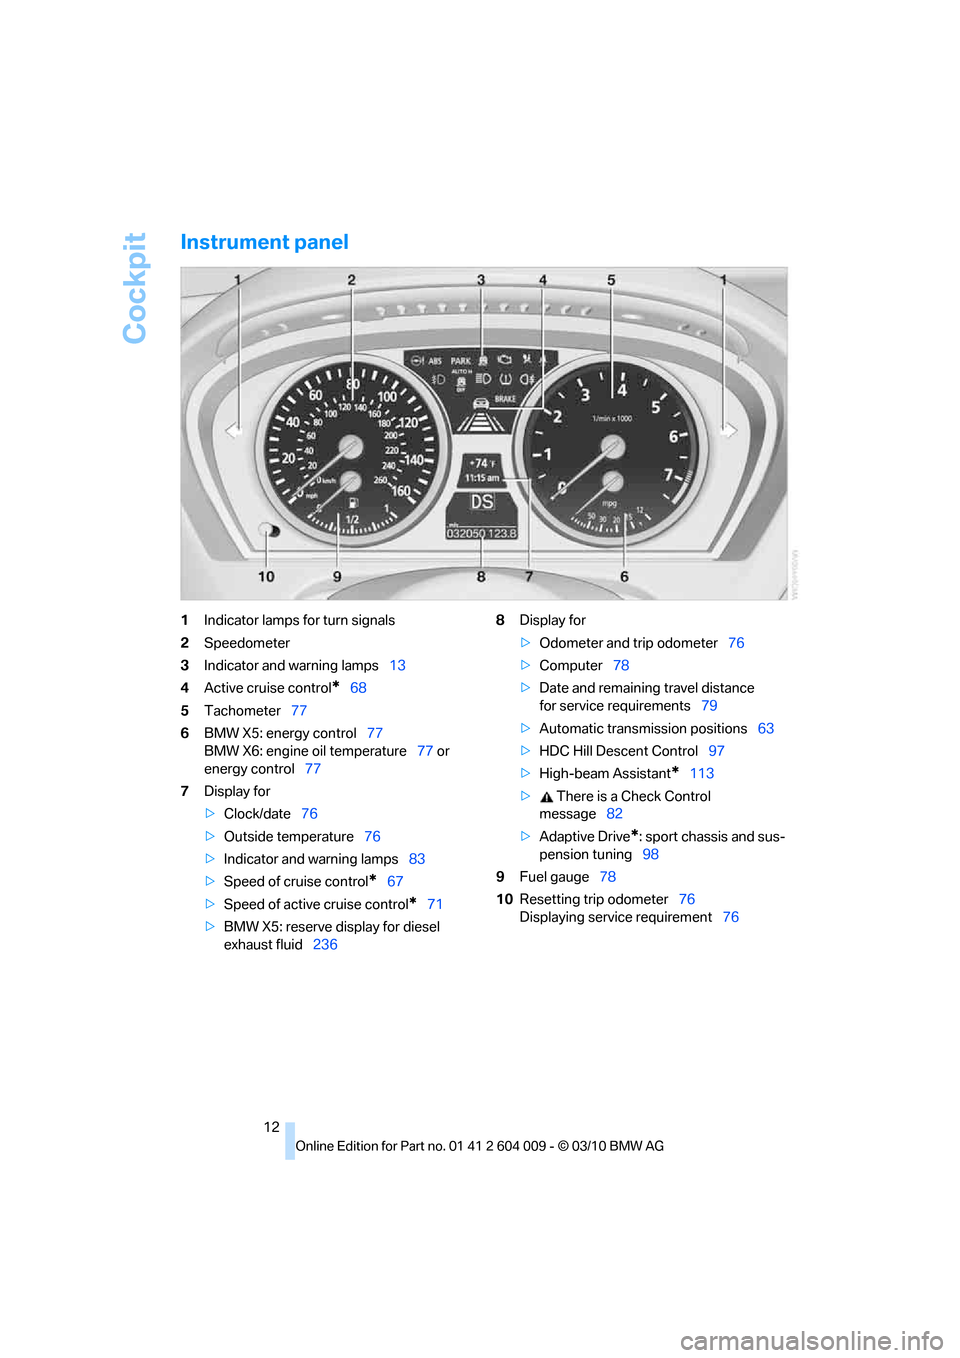
Instrument panel
1Indicator lamps for turn signals
2Speedometer
3Indicator and warning lamps13
4Active cruise control
*68
5Tachometer77
6BMW X5: energy control77
BMW X6: engine oil temperature77 or
energy control77
7Display for
>Clock/date76
>Outside temperature76
>Indicator and warning lamps83
>Speed of cruise control
*67
>Speed of active cruise control
*71
>BMW X5: reserve display for diesel
exhaust fluid2368Display for
>Odometer and trip odometer76
>Computer78
>Date and remaining travel distance
for service requirements79
>Automatic transmission positions63
>HDC Hill Descent Control97
>High-beam Assistant
*113
> There is a Check Control
message82
>Adaptive Drive
*: sport chassis and sus-
pension tuning98
9Fuel gauge78
10Resetting trip odometer76
Displaying service requirement76
Page 15 of 312
At a glance
13Reference
Controls
Driving tips
Communications
Navigation
Entertainment
Mobility
Indicator and warning lamps
The concept
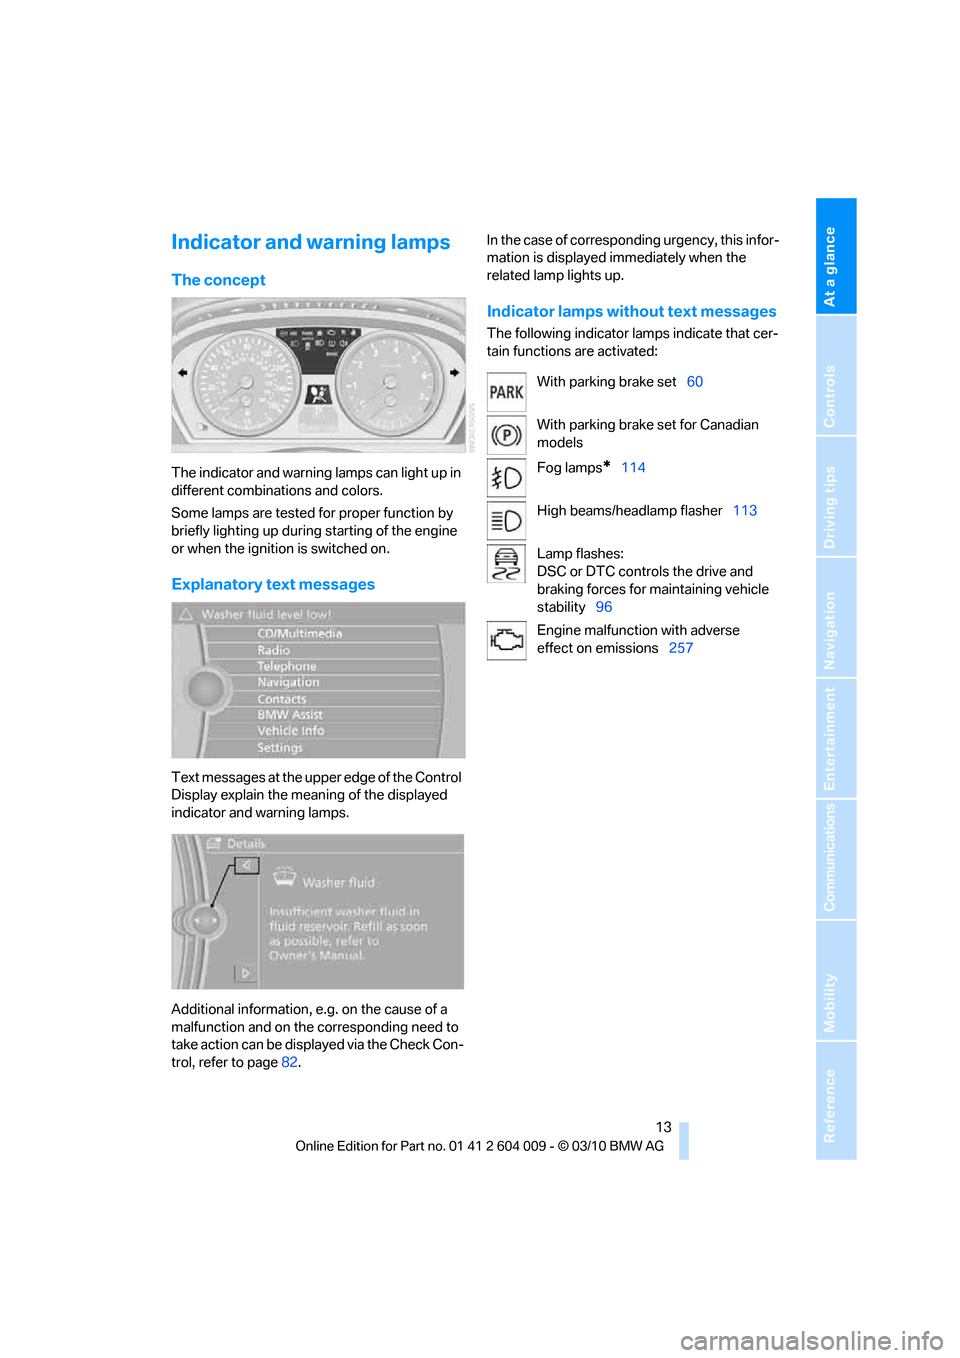
The indicator and warning lamps can light up in
different combinations and colors.
Some lamps are tested for proper function by
briefly lighting up during starting of the engine
or when the ignition is switched on.
Explanatory text messages
Text messages at the upper edge of the Control
Display explain the meaning of the displayed
indicator and warning lamps.
Additional information, e.g. on the cause of a
malfunction and on the corresponding need to
take action can be displayed via the Check Con-
trol, refer to page82.In the case of corresponding urgency, this infor-
mation is displayed immediately when the
related lamp lights up.
Indicator lamps without text messages
The following indicator lamps indicate that cer-
tain functions are activated:
With parking brake set60
With parking brake set for Canadian
models
Fog lamps
*114
High beams/headlamp flasher113
Lamp flashes:
DSC or DTC controls the drive and
braking forces for maintaining vehicle
stability96
Engine malfunction with adverse
effect on emissions257
Page 16 of 312
Cockpit
14
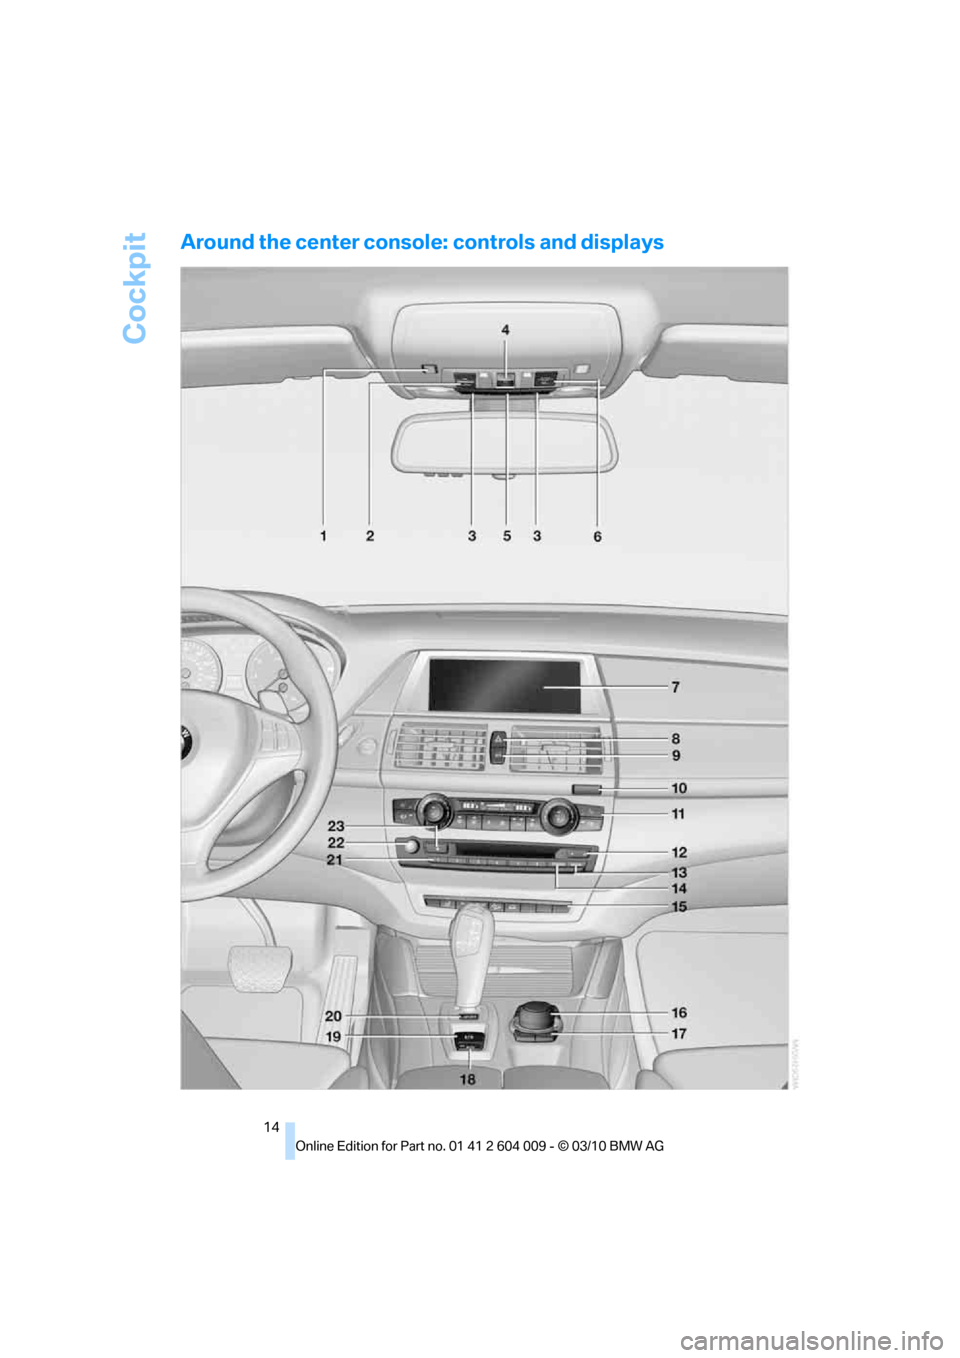
Around the center console: controls and displays
Page 17 of 312
At a glance
15Reference
Controls
Driving tips
Communications
Navigation
Entertainment
Mobility
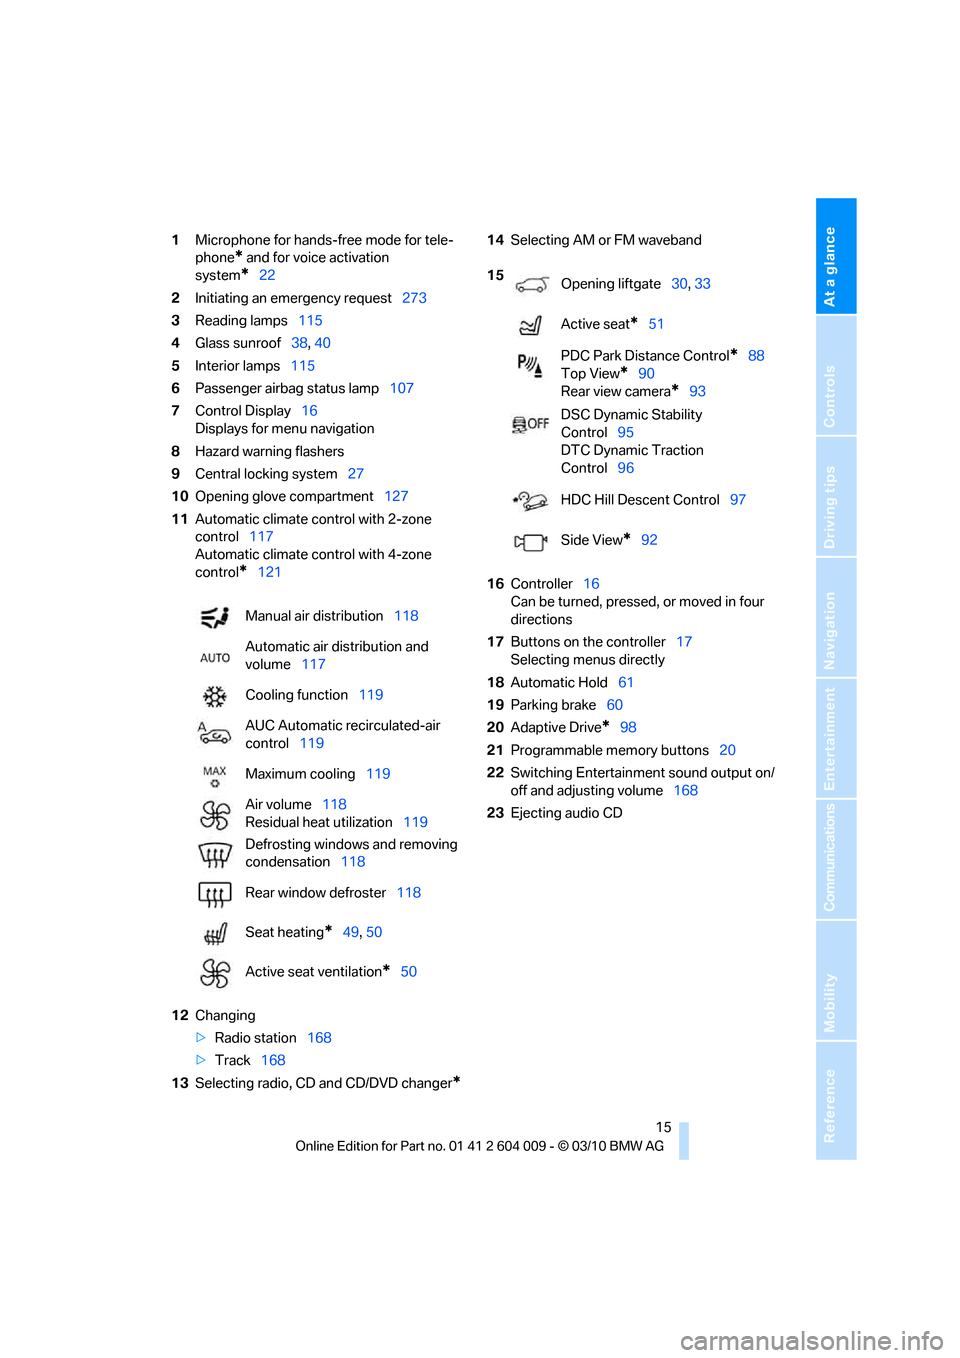
1Microphone for hands-free mode for tele-
phone
* and for voice activation
system
*22
2Initiating
an emergency request273
3Reading lamps115
4Glass sunroof38, 40
5Interior lamps115
6Passenger airbag status lamp107
7Control Display16
Displays for menu navigation
8Hazard warning flashers
9Central locking system27
10Opening glove compartment127
11Automatic climate control with 2-zone
control117
Automatic climate control with 4-zone
control
*121
12Changing
>Radio station168
>Track168
13Selecting radio, CD and CD/DVD changer
*
14Selecting AM or FM waveband
16Controller16
Can be turned, pressed, or moved in four
directions
17Buttons on the controller17
Selecting menus directly
18Automatic Hold61
19Parking brake60
20Adaptive Drive
*98
21Programmable memory buttons20
22Switching Entertainment sound output on/
off and adjusting volume168
23Ejecting audio CD Manual air distribution118
Automatic air distribution and
volume117
Cooling function119
AUC Automatic recirculated-air
control119
Maximum cooling119
Air volume118
Residual heat utilization119
Defrosting windows and removing
condensation118
Rear window defroster118
Seat heating
*49, 50
Active seat ventilation
*50
15
Opening liftgate30, 33
Active seat
*51
PDC Park Distance Control
*88
Top View
*90
Rear view camera
*93
DSC Dynamic Stability
Control95
DTC Dynamic Traction
Control96
HDC Hill Descent Control97
Side View
*92
Page 18 of 312
iDrive
16
iDrive
iDrive combines the functions of a large number
of switches. This allows these functions to be
operated from a central position. The following
section provides an introduction to basic menu navigation. The control of the individual func-
tions is described in connection with the rele-
vant equipment.
Controls
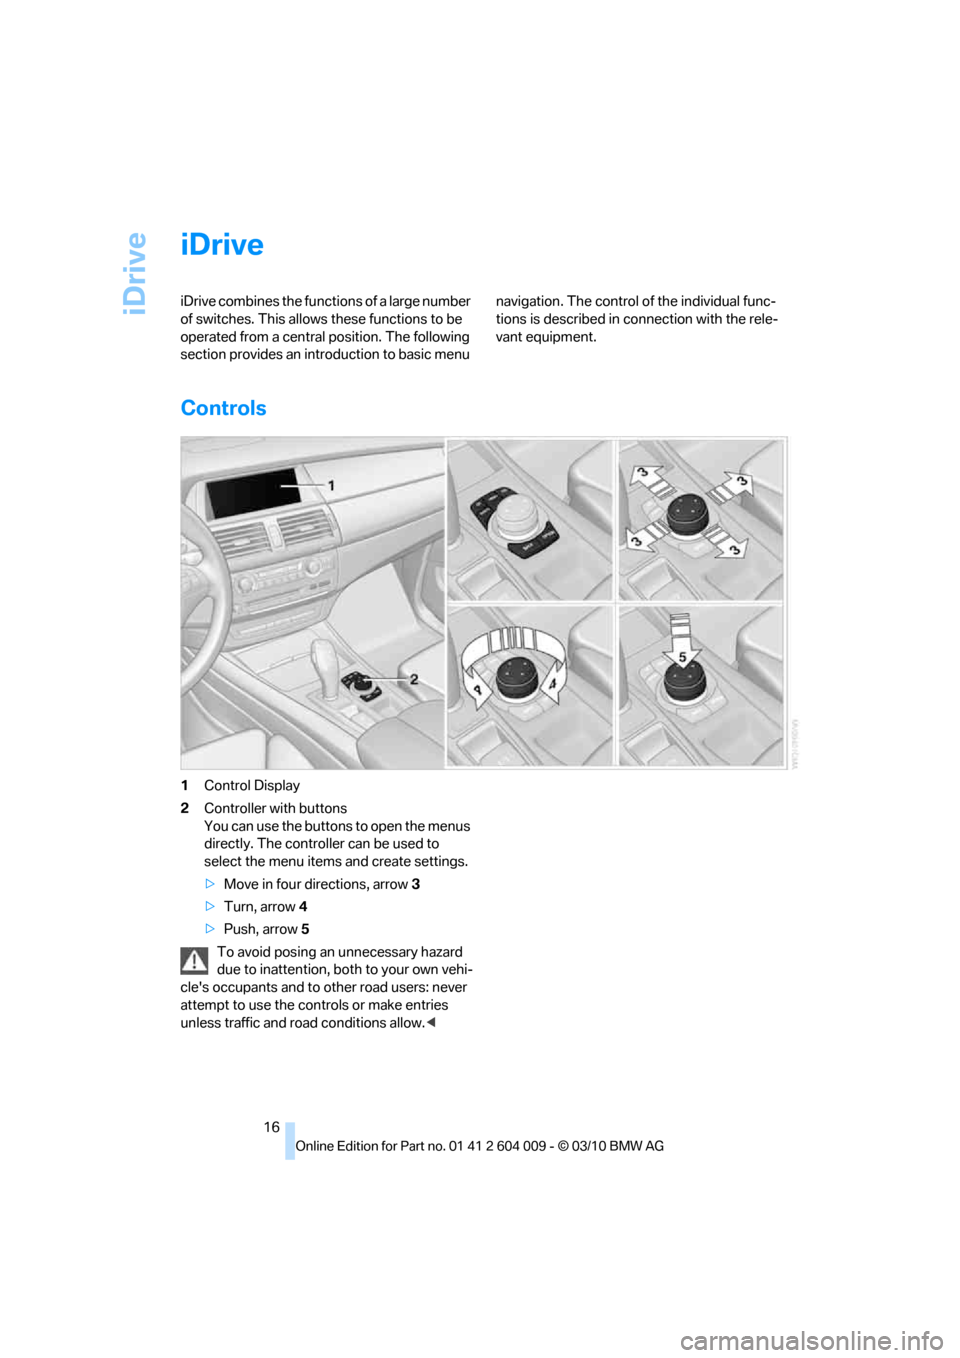
1Control Display
2Controller with buttons
You can use the buttons to open the menus
directly. The controller can be used to
select the menu items and create settings.
>Move in four directions, arrow 3
>Turn, arrow 4
>Push, arrow 5
To avoid posing an unnecessary hazard
due to inattention, both to your own vehi-
cle's occupants and to other road users: never
attempt to use the controls or make entries
unless traffic and road conditions allow.<
Page 19 of 312
At a glance
17Reference
Controls
Driving tips
Communications
Navigation
Entertainment
Mobility
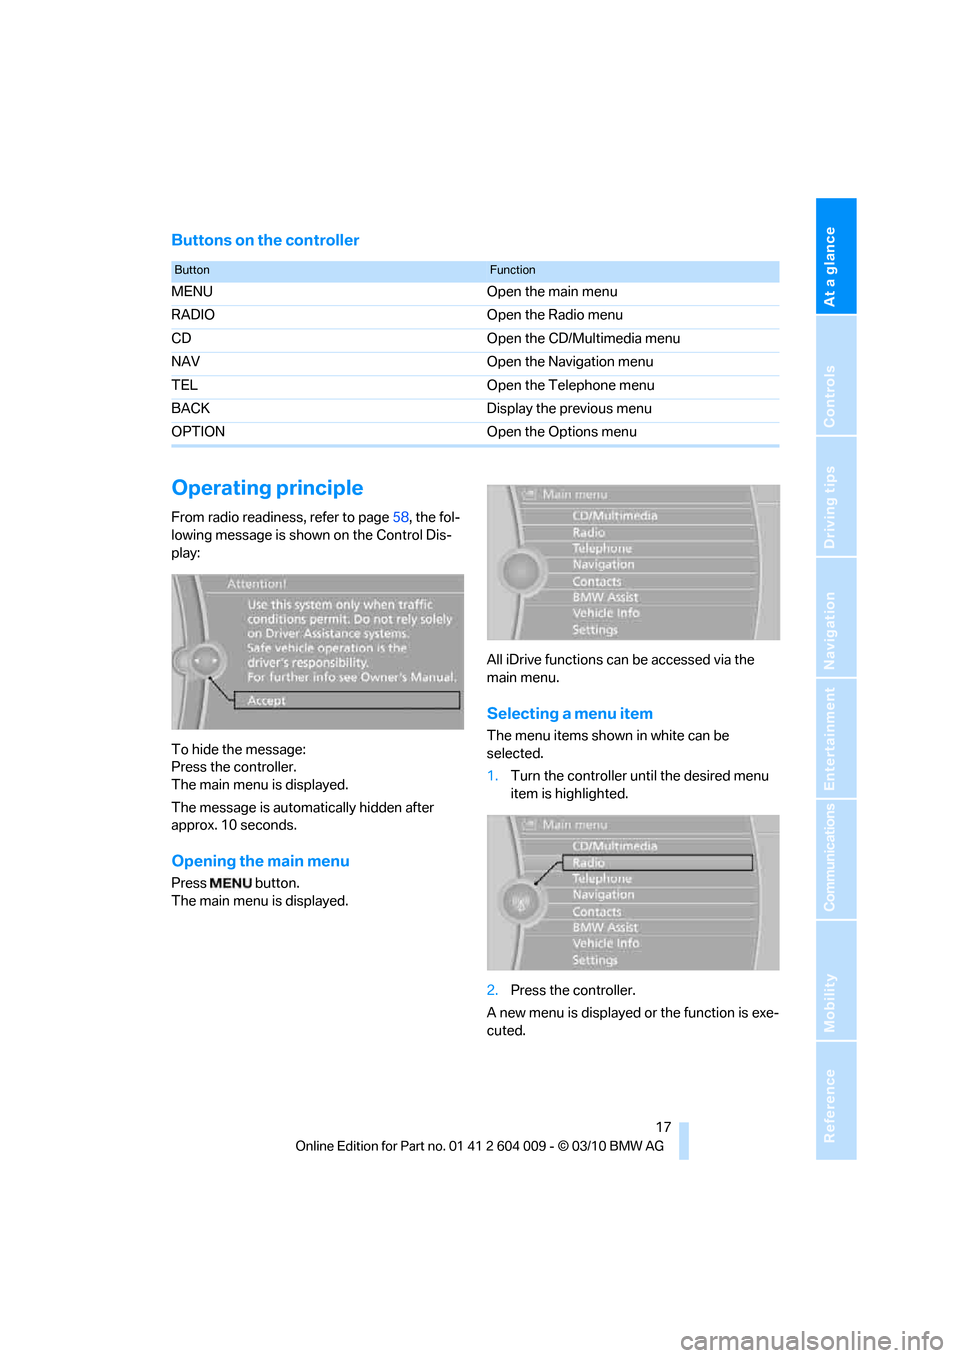
Buttons on the controller
Operating principle
From radio readiness, refer to page58, the fol-
lowing message is shown on the Control Dis-
play:
To hide the message:
Press the controller.
The main menu is displayed.
The message is automatically hidden after
approx. 10 seconds.
Opening the main menu
Press button.
The main menu is displayed.All iDrive functions can be accessed via the
main menu.
Selecting a menu item
The menu items shown in white can be
selected.
1.Turn the controller until the desired menu
item is highlighted.
2.Press the controller.
A new menu is displayed or the function is exe-
cuted.
ButtonFunction
MENU Open the main menu
RADIO Open the Radio menu
CD Open the CD/Multimedia menu
NAV Open the Navigation menu
TEL Open the Telephone menu
BACK Display the previous menu
OPTION Open the Options menu
Page 20 of 312
iDrive
18
Menu items in the Owner's Manual
In the Owner's Manual, menu items that can be
selected are set in quotation marks, e.g. "Set-
tings".
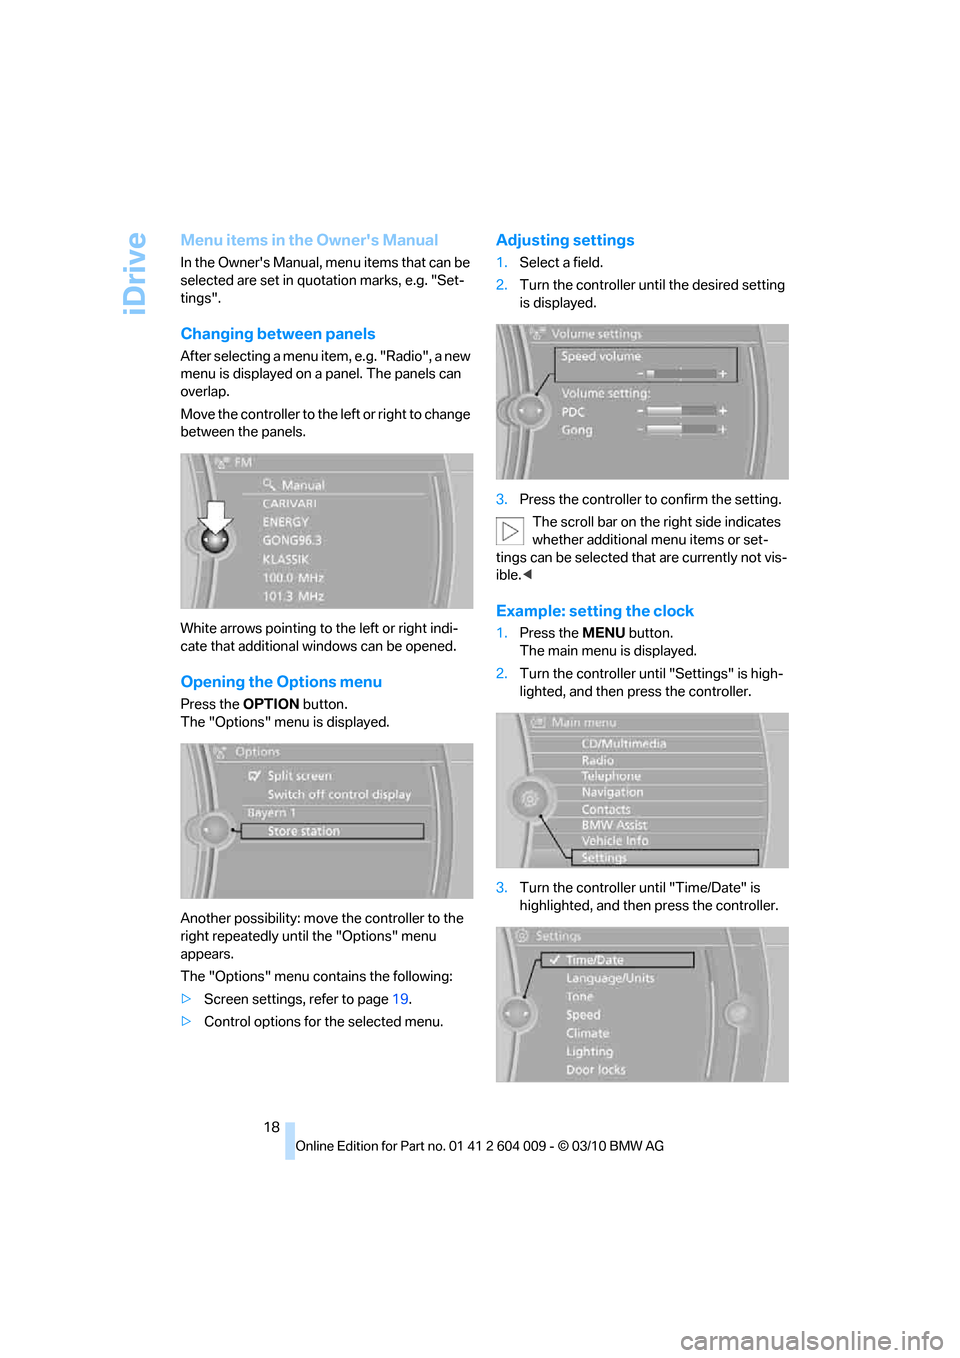
Changing between panels
After selecting a menu item, e.g. "Radio", a new
menu is displayed on a panel. The panels can
overlap.
Move the controller to the left or right to change
between the panels.
White arrows pointing to the left or right indi-
cate that additional windows can be opened.
Opening the Options menu
Press the OPTIONbutton.
The "Options" menu is displayed.
Another possibility: move the controller to the
right repeatedly until the "Options" menu
appears.
The "Options" menu contains the following:
>Screen settings, refer to page19.
>Control options for the selected menu.
Adjusting settings
1.Select a field.
2.Turn the controller until the desired setting
is displayed.
3.Press the controller to confirm the setting.
The scroll bar on the right side indicates
whether additional menu items or set-
tings can be selected that are currently not vis-
ible.<
Example: setting the clock
1.Press the MENUbutton.
The main menu is displayed.
2.Turn the controller until "Settings" is high-
lighted, and then press the controller.
3.Turn the controller until "Time/Date" is
highlighted, and then press the controller.