start stop button BMW X5 2011 E70 User Guide
[x] Cancel search | Manufacturer: BMW, Model Year: 2011, Model line: X5, Model: BMW X5 2011 E70Pages: 312, PDF Size: 8.91 MB
Page 199 of 312
Navigation
Entertainment
Driving tips
197Reference
At a glance
Controls
Communications
Mobility
1.Turn display screen, arrow1.
The display screen switches off.
2.Fold in display screen, arrow2.
The display screen is folded out in the reverse
order.
CD/DVD player
Controls
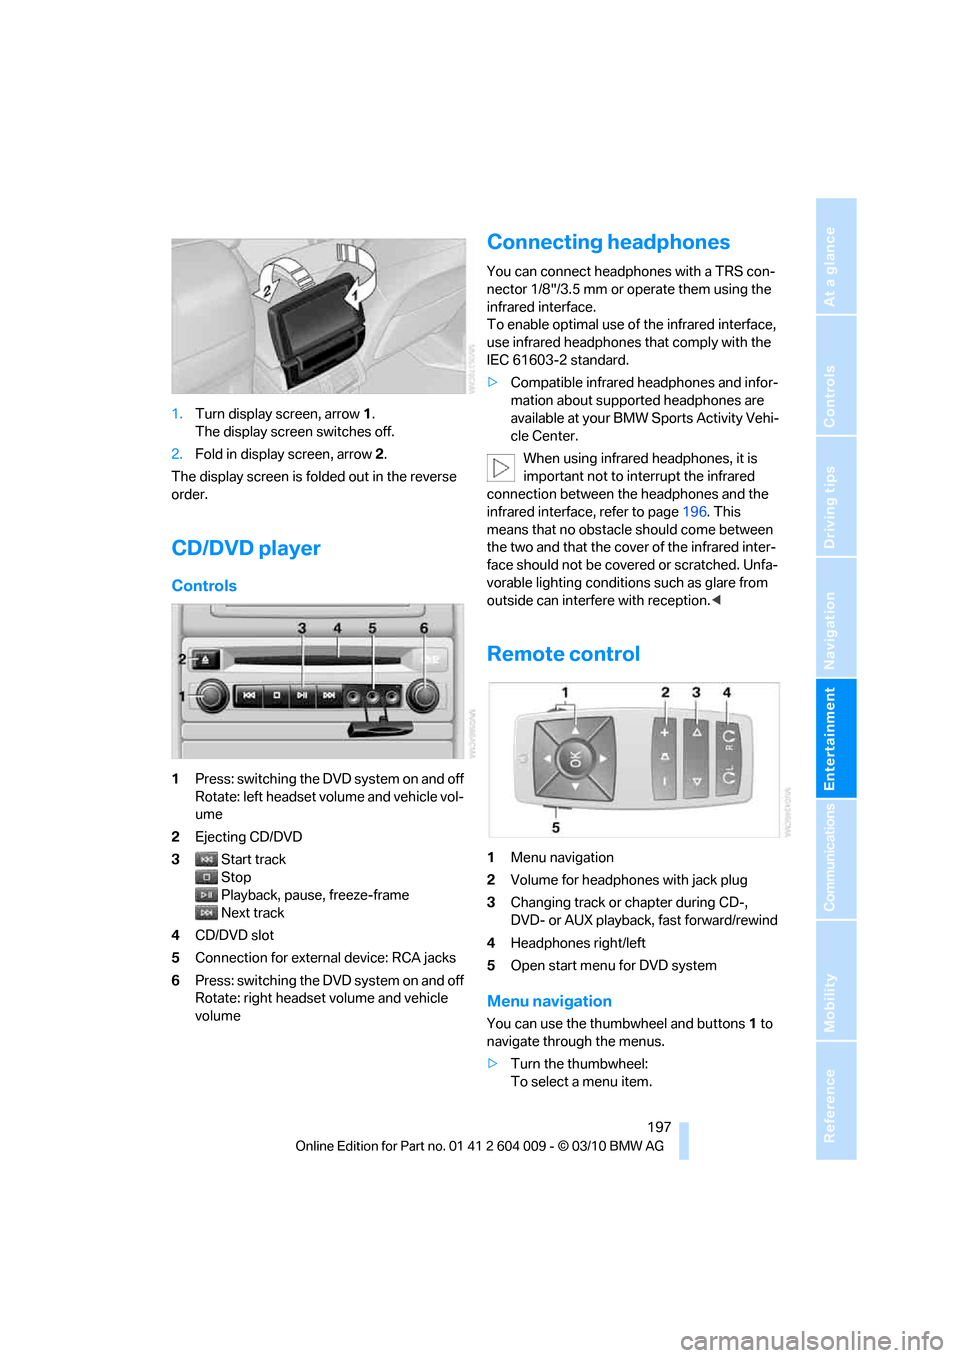
1Press: switching the DVD system on and off
Rotate: left headset volume and vehicle vol-
ume
2Ejecting CD/DVD
3Start track
Stop
Playback, pause, freeze-frame
Next track
4CD/DVD slot
5Connection for external device: RCA jacks
6Press: switching the DVD system on and off
Rotate: right headset volume and vehicle
volume
Connecting headphones
You can connect headphones with a TRS con-
nector 1/8"/3.5 mm or operate them using the
infrared interface.
To enable optimal use of the infrared interface,
use infrared headphones that comply with the
IEC 61603-2 standard.
>Compatible infrared headphones and infor-
mation about supported headphones are
available at your BMW Sports Activity Vehi-
cle Center.
When using infrared headphones, it is
important not to interrupt the infrared
connection between the headphones and the
infrared interface, refer to page196. This
means that no obstacle should come between
the two and that the cover of the infrared inter-
face should not be covered or scratched. Unfa-
vorable lighting conditions such as glare from
outside can interfere with reception.<
Remote control
1Menu navigation
2Volume for headphones with jack plug
3Changing track or chapter during CD-,
DVD- or AUX playback, fast forward/rewind
4Headphones right/left
5Open start menu for DVD system
Menu navigation
You can use the thumbwheel and buttons1 to
navigate through the menus.
>Turn the thumbwheel:
To select a menu item.
Page 201 of 312

Navigation
Entertainment
Driving tips
199Reference
At a glance
Controls
Communications
Mobility
Playing videos from CDs/
DVDs
Country codes of DVDs
Your DVD player only plays DVDs with the cod-
ing of your home region, e.g. Europe = 2. The
country codes supported by your DVD are con-
tained in the information on your DVD.
An overview of the coding zones:
D V D s w i t h t he c o d e 0 c a n b e p l a y e d o n a l l
devices.<
Starting playback
1.Push the CD/DVD into the drive with the
labeled side facing upward.
The CD/DVD is automatically pulled in.
>Playback begins automatically after a
few seconds.
>If it does not:
Select "DVD".
Press the button.
2.If the DVD control or the DVD-specific
menu is displayed when a DVD is inserted,
use the remote control buttons for menu
navigation to select the desired option.
Or:
Press the button on the CD/DVD player.
You can control the playback with the buttons
on the CD/DVD player or the DVD control.
Video CDs (VCDs) and Super Video CDs
(SVCDs) can only be played if they do not
have a DVD-specific menu.<
Ejecting CD/DVD
Press the button on the CD/DVD player.
The DVD emerges slightly from the drive.
DVD control
With the DVD control, you can select the title
and chapter, open the DVD-specific menu and
operate functions such as Language, Fast for-
ward and Reverse or Freeze frame.
A DVD can briefly deactivate functions of the
DVD control, under certain circumstances while
the entire DVD is being played. It is not possible
to operate the DVD control under these circum-
stances. In this case, try to make the selection
using the DVD-specific menu.
1.Press the button on the remote con-
trol during playback.
2.Press the buttons on the remote control
or turn the thumbwheel to select the
desired function.
3.Press the button.
The DVD control disappears again after a short
time if you have not selected a function.
CodeRegion
1USA, Canada
2 Japan, Europe, Middle East, South
Africa
3 Southeast Asia
4 Australia, Central and South Amer-
ica, New Zealand
5 Northwest Asia, North Africa
6China
SymbolFunction
Exit DVD control
"SET" Settings for playing DVD
Starting playback
Stop playback
Activate and deactivate
freeze frame
Skipping chapter
Fast forward/reverse
"Menu" Open DVD-specific menu
Page 202 of 312
DVD system in rear
200 Or:
Press the button on the remote control to
exit the DVD control.
Fast forward/reverse
Forward/reverse with DVD control
1.Press the button on the remote con-
trol during playback.
2.Select the symbol.
3.Press the button.
4.Press the button several times to
increase the fast forward/reverse speed.
The DVD playback will be distorted.
To cancel fast forward/reverse:
1.Select the symbol.
2.Press the button.
Or:
Press the button on the CD/DVD player.
The DVD will start play at the point selected.
Forward/reverse with remote control
Press and hold the button until you reach
the desired point.
Or:
1.During playback, turn the thumbwheel.
Fast forward/reverse is interrupted.
2.Continue to turn the thumbwheel.
The speed is increased.
3.Press the button on the CD/DVD player.
Fast forward/reverse is interrupted. The
DVD will start play at the point selected.
Skipping chapter
You can change to the next or previous chapter
during playback.
1.Press the button on the remote con-
trol during playback.
2.Select the symbol.
3.Press the button repeatedly, continuing
until you reach the desired chapter.Or:
Press the button on the left or right on the
remote control repeatedly until you reach the
desired chapter.
Freeze frame
1.Press the button on the remote con-
trol during playback.
2.Select the symbol.
3.Press the button.
To continue playback:
1.Select the or symbol.
2.Press the button.
As an alternative, you can also stop and con-
tinue playback with the button on the CD/
DVD player.
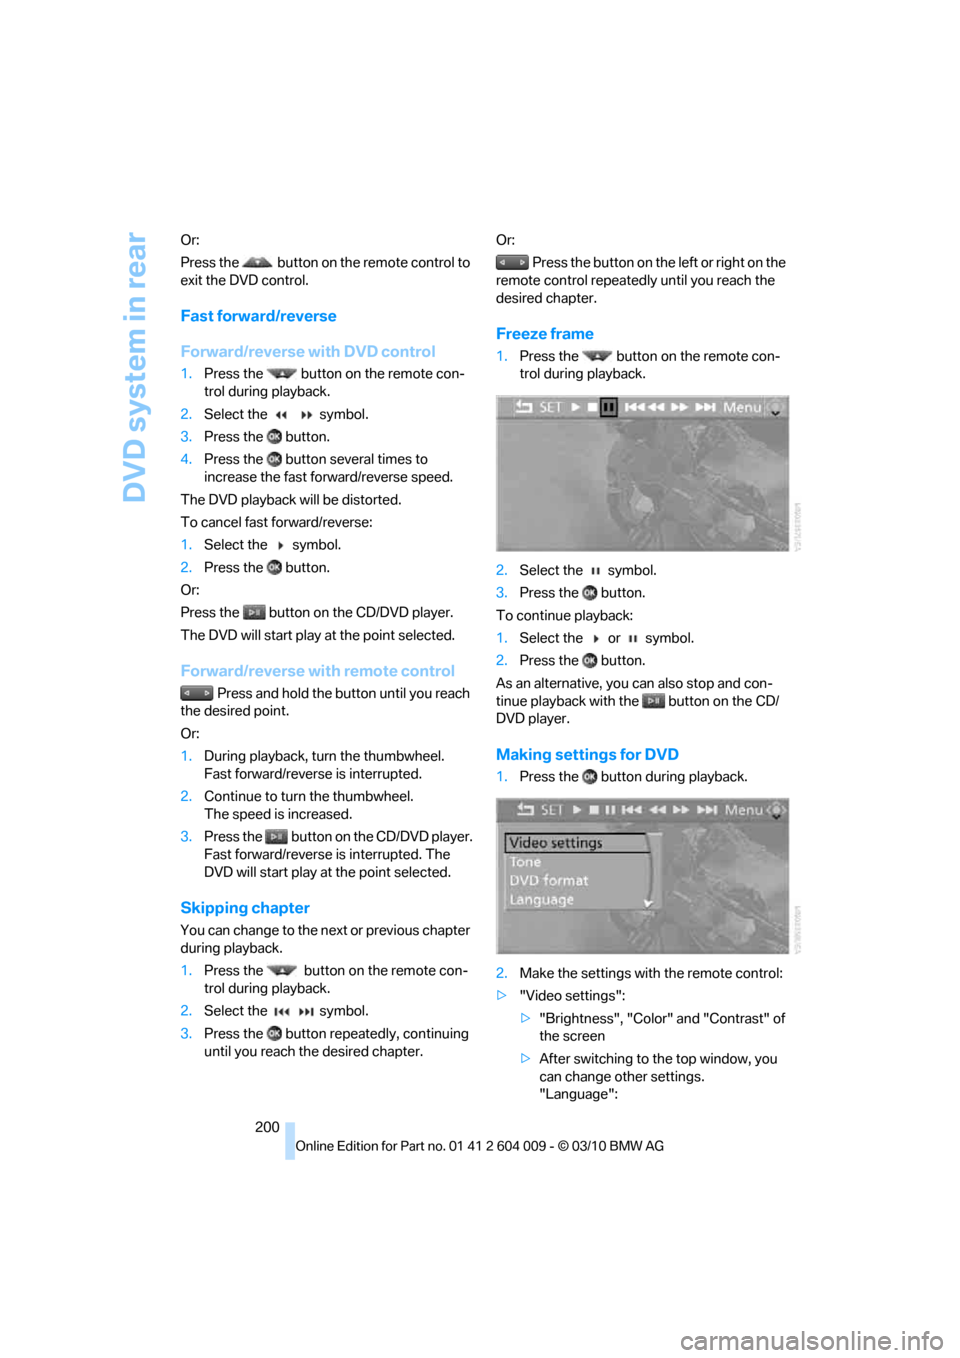
Making settings for DVD
1.Press the button during playback.
2.Make the settings with the remote control:
>"Video settings":
>"Brightness", "Color" and "Contrast" of
the screen
>After switching to the top window, you
can change other settings.
"Language":
Page 204 of 312
DVD system in rear
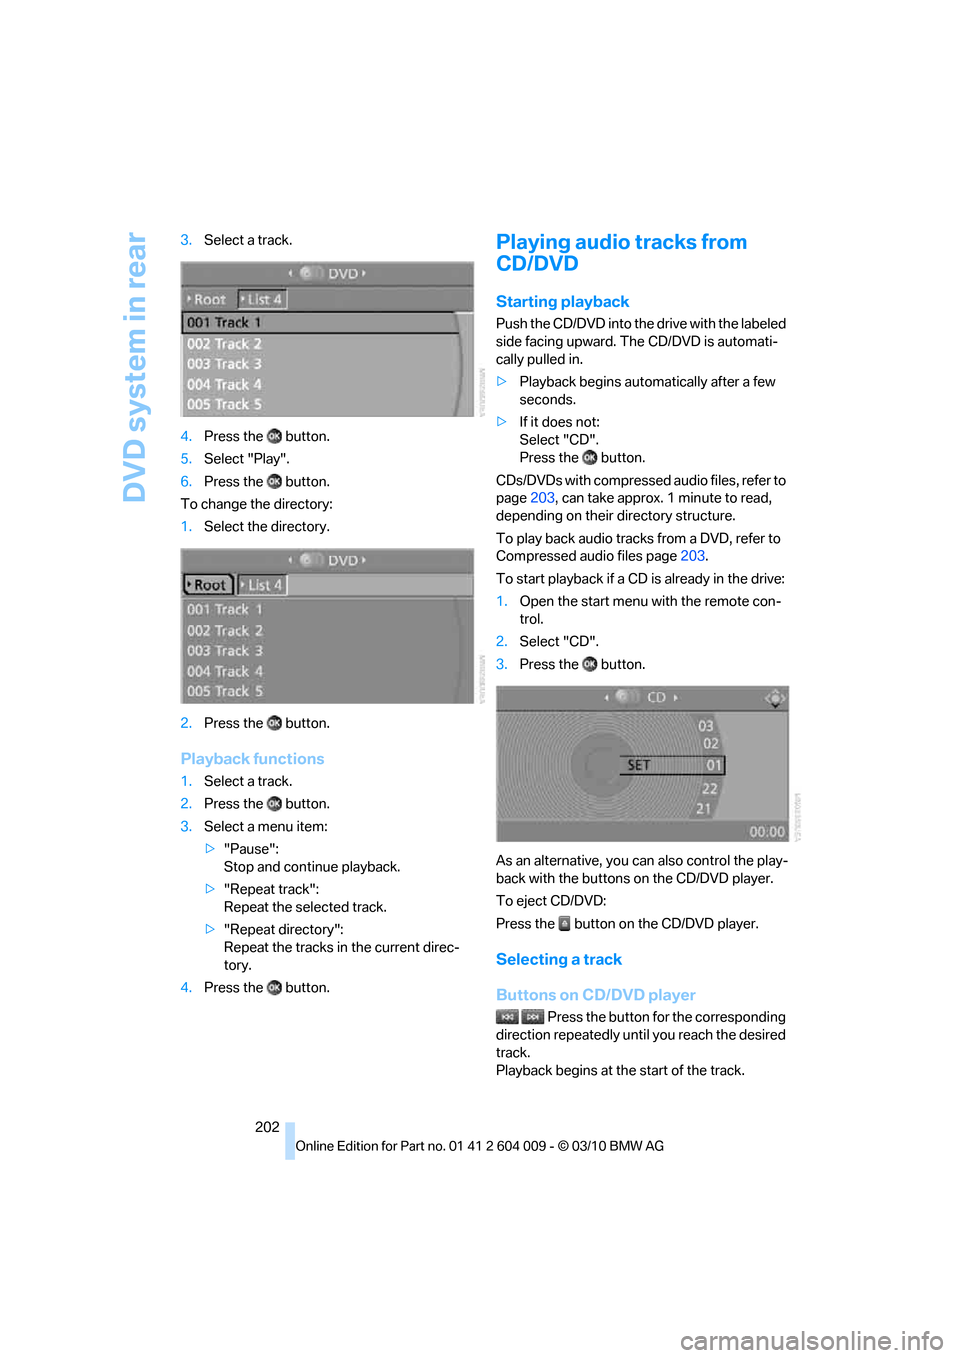
202 3.Select a track.
4.Press the button.
5.Select "Play".
6.Press the button.
To change the directory:
1.Select the directory.
2.Press the button.
Playback functions
1.Select a track.
2.Press the button.
3.Select a menu item:
>"Pause":
Stop and continue playback.
>"Repeat track":
Repeat the selected track.
>"Repeat directory":
Repeat the tracks in the current direc-
tory.
4.Press the button.
Playing audio tracks from
CD/DVD
Starting playback
Push the CD/DVD into the drive with the labeled
side facing upward. The CD/DVD is automati-
cally pulled in.
>Playback begins automatically after a few
seconds.
>If it does not:
Select "CD".
Press the button.
CDs/DVDs with compressed audio files, refer to
page203, can take approx. 1minute to read,
depending on their directory structure.
To play back audio tracks from a DVD, refer to
Compressed audio files page203.
To start playback if a CD is already in the drive:
1.Open the start menu with the remote con-
trol.
2.Select "CD".
3.Press the button.
As an alternative, you can also control the play-
back with the buttons on the CD/DVD player.
To eject CD/DVD:
Press the button on the CD/DVD player.
Selecting a track
Buttons on CD/DVD player
Press the button for the corresponding
direction repeatedly until you reach the desired
track.
Playback begins at the start of the track.
Page 205 of 312
Navigation
Entertainment
Driving tips
203Reference
At a glance
Controls
Communications
Mobility
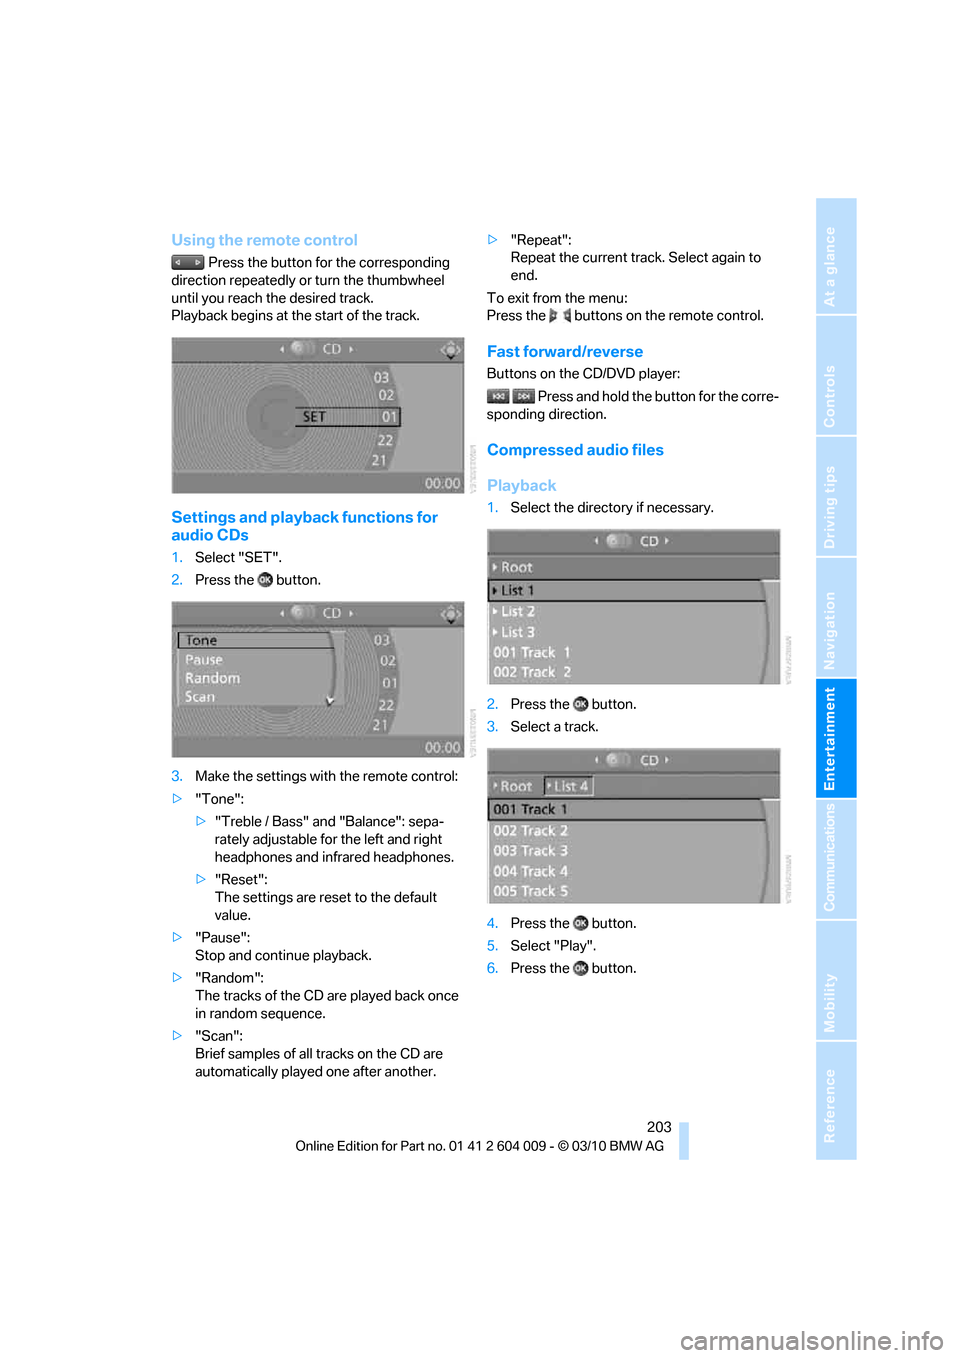
Using the remote control
Press the button for the corresponding
direction repeatedly or turn the thumbwheel
until you reach the desired track.
Playback begins at the start of the track.
Settings and playback functions for
audio CDs
1.Select "SET".
2.Press the button.
3.Make the settings with the remote control:
>"Tone":
>"Treble / Bass" and "Balance": sepa-
rately adjustable for the left and right
headphones and infrared headphones.
>"Reset":
The settings are reset to the default
value.
>"Pause":
Stop and continue playback.
>"Random":
The tracks of the CD are played back once
in random sequence.
>"Scan":
Brief samples of all tracks on the CD are
automatically played one after another.>"Repeat":
Repeat the current track. Select again to
end.
To exit from the menu:
Press the buttons on the remote control.
Fast forward/reverse
Buttons on the CD/DVD player:
Press and hold the button for the corre-
sponding direction.
Compressed audio files
Playback
1.Select the directory if necessary.
2.Press the button.
3.Select a track.
4.Press the button.
5.Select "Play".
6.Press the button.
Page 206 of 312
DVD system in rear
204 To change the directory:
1.Select the directory.
2.Press the button.
Settings and playback functions for
compressed audio files
1.Select a track.
2.Press the button.
3.Make the settings with the remote control:
>"Tone":
>"Treble / Bass" and "Balance": sepa-
rately adjustable for the left and right-
hand headphones and the infrared head-
phones.
>"Reset":
The settings are reset to the default
value.
>"Pause":
Stop and continue playback.
>"Scan directory":
Briefly sample the tracks in the current
directory.
>"Scan all":
Briefly sample all tracks.
>"Random directory":
Play the tracks in the current directory in a
random sequence.
>"Random all":
Play all tracks in a random sequence.
>"Repeat track":
Repeat the selected track.
>"Repeat directory":
Repeat the tracks in the current directory.>"Details":
Display any stored information on the cur-
rent track.
To exit from the menu:
Press the buttons on the remote control.
Displaying images from
CD/DVD
1.Push the CD/DVD into the drive with the
labeled side facing upward.
The CD/DVD is automatically pulled in.
2.Open the start menu with the remote con-
trol.
3.Select "Photo".
4.Press the button.
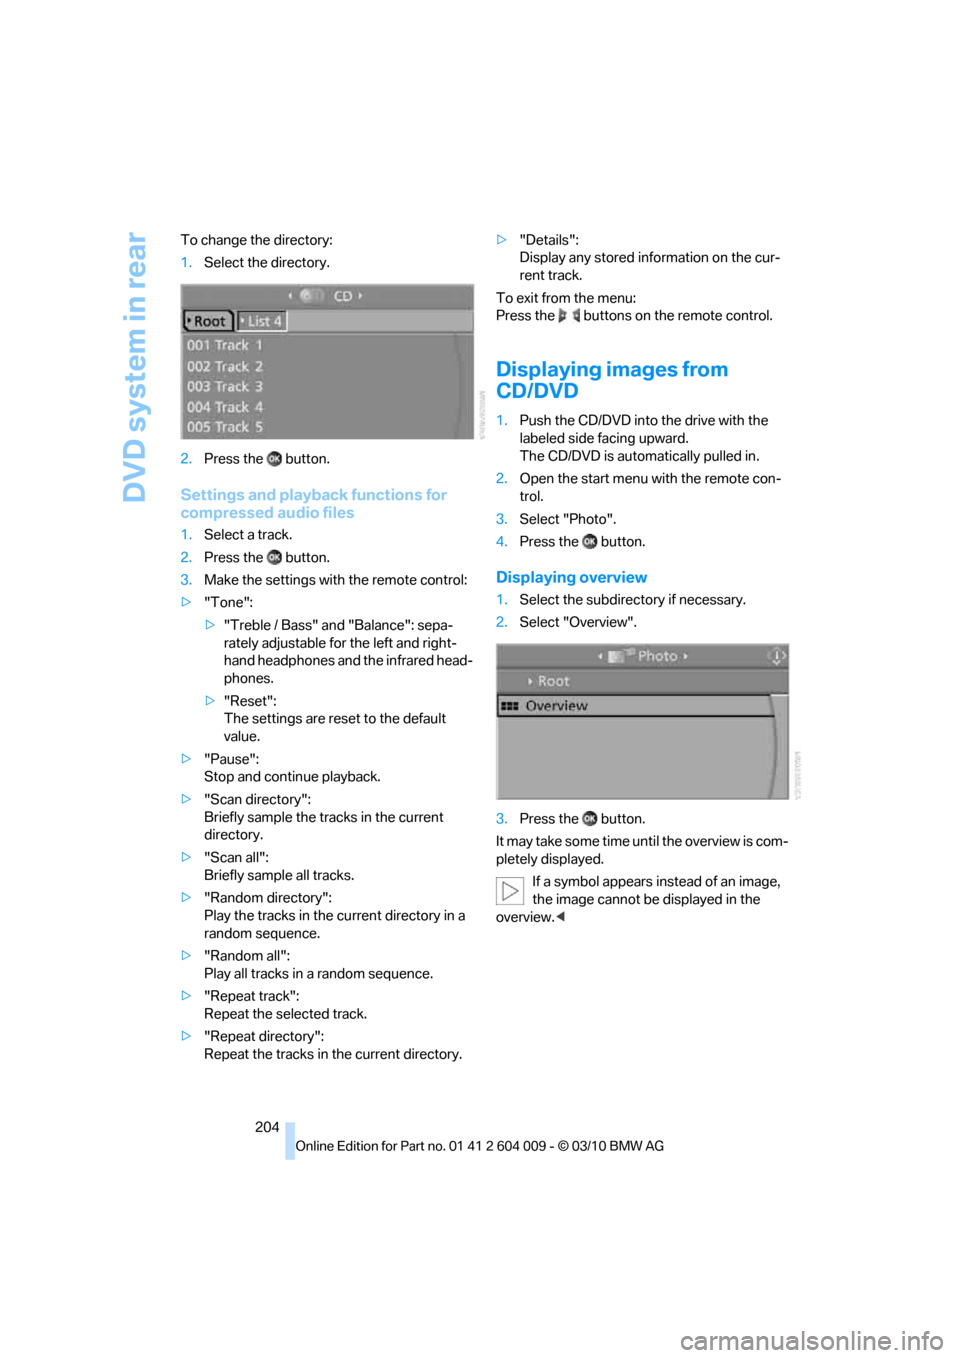
Displaying overview
1.Select the subdirectory if necessary.
2.Select "Overview".
3.Press the button.
It may take some time until the overview is com-
pletely displayed.
If a symbol appears instead of an image,
the image cannot be displayed in the
overview.<
Page 207 of 312
Navigation
Entertainment
Driving tips
205Reference
At a glance
Controls
Communications
Mobility
Displaying images
1.Use the buttons or the thumbwheel of the
remote control to select an image.
2.Press the button.
3.Displaying images:
>Scroll using the menu navigation but-
tons of the remote control
>Show slide show:
Turn the thumbwheel to adjust how long
each image is displayed.
Stop slide show:
Select "Stop"
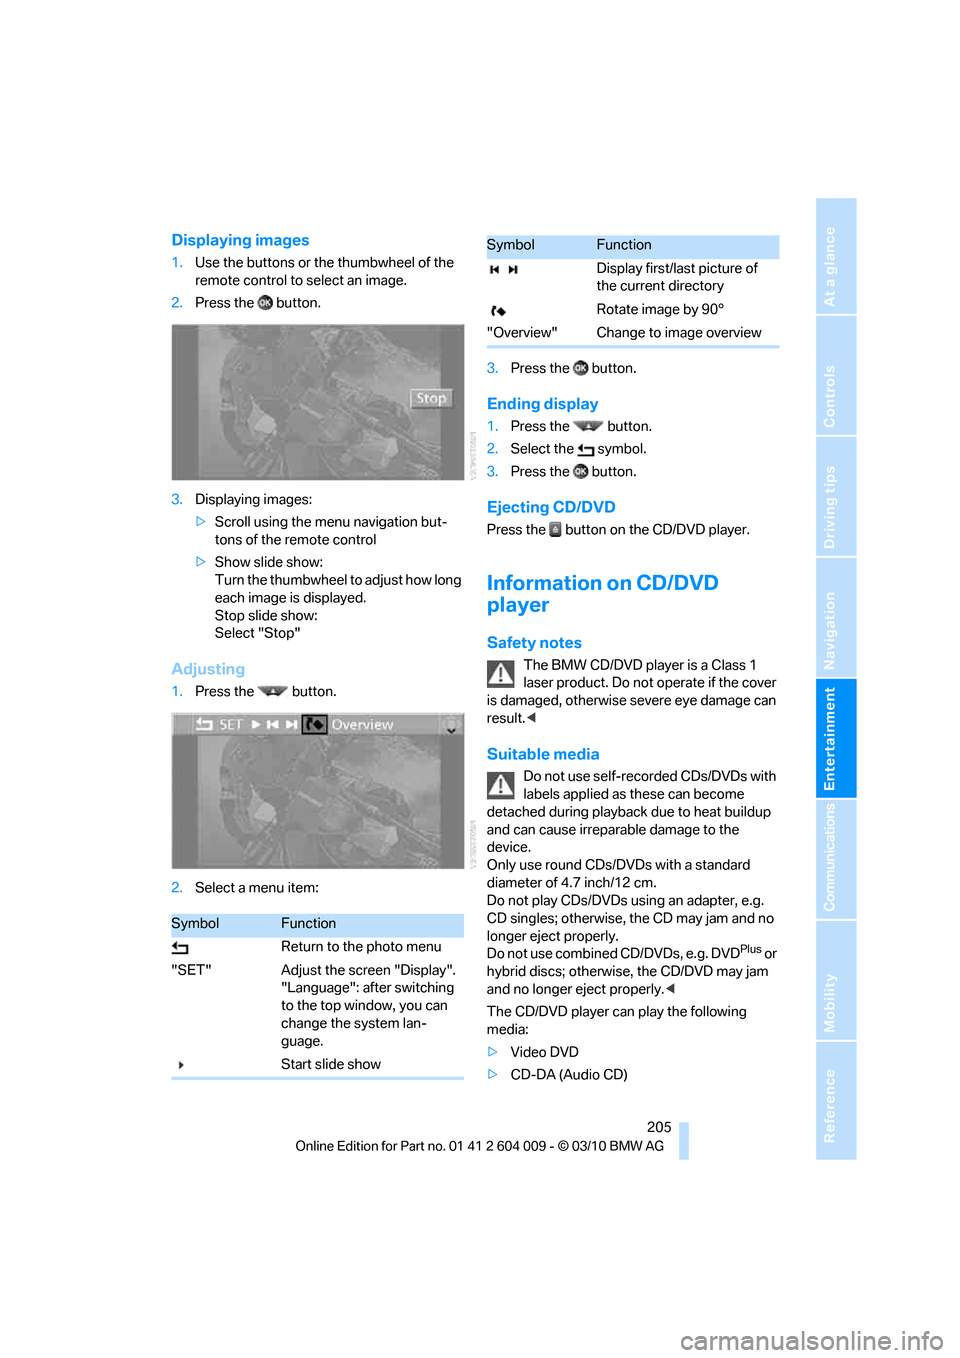
Adjusting
1.Press the button.
2.Select a menu item:3.Press the button.
Ending display
1.Press the button.
2.Select the symbol.
3.Press the button.
Ejecting CD/DVD
Press the button on the CD/DVD player.
Information on CD/DVD
player
Safety notes
The BMW CD/DVD player is a Class 1
laser product. Do not operate if the cover
is damaged, otherwise severe eye damage can
result.<
Suitable media
Do not use self-recorded CDs/DVDs with
labels applied as these can become
detached during playback due to heat buildup
and can cause irreparable damage to the
device.
Only use round CDs/DVDs with a standard
diameter of 4.7 inch/12 cm.
Do not play CDs/DVDs using an adapter, e.g.
CD singles; otherwise, the CD may jam and no
longer eject properly.
Do not use combined CD/DVDs, e.g. DVD
Plus or
hybrid discs; otherwise, the CD/DVD may jam
and no longer eject properly.<
The CD/DVD player can play the following
media:
>Video DVD
>CD-DA (Audio CD)
SymbolFunction
Return to the photo menu
"SET" Adjust the screen "Display".
"Language": after switching
to the top window, you can
change the system lan-
guage.
Start slide show
Display first/last picture of
the current directory
Rotate image by 90°
"Overview" Change to image overview
SymbolFunction
Page 215 of 312
213
Entertainment
Reference
At a glance
Controls
Driving tips Communications
Navigation
Mobility
>Depending on the mobile phone, certain
settings may be necessary on the mobile
phone, e.g. via the following menu items:
>Bluetooth activated
>Connection must be allowed without
requiring further confirmation
>Reconnect
>Depending on the mobile phone model, the
setting energy saving mode can, for exam-
ple, result in vehicle failing to detect the
paired mobile phone.
>For pairing purposes, define any 4 to 16-
digit number as a Bluetooth passkey,
e.g. 25081107. A long and complex number
offers the best protection against unautho-
rized access. This Bluetooth passkey is no
longer required following successful pair-
ing.
>The ignition is switched on.
Only pair the mobile phone with the vehi-
cle stationary, otherwise the passengers
and other road users can be endangered due to
a lack of attentiveness on the part of the
driver.<
Switching on ignition
1.Insert the remote control as far as possible
into the ignition lock.
2.Switch on ignition without operating the
brake or clutch or pressing the Start/Stop
button.
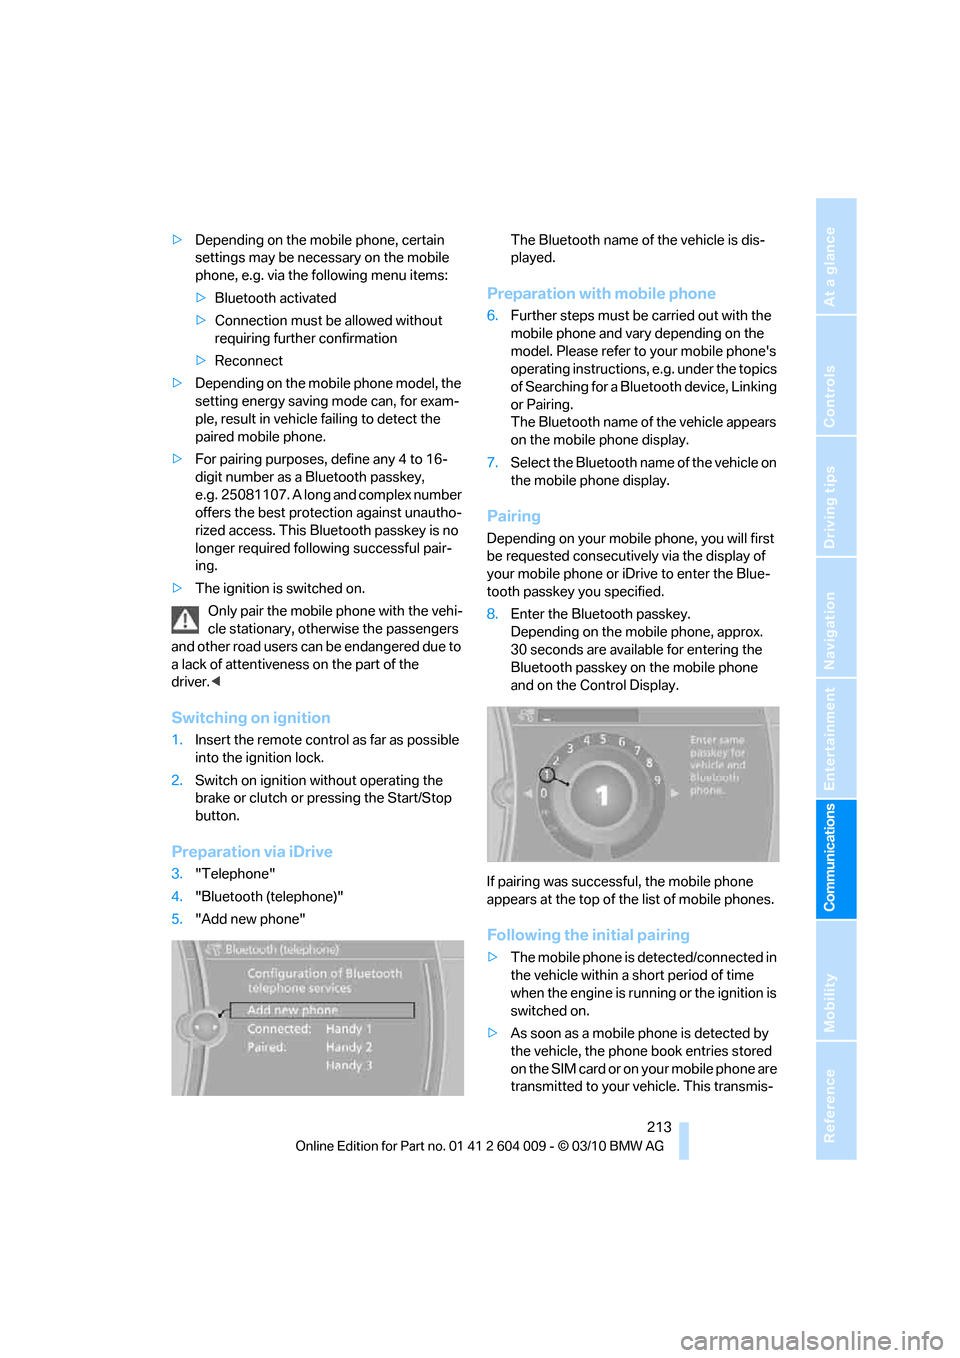
Preparation via iDrive
3."Telephone"
4."Bluetooth (telephone)"
5."Add new phone"The Bluetooth name of the vehicle is dis-
played.
Preparation with mobile phone
6.Further steps must be carried out with the
mobile phone and vary depending on the
model. Please refer to your mobile phone's
operating instructions, e.g. under the topics
of Searching for a Bluetooth device, Linking
or Pairing.
The Bluetooth name of the vehicle appears
on the mobile phone display.
7.Select the Bluetooth name of the vehicle on
the mobile phone display.
Pairing
Depending on your mobile phone, you will first
be requested consecutively via the display of
your mobile phone or iDrive to enter the Blue-
tooth passkey you specified.
8.Enter the Bluetooth passkey.
Depending on the mobile phone, approx.
30 seconds are available for entering the
Bluetooth passkey on the mobile phone
and on the Control Display.
If pairing was successful, the mobile phone
appears at the top of the list of mobile phones.
Following the initial pairing
>The mobile phone is detected/connected in
the vehicle within a short period of time
when the engine is running or the ignition is
switched on.
>As soon as a mobile phone is detected by
the vehicle, the phone book entries stored
on the SIM card or on your mobile phone are
transmitted to your vehicle. This transmis-
Page 307 of 312
Reference 305
At a glance
Controls
Driving tips
Communications
Navigation
Entertainment
Mobility
Snow chains250
Socket for Onboard
Diagnostics interface257
Socket for remote control,
refer to Ignition lock58
Sockets, refer to Connecting
electrical devices130
Soft closure aid, refer to
Automatic soft closing30
Soot particle filter, refer to
Diesel particulate filter139
SOS, refer to
Initiating an emergency
request273
Spare fuses271
Spare remote control26
Spare wheel, refer to
Changing wheels268
Spare wheel, refer to Compact
wheel268
Special destinations152
Special oils, refer to Approved
engine oils255
Specified oil grades, refer to
Approved engine oils255
Speed
– with compact wheel270
– with winter tires250
Speed display, refer to
Speedometer12
Speed limit detection,
computer78
Speed limit warning, refer to
Speed limit84
Speedometer12
Speed Volume169
Split screen, refer to Control
Display, switching on/off19
Split screen content, refer to
Display for split screen
content, selecting19
Sport program, automatic
transmission with
Steptronic64
Stability control, refer to
Driving stability control
systems95
Start/Stop button58Starting, refer to Starting
engine59
Starting assistance, refer to
Jump starting274
Starting difficulties, jump
starting274
Starting off on slopes, refer to
Drive-off assistant99
State/province, for
navigation149
Station, selecting
– radio171
Status of this Owner's Manual
at time of printing5
Steam cleaners259
Steering wheel
– adjusting52
– automatic adjustment, refer
to Steering wheel
memory44
– buttons on steering
wheel11
– easy entry/exit53
– heating53
– memory44
Steering with variable ratio,
refer to Active steering105
Steptronic, refer to Sport
program and manual mode
M/S64
Storage compartments128
Stored trip, calling up157
Storing a destination in the
address book151
Storing a trip156
Storing sitting position, refer
to Seat, mirror and steering
wheel memory44
Storing tires250
Storing vehicle261
Storing your vehicle261
Street, entering,
navigation150
Summer tires, refer to Wheels
and tires239
Surround169
Surround View90
SVCD181
SW, waveband171Switches, refer to Cockpit10
Switching cooling function on
and off119
Switching off
– engine59
Switching on
– audio168
– CD changer168
– CD player168
– radio168
Swiveling headlamps, refer to
Adaptive Light Control112
Symbols4
– indicator/warning lamps13
– status information19
T
Tachometer77
Tailgate32
Tail lamps264,266
– replacing bulbs264,266
Tank contents, refer to
Capacities284
Target cursor for
navigation154
Technical alterations, refer to
For your own safety5
Technical data280
Telephone212
– voice commands219
Telephone, refer to separate
operating instructions
Teleservice Diagnosis228
Teleservice Help228
Temperature
– changing units of
measure86
– refer to Coolant
temperature77
– setting for automatic climate
control118,121
Temperature display
– outside temperature76
– setting units86
– temperature warning76
Temperature warning76
Tempomat, refer to Cruise
control67