navigation system BMW X5 2011 E70 Workshop Manual
[x] Cancel search | Manufacturer: BMW, Model Year: 2011, Model line: X5, Model: BMW X5 2011 E70Pages: 312, PDF Size: 8.91 MB
Page 179 of 312
Navigation
Entertainment
Driving tips
177Reference
At a glance
Controls
Communications
Mobility
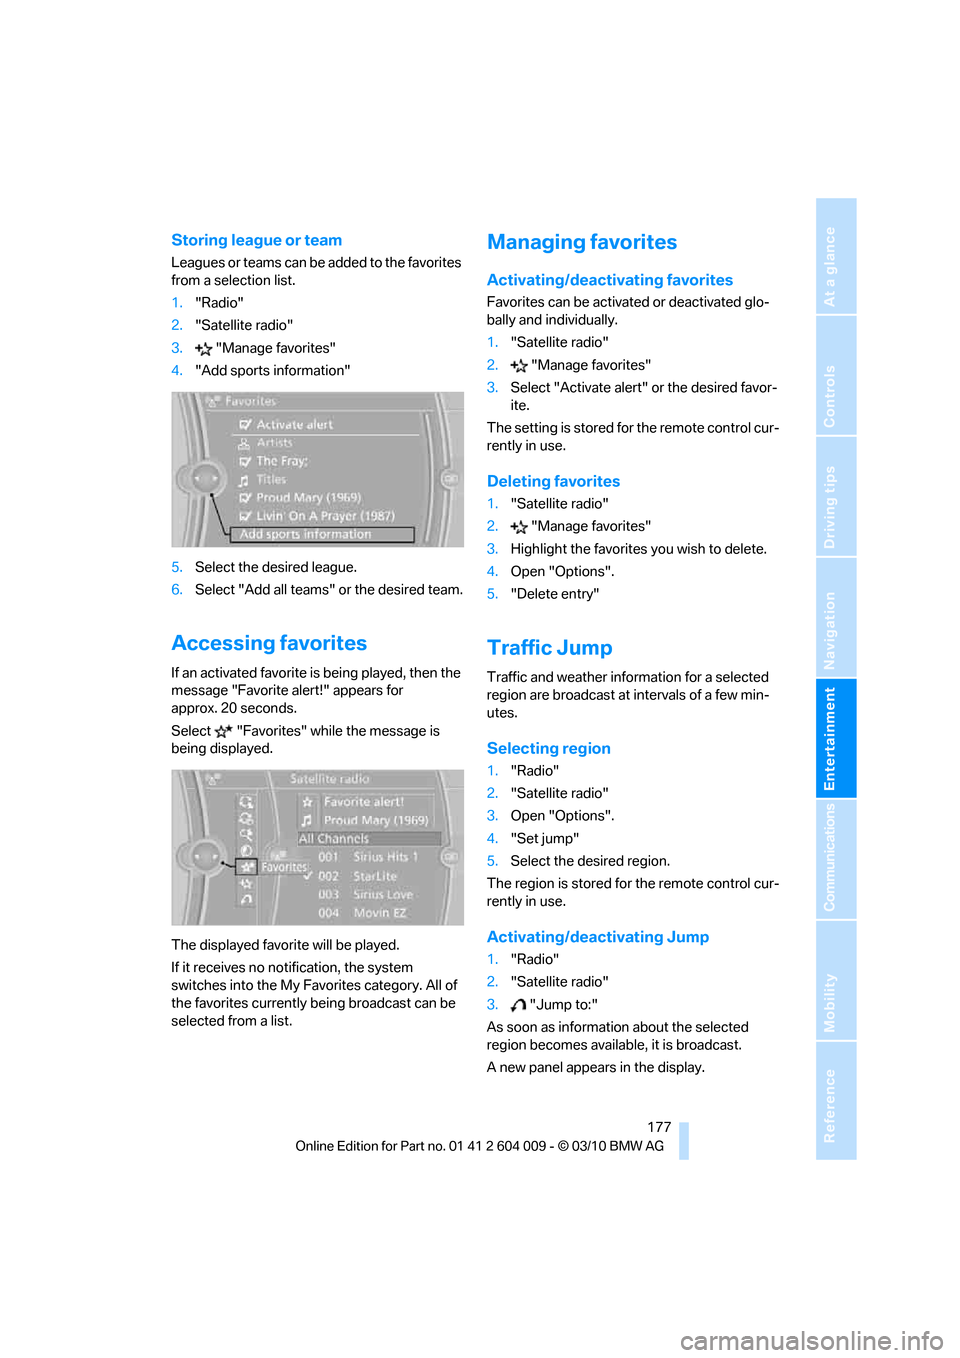
Storing league or team
Leagues or teams can be added to the favorites
from a selection list.
1."Radio"
2."Satellite radio"
3."Manage favorites"
4."Add sports information"
5.Select the desired league.
6.Select "Add all teams" or the desired team.
Accessing favorites
If an activated favorite is being played, then the
message "Favorite alert!" appears for
approx. 20 seconds.
Select "Favorites" while the message is
being displayed.
The displayed favorite will be played.
If it receives no notification, the system
switches into the My Favorites category. All of
the favorites currently being broadcast can be
selected from a list.
Managing favorites
Activating/deactivating favorites
Favorites can be activated or deactivated glo-
bally and individually.
1."Satellite radio"
2."Manage favorites"
3.Select "Activate alert" or the desired favor-
ite.
The setting is stored for the remote control cur-
rently in use.
Deleting favorites
1."Satellite radio"
2."Manage favorites"
3.Highlight the favorites you wish to delete.
4.Open "Options".
5."Delete entry"
Traffic Jump
Traffic and weather information for a selected
region are broadcast at intervals of a few min-
utes.
Selecting region
1."Radio"
2."Satellite radio"
3.Open "Options".
4."Set jump"
5.Select the desired region.
The region is stored for the remote control cur-
rently in use.
Activating/deactivating Jump
1."Radio"
2."Satellite radio"
3."Jump to:"
As soon as information about the selected
region becomes available, it is broadcast.
A new panel appears in the display.
Page 191 of 312
Navigation
Entertainment
Driving tips
189Reference
At a glance
Controls
Communications
Mobility
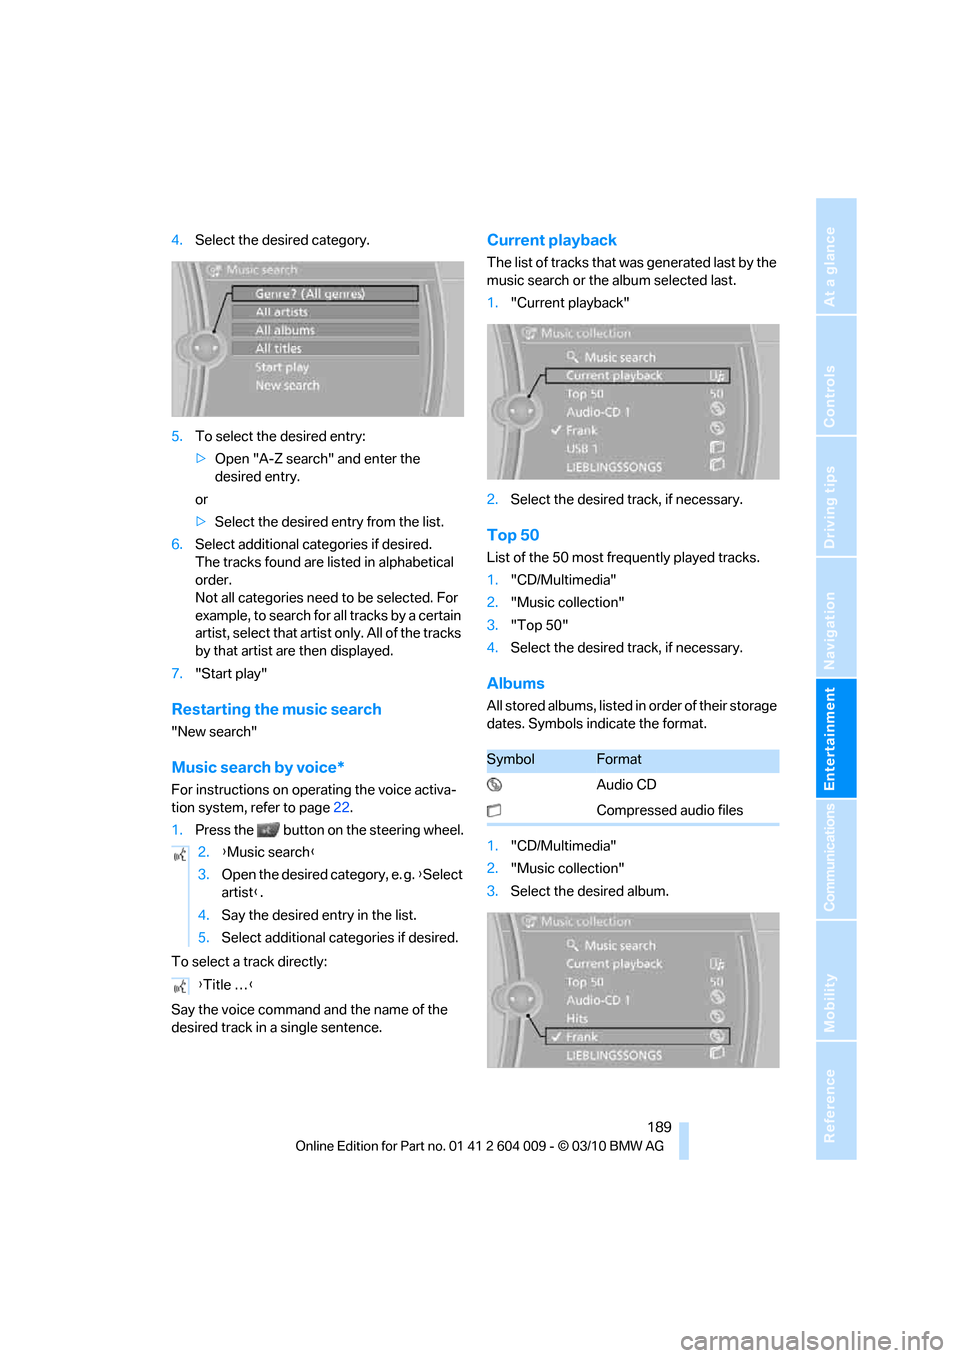
4.Select the desired category.
5.To select the desired entry:
>Open "A-Z search" and enter the
desired entry.
or
>Select the desired entry from the list.
6.Select additional categories if desired.
The tracks found are listed in alphabetical
order.
Not all categories need to be selected. For
example, to search for all tracks by a certain
artist, select that artist only. All of the tracks
by that artist are then displayed.
7."Start play"
Restarting the music search
"New search"
Music search by voice*
For instructions on operating the voice activa-
tion system, refer to page22.
1.Press the button on the steering wheel.
To select a track directly:
Say the voice command and the name of the
desired track in a single sentence.
Current playback
The list of tracks that was generated last by the
music search or the album selected last.
1."Current playback"
2.Select the desired track, if necessary.
Top 50
List of the 50 most frequently played tracks.
1."CD/Multimedia"
2."Music collection"
3."Top 50"
4.Select the desired track, if necessary.
Albums
All stored albums, listed in order of their storage
dates. Symbols indicate the format.
1."CD/Multimedia"
2."Music collection"
3.Select the desired album. 2.{Music search}
3.Open the desired category, e. g. {Select
artist}.
4.Say the desired entry in the list.
5.Select additional categories if desired.
{Title …}
SymbolFormat
Audio CD
Compressed audio files
Page 199 of 312
Navigation
Entertainment
Driving tips
197Reference
At a glance
Controls
Communications
Mobility
1.Turn display screen, arrow1.
The display screen switches off.
2.Fold in display screen, arrow2.
The display screen is folded out in the reverse
order.
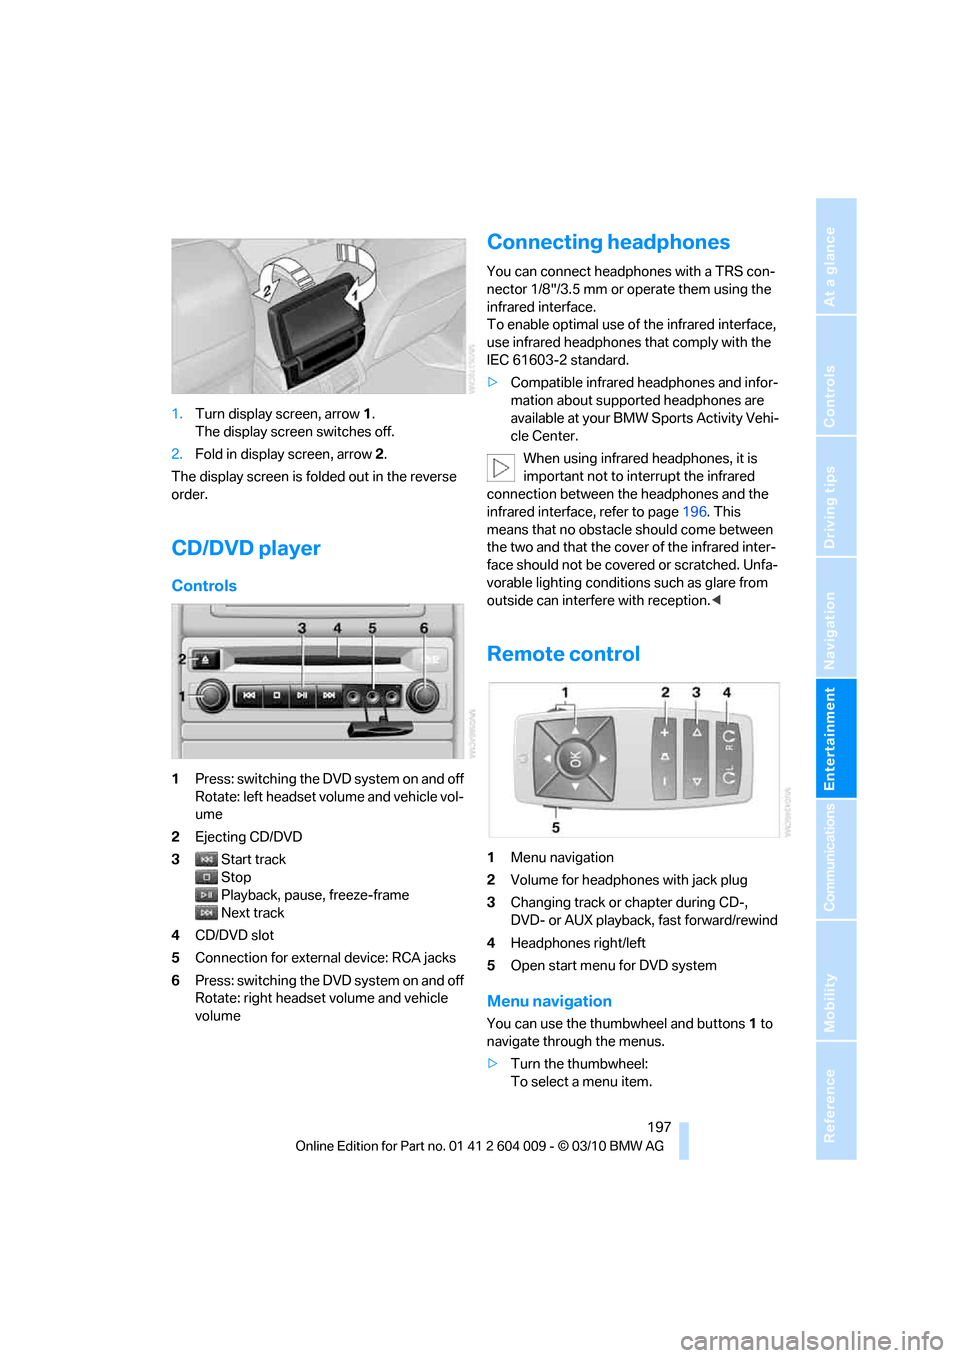
CD/DVD player
Controls
1Press: switching the DVD system on and off
Rotate: left headset volume and vehicle vol-
ume
2Ejecting CD/DVD
3Start track
Stop
Playback, pause, freeze-frame
Next track
4CD/DVD slot
5Connection for external device: RCA jacks
6Press: switching the DVD system on and off
Rotate: right headset volume and vehicle
volume
Connecting headphones
You can connect headphones with a TRS con-
nector 1/8"/3.5 mm or operate them using the
infrared interface.
To enable optimal use of the infrared interface,
use infrared headphones that comply with the
IEC 61603-2 standard.
>Compatible infrared headphones and infor-
mation about supported headphones are
available at your BMW Sports Activity Vehi-
cle Center.
When using infrared headphones, it is
important not to interrupt the infrared
connection between the headphones and the
infrared interface, refer to page196. This
means that no obstacle should come between
the two and that the cover of the infrared inter-
face should not be covered or scratched. Unfa-
vorable lighting conditions such as glare from
outside can interfere with reception.<
Remote control
1Menu navigation
2Volume for headphones with jack plug
3Changing track or chapter during CD-,
DVD- or AUX playback, fast forward/rewind
4Headphones right/left
5Open start menu for DVD system
Menu navigation
You can use the thumbwheel and buttons1 to
navigate through the menus.
>Turn the thumbwheel:
To select a menu item.
Page 203 of 312
Navigation
Entertainment
Driving tips
201Reference
At a glance
Controls
Communications
Mobility
The system language of the DVD sys-
tem
"Display": background brightness of
screen.
>"Tone":
>"Treble / Bass" and "Balance": sepa-
rately adjustable for the left and right-
hand headphones and the infrared head-
phones.
>"Reset":
The settings are reset to the default
value.
>"DVD format":
>"Standard"
>"Zoom": full-screen playback
>"Language":
Language of the DVD playback. The lan-
guage advances one setting each time the
menu item is selected.
>"Subtitles":
Language of the subtitles
or turn off the subtitles
>"Title":
Select individual tracks on the DVD
>"Angle of view":
Camera angle
Notes or symbols that appear during the
playback of a film generally point out differ-
ent camera angles. These are usually only
briefly available.
>"Menu":
Call up the DVD-specific menu.
>"Return":
Exit the menu, or:
Press the buttons on the remote con-
trol.
Many DVDs offer dialogs and subtitles in vari-
ous languages or scene descriptions for the
hearing impaired. These functions are stored
on the DVD.
With some DVDs, it is only possible to
select language, subtitles, camera angle,
or title by using the DVD-specific menu.
Consult the information accompanying your
DVD.
It is thus possible, for example, to select from
among several possible actions or to access
information about the film.
1.Press the button on the remote con-
trol during playback.
2.Select "Menu".
3.Press the button.
On some DVDs, you can use "Main
menu" and "Title" to access addi-
tional menus in which you can select music
scenes, for example.<
To make a selection:
1.Select the symbol.
2.Press the button until the desired func-
tion is selected.
3.Select the arrow.
4.Press the button.
To return to the start menu:
1.Select the arrow.
2.Press the button.
You can also select language, subtitles,
camera angle, or title in the DVD-specific
menu.
Consult the information accompanying your
DVD.<
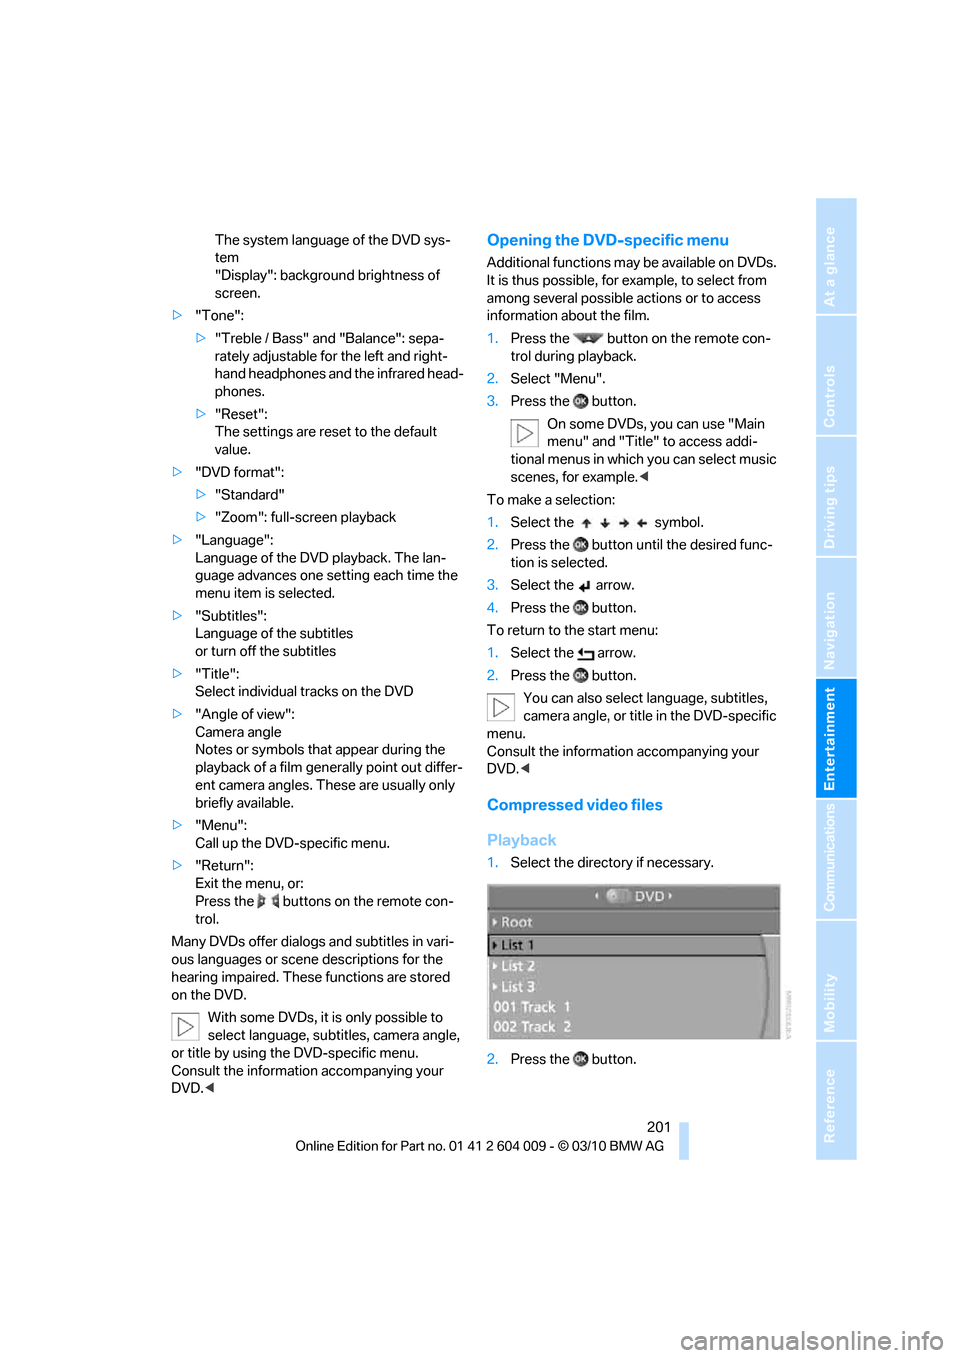
Compressed video files
Playback
1.Select the directory if necessary.
2.Press the button.
Page 207 of 312
Navigation
Entertainment
Driving tips
205Reference
At a glance
Controls
Communications
Mobility
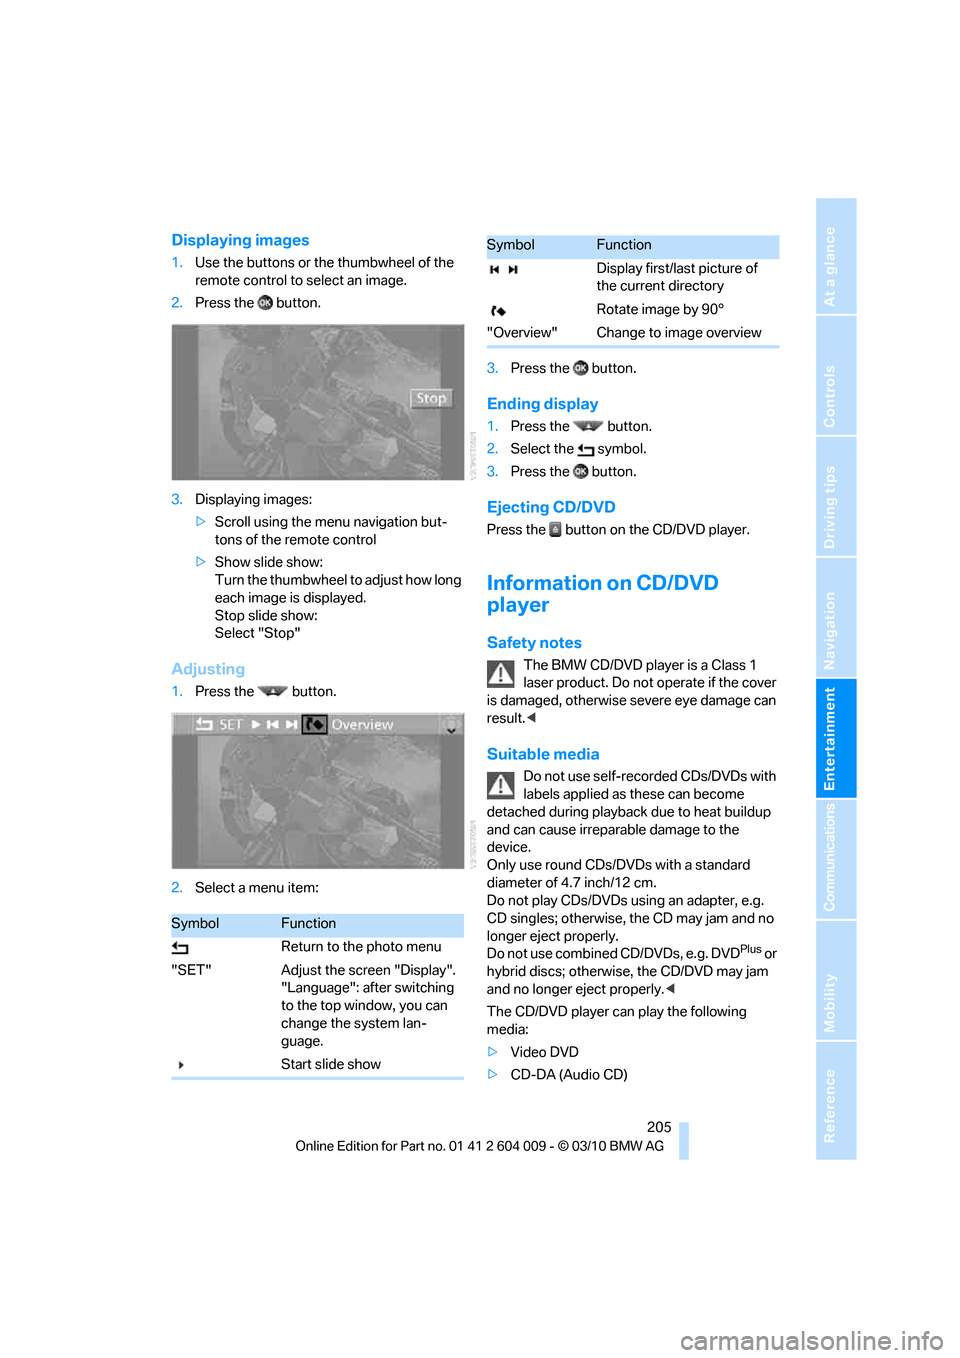
Displaying images
1.Use the buttons or the thumbwheel of the
remote control to select an image.
2.Press the button.
3.Displaying images:
>Scroll using the menu navigation but-
tons of the remote control
>Show slide show:
Turn the thumbwheel to adjust how long
each image is displayed.
Stop slide show:
Select "Stop"
Adjusting
1.Press the button.
2.Select a menu item:3.Press the button.
Ending display
1.Press the button.
2.Select the symbol.
3.Press the button.
Ejecting CD/DVD
Press the button on the CD/DVD player.
Information on CD/DVD
player
Safety notes
The BMW CD/DVD player is a Class 1
laser product. Do not operate if the cover
is damaged, otherwise severe eye damage can
result.<
Suitable media
Do not use self-recorded CDs/DVDs with
labels applied as these can become
detached during playback due to heat buildup
and can cause irreparable damage to the
device.
Only use round CDs/DVDs with a standard
diameter of 4.7 inch/12 cm.
Do not play CDs/DVDs using an adapter, e.g.
CD singles; otherwise, the CD may jam and no
longer eject properly.
Do not use combined CD/DVDs, e.g. DVD
Plus or
hybrid discs; otherwise, the CD/DVD may jam
and no longer eject properly.<
The CD/DVD player can play the following
media:
>Video DVD
>CD-DA (Audio CD)
SymbolFunction
Return to the photo menu
"SET" Adjust the screen "Display".
"Language": after switching
to the top window, you can
change the system lan-
guage.
Start slide show
Display first/last picture of
the current directory
Rotate image by 90°
"Overview" Change to image overview
SymbolFunction
Page 209 of 312
Navigation
Entertainment
Driving tips
207Reference
At a glance
Controls
Communications
Mobility
some CDs/DVDs cannot be played, can only be
played to a limited degree, or cause the system
to switch off. In this case, wait a short while and
then switch the system back on again. Then
remove the CD/DVD from the drive.
CDs/DVDs with compressed audio files
If the language set for the CD/DVD player does
not match the language of the music track, the
music tracks may be displayed incorrectly.
Care instructions
More information about this can be found under
Care, starting on page258.
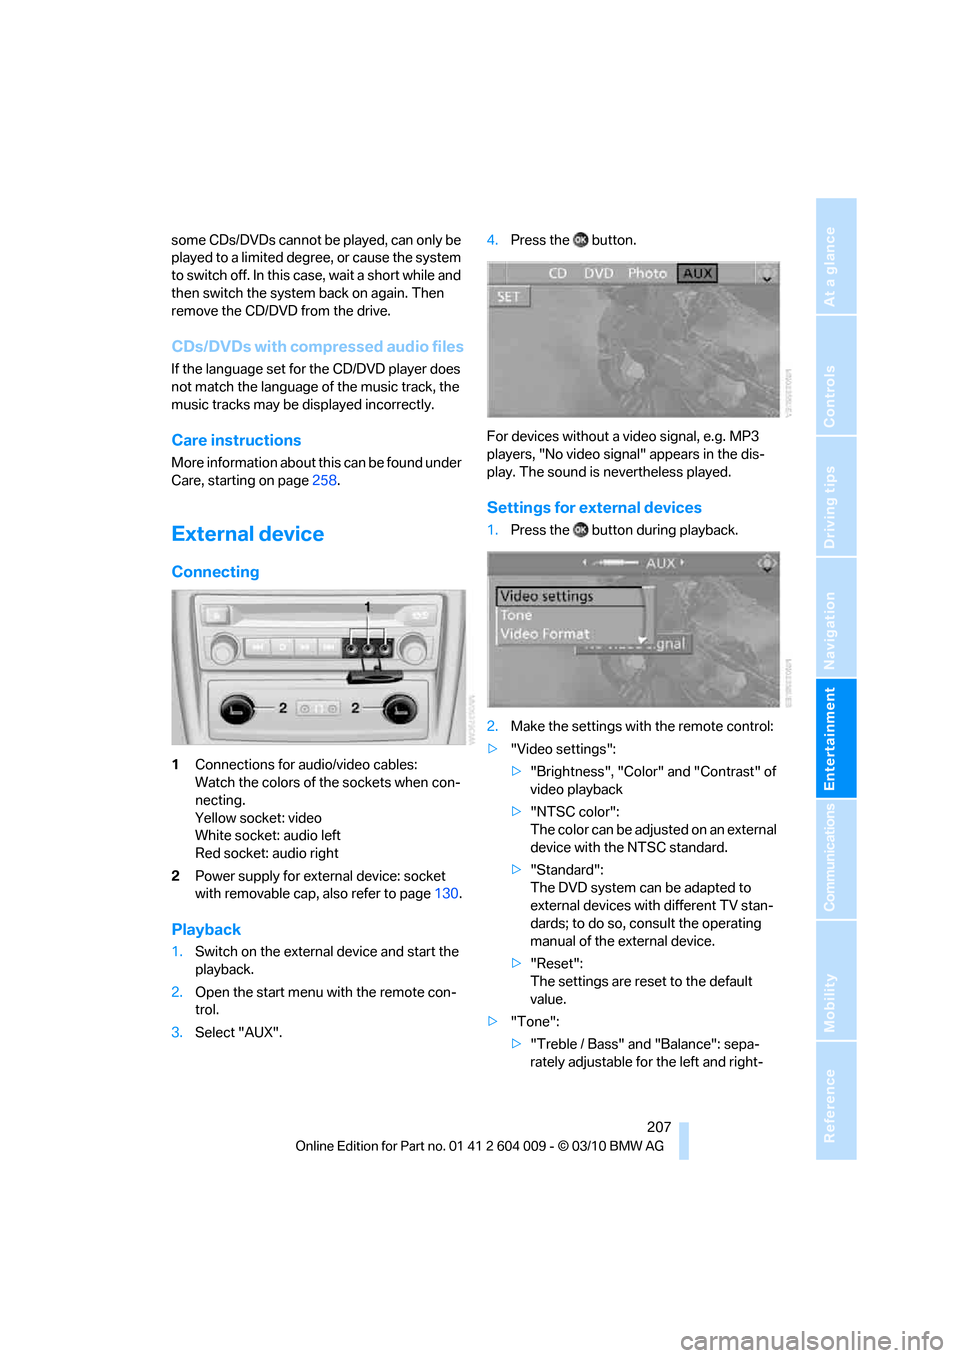
External device
Connecting
1Connections for audio/video cables:
Watch the colors of the sockets when con-
necting.
Yellow socket: video
White socket: audio left
Red socket: audio right
2Power supply for external device: socket
with removable cap, also refer to page130.
Playback
1.Switch on the external device and start the
playback.
2.Open the start menu with the remote con-
trol.
3.Select "AUX".4.Press the button.
For devices without a video signal, e.g. MP3
players, "No video signal" appears in the dis-
play. The sound is nevertheless played.
Settings for external devices
1.Press the button during playback.
2.Make the settings with the remote control:
>"Video settings":
>"Brightness", "Color" and "Contrast" of
video playback
>"NTSC color":
The color can be adjusted on an external
device with the NTSC standard.
>"Standard":
The DVD system can be adapted to
external devices with different TV stan-
dards; to do so, consult the operating
manual of the external device.
>"Reset":
The settings are reset to the default
value.
>"Tone":
>"Treble / Bass" and "Balance": sepa-
rately adjustable for the left and right-
Page 217 of 312
215
Entertainment
Reference
At a glance
Controls
Driving tips Communications
Navigation
Mobility
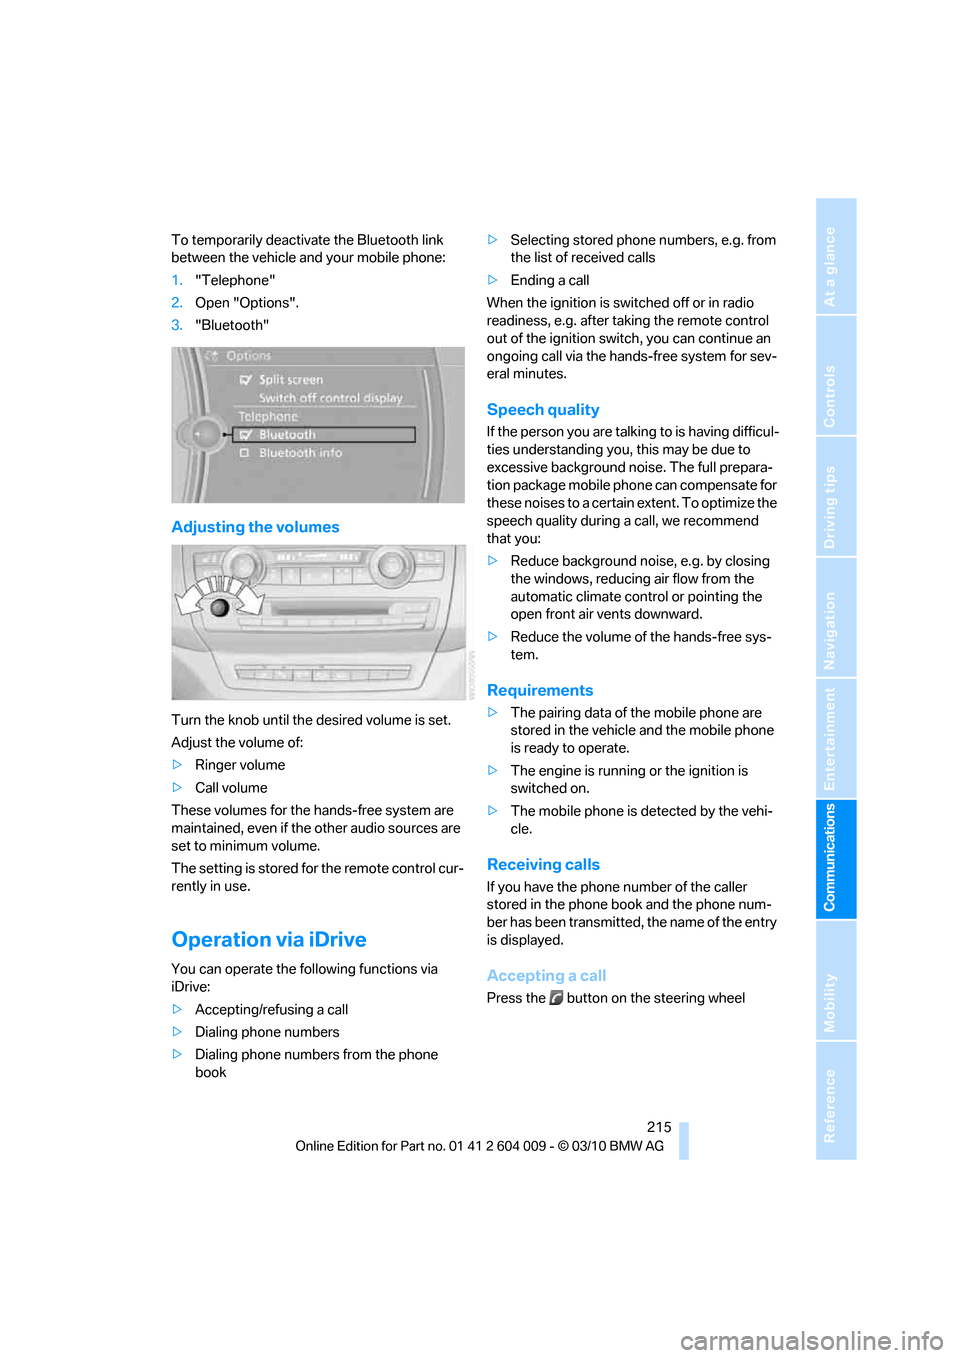
To temporarily deactivate the Bluetooth link
between the vehicle and your mobile phone:
1."Telephone"
2.Open "Options".
3."Bluetooth"
Adjusting the volumes
Turn the knob until the desired volume is set.
Adjust the volume of:
>Ringer volume
>Call volume
These volumes for the hands-free system are
maintained, even if the other audio sources are
set to minimum volume.
The setting is stored for the remote control cur-
rently in use.
Operation via iDrive
You can operate the following functions via
iDrive:
>Accepting/refusing a call
>Dialing phone numbers
>Dialing phone numbers from the phone
book>Selecting stored phone numbers, e.g. from
the list of received calls
>Ending a call
When the ignition is switched off or in radio
readiness, e.g. after taking the remote control
out of the ignition switch, you can continue an
ongoing call via the hands-free system for sev-
eral minutes.
Speech quality
If the person you are talking to is having difficul-
ties understanding you, this may be due to
excessive background noise. The full prepara-
tion package mobile phone can compensate for
these noises to a certain extent. To optimize the
speech quality during a call, we recommend
that you:
>Reduce background noise, e.g. by closing
the windows, reducing air flow from the
automatic climate control or pointing the
open front air vents downward.
>Reduce the volume of the hands-free sys-
tem.
Requirements
>The pairing data of the mobile phone are
stored in the vehicle and the mobile phone
is ready to operate.
>The engine is running or the ignition is
switched on.
>The mobile phone is detected by the vehi-
cle.
Receiving calls
If you have the phone number of the caller
stored in the phone book and the phone num-
ber has been transmitted, the name of the entry
is displayed.
Accepting a call
Press the button on the steering wheel
Page 221 of 312
219
Entertainment
Reference
At a glance
Controls
Driving tips Communications
Navigation
Mobility
My Info
To start destination guidance:
1.Select the message that contains the
desired destination.
2. "Start guidance" or "Add as another
dest.".
To dial the number in the message:
1.Select the message that contains the
desired number.
2. "Call"
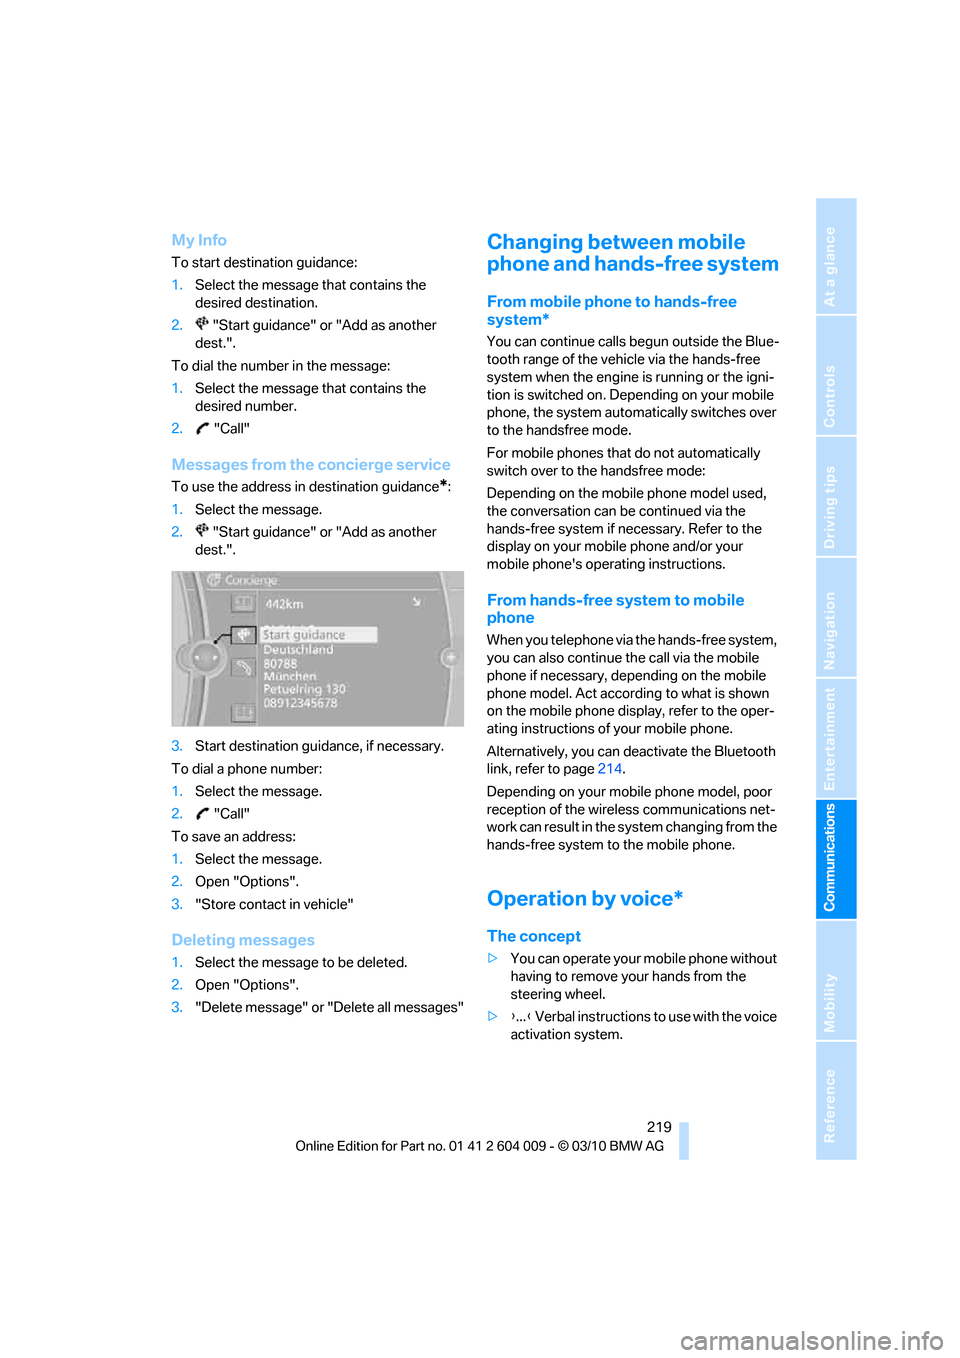
Messages from the concierge service
To use the address in destination guidance*:
1.Select the message.
2. "Start guidance" or "Add as another
dest.".
3.Start destination guidance, if necessary.
To dial a phone number:
1.Select the message.
2. "Call"
To save an address:
1.Select the message.
2.Open "Options".
3."Store contact in vehicle"
Deleting messages
1.Select the message to be deleted.
2.Open "Options".
3."Delete message" or "Delete all messages"
Changing between mobile
phone and hands-free system
From mobile phone to hands-free
system*
You can continue calls begun outside the Blue-
tooth range of the vehicle via the hands-free
system when the engine is running or the igni-
tion is switched on. Depending on your mobile
phone, the system automatically switches over
to the handsfree mode.
For mobile phones that do not automatically
switch over to the handsfree mode:
Depending on the mobile phone model used,
the conversation can be continued via the
hands-free system if necessary. Refer to the
display on your mobile phone and/or your
mobile phone's operating instructions.
From hands-free system to mobile
phone
When you telephone via the hands-free system,
you can also continue the call via the mobile
phone if necessary, depending on the mobile
phone model. Act according to what is shown
on the mobile phone display, refer to the oper-
ating instructions of your mobile phone.
Alternatively, you can deactivate the Bluetooth
link, refer to page214.
Depending on your mobile phone model, poor
reception of the wireless communications net-
work can result in the system changing from the
hands-free system to the mobile phone.
Operation by voice*
The concept
>You can operate your mobile phone without
having to remove your hands from the
steering wheel.
>{...} Verbal instructions to use with the voice
activation system.
Page 223 of 312
221
Entertainment
Reference
At a glance
Controls
Driving tips Communications
Navigation
Mobility
Calling
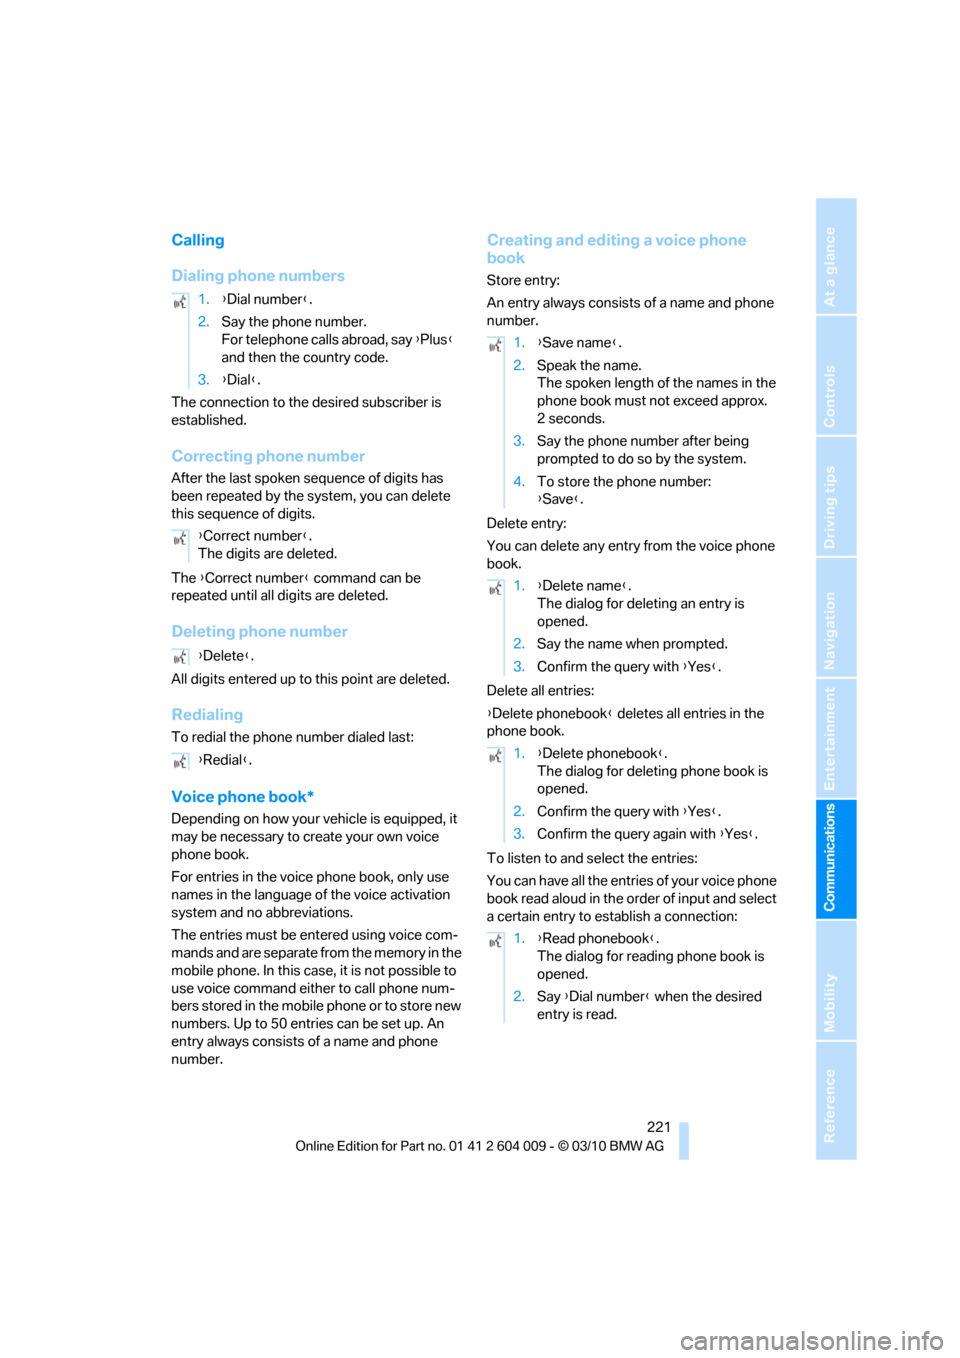
Dialing phone numbers
The connection to the desired subscriber is
established.
Correcting phone number
After the last spoken sequence of digits has
been repeated by the system, you can delete
this sequence of digits.
The {Correct number} command can be
repeated until all digits are deleted.
Deleting phone number
All digits entered up to this point are deleted.
Redialing
To redial the phone number dialed last:
Voice phone book*
Depending on how your vehicle is equipped, it
may be necessary to create your own voice
phone book.
For entries in the voice phone book, only use
names in the language of the voice activation
system and no abbreviations.
The entries must be entered using voice com-
mands and are separate from the memory in the
mobile phone. In this case, it is not possible to
use voice command either to call phone num-
bers stored in the mobile phone or to store new
numbers. Up to 50 entries can be set up. An
entry always consists of a name and phone
number.
Creating and editing a voice phone
book
Store entry:
An entry always consists of a name and phone
number.
Delete entry:
You can delete any entry from the voice phone
book.
Delete all entries:
{Delete phonebook} deletes all entries in the
phone book.
To listen to and select the entries:
You can have all the entries of your voice phone
book read aloud in the order of input and select
a certain entry to establish a connection: 1.{Dial number}.
2.Say the phone number.
For telephone calls abroad, say {Plus}
and then the country code.
3.{Dial}.
{Correct number}.
The digits are deleted.
{Delete}.
{Redial}.
1.{Save name}.
2.Speak the name.
The spoken length of the names in the
phone book must not exceed approx.
2seconds.
3.Say the phone number after being
prompted to do so by the system.
4.To store the phone number:
{Save}.
1.{Delete name}.
The dialog for deleting an entry is
opened.
2.Say the name when prompted.
3.Confirm the query with {Yes}.
1.{Delete phonebook}.
The dialog for deleting phone book is
opened.
2.Confirm the query with {Yes}.
3.Confirm the query again with {Yes}.
1.{Read phonebook}.
The dialog for reading phone book is
opened.
2.Say {Dial number} when the desired
entry is read.
Page 226 of 312
Contacts
224
Contacts
You can create and edit contacts. The contacts
from the mobile phone
* are displayed as well if
this function is supported by the mobile phone.
The addresses can be used as destinations for
navigation and the phone numbers can be
dialed.
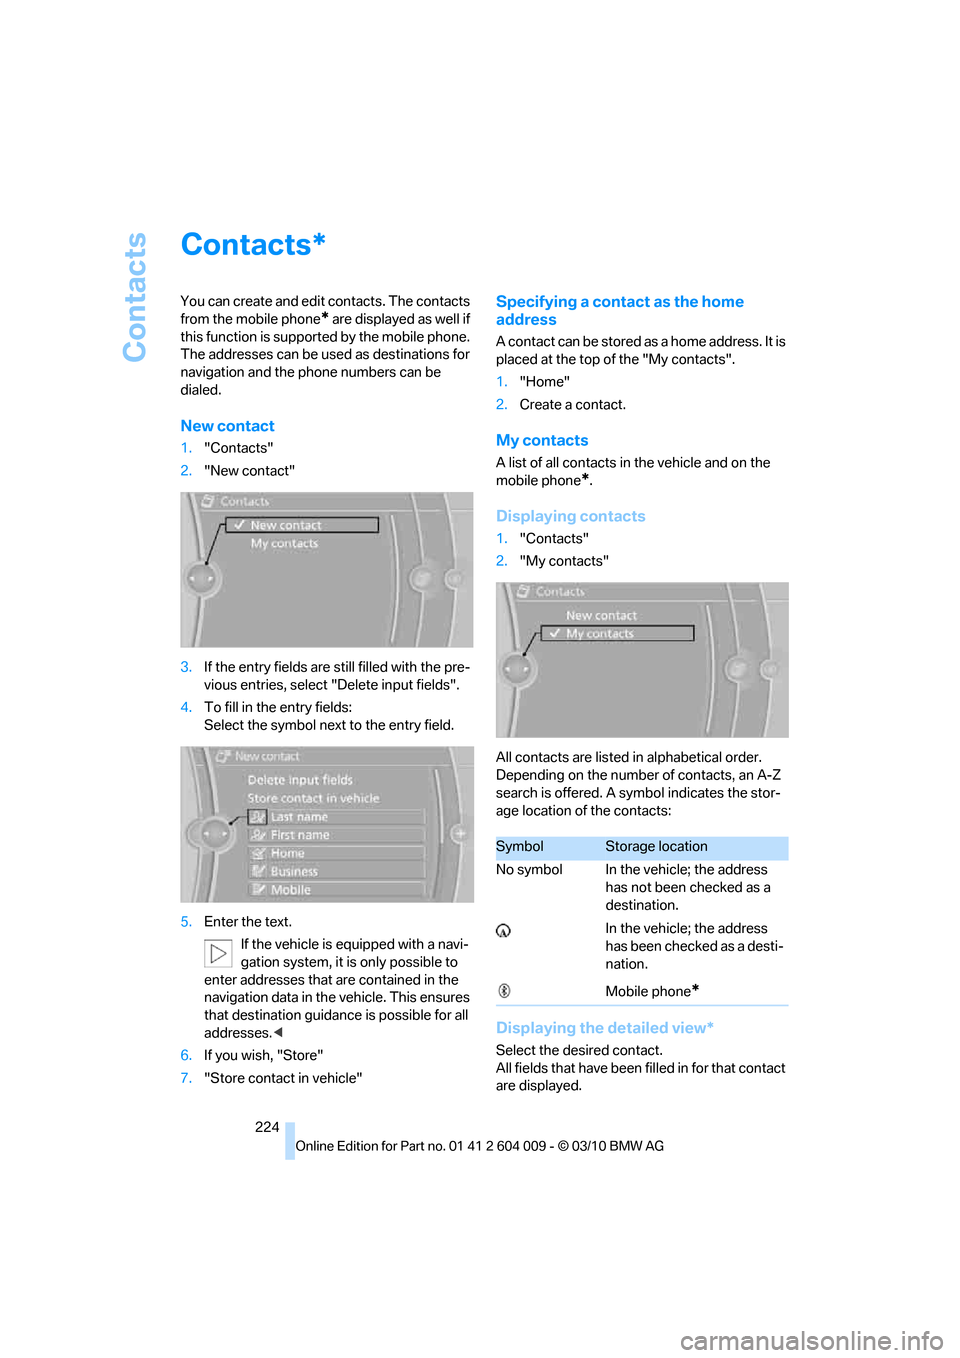
New contact
1."Contacts"
2."New contact"
3.If the entry fields are still filled with the pre-
vious entries, select "Delete input fields".
4.To fill in the entry fields:
Select the symbol next to the entry field.
5.Enter the text.
If the vehicle is equipped with a navi-
gation system, it is only possible to
enter addresses that are contained in the
navigation data in the vehicle. This ensures
that destination guidance is possible for all
addresses.<
6.If you wish, "Store"
7."Store contact in vehicle"
Specifying a contact as the home
address
A contact can be stored as a home address. It is
placed at the top of the "My contacts".
1."Home"
2.Create a contact.
My contacts
A list of all contacts in the vehicle and on the
mobile phone
*.
Displaying contacts
1."Contacts"
2."My contacts"
All contacts are listed in alphabetical order.
Depending on the number of contacts, an A-Z
search is offered. A symbol indicates the stor-
age location of the contacts:
Displaying the detailed view*
Select the desired contact.
All fields that have been filled in for that contact
are displayed.
*
SymbolStorage location
No symbol In the vehicle; the address
has not been checked as a
destination.
In the vehicle; the address
has been checked as a desti-
nation.
Mobile phone
*