Light BMW X5 2013 E70 Owner's Manual
[x] Cancel search | Manufacturer: BMW, Model Year: 2013, Model line: X5, Model: BMW X5 2013 E70Pages: 345, PDF Size: 9.45 MB
Page 305 of 345
▷When the vehicle has not been driven for
more than one month.
Starting aid terminals
Only charge using the starting aid terminals,
refer to page 309, in the engine compartment
while the engine is switched off.
Power failure
After a temporary power loss, some equipment
needs to be reinitialized.
Individual settings need to be reprogrammed:
▷Seat and mirror memory: store the posi‐
tions again, refer to page 57.▷Time: update, refer to page 87.▷Date: update, refer to page 87.▷Radio station: save again, refer to
page 192.▷Navigation system: wait for the navigation
system to be operational.▷Glass sunroof/panoramic glass sunroof: it
may only be possible to raise the roof.
Have the system initialized by the service
center.▷Digital compass: recalibrate, refer to
page 141.▷Active steering: the system automatically
initializes for a short time as you drive. Dur‐
ing this time, the system is deactivated, re‐
fer to page 110.▷xDrive: the system automatically initializes
as you drive. During this time, indicator
lamps light up. If the lamps do not disap‐
pear during the current trip, have the sys‐
tem checked.
Disposing of old batteries
Have old batteries disposed of by your
service center or bring them to a recy‐
cling center.
Maintain the battery in an upright position for
transport and storage. Secure the battery so
that it does not tip over during transport.
Fuses
Replacing fuses
Never attempt to repair a blown fuse and
do not replace a defective fuse with a substi‐
tute of another color or amperage rating; this
could lead to a circuit overload, ultimately re‐
sulting in a fire in the vehicle.◀
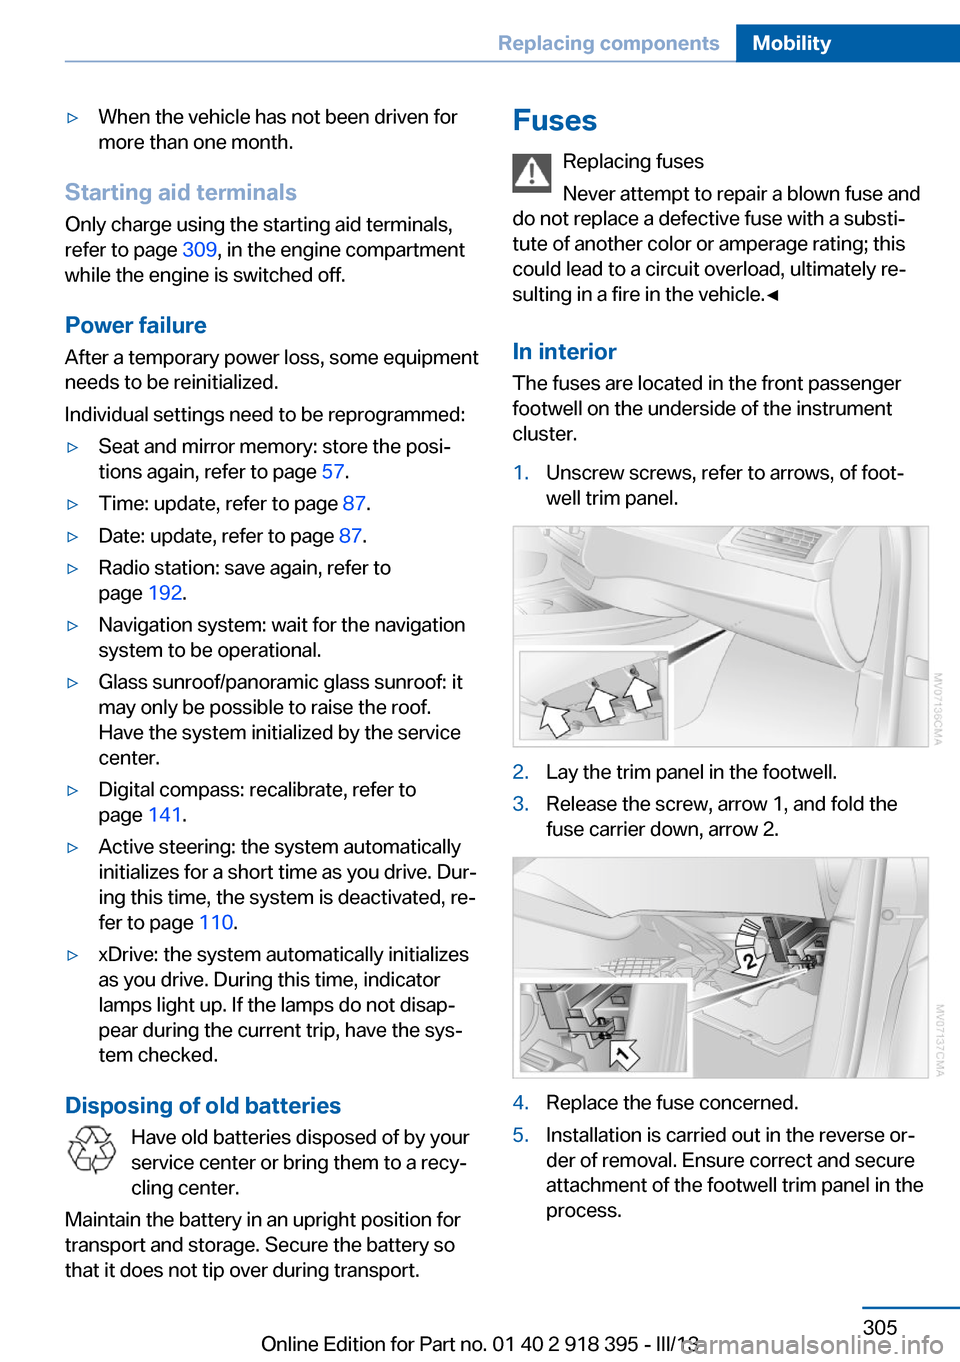
In interior The fuses are located in the front passenger
footwell on the underside of the instrument
cluster.1.Unscrew screws, refer to arrows, of foot‐
well trim panel.2.Lay the trim panel in the footwell.3.Release the screw, arrow 1, and fold the
fuse carrier down, arrow 2.4.Replace the fuse concerned.5.Installation is carried out in the reverse or‐
der of removal. Ensure correct and secure
attachment of the footwell trim panel in the
process.Seite 305Replacing componentsMobility305
Online Edition for Part no. 01 40 2 918 395 - III/13
Page 307 of 345
Breakdown assistanceVehicle equipment
This chapter describes all series equipment as
well as country-specific and special equipment
offered for this model series.Therefore, it also
describes equipment that may not be found in
your vehicle, for instance due to the selected
special equipment or the country version. This
also applies to safety-related functions and
systems.
Hazard warning flashers
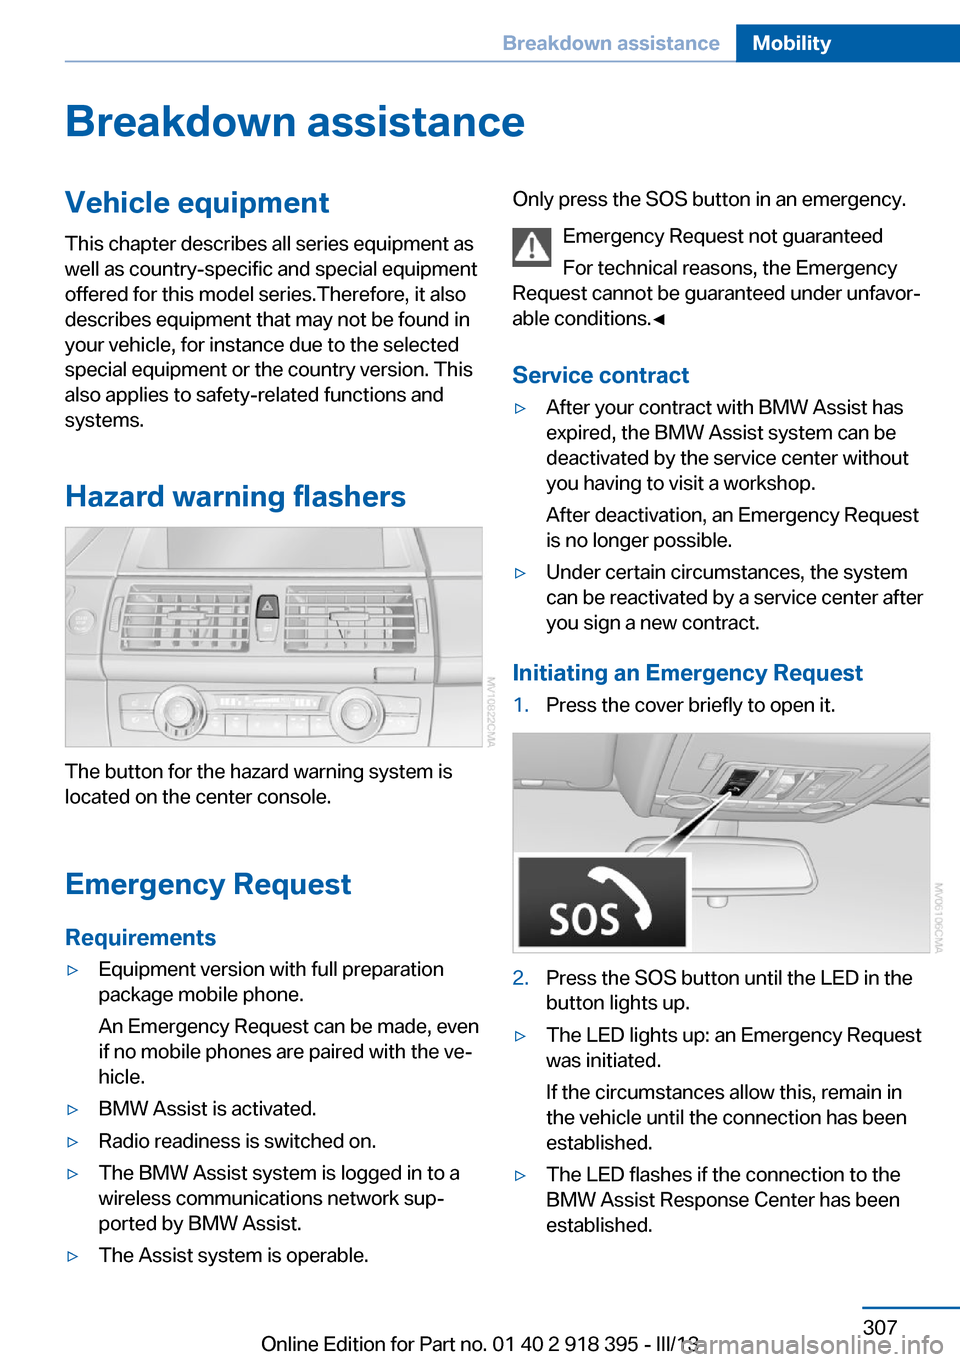
The button for the hazard warning system is
located on the center console.
Emergency RequestRequirements
▷Equipment version with full preparation
package mobile phone.
An Emergency Request can be made, even
if no mobile phones are paired with the ve‐
hicle.▷BMW Assist is activated.▷Radio readiness is switched on.▷The BMW Assist system is logged in to a
wireless communications network sup‐
ported by BMW Assist.▷The Assist system is operable.Only press the SOS button in an emergency.
Emergency Request not guaranteed
For technical reasons, the Emergency
Request cannot be guaranteed under unfavor‐
able conditions.◀
Service contract▷After your contract with BMW Assist has
expired, the BMW Assist system can be
deactivated by the service center without
you having to visit a workshop.
After deactivation, an Emergency Request
is no longer possible.▷Under certain circumstances, the system
can be reactivated by a service center after
you sign a new contract.
Initiating an Emergency Request
1.Press the cover briefly to open it.2.Press the SOS button until the LED in the
button lights up.▷The LED lights up: an Emergency Request
was initiated.
If the circumstances allow this, remain in
the vehicle until the connection has been
established.▷The LED flashes if the connection to the
BMW Assist Response Center has been
established.Seite 307Breakdown assistanceMobility307
Online Edition for Part no. 01 40 2 918 395 - III/13
Page 310 of 345
No additional passengers
Do not transport any passengers other
than the driver in a vehicle that is being
towed.◀
Transporting your vehicle
Note Your vehicle is not permitted to be towed.
Therefore, contact a service center in the
event of a breakdown.
Do not have the vehicle towed
Have your vehicle transported on a load‐
ing platform only; otherwise, damage may oc‐
cur.◀
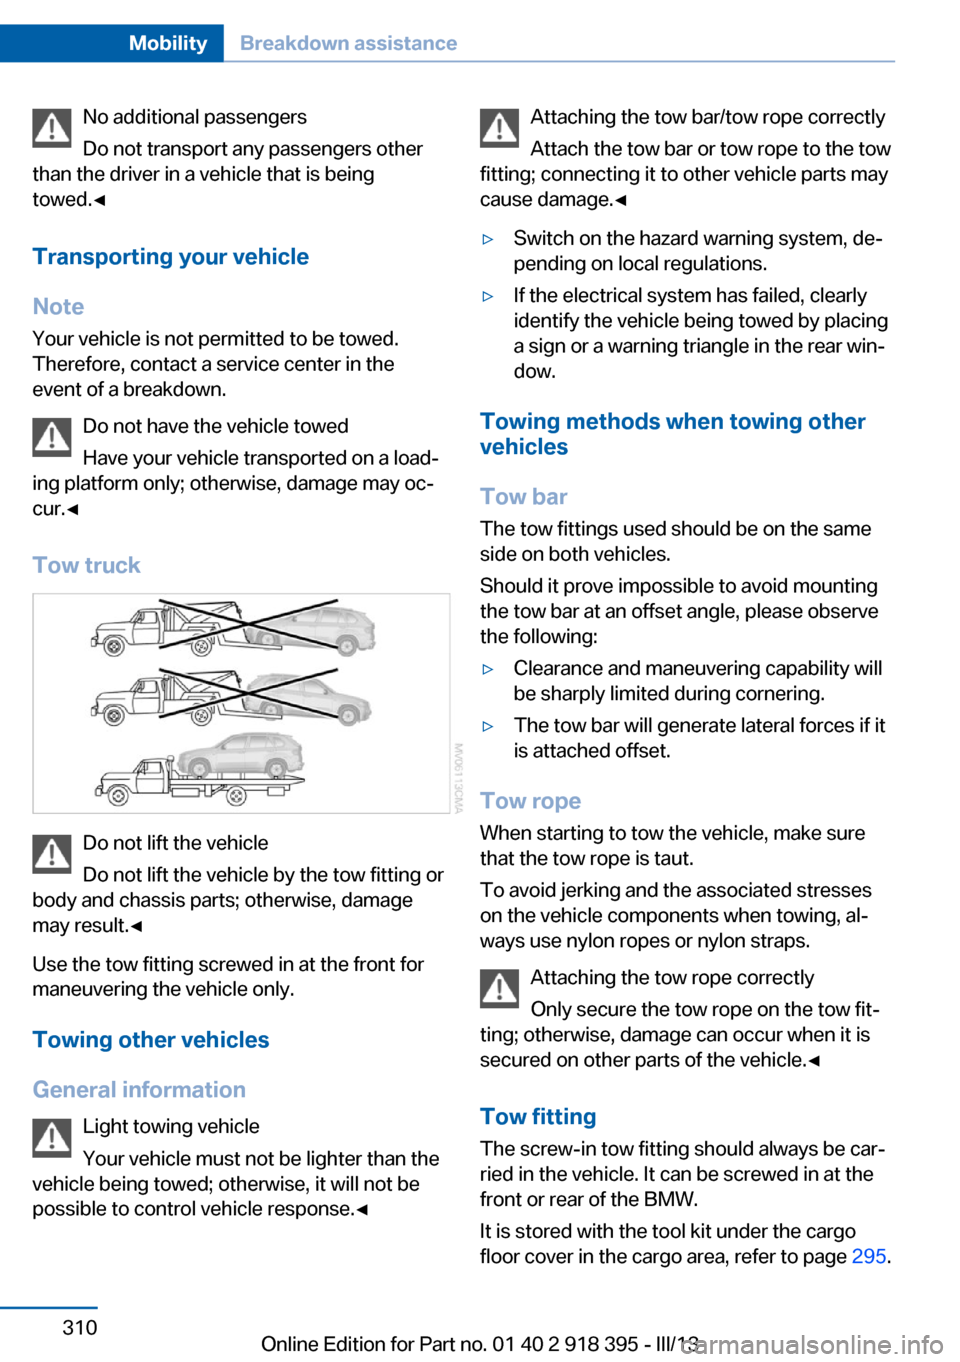
Tow truck
Do not lift the vehicle
Do not lift the vehicle by the tow fitting or
body and chassis parts; otherwise, damage
may result.◀
Use the tow fitting screwed in at the front for
maneuvering the vehicle only.
Towing other vehicles
General information Light towing vehicle
Your vehicle must not be lighter than the
vehicle being towed; otherwise, it will not be
possible to control vehicle response.◀
Attaching the tow bar/tow rope correctly
Attach the tow bar or tow rope to the tow
fitting; connecting it to other vehicle parts may
cause damage.◀▷Switch on the hazard warning system, de‐
pending on local regulations.▷If the electrical system has failed, clearly
identify the vehicle being towed by placing
a sign or a warning triangle in the rear win‐
dow.
Towing methods when towing other
vehicles
Tow bar The tow fittings used should be on the same
side on both vehicles.
Should it prove impossible to avoid mounting
the tow bar at an offset angle, please observe
the following:
▷Clearance and maneuvering capability will
be sharply limited during cornering.▷The tow bar will generate lateral forces if it
is attached offset.
Tow rope
When starting to tow the vehicle, make sure
that the tow rope is taut.
To avoid jerking and the associated stresses
on the vehicle components when towing, al‐
ways use nylon ropes or nylon straps.
Attaching the tow rope correctly
Only secure the tow rope on the tow fit‐
ting; otherwise, damage can occur when it is
secured on other parts of the vehicle.◀
Tow fitting
The screw-in tow fitting should always be car‐
ried in the vehicle. It can be screwed in at the
front or rear of the BMW.
It is stored with the tool kit under the cargo
floor cover in the cargo area, refer to page 295.
Seite 310MobilityBreakdown assistance310
Online Edition for Part no. 01 40 2 918 395 - III/13
Page 313 of 345
Transmission position P will be engaged:▷Automatically after approx. 30 minutes.▷When the remote control is removed from
the ignition lock.
Mixed tires
Note the vehicle width
Before driving into a car wash, make sure
that the vehicle width is not too large for the
car wash, as otherwise the vehicle and the car
wash could be damaged.◀
Headlamps
▷Do not rub dry and do not use abrasive or
caustic cleansers.▷Soak areas that have been soiled e.g. due
to insects, with shampoo and wash off with
water.▷Thaw ice with de-icing spray; do not use an
ice scraper.
After washing the vehicle
After washing the vehicle, apply the brakes
briefly to dry them; otherwise, braking action
can be reduced and corrosion of the brake
discs can occur.
Fully remove any residue from the windows to
prevent obstruction of view from streaking,
wiping noises, and wiper wear.
Vehicle careCar care productsBMW recommends using cleaning and care
products from BMW, since these have been
tested and approved.
Car care and cleaning products
Follow the instructions on the container.
When cleaning the interior, open the doors or
windows.
Only use products intended for cleaning vehi‐
cles.
Cleansers can contain substances that are
dangerous and harmful to your health.◀
Vehicle paint
Regular care contributes to driving safety and value retention. Environmental influences in
areas with high air pollution or natural contami‐
nants, such as tree resin or pollen, can have an
impact on the vehicle paint. Tailor the fre‐
quency and extent of your car care to these in‐
fluences.
Immediately remove aggressive substances,
such as spilled fuel, oil, grease, or bird drop‐
pings, to prevent damage to or discoloration of
the paintwork.
Leather care
Remove dust from the leather often, using a
cloth or vacuum cleaner.
Otherwise, particles of dust and road grime
chafe in pores and folds, and lead to increased
wear and premature degradation of the leather
surface.
To guard against discoloration, such as from
clothing, provide leather care roughly every
two months.
Clean light-colored leather more frequently as
dust and dirt are more noticeable.
Use leather care products; otherwise, dirt and
grease will gradually break down the protective
layer of the leather surface.
Suitable care products are available from the
service center.
Upholstery material care Vacuum regularly with a vacuum cleaner.
If they are very dirty, e.g., beverage stains, use
a soft sponge or microfiber cloth with a suita‐
ble interior cleaner.Seite 313CareMobility313
Online Edition for Part no. 01 40 2 918 395 - III/13
Page 314 of 345
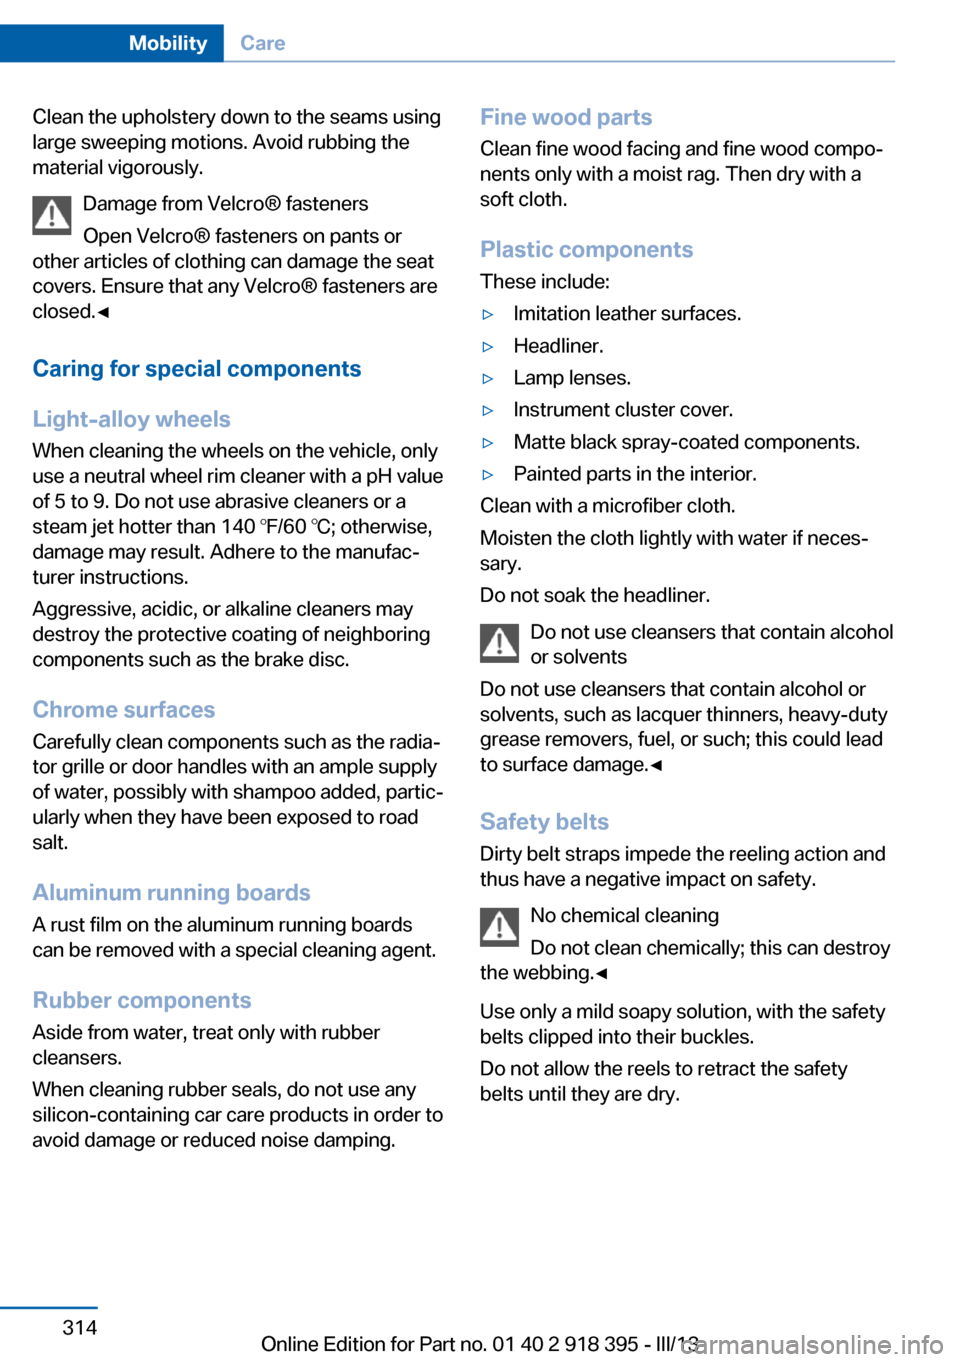
Clean the upholstery down to the seams using
large sweeping motions. Avoid rubbing the
material vigorously.
Damage from Velcro® fasteners
Open Velcro® fasteners on pants or
other articles of clothing can damage the seat
covers. Ensure that any Velcro® fasteners are
closed.◀
Caring for special components
Light-alloy wheels When cleaning the wheels on the vehicle, only
use a neutral wheel rim cleaner with a pH value
of 5 to 9. Do not use abrasive cleaners or a
steam jet hotter than 140 ℉/60 ℃; otherwise,
damage may result. Adhere to the manufac‐
turer instructions.
Aggressive, acidic, or alkaline cleaners may
destroy the protective coating of neighboring
components such as the brake disc.
Chrome surfaces
Carefully clean components such as the radia‐
tor grille or door handles with an ample supply
of water, possibly with shampoo added, partic‐
ularly when they have been exposed to road
salt.
Aluminum running boards
A rust film on the aluminum running boards
can be removed with a special cleaning agent.
Rubber components
Aside from water, treat only with rubber
cleansers.
When cleaning rubber seals, do not use any
silicon-containing car care products in order to
avoid damage or reduced noise damping.Fine wood parts
Clean fine wood facing and fine wood compo‐
nents only with a moist rag. Then dry with a
soft cloth.
Plastic components
These include:▷Imitation leather surfaces.▷Headliner.▷Lamp lenses.▷Instrument cluster cover.▷Matte black spray-coated components.▷Painted parts in the interior.
Clean with a microfiber cloth.
Moisten the cloth lightly with water if neces‐
sary.
Do not soak the headliner.
Do not use cleansers that contain alcohol
or solvents
Do not use cleansers that contain alcohol or
solvents, such as lacquer thinners, heavy-duty
grease removers, fuel, or such; this could lead
to surface damage.◀
Safety belts
Dirty belt straps impede the reeling action and
thus have a negative impact on safety.
No chemical cleaning
Do not clean chemically; this can destroy
the webbing.◀
Use only a mild soapy solution, with the safety
belts clipped into their buckles.
Do not allow the reels to retract the safety
belts until they are dry.
Seite 314MobilityCare314
Online Edition for Part no. 01 40 2 918 395 - III/13
Page 322 of 345
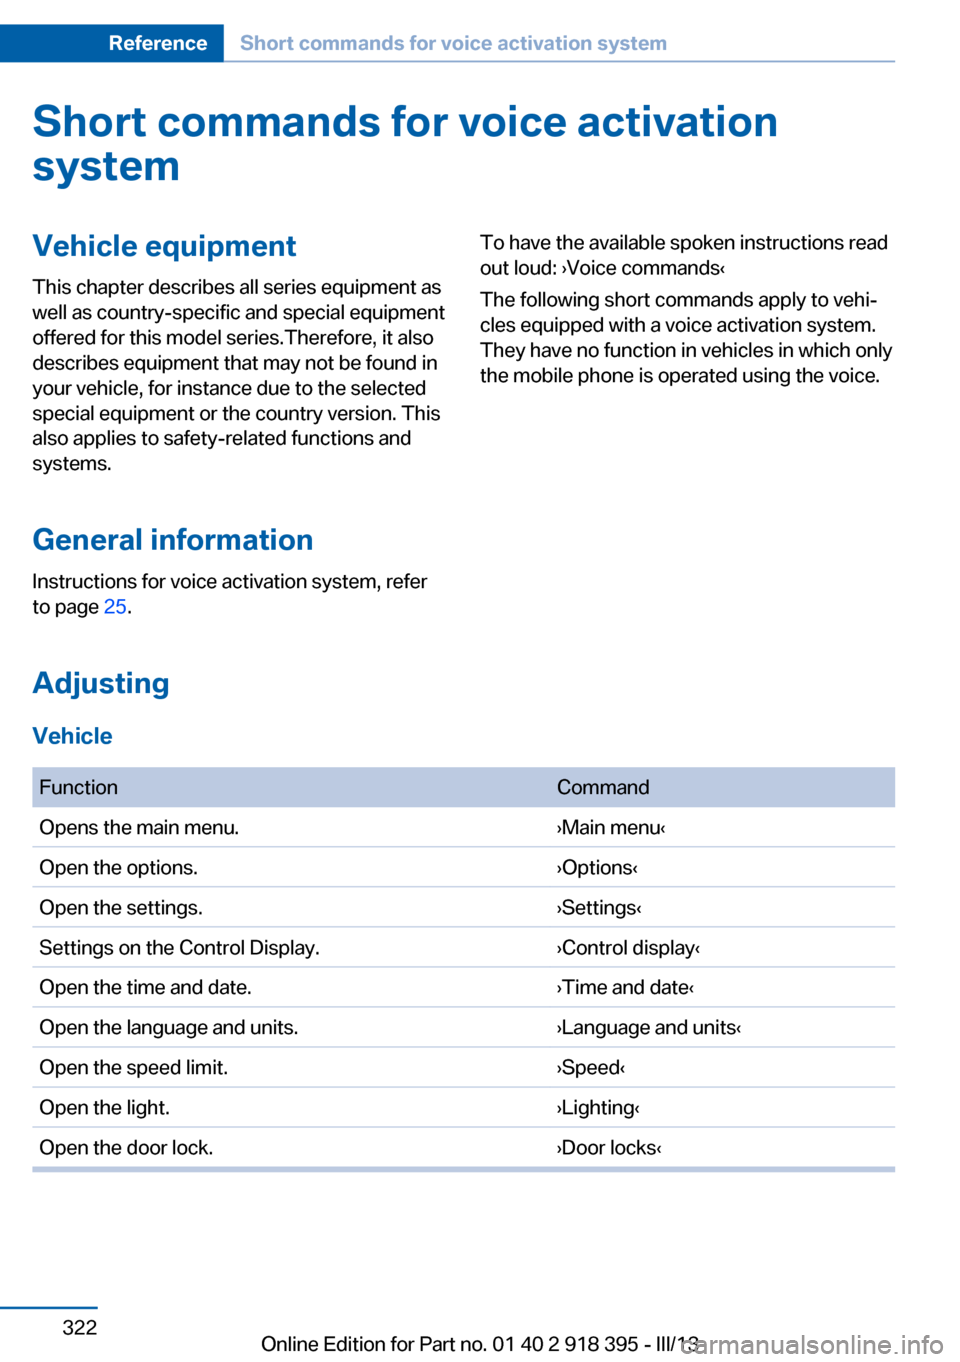
Short commands for voice activationsystemVehicle equipment
This chapter describes all series equipment as
well as country-specific and special equipment
offered for this model series.Therefore, it also
describes equipment that may not be found in
your vehicle, for instance due to the selected
special equipment or the country version. This
also applies to safety-related functions and
systems.
General information
Instructions for voice activation system, refer
to page 25.To have the available spoken instructions read
out loud: ›Voice commands‹
The following short commands apply to vehi‐
cles equipped with a voice activation system.
They have no function in vehicles in which only
the mobile phone is operated using the voice.
Adjusting
Vehicle
FunctionCommandOpens the main menu.›Main menu‹Open the options.›Options‹Open the settings.›Settings‹Settings on the Control Display.›Control display‹Open the time and date.›Time and date‹Open the language and units.›Language and units‹Open the speed limit.›Speed‹Open the light.›Lighting‹Open the door lock.›Door locks‹Seite 322ReferenceShort commands for voice activation system322
Online Edition for Part no. 01 40 2 918 395 - III/13
Page 325 of 345
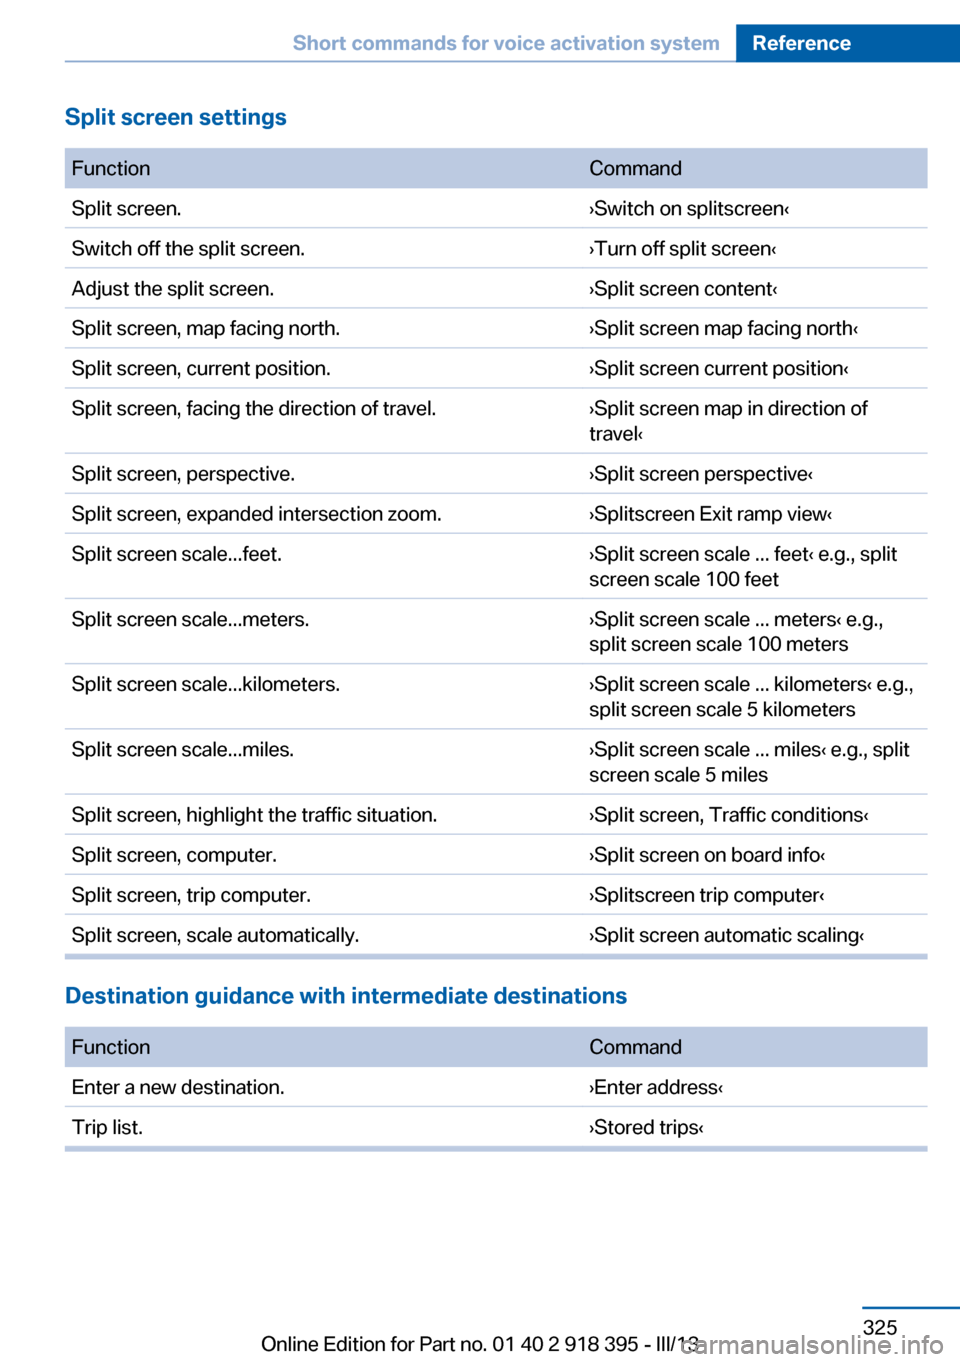
Split screen settings FunctionCommandSplit screen.›Switch on splitscreen‹Switch off the split screen.›Turn off split screen‹Adjust the split screen.›Split screen content‹Split screen, map facing north.›Split screen map facing north‹Split screen, current position.›Split screen current position‹Split screen, facing the direction of travel.›Split screen map in direction of
travel‹Split screen, perspective.›Split screen perspective‹Split screen, expanded intersection zoom.›Splitscreen Exit ramp view‹Split screen scale...feet.›Split screen scale ... feet‹ e.g., split
screen scale 100 feetSplit screen scale...meters.›Split screen scale ... meters‹ e.g.,
split screen scale 100 metersSplit screen scale...kilometers.›Split screen scale ... kilometers‹ e.g.,
split screen scale 5 kilometersSplit screen scale...miles.›Split screen scale ... miles‹ e.g., split
screen scale 5 milesSplit screen, highlight the traffic situation.›Split screen, Traffic conditions‹Split screen, computer.›Split screen on board info‹Split screen, trip computer.›Splitscreen trip computer‹Split screen, scale automatically.›Split screen automatic scaling‹
Destination guidance with intermediate destinations
FunctionCommandEnter a new destination.›Enter address‹Trip list.›Stored trips‹Seite 325Short commands for voice activation systemReference325
Online Edition for Part no. 01 40 2 918 395 - III/13
Page 330 of 345
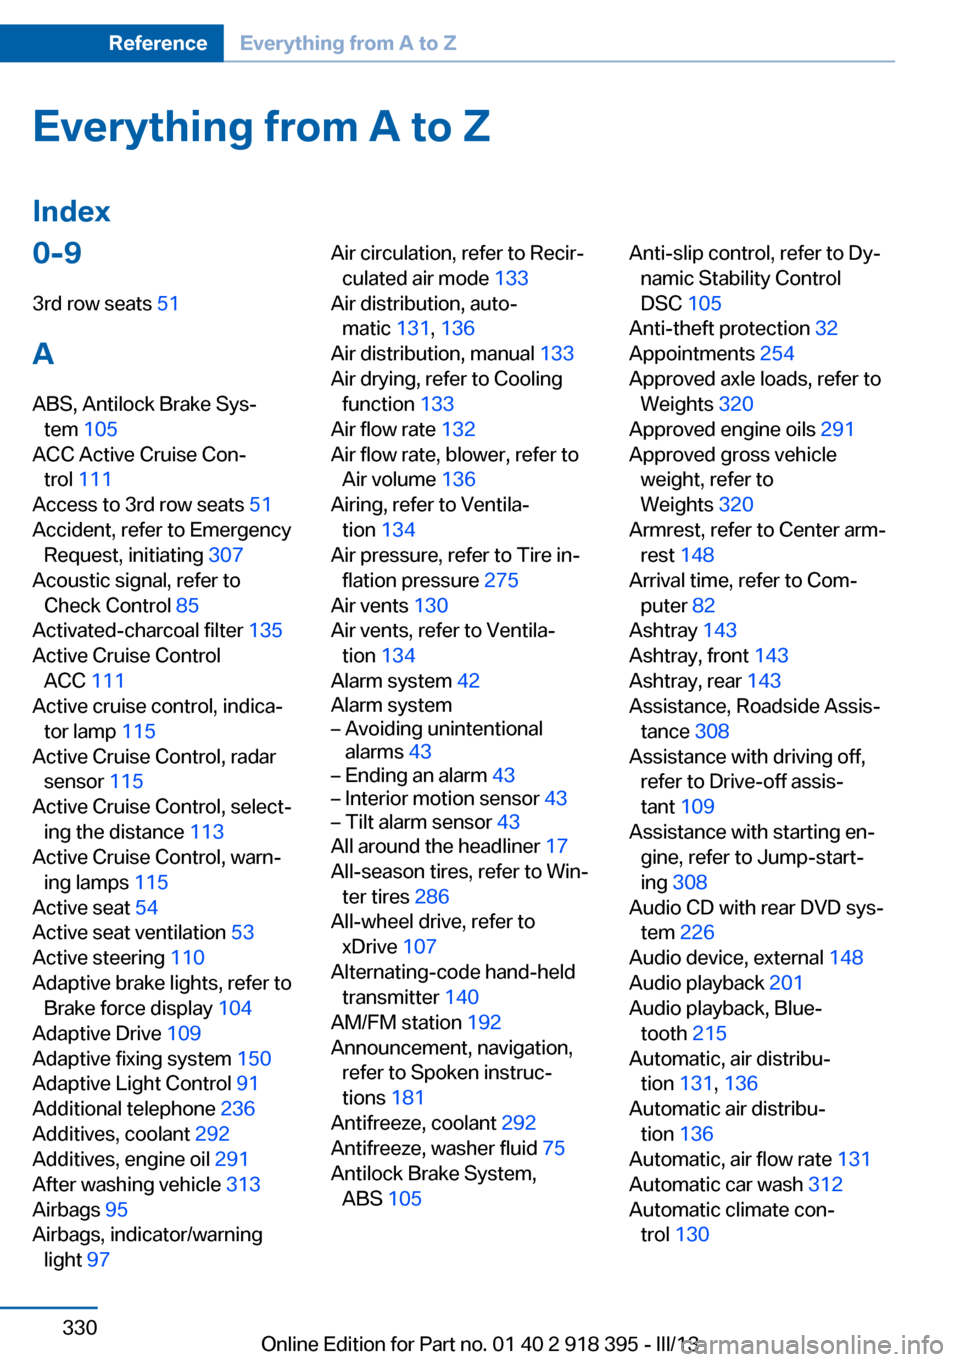
Everything from A to Z
Index0-9 3rd row seats 51
A ABS, Antilock Brake Sys‐ tem 105
ACC Active Cruise Con‐ trol 111
Access to 3rd row seats 51
Accident, refer to Emergency Request, initiating 307
Acoustic signal, refer to Check Control 85
Activated-charcoal filter 135
Active Cruise Control ACC 111
Active cruise control, indica‐ tor lamp 115
Active Cruise Control, radar sensor 115
Active Cruise Control, select‐ ing the distance 113
Active Cruise Control, warn‐ ing lamps 115
Active seat 54
Active seat ventilation 53
Active steering 110
Adaptive brake lights, refer to Brake force display 104
Adaptive Drive 109
Adaptive fixing system 150
Adaptive Light Control 91
Additional telephone 236
Additives, coolant 292
Additives, engine oil 291
After washing vehicle 313
Airbags 95
Airbags, indicator/warning light 97 Air circulation, refer to Recir‐
culated air mode 133
Air distribution, auto‐ matic 131, 136
Air distribution, manual 133
Air drying, refer to Cooling function 133
Air flow rate 132
Air flow rate, blower, refer to Air volume 136
Airing, refer to Ventila‐ tion 134
Air pressure, refer to Tire in‐ flation pressure 275
Air vents 130
Air vents, refer to Ventila‐ tion 134
Alarm system 42
Alarm system– Avoiding unintentional
alarms 43– Ending an alarm 43– Interior motion sensor 43– Tilt alarm sensor 43
All around the headliner 17
All-season tires, refer to Win‐ ter tires 286
All-wheel drive, refer to xDrive 107
Alternating-code hand-held transmitter 140
AM/FM station 192
Announcement, navigation, refer to Spoken instruc‐
tions 181
Antifreeze, coolant 292
Antifreeze, washer fluid 75
Antilock Brake System, ABS 105
Anti-slip control, refer to Dy‐
namic Stability Control
DSC 105
Anti-theft protection 32
Appointments 254
Approved axle loads, refer to Weights 320
Approved engine oils 291
Approved gross vehicle weight, refer to
Weights 320
Armrest, refer to Center arm‐ rest 148
Arrival time, refer to Com‐ puter 82
Ashtray 143
Ashtray, front 143
Ashtray, rear 143
Assistance, Roadside Assis‐ tance 308
Assistance with driving off, refer to Drive-off assis‐
tant 109
Assistance with starting en‐ gine, refer to Jump-start‐
ing 308
Audio CD with rear DVD sys‐ tem 226
Audio device, external 148
Audio playback 201
Audio playback, Blue‐ tooth 215
Automatic, air distribu‐ tion 131, 136
Automatic air distribu‐ tion 136
Automatic, air flow rate 131
Automatic car wash 312
Automatic climate con‐ trol 130 Seite 330ReferenceEverything from A to Z330
Online Edition for Part no. 01 40 2 918 395 - III/13
Page 331 of 345
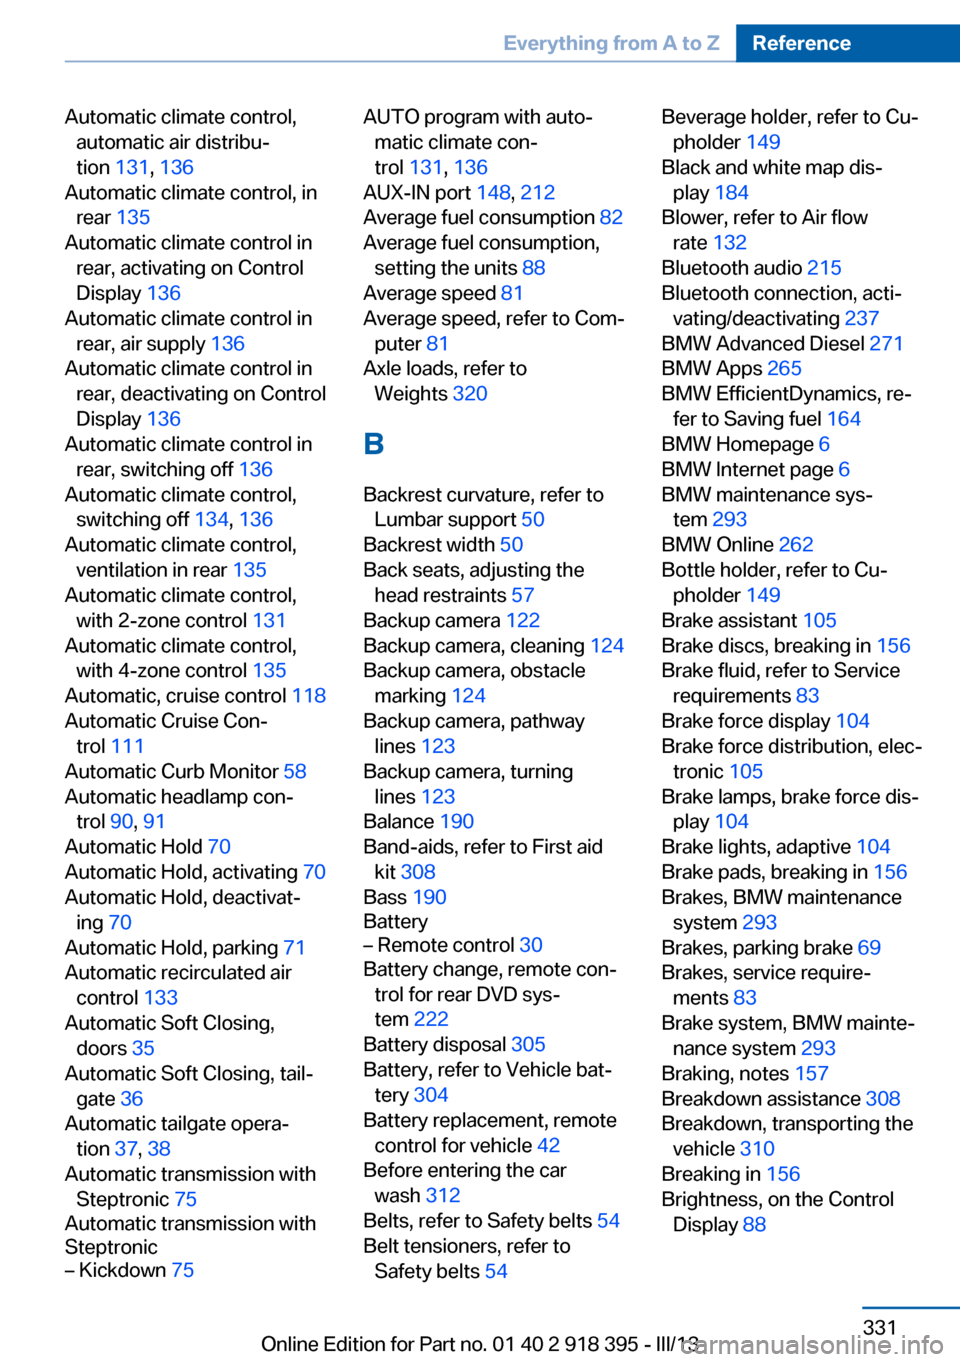
Automatic climate control,automatic air distribu‐
tion 131, 136
Automatic climate control, in rear 135
Automatic climate control in rear, activating on Control
Display 136
Automatic climate control in rear, air supply 136
Automatic climate control in rear, deactivating on Control
Display 136
Automatic climate control in rear, switching off 136
Automatic climate control, switching off 134, 136
Automatic climate control, ventilation in rear 135
Automatic climate control, with 2-zone control 131
Automatic climate control, with 4-zone control 135
Automatic, cruise control 118
Automatic Cruise Con‐ trol 111
Automatic Curb Monitor 58
Automatic headlamp con‐ trol 90, 91
Automatic Hold 70
Automatic Hold, activating 70
Automatic Hold, deactivat‐ ing 70
Automatic Hold, parking 71
Automatic recirculated air control 133
Automatic Soft Closing, doors 35
Automatic Soft Closing, tail‐ gate 36
Automatic tailgate opera‐ tion 37, 38
Automatic transmission with Steptronic 75
Automatic transmission with
Steptronic– Kickdown 75AUTO program with auto‐
matic climate con‐
trol 131 , 136
AUX-IN port 148, 212
Average fuel consumption 82
Average fuel consumption, setting the units 88
Average speed 81
Average speed, refer to Com‐ puter 81
Axle loads, refer to Weights 320
B
Backrest curvature, refer to Lumbar support 50
Backrest width 50
Back seats, adjusting the head restraints 57
Backup camera 122
Backup camera, cleaning 124
Backup camera, obstacle marking 124
Backup camera, pathway lines 123
Backup camera, turning lines 123
Balance 190
Band-aids, refer to First aid kit 308
Bass 190
Battery– Remote control 30
Battery change, remote con‐
trol for rear DVD sys‐
tem 222
Battery disposal 305
Battery, refer to Vehicle bat‐ tery 304
Battery replacement, remote control for vehicle 42
Before entering the car wash 312
Belts, refer to Safety belts 54
Belt tensioners, refer to Safety belts 54
Beverage holder, refer to Cu‐
pholder 149
Black and white map dis‐ play 184
Blower, refer to Air flow rate 132
Bluetooth audio 215
Bluetooth connection, acti‐ vating/deactivating 237
BMW Advanced Diesel 271
BMW Apps 265
BMW EfficientDynamics, re‐ fer to Saving fuel 164
BMW Homepage 6
BMW Internet page 6
BMW maintenance sys‐ tem 293
BMW Online 262
Bottle holder, refer to Cu‐ pholder 149
Brake assistant 105
Brake discs, breaking in 156
Brake fluid, refer to Service requirements 83
Brake force display 104
Brake force distribution, elec‐ tronic 105
Brake lamps, brake force dis‐ play 104
Brake lights, adaptive 104
Brake pads, breaking in 156
Brakes, BMW maintenance system 293
Brakes, parking brake 69
Brakes, service require‐ ments 83
Brake system, BMW mainte‐ nance system 293
Braking, notes 157
Breakdown assistance 308
Breakdown, transporting the vehicle 310
Breaking in 156
Brightness, on the Control Display 88 Seite 331Everything from A to ZReference331
Online Edition for Part no. 01 40 2 918 395 - III/13
Page 332 of 345
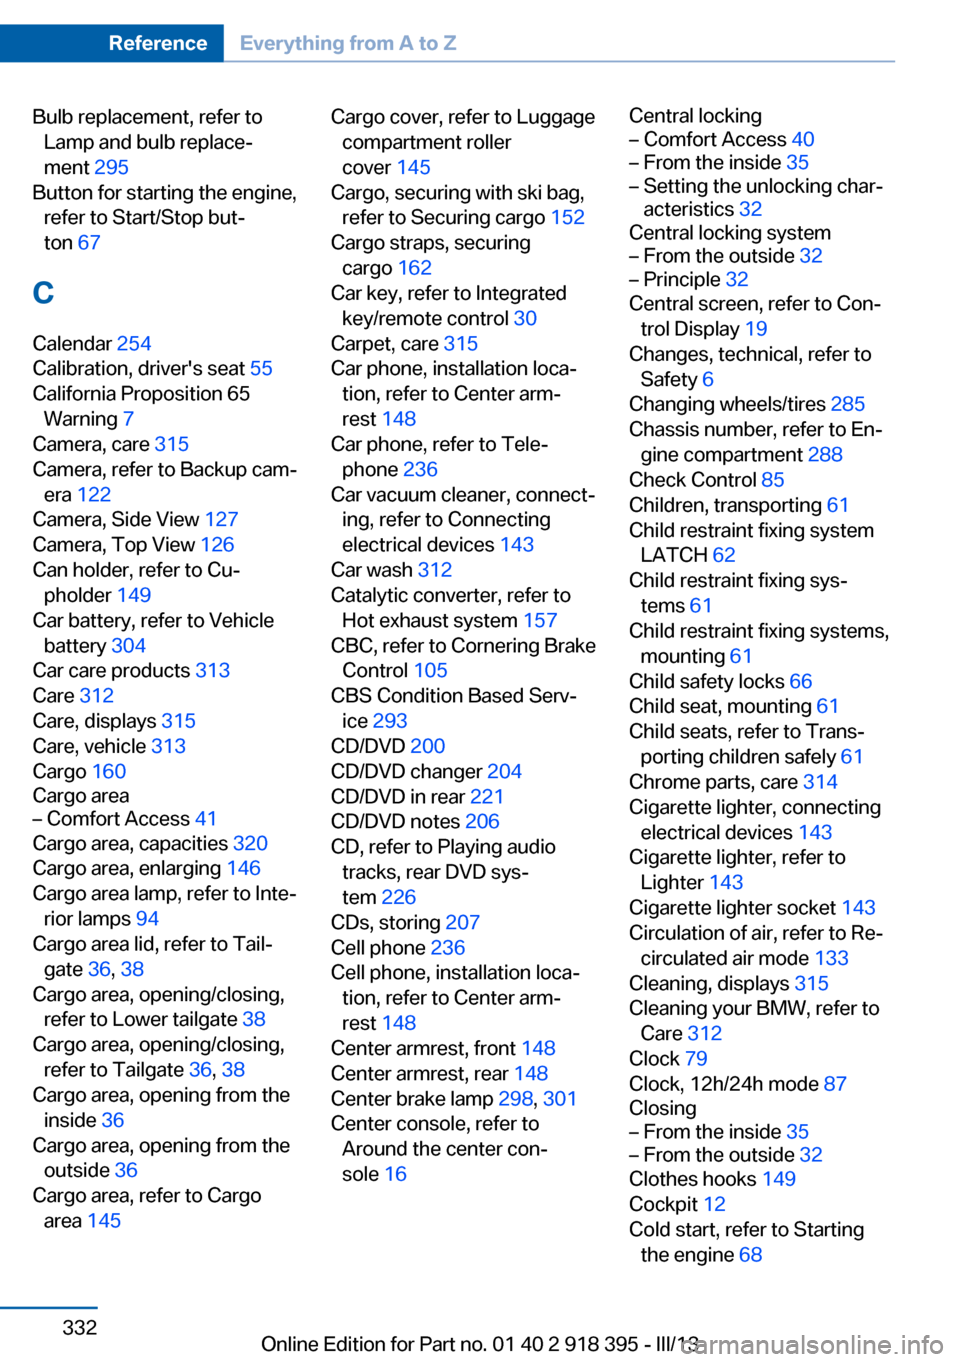
Bulb replacement, refer toLamp and bulb replace‐
ment 295
Button for starting the engine, refer to Start/Stop but‐
ton 67
C
Calendar 254
Calibration, driver's seat 55
California Proposition 65 Warning 7
Camera, care 315
Camera, refer to Backup cam‐ era 122
Camera, Side View 127
Camera, Top View 126
Can holder, refer to Cu‐ pholder 149
Car battery, refer to Vehicle battery 304
Car care products 313
Care 312
Care, displays 315
Care, vehicle 313
Cargo 160
Cargo area– Comfort Access 41
Cargo area, capacities 320
Cargo area, enlarging 146
Cargo area lamp, refer to Inte‐ rior lamps 94
Cargo area lid, refer to Tail‐ gate 36, 38
Cargo area, opening/closing, refer to Lower tailgate 38
Cargo area, opening/closing, refer to Tailgate 36, 38
Cargo area, opening from the inside 36
Cargo area, opening from the outside 36
Cargo area, refer to Cargo area 145
Cargo cover, refer to Luggage
compartment roller
cover 145
Cargo, securing with ski bag, refer to Securing cargo 152
Cargo straps, securing cargo 162
Car key, refer to Integrated key/remote control 30
Carpet, care 315
Car phone, installation loca‐ tion, refer to Center arm‐
rest 148
Car phone, refer to Tele‐ phone 236
Car vacuum cleaner, connect‐ ing, refer to Connecting
electrical devices 143
Car wash 312
Catalytic converter, refer to Hot exhaust system 157
CBC, refer to Cornering Brake Control 105
CBS Condition Based Serv‐ ice 293
CD/DVD 200
CD/DVD changer 204
CD/DVD in rear 221
CD/DVD notes 206
CD, refer to Playing audio tracks, rear DVD sys‐
tem 226
CDs, storing 207
Cell phone 236
Cell phone, installation loca‐ tion, refer to Center arm‐
rest 148
Center armrest, front 148
Center armrest, rear 148
Center brake lamp 298, 301
Center console, refer to Around the center con‐
sole 16 Central locking– Comfort Access 40– From the inside 35– Setting the unlocking char‐
acteristics 32
Central locking system
– From the outside 32– Principle 32
Central screen, refer to Con‐
trol Display 19
Changes, technical, refer to Safety 6
Changing wheels/tires 285
Chassis number, refer to En‐ gine compartment 288
Check Control 85
Children, transporting 61
Child restraint fixing system LATCH 62
Child restraint fixing sys‐ tems 61
Child restraint fixing systems, mounting 61
Child safety locks 66
Child seat, mounting 61
Child seats, refer to Trans‐ porting children safely 61
Chrome parts, care 314
Cigarette lighter, connecting electrical devices 143
Cigarette lighter, refer to Lighter 143
Cigarette lighter socket 143
Circulation of air, refer to Re‐ circulated air mode 133
Cleaning, displays 315
Cleaning your BMW, refer to Care 312
Clock 79
Clock, 12h/24h mode 87
Closing
– From the inside 35– From the outside 32
Clothes hooks 149
Cockpit 12
Cold start, refer to Starting the engine 68
Seite 332ReferenceEverything from A to Z332
Online Edition for Part no. 01 40 2 918 395 - III/13