display BMW X5 2013 E70 User Guide
[x] Cancel search | Manufacturer: BMW, Model Year: 2013, Model line: X5, Model: BMW X5 2013 E70Pages: 345, PDF Size: 9.45 MB
Page 21 of 345
▷Control options for the selected main
menu, e.g., for "Radio".▷If applicable, further operating options for
the selected menu, for instance "Store
station".
Changing settings
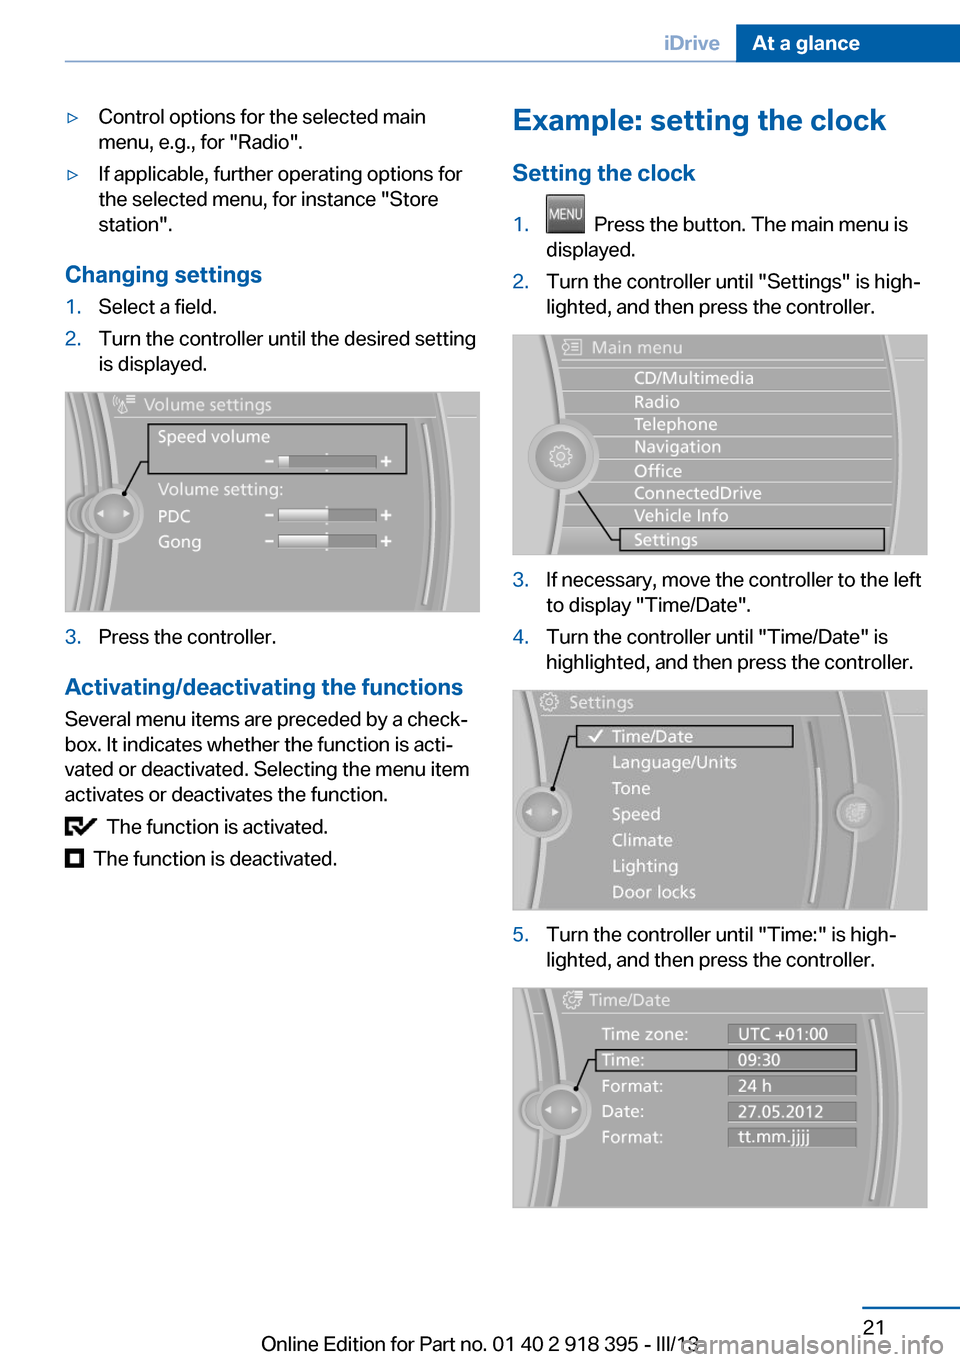
1.Select a field.2.Turn the controller until the desired setting
is displayed.3.Press the controller.
Activating/deactivating the functions
Several menu items are preceded by a check‐
box. It indicates whether the function is acti‐
vated or deactivated. Selecting the menu item
activates or deactivates the function.
The function is activated.
The function is deactivated.
Example: setting the clock
Setting the clock1. Press the button. The main menu is
displayed.2.Turn the controller until "Settings" is high‐
lighted, and then press the controller.3.If necessary, move the controller to the left
to display "Time/Date".4.Turn the controller until "Time/Date" is
highlighted, and then press the controller.5.Turn the controller until "Time:" is high‐
lighted, and then press the controller.Seite 21iDriveAt a glance21
Online Edition for Part no. 01 40 2 918 395 - III/13
Page 22 of 345
6.Turn the controller to set the hours and
press the controller.7.Turn the controller to set the minutes and
press the controller.
Status information
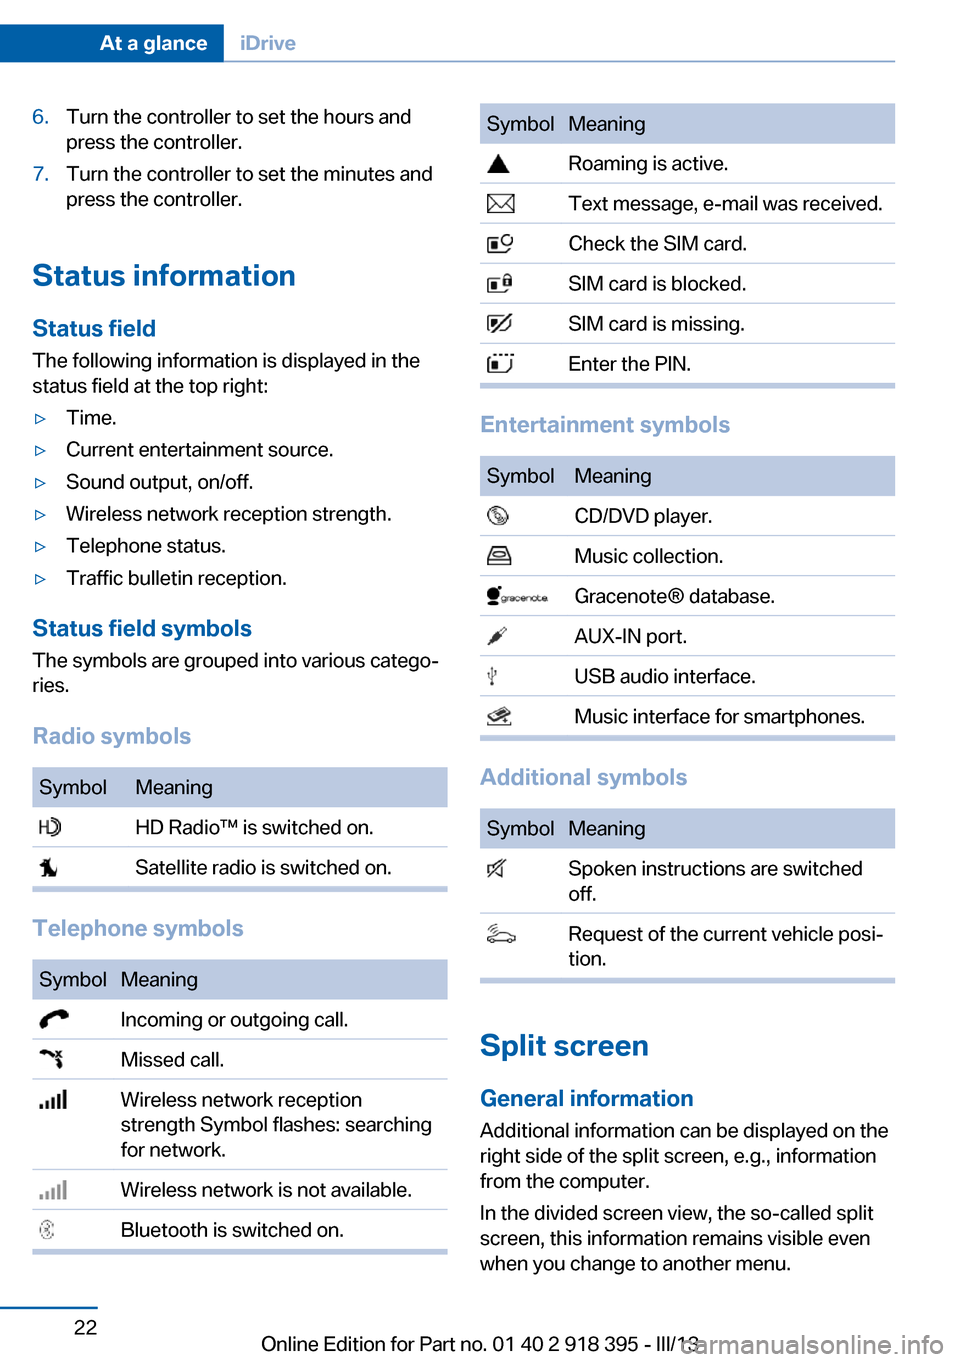
Status field The following information is displayed in the
status field at the top right:
▷Time.▷Current entertainment source.▷Sound output, on/off.▷Wireless network reception strength.▷Telephone status.▷Traffic bulletin reception.
Status field symbols
The symbols are grouped into various catego‐
ries.
Radio symbols
SymbolMeaning HD Radio™ is switched on. Satellite radio is switched on.
Telephone symbols
SymbolMeaning Incoming or outgoing call. Missed call. Wireless network reception
strength Symbol flashes: searching
for network. Wireless network is not available. Bluetooth is switched on.SymbolMeaning Roaming is active. Text message, e-mail was received. Check the SIM card. SIM card is blocked. SIM card is missing. Enter the PIN.
Entertainment symbols
SymbolMeaning CD/DVD player. Music collection. Gracenote® database. AUX-IN port. USB audio interface. Music interface for smartphones.
Additional symbols
SymbolMeaning Spoken instructions are switched
off. Request of the current vehicle posi‐
tion.
Split screen
General information Additional information can be displayed on the
right side of the split screen, e.g., information
from the computer.
In the divided screen view, the so-called split
screen, this information remains visible even when you change to another menu.
Seite 22At a glanceiDrive22
Online Edition for Part no. 01 40 2 918 395 - III/13
Page 23 of 345
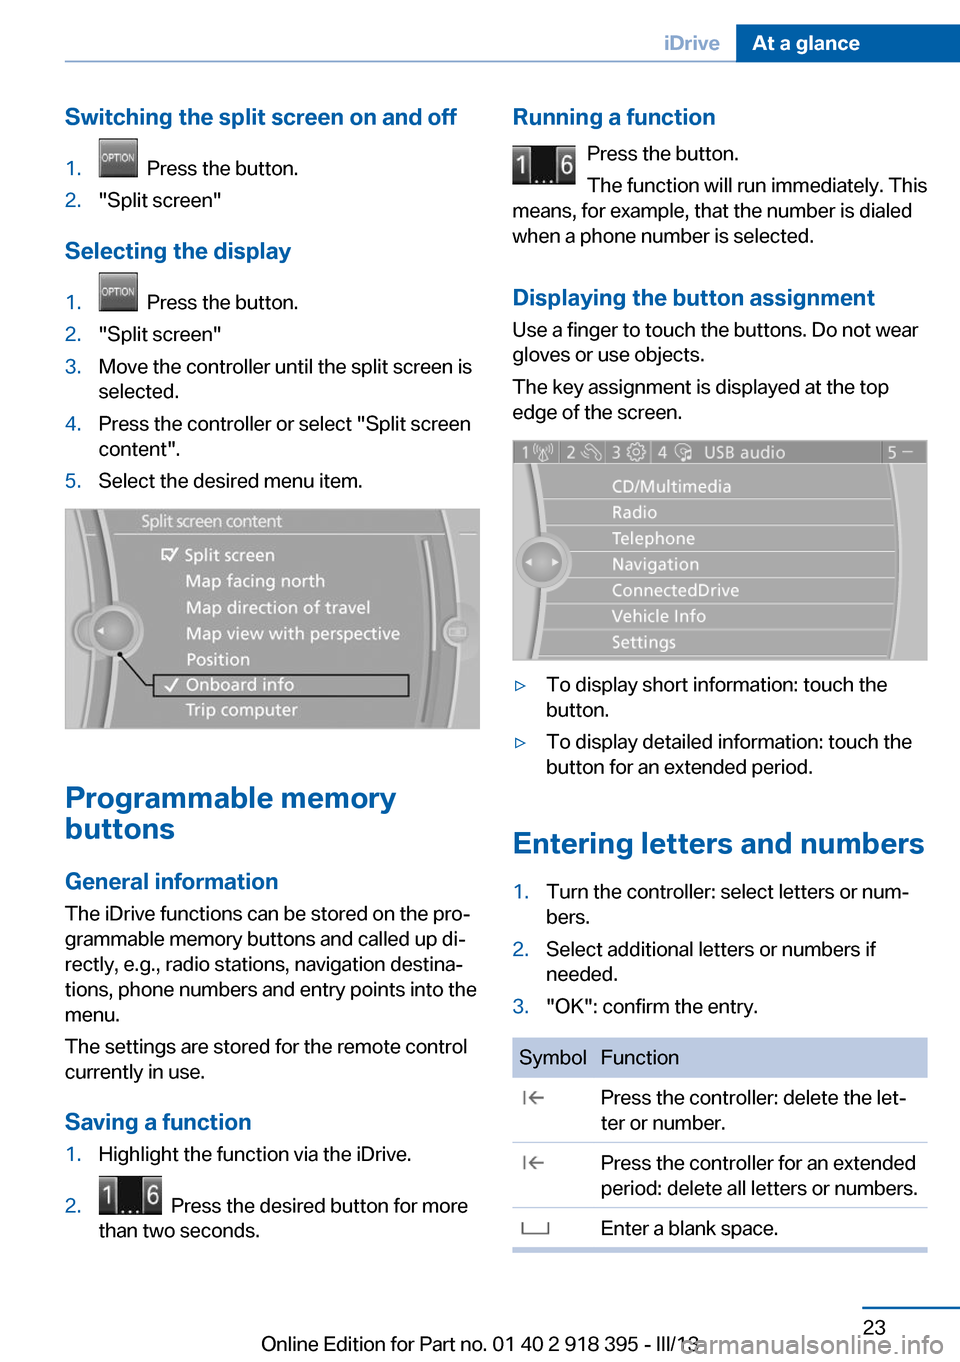
Switching the split screen on and off1. Press the button.2."Split screen"
Selecting the display
1. Press the button.2."Split screen"3.Move the controller until the split screen is
selected.4.Press the controller or select "Split screen
content".5.Select the desired menu item.
Programmable memory
buttons
General information
The iDrive functions can be stored on the pro‐
grammable memory buttons and called up di‐
rectly, e.g., radio stations, navigation destina‐
tions, phone numbers and entry points into the
menu.
The settings are stored for the remote control
currently in use.
Saving a function
1.Highlight the function via the iDrive.2. Press the desired button for more
than two seconds.Running a function
Press the button.
The function will run immediately. This
means, for example, that the number is dialed
when a phone number is selected.
Displaying the button assignment Use a finger to touch the buttons. Do not wear
gloves or use objects.
The key assignment is displayed at the top
edge of the screen.▷To display short information: touch the
button.▷To display detailed information: touch the
button for an extended period.
Entering letters and numbers
1.Turn the controller: select letters or num‐
bers.2.Select additional letters or numbers if
needed.3."OK": confirm the entry.SymbolFunction Press the controller: delete the let‐
ter or number. Press the controller for an extended
period: delete all letters or numbers. Enter a blank space.Seite 23iDriveAt a glance23
Online Edition for Part no. 01 40 2 918 395 - III/13
Page 24 of 345
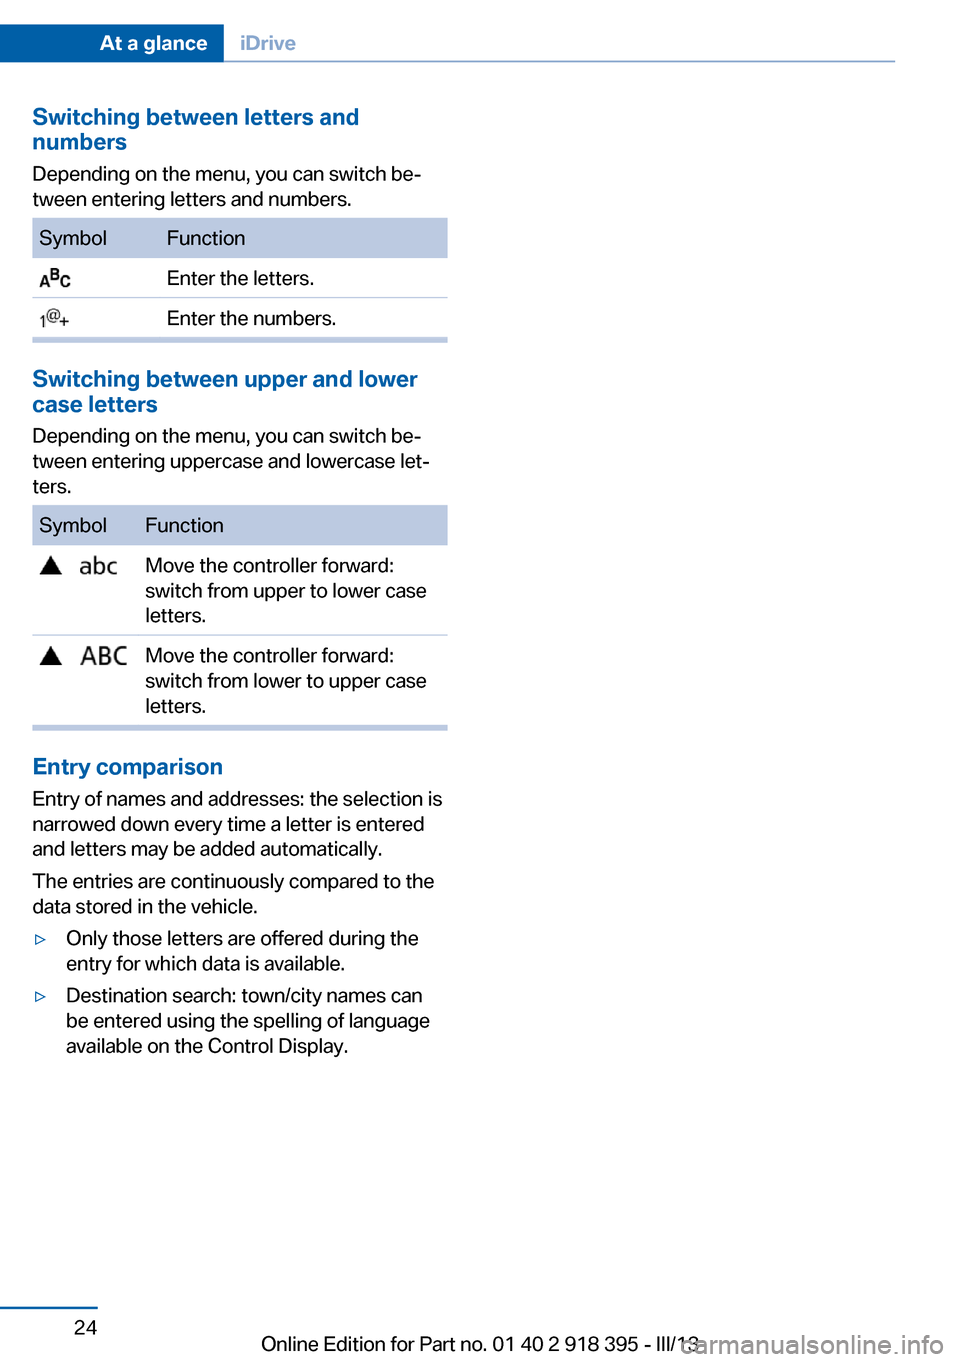
Switching between letters and
numbers
Depending on the menu, you can switch be‐
tween entering letters and numbers.SymbolFunction Enter the letters. Enter the numbers.
Switching between upper and lower
case letters
Depending on the menu, you can switch be‐
tween entering uppercase and lowercase let‐
ters.
SymbolFunction Move the controller forward:
switch from upper to lower case
letters. Move the controller forward:
switch from lower to upper case
letters.
Entry comparison
Entry of names and addresses: the selection is
narrowed down every time a letter is entered
and letters may be added automatically.
The entries are continuously compared to the
data stored in the vehicle.
▷Only those letters are offered during the
entry for which data is available.▷Destination search: town/city names can
be entered using the spelling of language
available on the Control Display.Seite 24At a glanceiDrive24
Online Edition for Part no. 01 40 2 918 395 - III/13
Page 25 of 345
Voice activation systemVehicle equipment
This chapter describes all series equipment as
well as country-specific and special equipment
offered for this model series.Therefore, it also
describes equipment that may not be found in
your vehicle, for instance due to the selected
special equipment or the country version. This
also applies to safety-related functions and
systems.
The concept▷Most functions that are displayed on the
Control Display can be operated with the
voice activation system using spoken com‐
mands. The system prompts you to make
your entries.▷Functions that can only be used when the
vehicle is stationary cannot be operated
using the voice activation system.▷The system uses a special microphone lo‐
cated in the area of the interior rearview
mirror.▷›...‹ Verbal instructions in the Owner's
Manual to use with the voice activation
system.
Requirements
Via the Control Display, set a language that is
also supported by the voice activation system
so that the spoken commands can be identi‐
fied.
Set the language, refer to page 88.
Using voice activation
Activating the voice activation system1. Press the button on the steering
wheel.2.Wait for the signal.3.Say the command.
The command appears on the Control Dis‐
play.
The symbol on the Control Display indi‐
cates that the voice activation system is active.
If no other commands are available, operate
the function via iDrive in this case.
Terminating the voice activation
system
Briefly press the button on the steer‐
ing wheel or ›Cancel‹.
Possible commands
Most menu items on the Control Display can
be voiced as commands.
The available commands depend on the menu
that is currently displayed on the Control Dis‐
play.
The functions of the main menu have short
commands.
Some list items, such as the phone book en‐
tries, can also be selected via the voice activa‐
tion system. Say the list items exactly as they
are displayed on the list.
Having possible commands read aloud You can have the system read possible com‐
mands aloud: ›Voice commands‹.
Seite 25Voice activation systemAt a glance25
Online Edition for Part no. 01 40 2 918 395 - III/13
Page 26 of 345
For example, if the "Settings" menu is dis‐
played, the commands for the settings are
read out loud.
Executing functions using short
commands
Functions on the main menu can be performed
directly by means of short commands, usually
irrespective of which menu item is currently selected, for instance ›Vehicle status‹.
List of short commands of the voice activation
system, refer to page 322.
Help dialog for the voice activation
system
Calling up help dialog: ›Help‹
Additional commands for the help dialog:▷›Help with examples‹: information about the
current operating options and the most im‐
portant commands for them are an‐
nounced.▷›Help with voice activation‹: information
about the principle of operation for the
voice activation system is announced.
Example: playing back a CD
Via the main menu The commands of the menu items are spoken
out loud, in the same way as they are selected
via the controller.
1.Switch on the Entertainment sound output
if necessary.2. Press the button on the steering
wheel.3.›C D and multimedia‹
The medium last played is played back.4.›C D‹5.›C D drive‹
The CD is played back.6. Press the button on the steering
wheel again to select a specific track.7.›Track ...‹ e.g., CD track 4.
Via short commands
Playback of the CD can also be started using a
short command.
1.Switch on the Entertainment sound output
if necessary.2. Press the button on the steering
wheel.3.›C D drive Track ...‹ e.g., CD track 4.
Setting the voice dialog
You can set whether the system should use
the standard dialog or a shorter version.
In the shorter variant of the voice dialog, the
announcements from the system are issued in
an abbreviated form.
On the Control Display:
1."Settings"2."Language/Units"3."Speech mode:"4.Select the setting.
Adjusting the volume
Turn the volume knob while giving an instruc‐
tion until the desired volume is set.
Seite 26At a glanceVoice activation system26
Online Edition for Part no. 01 40 2 918 395 - III/13
Page 31 of 345
▷The settings are automatically saved in the
profile currently activated in the remote
control.▷The remote control used is detected when
the vehicle is unlocked and the stored pro‐
file is called up.▷Your personal settings will be recognized
and called up again even if the vehicle has
been used in the meantime by someone
else with another remote control.
The individual settings are stored for a maxi‐
mum of four remote controls. They are stored
for two remote controls if Comfort Access is in
use.
Personal Profile settingsThe following functions and settings can be
stored in a profile.
More information on the settings can be found
under:
▷Assigning the programmable memory but‐
tons, refer to page 23.▷Response of the central locking system
when the car is being unlocked, refer to
page 32.▷Automatic locking of the vehicle, refer to
page 35.▷Driver's seat, exterior mirror and steering
wheel positions, refer to page 57.▷Settings for the display on the Control Dis‐
play and in the instrument cluster:▷12h/24h clock format, refer to
page 87.▷Date format, refer to page 88.▷Brightness of the Control Display, refer
to page 88.▷Language on the Control Display, refer
to page 88.▷Units of measure for fuel consumption,
distance covered/remaining distances,
and temperature, refer to page 88.▷Show visual warning for the Park Distance
Control PDC, refer to page 121.▷Show visual warning for Top View, refer to
page 124.▷Show Side View, refer to page 126.▷Backup camera:▷Function selection, refer to page 123.▷Type of display, refer to page 124.▷Lane departure warning: last setting, on/
off, refer to page 102.▷Head-up Display: selection, brightness and
position of the display, refer to page 127.▷Adaptive Drive: selected chassis and sus‐
pension tuning, refer to page 109.▷Light settings:▷Triple turn signal activation, refer to
page 73.▷Welcome lamps, refer to page 90.▷Headlamp courtesy delay feature, refer
to page 91.▷Daytime running lights, refer to
page 91.▷High-beam Assistant, refer to
page 92.▷Automatic climate control with 2-zone con‐
trol: settings, refer to page 131.▷Navigation:▷Voice activation, refer to page 181.▷Route criteria, refer to page 179.▷Map view settings, refer to page 183.▷Entertainment:▷Tone control, refer to page 190.▷Radio, stored stations, refer to
page 198.▷CD/multimedia, audio source listened
to last, refer to page 200.▷Telephone: volume, refer to page 240.Seite 31Opening and closingControls31
Online Edition for Part no. 01 40 2 918 395 - III/13
Page 42 of 345
start the engine: the engine cannot be started.
The remote control is not in the vehicle or has
a malfunction. Take the remote control with
you inside the vehicle or have it checked. If
necessary, insert another remote control into
the ignition switch.
The warning lamp in the instrumentcluster lights up while the engine is
running: the remote control is no lon‐
ger inside the vehicle.
After switching off the engine, the engine can
only be started again within approx. 10 sec‐
onds if no door has been opened.
The indicator lamp in the instrument
cluster comes on and a message ap‐
pears on the Control Display: replace
the remote control battery.
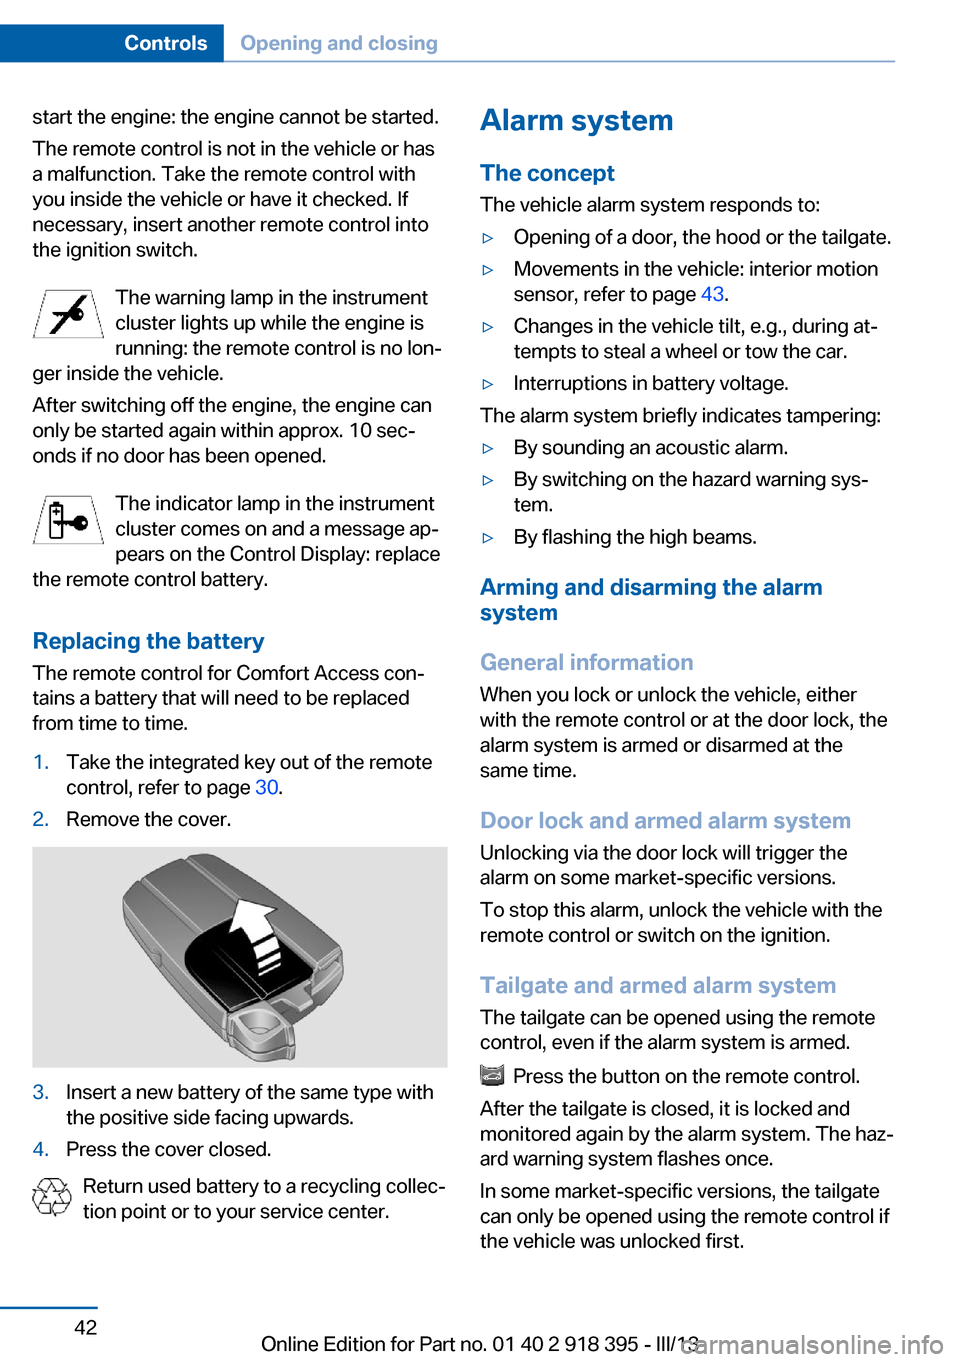
Replacing the battery
The remote control for Comfort Access con‐
tains a battery that will need to be replaced
from time to time.1.Take the integrated key out of the remote
control, refer to page 30.2.Remove the cover.3.Insert a new battery of the same type with
the positive side facing upwards.4.Press the cover closed.
Return used battery to a recycling collec‐
tion point or to your service center.
Alarm system
The conceptThe vehicle alarm system responds to:▷Opening of a door, the hood or the tailgate.▷Movements in the vehicle: interior motion
sensor, refer to page 43.▷Changes in the vehicle tilt, e.g., during at‐
tempts to steal a wheel or tow the car.▷Interruptions in battery voltage.
The alarm system briefly indicates tampering:
▷By sounding an acoustic alarm.▷By switching on the hazard warning sys‐
tem.▷By flashing the high beams.
Arming and disarming the alarm
system
General information
When you lock or unlock the vehicle, either
with the remote control or at the door lock, the
alarm system is armed or disarmed at the
same time.
Door lock and armed alarm systemUnlocking via the door lock will trigger the
alarm on some market-specific versions.
To stop this alarm, unlock the vehicle with the
remote control or switch on the ignition.
Tailgate and armed alarm system
The tailgate can be opened using the remote
control, even if the alarm system is armed.
Press the button on the remote control.
After the tailgate is closed, it is locked and
monitored again by the alarm system. The haz‐
ard warning system flashes once.
In some market-specific versions, the tailgate
can only be opened using the remote control if
the vehicle was unlocked first.
Seite 42ControlsOpening and closing42
Online Edition for Part no. 01 40 2 918 395 - III/13
Page 51 of 345
▷Increase or decrease curvature:
Press front or rear section of switch.▷Shift curvature up or down:
Press upper or lower section of switch.
BMW X5: rear seats
2nd row seats If the row of seats is divided, each side can be
adjusted separately.
Do not adjust the seat while driving
Never adjust the 2nd row seats while the
vehicle is moving, as otherwise the passengers
on the 3rd row seats could be injured.
Make sure that the locking devices of the 2nd
row seats engage properly. Otherwise the re‐
straining effect of the safety belts during an ac‐
cident could be reduced.◀
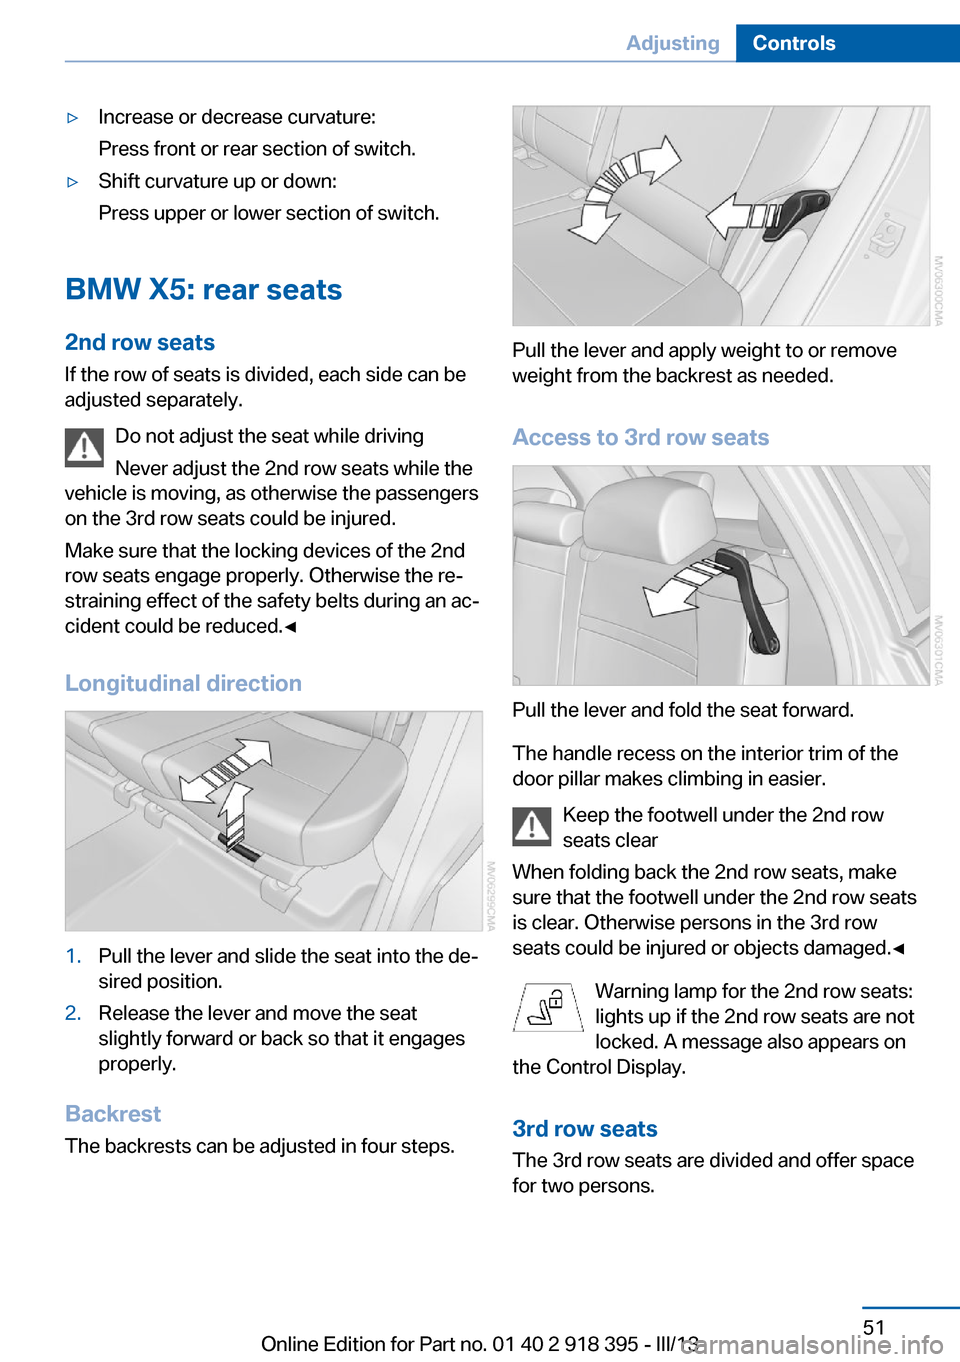
Longitudinal direction
1.Pull the lever and slide the seat into the de‐
sired position.2.Release the lever and move the seat
slightly forward or back so that it engages
properly.
Backrest
The backrests can be adjusted in four steps.
Pull the lever and apply weight to or remove
weight from the backrest as needed.
Access to 3rd row seats
Pull the lever and fold the seat forward.
The handle recess on the interior trim of the
door pillar makes climbing in easier.
Keep the footwell under the 2nd row
seats clear
When folding back the 2nd row seats, make
sure that the footwell under the 2nd row seats
is clear. Otherwise persons in the 3rd row
seats could be injured or objects damaged.◀
Warning lamp for the 2nd row seats:
lights up if the 2nd row seats are not
locked. A message also appears on
the Control Display.
3rd row seats
The 3rd row seats are divided and offer space
for two persons.
Seite 51AdjustingControls51
Online Edition for Part no. 01 40 2 918 395 - III/13
Page 53 of 345
Active seat ventilation and
seat heating
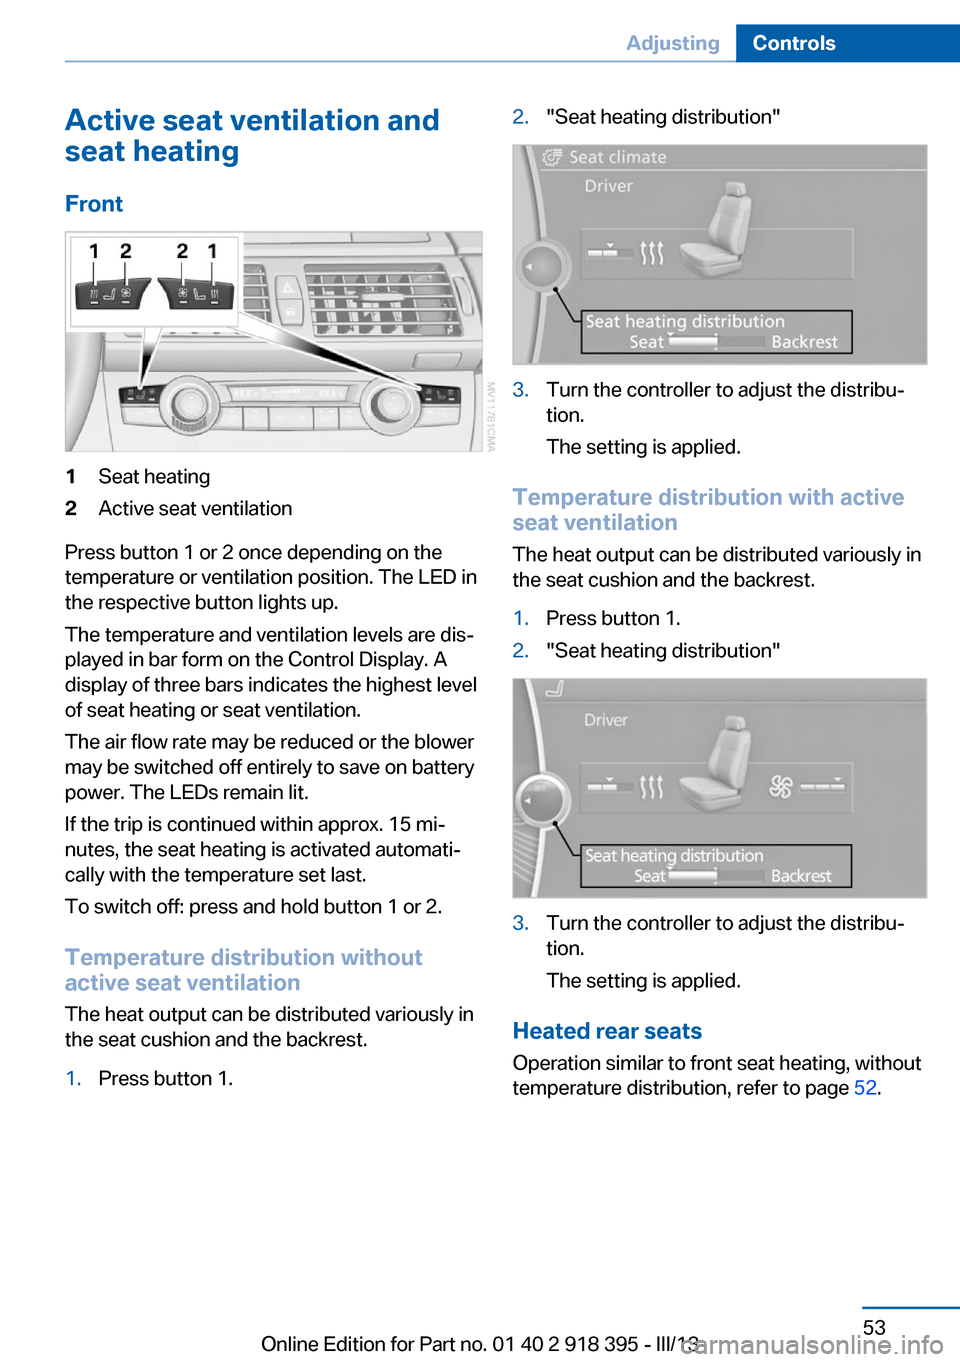
Front1Seat heating2Active seat ventilation
Press button 1 or 2 once depending on the
temperature or ventilation position. The LED in
the respective button lights up.
The temperature and ventilation levels are dis‐
played in bar form on the Control Display. A
display of three bars indicates the highest level
of seat heating or seat ventilation.
The air flow rate may be reduced or the blower
may be switched off entirely to save on battery
power. The LEDs remain lit.
If the trip is continued within approx. 15 mi‐
nutes, the seat heating is activated automati‐
cally with the temperature set last.
To switch off: press and hold button 1 or 2.
Temperature distribution without
active seat ventilation
The heat output can be distributed variously in
the seat cushion and the backrest.
1.Press button 1.2."Seat heating distribution"3.Turn the controller to adjust the distribu‐
tion.
The setting is applied.
Temperature distribution with active
seat ventilation
The heat output can be distributed variously in
the seat cushion and the backrest.
1.Press button 1.2."Seat heating distribution"3.Turn the controller to adjust the distribu‐
tion.
The setting is applied.
Heated rear seats Operation similar to front seat heating, without
temperature distribution, refer to page 52.
Seite 53AdjustingControls53
Online Edition for Part no. 01 40 2 918 395 - III/13