width BMW X5 2014 F15 Owner's Manual
[x] Cancel search | Manufacturer: BMW, Model Year: 2014, Model line: X5, Model: BMW X5 2014 F15Pages: 265, PDF Size: 6.2 MB
Page 51 of 265
Forward/backward
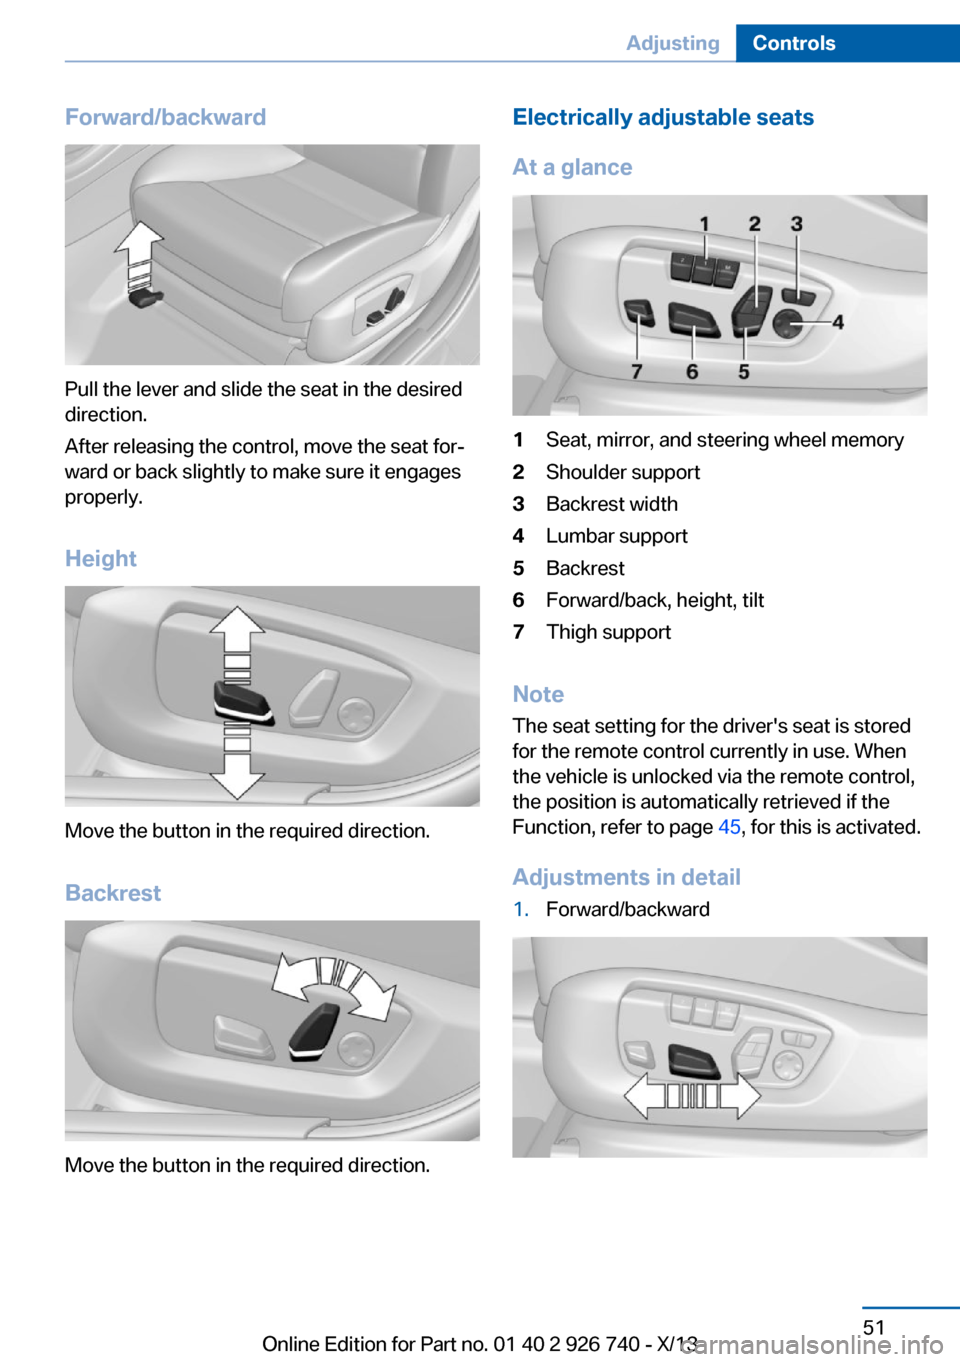
Pull the lever and slide the seat in the desired
direction.
After releasing the control, move the seat for‐
ward or back slightly to make sure it engages
properly.
Height
Move the button in the required direction. Backrest
Move the button in the required direction.
Electrically adjustable seats
At a glance1Seat, mirror, and steering wheel memory2Shoulder support3Backrest width4Lumbar support5Backrest6Forward/back, height, tilt7Thigh support
Note The seat setting for the driver's seat is stored
for the remote control currently in use. When
the vehicle is unlocked via the remote control,
the position is automatically retrieved if the
Function, refer to page 45, for this is activated.
Adjustments in detail
1.Forward/backwardSeite 51AdjustingControls51
Online Edition for Part no. 01 40 2 926 740 - X/13
Page 53 of 265
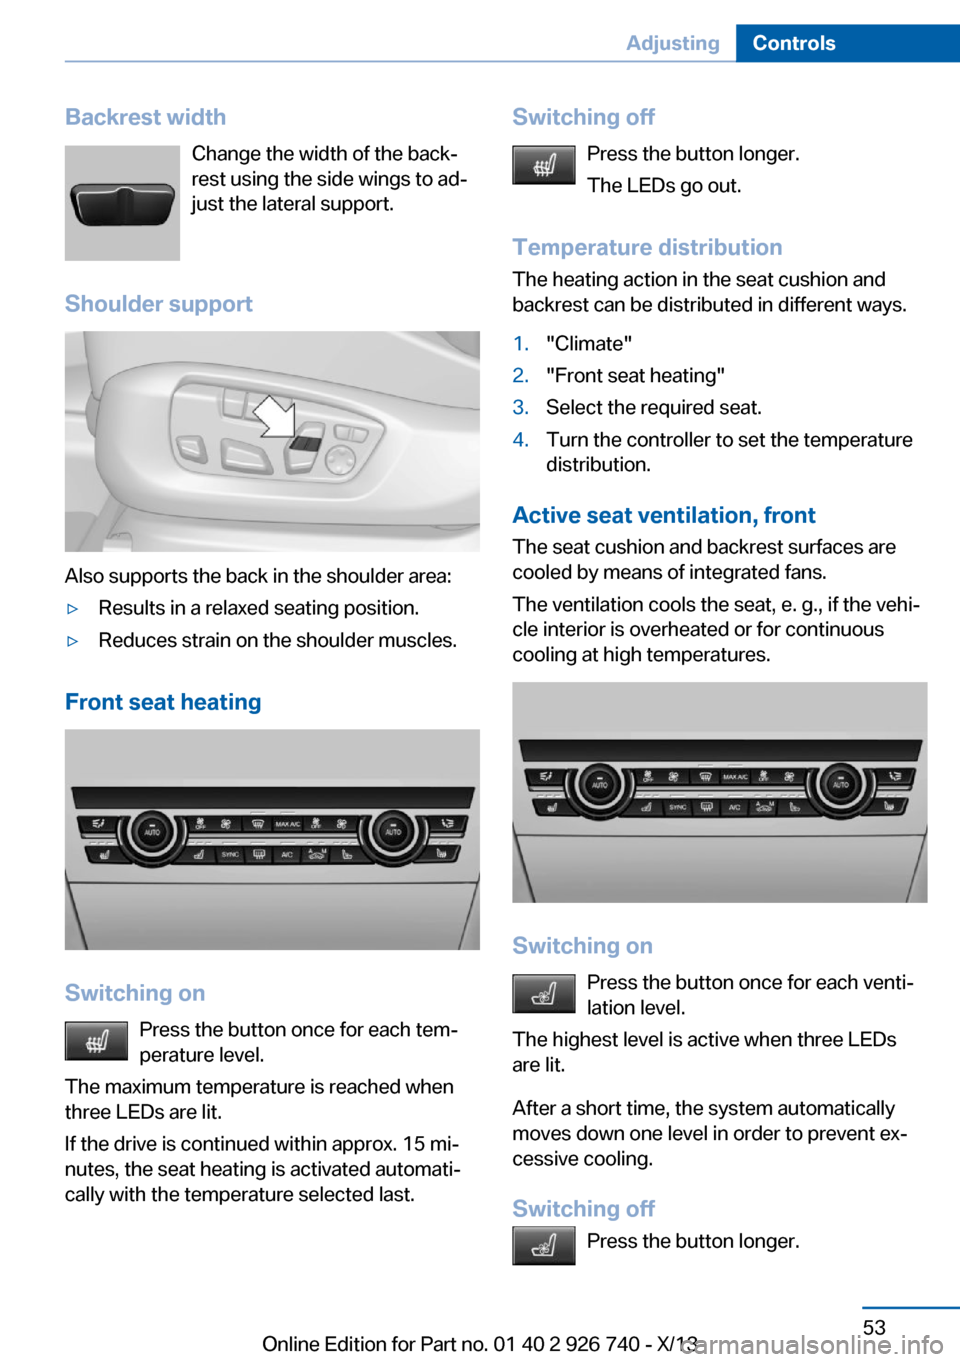
Backrest widthChange the width of the back‐
rest using the side wings to ad‐
just the lateral support.
Shoulder support
Also supports the back in the shoulder area:
▷Results in a relaxed seating position.▷Reduces strain on the shoulder muscles.
Front seat heating
Switching on Press the button once for each tem‐
perature level.
The maximum temperature is reached when
three LEDs are lit.
If the drive is continued within approx. 15 mi‐
nutes, the seat heating is activated automati‐
cally with the temperature selected last.
Switching off
Press the button longer.
The LEDs go out.
Temperature distribution
The heating action in the seat cushion and
backrest can be distributed in different ways.1."Climate"2."Front seat heating"3.Select the required seat.4.Turn the controller to set the temperature
distribution.
Active seat ventilation, front
The seat cushion and backrest surfaces are
cooled by means of integrated fans.
The ventilation cools the seat, e. g., if the vehi‐
cle interior is overheated or for continuous
cooling at high temperatures.
Switching on
Press the button once for each venti‐
lation level.
The highest level is active when three LEDs
are lit.
After a short time, the system automatically
moves down one level in order to prevent ex‐
cessive cooling.
Switching off Press the button longer.
Seite 53AdjustingControls53
Online Edition for Part no. 01 40 2 926 740 - X/13
Page 61 of 265
Fold in the mirror in a car wash
Before washing the car in an automatic
car wash, fold in the exterior mirrors by hand or
with the button; otherwise, the mirrors could
be damaged, depending on the width of the
vehicle.◀
Automatic heating
Both exterior mirrors are automatically heated
whenever the engine is running.
Automatic dimming feature Both exterior mirrors are automatically dim‐
med. Photocells are used for control in the In‐
terior rear view mirror, refer to page 61.
Interior rearview mirror, automatic
dimming feature
The concept
Photocells are used for control:
▷In the mirror glass.▷On the back of the mirror.
Functional requirement For proper operation:
▷Keep the photocells clean.▷Do not cover the area between the inside
rearview mirror and the windshield.Steering wheel
General information Do not adjust while driving
Do not adjust the steering wheel while
driving; otherwise, an unexpected movement
could result in an accident.◀
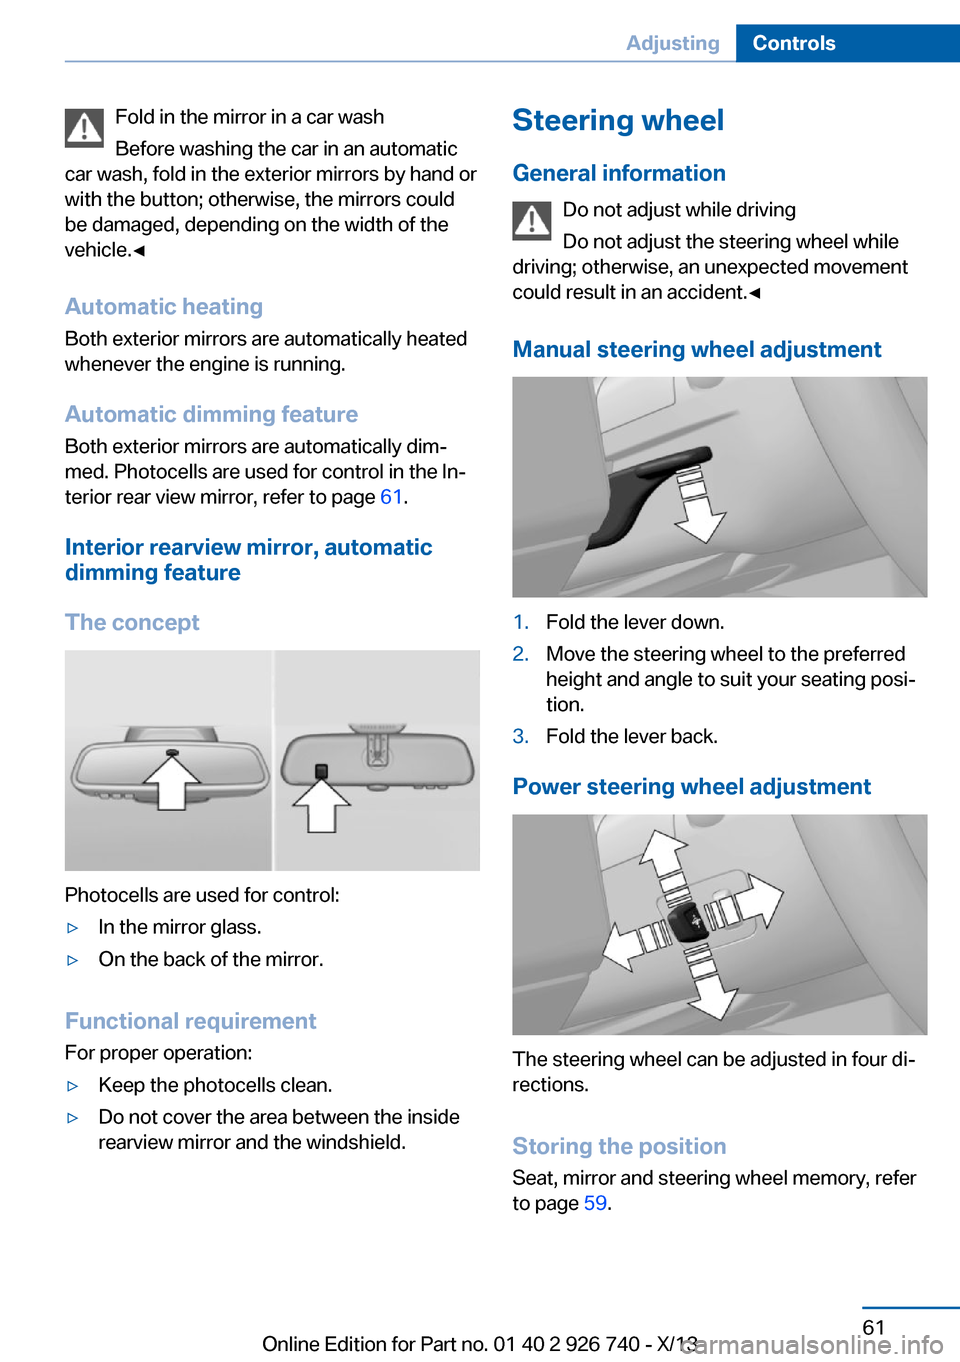
Manual steering wheel adjustment1.Fold the lever down.2.Move the steering wheel to the preferred
height and angle to suit your seating posi‐
tion.3.Fold the lever back.
Power steering wheel adjustment
The steering wheel can be adjusted in four di‐
rections.
Storing the position Seat, mirror and steering wheel memory, refer
to page 59.
Seite 61AdjustingControls61
Online Edition for Part no. 01 40 2 926 740 - X/13
Page 64 of 265
Lock the rear seat backrests in position
Before installation of child restraint sys‐
tems on the rear seat backrest, set a backrest
tilt at which the childseat rests firmly against
the backrest and securely latch all backrests.
Otherwise, the stability of the child seat is lim‐
ited, and there is an increased risk of injury be‐
cause of unexpected movement of the rear
seat backrest.◀
Lock seats of the second row of seats
When equipped with a third row of seats:
when a child restraint system is installed on
the second row of seats, make sure that this
seat is correctly locked; otherwise, there is an
increased risk of injury for the child in the event
of an accident.◀
Only approved child restraint systems on
the third row of seats
On the third row of seats install only approved
child restraint systems; otherwise the protec‐
tive effect is not guaranteed and there is an in‐
creased risk of injury for the child in the event
of an accident.◀
On the front passenger seat
Deactivating airbags
After installing a child restraint fixing system in
the front passenger seat, make sure that the
front, knee and side airbags on the front pas‐
senger side are deactivated.
Deactivate the front passenger airbags auto‐
matically, refer to page 106.
Deactivating the front passenger airbags
If a child restraint fixing system is used in
the front passenger seat, the front passenger
airbags must be deactivated; otherwise, there
is an increased risk of injury to the child when
the airbags are triggered, even with a child re‐
straint fixing system.◀Seat position and height
Before installing a child restraint fixing system,
move the front passenger seat as far back as
possible and adjust its height to the highest
position to obtain the best possible position for
the belt and to offer optimal protection in the
event of an accident.
Do not change the seat position and height af‐
ter this.
Backrest width Adjustable backrest width: before installing a
child restraint fixing system in the front pas‐
senger seat, open the backrest width com‐
pletely. Do not change the backrest width
again and do not call up a memory position.
Backrest width for the child seat
Before installing a child restraint fixing
system in the front passenger seat, the back‐
rest width must be opened completely. Do not
change the adjustment after this; otherwise,
the stability of the child seat will be reduced.◀
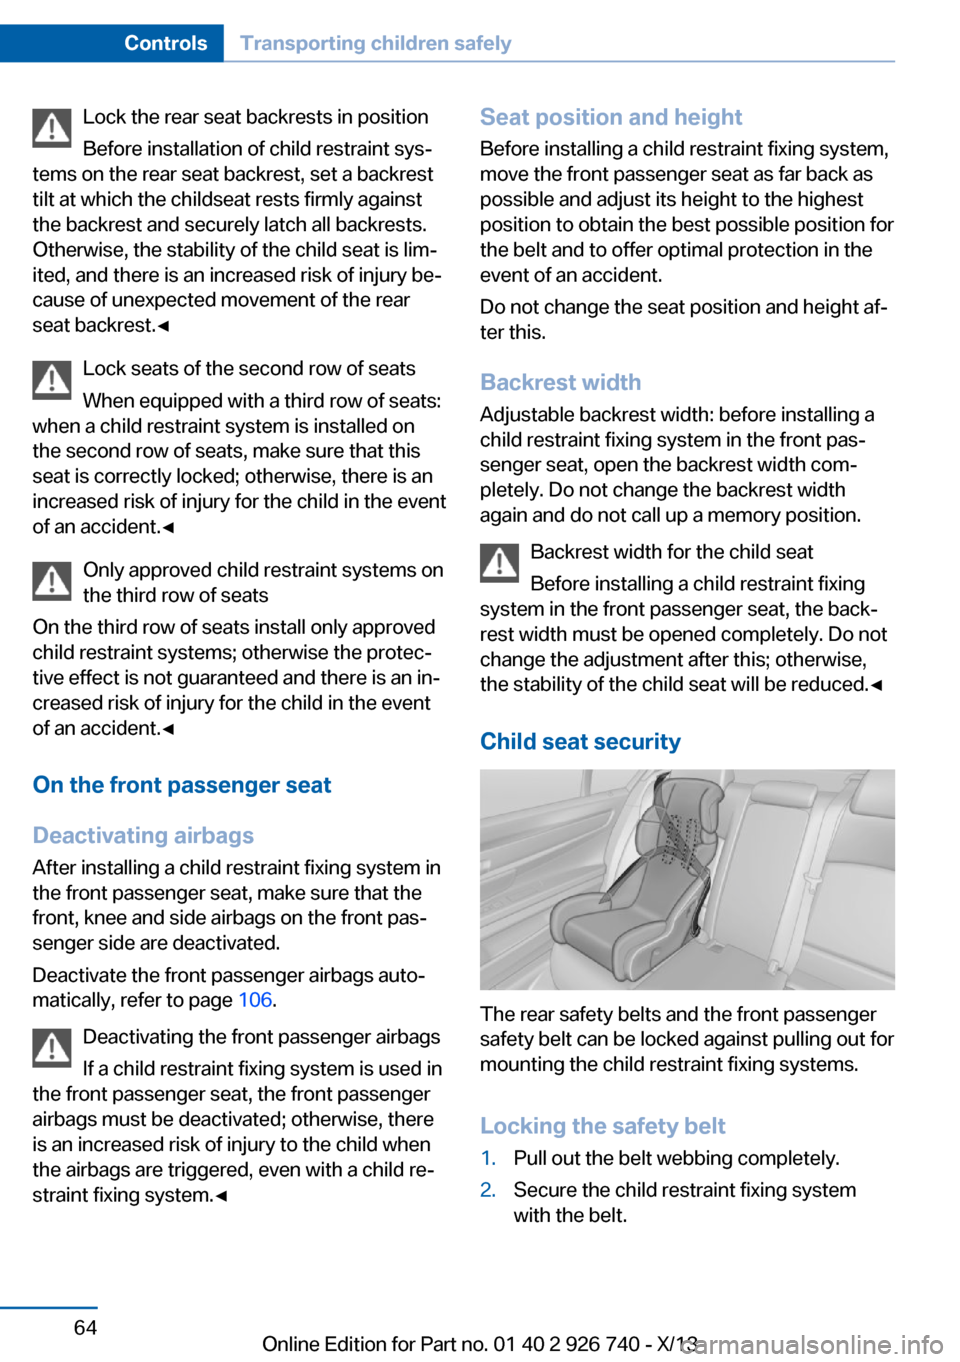
Child seat security
The rear safety belts and the front passenger
safety belt can be locked against pulling out for
mounting the child restraint fixing systems.
Locking the safety belt
1.Pull out the belt webbing completely.2.Secure the child restraint fixing system
with the belt.Seite 64ControlsTransporting children safely64
Online Edition for Part no. 01 40 2 926 740 - X/13
Page 145 of 265
Congestion Assistant
The concept In congestion situations, the system controls
the speed, steers independently as required
and keeps the vehicle close to the center of
the lane.
To the extent possible, the system automati‐
cally adjusts the speed to a slower vehicle
ahead of you. The distance that the vehicle
maintains to the vehicle ahead of you can be
varied. For safety reasons, it depends on the
speed. To maintain a certain distance, the sys‐
tem automatically reduces the speed, applies
the brakes lightly, or accelerates again if the
vehicle ahead begins moving faster.
When lane markings are detected, the system
keeps the vehicle in the center of the lane. For
this purpose, the system steers independently
as needed, for example, during cornering.
General information The congestion assistant determines speed
and distance from the vehicle in front and the
position of the lane markings via a radar sensor
and a camera.
Sensors on the steering wheel detect whether
the steering wheel is being touched.
The system is deactivated as soon as the
steering wheel is no longer being touched.
In order to be able to use the Congestion As‐
sistant, place your hands around the steering
wheel.
When driving with gloves or with protective
covers, contact with the steering wheel cannot
be detected by the sensors. The system in this
case cannot be used.
Hints Personal responsibility
Even an active system does not release
the driver from personal responsibility for the
driving process, especially for lane tracking,adaptation of speed, distance and driving style
to the traffic conditions.
Because of technical system limits, the system
cannot independently react appropriately in all
traffic situations.
Monitor the driving process, the surrounding
area and what is occurring in traffic continu‐
ously and attentively and actively intervene as
required, e.g., by braking, steering or making
an evasive maneuver.◀
Unfavorable weather conditions
In the event of unfavorable weather and
light conditions, e. g. if there is rain, snowfall,
slush, fog or glare, this may result in poorer
recognition of vehicles and lane limits as well
as short-term interruptions for vehicles that are
already detected. Drive attentively, and react to
the current traffic events. Intervene actively
when necessary, e.g., by braking, steering or
making an evasive maneuver, otherwise, there
is danger of an accident.◀
Functional requirements▷Drive on approved road type. The data on
this are stored in the navigation system.
Approved road types are highways.▷Sufficient lane width.▷Lane marking on both sides is detected.▷Vehicle driving ahead is detected.▷Speed below 25 mph/40 km/h.▷Both hands on the steering wheel rim.▷Sufficient curvature.▷Drive in the center of the lane.Seite 145Driving comfortControls145
Online Edition for Part no. 01 40 2 926 740 - X/13
Page 216 of 265
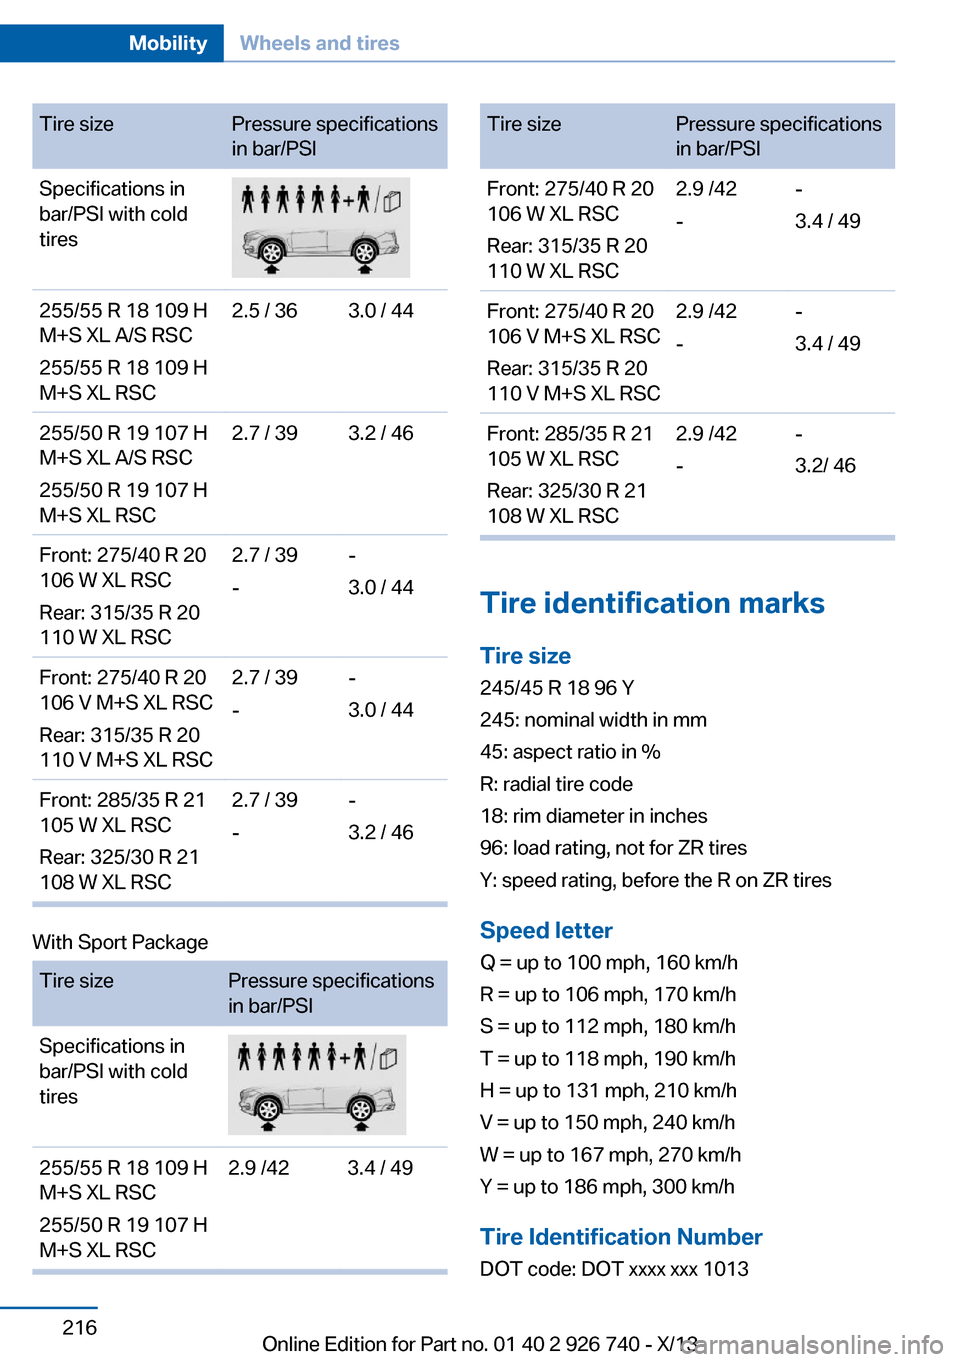
Tire sizePressure specifications
in bar/PSISpecifications in
bar/PSI with cold
tires255/55 R 18 109 H
M+S XL A/S RSC
255/55 R 18 109 H
M+S XL RSC2.5 / 363.0 / 44255/50 R 19 107 H
M+S XL A/S RSC
255/50 R 19 107 H
M+S XL RSC2.7 / 393.2 / 46Front: 275/40 R 20
106 W XL RSC
Rear: 315/35 R 20
110 W XL RSC2.7 / 39
--
3.0 / 44Front: 275/40 R 20
106 V M+S XL RSC
Rear: 315/35 R 20
110 V M+S XL RSC2.7 / 39
--
3.0 / 44Front: 285/35 R 21
105 W XL RSC
Rear: 325/30 R 21
108 W XL RSC2.7 / 39
--
3.2 / 46
With Sport Package
Tire sizePressure specifications
in bar/PSISpecifications in
bar/PSI with cold
tires255/55 R 18 109 H
M+S XL RSC
255/50 R 19 107 H
M+S XL RSC2.9 /423.4 / 49Tire sizePressure specifications
in bar/PSIFront: 275/40 R 20
106 W XL RSC
Rear: 315/35 R 20
110 W XL RSC2.9 /42
--
3.4 / 49Front: 275/40 R 20
106 V M+S XL RSC
Rear: 315/35 R 20
110 V M+S XL RSC2.9 /42
--
3.4 / 49Front: 285/35 R 21
105 W XL RSC
Rear: 325/30 R 21
108 W XL RSC2.9 /42
--
3.2/ 46
Tire identification marks
Tire size 245/45 R 18 96 Y
245: nominal width in mm
45: aspect ratio in %
R: radial tire code
18: rim diameter in inches
96: load rating, not for ZR tires
Y: speed rating, before the R on ZR tires
Speed letter
Q = up to 100 mph, 160 km/h
R = up to 106 mph, 170 km/h
S = up to 112 mph, 180 km/h
T = up to 118 mph, 190 km/h
H = up to 131 mph, 210 km/h
V = up to 150 mph, 240 km/h
W = up to 167 mph, 270 km/h
Y = up to 186 mph, 300 km/h
Tire Identification Number
DOT code: DOT xxxx xxx 1013
Seite 216MobilityWheels and tires216
Online Edition for Part no. 01 40 2 926 740 - X/13
Page 217 of 265
xxxx: manufacturer code for the tire brand
xxx: tire size and tire design
1013: tire age
Tires with DOT codes meet the guidelines of
the U.S. Department of Transportation.
Tire age DOT … 1013: the tire was manufactured in the
10th week 2013.
Recommendation
Regardless of wear, replace tires at least every
6 years.
Uniform Tire Quality Grading
Quality grades can be found where applicable
on the tire sidewall between tread shoulder
and maximum section width.
For example: Treadwear 200; Traction AA;
Temperature A
DOT Quality Grades Treadwear
Traction AA A B C
Temperature A B C
All passenger car tires must conform to Fed‐
eral Safety Requirements in addition to these
grades.
Treadwear The treadwear grade is a comparative rating
based on the wear rate of the tire when tested
under controlled conditions on a specified gov‐
ernment test course. For example, a tire graded 150 would wear one and one-half, 1 g,times as well on the government course as a
tire graded 100. The relative performance of
tires depends upon the actual conditions of
their use, however, and may depart signifi‐
cantly from the norm due to variations in driv‐
ing habits, service practices and differences in
road characteristics and climate.Traction
The traction grades, from highest to lowest,
are AA, A, B, and C.
Those grades represent the tire's ability to
stop on wet pavement as measured under
controlled conditions on specified government
test surfaces of asphalt and concrete. A tire
marked C may have poor traction performance.
The traction grade assigned to this tire is
based on straight-ahead braking traction tests,
and does not include acceleration, cornering,
hydroplaning, or peak traction characteristics.
Temperature
The temperature grades are A, the highest, B,
and C, representing the tire's resistance to the
generation of heat and its ability to dissipate
heat when tested under controlled conditions
on a specified indoor laboratory test wheel.
Sustained high temperature can cause the ma‐
terial of the tire to degenerate and reduce tire
life, and excessive temperature can lead to
sudden tire failure. The grade C corresponds
to a level of performance which all passenger
car tires must meet under the Federal Motor
Vehicle Safety Standard No. 109. Grades Band
A represent higher levels of performance on
the laboratory test wheel than the minimum re‐
quired by law.
Temperature grade for this tire
The temperature grade for this tire is es‐
tablished for a tire that is properly inflated and
not overloaded. Excessive speed, underinfla‐
tion, or excessive loading, either separately or
in combination, can cause heat buildup and
possible tire failure.
If necessary, have the vehicle towed.◀
RSC – Run-flat tires
Run-flat tires, refer to page 220, are labeled
with a circular symbol containing the letters
RSC marked on the sidewall.Seite 217Wheels and tiresMobility217
Online Edition for Part no. 01 40 2 926 740 - X/13
Page 244 of 265
CareVehicle equipmentAll standard, country-specific and optional
equipment that is offered in the model series is
described in this chapter. Therefore, equip‐
ment is also described that is not available in a
vehicle, e. g., because of the selected optional
equipment or country variant. This also applies
for safety-related functions and systems.
Car washes Hints Steam jets or high-pressure washers
When using steam jets or high-pressure
washers, hold them a sufficient distance away and use a maximum temperature of
140 ℉/60 ℃.
If the vehicle has a glass sunroof, ensure that a distance of at least 31.5 inches/80 cm is main‐
tained. Holding them too close or using exces‐
sively high pressures or temperatures can
cause damage or preliminary damage that may
then lead to long-term damage.
Follow the user's manual for the high-pressure
washer.◀
Cleaning sensors/cameras with high-
pressure washers
When using high-pressure washers, do not
spray the exterior sensors and cameras, e.g., Park Distance Control, for extended periods of
time and only from a distance of at least
12 in/30 cm.◀▷Regularly remove foreign items such as
leaves in the area below the windshield
when the hood is raised.▷Wash your vehicle frequently, particularly
in winter.Intense soiling and road salt can damage
the vehicle.
Automatic car washes
Hints
Note the following:
▷Give preference to cloth car washes or
those that use soft brushes in order to
avoid paint damage.▷Make sure that the wheels and tires are not
damaged by the transport mechanisms.▷Fold in the exterior mirrors; otherwise, they
may be damaged, depending on the width
of the vehicle.▷Deactivate, refer to page 76,the rain sensor
to avoid unintentional wiper activation.▷In some cases, an unintentional alarm can
be triggered by the interior motion sensor
of the alarm system. Follow the instruc‐
tions on avoiding an unintentional alarm,
refer to page 46.
Guide rails in car washes
Avoid car washes with guide rails higher
than 4 in/10 cm; otherwise, the vehicle body
could be damaged.◀
Different types of tires Observing vehicle width
Before entering washing systems, make
sure that the vehicle width is not too great for
the car wash; otherwise, there could be dam‐
age to the vehicle and car wash.◀
Before driving into a car wash In order to ensure that the vehicle can roll in a
car wash, take the following steps:
1.Drive into the car wash.Seite 244MobilityCare244
Online Edition for Part no. 01 40 2 926 740 - X/13
Page 250 of 265
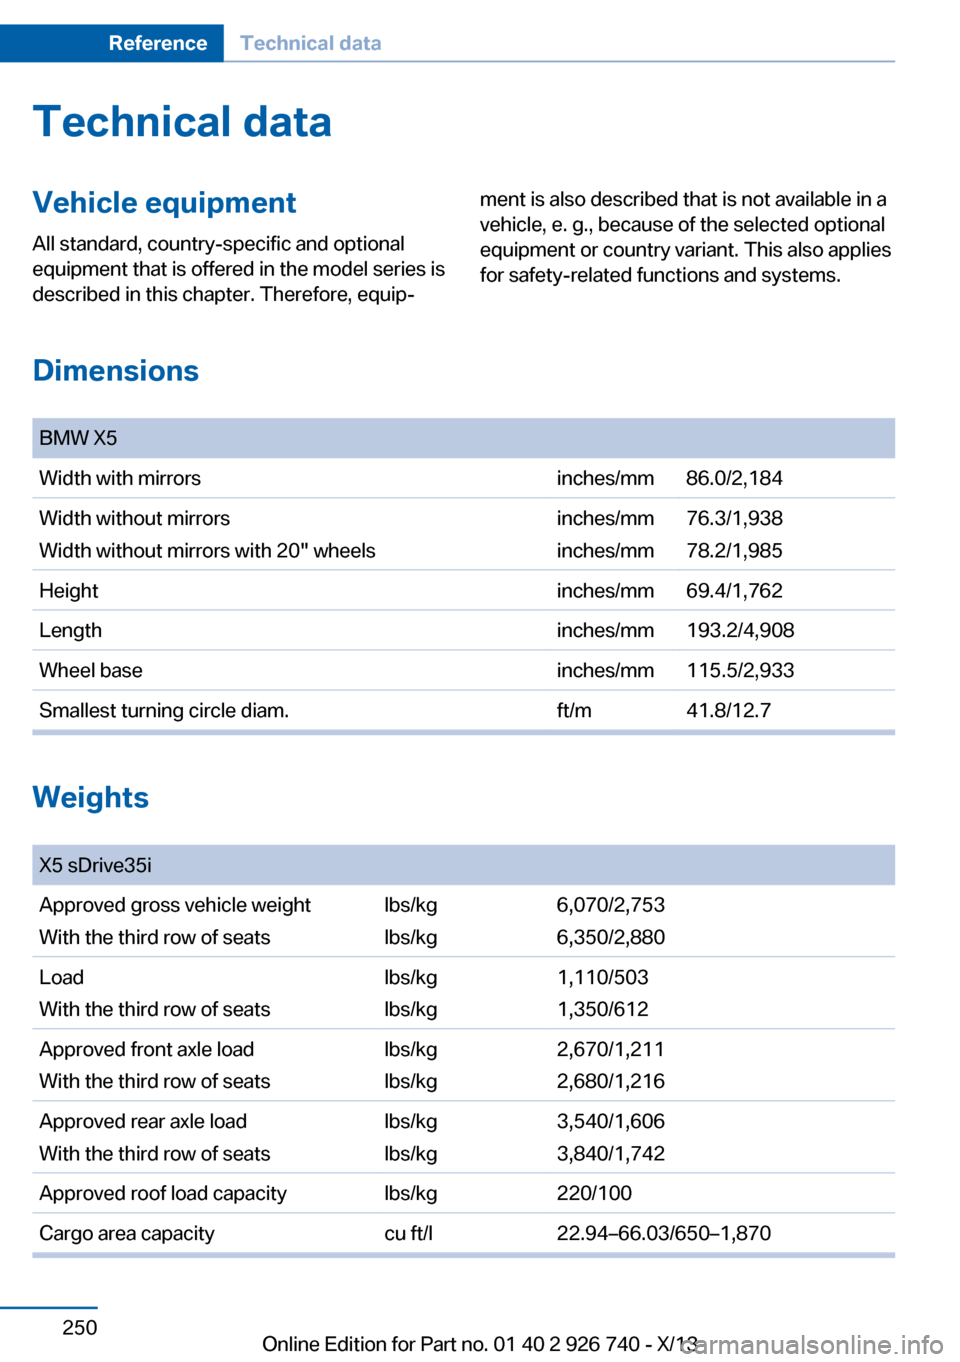
Technical dataVehicle equipment
All standard, country-specific and optional
equipment that is offered in the model series is
described in this chapter. Therefore, equip‐
ment is also described that is not available in a
vehicle, e. g., because of the selected optional
equipment or country variant. This also applies
for safety-related functions and systems.Dimensions
BMW X5Width with mirrorsinches/mm86.0/2,184Width without mirrors
Width without mirrors with 20" wheels
inches/mm
inches/mm
76.3/1,938
78.2/1,985
Heightinches/mm69.4/1,762Lengthinches/mm193.2/4,908Wheel baseinches/mm115.5/2,933Smallest turning circle diam.ft/m41.8/12.7
Weights
X5 sDrive35iApproved gross vehicle weight
With the third row of seats
lbs/kg
lbs/kg
6,070/2,753
6,350/2,880
Load
With the third row of seats
lbs/kg
lbs/kg
1,110/503
1,350/612
Approved front axle load
With the third row of seats
lbs/kg
lbs/kg
2,670/1,211
2,680/1,216
Approved rear axle load
With the third row of seats
lbs/kg
lbs/kg
3,540/1,606
3,840/1,742
Approved roof load capacitylbs/kg220/100Cargo area capacitycu ft/l22.94–66.03/650–1,870Seite 250ReferenceTechnical data250
Online Edition for Part no. 01 40 2 926 740 - X/13
Page 254 of 265
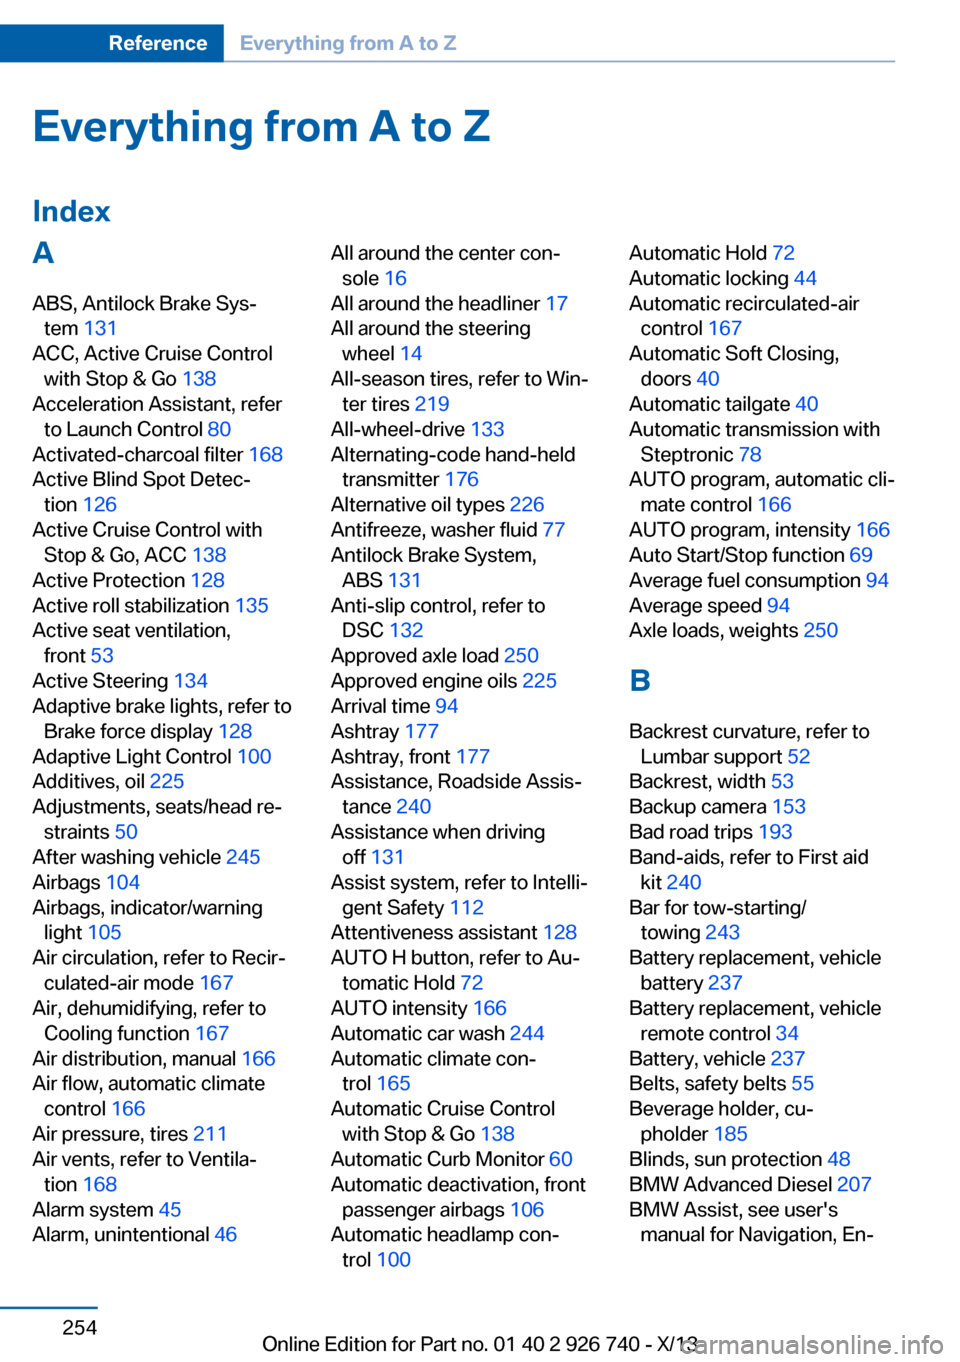
Everything from A to Z
IndexA ABS, Antilock Brake Sys‐ tem 131
ACC, Active Cruise Control with Stop & Go 138
Acceleration Assistant, refer to Launch Control 80
Activated-charcoal filter 168
Active Blind Spot Detec‐ tion 126
Active Cruise Control with Stop & Go, ACC 138
Active Protection 128
Active roll stabilization 135
Active seat ventilation, front 53
Active Steering 134
Adaptive brake lights, refer to Brake force display 128
Adaptive Light Control 100
Additives, oil 225
Adjustments, seats/head re‐ straints 50
After washing vehicle 245
Airbags 104
Airbags, indicator/warning light 105
Air circulation, refer to Recir‐ culated-air mode 167
Air, dehumidifying, refer to Cooling function 167
Air distribution, manual 166
Air flow, automatic climate control 166
Air pressure, tires 211
Air vents, refer to Ventila‐ tion 168
Alarm system 45
Alarm, unintentional 46 All around the center con‐
sole 16
All around the headliner 17
All around the steering wheel 14
All-season tires, refer to Win‐ ter tires 219
All-wheel-drive 133
Alternating-code hand-held transmitter 176
Alternative oil types 226
Antifreeze, washer fluid 77
Antilock Brake System, ABS 131
Anti-slip control, refer to DSC 132
Approved axle load 250
Approved engine oils 225
Arrival time 94
Ashtray 177
Ashtray, front 177
Assistance, Roadside Assis‐ tance 240
Assistance when driving off 131
Assist system, refer to Intelli‐ gent Safety 112
Attentiveness assistant 128
AUTO H button, refer to Au‐ tomatic Hold 72
AUTO intensity 166
Automatic car wash 244
Automatic climate con‐ trol 165
Automatic Cruise Control with Stop & Go 138
Automatic Curb Monitor 60
Automatic deactivation, front passenger airbags 106
Automatic headlamp con‐ trol 100 Automatic Hold 72
Automatic locking 44
Automatic recirculated-air control 167
Automatic Soft Closing, doors 40
Automatic tailgate 40
Automatic transmission with Steptronic 78
AUTO program, automatic cli‐ mate control 166
AUTO program, intensity 166
Auto Start/Stop function 69
Average fuel consumption 94
Average speed 94
Axle loads, weights 250
B Backrest curvature, refer to Lumbar support 52
Backrest, width 53
Backup camera 153
Bad road trips 193
Band-aids, refer to First aid kit 240
Bar for tow-starting/ towing 243
Battery replacement, vehicle battery 237
Battery replacement, vehicle remote control 34
Battery, vehicle 237
Belts, safety belts 55
Beverage holder, cu‐ pholder 185
Blinds, sun protection 48
BMW Advanced Diesel 207
BMW Assist, see user's manual for Navigation, En‐Seite 254ReferenceEverything from A to Z254
Online Edition for Part no. 01 40 2 926 740 - X/13