starting engine BMW X5 2015 F15 Owner's Manual
[x] Cancel search | Manufacturer: BMW, Model Year: 2015, Model line: X5, Model: BMW X5 2015 F15Pages: 275, PDF Size: 6.46 MB
Page 35 of 275
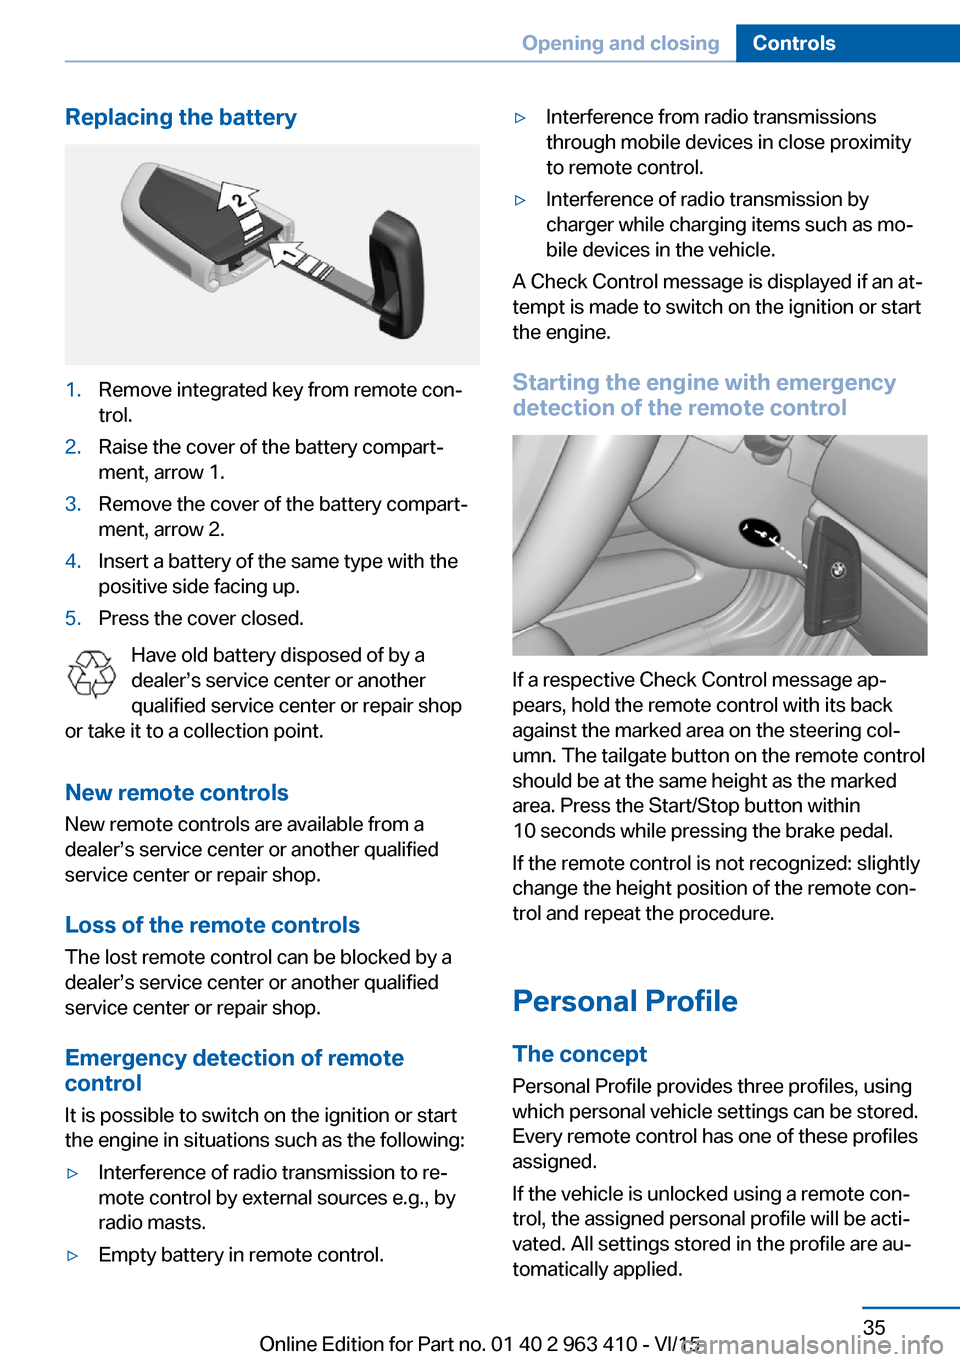
Replacing the battery1.Remove integrated key from remote con‐
trol.2.Raise the cover of the battery compart‐
ment, arrow 1.3.Remove the cover of the battery compart‐
ment, arrow 2.4.Insert a battery of the same type with the
positive side facing up.5.Press the cover closed.
Have old battery disposed of by a
dealer’s service center or another
qualified service center or repair shop
or take it to a collection point.
New remote controlsNew remote controls are available from a
dealer’s service center or another qualified
service center or repair shop.
Loss of the remote controls
The lost remote control can be blocked by a
dealer’s service center or another qualified
service center or repair shop.
Emergency detection of remote
control
It is possible to switch on the ignition or start
the engine in situations such as the following:
▷Interference of radio transmission to re‐
mote control by external sources e.g., by
radio masts.▷Empty battery in remote control.▷Interference from radio transmissions
through mobile devices in close proximity
to remote control.▷Interference of radio transmission by
charger while charging items such as mo‐
bile devices in the vehicle.
A Check Control message is displayed if an at‐
tempt is made to switch on the ignition or start
the engine.
Starting the engine with emergency
detection of the remote control
If a respective Check Control message ap‐
pears, hold the remote control with its back
against the marked area on the steering col‐
umn. The tailgate button on the remote control
should be at the same height as the marked
area. Press the Start/Stop button within
10 seconds while pressing the brake pedal.
If the remote control is not recognized: slightly
change the height position of the remote con‐
trol and repeat the procedure.
Personal Profile
The concept Personal Profile provides three profiles, using
which personal vehicle settings can be stored.
Every remote control has one of these profiles
assigned.
If the vehicle is unlocked using a remote con‐
trol, the assigned personal profile will be acti‐
vated. All settings stored in the profile are au‐
tomatically applied.
Seite 35Opening and closingControls35
Online Edition for Part no. 01 40 2 963 410 - VI/15
Page 41 of 275
Automatic tailgate operation
Adjusting the opening height
You can set how far the tailgate should open.
CAUTION
The tailgate swings back and up when it
opens. There is risk of property damage. Make
sure that the area of movement of the tailgate
is clear during opening and closing.◀
When adjusting the opening height, ensure
that there is a clearance of at least 4 in/10 cm
above the tailgate.1."Settings"2."Tailgate"3.Turn the controller until the desired open‐
ing height is selected.
Opening
CAUTION
The tailgate swings back and up when it
opens. There is risk of property damage. Make
sure that the area of movement of the tailgate
is clear during opening and closing.◀
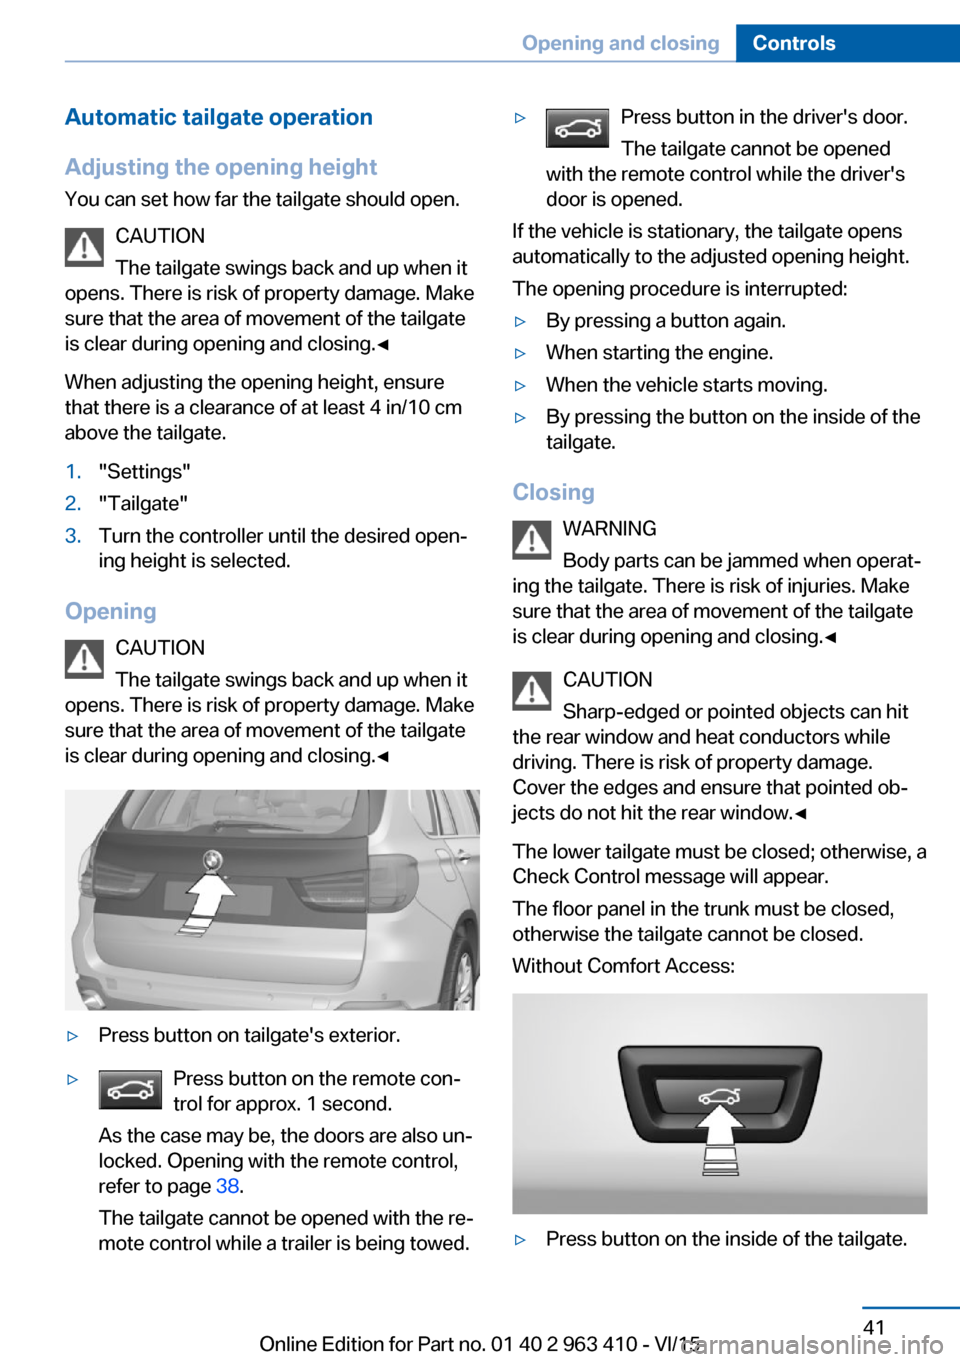
▷Press button on tailgate's exterior.▷Press button on the remote con‐
trol for approx. 1 second.
As the case may be, the doors are also un‐
locked. Opening with the remote control,
refer to page 38.
The tailgate cannot be opened with the re‐
mote control while a trailer is being towed.▷Press button in the driver's door.
The tailgate cannot be opened
with the remote control while the driver's
door is opened.
If the vehicle is stationary, the tailgate opens
automatically to the adjusted opening height.
The opening procedure is interrupted:
▷By pressing a button again.▷When starting the engine.▷When the vehicle starts moving.▷By pressing the button on the inside of the
tailgate.
Closing
WARNING
Body parts can be jammed when operat‐
ing the tailgate. There is risk of injuries. Make sure that the area of movement of the tailgate
is clear during opening and closing.◀
CAUTION
Sharp-edged or pointed objects can hit
the rear window and heat conductors while
driving. There is risk of property damage.
Cover the edges and ensure that pointed ob‐
jects do not hit the rear window.◀
The lower tailgate must be closed; otherwise, a
Check Control message will appear.
The floor panel in the trunk must be closed,
otherwise the tailgate cannot be closed.
Without Comfort Access:
▷Press button on the inside of the tailgate.Seite 41Opening and closingControls41
Online Edition for Part no. 01 40 2 963 410 - VI/15
Page 42 of 275
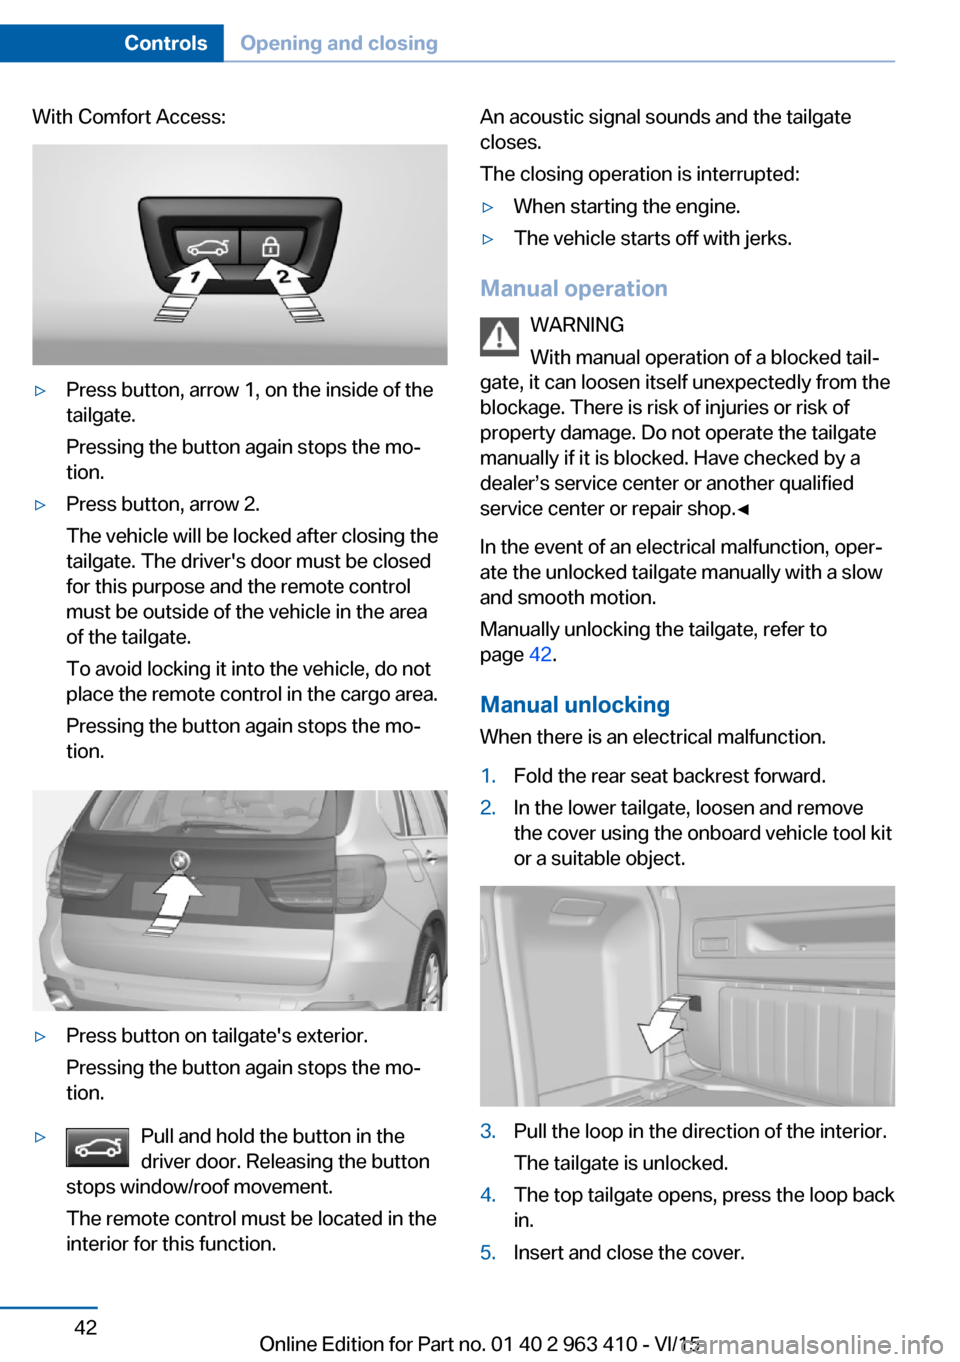
With Comfort Access:▷Press button, arrow 1, on the inside of the
tailgate.
Pressing the button again stops the mo‐
tion.▷Press button, arrow 2.
The vehicle will be locked after closing the
tailgate. The driver's door must be closed
for this purpose and the remote control
must be outside of the vehicle in the area
of the tailgate.
To avoid locking it into the vehicle, do not
place the remote control in the cargo area.
Pressing the button again stops the mo‐
tion.▷Press button on tailgate's exterior.
Pressing the button again stops the mo‐
tion.▷Pull and hold the button in the
driver door. Releasing the button
stops window/roof movement.
The remote control must be located in the
interior for this function.An acoustic signal sounds and the tailgate
closes.
The closing operation is interrupted:▷When starting the engine.▷The vehicle starts off with jerks.
Manual operation
WARNING
With manual operation of a blocked tail‐
gate, it can loosen itself unexpectedly from the
blockage. There is risk of injuries or risk of
property damage. Do not operate the tailgate
manually if it is blocked. Have checked by a
dealer’s service center or another qualified
service center or repair shop.◀
In the event of an electrical malfunction, oper‐
ate the unlocked tailgate manually with a slow
and smooth motion.
Manually unlocking the tailgate, refer to
page 42.
Manual unlocking
When there is an electrical malfunction.
1.Fold the rear seat backrest forward.2.In the lower tailgate, loosen and remove
the cover using the onboard vehicle tool kit
or a suitable object.3.Pull the loop in the direction of the interior.
The tailgate is unlocked.4.The top tailgate opens, press the loop back
in.5.Insert and close the cover.Seite 42ControlsOpening and closing42
Online Edition for Part no. 01 40 2 963 410 - VI/15
Page 70 of 275
The radio-ready state remains active if, e.g.,
the ignition is automatically switched off for the
following reasons:▷Opening or closing the driver's door.▷Unfastening of the driver's safety belt.▷When automatically switching from low
beams to parking lights.
If the engine is switched off and the ignition is
switched on, the system automatically
switches to the radio-ready state if the lights
are turned off or, if correspondingly equipped,
the daytime running lights are activated.
Starting the engine
Information DANGER
If the exhaust pipe is blocked or ventila‐
tion is insufficient, harmful exhaust gases can
enter into the vehicle. The exhaust gases con‐
tain carbon monoxide, an odorless and color‐
less but highly toxic gas. In enclosed areas, ex‐
haust gases can also accumulate outside of
the vehicle. There is danger to life. Keep the
exhaust pipe free and ensure sufficient ventila‐
tion.◀
WARNING
An unsecured vehicle can put itself into
motion and roll away. There is risk of an acci‐
dent. Before exiting, secure the vehicle against
rolling.
In order to ensure that the vehicle is secured
against rolling away, observe the following:
▷Set the parking brake.▷On uphill grades or on a slope, turn the
front wheels in the direction of the curb.▷On uphill grades or on a slope, also secure
the vehicle, e.g. with a wheel chock.◀CAUTION
In the case of repeated starting attempts
or repeated starting in quick succession, the
fuel is not burned or is inadequately burned.
The catalytic converter can overheat. There is
risk of property damage. Avoid repeated start‐
ing in quick succession.◀
Diesel engine
If the engine is cold and temperatures are be‐
low approx. 32 ℉/0 ℃, the start process may
be delayed somewhat due to automatic pre‐
heating.
A Check Control message is displayed.
Steptronic transmission
Starting the engine1.Depress the brake pedal.2.Press the Start/Stop button.
The ignition is activated automatically for a
certain time and is stopped as soon as the en‐
gine starts.
Engine stop
Information WARNING
Unattended children or animals can
move the vehicle and endanger themselves
and traffic, e.g. with the following actions:
▷Pressing the Start/Stop button.▷Releasing the parking brake.▷Opening and closing of doors or windows.▷Shifting the selector lever into neutral.▷Using vehicle equipment.
There is risk of accidents or injuries. Do not
leave children or animals unattended in the ve‐
hicle. Carry remote control along when exiting
and lock the vehicle.◀
Seite 70ControlsDriving70
Online Edition for Part no. 01 40 2 963 410 - VI/15
Page 72 of 275
▷After driving in reverse.▷Fogging of the windows when the auto‐
matic climate control is switched on.▷Vehicle battery is heavily discharged.▷At higher elevations.▷The engine compartment lid is unlocked.▷HDC Hill Descent Control is activated.▷The parking assistant is activated.▷Stop-and-go traffic.▷Selector lever in selector lever position N,
M/S or R.▷Use of fuel with high ethanol content.
Starting the engine
The engine starts automatically under the fol‐
lowing conditions:
▷Steptronic transmission:
By releasing the brake pedal.
When Automatic Hold is activated: press
the accelerator pedal.
After the engine starts, accelerate as usual.
Safety mode
After the engine switches off automatically, it
will not start again automatically if any one of
the following conditions are met:
▷The driver's safety belt is unbuckled and
the driver's door is open.▷The hood was unlocked.
Some indicator lights light up for a varied
length of time.
The engine can only be started via the Start/
Stop button.
Functional limitations
Even if driving off was not intended, the deacti‐
vated engine starts up automatically in the fol‐
lowing situations:
▷Excessive warming of the car's interior
when the cooling function is switched on.▷The steering wheel is turned.▷Steptronic transmission: change from se‐
lector lever position D to R, N or M/S.▷Steptronic transmission: change from se‐
lector lever position P to N, D, R or M/S.▷Fogging of the windows when the auto‐
matic climate control is switched on.▷Vehicle battery is heavily discharged.▷Excessive cooling of the car's interior when
the heating is switched on.
Activating/deactivating the system
manually
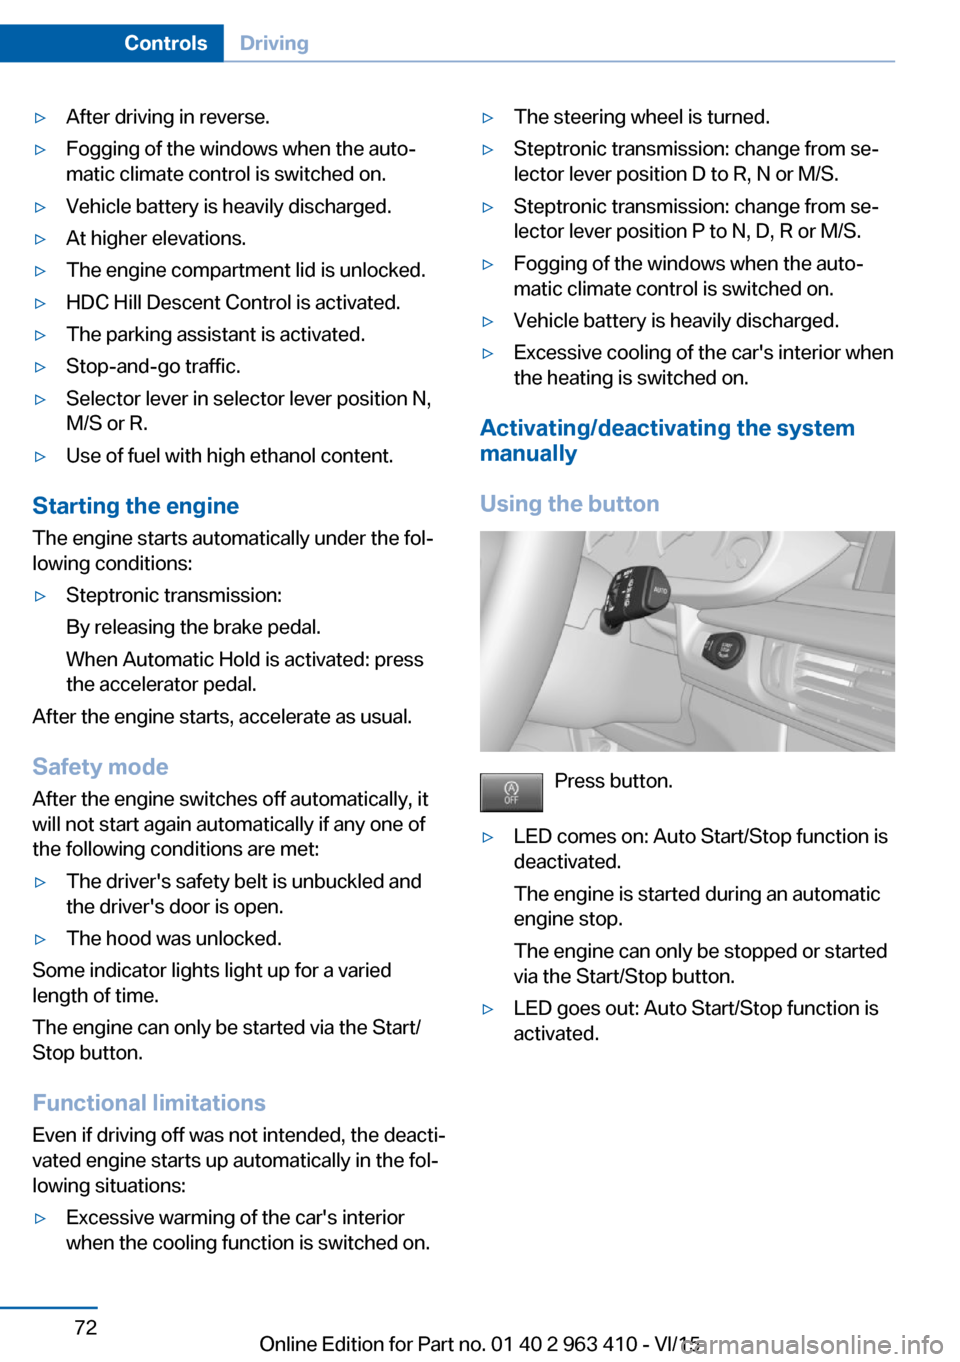
Using the button
Press button.
▷LED comes on: Auto Start/Stop function is
deactivated.
The engine is started during an automatic
engine stop.
The engine can only be stopped or started
via the Start/Stop button.▷LED goes out: Auto Start/Stop function is
activated.Seite 72ControlsDriving72
Online Edition for Part no. 01 40 2 963 410 - VI/15
Page 84 of 275
General information
The use of Launch Control causes premature
component wear since this function represents
a very heavy load for the vehicle.
Do not use Launch Control during the break-in,
refer to page 192, period.
To increase vehicle stability, activate DSC again as soon as possible.
An experienced driver may be able to achieve
better acceleration values in DSC OFF mode.
Requirements
Launch Control is available when the engine is
warmed up, that is, after uninterrupted driving
of at least 6 miles/10 km.
To start with Launch Control do not steer the
steering wheel.
Start with launch controlWhile the engine is running:1. Press button or select Sport+ with
the Driving Dynamics Control.
TRACTION is displayed in the instrument
cluster and the indicator lamp for DSC OFF
lights up.2.Engage selector lever position S.3.With the left foot, forcefully press down on
the brake.4.Press and hold down the accelerator pedal
beyond the resistance point at the full
throttle position, kickdown.
A flag symbol is displayed in the instru‐
ment cluster.5.The starting engine speed adjusts. Within
3 seconds, release the brake.
Before using Launch Control, allow the trans‐
mission to cool down for approx. 5 minutes.
Launch Control adjusts to the surrounding
conditions, e.g., wet pavement, when used
again.
Seite 84ControlsDriving84
Online Edition for Part no. 01 40 2 963 410 - VI/15
Page 131 of 275
Small animals are not detected by the object
detection function, even if they are clearly visi‐
ble in the image.
Limited detection, e.g. in the following circum‐
stances:▷People or animals who are fully or partially
covered, especially when their heads are
covered.▷People who are not in an upright position,
e.g., lying down.▷Cyclists on unconventional bicycles (e.g.,
recumbent bicycles).▷After physical damage to the system, e.g.,
after an accident.
No display on the rear screen
The image from Night Vision cannot be dis‐
played on the rear screen.
Lane departure warning The concept Starting at a specific speed, this system alerts
you when the vehicle on streets with lane
markings is about to leave the lane. This
speed, depending on the country version, is
between 35 mph/55 km/h and
45 mph/70 km/h.
The steering wheel begins vibrating gently in
the event of warnings. The time of the warning
may vary depending on the current driving sit‐
uation.
The system does not provide a warning if the
turn signal is set before leaving the lane.
Information WARNING
The system does not relieve from the
personal responsibility to correctly assess
route and traffic situation. There is risk of an
accident. Adjust the driving style to the traffic
conditions. Watch traffic closely and actively
interfere in the respective situations. In the
event of a warning, do not unnecessarily jerk
the steering wheel.◀
Overview
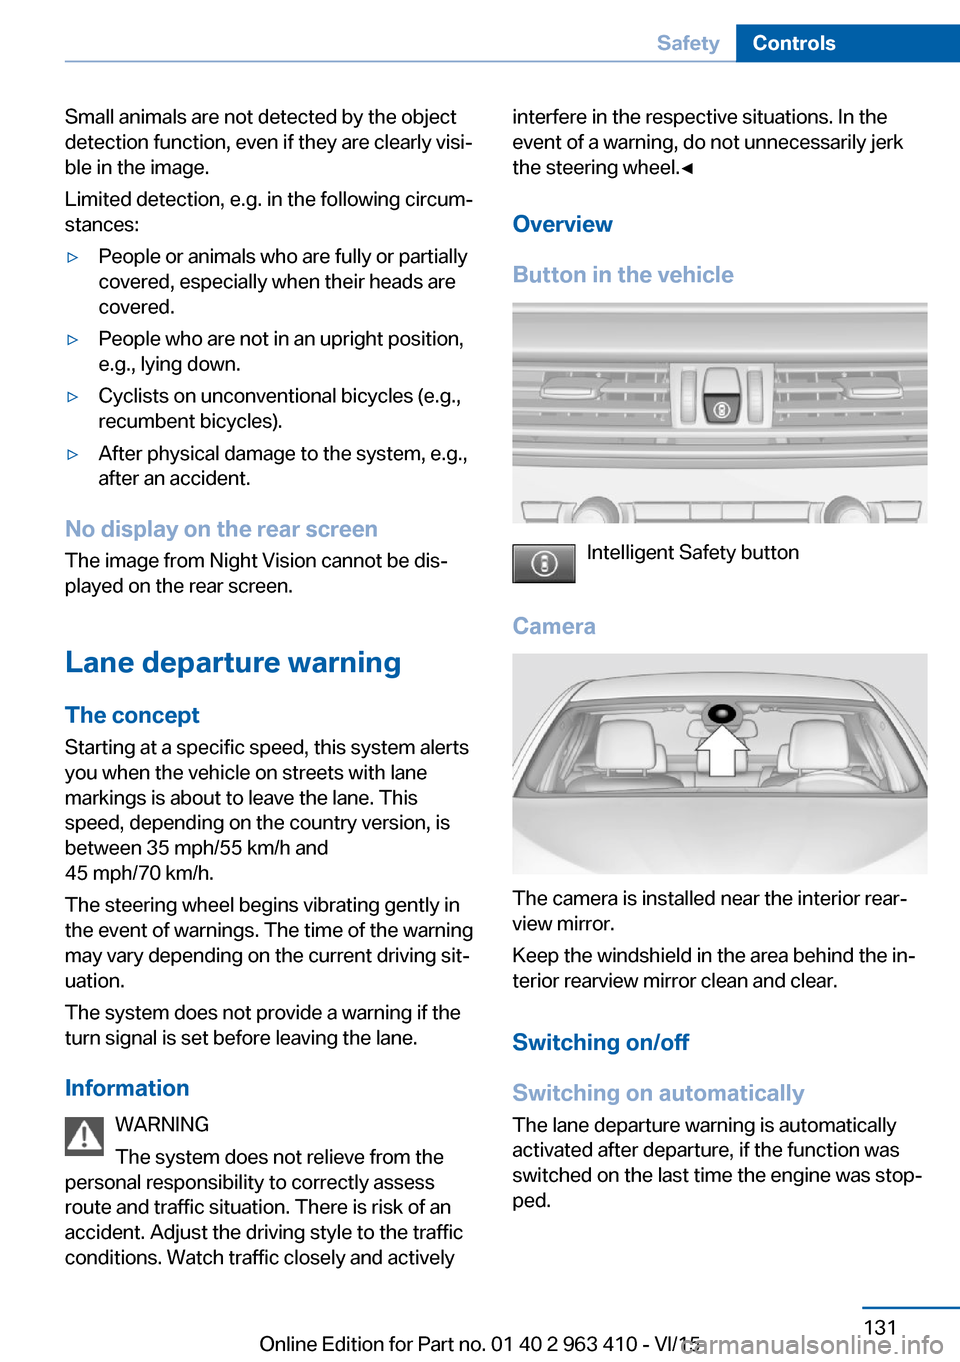
Button in the vehicle
Intelligent Safety button
Camera
The camera is installed near the interior rear‐
view mirror.
Keep the windshield in the area behind the in‐
terior rearview mirror clean and clear.
Switching on/off
Switching on automatically The lane departure warning is automatically
activated after departure, if the function was
switched on the last time the engine was stop‐
ped.
Seite 131SafetyControls131
Online Edition for Part no. 01 40 2 963 410 - VI/15
Page 135 of 275
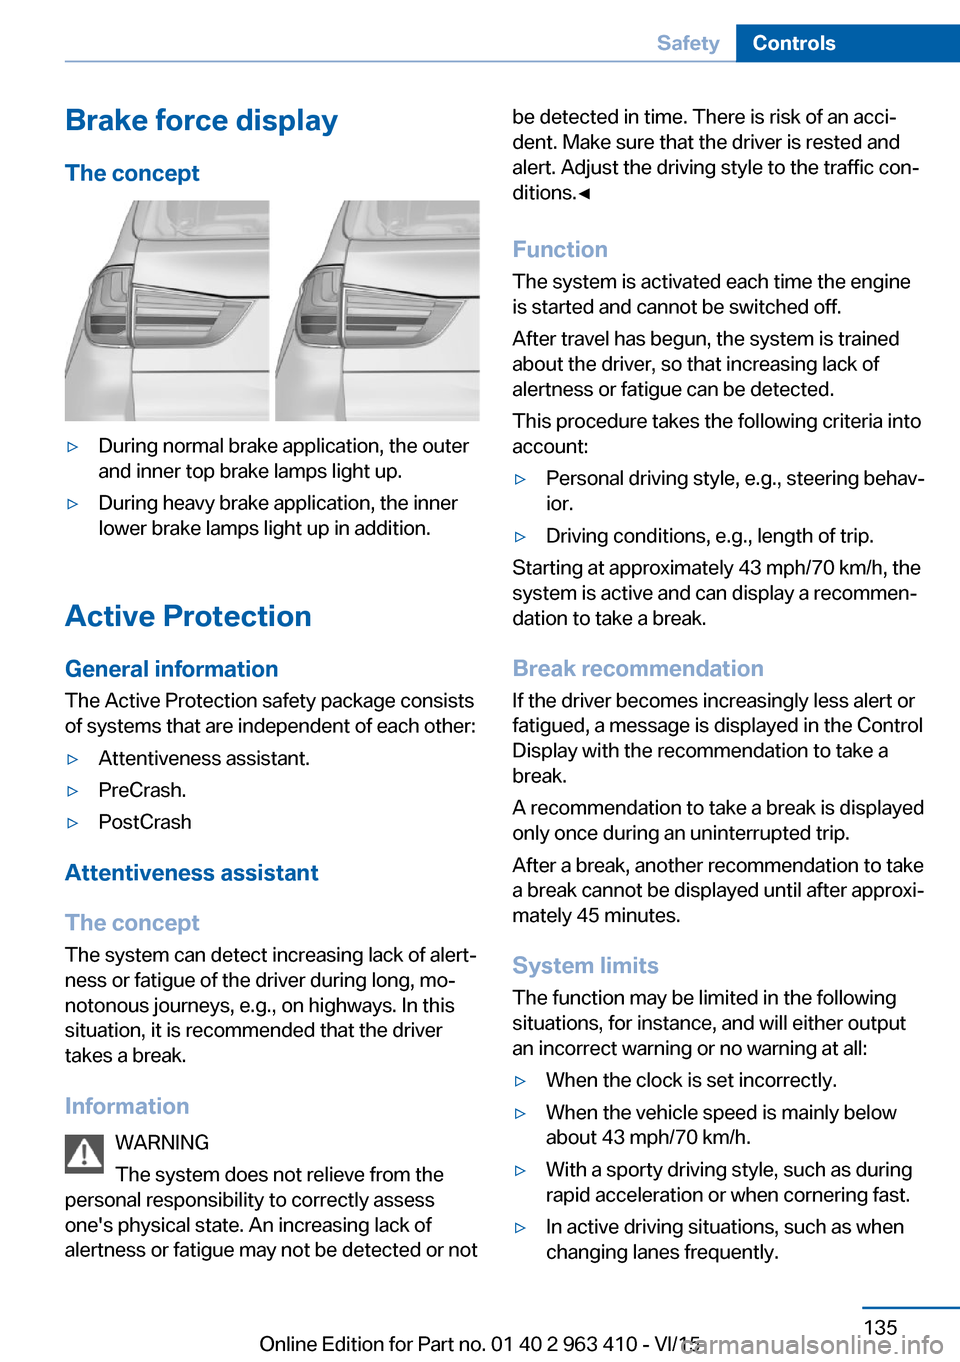
Brake force display
The concept▷During normal brake application, the outer
and inner top brake lamps light up.▷During heavy brake application, the inner
lower brake lamps light up in addition.
Active Protection
General information
The Active Protection safety package consists
of systems that are independent of each other:
▷Attentiveness assistant.▷PreCrash.▷PostCrash
Attentiveness assistant
The concept The system can detect increasing lack of alert‐
ness or fatigue of the driver during long, mo‐
notonous journeys, e.g., on highways. In this situation, it is recommended that the driver
takes a break.
Information WARNING
The system does not relieve from the
personal responsibility to correctly assess
one's physical state. An increasing lack of
alertness or fatigue may not be detected or not
be detected in time. There is risk of an acci‐
dent. Make sure that the driver is rested and
alert. Adjust the driving style to the traffic con‐
ditions.◀
Function
The system is activated each time the engine
is started and cannot be switched off.
After travel has begun, the system is trained
about the driver, so that increasing lack of
alertness or fatigue can be detected.
This procedure takes the following criteria into
account:▷Personal driving style, e.g., steering behav‐
ior.▷Driving conditions, e.g., length of trip.
Starting at approximately 43 mph/70 km/h, the
system is active and can display a recommen‐
dation to take a break.
Break recommendation
If the driver becomes increasingly less alert or
fatigued, a message is displayed in the Control
Display with the recommendation to take a
break.
A recommendation to take a break is displayed
only once during an uninterrupted trip.
After a break, another recommendation to take
a break cannot be displayed until after approxi‐
mately 45 minutes.
System limits
The function may be limited in the following
situations, for instance, and will either output
an incorrect warning or no warning at all:
▷When the clock is set incorrectly.▷When the vehicle speed is mainly below
about 43 mph/70 km/h.▷With a sporty driving style, such as during
rapid acceleration or when cornering fast.▷In active driving situations, such as when
changing lanes frequently.Seite 135SafetyControls135
Online Edition for Part no. 01 40 2 963 410 - VI/15
Page 178 of 275
Connecting electrical
devices
Information CAUTION
Battery chargers for the vehicle battery
can work with high voltages and currents,
which means that the 12V on-board network
can be overloaded or damaged. There is risk of
property damage. Only connect battery charg‐
ers for the vehicle battery to the starting aid
terminals in the engine compartment.◀
CAUTION
If metal objects fall into the socket, they
can cause a short circuit. There is risk of prop‐
erty damage. Replace the cigarette lighter or socket cover again after using the socket.◀
Sockets
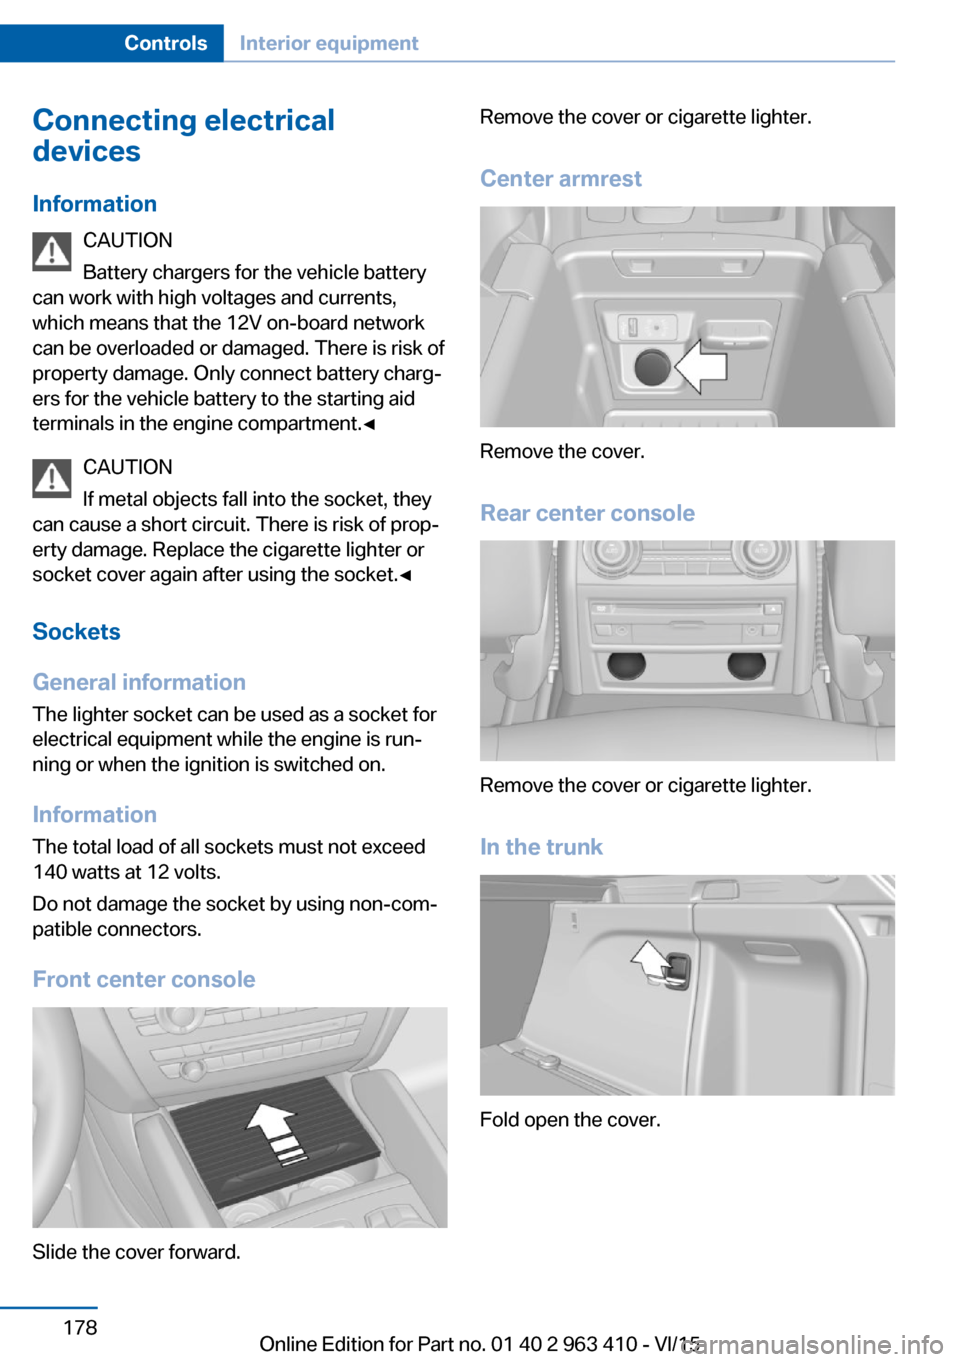
General information The lighter socket can be used as a socket for
electrical equipment while the engine is run‐
ning or when the ignition is switched on.
Information The total load of all sockets must not exceed
140 watts at 12 volts.
Do not damage the socket by using non-com‐
patible connectors.
Front center console
Slide the cover forward.
Remove the cover or cigarette lighter.
Center armrest
Remove the cover.
Rear center console
Remove the cover or cigarette lighter.
In the trunk
Fold open the cover.
Seite 178ControlsInterior equipment178
Online Edition for Part no. 01 40 2 963 410 - VI/15
Page 195 of 275
Condensation under the parked
vehicle
When using the automatic climate control,
condensation water develops collecting under‐
neath the vehicle.
These traces of water under the vehicle are
normal.
Driving on poor roads The vehicle combines all-wheel drive with the
advantages of a normal automobile.
CAUTION
Objects in unpaved areas, e.g. stones or
branches, can damage the vehicle. There is
risk of property damage. Do not drive on un‐
paved terrain.◀
For your own safety, for the safety of passen‐
gers and of the vehicle, heed the following
points:▷Become familiar with the vehicle before
starting a trip; do not take risks in driving.▷Adjust the speed to the road surface con‐
ditions. The steeper and more uneven the
road surface, the slower the speed should
be.▷When driving on steep uphill or downhill
grades: add engine oil and coolant up to
near the MAX mark. Uphill and downhill
grades can be traveled up to no more than
50 %.▷On steep downhill grades, use Hill Descent
Control HDC, refer to page 140.
Starting out is possible on uphill grades up
to 32 %. The permissible side tilt is 50 %.▷Avoid that the chassis bottom coming in
contact with the ground.
The ground clearance is no more than 7.8
inches/20 cm and can vary according to
the vehicle's load.▷When wheels continue to spin, depress the
accelerator so that driving stability controlsystems can distribute the driving force to
the wheels. Activate DTC Dynamic Trac‐
tion Control if available.
After a trip on poor roads
After a trip on poor roads, check wheels and
tires for damage to maintain driving safety.
Clear heavy soiling from the body.
Seite 195Things to remember when drivingDriving tips195
Online Edition for Part no. 01 40 2 963 410 - VI/15