suspension BMW X5 3.0I 2006 E53 Owner's Manual
[x] Cancel search | Manufacturer: BMW, Model Year: 2006, Model line: X5 3.0I, Model: BMW X5 3.0I 2006 E53Pages: 202, PDF Size: 4.13 MB
Page 5 of 202
5n
OverviewControlsMaintenanceRepairsDataIndex
Controls and features
Passenger safety systems:
Airbags55
Transporting children safely57
Vehicle Memory,
Key Memory61
Driving:
Ignition lock62
Starting engine62
Switching off engine63
Handbrake64
Manual transmission64
Automatic transmission with
Steptronic65
Turn signals/
headlamp flasher68
Washer/wiper system/
rain sensor69
Cruise control71
Everything under control:
Odometer, outside temperature
display73
Tachometer74
Energy control74
Engine oil temperature gauge75
Fuel gauge75
Coolant temperature gauge76
Service Interval Display76
Check Control77
Computer79
MID Multi-Information
Display81Digital clock in MID82
Computer in MID85
Technology for safety and
driving convenience:
PDC Park Distance Control 90
Antilock Brake System91
DSC Dynamic Stability
Control92
xDrive94
HDC Hill Descent Control94
Self-leveling suspension95
2-axle self-leveling
suspension96
Brake force display98
Flat Tire Monitor98
Lamps:
Parking lamps/low beams100
Adaptive Head Light101
High beams/roadside parking
lamps101
Front fog lamps102
Instrument lighting102
Interior lamps103
Controlling the climate for
pleasant driving:
Air conditioner104
Automatic climate control107
Roller sun blinds113
Parked car ventilation113Cabin convenience:
Integrated universal remote
control114
Telephone116
Interior rearview mirror with
digital compass117
Glove compartment119
Storage compartments119
Cup holders120
Ashtray, front121
Ashtray, rear121
Cigarette lighter, rear122
Loading and transporting:
Ski bag123
Cargo area
Folding rear backrests
down124
Roll-up cover125
Partition net125
Covers in cargo area127
Sockets128
Pull-out cargo floor128
Cargo loading130
Roof-mounted luggage rack132
Page 10 of 202
10n
NotesBMW cannot test every product on the
market to determine whether it can be
used on a BMW safely and without risk
to either the vehicle, its operation, or its
occupants.
Genuine BMW Parts, BMW Accessories
and other products approved by BMW,
together with professional advice on
using these items, are available from all
BMW Sports Activity Vehicle centers.
Installation and operation of non-BMW
approved accessories such as alarms,
radios, amplifiers, radar detectors,
wheels, suspension components, brake
dust shields, telephones – including
operation of any mobile phone from
within the vehicle without using an
externally mounted antenna – or trans-
ceiver equipment such as CBs, walkie-
talkies, ham radios or similar accesso-
ries, may cause extensive damage to
the vehicle, compromise its safety,
interfere with the vehicle's electrical
system or affect the validity of the BMW
Limited Warranty. Refer to your BMW
Sports Activity Vehicle center for addi-
tional information.< Maintenance, replacement, or
repair of the emission control
devices and systems may be performed
by any automotive repair establishment
or individual using any certified auto-
motive part.<
Symbol on vehicle parts
Indicates that you should consult
the relevant section of this
Owner's Manual for information on a
particular part or assembly.
Service and WarrantyThis manual is supplemented by a Ser-
vice and Warranty Information Booklet
for US models or a Warranty and Ser-
vice Guide Booklet for Canadian mod-
els.
We recommend that you read this pub-
lication thoroughly.
Your BMW is covered by the following
warranties:
>New Vehicle Limited Warranty
>Rust Perforation Limited Warranty
>Federal Emissions System Defect
Warranty
>Federal Emissions Performance
Warranty
>California Emissions Control System
Limited Warranty
Detailed information about these war-
ranties is listed in the Service and War-
ranty Information Booklet for US mod-
els or in the Warranty and Service
Guide Booklet for Canadian models.
Page 21 of 202
21n
OverviewControlsMaintenanceRepairsDataIndex
Indicator and warning lamps Red: an important reminder
Handbrake
*
Lights up with handbrake
engaged.
For additional information, refer to
page64
Handbrake warning lamp
* for
Canadian models
Please fasten safety belts +
Indicator lamp flashes or lights
up. In addition, a signal sounds
and, depending on the equipment, a
message* appears in the Check Con-
trol. Please check safety belts for cor-
rect placement.
The belt reminder is activated when the
safety belt on the driver's side has not
yet been fastened.
The belt reminder is also active at
speeds greater than approx. 5 mph/
8 km/h when the passenger belt has
not yet been fastened, heavy objects
are placed on the front passenger seat,
or passengers sitting in the front
remove their safety belts.
For additional information on safety
belts, refer to page49
Airbags
+
Malfunction in airbag system.
Have the system checked as
soon as possible.
For additional information, refer to
page55
Yellow: check as soon as possible
DBC Dynamic Brake Control
+
Malfunction in the DBC system.
Please have the system
checked as soon as possible.
For details on DBC, refer to page91
Display of the previously
described malfunction in Cana-
dian models.
Engine oil level
Comes on while driving: the oil
level is at the absolute minimum;
refill as soon as possible. Do not drive
more than approx. 30 miles/50 km until
you do.
For additional information, refer to
page152
Engine oil level
Comes on after the engine has
been switched off: add engine
oil at your earliest opportunity, e.g.
when you stop to refuel.
For additional information, refer to
page152
Automatic transmission
*
The automatic transmission
switches into the emergency
program due to a malfunction. Have the
system checked as soon as possible.
For additional information, refer to
page67
Brake pads
* +
Have the condition of the brake
pads checked.
For additional information, refer to
page140
Self-leveling suspension
* +
The self-leveling suspension
is inactive. Have the system
checked as soon as possible.
For additional information, refer to
page95
Page 95 of 202
95n
OverviewControlsMaintenanceRepairsDataIndex
HDC Hill Descent Control Self-leveling suspension
*
Using HDC With manual transmission:
Use HDC in first gear and in Reverse
since the engine's braking action is
diminished in the higher gears.
With automatic transmission:
You can use HDC in every drive posi-
tion. In case of a malfunction If the LED in the button goes out during
HDC operation or does not light up
when the HDC is activated:
HDC is temporarily unavailable due to
excessive brake temperature. The warning lamp for the self-
leveling suspension comes on,
or the message SELFLEVEL
SUSP.INACT appears in the Check
Control: there is a malfunction in the
self-leveling suspension.
Stop and inspect the vehicle. If the rear
of the vehicle is visibly lower than the
front, possibly accompanied by a tilt
noticeable when you compare the left
rear with the right rear, please respond
by immediately proceeding to the near-
est BMW Sports Activity Vehicle center.
Drive with appropriate caution in the
meantime. The vehicle has reduced
ground clearance and driving comfort
may be noticeably reduced.
Even when the position of the vehicle is
normal, have the system checked as
soon as possible when a malfunction is
indicated.
Page 96 of 202
96n
2-axle self-leveling suspension
*
The concept Your vehicle is equipped with 2-axle
self-leveling suspension acting on both
the front and rear suspension. This sys-
tem combines automatic self-leveling,
which compensates for variations in
front-to-rear load-distribution patterns,
with a selection feature allowing drivers
to choose from among several ride-
height options.
You may choose from among the fol-
lowing ride heights:
>Normal
The standard setting is intended for
most operating conditions, including
trailer towing
>Off-Road
Increased level for more ground
clearance
>Access
Lowers vehicle for more convenient
cargo handling or easier passenger
entries and exits.
Changes in ride height are initiated
either manually, using the control but-
ton, refer to page 97, or automatically in
response to specific speeds. When the
ride height is selected manually, the
driver has the additional option of revis-
ing the ride-height selection by entering a new command during the adjustment
process.
When the vehicle is stationary, the sys-
tem executes ride-height changes in
both directions – up and down – when-
ever the doors are closed. The tailgate/
liftgate may be open. The system raises
the vehicle only when the engine is run-
ning.
The system's automatic self-leveling
feature automatically compensates for
variations in the vehicle's load.
The ground clearance of the vehicle
6.5-9 in/16.5-22 cm, depending on the
level selected.
Frequent changes in ride height
initiated at short intervals can
overheat the compressor, causing the
system to briefly suspend active opera-
tion.<
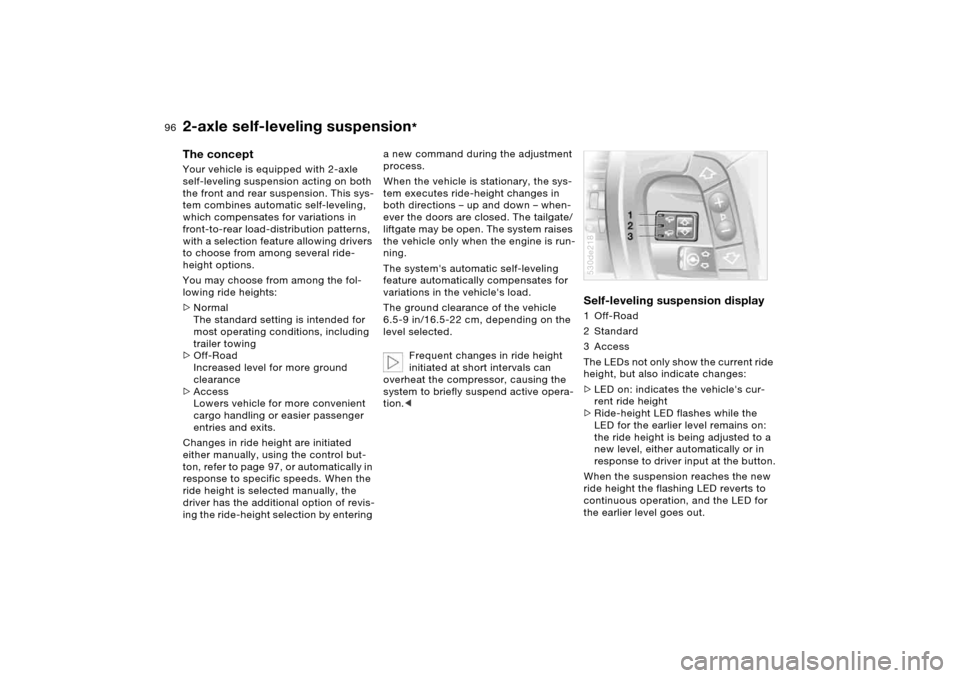
Self-leveling suspension display 1 Off-Road
2Standard
3 Access
The LEDs not only show the current ride
height, but also indicate changes:
>LED on: indicates the vehicle's cur-
rent ride height
>Ride-height LED flashes while the
LED for the earlier level remains on:
the ride height is being adjusted to a
new level, either automatically or in
response to driver input at the button.
When the suspension reaches the new
ride height the flashing LED reverts to
continuous operation, and the LED for
the earlier level goes out.530de218
Page 97 of 202
97n
OverviewControlsMaintenanceRepairsDataIndex
2-axle self-leveling suspension
*
>LED for current ride height flashes for
roughly 3 seconds when you press
the button: change in ride height is
not possible.
Raising Available only when the engine is run-
ning.
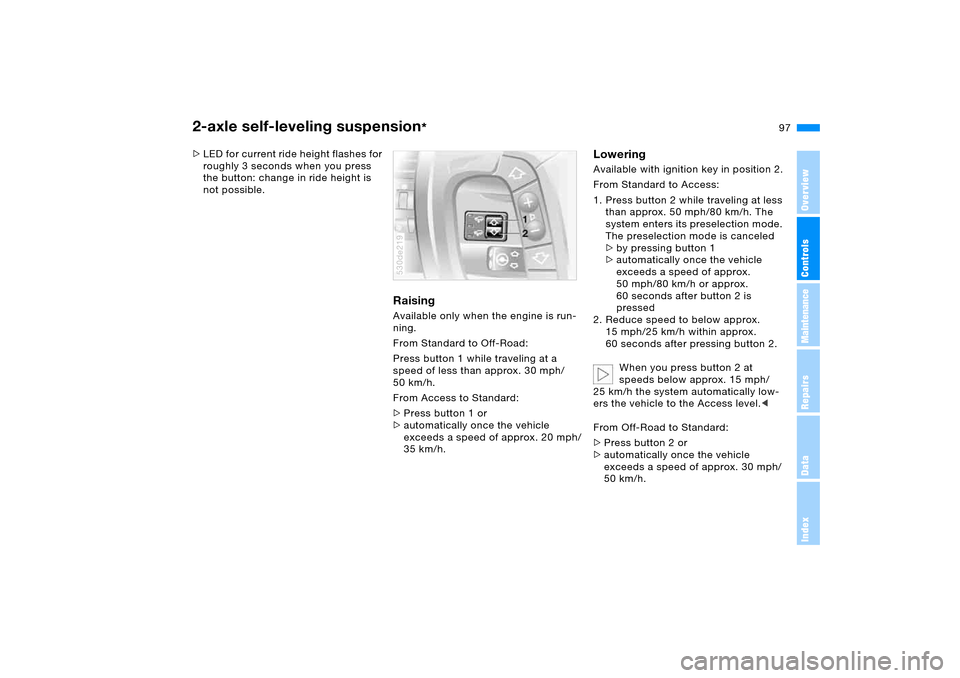
From Standard to Off-Road:
Press button 1 while traveling at a
speed of less than approx. 30 mph/
50 km/h.
From Access to Standard:
>Press button 1 or
>automatically once the vehicle
exceeds a speed of approx. 20 mph/
35 km/h.530de219
Lowering Available with ignition key in position 2.
From Standard to Access:
1. Press button 2 while traveling at less
than approx. 50 mph/80 km/h. The
system enters its preselection mode.
The preselection mode is canceled
>by pressing button 1
>automatically once the vehicle
exceeds a speed of approx.
50 mph/80 km/h or approx.
60 seconds after button 2 is
pressed
2. Reduce speed to below approx.
15 mph/25 km/h within approx.
60 seconds after pressing button 2.
When you press button 2 at
speeds below approx. 15 mph/
25 km/h the system automatically low-
ers the vehicle to the Access level.<
From Off-Road to Standard:
>Press button 2 or
>automatically once the vehicle
exceeds a speed of approx. 30 mph/
50 km/h.
Page 137 of 202
137n
OverviewControlsMaintenanceRepairsDataIndex
General driving notesClosing liftgate/tailgate
Operate the vehicle only when the
tailgate and liftgate are completely
closed. Otherwise, exhaust fumes
could enter into the passenger com-
partment.<
However, if special circumstances
should make it absolutely necessary to
operate the vehicle with the liftgate/tail-
gate open:
1. Close all windows and the panorama
glass roof
2. Increase the air supply for the air
conditioner or automatic climate
control to a high level, refer to
page105 or109.
Hot exhaust system
Extreme temperatures occur on
the exhaust system on any vehi-
cle. Do not remove the heat shields
installed adjacent to it, and never apply
undercoating to them. When driving,
standing at idle and while parking, take
care to avoid possible contact between
a hot exhaust system and any highly
flammable materials such as hay,
leaves, grass etc. Otherwise, there is a
danger of ignition and fire, with the risk
of serious injuries and damage.<
Mobile communications devices
in vehicle
BMW advises against using
mobile communications devices
such as mobile phones inside the vehi-
cle unless they are directly connected
to the external antenna. Otherwise, it is
impossible to prevent a mutual interfer-
ence of the vehicle electronics with the
mobile phone device. Also, there is no
guarantee that the radiation generated
by the transmission will be conveyed
out from the interior of the vehicle.<
When vehicle is parked Condensation forms in the air condi-
tioner system during operation and then
exits under the vehicle. Traces of water
on the ground are therefore normal.Brakes
Do not drive with your foot resting
on the brake pedal. Even light but
consistent pedal pressure can lead to
excessively high temperatures, brake
wear and possibly even brake failure.<
Road hazards
If road hazards, obstacles or curbs
are unavoidable, only drive over
them very slowly and carefully, other-
wise the wheels and suspension parts,
especially on vehicles fitted with low
profile tires, can be damaged.<
For more information on wheels and
tires, refer to page146.
Before driving into a car washFold in the exterior mirrors, refer to
page53, otherwise they could be dam-
aged due to the width of the vehicle.Hydroplaning
When driving on wet or slushy
roads, reduce road speed. If you
do not, a wedge of water can form
between tires and road surface. This
state can cause a partial or total loss
of contact with the road surface, of
braking control and of control over the
vehicle.<
Page 139 of 202
139n
OverviewControlsMaintenanceRepairsDataIndex
Driving your X5>Please note that it is possible for the
undercarriage to touch the ground,
for example on crests and bumpy
roads. The ground clearance of the
vehicle is:
– without self-leveling suspension
X5 3.0i, 4.4i: 8 in/20 cm
X5 3.0d: 7 in/17.5 cm
– with 2-axle self-leveling suspen-
sion
*
6.5-9 in/16.5-22 cm, depending on
the level selected.
>Only drive through water up to a max-
imum depth of 20 in/50 cm and only
at walking speed, making sure not to
stop in the process. When equipped
with 2-axle self leveling suspension
*,
switch the vehicle to the Off-Road
setting before driving through, refer
to page97.
After leaving the water, apply the
footbrake lightly several times while
driving at low speeds so as to dry the
brakes by braking and to prevent
decreased braking action due to wet-
ness.
Back onto paved road Our recommendation that you observe
the following points after driving on
adverse road surfaces is not intended
as a beauty treatment for your BMW.
Instead, it is intended to maintain driv-
ing safety:
>Clean the worst of the dirt from the
body and inspect the undercarriage
for damage.
>Clean mud, snow, ice etc. from the
wheels and tires and check the
wheels for damage.
>Check to determine whether rocks,
gravel or accumulations of dirt on the
brake rotors and calipers could influ-
ence braking performance. Remove
all such foreign objects.
>In order to clean the brake rotors,
apply the footbrake gently several
times while driving at a low speed.
Be sure that following traffic is not
endangered by this.
>For cleaning the handbrake, apply the
lever slightly at approx. 25 mph/
40 km/h and continue to drive for
approx. 200 yards/200 meters, pro-
vided that traffic conditions allow you
to do so.
Page 181 of 202
181n
OverviewControlsMaintenanceRepairsDataIndex
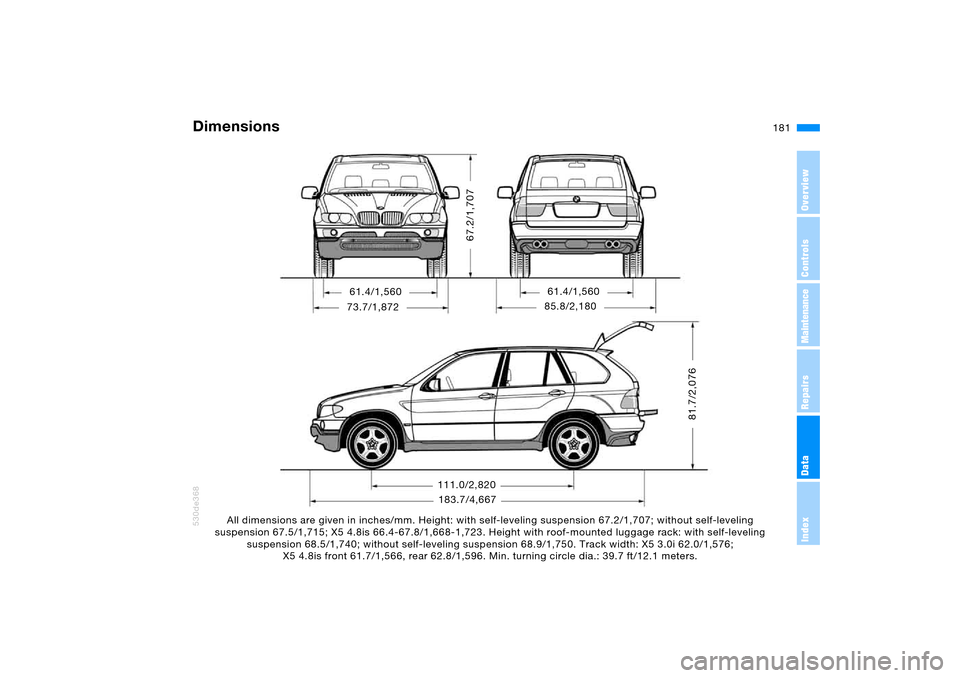
Dimensions
530de210530de368
All dimensions are given in inches/mm. Height: with self-leveling suspension 67.2/1,707; without self-leveling
suspension 67.5/1,715; X5 4.8is 66.4-67.8/1,668-1,723. Height with roof-mounted luggage rack: with self-leveling
suspension 68.5/1,740; without self-leveling suspension 68.9/1,750. Track width: X5 3.0i 62.0/1,576;
X5 4.8is front 61.7/1,566, rear 62.8/1,596. Min. turning circle dia.: 39.7 ft/12.1 meters.
73.7/1,872
85.8/2,180
61.4/1,560
61.4/1,560
111.0/2,820183.7/4,667
67.2/1,707
81.7/2,076
Page 192 of 202
Everything from A to ZHead restraints47
adjusting47
installing in front48
removing and installing in
rear48
removing in front48
sitting safely43
Heated mirrors54
Heated rear window
air conditioner105
automatic climate
control110
Heated seats52
Heated steering wheel53
Heater
rear window105,110
steering wheel53
Heating
exterior mirror54
residual heat
utilization110
seats52
Heating and
ventilation104,107
Heating while stationary110
Heavy cargo, refer to Cargo
loading131
Heavy-duty cargo straps,
refer to Cargo loading131
Height, refer to
Dimensions181Height adjustment
seats45,46
steering wheel52
High beams101
headlamp flasher68
indicator lamp22
replacing bulbs162
High temperatures137
Hill Descent Control HDC94
Hills138,140
Holder for cups120
Hood150
Horn14
Hotel function30
Hot exhaust system137
Hydraulic brake assistant,
refer to DBC91
Hydraulic system, brakes19
Hydroplaning137,147
I
Ice, refer to Outside
temperature warning
73
Identification, tire145
Ignition62
Ignition key30
Ignition key positions, refer
to Ignition lock62
Ignition lock62
Immobilizer function88
Imprint4Independent ventilation,
refer to Parked car
ventilation113
Indicating
elements15,17,18
Indicator/warning lamp
airbags57
alarm system38
automatic transmission
with Steptronic67
brakes155
coolant temperature76
DSC92
engine temperature76
fasten safety belts49
Flat Tire Monitor99
front fog lamps102
reserve75
self-leveling
suspension95
Indicator and warning lamps,
overview19
Indicator lighting, refer to
Instrument lighting102
Individual air distribution109
Individual settings, refer to
Vehicle Memory, Key
Memory61
Inflation pressure, tires, refer
to Tire inflation
pressure141Initializing, refer to Power
loss42
INSPECTION76
Instrument cluster15,17,18
refer to Cockpit14
Instrument lighting102
Instrument panel14
Integrated universal remote
control114
Interface socket for Onboard
Diagnostics157
Interior lamps103
remote control31
Interior mirror, automatic
dimming feature138
Interior motion sensor
39
switching off31,39
Interior rearview mirror54
compass117
Interlock, refer to Steering
lock engaged62
Intermittent operation of
wipers69,71
Interval Display, Service76
J
Jacking points for vehicle
jack170
Jumpering, refer to Jump
starting174
Jump starting174