stop start BMW X5 3.0I 2007 E70 Owner's Guide
[x] Cancel search | Manufacturer: BMW, Model Year: 2007, Model line: X5 3.0I, Model: BMW X5 3.0I 2007 E70Pages: 272, PDF Size: 9.03 MB
Page 178 of 272
DVD system in rear
176
Fast forward/reverse
Forward/reverse with DVD control
1.Press the button on the remote con-
trol during playback.
2.Select the symbol.
3.Press the button.
4.Press the button several times to
increase the fast forward/reverse speed.
The DVD playback will be distorted.
To cancel fast forward/reverse:
1.Select the symbol.
2.Press the button.
Or:
Press the button on the CD/DVD player.
The DVD will start play at the point selected.
Forward/reverse with remote control
Press and hold the button until you reach
the desired point.
Or:
1.During playback, turn the knurled wheel.
Fast forward/reverse is interrupted.
2.Continue to turn the knurled wheel.
The speed is increased.
3.Press the button on the CD/DVD player.
Fast forward/reverse is interrupted.
The DVD will start play at the point selected.
Skipping chapter
You can change to the next or previous chapter
during playback.
1.Press the button on the remote con-
trol during playback.
2.Select the symbol.
3.Press the button repeatedly, continuing
until you reach the desired chapter.
Or:
Press the button on the left or right on the
remote control repeatedly until you reach the
desired chapter.
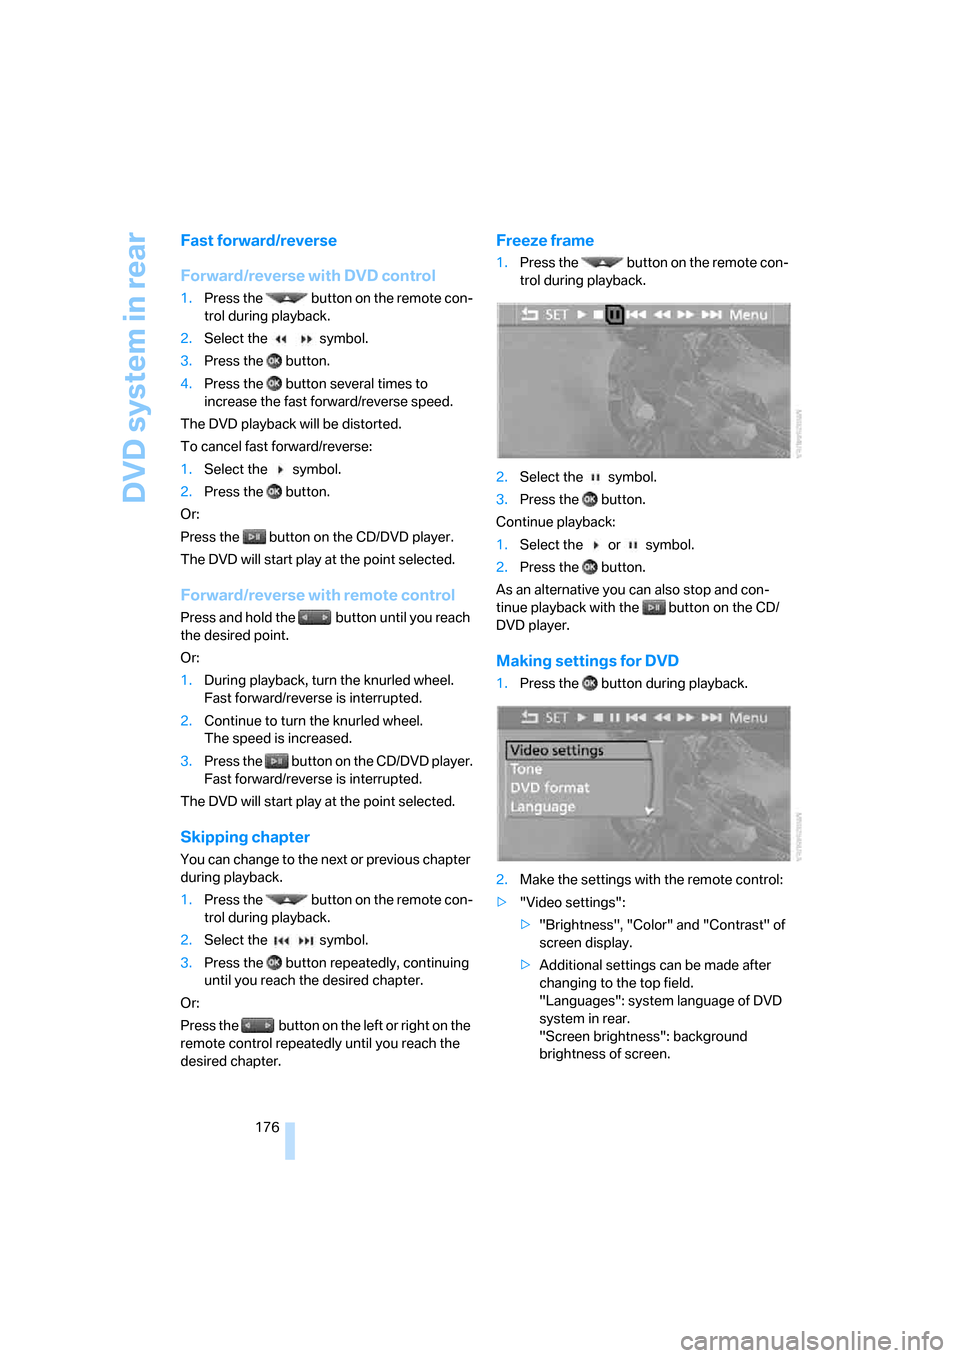
Freeze frame
1.Press the button on the remote con-
trol during playback.
2.Select the symbol.
3.Press the button.
Continue playback:
1.Select the or symbol.
2.Press the button.
As an alternative you can also stop and con-
tinue playback with the button on the CD/
DVD player.
Making settings for DVD
1.Press the button during playback.
2.Make the settings with the remote control:
>"Video settings":
>"Brightness", "Color" and "Contrast" of
screen display.
>Additional settings can be made after
changing to the top field.
"Languages": system language of DVD
system in rear.
"Screen brightness": background
brightness of screen.
Page 180 of 272
DVD system in rear
178
Compressed video files
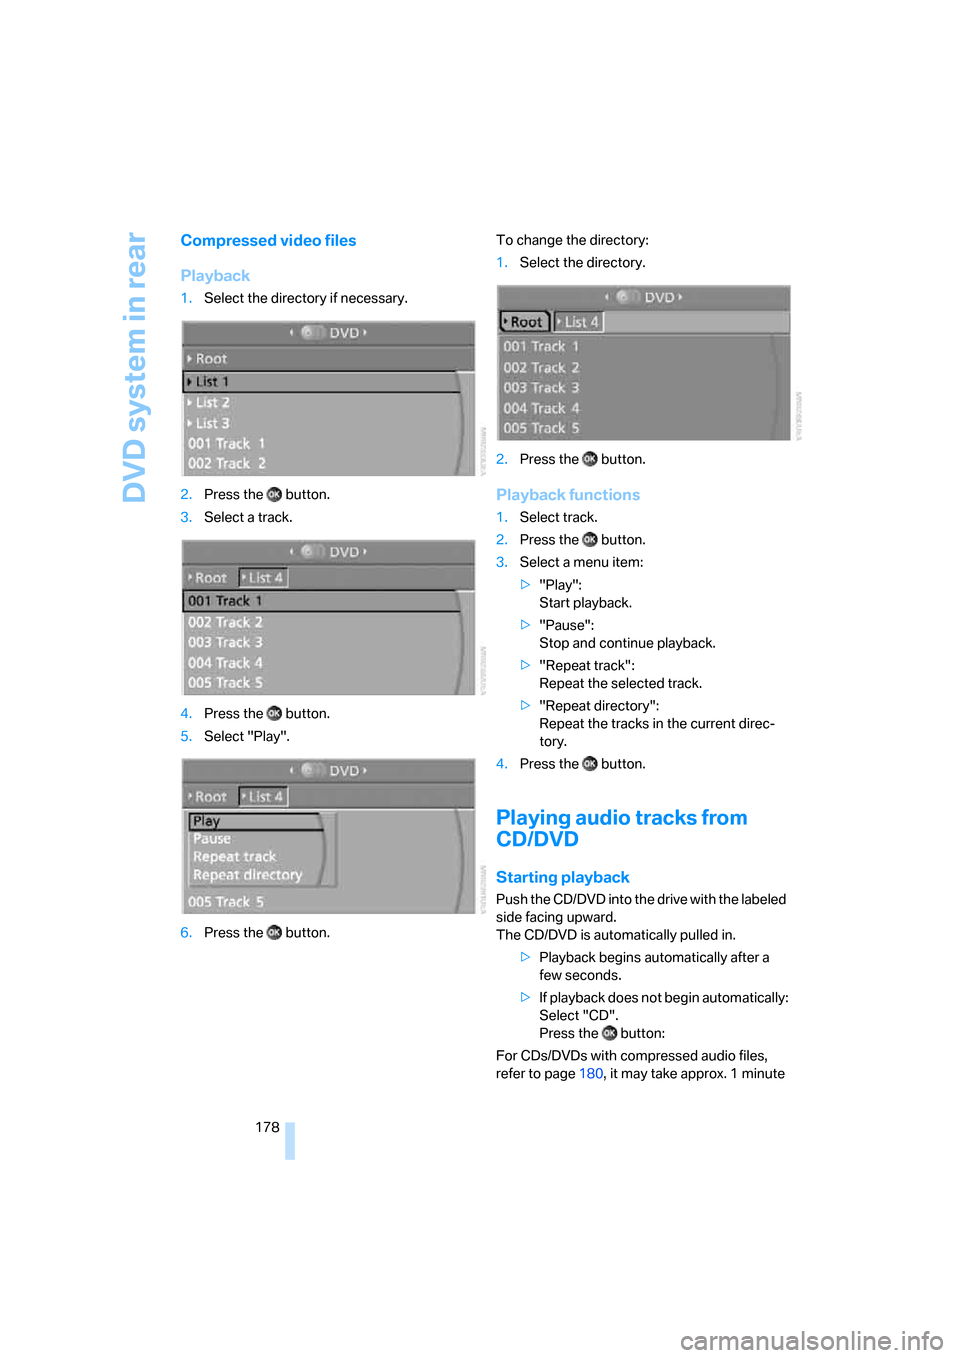
Playback
1.Select the directory if necessary.
2.Press the button.
3.Select a track.
4.Press the button.
5.Select "Play".
6.Press the button.To change the directory:
1.Select the directory.
2.Press the button.
Playback functions
1.Select track.
2.Press the button.
3.Select a menu item:
>"Play":
Start playback.
>"Pause":
Stop and continue playback.
>"Repeat track":
Repeat the selected track.
>"Repeat directory":
Repeat the tracks in the current direc-
tory.
4.Press the button.
Playing audio tracks from
CD/DVD
Starting playback
Push the CD/DVD into the drive with the labeled
side facing upward.
The CD/DVD is automatically pulled in.
>Playback begins automatically after a
few seconds.
>If playback does not begin automatically:
Select "CD".
Press the button:
For CDs/DVDs with compressed audio files,
refer to page180, it may take approx. 1 minute
Page 181 of 272
Navigation
Entertainment
Driving tips
179Reference
At a glance
Controls
Communications
Mobility
to read the data depending on the directory
structure.
To start playback when there is already a
CD/DVD in the drive:
1.Open the start menu with the remote con-
trol.
2.Select "CD".
As an alternative you can also control the play-
back with the buttons on the CD/DVD player.
Ejecting CD/DVD:
Press the button on the CD/DVD player.
Selecting a track
Buttons on the CD/DVD player
Press the button for the corresponding
direction repeatedly until you reach the desired
track.
Playback begins at the start of the track.
Via the remote control
Press the button for the corresponding
direction repeatedly or turn the knurled wheel
until you reach the desired track.
Playback begins at the start of the track.
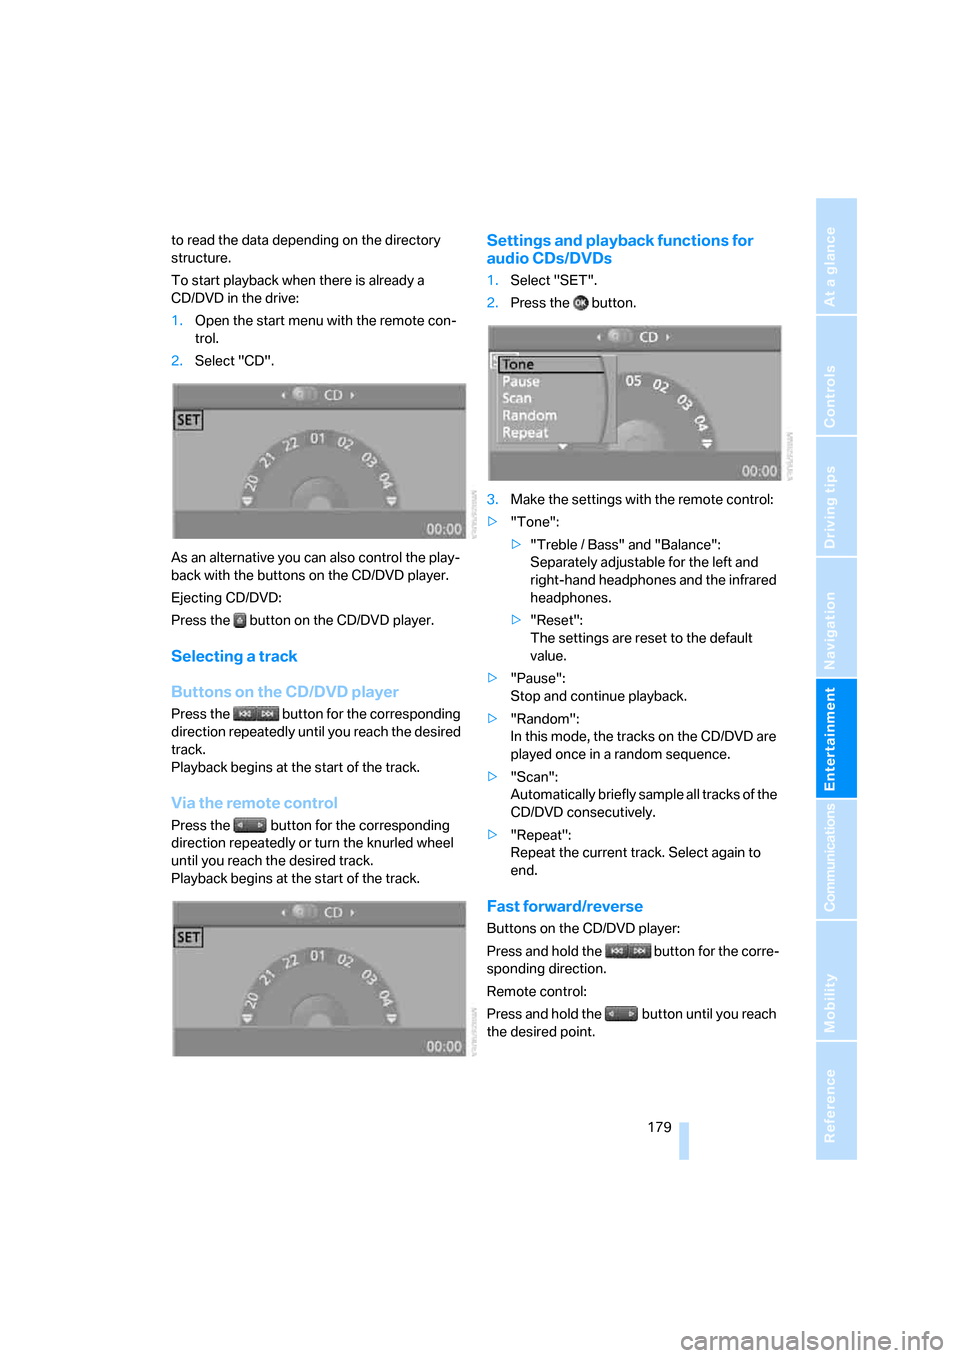
Settings and playback functions for
audio CDs/DVDs
1.Select "SET".
2.Press the button.
3.Make the settings with the remote control:
>"Tone":
>"Treble / Bass" and "Balance":
Separately adjustable for the left and
right-hand headphones and the infrared
headphones.
>"Reset":
The settings are reset to the default
value.
>"Pause":
Stop and continue playback.
>"Random":
In this mode, the tracks on the CD/DVD are
played once in a random sequence.
>"Scan":
Automatically briefly sample all tracks of the
CD/DVD consecutively.
>"Repeat":
Repeat the current track. Select again to
end.
Fast forward/reverse
Buttons on the CD/DVD player:
Press and hold the button for the corre-
sponding direction.
Remote control:
Press and hold the button until you reach
the desired point.
Page 182 of 272
DVD system in rear
180
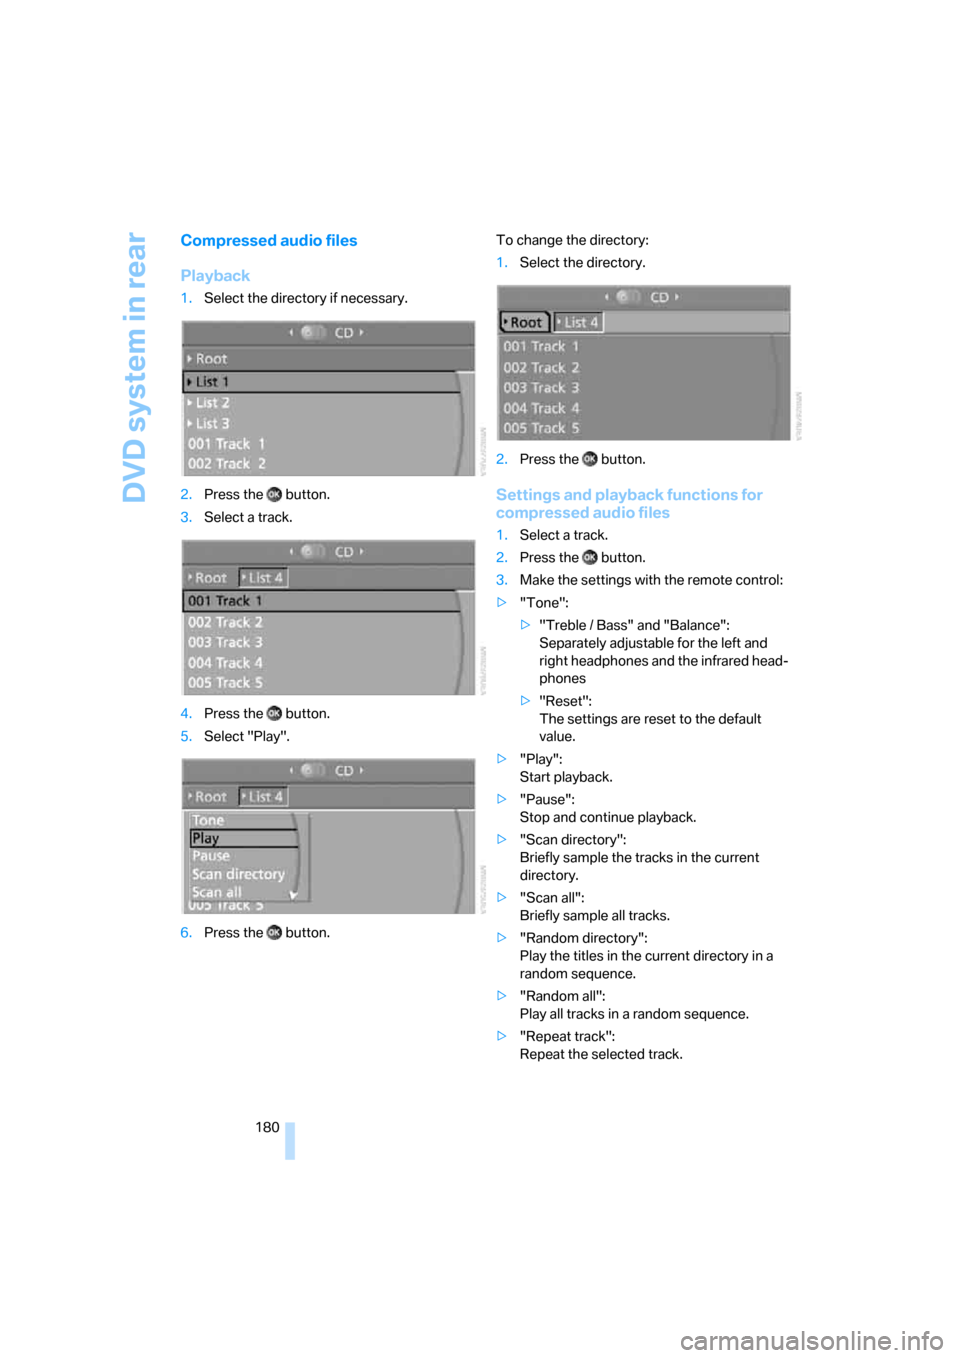
Compressed audio files
Playback
1.Select the directory if necessary.
2.Press the button.
3.Select a track.
4.Press the button.
5.Select "Play".
6.Press the button.To change the directory:
1.Select the directory.
2.Press the button.
Settings and playback functions for
compressed audio files
1.Select a track.
2.Press the button.
3.Make the settings with the remote control:
>"Tone":
>"Treble / Bass" and "Balance":
Separately adjustable for the left and
right headphones and the infrared head-
phones
>"Reset":
The settings are reset to the default
value.
>"Play":
Start playback.
>"Pause":
Stop and continue playback.
>"Scan directory":
Briefly sample the tracks in the current
directory.
>"Scan all":
Briefly sample all tracks.
>"Random directory":
Play the titles in the current directory in a
random sequence.
>"Random all":
Play all tracks in a random sequence.
>"Repeat track":
Repeat the selected track.
Page 183 of 272
Navigation
Entertainment
Driving tips
181Reference
At a glance
Controls
Communications
Mobility
>"Repeat directory":
Repeat the tracks in the current directory.
>"Details":
Display any stored information on the cur-
rent track.
Displaying images from
CD/DVD
1.Push the CD/DVD into the drive with the
labeled side facing upward.
The CD/DVD is automatically pulled in.
2.Open the start menu with the remote con-
trol.
3.Select "Photo".
4.Press the button.
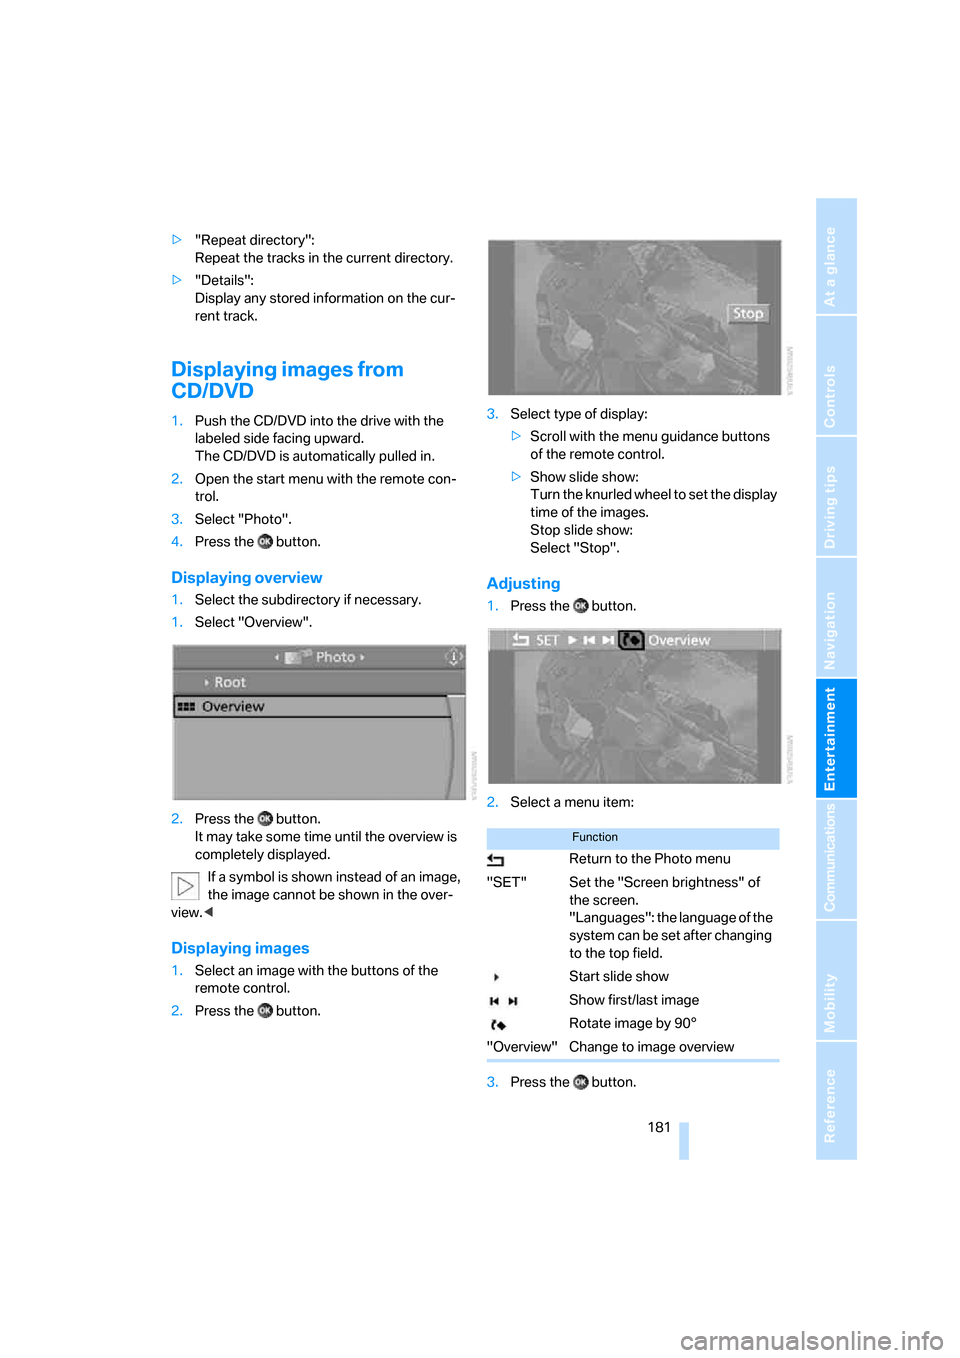
Displaying overview
1.Select the subdirectory if necessary.
1.Select "Overview".
2.Press the button.
It may take some time until the overview is
completely displayed.
If a symbol is shown instead of an image,
the image cannot be shown in the over-
view.<
Displaying images
1.Select an image with the buttons of the
remote control.
2.Press the button.3.Select type of display:
>Scroll with the menu guidance buttons
of the remote control.
>Show slide show:
Turn the knurled wheel to set the display
time of the images.
Stop slide show:
Select "Stop".
Adjusting
1.Press the button.
2.Select a menu item:
3.Press the button.
Function
Return to the Photo menu
"SET" Set the "Screen brightness" of
the screen.
"Languages": the language of the
system can be set after changing
to the top field.
Start slide show
Show first/last image
Rotate image by 90°
"Overview" Change to image overview
Page 191 of 272
189
Entertainment
Reference
At a glance
Controls
Driving tips Communications
Navigation
Mobility
>Programmable memory/direct selection
buttons, refer to page21
Phoning with the BMW Assist system*:
BMW Assist calls
You can use the BMW Assist system via the
hands-free unit for BMW Assist calls.
When the status information "Communication"
or "BMW Assist" is displayed in "BMW Ser-
vice", only BMW Assist calls are possible.
It may not be possible to establish a telephone
connection using the mobile phone while a con-
nection is being established to BMW Assist or
while a call to BMW Assist is already in
progress. If this happens, you must log off the
mobile phone from the vehicle if you wish to
place a call with the mobile phone.
Commissioning
Logging on mobile phone on vehicle
The following prerequisites must be met:
>Suitable mobile phone: the mobile phone is
supported by the full mobile phone prepara-
tion package.
>The mobile phone is ready to operate.
>The Bluetooth link on the vehicle, refer to
page192, and on the mobile phone is
active.
>Depending on the mobile phone, preset-
tings on the mobile phone are necessary,
e.g. via the menu item Bluetooth activated
or the menu item Connection not with con-
firmation.
>Depending on the mobile phone model, the
setting energy saving mode can, for exam-
ple, result in vehicle failing to detect the
logged-on mobile phone.
>For logging on, specify any desired number
as the Bluetooth passkey, e.g. 1. This Blue-
tooth passkey is no longer required follow-
ing successful logon.
>The ignition is switched on.Only log on the mobile phone with the
vehicle stopped, otherwise the passen-
gers and other road users can be endangered
due to a lack of attentiveness on the part of the
driver.<
Switching on ignition
1.Insert the remote control as far as possible
into the ignition lock.
2.Switch on the ignition by pressing the Start/
Stop button without depressing the brake
pedal.
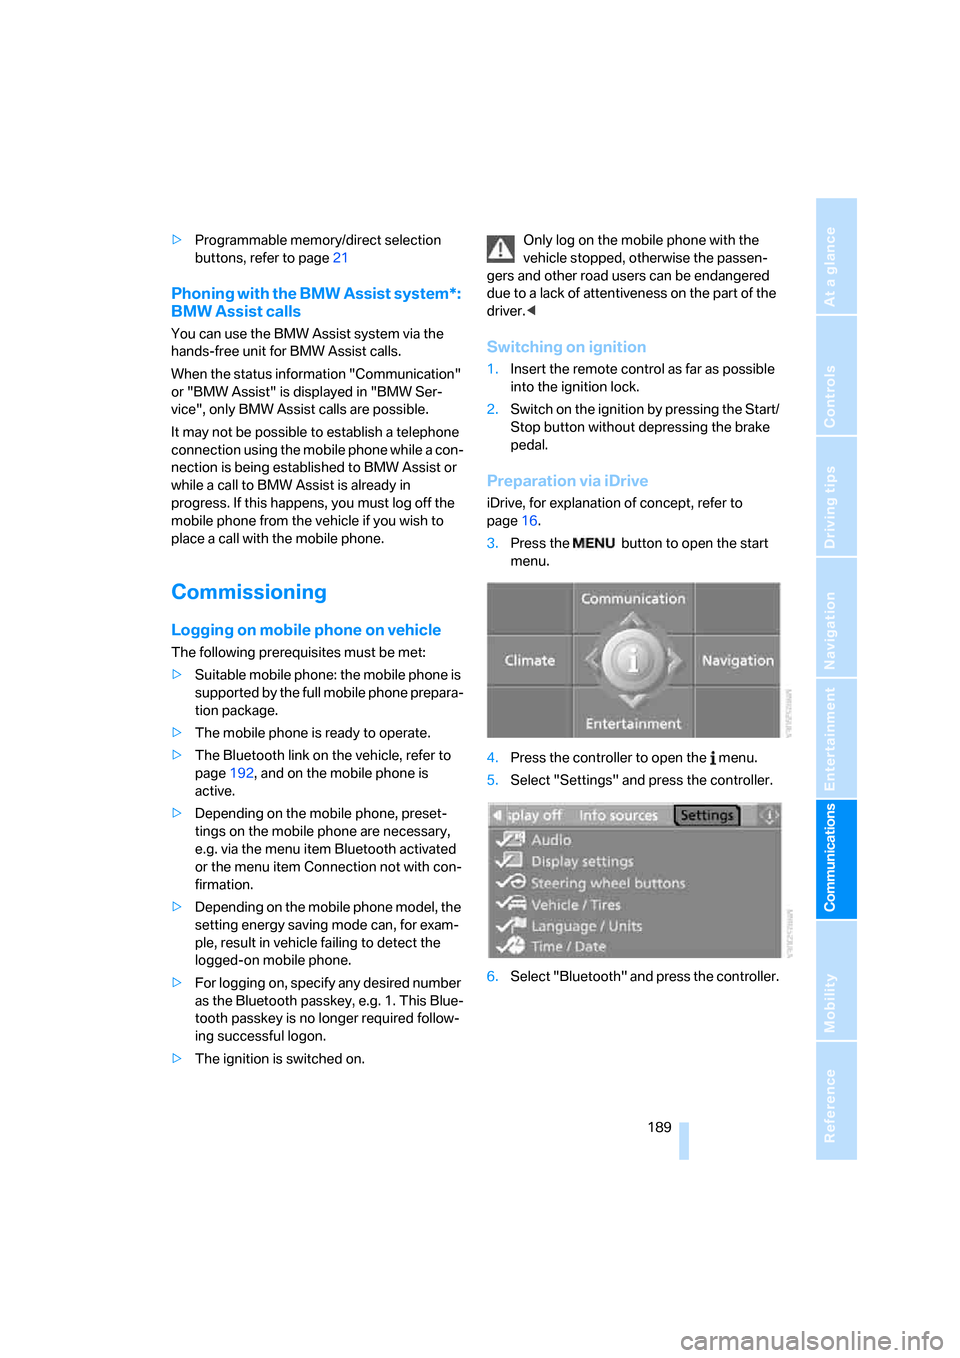
Preparation via iDrive
iDrive, for explanation of concept, refer to
page16.
3.Press the button to open the start
menu.
4.Press the controller to open the menu.
5.Select "Settings" and press the controller.
6.Select "Bluetooth" and press the controller.
Page 225 of 272
Mobility
223Reference
At a glance
Controls
Driving tips
Communications
Navigation
Entertainment
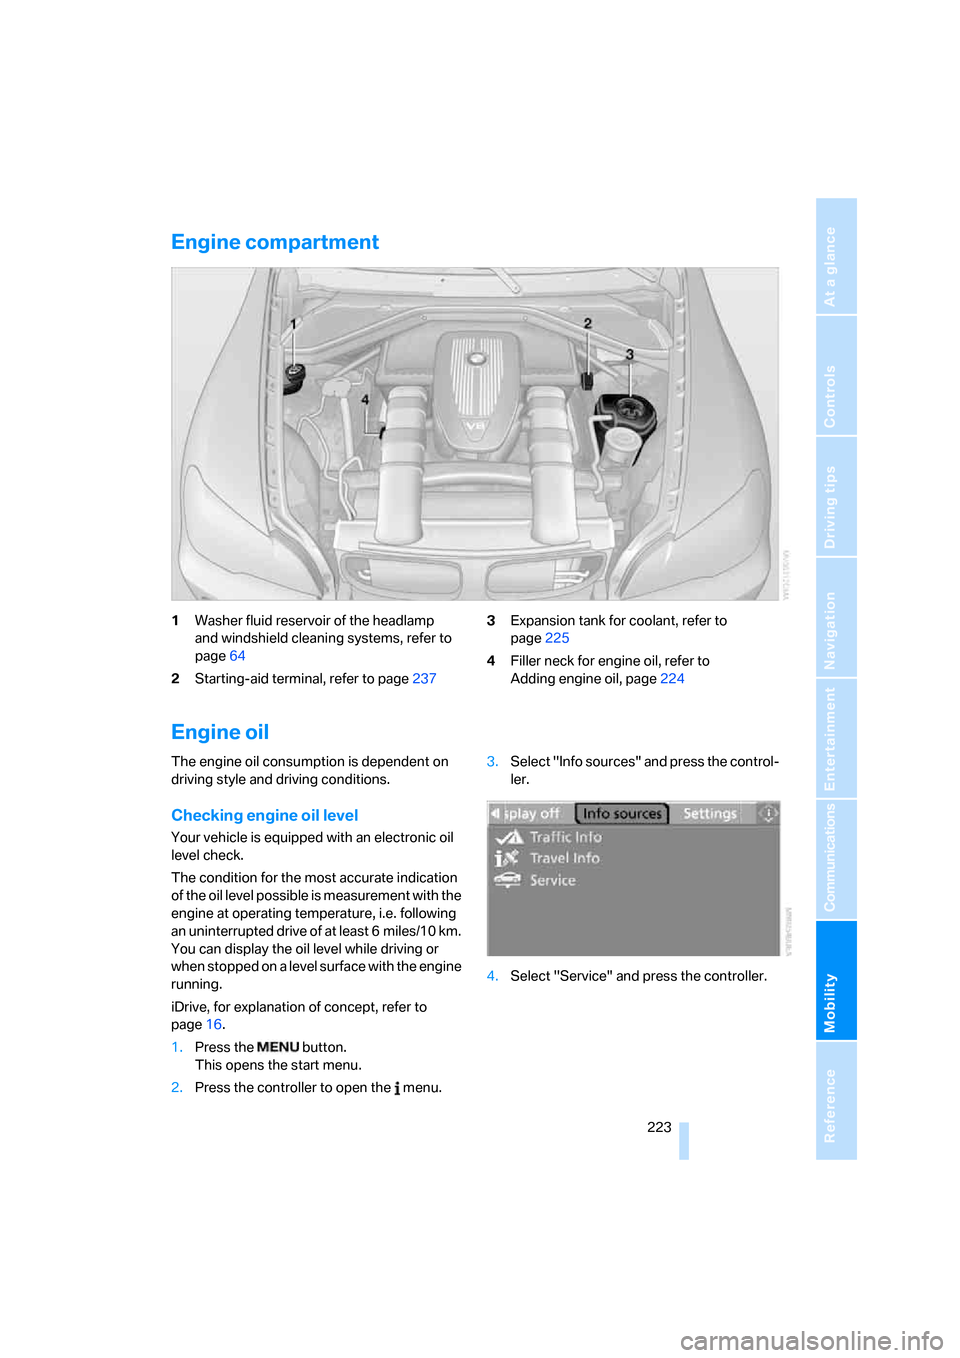
Engine compartment
1Washer fluid reservoir of the headlamp
and windshield cleaning systems, refer to
page64
2Starting-aid terminal, refer to page2373Expansion tank for coolant, refer to
page225
4Filler neck for engine oil, refer to
Adding engine oil, page224
Engine oil
The engine oil consumption is dependent on
driving style and driving conditions.
Checking engine oil level
Your vehicle is equipped with an electronic oil
level check.
The condition for the most accurate indication
of the oil level possible is measurement with the
engine at operating temperature, i.e. following
an uninterrupted drive of at least 6 miles/10 km.
You can display the oil level while driving or
when stopped on a level surface with the engine
running.
iDrive, for explanation of concept, refer to
page16.
1.Press the button.
This opens the start menu.
2.Press the controller to open the menu.3.Select "Info sources" and press the control-
ler.
4.Select "Service" and press the controller.
Page 241 of 272
Mobility
239Reference
At a glance
Controls
Driving tips
Communications
Navigation
Entertainment
Being towed
Make sure that the ignition is switched on,
refer to page56, otherwise the low
beams, tail lamps, turn signals and windshield
wipers would not be available. When the engine
is stopped, there is no power assist. This then
requires increased effort for braking and steer-
ing. Active steering is deactivated and larger
steering wheel movements are required.<
Switch on the hazard warning flashers depend-
ing on the local regulations. If the electrical sys-
tem fails, mark the vehicle to be towed, e.g. with
a sign or warning triangle in the rear window.
Engage transmission position N and release the
parking brake before towing.
Manually releasing transmission lock, refer to
page61.
Do not exceed a towing speed of 45 mph/
70 km/h and a towing distance of
90 miles/150 km, otherwise the automatic
transmission may be damaged.<
Towing methods
Do not lift vehicle by tow fitting or body
and chassis parts, otherwise damage may
result.<
In some countries, towing with tow bars or
ropes in public traffic is not permitted. Familiar-
ize yourself with the regulations on towing in the
respective country.
With tow bar
The towing vehicle may not be lighter
than the vehicle to be towed, otherwise it
will not be possible to reliably control vehicle
response.<
The tow fittings used should be on the same
side on both vehicles. Should it prove impossi-
ble to avoid mounting the tow bar at an offset
angle, please observe the following:
>Clearance and maneuvering capability will
be sharply limited during cornering.
>When mounted at an angle, the tow bar will
exert lateral forces, tending to push the
vehicle sideways.Only attach the tow bar to the tow fittings,
as attachment to other vehicle parts can
lead to damage.<
With tow rope
When starting off in the towing vehicle, make
sure that the tow rope is taut.
To avoid jerking and the associated
stresses on vehicle components when
towing, always use nylon ropes or nylon straps.
Only attach tow ropes to the tow fittings, as
attachment to other vehicle parts can lead to
damage.<
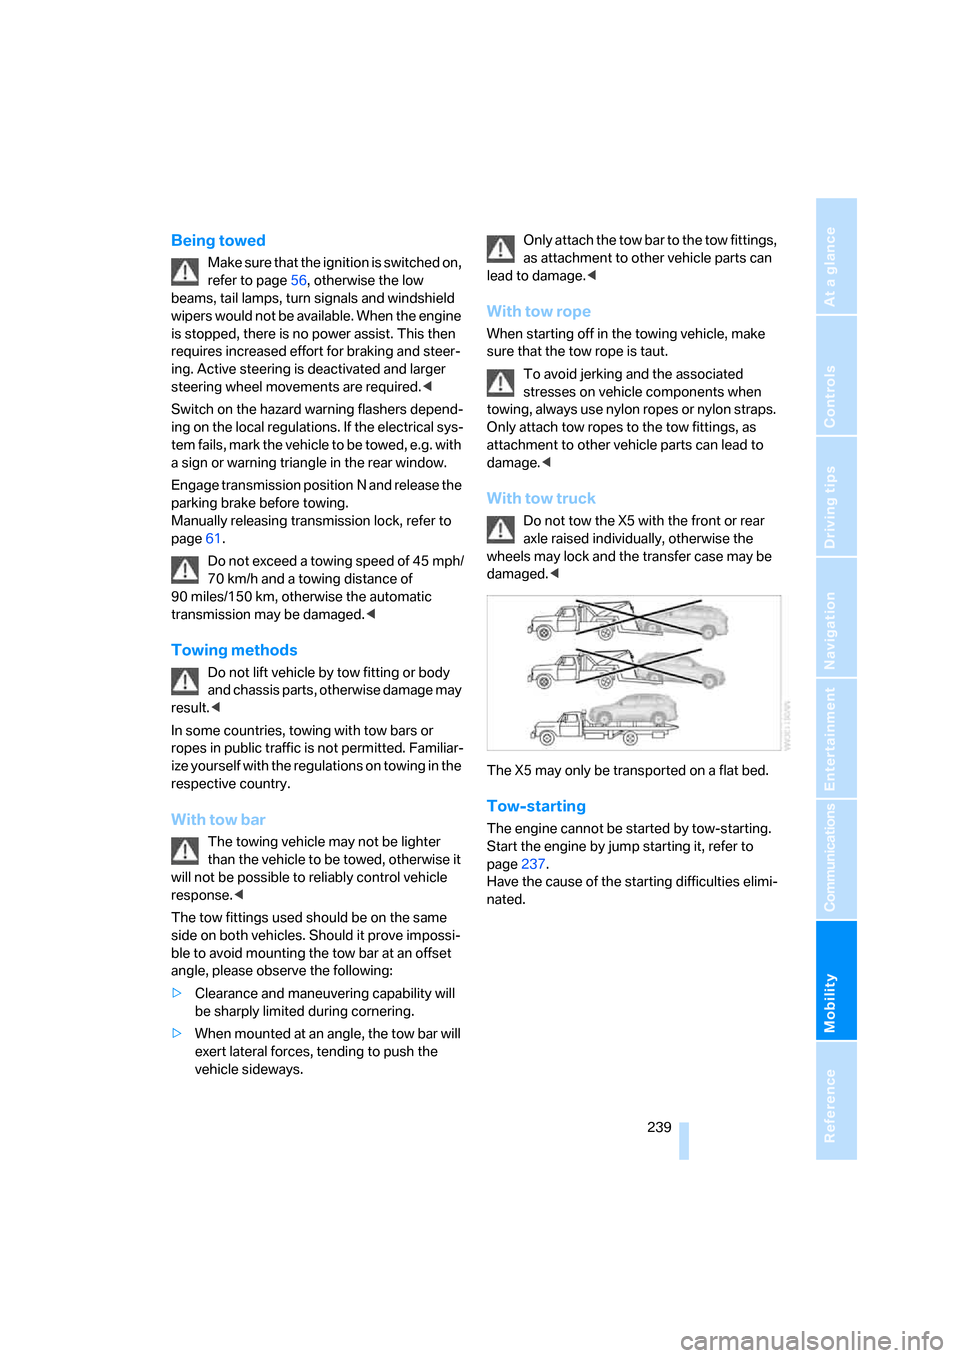
With tow truck
Do not tow the X5 with the front or rear
axle raised individually, otherwise the
wheels may lock and the transfer case may be
damaged.<
The X5 may only be transported on a flat bed.
Tow-starting
The engine cannot be started by tow-starting.
Start the engine by jump starting it, refer to
page237.
Have the cause of the starting difficulties elimi-
nated.
Page 248 of 272
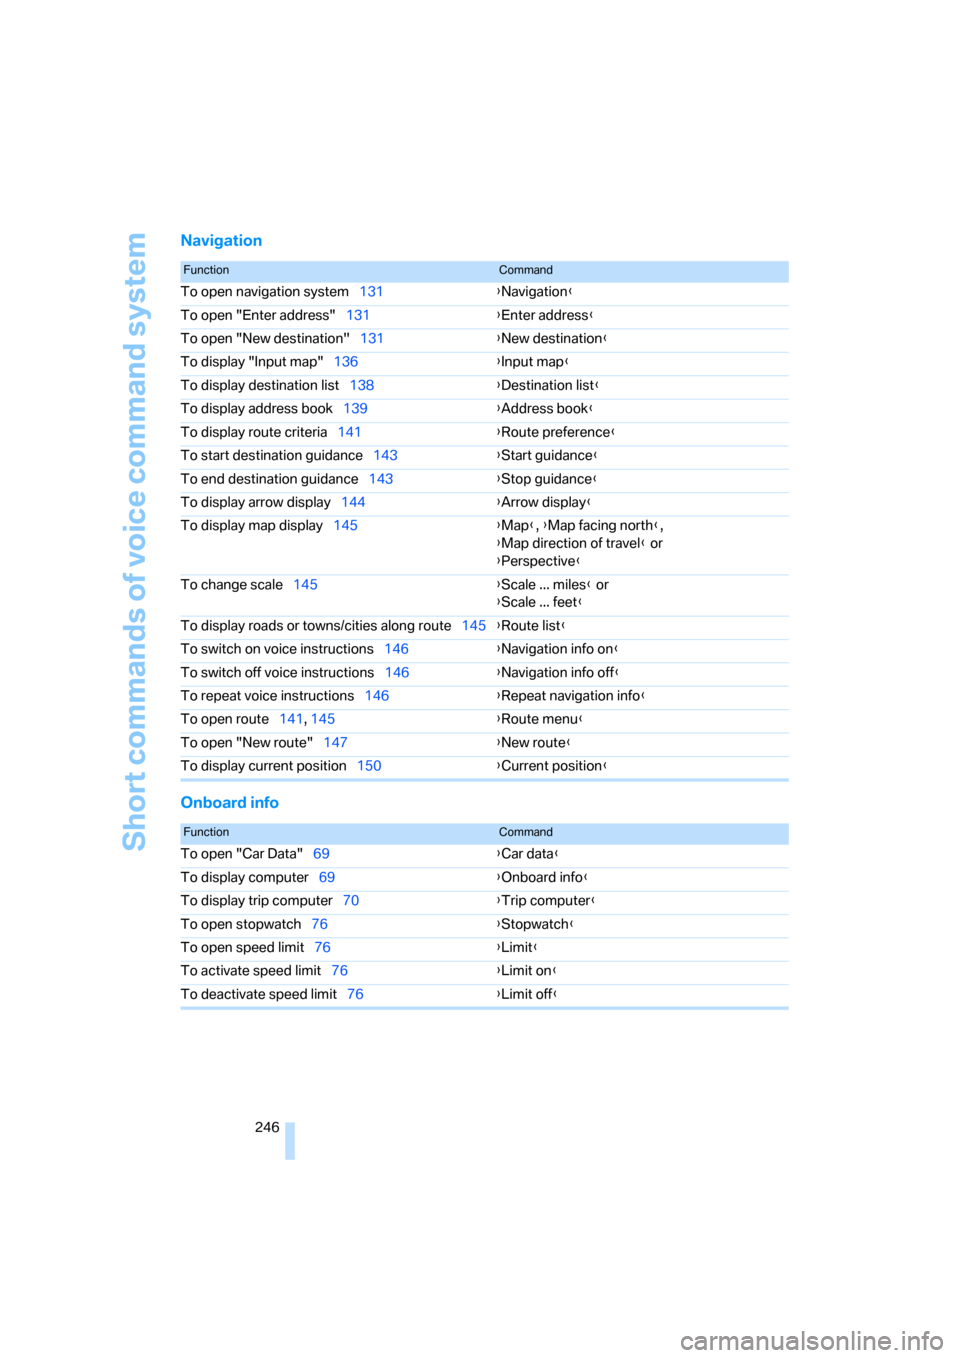
Short commands of voice command system
246
Navigation
Onboard info
FunctionCommand
To open navigation system131{Navigation}
To open "Enter address"131{Enter address}
To open "New destination"131{New destination}
To display "Input map"136{Input map}
To display destination list138{Destination list}
To display address book139{Address book}
To display route criteria141{Route preference}
To start destination guidance143{Start guidance}
To end destination guidance143{Stop guidance}
To display arrow display144{Arrow display}
To display map display145{Map}, {Map facing north},
{Map direction of travel} or
{Perspective}
To change scale145{Scale ... miles} or
{Scale ... feet}
To display roads or towns/cities along route145{Route list}
To switch on voice instructions146{Navigation info on}
To switch off voice instructions146{Navigation info off}
To repeat voice instructions146{Repeat navigation info}
To open route141, 145
{Route menu}
To open "New route"147{New route}
To display current position150{Current position}
FunctionCommand
To open "Car Data"69{Car data}
To display computer69{Onboard info}
To display trip computer70{Trip computer}
To open stopwatch76{Stopwatch}
To open speed limit76{Limit}
To activate speed limit76{Limit on}
To deactivate speed limit76{Limit off}
Page 264 of 272
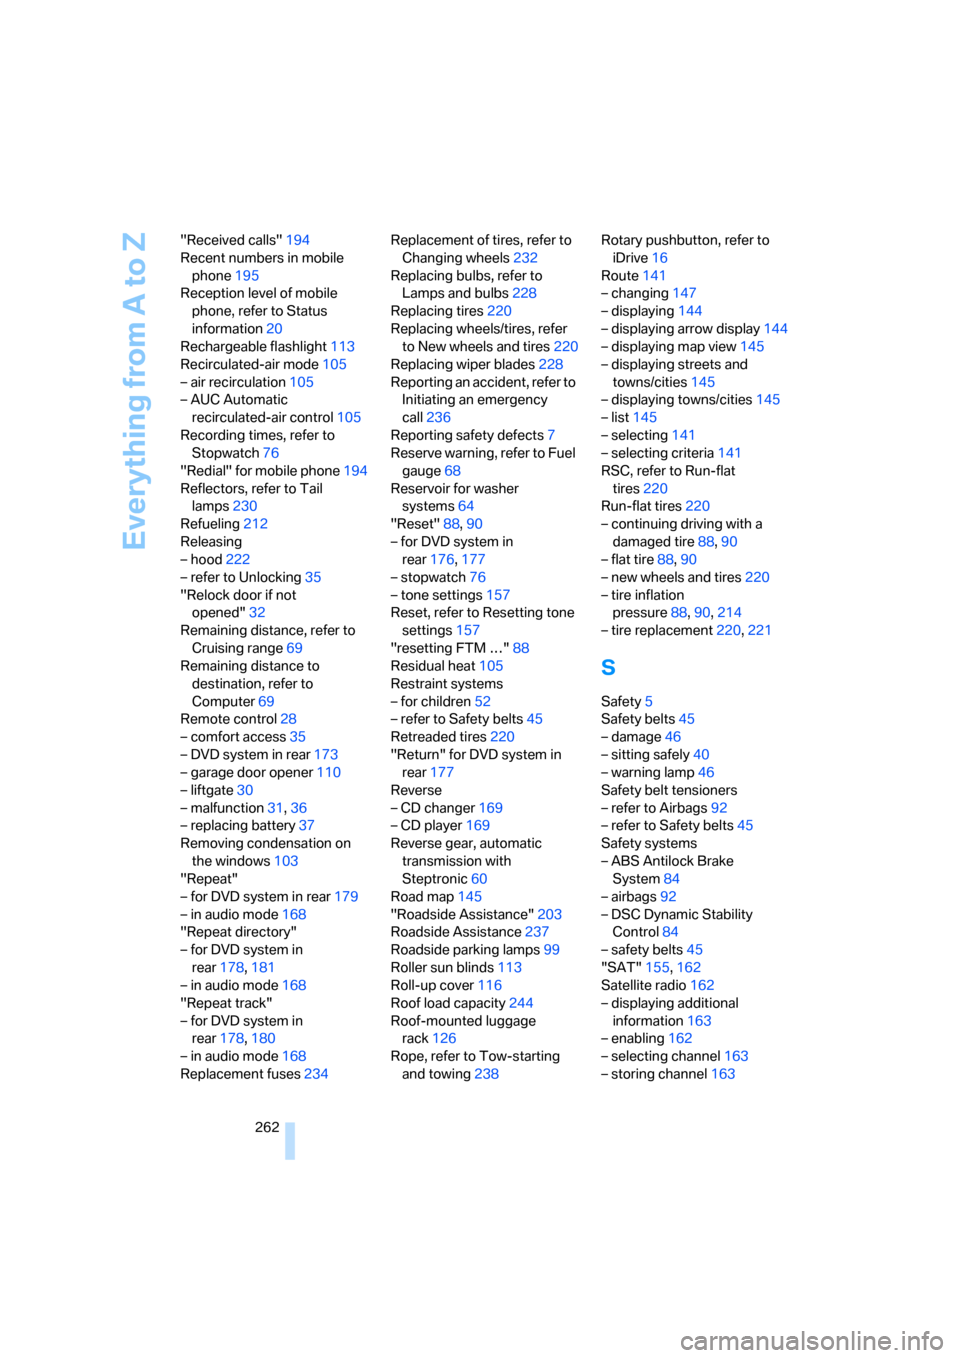
Everything from A to Z
262 "Received calls"194
Recent numbers in mobile
phone195
Reception level of mobile
phone, refer to Status
information20
Rechargeable flashlight113
Recirculated-air mode105
– air recirculation105
– AUC Automatic
recirculated-air control105
Recording times, refer to
Stopwatch76
"Redial" for mobile phone194
Reflectors, refer to Tail
lamps230
Refueling212
Releasing
– hood222
– refer to Unlocking35
"Relock door if not
opened"32
Remaining distance, refer to
Cruising range69
Remaining distance to
destination, refer to
Computer69
Remote control28
– comfort access35
– DVD system in rear173
– garage door opener110
– liftgate30
– malfunction31,36
– replacing battery37
Removing condensation on
the windows103
"Repeat"
– for DVD system in rear179
– in audio mode168
"Repeat directory"
– for DVD system in
rear178,181
– in audio mode168
"Repeat track"
– for DVD system in
rear178,180
– in audio mode168
Replacement fuses234Replacement of tires, refer to
Changing wheels232
Replacing bulbs, refer to
Lamps and bulbs228
Replacing tires220
Replacing wheels/tires, refer
to New wheels and tires220
Replacing wiper blades228
Reporting an accident, refer to
Initiating an emergency
call236
Reporting safety defects
7
Reserve warning, refer to Fuel
gauge68
Reservoir for washer
systems64
"Reset"88,90
– for DVD system in
rear176,177
– stopwatch76
– tone settings157
Reset, refer to Resetting tone
settings157
"resetting FTM …"88
Residual heat105
Restraint systems
– for children52
– refer to Safety belts45
Retreaded tires220
"Return" for DVD system in
rear177
Reverse
– CD changer169
– CD player169
Reverse gear, automatic
transmission with
Steptronic60
Road map145
"Roadside Assistance"203
Roadside Assistance237
Roadside parking lamps99
Roller sun blinds113
Roll-up cover116
Roof load capacity244
Roof-mounted luggage
rack126
Rope, refer to Tow-starting
and towing238Rotary pushbutton, refer to
iDrive16
Route141
– changing147
– displaying144
– displaying arrow display144
– displaying map view145
– displaying streets and
towns/cities145
– displaying towns/cities145
– list145
– selecting141
– selecting criteria141
RSC, refer to Run-flat
tires220
Run-flat tires220
– continuing driving with a
damaged tire88,90
– flat tire88,
90
– new wheels and tires220
– tire inflation
pressure88,90,214
– tire replacement220,221
S
Safety5
Safety belts45
– damage46
– sitting safely40
– warning lamp46
Safety belt tensioners
– refer to Airbags92
– refer to Safety belts45
Safety systems
– ABS Antilock Brake
System84
– airbags92
– DSC Dynamic Stability
Control84
– safety belts45
"SAT"155,162
Satellite radio162
– displaying additional
information163
– enabling162
– selecting channel163
– storing channel163