climate settings BMW X5 3.0Si 2008 E70 Owner's Manual
[x] Cancel search | Manufacturer: BMW, Model Year: 2008, Model line: X5 3.0Si, Model: BMW X5 3.0Si 2008 E70Pages: 292, PDF Size: 9.32 MB
Page 5 of 292
Reference
At a glance
Controls
Driving tips
Communications
Navigation
Entertainment
Mobility
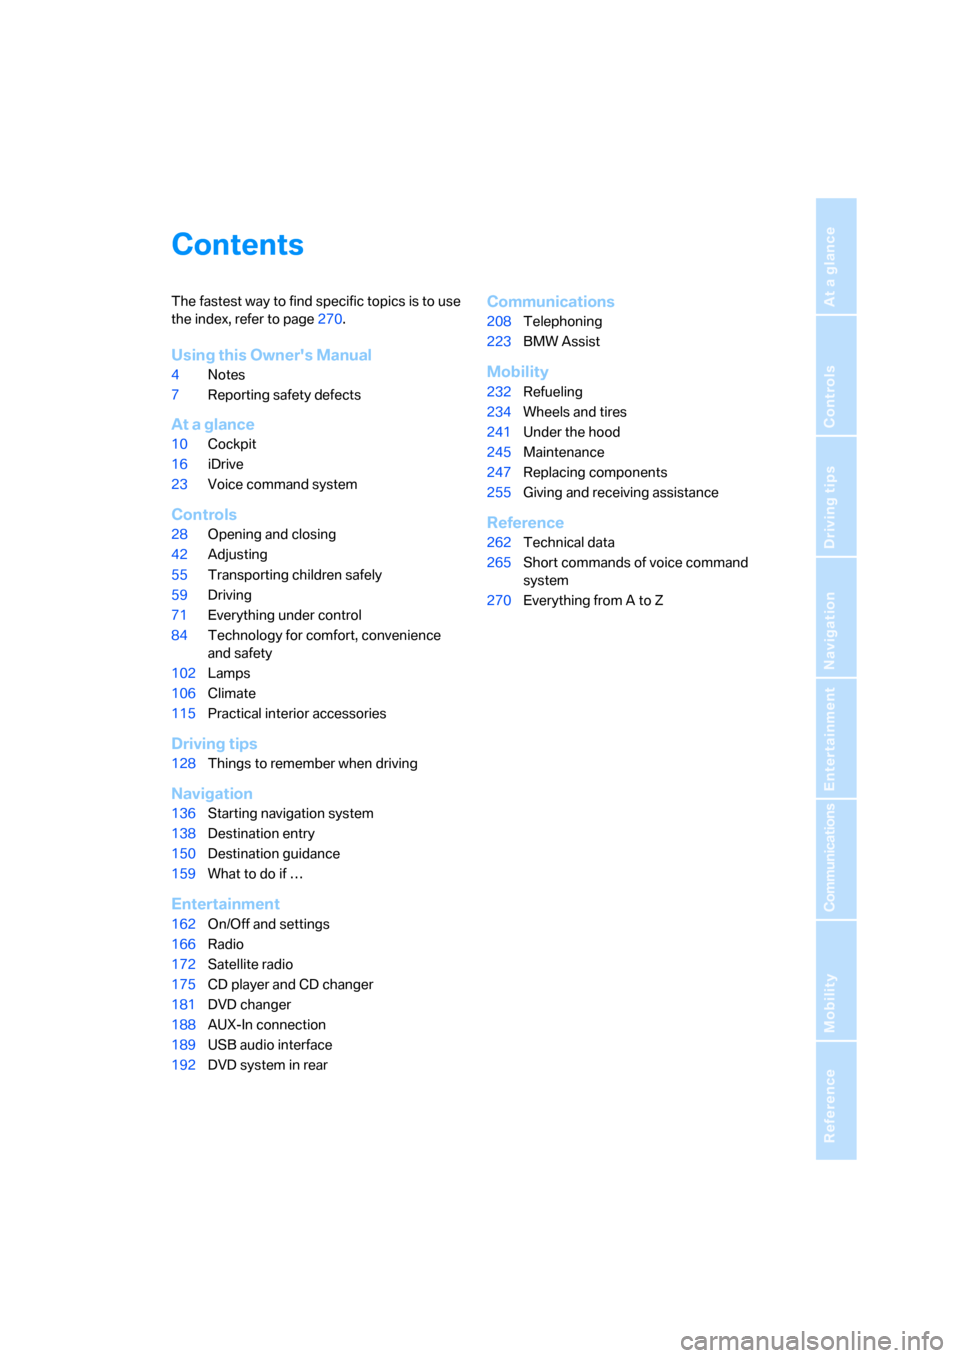
Contents
The fastest way to find specific topics is to use
the index, refer to page270.
Using this Owner's Manual
4Notes
7Reporting safety defects
At a glance
10Cockpit
16iDrive
23Voice command system
Controls
28Opening and closing
42Adjusting
55Transporting children safely
59Driving
71Everything under control
84Technology for comfort, convenience
and safety
102Lamps
106Climate
115Practical interior accessories
Driving tips
128Things to remember when driving
Navigation
136Starting navigation system
138Destination entry
150Destination guidance
159What to do if …
Entertainment
162On/Off and settings
166Radio
172Satellite radio
175CD player and CD changer
181DVD changer
188AUX-In connection
189USB audio interface
192DVD system in rear
Communications
208Telephoning
223BMW Assist
Mobility
232Refueling
234Wheels and tires
241Under the hood
245Maintenance
247Replacing components
255Giving and receiving assistance
Reference
262Technical data
265Short commands of voice command
system
270Everything from A to Z
Page 19 of 292
At a glance
17Reference
Controls
Driving tips
Communications
Navigation
Entertainment
Mobility
Menu overview
Communication
>Telephone*
>BMW Assist* or TeleService*
Navigation or onboard information
>Navigation system*
>Onboard information, e.g. for displaying
the average fuel consumption
Entertainment
>Radio
>CD player and CD changer
*
>External audio device
Climate
>Vent settings
>Seat heater distribution
*
>Automatic programs
>Parked car ventilation
*
menu
>Switching off Control Display
>Tone and display settings
>Settings for traffic information
*
>Settings for your vehicle, e.g. for the central
locking system
>Display of maintenance intervals and dead-
lines for legally mandated inspections
>Settings for telephone
*
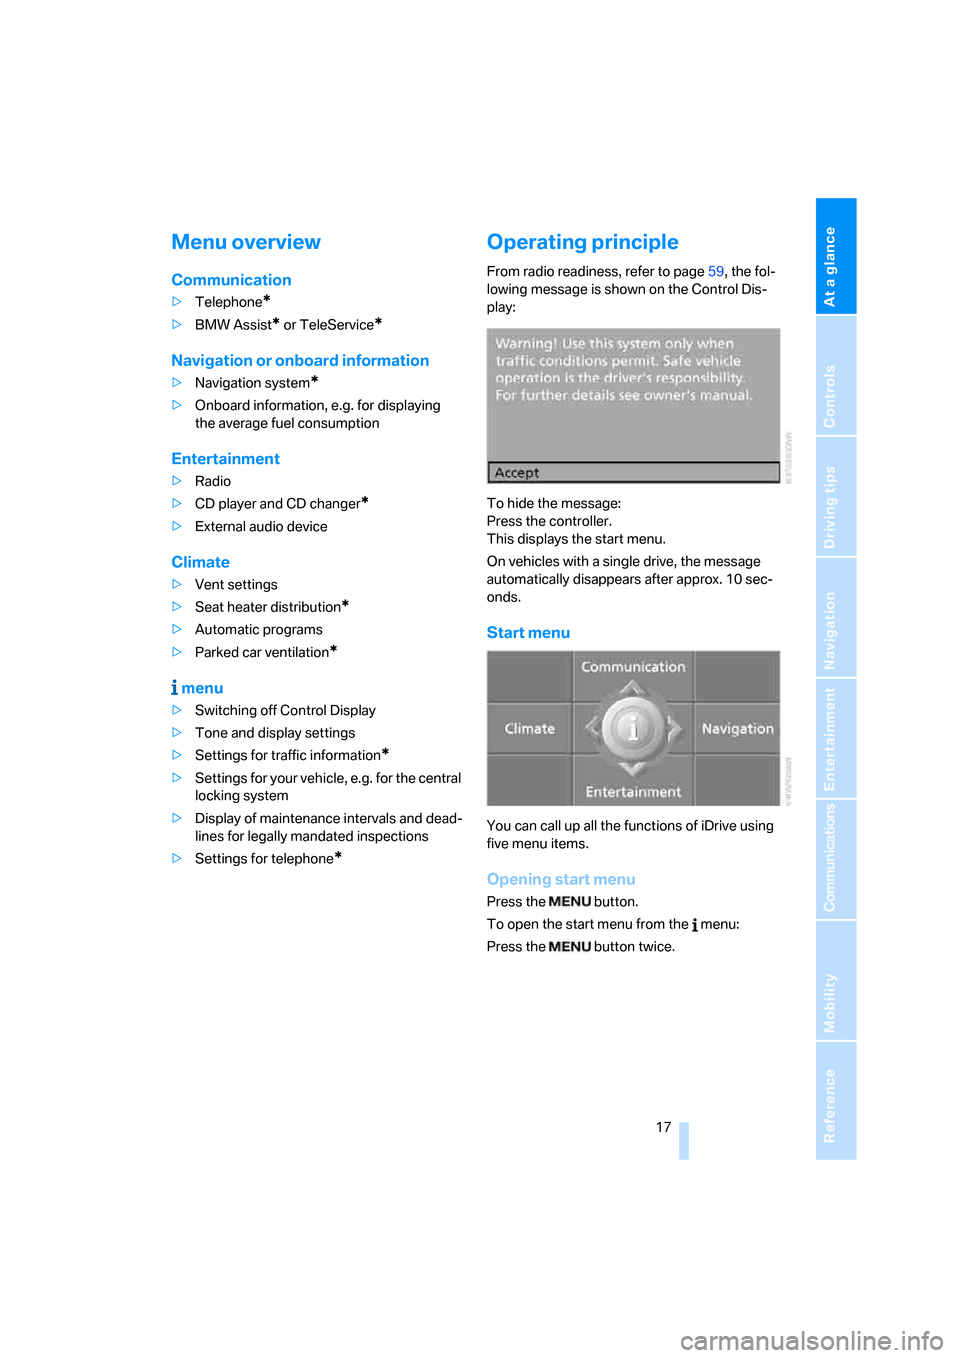
Operating principle
From radio readiness, refer to page59, the fol-
lowing message is shown on the Control Dis-
play:
To hide the message:
Press the controller.
This displays the start menu.
On vehicles with a single drive, the message
automatically disappears after approx. 10 sec-
onds.
Start menu
You can call up all the functions of iDrive using
five menu items.
Opening start menu
Press the button.
To open the start menu from the menu:
Press the button twice.
Page 20 of 292
iDrive
18
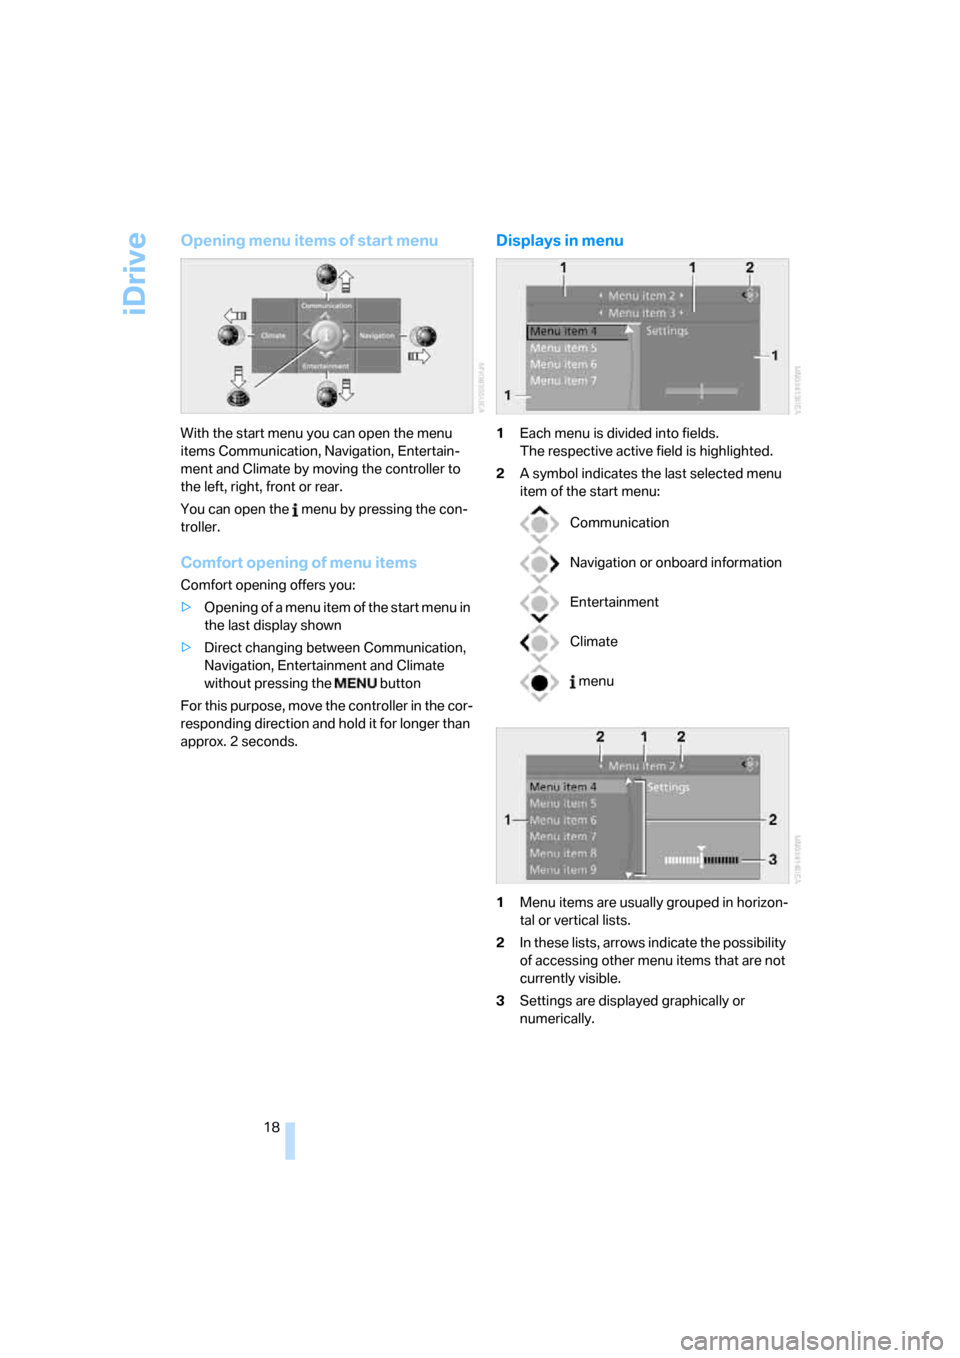
Opening menu items of start menu
With the start menu you can open the menu
items Communication, Navigation, Entertain-
ment and Climate by moving the controller to
the left, right, front or rear.
You can open the menu by pressing the con-
troller.
Comfort opening of menu items
Comfort opening offers you:
>Opening of a menu item of the start menu in
the last display shown
>Direct changing between Communication,
Navigation, Entertainment and Climate
without pressing the button
For this purpose, move the controller in the cor-
responding direction and hold it for longer than
approx. 2 seconds.
Displays in menu
1Each menu is divided into fields.
The respective active field is highlighted.
2A symbol indicates the last selected menu
item of the start menu:
1Menu items are usually grouped in horizon-
tal or vertical lists.
2In these lists, arrows indicate the possibility
of accessing other menu items that are not
currently visible.
3Settings are displayed graphically or
numerically.
Communication
Navigation or onboard information
Entertainment
Climate
menu
Page 31 of 292
Controls
29Reference
At a glance
Driving tips
Communications
Navigation
Entertainment
Mobility
>Settings for the display on the Control Dis-
play:
>Brightness of the Control Display, refer
to page82
>Measuring units for consumption, route/
distances, temperature, and pressure,
refer to page82
>Language on Control Display, refer to
page83
>12h/24h mode of the clock, refer to
page82
>Date format, refer to page82
>Showing optical warning for PDC Park Dis-
tance Control
*, refer to page85
>Selection, brightness and position of dis-
play in Head-Up Display
*, refer to page99
>Settings of automatic climate control, refer
to page107
>Positions of driver's seat, exterior mirrors,
and steering wheel
*, refer to page44
>With Adaptive Drive
*, last selected chassis
and suspension tuning setting, refer to
page91
>Audio sources, volume and tone settings,
refer to page163
>Radio, displaying stored stations, refer to
page166
>Telephone, setting volume, refer to
pages214,220
>Pathway lighting, refer to page103, and
daytime running lamps
*, refer to page103
>Triple turn signal activation, refer to
page67
>With rear view camera
*, selection of func-
tions, refer to page86, and type of display,
refer to page88
>With programmable memory/direct selec-
tion buttons, selection of stored functions,
refer to page21
Central locking system
The concept
The central locking system is ready for opera-
tion whenever the driver's door is closed.
The system simultaneously engages and
releases the locks on the following:
>Doors
>Liftgate
>Fuel filler door
Operating from outside
>via the remote control
>via the door lock
>with comfort access
* via the door handles
At the same time, the anti-theft system is also
operated. It prevents the doors from being
unlocked using the lock buttons or door han-
dles. The interior lamps and the courtesy
lamps
* are also switched on and off with the
remote control. The alarm system
is armed/dis-
armed at the same time.
You can find more detailed information on the
alarm system
on page35.
Operating from inside
Via the button for central locking, refer to
page32. The fuel filler door is not locked.
In an accident of sufficient severity, the central
locking system automatically unlocks the vehi-
cle. In addition, the hazard warning flashers and
interior lamps come on.
Opening and closing:
Using remote control
Persons or animals left unattended in a
parked vehicle can lock the doors from
the inside. Always take along the remote control
when leaving the vehicle so that the vehicle can
then be opened from the outside.<
Page 109 of 292
Controls
107Reference
At a glance
Driving tips
Communications
Navigation
Entertainment
Mobility
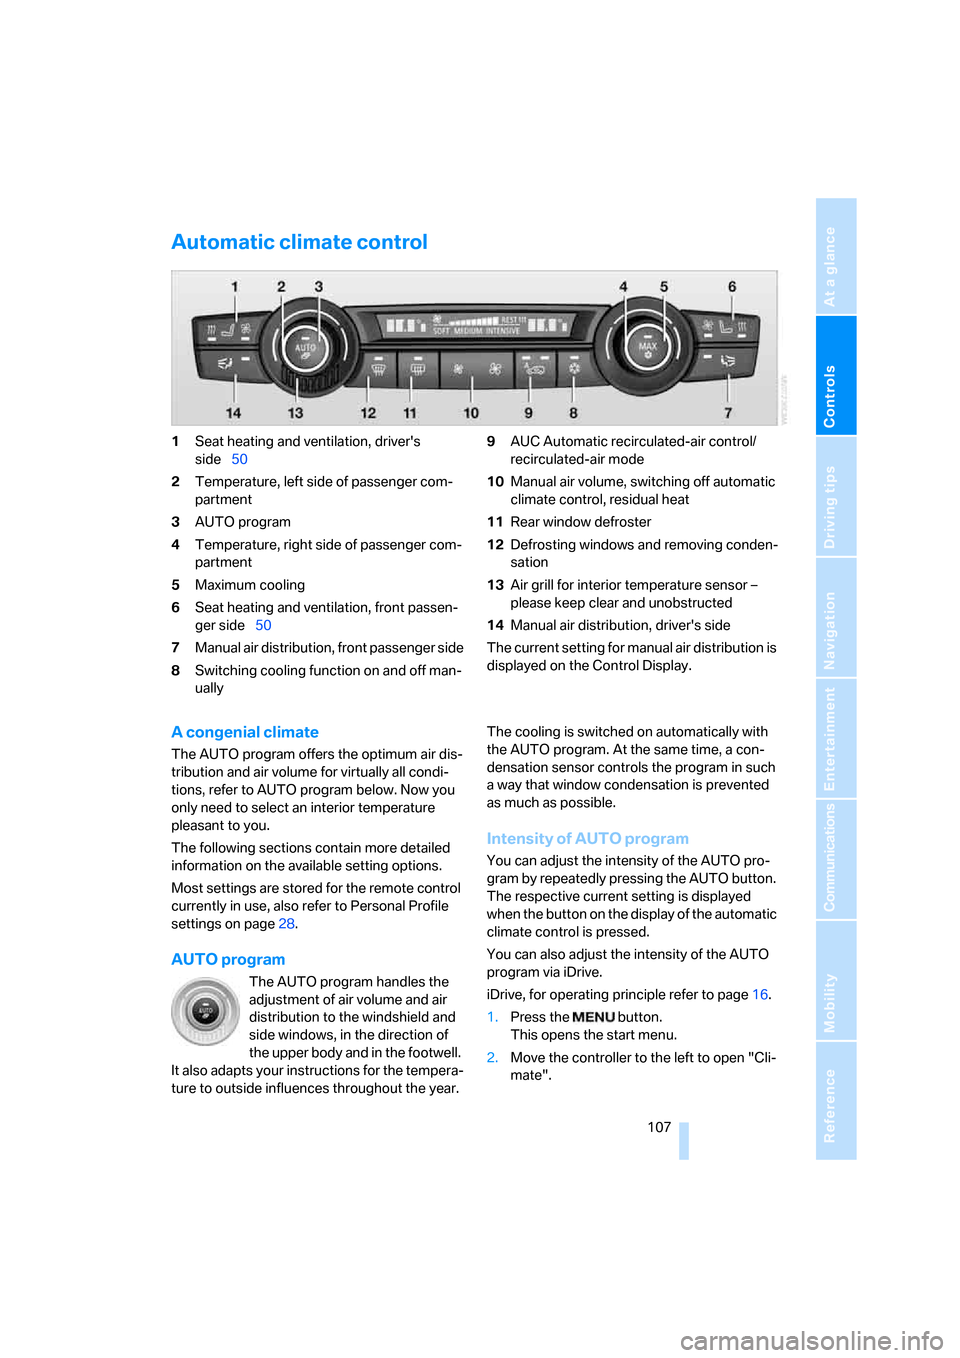
Automatic climate control
1Seat heating and ventilation, driver's
side50
2Temperature, left side of passenger com-
partment
3AUTO program
4Temperature, right side of passenger com-
partment
5Maximum cooling
6Seat heating
and ventilation, front passen-
ger side50
7Manual air distribution, front passenger side
8Switching cooling function on and off man-
ually9AUC Automatic recirculated-air control/
recirculated-air mode
10Manual air volume, switching off automatic
climate control, residual heat
11Rear window defroster
12Defrosting windows and removing conden-
sation
13Air grill for interior temperature sensor –
please keep clear and unobstructed
14Manual air distribution, driver's side
The current setting for manual air distribution is
displayed on the Control Display.
A congenial climate
The AUTO program offers the optimum air dis-
tribution and air volume for virtually all condi-
tions, refer to AUTO program below. Now you
only need to select an interior temperature
pleasant to you.
The following sections contain more detailed
information on the available setting options.
Most settings are stored for the remote control
currently in use, also refer to Personal Profile
settings on page28.
AUTO program
The AUTO program handles the
adjustment of air volume and air
distribution to the windshield and
side windows, in the direction of
the upper body and in the footwell.
It also adapts your instructions for the tempera-
ture to outside influences throughout the year.The cooling is switched on automatically with
the AUTO program. At the same time, a con-
densation sensor controls the program in such
a way that window condensation is prevented
as much as possible.
Intensity of AUTO program
You can adjust the intensity of the AUTO pro-
gram by repeatedly pressing the AUTO button.
The respective current setting is displayed
when the button on the display of the automatic
climate control is pressed.
You can also adjust the intensity of the AUTO
program via iDrive.
iDrive, for operating principle refer to page16.
1.Press the button.
This opens the start menu.
2.Move the controller to the left to open "Cli-
mate".
Page 110 of 292
Climate
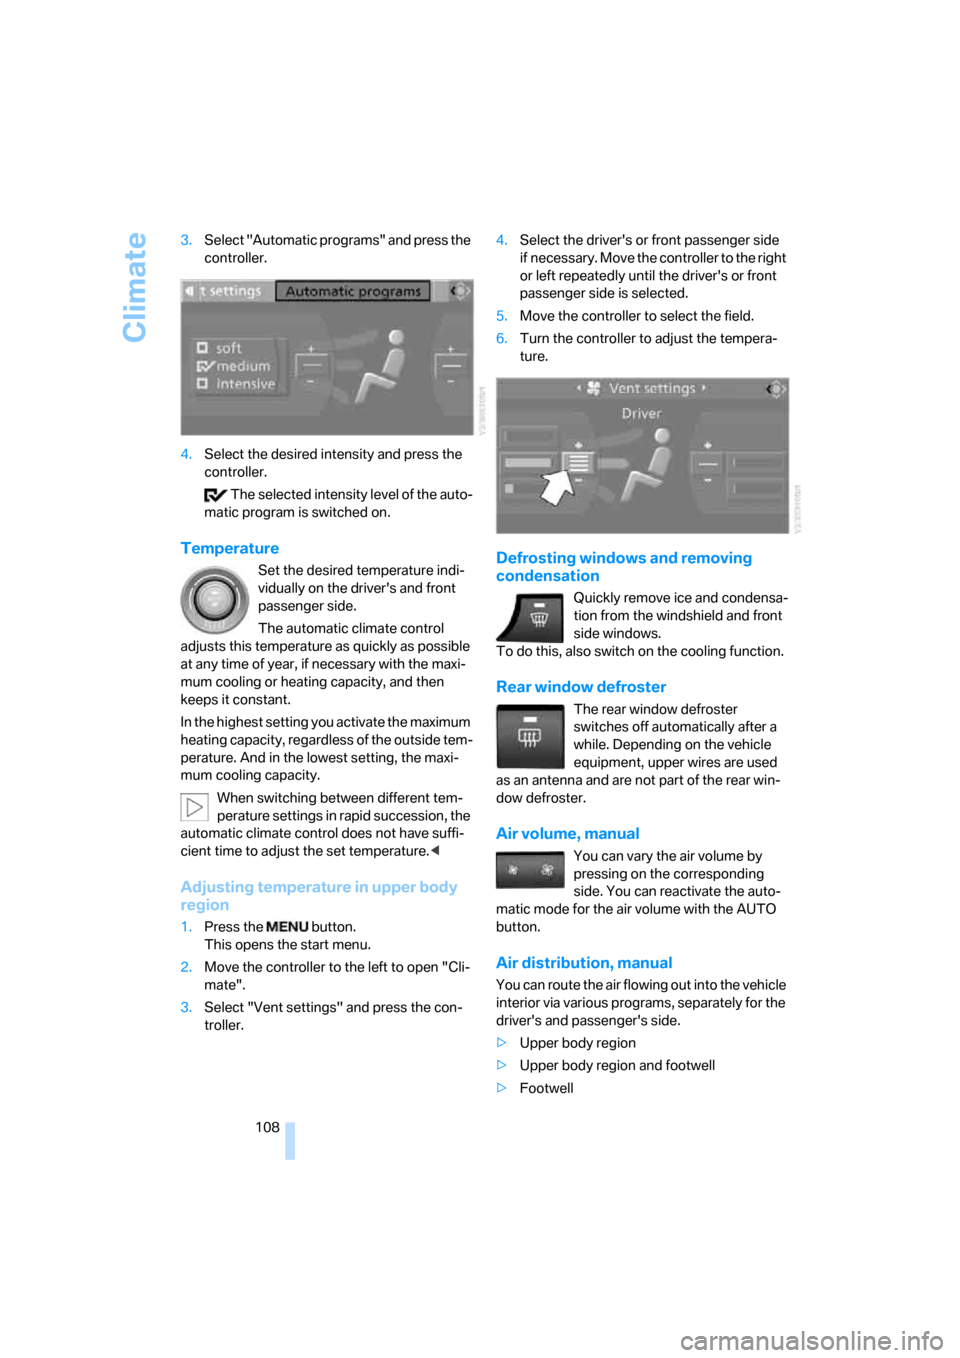
108 3.Select "Automatic programs" and press the
controller.
4.Select the desired intensity and press the
controller.
The selected intensity level of the auto-
matic program is switched on.
Temperature
Set the desired temperature indi-
vidually on the driver's and front
passenger side.
The automatic climate control
adjusts this temperature as quickly as possible
at any time of year, if necessary with the maxi-
mum cooling or heating capacity, and then
keeps it constant.
In the highest setting you activate the maximum
heating capacity, regardless of the outside tem-
perature. And in the lowest setting, the maxi-
mum cooling capacity.
When switching between different tem-
perature settings in rapid succession, the
automatic climate control does not have suffi-
cient time to adjust the set temperature.<
Adjusting temperature in upper body
region
1.Press the button.
This opens the start menu.
2.Move the controller to the left to open "Cli-
mate".
3.Select "Vent settings" and press the con-
troller.4.Select the driver's or front passenger side
if necessary. Move the controller to the right
or left repeatedly until the driver's or front
passenger side is selected.
5.Move the controller to select the field.
6.Turn the controller to adjust the tempera-
ture.
Defrosting windows and removing
condensation
Quickly remove ice and condensa-
tion from the windshield and front
side windows.
To do this, also switch on the cooling function.
Rear window defroster
The rear window defroster
switches off automatically after a
while. Depending on the vehicle
equipment, upper wires are used
as an antenna and are not part of the rear win-
dow defroster.
Air volume, manual
You can vary the air volume by
pressing on the corresponding
side. You can reactivate the auto-
matic mode for the air volume with the AUTO
button.
Air distribution, manual
You can route the air flowing out into the vehicle
interior via various programs, separately for the
driver's and passenger's side.
>Upper body region
>Upper body region and footwell
>Footwell
Page 111 of 292
Controls
109Reference
At a glance
Driving tips
Communications
Navigation
Entertainment
Mobility
>Driver's side: windows and footwell
>Individual program
Selecting program
Press the button repeatedly until
the desired program is shown on
the Control Display.
Adjusting air distribution individually –
individual program
The settings are stored in this program.
iDrive, for operating principle refer to page16.
1.Press the button.
This opens the start menu.
2.Move the controller to the left to open "Cli-
mate".
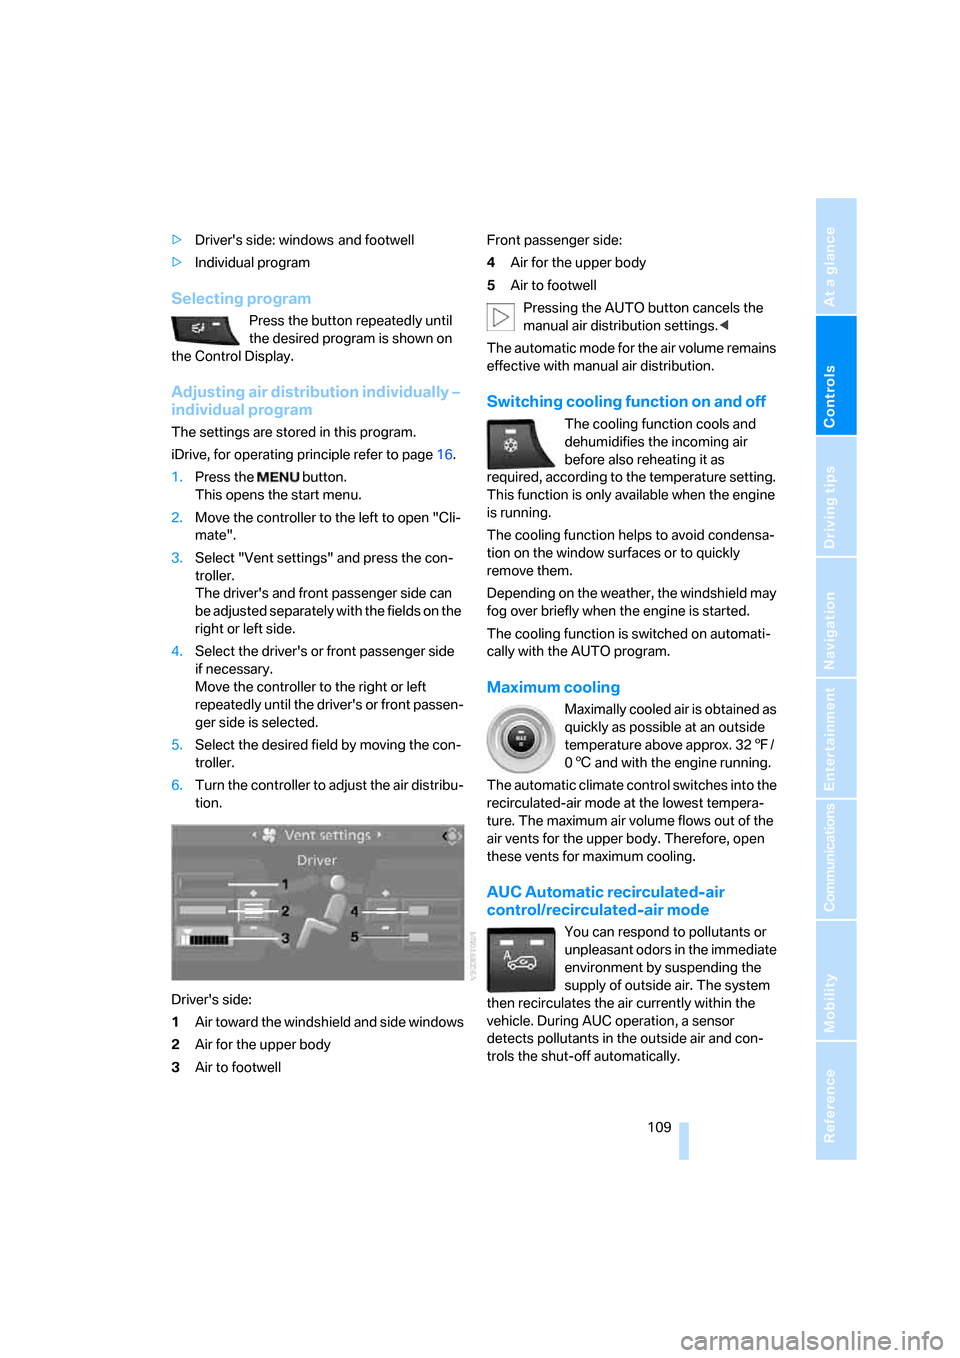
3.Select "Vent settings" and press the con-
troller.
The driver's and front passenger side can
be adjusted separately with the fields on the
right or left side.
4.Select the driver's or front passenger side
if necessary.
Move the controller to the right or left
repeatedly until the driver's or front passen-
ger side is selected.
5.Select the desired field by moving the con-
troller.
6.Turn the controller to adjust the air distribu-
tion.
Driver's side:
1Air toward the windshield and side windows
2Air for the upper body
3Air to footwellFront passenger side:
4Air for the upper body
5Air to footwell
Pressing the AUTO button cancels the
manual air distribution settings.<
The automatic mode for the air volume remains
effective with manual air distribution.
Switching cooling function on and off
The cooling function cools and
dehumidifies the incoming air
before also reheating it as
required, according to the temperature setting.
This function is only available when the engine
is running.
The cooling function helps to avoid condensa-
tion on the window surfaces or to quickly
remove them.
Depending on the weather, the windshield may
fog over briefly when the engine is started.
The cooling function is switched on automati-
cally with the AUTO program.
Maximum cooling
Maximally cooled air is obtained as
quickly as possible at an outside
temperature above approx. 327/
06 and with the engine running.
The automatic climate control switches into the
recirculated-air mode at the lowest tempera-
ture. The maximum air volume flows out of the
air vents for the upper body. Therefore, open
these vents for maximum cooling.
AUC Automatic recirculated-air
control/recirculated-air mode
You can respond to pollutants or
unpleasant odors in the immediate
environment by suspending the
supply of outside air. The system
then recirculates the air currently within the
vehicle. During AUC operation, a sensor
detects pollutants in the outside air and con-
trols the shut-off automatically.
Page 114 of 292
Climate
112
Activating rear automatic climate
control
iDrive, for operating principle refer to page16.
1.Press the button.
This opens the start menu.
2.Move the controller to the left to open "Cli-
mate".
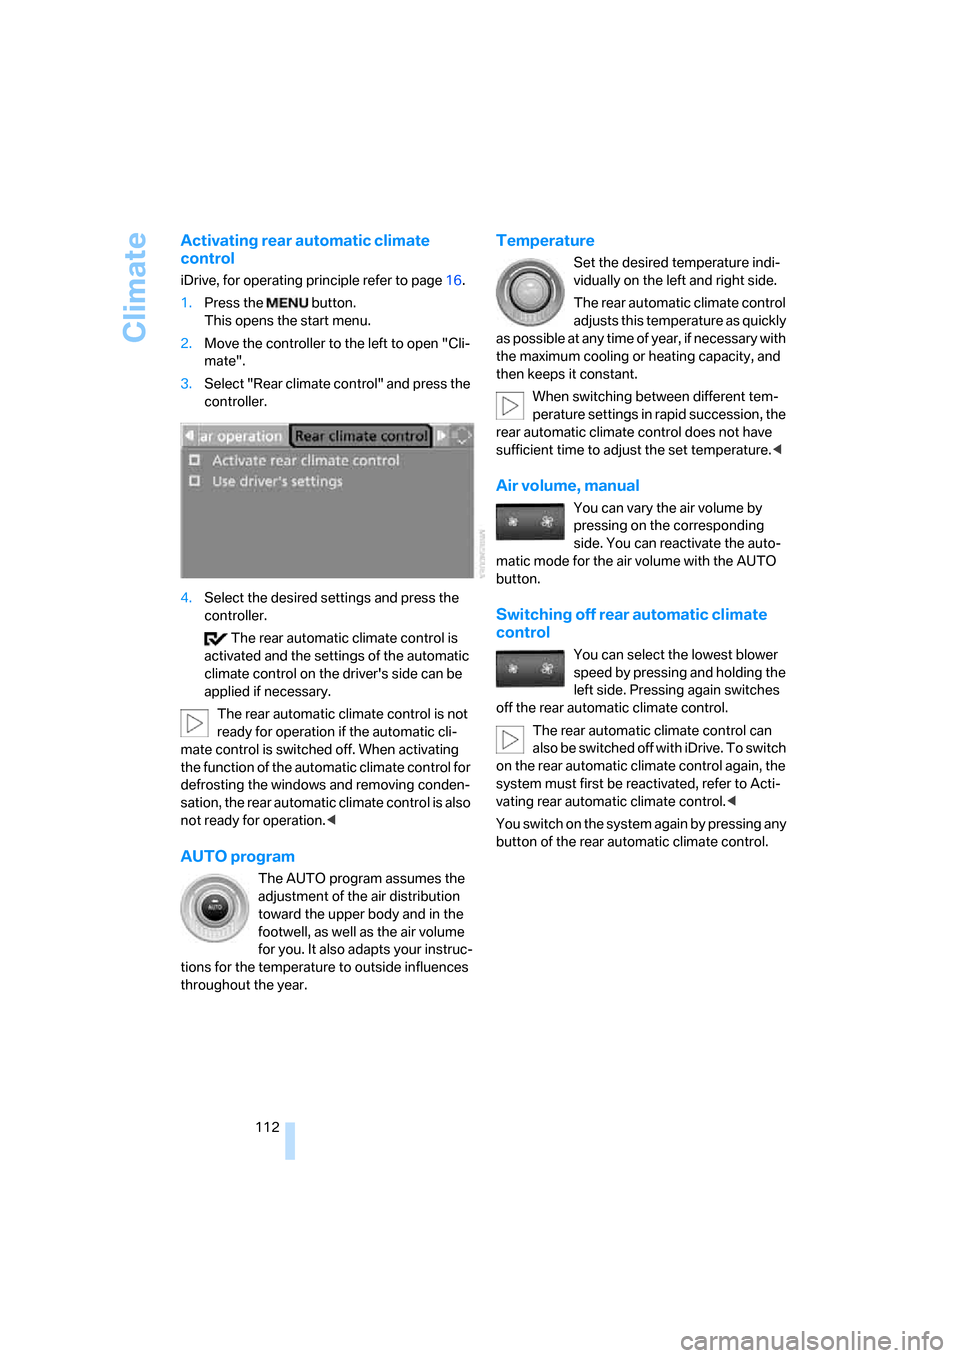
3.Select "Rear climate control" and press the
controller.
4.Select the desired settings and press the
controller.
The rear automatic climate control is
activated and the settings of the automatic
climate control on the driver's side can be
applied if necessary.
The rear automatic climate control is not
ready for operation if the automatic cli-
mate control is switched off. When activating
the function of the automatic climate control for
defrosting the windows and removing conden-
sation, the rear automatic climate control is also
not ready for operation.<
AUTO program
The AUTO program assumes the
adjustment of the air distribution
toward the upper body and in the
footwell, as well as the air volume
for you. It also adapts your instruc-
tions for the temperature to outside influences
throughout the year.
Temperature
Set the desired temperature indi-
vidually on the left and right side.
The rear automatic climate control
adjusts this temperature as quickly
as possible at any time of year, if necessary with
the maximum cooling or heating capacity, and
then keeps it constant.
When switching between different tem-
perature settings in rapid succession, the
rear automatic climate control does not have
sufficient time to adjust the set temperature.<
Air volume, manual
You can vary the air volume by
pressing on the corresponding
side. You can reactivate the auto-
matic mode for the air volume with the AUTO
button.
Switching off rear automatic climate
control
You can select the lowest blower
speed by pressing and holding the
left side. Pressing again switches
off the rear automatic climate control.
The rear automatic climate control can
also be switched off with iDrive. To switch
on the rear automatic climate control again, the
system must first be reactivated, refer to Acti-
vating rear automatic climate control.<
You switch on the system again by pressing any
button of the rear automatic climate control.
Page 270 of 292
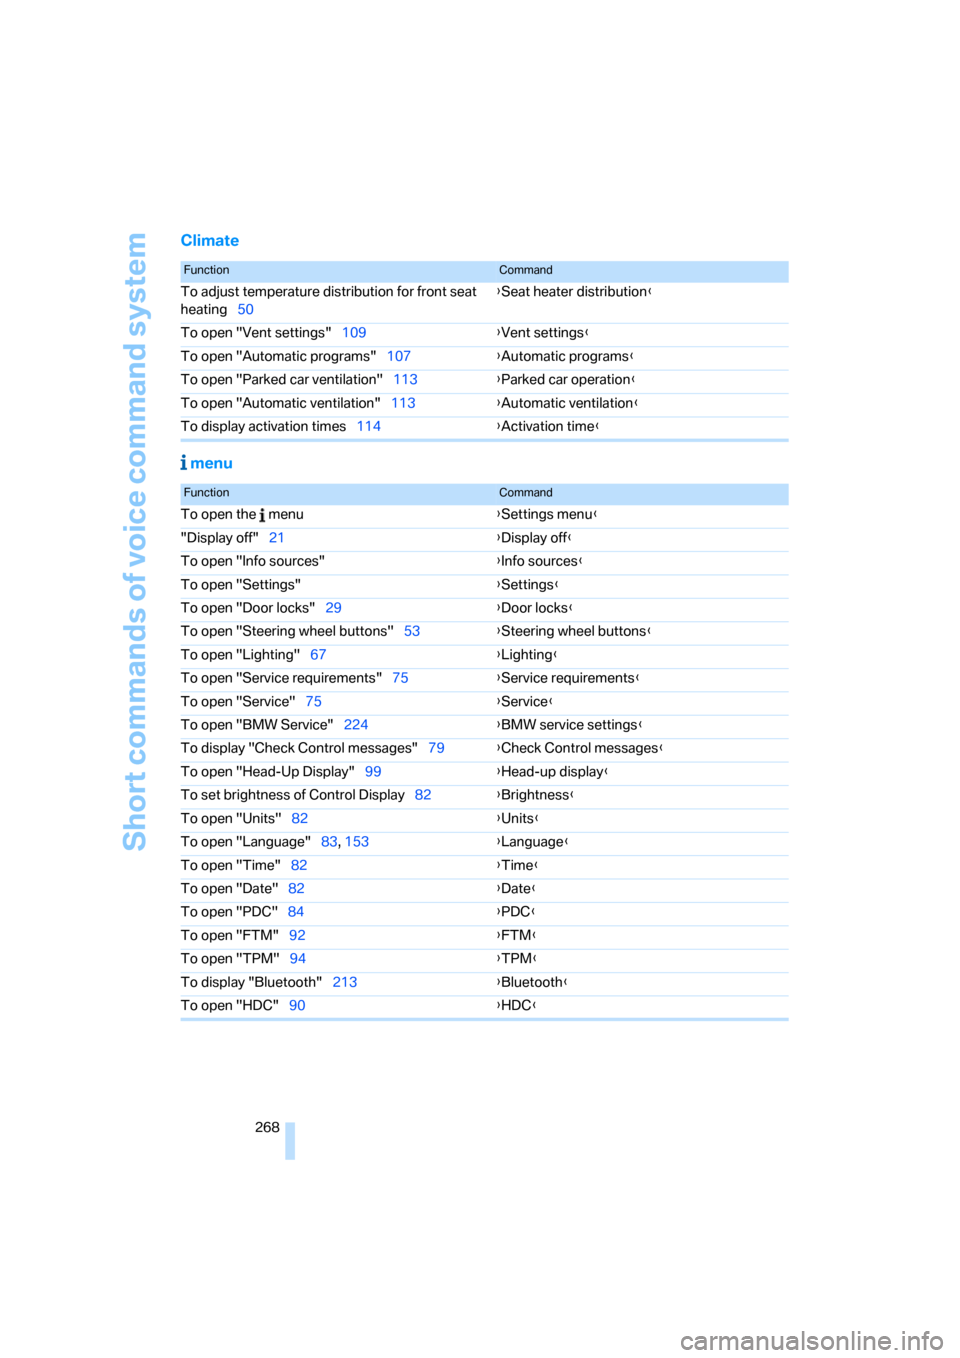
Short commands of voice command system
268
Climate
menu
FunctionCommand
To adjust temperature distribution for front seat
heating50{Seat heater distribution}
To open "Vent settings"109{Vent settings}
To open "Automatic programs"107{Automatic programs}
To open "Parked car ventilation"113{Parked car operation}
To open "Automatic ventilation"113{Automatic ventilation}
To display activation times114{Activation time}
FunctionCommand
To open the menu{Settings menu}
"Display off"21{Display off}
To open "Info sources"{Info sources}
To open "Settings"{Settings}
To open "Door locks"29{Door locks}
To open "Steering wheel buttons"53{Steering wheel buttons}
To open "Lighting"67{Lighting}
To open "Service requirements"75{Service requirements}
To open "Service"75{Service}
To open "BMW Service"224{BMW service settings}
To display "Check Control messages"79{Check Control messages}
To open "Head-Up Display"99{Head-up display}
To set brightness of Control Display82{Brightness}
To open "Units"82{Units}
To open "Language"83, 153{Language}
To open "Time"82{Time}
To open "Date"82{Date}
To open "PDC"84{PDC}
To open "FTM"92{FTM}
To open "TPM"94{TPM}
To display "Bluetooth"213
{Bluetooth}
To open "HDC"90{HDC}
Page 279 of 292
Reference 277
At a glance
Controls
Driving tips
Communications
Navigation
Entertainment
Mobility
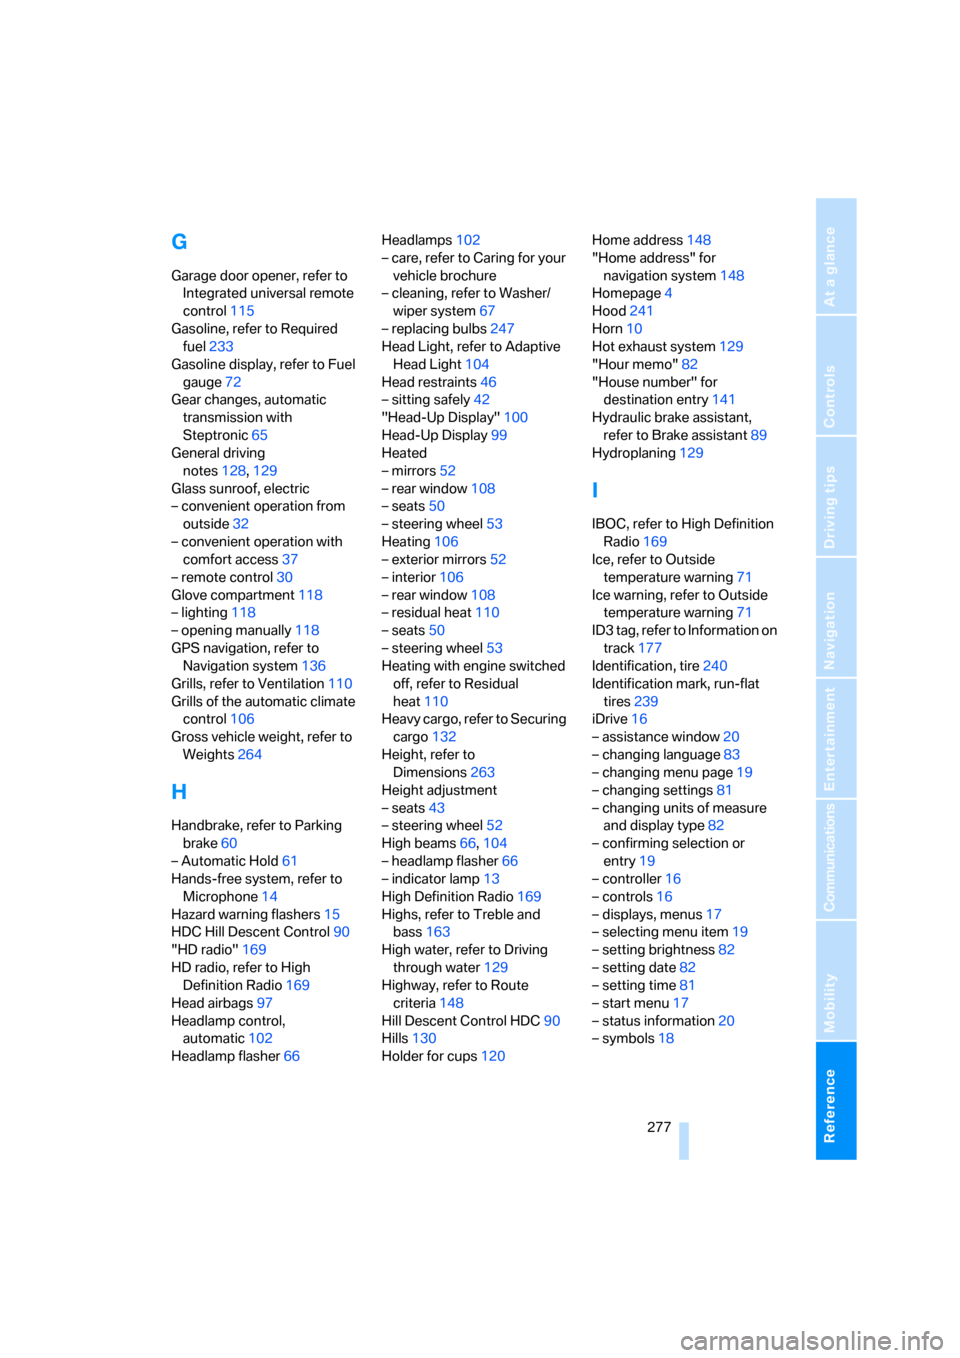
G
Garage door opener, refer to
Integrated universal remote
control115
Gasoline, refer to Required
fuel233
Gasoline display, refer to Fuel
gauge72
Gear changes, automatic
transmission with
Steptronic65
General driving
notes128,129
Glass sunroof, electric
– convenient operation from
outside32
– convenient operation with
comfort access37
– remote control30
Glove compartment118
– lighting118
– opening manually118
GPS navigation, refer to
Navigation system136
Grills, refer to Ventilation110
Grills of the automatic climate
control106
Gross vehicle weight, refer to
Weights264
H
Handbrake, refer to Parking
brake60
– Automatic Hold61
Hands-free system, refer to
Microphone14
Hazard warning flashers15
HDC Hill Descent Control90
"HD radio"169
HD radio, refer to High
Definition Radio169
Head airbags97
Headlamp control,
automatic102
Headlamp flasher66Headlamps102
– care, refer to Caring for your
vehicle brochure
– cleaning, refer to Washer/
wiper system67
– replacing bulbs247
Head Light, refer to Adaptive
Head Light104
Head restraints46
– sitting safely42
"Head-Up Display"100
Head-Up Display99
Heated
– mirrors52
– rear window108
– seats50
– steering wheel53
Heating106
– exterior mirrors52
– interior106
– rear window108
– residual heat110
– seats50
– steering wheel53
Heating with engine switched
off, refer to Residual
heat110
Heavy cargo, refer to Securing
cargo132
Height, refer to
Dimensions263
Height adjustment
– seats43
– steering wheel52
High beams66,104
– headlamp flasher66
– indicator lamp13
High Definition Radio169
Highs, refer to Treble and
bass163
High water, refer to Driving
through water129
Highway, refer to Route
criteria148
Hill Descent Control HDC90
Hills130
Holder for cups120Home address148
"Home address" for
navigation system148
Homepage4
Hood241
Horn10
Hot exhaust system129
"Hour memo"82
"House number" for
destination entry141
Hydraulic brake assistant,
refer to Brake assistant89
Hydroplaning129
I
IBOC, refer to High Definition
Radio169
Ice, refer to Outside
temperature warning71
Ice warning, refer to Outside
temperature warning71
ID3 tag, refer to Information on
track177
Identification, tire240
Identification mark, run-flat
tires239
iDrive16
– assistance window20
– changing language83
– changing menu page19
– changing settings81
– changing units of measure
and display type82
– confirming selection or
entry19
– controller16
– controls16
– displays, menus17
– selecting menu item19
– setting brightness82
– setting date82
– setting time81
– start menu17
– status information20
– symbols18