remote control BMW X5 3.0Si 2008 E70 Owner's Guide
[x] Cancel search | Manufacturer: BMW, Model Year: 2008, Model line: X5 3.0Si, Model: BMW X5 3.0Si 2008 E70Pages: 292, PDF Size: 9.32 MB
Page 105 of 292
Controls
103Reference
At a glance
Driving tips
Communications
Navigation
Entertainment
Mobility
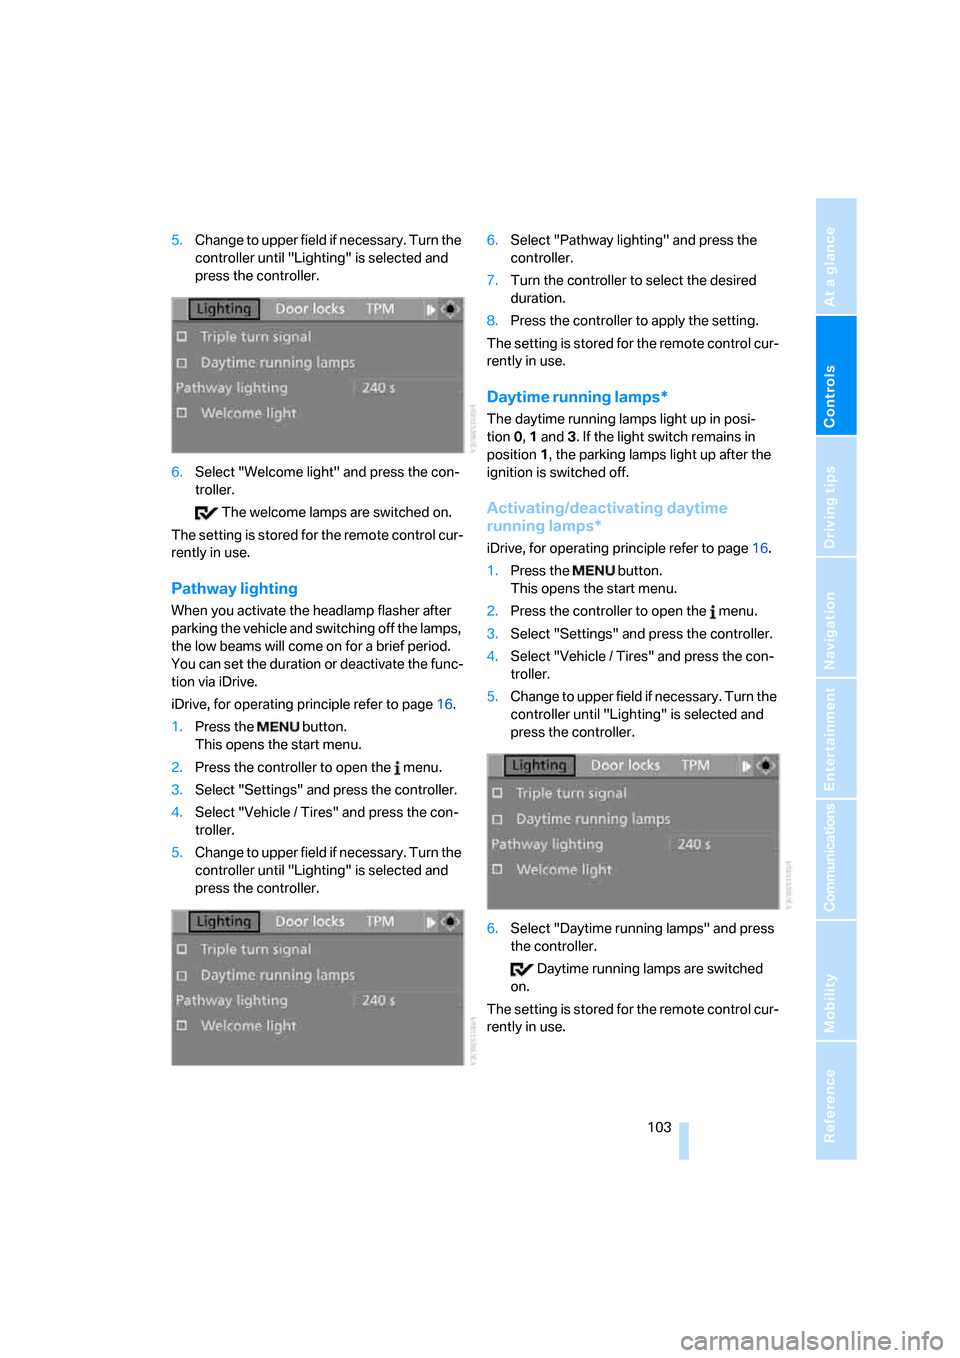
5.Change to upper field if necessary. Turn the
controller until "Lighting" is selected and
press the controller.
6.Select "Welcome light" and press the con-
troller.
The welcome lamps are switched on.
The setting is stored for the remote control cur-
rently in use.
Pathway lighting
When you activate the headlamp flasher after
parking the vehicle and switching off the lamps,
the low beams will come on for a brief period.
You can set the duration or deactivate the func-
tion via iDrive.
iDrive, for operating principle refer to page16.
1.Press the button.
This opens the start menu.
2.Press the controller to open the menu.
3.Select "Settings" and press the controller.
4.Select "Vehicle / Tires" and press the con-
troller.
5.Change to upper field if necessary. Turn the
controller until "Lighting" is selected and
press the controller.6.Select "Pathway lighting" and press the
controller.
7.Turn the controller to select the desired
duration.
8.Press the controller to apply the setting.
The setting is stored for the remote control cur-
rently in use.
Daytime running lamps*
The daytime running lamps light up in posi-
tion0, 1 and 3. If the light switch remains in
position1, the parking lamps light up after the
ignition is switched off.
Activating/deactivating daytime
running lamps*
iDrive, for operating principle refer to page16.
1.Press the button.
This opens the start menu.
2.Press the controller to open the menu.
3.Select "Settings" and press the controller.
4.Select "Vehicle / Tires" and press the con-
troller.
5.Change to upper field if necessary. Turn the
controller until "Lighting" is selected and
press the controller.
6.Select "Daytime running lamps" and press
the controller.
Daytime running lamps are switched
on.
The setting is stored for the remote control cur-
rently in use.
Page 109 of 292
Controls
107Reference
At a glance
Driving tips
Communications
Navigation
Entertainment
Mobility
Automatic climate control
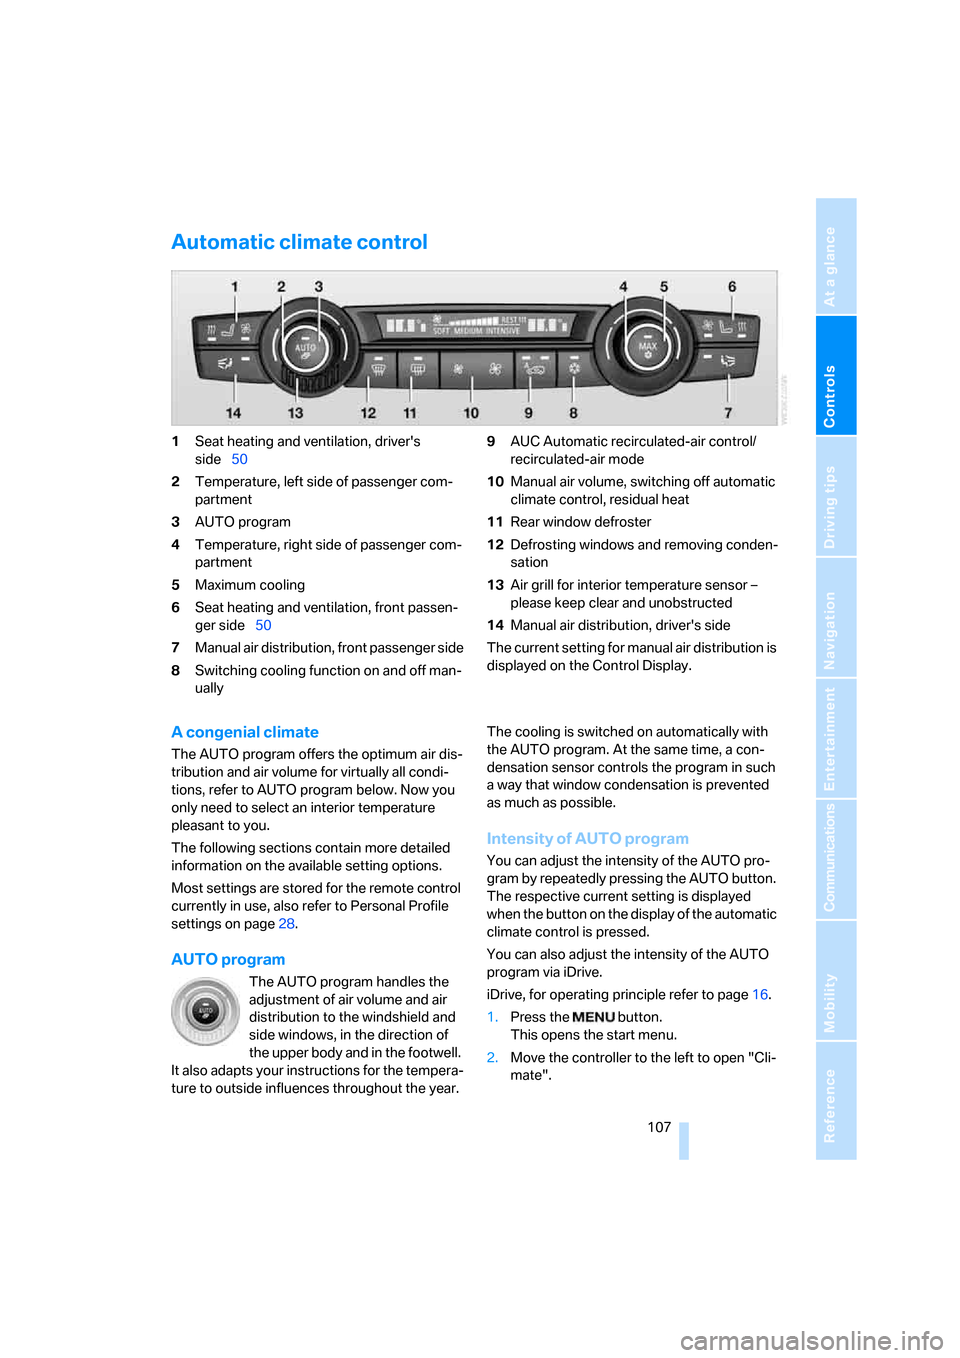
1Seat heating and ventilation, driver's
side50
2Temperature, left side of passenger com-
partment
3AUTO program
4Temperature, right side of passenger com-
partment
5Maximum cooling
6Seat heating
and ventilation, front passen-
ger side50
7Manual air distribution, front passenger side
8Switching cooling function on and off man-
ually9AUC Automatic recirculated-air control/
recirculated-air mode
10Manual air volume, switching off automatic
climate control, residual heat
11Rear window defroster
12Defrosting windows and removing conden-
sation
13Air grill for interior temperature sensor –
please keep clear and unobstructed
14Manual air distribution, driver's side
The current setting for manual air distribution is
displayed on the Control Display.
A congenial climate
The AUTO program offers the optimum air dis-
tribution and air volume for virtually all condi-
tions, refer to AUTO program below. Now you
only need to select an interior temperature
pleasant to you.
The following sections contain more detailed
information on the available setting options.
Most settings are stored for the remote control
currently in use, also refer to Personal Profile
settings on page28.
AUTO program
The AUTO program handles the
adjustment of air volume and air
distribution to the windshield and
side windows, in the direction of
the upper body and in the footwell.
It also adapts your instructions for the tempera-
ture to outside influences throughout the year.The cooling is switched on automatically with
the AUTO program. At the same time, a con-
densation sensor controls the program in such
a way that window condensation is prevented
as much as possible.
Intensity of AUTO program
You can adjust the intensity of the AUTO pro-
gram by repeatedly pressing the AUTO button.
The respective current setting is displayed
when the button on the display of the automatic
climate control is pressed.
You can also adjust the intensity of the AUTO
program via iDrive.
iDrive, for operating principle refer to page16.
1.Press the button.
This opens the start menu.
2.Move the controller to the left to open "Cli-
mate".
Page 117 of 292
Controls
115Reference
At a glance
Driving tips
Communications
Navigation
Entertainment
Mobility
Practical interior accessories
Integrated universal remote
control*
The concept
The integrated universal remote control can
replace as many as three hand-held transmit-
ters for various remote-controlled accessories,
such as garage and gate or lighting systems.
The integrated universal remote control regis-
ters and stores signals from the original hand-
held transmitters.
The signal of an original hand-held transmitter
can be programmed on one of the three mem-
ory buttons1. Then with the ignition switched
on, this programmed memory button1 can be
used to operate the respective feature. The
LED2 flashes to confirm transmission of the
signal.
Should you sell your vehicle one day, be sure to
delete the stored programs beforehand for your
safety, refer to page116.
To prevent possible damage or injury,
before programming or using the inte-
grated universal remote control, always inspect
the immediate area to make certain that no peo-
ple, animals or objects are within the travel
range of the device. Also, comply with the
safety precautions of the original hand-held
transmitter.<
Checking compatibility
If you see this symbol on the packaging
or in the manual supplied with the orig-
inal hand-held transmitter, it is safe to
assume that it is compatible with the integrated
universal remote control.
Should you have additional questions,
please contact your BMW Sports Activity
Vehicle Center or call: 1-800-355-3515.
Information is also provided on the Internet at:
www.bmwusa.com or
www.homelink.com.HomeLink is a registered trademark of Johnson
Controls, Inc.<
Programming
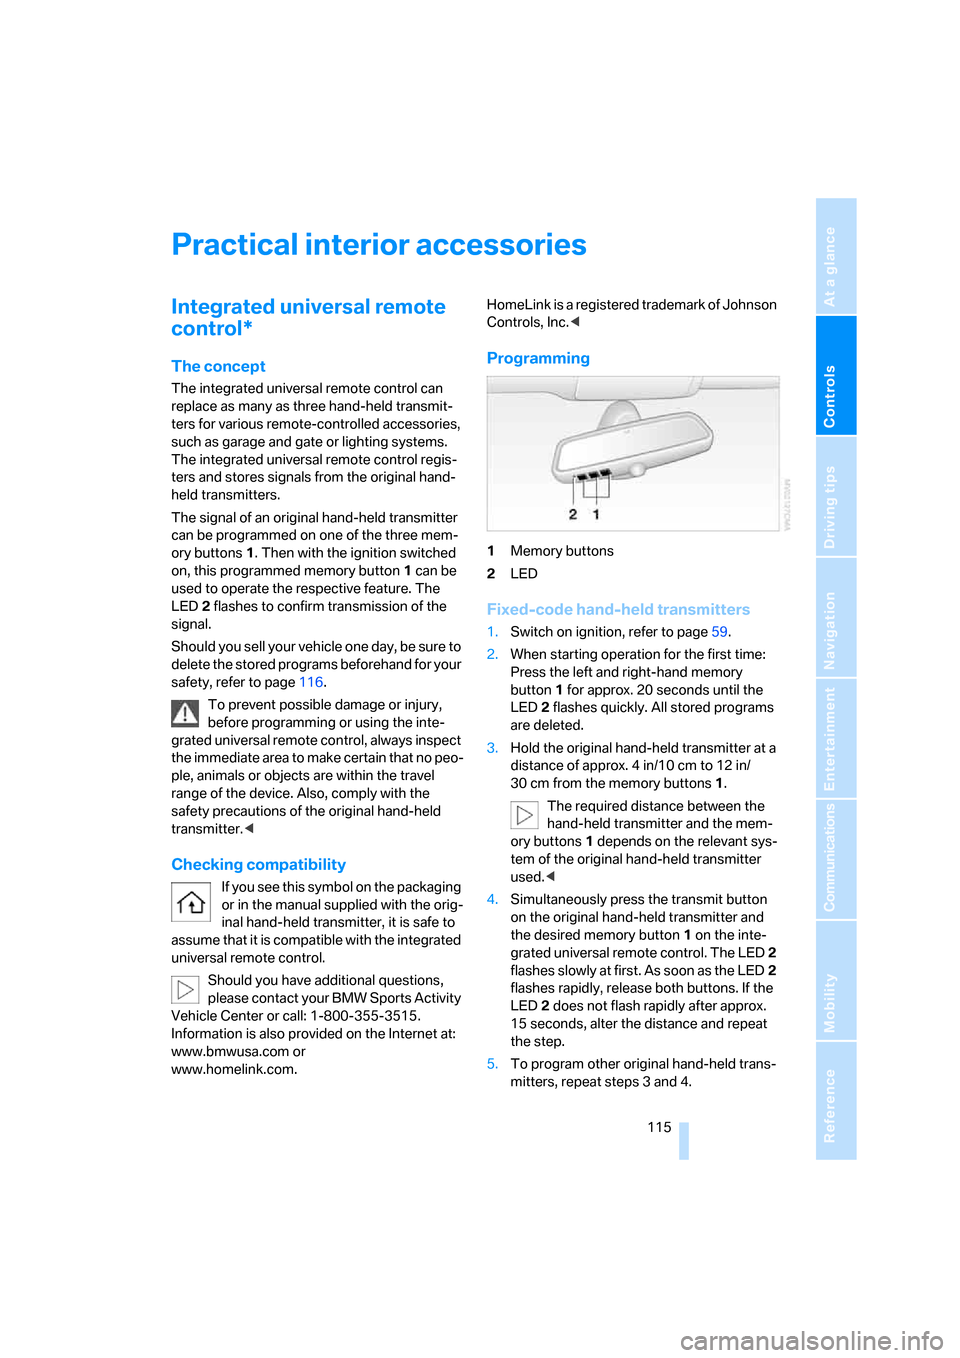
1Memory buttons
2LED
Fixed-code hand-held transmitters
1.Switch on ignition, refer to page59.
2.When starting operation for the first time:
Press the left and right-hand memory
button1 for approx. 20 seconds until the
LED2 flashes quickly. All stored programs
are deleted.
3.Hold the original hand-held transmitter at a
distance of approx. 4 in/10 cm to 12 in/
30 cm from the memory buttons1.
The required distance between the
hand-held transmitter and the mem-
ory buttons1 depends on the relevant sys-
tem of the original hand-held transmitter
used.<
4.Simultaneously press the transmit button
on the original hand-held transmitter and
the desired memory button 1 on the inte-
grated universal remote control. The LED 2
flashes slowly at first. As soon as the LED2
flashes rapidly, release both buttons. If the
LED2 does not flash rapidly after approx.
15 seconds, alter the distance and repeat
the step.
5.To program other original hand-held trans-
mitters, repeat steps 3 and 4.
Page 118 of 292
Practical interior accessories
116 The corresponding memory button 1 is now
programmed with the signal of the original
hand-held transmitter.
You can operate the device when the engine is
running or when the ignition is switched on.
If the device cannot be used after
repeated programming, check whether
the original hand-held transmitter uses an alter-
nating-code system. To do so, either read the
instructions for the original hand-held transmit-
ter or hold down the programmed memory
button1 of the integrated universal remote
control. If the LED2 on the integrated universal
remote control flashes rapidly for a short time
and then remains lit for approx. 2 seconds, this
indicates that the original hand-held transmitter
uses an alternating-code system. In the case of
an alternating-code system, program the mem-
ory buttons1 as described at Alternating-code
hand-held transmitters.<
Alternating-code hand-held
transmitters
To program the integrated universal remote
control, consult the operating instructions for
the equipment to be set. You will find informa-
tion there on the possibilities for synchroniza-
tion.
When programming hand-held transmitters
that employ an alternating code, please observe
the following supplementary instructions:
Programming will be easier with the aid of
a second person.<
1.Park your vehicle within the range of the
remote-controlled device.
2.Program the integrated universal remote
control as described above in the section
Fixed-code hand-held transmitters.
3.Locate the button on the receiver of the
device to be set, e. g. on the drive unit.
4.Press the button on the receiver of the
device to be set. After step 4, you have
approx. 30 seconds for step 5.
5.Press the programmed memory button1
of the integrated universal remote control
three times.The corresponding memory button 1 is now
programmed with the signal of the original
hand-held transmitter.
Should you have questions, please con-
tact your BMW Sports Activity Vehicle
Center.<
Deleting all stored programs
Press the left and right-hand memory button1
for approx. 20 seconds until the LED2 flashes
quickly:
All stored programs are deleted.
Reassigning individual programs
1.Hold the original hand-held transmitter at a
distance of approx. 4 in/10 cm to 12 in/
30 cm from the memory buttons1.
The required distance between the
hand-held transmitter and the mem-
ory buttons1 depends on the relevant sys-
tem of the original hand-held transmitter
used.<
2.Press the desired memory button1 of the
integrated universal remote control.
3.When the LED 2 flashes slowly after approx.
20 seconds, press the transmit button of
the original hand-held transmitter. Release
both buttons as soon as the LED2 flashes
rapidly. If the LED2 does not flash rapidly
after approx. 15 seconds, alter the distance
and repeat the step.
Page 123 of 292
Controls
121Reference
At a glance
Driving tips
Communications
Navigation
Entertainment
Mobility
Rear
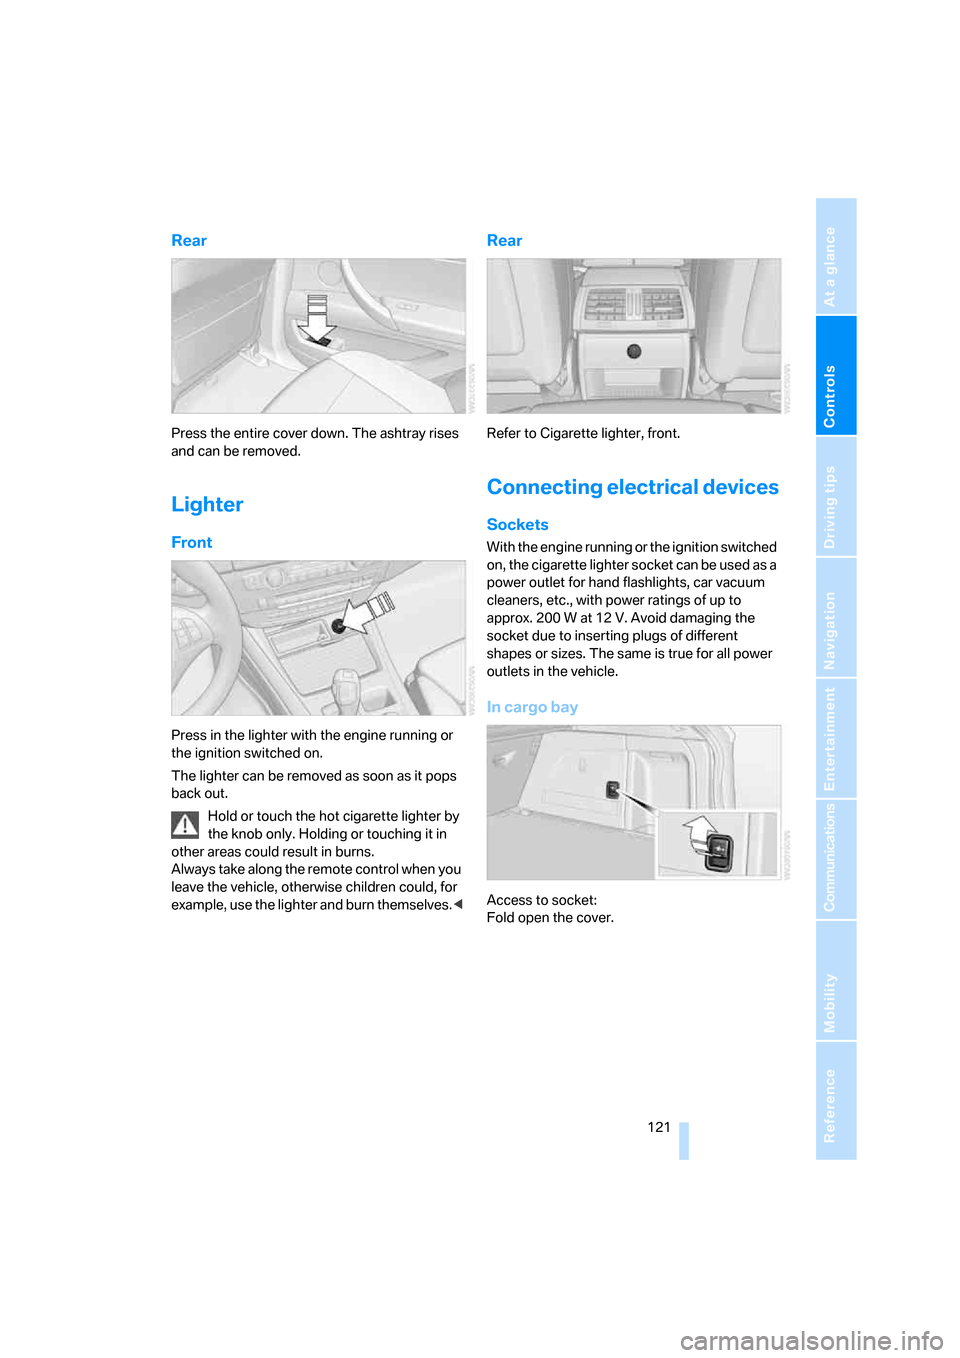
Press the entire cover down. The ashtray rises
and can be removed.
Lighter
Front
Press in the lighter with the engine running or
the ignition switched on.
The lighter can be removed as soon as it pops
back out.
Hold or touch the hot cigarette lighter by
the knob only. Holding or touching it in
other areas could result in burns.
Always take along the remote control when you
leave the vehicle, otherwise children could, for
example, use the lighter and burn themselves.<
Rear
Refer to Cigarette lighter, front.
Connecting electrical devices
Sockets
With the engine running or the ignition switched
on, the cigarette lighter socket can be used as a
power outlet for hand flashlights, car vacuum
cleaners, etc., with power ratings of up to
approx. 200 W at 12 V. Avoid damaging the
socket due to inserting plugs of different
shapes or sizes. The same is true for all power
outlets in the vehicle.
In cargo bay
Access to socket:
Fold open the cover.
Page 132 of 292
Things to remember when driving
130 possible obstacles with a minimum of steering
effort.
Pulsation of the brake pedal, combined with
sounds from the hydraulic circuits, indicate that
ABS is in its active mode.
Do not drive with your foot resting on the
brake pedal. Even light but consistent
pedal pressure can lead to high temperatures,
brake wear and possibly even brake failure.<
Driving in wet conditions
When roads are wet or there is heavy rain,
briefly exert gentle pressure on the brake pedal
every few miles. Monitor traffic conditions to
ensure that this maneuver does not endanger
other road users. The heat generated in this
process helps dry the pads and rotors to ensure
that full braking efficiency will then be available
when you need it.
Hills
To prevent overheating and the resulting
reduced efficiency of the brake system,
drive long or steep downhill gradients in the
gear in which the least braking is required. Even
light but consistent pressure on the brake pedal
can lead to high temperatures, brake wear and
possibly even brake failure.<
The braking effect of the engine can be further
increased by downshifting in the manual mode
of the automatic transmission, if necessary into
first gear, refer to page65. This prevents an
excessive strain on the brakes.
Do not drive in idle or with the engine
stopped, otherwise there will be no
engine braking action or support of the braking
force and steering.
Never allow floor mats, carpets or any other
objects to protrude into the area of movement
of the pedals and impair their operation.<
Corrosion on brake rotors
When the vehicle is driven only occasionally,
during extended periods when the vehicle is not
used at all, and in operating conditions where
brake applications are less frequent, there is an
increased tendency for corrosion to form on rotors, while contaminants accumulate on the
brake pads. This occurs because the minimum
pressure which must be exerted by the pads
during brake applications to clean the rotors is
not reached.
Should corrosion form on the brake rotors, the
brakes will tend to respond with a pulsating
effect that even extended application will fail to
cure.
When vehicle is parked
Condensation forms in the automatic climate
control system during operation, and then exits
under the vehicle. Traces of condensed water
under the vehicle are therefore normal.
Before driving into a car wash
Fold in the exterior mirrors, refer to page51,
otherwise they could be damaged due to the
width of the vehicle.
Release the parking brake, particularly when
you have activated Automatic Hold, refer to
page61.
General information on the care and mainte-
nance of your BMW is contained in the Caring
for your vehicle brochure.
Mixed tires*
Before driving into a car wash, make sure
that the vehicle width is not too large for
the car wash, as otherwise the vehicle and the
car wash could be damaged.<
Rear window wiper
The rear window wiper can be damaged in car
washes. Take appropriate protective measures;
ask the car wash operator if necessary.
With comfort access*
Insert the remote control into the ignition lock.
The engine can be switched off in transmission
position N, also refer to page37.
Page 156 of 292
Destination guidance
154
Repeating and canceling voice
instructions
With the programmable buttons on the steering
wheel you can also make the following settings,
refer to page53:
>Repeat the voice instruction:
Press the button.
>Switch voice instructions on/off:
Hold the button down.
Setting volume of voice instructions
The volume can only be adjusted while a voice
instruction is being output.
1.Repeat the last voice instruction, if neces-
sary.
2.Turn the button during the voice instruction
to select the desired volume.
This volume is independent of the volume of the
audio sources.
The setting is stored for the remote control cur-
rently in use.
Changing route
During destination guidance, you can revise the
navigation system's route recommendations to
avoid particular stretches of road. Enter the
number of miles/kilometers that you want to
travel before returning to the original route.
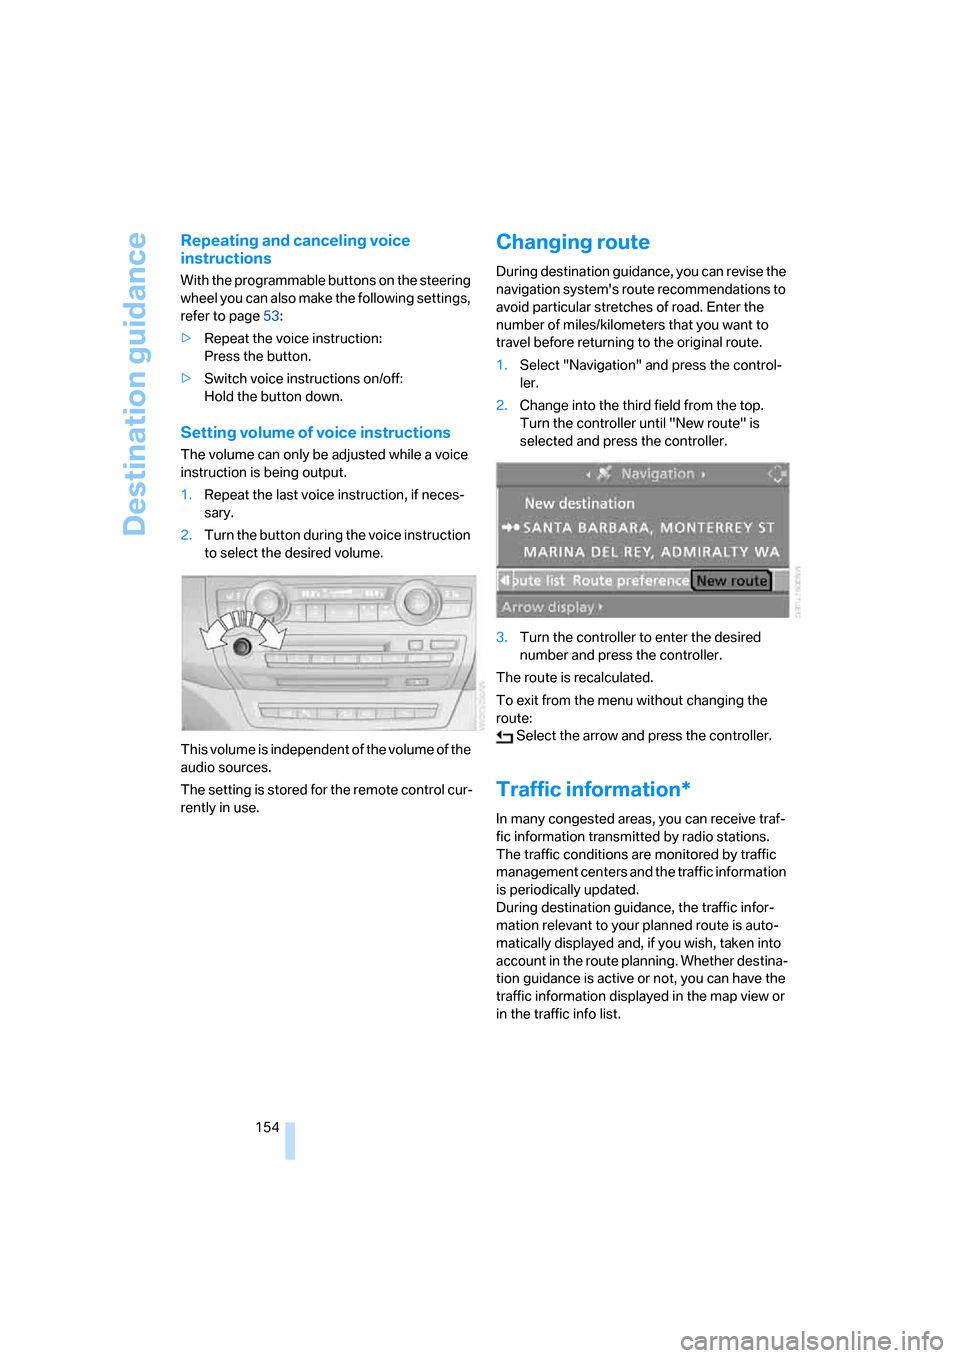
1.Select "Navigation" and press the control-
ler.
2.Change into the third field from the top.
Turn the controller until "New route" is
selected and press the controller.
3.Turn the controller to enter the desired
number and press the controller.
The route is recalculated.
To exit from the menu without changing the
route:
Select the arrow and press the controller.
Traffic information*
In many congested areas, you can receive traf-
fic information transmitted by radio stations.
The traffic conditions are monitored by traffic
management centers and the traffic information
is periodically updated.
During destination guidance, the traffic infor-
mation relevant to your planned route is auto-
matically displayed and, if you wish, taken into
account in the route planning. Whether destina-
tion guidance is active or not, you can have the
traffic information displayed in the map view or
in the traffic info list.
Page 165 of 292
Navigation
Entertainment
Driving tips
163Reference
At a glance
Controls
Communications
Mobility
You have the following choices:
>"FM" and "AM": radio reception
>"WB": Weather Band station
>"SAT": satellite radio
*
>"CD": CD player or changer
>"AUX": AUX-In connection, USB audio
interface
>"Set": depending on the audio source,
other adjustments can be made, e.g. with
the radio: update station with strongest
reception, store station, tone control, sam-
ple stations.
From another menu, you can change
directly to the screen last displayed,
refer to Comfort opening of menu items on
page18.<
From radio readiness, the selected audio
source is stored for the remote control currently
in use.
Switching on/off
To switch the Entertainment sound output on
and off:
Press knob1 on the CD player.
This symbol on the Control Display indi-
cates that sound output is switched off.
For equipment with a single drive, the sound
output is available for approx. 20 minutes with
the ignition switched off.
Switch on the sound output again for this pur-
pose.
Adjusting volume
Turn knob1 on the CD player until the desired
volume is set.
You can also adjust the volume with buttons on
the steering wheel, refer to page11.
From radio readiness, the setting is stored for
the remote control currently in use.
Tone control
You can alter various tone settings, e. g. treble
and bass, or the speed-dependent volume
increase.
The tone settings are set for all audio sources at
once.
From radio readiness, the settings are stored
for the remote control currently in use.
Changing tone settings
1.Press the button.
This opens the start menu.
2.Press the controller to open the menu.
3.Turn the controller until "Settings" is
selected and press the controller.
4.Select "Audio" or "Tone / Volume" and
press the controller.
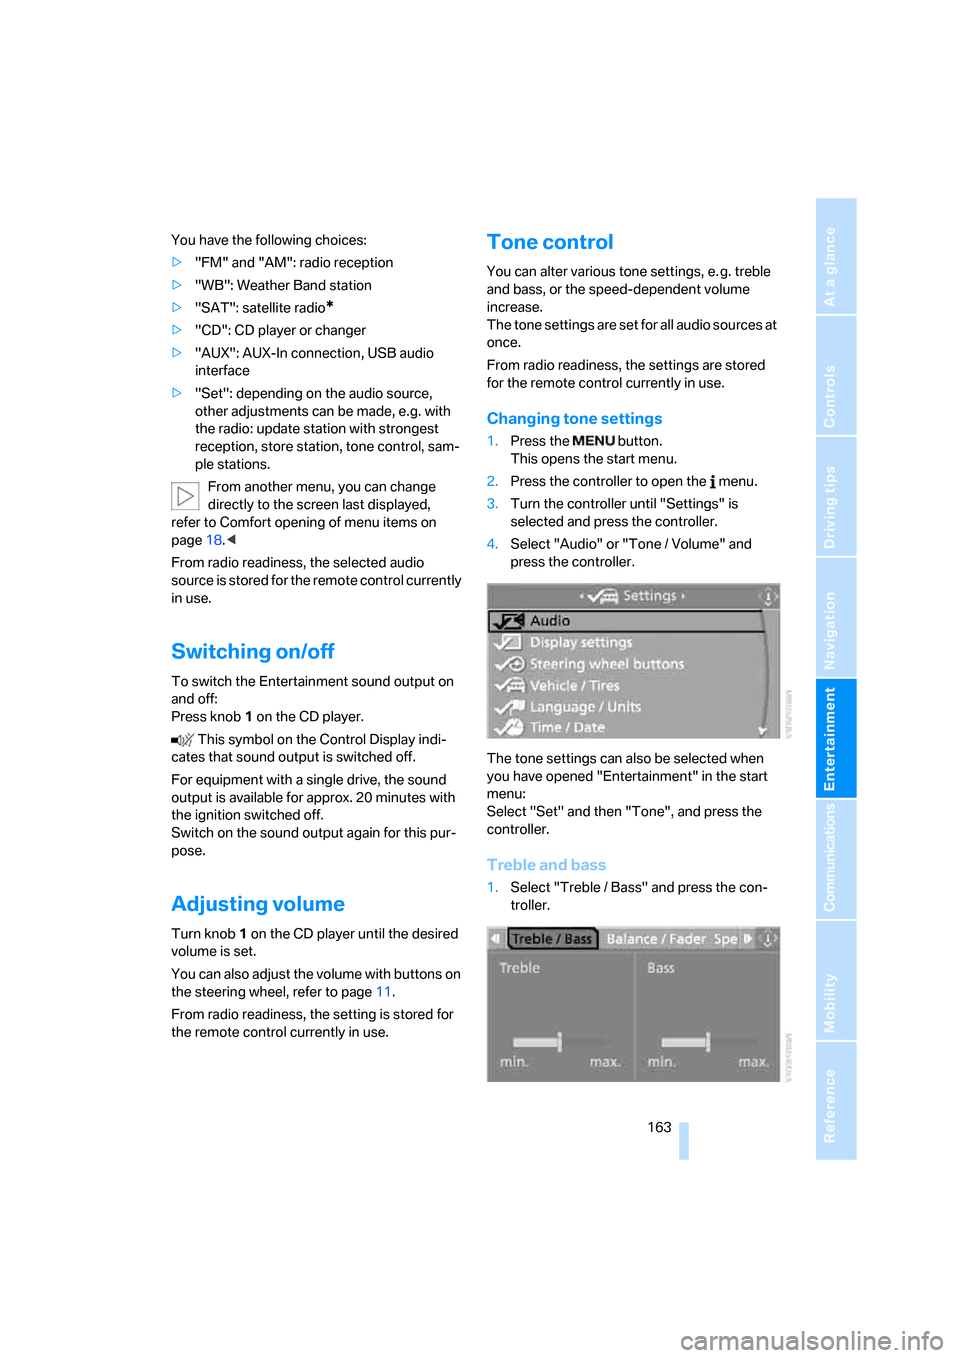
The tone settings can also be selected when
you have opened "Entertainment" in the start
menu:
Select "Set" and then "Tone", and press the
controller.
Treble and bass
1.Select "Treble / Bass" and press the con-
troller.
Page 170 of 292
Radio
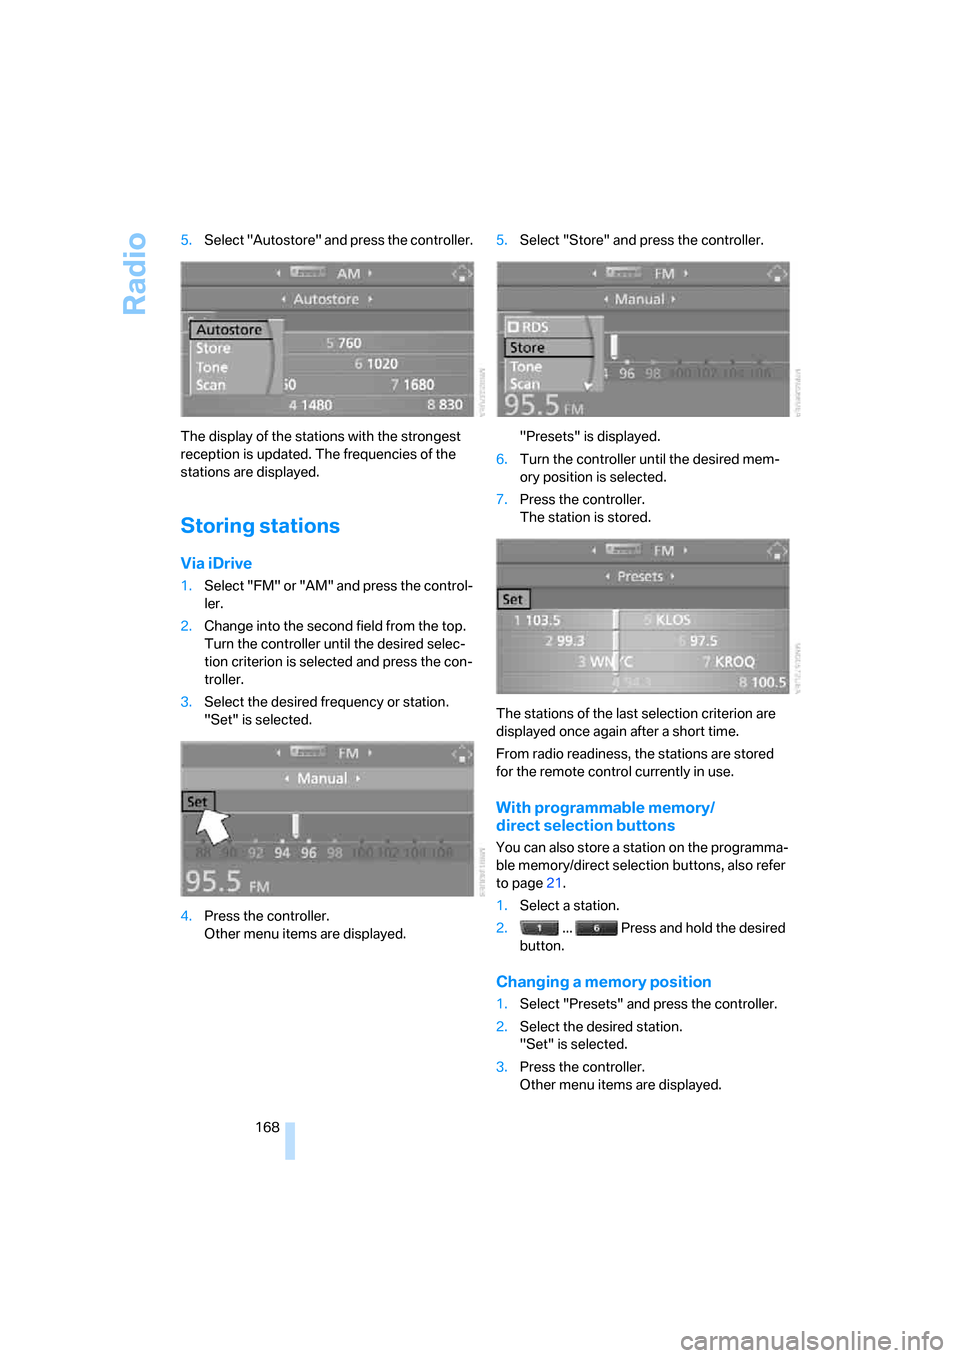
168 5.Select "Autostore" and press the controller.
The display of the stations with the strongest
reception is updated. The frequencies of the
stations are displayed.
Storing stations
Via iDrive
1.Select "FM" or "AM" and press the control-
ler.
2.Change into the second field from the top.
Turn the controller until the desired selec-
tion criterion is selected and press the con-
troller.
3.Select the desired frequency or station.
"Set" is selected.
4.Press the controller.
Other menu items are displayed.5.Select "Store" and press the controller.
"Presets" is displayed.
6.Turn the controller until the desired mem-
ory position is selected.
7.Press the controller.
The station is stored.
The stations of the last selection criterion are
displayed once again after a short time.
From radio readiness, the stations are stored
for the remote control currently in use.
With programmable memory/
direct selection buttons
You can also store a station on the programma-
ble memory/direct selection buttons, also refer
to page21.
1.Select a station.
2. ... Press and hold the desired
button.
Changing a memory position
1.Select "Presets" and press the controller.
2.Select the desired station.
"Set" is selected.
3.Press the controller.
Other menu items are displayed.
Page 171 of 292
Navigation
Entertainment
Driving tips
169Reference
At a glance
Controls
Communications
Mobility
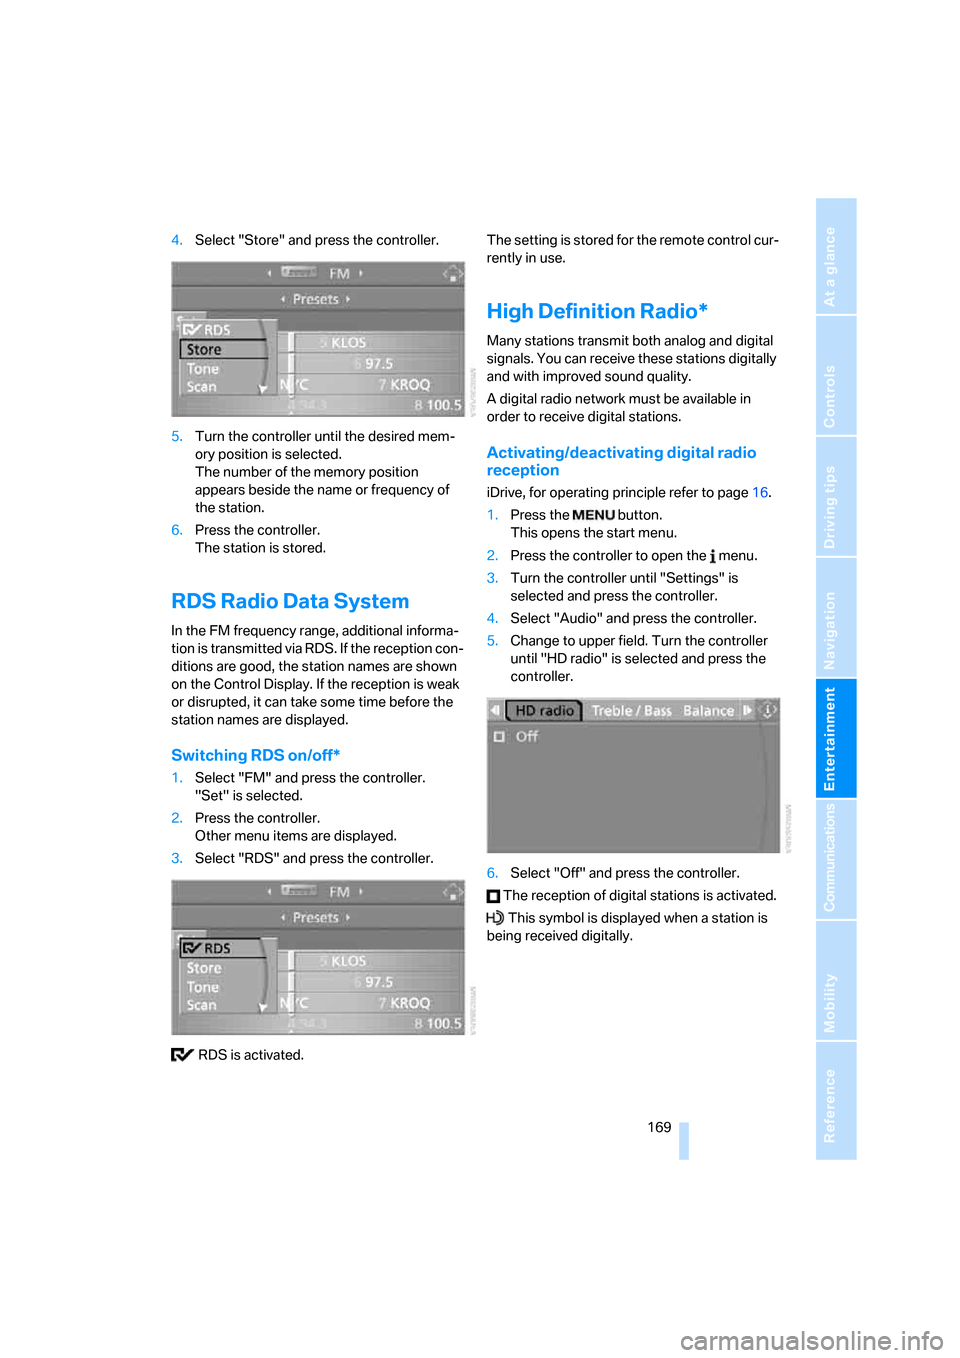
4.Select "Store" and press the controller.
5.Turn the controller until the desired mem-
ory position is selected.
The number of the memory position
appears beside the name or frequency of
the station.
6.Press the controller.
The station is stored.
RDS Radio Data System
In the FM frequency range, additional informa-
tion is transmitted via RDS. If the reception con-
ditions are good, the station names are shown
on the Control Display. If the reception is weak
or disrupted, it can take some time before the
station names are displayed.
Switching RDS on/off*
1.Select "FM" and press the controller.
"Set" is selected.
2.Press the controller.
Other menu items are displayed.
3.Select "RDS" and press the controller.
RDS is activated.The setting is stored for the remote control cur-
rently in use.
High Definition Radio*
Many stations transmit both analog and digital
signals. You can receive these stations digitally
and with improved sound quality.
A digital radio network must be available in
order to receive digital stations.
Activating/deactivating digital radio
reception
iDrive, for operating principle refer to page16.
1.Press the button.
This opens the start menu.
2.Press the controller to open the menu.
3.Turn the controller until "Settings" is
selected and press the controller.
4.Select "Audio" and press the controller.
5.Change to upper field. Turn the controller
until "HD radio" is selected and press the
controller.
6.Select "Off" and press the controller.
The reception of digital stations is activated.
This symbol is displayed when a station is
being received digitally.