display BMW X5 3.0Si 2008 E70 Repair Manual
[x] Cancel search | Manufacturer: BMW, Model Year: 2008, Model line: X5 3.0Si, Model: BMW X5 3.0Si 2008 E70Pages: 292, PDF Size: 9.32 MB
Page 111 of 292
Controls
109Reference
At a glance
Driving tips
Communications
Navigation
Entertainment
Mobility
>Driver's side: windows and footwell
>Individual program
Selecting program
Press the button repeatedly until
the desired program is shown on
the Control Display.
Adjusting air distribution individually –
individual program
The settings are stored in this program.
iDrive, for operating principle refer to page16.
1.Press the button.
This opens the start menu.
2.Move the controller to the left to open "Cli-
mate".
3.Select "Vent settings" and press the con-
troller.
The driver's and front passenger side can
be adjusted separately with the fields on the
right or left side.
4.Select the driver's or front passenger side
if necessary.
Move the controller to the right or left
repeatedly until the driver's or front passen-
ger side is selected.
5.Select the desired field by moving the con-
troller.
6.Turn the controller to adjust the air distribu-
tion.
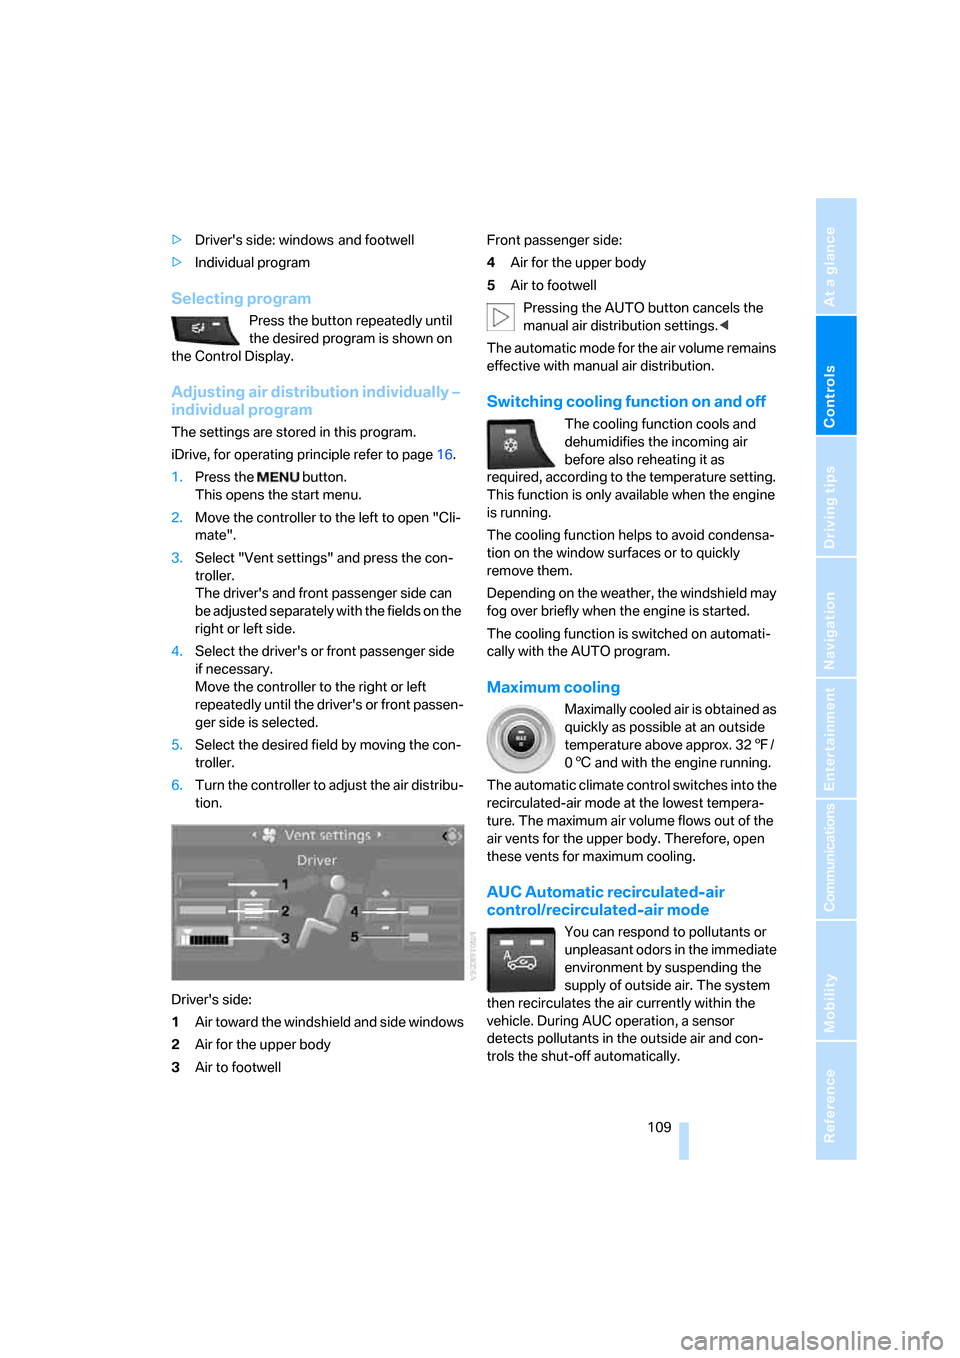
Driver's side:
1Air toward the windshield and side windows
2Air for the upper body
3Air to footwellFront passenger side:
4Air for the upper body
5Air to footwell
Pressing the AUTO button cancels the
manual air distribution settings.<
The automatic mode for the air volume remains
effective with manual air distribution.
Switching cooling function on and off
The cooling function cools and
dehumidifies the incoming air
before also reheating it as
required, according to the temperature setting.
This function is only available when the engine
is running.
The cooling function helps to avoid condensa-
tion on the window surfaces or to quickly
remove them.
Depending on the weather, the windshield may
fog over briefly when the engine is started.
The cooling function is switched on automati-
cally with the AUTO program.
Maximum cooling
Maximally cooled air is obtained as
quickly as possible at an outside
temperature above approx. 327/
06 and with the engine running.
The automatic climate control switches into the
recirculated-air mode at the lowest tempera-
ture. The maximum air volume flows out of the
air vents for the upper body. Therefore, open
these vents for maximum cooling.
AUC Automatic recirculated-air
control/recirculated-air mode
You can respond to pollutants or
unpleasant odors in the immediate
environment by suspending the
supply of outside air. The system
then recirculates the air currently within the
vehicle. During AUC operation, a sensor
detects pollutants in the outside air and con-
trols the shut-off automatically.
Page 112 of 292
Climate
110 By pressing the button repeatedly, you can
request three operating modes:
>LED off: outside air flows in continuously.
>Left LED on, AUC mode: the system
detects pollutants in the outside air and
shuts off the supply as needed.
>Right LED on, recirculated-air mode: the
supply of outside air is permanently shut off.
Should the windows fog up in the recircu-
lated-air mode, press the AUTO button or
switch off the recirculated-air mode and
increase the air volume if necessary.
The recirculated-air mode should not be used
without interruption over an extended period of
time, as the air quality inside the vehicle deteri-
orates continuously.<
Residual heat
The heat stored in the engine is used to heat the
passenger compartment, e.g. while stopped at
a school to pick up a child.
Switching on
Pressing the right side switches on
the residual heat utilization when
the following conditions are met:
>up to 15 minutes after switching off the
engine
>with the engine at operating temperature
>with sufficient battery voltage
>at an outside temperature below 777/
256
REST appears on the display of the automatic
climate control when the residual heat utiliza-
tion is switched on.
From radio readiness the interior temperature,
the air volume and the air distribution can be
set.
Switching off
You can select the lowest blower speed by
pressing and holding the left side. Pressing
again switches off the residual heat utilization.
REST disappears from the display of the auto-
matic climate control.
Switching automatic climate control on
and off
You can select the lowest blower
speed by pressing and holding the
left side. Pressing again switches
off the automatic climate control.
You switch on the system again by pressing any
button of the automatic climate control.
Front ventilation
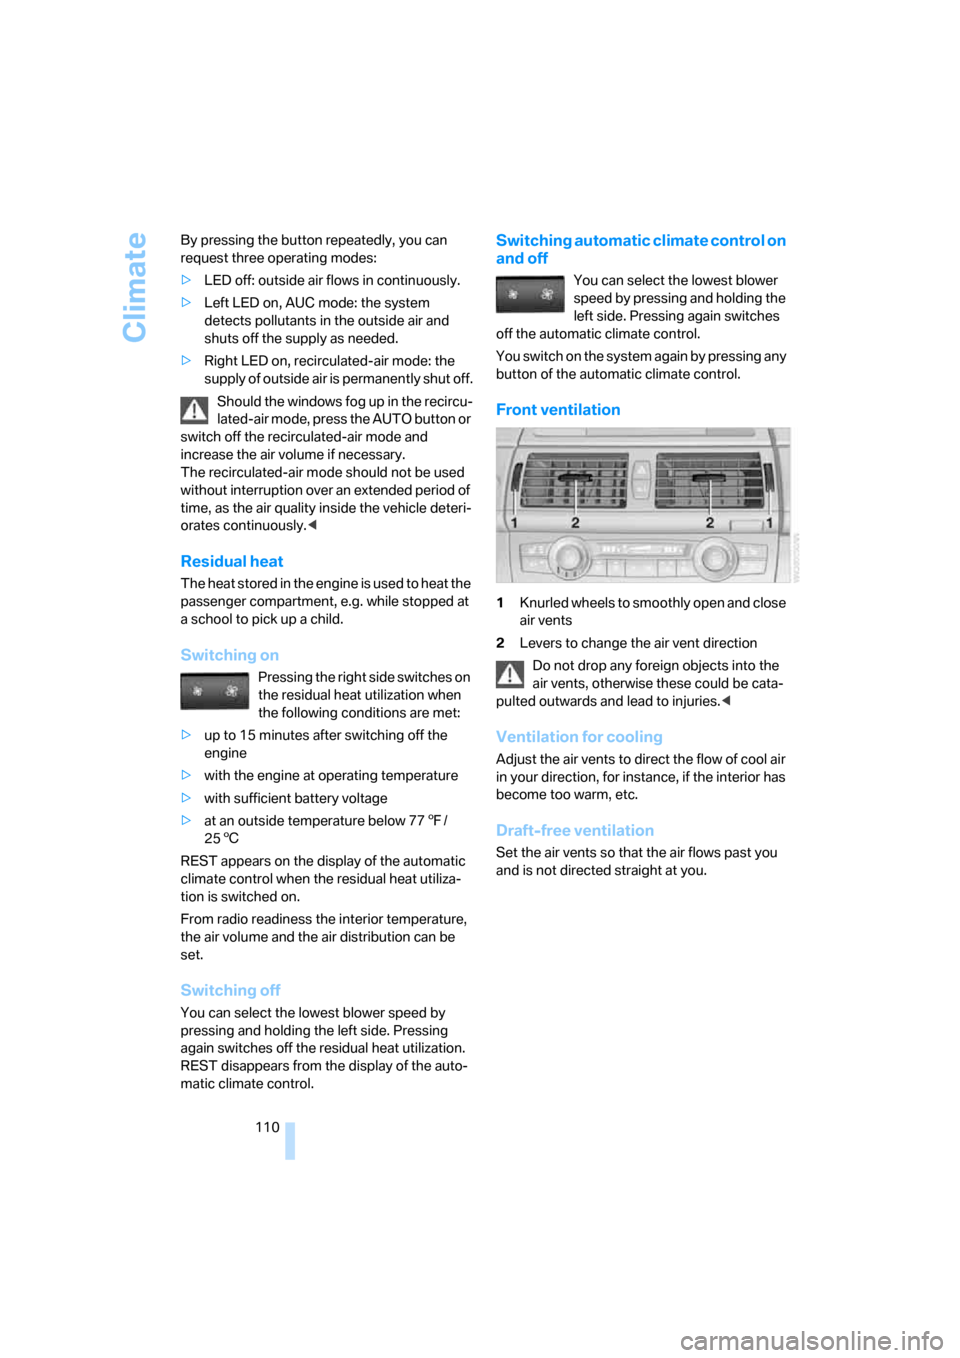
1Knurled wheels to smoothly open and close
air vents
2Levers to change the air vent direction
Do not drop any foreign objects into the
air vents, otherwise these could be cata-
pulted outwards and lead to injuries.<
Ventilation for cooling
Adjust the air vents to direct the flow of cool air
in your direction, for instance, if the interior has
become too warm, etc.
Draft-free ventilation
Set the air vents so that the air flows past you
and is not directed straight at you.
Page 113 of 292
Controls
111Reference
At a glance
Driving tips
Communications
Navigation
Entertainment
Mobility
Ventilation in rear
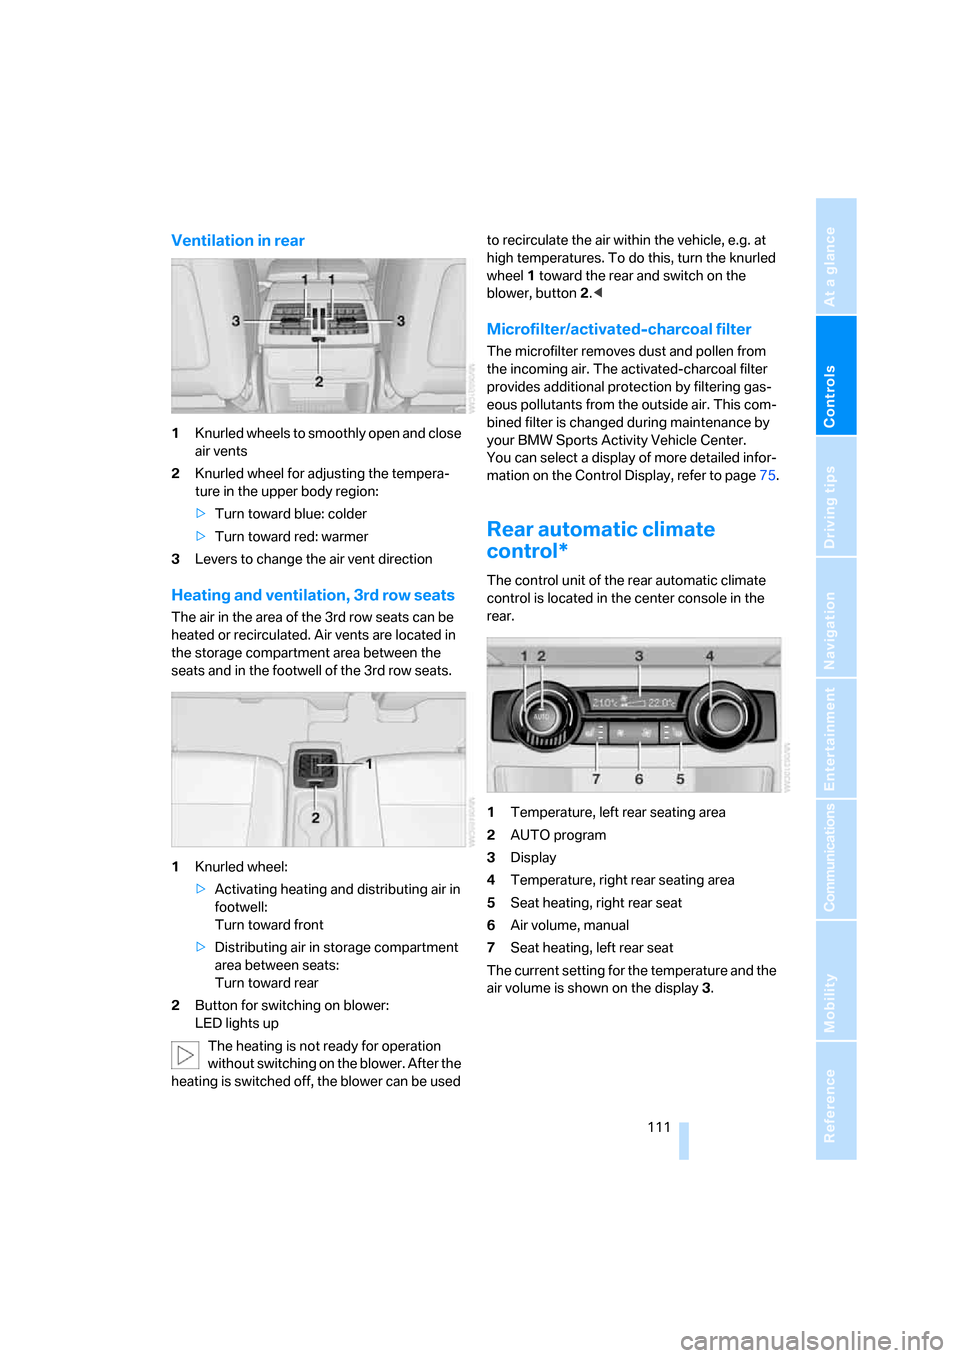
1Knurled wheels to smoothly open and close
air vents
2Knurled wheel for adjusting the tempera-
ture in the upper body region:
>Turn toward blue: colder
>Turn toward red: warmer
3Levers to change the air vent direction
Heating and ventilation, 3rd row seats
The air in the area of the 3rd row seats can be
heated or recirculated. Air vents are located in
the storage compartment area between the
seats and in the footwell of the 3rd row seats.
1Knurled wheel:
>Activating heating and distributing air in
footwell:
Turn toward front
>Distributing air in storage compartment
area between seats:
Turn toward rear
2Button for switching on blower:
LED lights up
The heating is not ready for operation
without switching on the blower. After the
heating is switched off, the blower can be used to recirculate the air within the vehicle, e.g. at
high temperatures. To do this, turn the knurled
wheel1 toward the rear and switch on the
blower, button2.<
Microfilter/activated-charcoal filter
The microfilter removes dust and pollen from
the incoming air. The activated-charcoal filter
provides additional protection by filtering gas-
eous pollutants from the outside air. This com-
bined filter is changed during maintenance by
your BMW Sports Activity Vehicle Center.
You can select a display of more detailed infor-
mation on the Control Display, refer to page75.
Rear automatic climate
control*
The control unit of the rear automatic climate
control is located in the center console in the
rear.
1Temperature, left rear seating area
2AUTO program
3Display
4Temperature, right rear seating area
5Seat heating, right rear seat
6Air volume, manual
7Seat heating, left rear seat
The current setting for the temperature and the
air volume is shown on the display3.
Page 116 of 292
Climate
114 The symbol on the display of the automatic
climate control flashes.
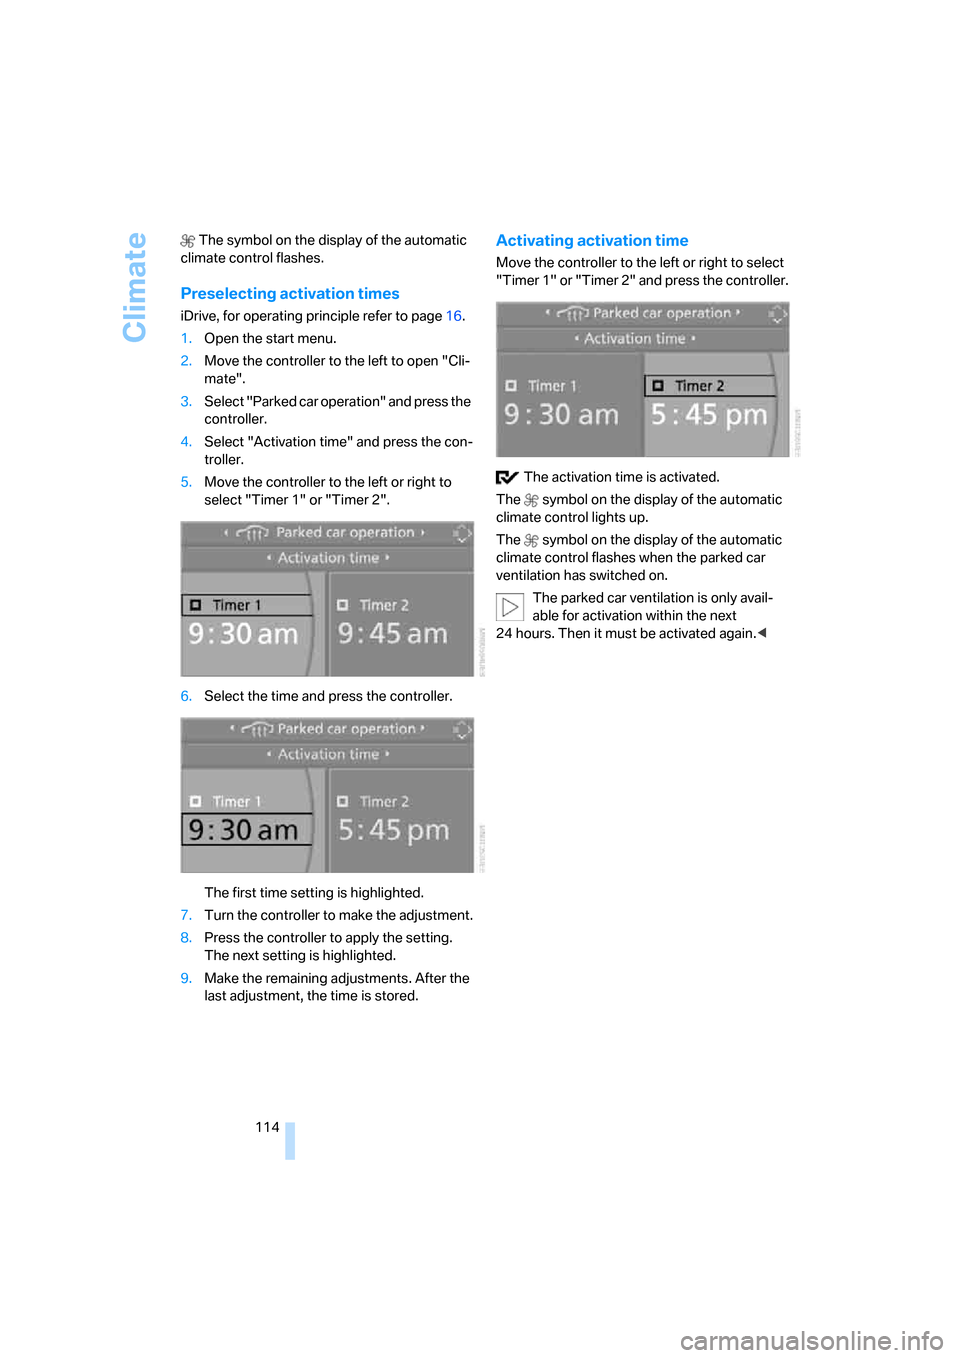
Preselecting activation times
iDrive, for operating principle refer to page16.
1.Open the start menu.
2.Move the controller to the left to open "Cli-
mate".
3.Select "Parked car operation" and press the
controller.
4.Select "Activation time" and press the con-
troller.
5.Move the controller to the left or right to
select "Timer 1" or "Timer 2".
6.Select the time and press the controller.
The first time setting is highlighted.
7.Turn the controller to make the adjustment.
8.Press the controller to apply the setting.
The next setting is highlighted.
9.Make the remaining adjustments. After the
last adjustment, the time is stored.
Activating activation time
Move the controller to the left or right to select
"Timer 1" or "Timer 2" and press the controller.
The activation time is activated.
The symbol on the display of the automatic
climate control lights up.
The symbol on the display of the automatic
climate control flashes when the parked car
ventilation has switched on.
The parked car ventilation is only avail-
able for activation within the next
24 hours. Then it must be activated again.<
Page 119 of 292
Controls
117Reference
At a glance
Driving tips
Communications
Navigation
Entertainment
Mobility
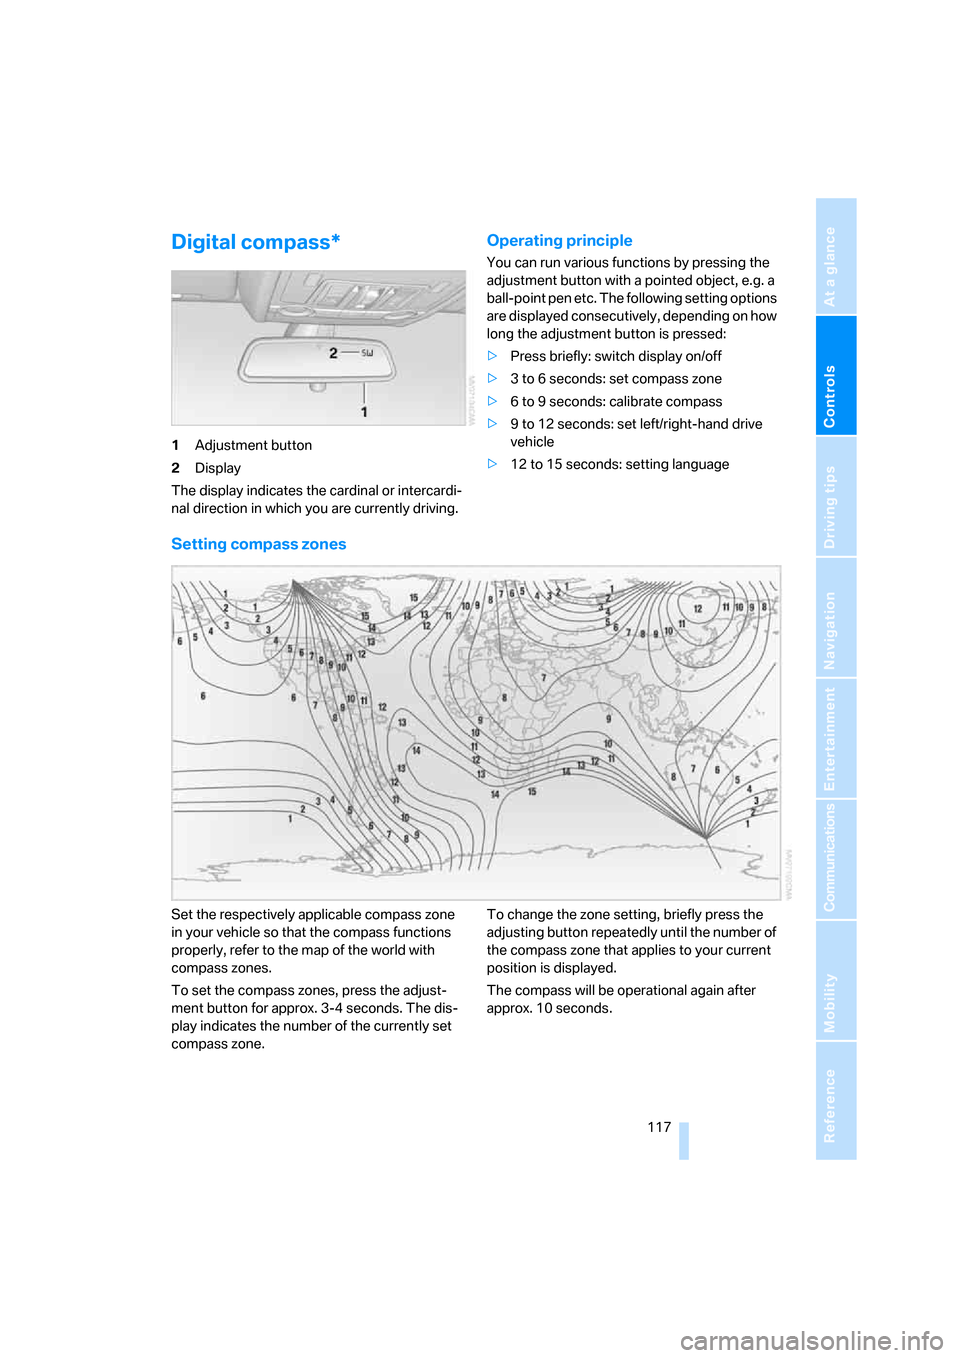
Digital compass*
1Adjustment button
2Display
The display indicates the cardinal or intercardi-
nal direction in which you are currently driving.
Operating principle
You can run various functions by pressing the
adjustment button with a pointed object, e.g. a
ball-point pen etc. The following setting options
are displayed consecutively, depending on how
long the adjustment button is pressed:
>Press briefly: switch display on/off
>3 to 6 seconds: set compass zone
>6 to 9 seconds: calibrate compass
>9 to 12 seconds: set left/right-hand drive
vehicle
>12 to 15 seconds: setting language
Setting compass zones
Set the respectively applicable compass zone
in your vehicle so that the compass functions
properly, refer to the map of the world with
compass zones.
To set the compass zones, press the adjust-
ment button for approx. 3-4 seconds. The dis-
play indicates the number of the currently set
compass zone.To change the zone setting, briefly press the
adjusting button repeatedly until the number of
the compass zone that applies to your current
position is displayed.
The compass will be operational again after
approx. 10 seconds.
Page 120 of 292
Practical interior accessories
118
Calibrating digital compass
In the following situations, the digital compass
must be calibrated:
>The wrong cardinal direction appears on
the display.
>The cardinal direction displayed does not
change despite a change in the direction of
travel.
>Not all cardinal directions are displayed.
Procedure
1.Make sure that there are no large metal
objects or overhead power lines in the vicin-
ity of your vehicle and that you have enough
space to drive in a circle.
2.Input the currently applicable compass
zone.
3.Press the adjustment button for approx.
6-7 seconds to display C. Then drive in a
complete circle at least once at a maximum
speed of 4 mph/7 km/h.
If the calibration is successful, display C is
replaced with the points of the compass.
Setting right/left-hand drive vehicle
Your digital compass is already set to right or
left-hand drive vehicle to match your vehicle at
the factory.
Setting language
You can set the language of the display.
Press the adjustment button for approx.
12-13 seconds. Briefly press the adjustment
button again to change between English "E"
and German "O".
The setting is automatically stored after approx.
10 seconds.
Roller sun blinds for rear side
windows*
Pull the loop of the roller sun blind and hook
onto bracket.
Do not open the window with the roller
blind raised, as otherwise there is a dan-
ger of damage, and therefore a danger of inju-
ries at higher speeds.<
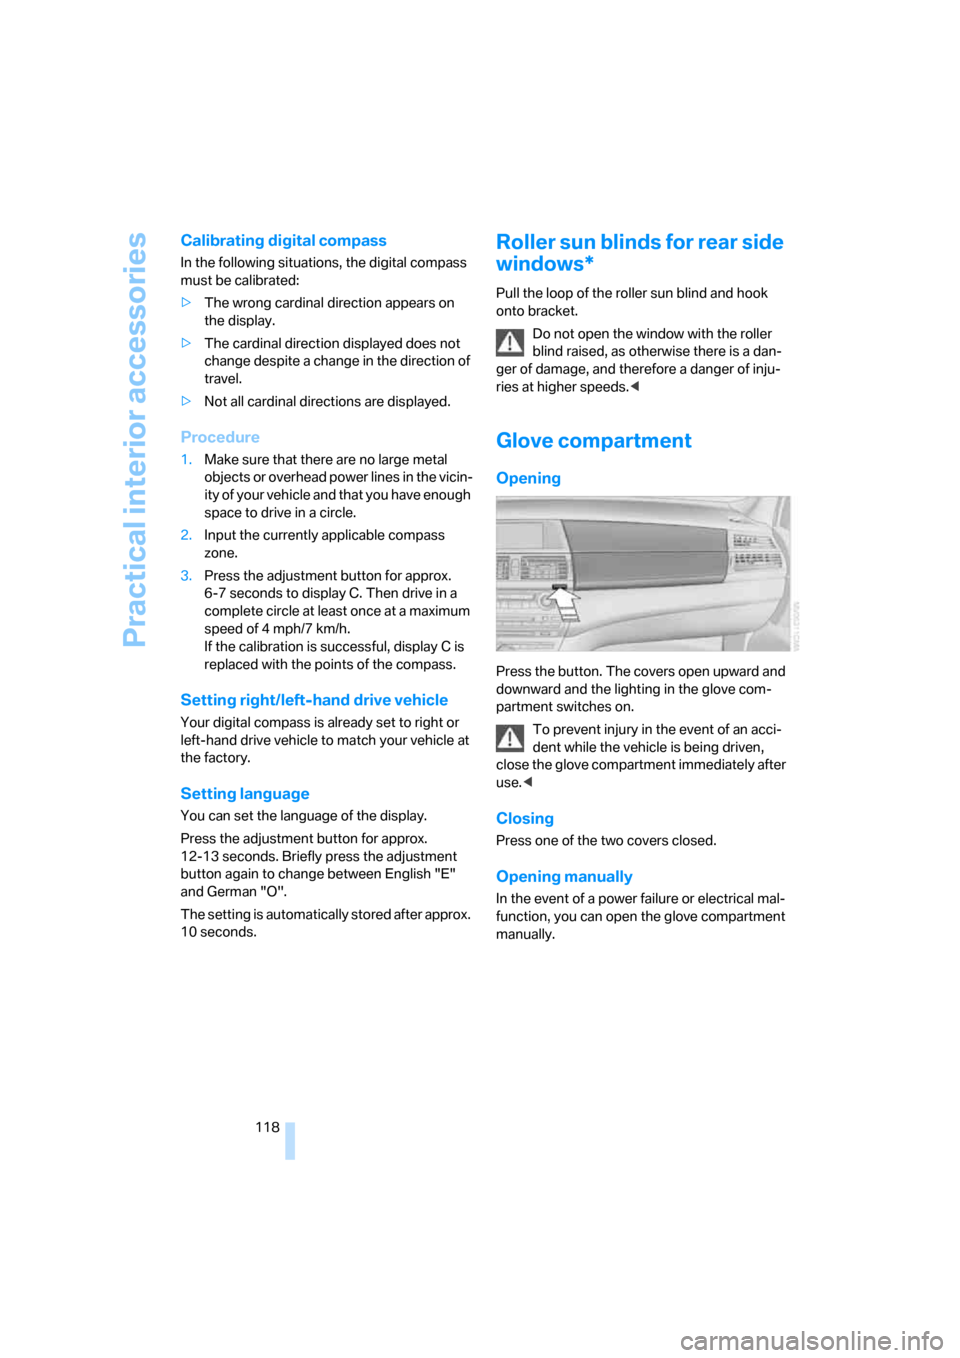
Glove compartment
Opening
Press the button. The covers open upward and
downward and the lighting in the glove com-
partment switches on.
To prevent injury in the event of an acci-
dent while the vehicle is being driven,
close the glove compartment immediately after
use.<
Closing
Press one of the two covers closed.
Opening manually
In the event of a power failure or electrical mal-
function, you can open the glove compartment
manually.
Page 127 of 292
Controls
125Reference
At a glance
Driving tips
Communications
Navigation
Entertainment
Mobility
Ski bag*
The ski bag is designed for safe, clean transport
of up to 4 pa irs of s tandard s kis or up to 2 snow-
boards.
With the ski bag you can stow skis with a length
of up to 6.9 ft/2.10 m. When skis of 6.9 ft/2.10 m
in length are loaded, the ski bag will tend to con-
tract, reducing its overall capacity.
Before loading the ski bag, fold in the dis-
play screen of the DVD system in the
rear
*, as otherwise the display screen could be
damaged.<
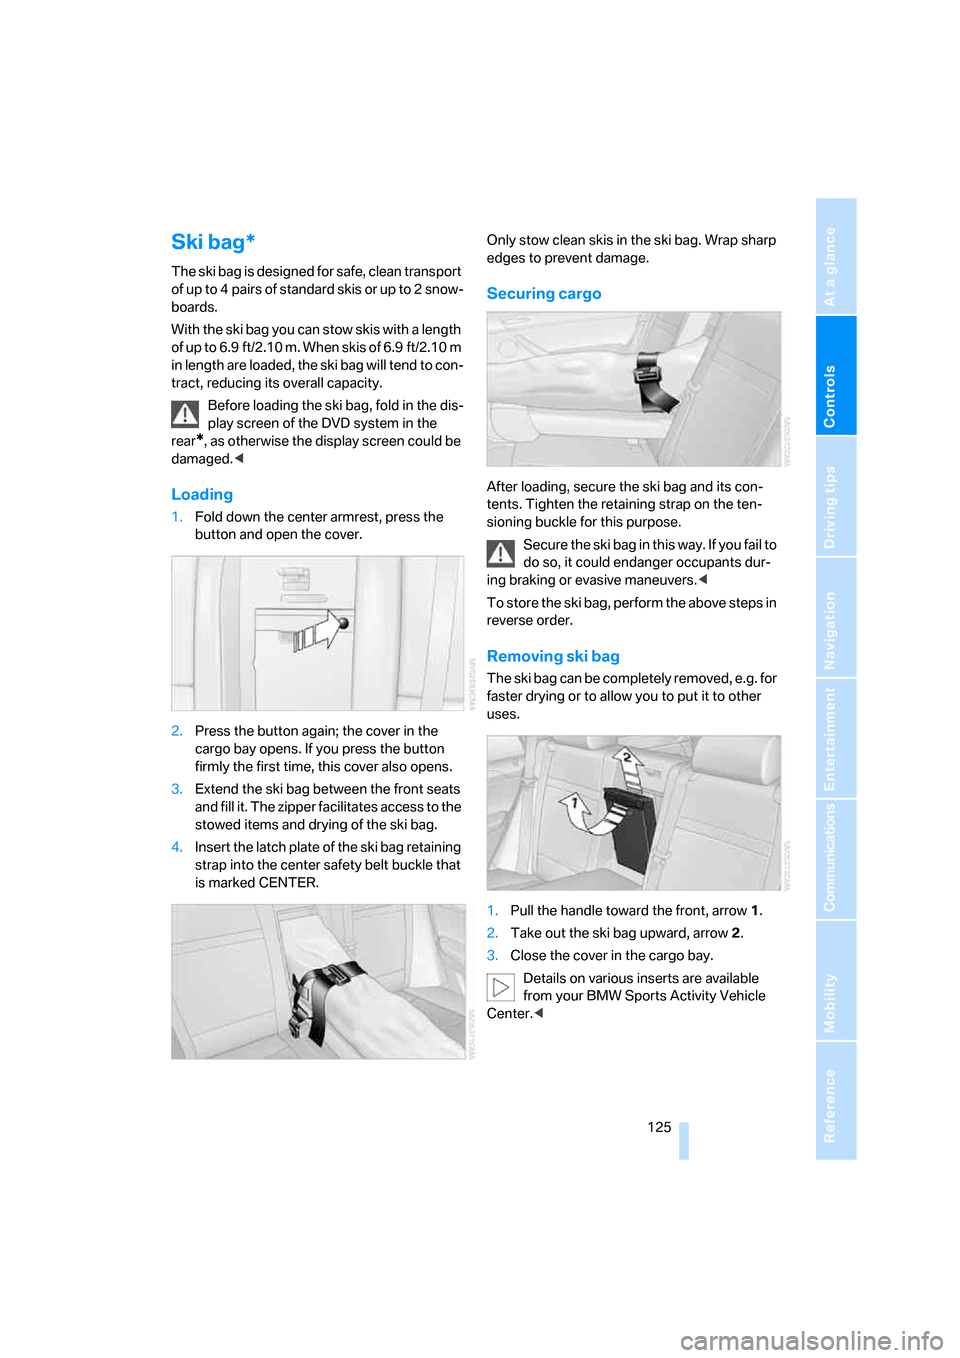
Loading
1.Fold down the center armrest, press the
button and open the cover.
2.Press the button again; the cover in the
cargo bay opens. If you press the button
firmly the first time, this cover also opens.
3.Extend the ski bag between the front seats
and fill it. The zipper facilitates access to the
stowed items and drying of the ski bag.
4.Insert the latch plate of the ski bag retaining
strap into the center safety belt buckle that
is marked CENTER.Only stow clean skis in the ski bag. Wrap sharp
edges to prevent damage.
Securing cargo
After loading, secure the ski bag and its con-
tents. Tighten the retaining strap on the ten-
sioning buckle for this purpose.
Secure the ski bag in this way. If you fail to
do so, it could endanger occupants dur-
ing braking or evasive maneuvers.<
To store the ski bag, perform the above steps in
reverse order.
Removing ski bag
The ski bag can be completely removed, e.g. for
faster drying or to allow you to put it to other
uses.
1.Pull the handle toward the front, arrow1.
2.Take out the ski bag upward, arrow2.
3.Close the cover in the cargo bay.
Details on various inserts are available
from your BMW Sports Activity Vehicle
Center.<
Page 138 of 292
Starting navigation system
136
Starting navigation system
Your navigation system can use satellites to
ascertain the precise position of your vehicle
and guide you reliably to any destination you
enter.
Navigation DVD
The navigation system requires a special navi-
gation DVD. The latest version is available at
your BMW Sports Activity Vehicle Center.
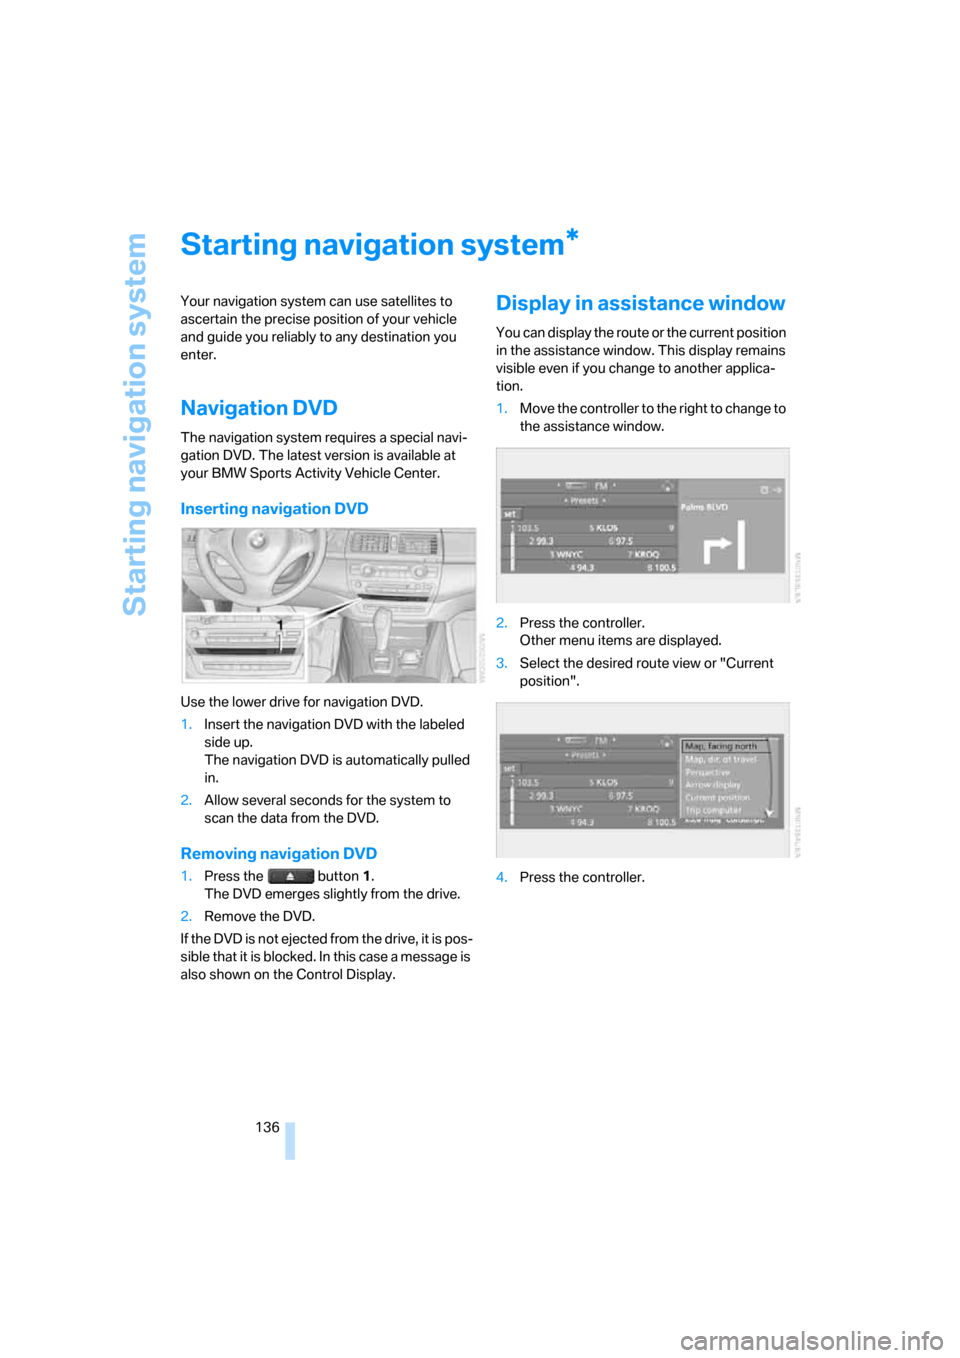
Inserting navigation DVD
Use the lower drive for navigation DVD.
1.Insert the navigation DVD with the labeled
side up.
The navigation DVD is automatically pulled
in.
2.Allow several seconds for the system to
scan the data from the DVD.
Removing navigation DVD
1.Press the button 1.
The DVD emerges slightly from the drive.
2.Remove the DVD.
If the DVD is not ejected from the drive, it is pos-
sible that it is blocked. In this case a message is
also shown on the Control Display.
Display in assistance window
You can display the route or the current position
in the assistance window. This display remains
visible even if you change to another applica-
tion.
1.Move the controller to the right to change to
the assistance window.
2.Press the controller.
Other menu items are displayed.
3.Select the desired route view or "Current
position".
4.Press the controller.
*
Page 139 of 292
Navigation
Driving tips
137Reference
At a glance
Controls
Communications
Entertainment
Mobility
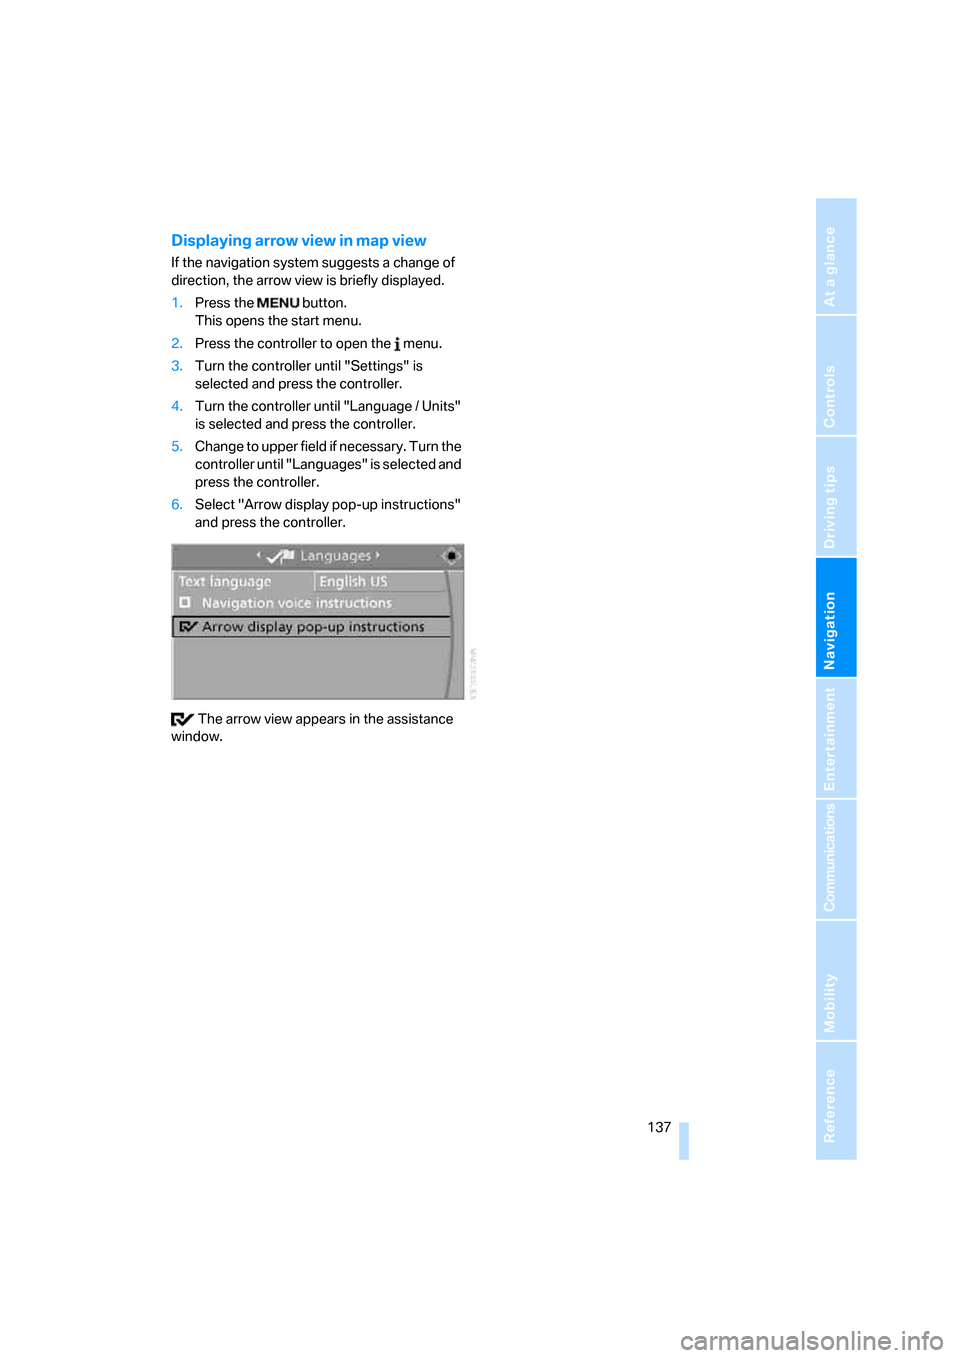
Displaying arrow view in map view
If the navigation system suggests a change of
direction, the arrow view is briefly displayed.
1.Press the button.
This opens the start menu.
2.Press the controller to open the menu.
3.Turn the controller until "Settings" is
selected and press the controller.
4.Turn the controller until "Language / Units"
is selected and press the controller.
5.Change to upper field if necessary. Turn the
controller until "Languages" is selected and
press the controller.
6.Select "Arrow display pop-up instructions"
and press the controller.
The arrow view appears in the assistance
window.
Page 140 of 292
Destination entry
138
Destination entry
In entering your destination you can select from
among the following options:
>Entering a destination manually, see below
>Entering destination via voice*, refer to
page141
>Selecting destination using information,
refer to page144
>Selecting destination from a list, refer to
Destination list, page145
>Selecting destination from address book,
refer to page146
>Selecting home address, refer to page148
After selecting your destination you can pro-
ceed to start the destination guidance, refer to
page150.
You can also store a navigation destination on
the programmable memory/direct selection
buttons, refer to page21.
Enter data only when the vehicle is sta-
tionary, and always give priority to the
applicable traffic regulations in the event of any
contradiction between traffic and road condi-
tions and the instructions issued by the naviga-
tion system. If you do not observe this precau-
tion, you can endanger the vehicle occupants
and other road users.
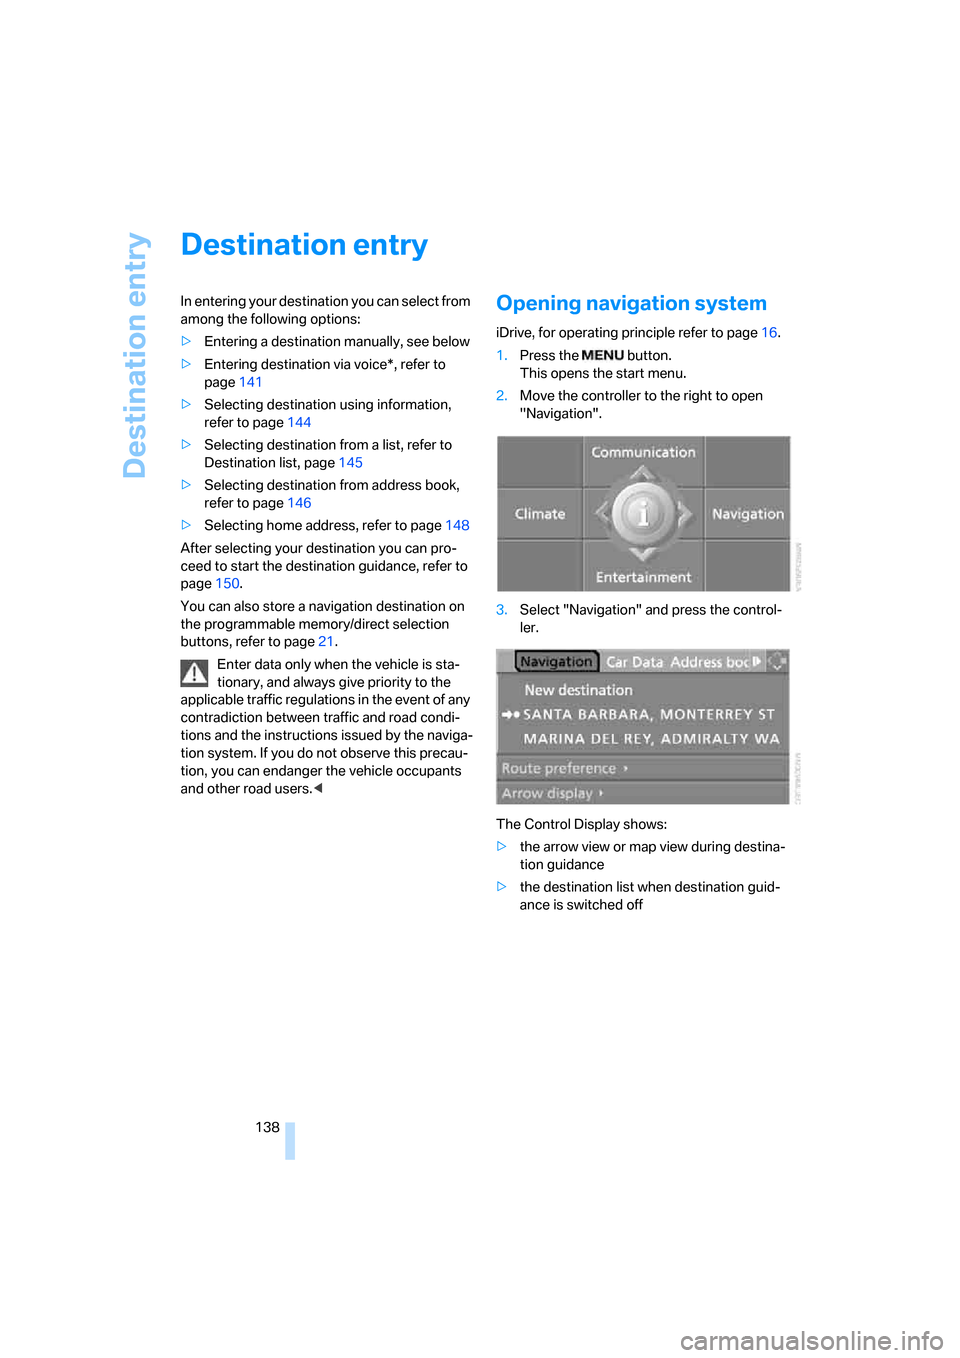
1.Press the button.
This opens the start menu.
2.Move the controller to the right to open
"Navigation".
3.Select "Navigation" and press the control-
ler.
The Control Display shows:
>the arrow view or map view during destina-
tion guidance
>the destination list when destination guid-
ance is switched off