check engine BMW X5 4.4I 2004 E53 Owner's Guide
[x] Cancel search | Manufacturer: BMW, Model Year: 2004, Model line: X5 4.4I, Model: BMW X5 4.4I 2004 E53Pages: 200, PDF Size: 3.91 MB
Page 156 of 200
154n
OBD interface socket
An illuminated indicator lamp
informs you of the need for ser-
vice, not of the need to stop the
vehicle. However, the systems should
be checked by your BMW Sports Activ-
ity Vehicle center at the earliest possi-
ble opportunity.
Display of the previously
described malfunction on Cana-
dian models.
Under certain conditions, the indicator
lamp will blink or flash. This indicates a
rather severe level of engine misfire.
When this occurs, you should reduce
speed and consult the nearest BMW
Sports Activity Vehicle center as soon
as possible. Severe engine misfire over
only a short period of time can seriously
damage emission control components,
especially the catalytic converter.
When the filler cap is not properly
tightened, the OBD system can
detect the vapor leak and the indicator
lamp will light up. If the filler cap is sub-
sequently tightened, the indicator lamp
should go out within a few days.<
Page 161 of 200
159n
OverviewControlsMaintenanceRepairsDataIndex
Lamps and bulbs The lamps and bulbs make essential
contributions to the safety of your vehi-
cle. For this reason, follow the instruc-
tions below carefully when replacing a
bulb. If you are not familiar with any of
the procedures, consult your BMW
Sports Activity Vehicle center.
Never touch the glass on new
bulbs with your bare fingers, as
even minute amounts of contamination
will burn into the bulb's surface and
reduce its service life. Use a clean
cloth, paper napkin, or a similar mate-
rial, or hold the bulb by its metallic
base.<
A replacement bulb set is available from
your BMW Sports Activity Vehicle cen-
ter.
To prevent short circuits, before
working on any electrical system,
equipment or accessory you should
always switch it off and disconnect the
cable from the battery's negative termi-
nal before starting.
To avoid possible injury or equipment
damage when changing bulbs, observe
any instructions provided by the bulb
manufacturer.<
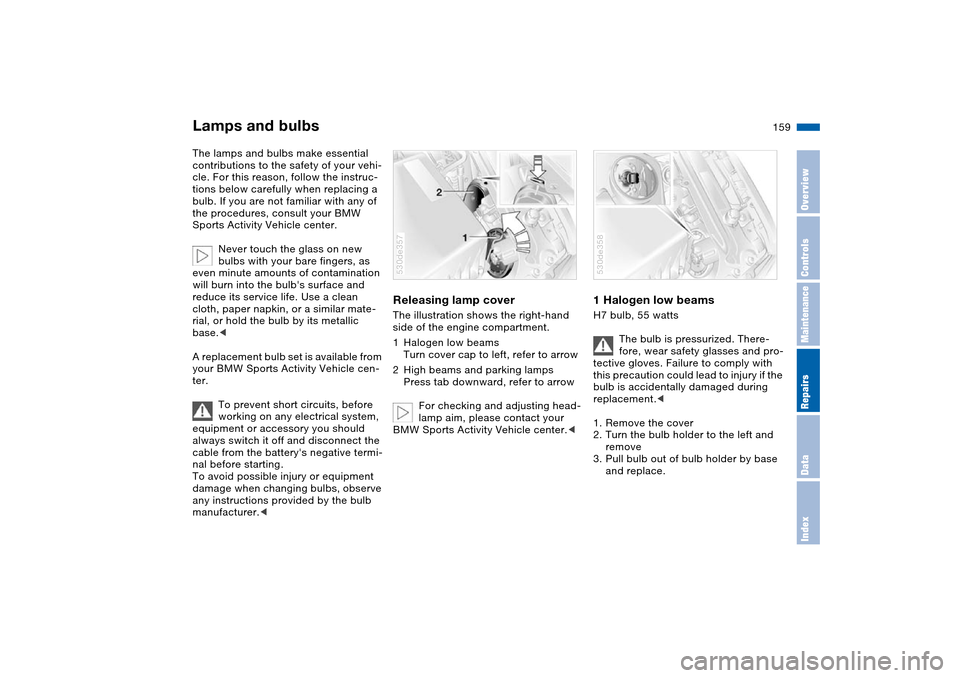
Releasing lamp cover The illustration shows the right-hand
side of the engine compartment.
1Halogen low beams
Turn cover cap to left, refer to arrow
2High beams and parking lamps
Press tab downward, refer to arrow
For checking and adjusting head-
lamp aim, please contact your
BMW Sports Activity Vehicle center.< 530de357
1 Halogen low beams H7 bulb, 55 watts
The bulb is pressurized. There-
fore, wear safety glasses and pro-
tective gloves. Failure to comply with
this precaution could lead to injury if the
bulb is accidentally damaged during
replacement.<
1. Remove the cover
2. Turn the bulb holder to the left and
remove
3. Pull bulb out of bulb holder by base
and replace.530de358
Page 170 of 200
168n
Changing a wheel Battery 10. Screw in the remaining lug bolts.
Tighten all the bolts securely in a
diagonal pattern
11. Lower the jack and remove it from
beneath the vehicle
12. Tighten the lug bolts in a diagonal
pattern
13. Check and correct the tire inflation
pressure at the earliest opportunity.
After mounting the spare wheel or
correcting the inflation pressure,
reinitialize the Flat Tire Monitor,
refer to page 100.
Protect valve stems and valves from dirt
using screw-on valve stem caps. Dirt in
the valve stems frequently leads to slow
leaks.
The vehicle jack is designed for
changing wheels only. Do not
attempt to raise another vehicle model
with it or to raise any load of any kind.
To do so could cause accidents and
personal injury.
To ensure safety, always have the lug
bolts checked with a calibrated torque
wrench as soon as possible to ensure
that they are tightened to the speci-
fied torque. The tightening torque is
101 lb-ft/140 Nm.<
Store the wheel and the tools in the
order opposite that for removal.
Before removing the support rod,
be sure that the tailgate is held
down firmly. If you fail to do so, it could
retract sharply upward and cause per-
sonal injury and vehicle damage.
After you remove the rod, close the tail-
gate carefully. Continue to hold it firmly
until it is completely closed.<
If light-alloy wheels other than Genuine
BMW light-alloy wheels have been
mounted, it may be necessary to use
different lug bolts for those wheels.
Replace the defective tire as soon as
possible and have the new wheel/tire
balanced.
Driving with spare wheel
Do not exceed a speed of
130 mph/210 km/h, as otherwise
accidents may occur due to tire dam-
age.<
With certain wheel-and-tire com-
binations the size of the spare
wheel differs from that of the other
wheels. However, to restore the original
state, the normal wheel should be
remounted as soon as possible.<
Battery posts, terminals and
related accessories contain lead
and lead compounds. Wash hands after
handling.<
Battery care The battery is maintenance-free, that is,
the original electrolyte will normally last
for the service life of the battery under
moderate climatic conditions. Your
BMW Sport Activity Vehicle center will
be glad to advise in all matters con-
cerning the battery.Charging battery Only charge the battery in the vehicle
via the terminals in the engine compart-
ment with the engine off. For correct
connections, refer to Jump-starting on
page 171. Disposal
Following replacement, have old
batteries disposed of by your
BMW Sports Activity Vehicle center or
hand them in to a recycling center.
Maintain the battery in an upright posi-
tion for transport and storage. Always
restrain the battery to prevent it from
tipping over during transport.<
Page 173 of 200
171n
OverviewControlsMaintenanceRepairsDataIndex
Jump-starting When your battery is discharged you
can used two jumper cables to start
your vehicle with power from the bat-
tery in a second vehicle. You can also
use the same method to help start
another vehicle. Use only jumper cables
with fully-insulated clamp handles.
To avoid the risk of potentially
fatal injury, always avoid all con-
tact with electrical components while
the engine is running. Carefully observe
the following instructions to avoid per-
sonal injury and/or damage to one or
both vehicles.<
Preparing1. Check whether the battery of the
other vehicle has a voltage of
12 Volts and approximately the same
capacitance in Ah. This information
can be found on the battery
2. Switch off the engine of the support
vehicle
3. Switch off any electrical systems and
components in both vehicles.
Ensure that no contact exists
between the bodywork on the two
vehicles, otherwise there is a danger of
short circuits.
sparks, always observe this
sequence when connecting jumper
cables.<
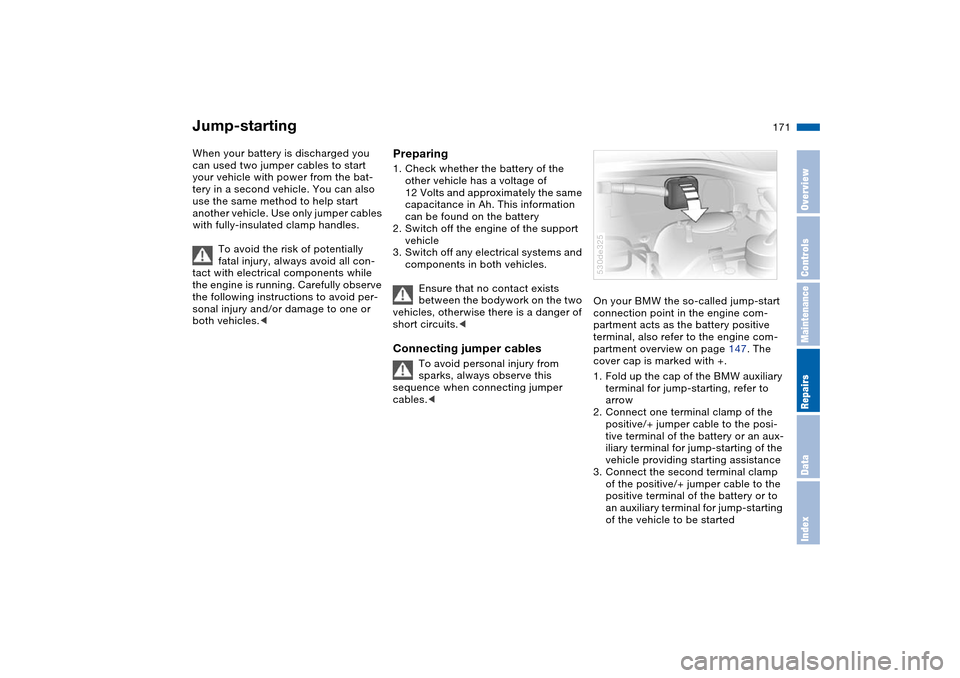
On your BMW the so-called jump-start
connection point in the engine com-
partment acts as the battery positive
terminal, also refer to the engine com-
partment overview on page 147. The
cover cap is marked with +.
1. Fold up the cap of the BMW auxiliary
terminal for jump-starting, refer to
arrow
2. Connect one terminal clamp of the
positive/+ jumper cable to the posi-
tive terminal of the battery or an aux-
iliary terminal for jump-starting of the
vehicle providing starting assistance
3. Connect the second terminal clamp
of the positive/+ jumper cable to the
positive terminal of the battery or to
an auxiliary terminal for jump-starting
of the vehicle to be started530de325
Page 177 of 200
175n
OverviewControlsMaintenanceRepairsDataIndex
Towing and tow-starting vehicleTow-starting
Do not tow-start vehicles with an
automatic transmission.
For information on jump-starting, refer
to page 171.<
Only tow-start vehicles with a catalytic
converter with the engine cold. It is bet-
ter to jump-start the engine, refer to
page 171.
1. Switch on the hazard warning flash-
ers and observe local regulations
2. Turn the ignition key to position 2
3. Engage the 3rd gear
4. Tow-start with the clutch pedal com-
pletely depressed and slowly release
the clutch pedal. After the engine
starts, immediately depress the
clutch pedal completely again
5. Stop at a suitable location, remove
the tow bar or rope and switch off
the hazard warning flashers
6. Have the vehicle checked.
Do not activate the HDC Hill
Descent Control during tow-
starting, refer to page 96.<
Page 188 of 200
Everything from A to ZCaring for the carpet, refer to
Caring for your vehicle
brochure
Cassette operation, refer to
Owner's Manual for Radio/
Onboard Computer
Catalytic converter, refer to
Hot exhaust system 138
CD changer, refer to
Owner's Manual for Radio/
Onboard Computer
CD operation, refer to
Owner's Manual for Radio/
Onboard Computer
Center armrest, refer to
Storage
compartments 119
Center brake lamp, bulb
replacement 162
Central locking system 30
interior 34
Changes, technical, refer to
For your own safety 8
Changing a wheel 163
Changing tires 142
spare wheel 165
Charge-current indicator
light 19
CHECK button 79
Check Control 79Child's seats, refer to Child-
restraint systems 59
Child-restraint systems 59
Child-safety locks 62
Chocks 164
Chrome parts, care, refer to
Caring for your vehicle
brochure
Chrome sections, care, refer
to Caring for your vehicle
brochure
Cigarette lighter 121, 122
Circulation of air, refer to
Recirculated-air
mode 107, 112
Cleaning the rear window 73
Cleaning, vehicle, refer to
Caring for your vehicle
brochure
Climate control in the rear
passenger area 113
Clock 84
12 or 24-hour mode 84
changing time and date 84
setting 84
setting, refer also to
Owner's Manual for Radio/
Onboard Computer
Closing
from inside 34
from outside 31, 33Cockpit 14
Code
activating 90
deactivating 91
establishing 90
Cold start, refer to Starting
engine 65
Combination of wheels/
tires 145
Comfort seat 46
Comfort starting, refer to
Starting engine 65
Compact Disc operation,
refer to Owner's Manual
for Radio/Onboard
Computer
Compartments, refer to
Storage
compartments 119
Compass interior mirror 55
Compression ratio, refer to
Engine specifications 178
Computer 82, 87
also refer to Owner's
Manual for Onboard
Computer
Condensation, refer to
Air conditioning 107, 112
Connecting a vacuum
cleaner, refer to Power
sockets 121, 128Consumption indicator, refer
to Fuel gauge 77
Consumption, refer to
Average consumption 89
Fuel consumption 89
Contents 4
Controls, refer to Cockpit 14
Convenience opening
panorama glass roof 31
windows 31
Convenience operation
from outside 33
panorama glass roof 33
windows 33
Coolant 150
level 150
temperature 78
temperature gauge 78
warning lamp 78
Cooling system, refer to
Capacities 181
Cooling, maximum 112
Cooling, refer to
Air conditioning 107, 112
Temperature 107, 111
Copyright 4
Correct tires
wheel/tire
replacement 145
winter tires 145
Page 190 of 200
Everything from A to ZEngine
breaking-in 136
data 178
electronic circuitry 22
speed 76
starting 64
switching off 65
Engine compartment 147
Engine coolant 150
Engine hood 146
Engine oil 148
additives, refer to Adding
engine oil 149
filling capacity 181
indicator/warning lamp 19
specified oils 149
Engine oil level, indicator/
warning lamp 21
Engine oil pressure,
indicator/warning lamp 19
Engine oil thermometer 77
Engine output, refer to
Engine specifications 178
Engine specifications 178
Engine speed, refer to
Engine specifications 178
Environmentally friendly
driving, refer to Energy
Control 76ESP Electronic Stability
Program, refer to DSC
Dynamic Stability
Control 94
Exhaust system 138
Extended immobilizer
function 90
Exterior mirror
automatic dimming
feature 55
Exterior mirrors 54
F
Failure messages, refer to
Check Control 79
Failure of a current
consumer 169
False alarms, refer to
Avoiding unintentional
alarms 39
Fan
refer to Air
supply 107, 111
Fasten safety belts
warning lamp 21, 49
Fault displays, refer to Check
Control 79
Filter, refer to
Microfilter 108
Microfilter/activated-
charcoal filter 114First aid, refer to First-aid
kit 24
First-aid kit 24
Flashlight 119
Flat tire 163
Flat Tire Monitor 100
refer to Tire inflation
pressure 140
spare wheel 165
Flat Tire Monitor 100
indicator lamp 101
initializing 100
Flooding, refer to Water on
roads 137
Floor coverings, carpet, refer
to Caring for your vehicle
brochure
Floor mats, refer to Caring
for your vehicle brochure
Fluid level, indicator lamp 21
Fog lamps 104
indicator lamp 22
Folding rear backrest 124
Folding the floor cover
up 128
Footbrake, refer to Driving
notes 138
Footwell lamps 105
Front airbags 57
Front fog lamps 104
bulb replacement 161Fuel
average
consumption 82, 89
display 77
preparation, refer to
Engine specifications 178
quality 26
volume, refer to
Capacities 181
Fuel clock, refer to Fuel
gauge 77
Fuel display, refer to Fuel
gauge 77
Fuel filler door 24
manual operation 24
Fuel tank capacity, refer to
Capacities 181
Fuel-saving driving, refer to
Energy Control 76
Fuses 169
G
Garage-door opener, refer to
Integrated universal
remote control 116
Gasoline display, refer to
Fuel gauge 77
Gasoline, refer to Fuel
quality 26
Gear changes, refer to
Automatic transmission
with Steptronic 68
Page 197 of 200
Everything from A to Z
195n
OverviewControlsMaintenanceRepairsDataIndex
V
Valve
inserts 168
screw caps 168
Vehicle
battery 168
breaking-in 136
care, refer to Caring for
your vehicle brochure
loading 130
measurements, refer to
Dimensions 179
parking 65
storage, refer to Caring for
your vehicle brochure
washing, refer to Caring for
your vehicle brochure
weight 180
Vehicle jack 165
Vehicle Memory 63
Ventilation 106, 109
draft-free 108, 113
in rear 108
while parked 115
Viscosity 149
Voice command system 23
Voice control, refer to
separate Owner's Manual
Volume, cargo area 180W
Warning and indicator
lamps 19
Warning triangle 24
Warnings, refer to Check
Control 79
Warranty 10
refer also to Service and
Warranty Information
Booklet for US models or
Warranty and Service
Guide Booklet for
Canadian models
Warranty and Service Guide
Booklet for Canadian
models 152
Washer fluid 148
Washer fluid reservoir
content 181
refer to Windshield and
headlamp washer
system 148
Waste container, refer to
Ashtray 121
Water on roads, flooding 137
Wear indicators in the tires,
refer to Tire tread 144
Weights 180
Wheel and tire
combinations 144Wheelbase, refer to
Dimensions 179
Wheelslip control, DSC
Dynamic Stability
Control 94
Width, refer to
Dimensions 179
Windows
convenience operation 33
defrosting, refer to
Defrosting
windows 108, 111
Windshield washer fluid
tank 148
capacity, refer to Filling
capacities 181
Windshield washer system
washer fluid 148
washer/wiper system 71
Windshield wiper blades
care, refer to Caring for
your vehicle brochure
replacement 158
Windshield wipers, refer to
Wiper/washer system 71
Windshield, cleaning 72
Winter tires 145
changing 145
condition 143
storage 145
Wiper system 71Working in the engine
compartment 146
Wrenches, refer to Onboard
tool kit 158
X
xDrive 95
Xenon lamps, bulb
replacement 160