window BMW X5 4.8I 2008 E70 User Guide
[x] Cancel search | Manufacturer: BMW, Model Year: 2008, Model line: X5 4.8I, Model: BMW X5 4.8I 2008 E70Pages: 292, PDF Size: 9.32 MB
Page 38 of 292
Opening and closing
36
Tilt alarm sensor
The tilt of the vehicle is monitored. The alarm
system reacts, e.g. in case of an attempted
wheel theft or towing.
Interior motion sensor
In order for the interior motion sensor to func-
tion properly, the windows and panorama glass
sunroof
* must be completely closed.
Avoiding unintentional alarms
The tilt alarm sensor and interior motion sensor
may be switched off at the same time. This pre-
vents unintentional alarms, e.g. in the following
situations:
>In stacking garages
>When transporting on car-carrying trains,
by sea or on a trailer
>When animals are to remain in the vehicle
Switching off tilt alarm sensor and
interior motion sensor
Press the button on the remote control
again as soon as the vehicle is locked.
The indicator lamp lights up briefly and then
flashes continuously. The tilt alarm sensor and
the interior motion sensor are switched off until
the next time the vehicle is unlocked and subse-
quently locked again.
Comfort access*
Comfort access enables you to access your
vehicle without having to hold the remote con-
trol in your hand. It is sufficient to carry the
remote control with you, e.g. in your jacket
pocket. The vehicle automatically detects the
related remote control in the immediate vicinity
or in the interior.
Comfort access supports the following func-
tions:
>Unlocking/locking vehicle
>Comfort closing
>Opening liftgate>Starting engine
Functional requirements
>The vehicle can only be unlocked if the
vehicle detects that the remote control car-
ried is not located in the vehicle interior.
>The next unlocking and locking cycle is not
possible until after approx. 2 seconds.
>The engine can only be started if the vehicle
detects that the remote control is located in
the vehicle.
Comparison with ordinary remote
control
You can control the functions mentioned previ-
ously with the comfort access or by pressing
the buttons on the remote control. Therefore,
please familiarize yourself with the information
on opening and closing beginning on page28
beforehand.
The special features when using comfort
access are described in the following.
Should a short delay occur when opening
or closing the windows or the panorama
glass sunroof
*, the system is checking whether
a remote control is located in the vehicle. Please
repeat opening or closing if necessary.<
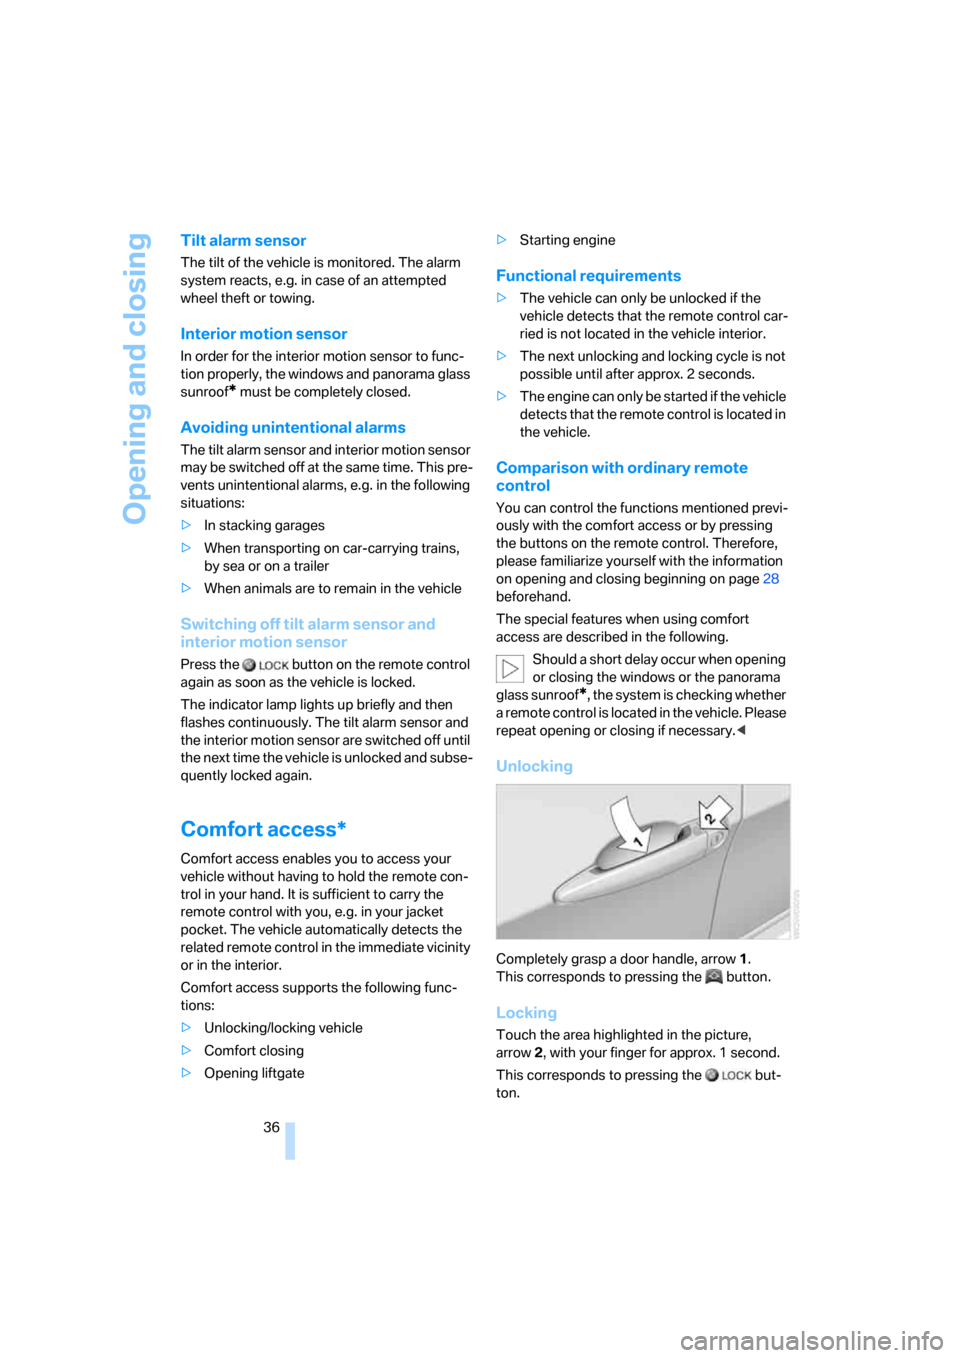
Unlocking
Completely grasp a door handle, arrow1.
This corresponds to pressing the button.
Locking
Touch the area highlighted in the picture,
arrow2, with your finger for approx. 1 second.
This corresponds to pressing the but-
ton.
Page 39 of 292
Controls
37Reference
At a glance
Driving tips
Communications
Navigation
Entertainment
Mobility
Please make sure that all electronic sys-
tems/consumers are switched off before
locking to save the battery.<
Comfort closing
Hold a finger or the back of a hand on the sur-
face, arrow2.
The windows and the panorama glass sunroof
*
are closed.
Watch during the closing process to be
sure that no one is injured. Removing the
hand from the door handle immediately stops
the closing process.<
Opening liftgate
Press the button on the liftgate.
This corresponds to pressing the button.
If a remote control accidentally left in the
cargo bay is detected in the locked vehi-
cle after closing the liftgate, the liftgate opens
again. The hazard warning flashers flash and a
signal
* sounds.<
Switching on radio readiness
By briefly pressing the Start/Stop button, you
switch on the radio readiness, refer to page59.
When doing so, do not depress the brake
pedal, otherwise the engine will start.<
Starting engine
You can start the engine or switch on the igni-
tion if a remote control is located in the interior
of the vehicle. It need not be inserted in the igni-
tion lock, refer to page59.
As long as no remote control is detected in the
vehicle, it is only possible to restart the engine
within approx. 10 seconds after it is switched off
if no door has been opened.
Switching off engine
>Remote control not in ignition lock:
After switching off the engine, the transmis-
sion is automatically switched into trans-
mission position P.>Remote control in ignition lock:
If transmission position N is engaged, the
transmission remains in this position after
the engine is switched off.
Before driving into a car wash
The vehicle can roll if you proceed according to
the following steps:
1.Insert remote control into ignition lock.
2.Depress brake pedal.
3.Engage transmission position N.
4.Release the parking brake.
5.Switch off the engine.
6.Leave the remote control in the ignition
lock.
Malfunction
The comfort access function may malfunction
due to local radio waves. Then open or close the
vehicle with the buttons on the remote control
or with a key. To start the engine following this,
insert the remote control in the ignition lock.
The warning lamp in the instrument
panel lights up when an attempt is
made to start the engine: starting the
engine is not possible. The remote control is
not in the vehicle or has a malfunction. Take
along the remote control into the vehicle or
have it checked. Insert another remote control
into the ignition lock if necessary.
The warning lamp in the instrument
panel lights up when the engine is
running: the remote control is no
longer in the vehicle. After switching off the
engine, the engine can only be started again
within approx. 10 seconds if no door has been
opened.
The indicator lamp in the instrument
panel lights up and a message
appears on the Control Display:
Replace the battery of the remote control.
Page 40 of 292
Opening and closing
38
Replacing battery
The remote control for comfort access contains
a battery which must be replaced if necessary.
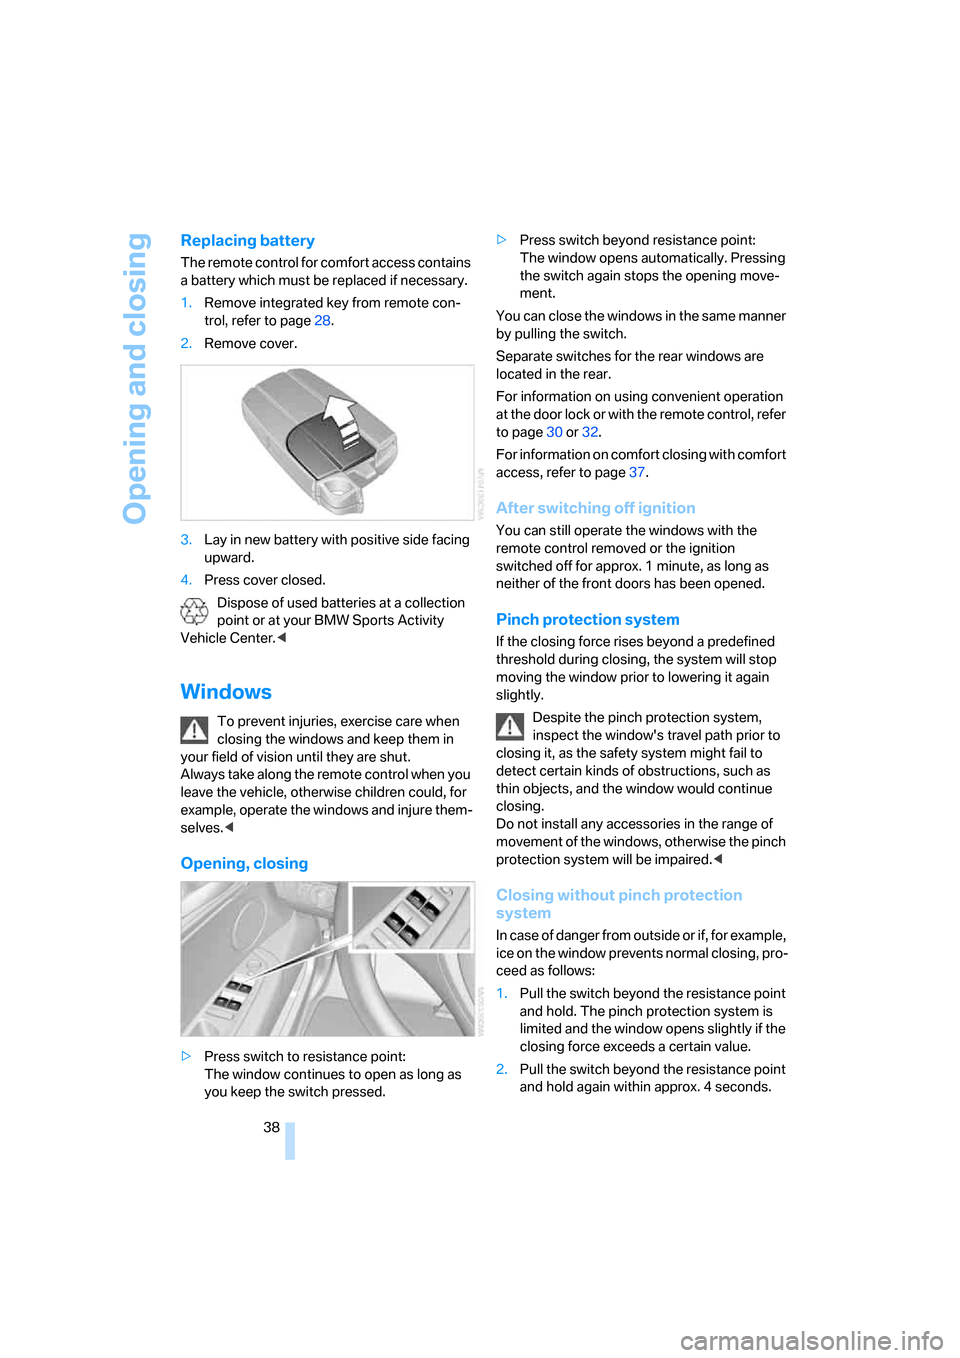
1.Remove integrated key from remote con-
trol, refer to page28.
2.Remove cover.
3.Lay in new battery with positive side facing
upward.
4.Press cover closed.
Dispose of used batteries at a collection
point or at your BMW Sports Activity
Vehicle Center.<
Windows
To prevent injuries, exercise care when
closing the windows and keep them in
your field of vision until they are shut.
Always take along the remote control when you
leave the vehicle, otherwise children could, for
example, operate the windows and injure them-
selves.<
Opening, closing
>Press switch to resistance point:
The window continues to open as long as
you keep the switch pressed.>Press switch beyond resistance point:
The window opens automatically. Pressing
the switch again stops the opening move-
ment.
You can close the windows in the same manner
by pulling the switch.
Separate switches for the rear windows are
located in the rear.
For information on using convenient operation
at the door lock or with the remote control, refer
to page30 or32.
For information on comfort closing with comfort
access, refer to page37.
After switching off ignition
You can still operate the windows with the
remote control removed or the ignition
switched off for approx. 1 minute, as long as
neither of the front doors has been opened.
Pinch protection system
If the closing force rises beyond a predefined
threshold during closing, the system will stop
moving the window prior to lowering it again
slightly.
Despite the pinch protection system,
inspect the window's travel path prior to
closing it, as the safety system might fail to
detect certain kinds of obstructions, such as
thin objects, and the window would continue
closing.
Do not install any accessories in the range of
movement of the windows, otherwise the pinch
protection system will be impaired.<
Closing without pinch protection
system
In case of danger from outside or if, for example,
ice on the window prevents normal closing, pro-
ceed as follows:
1.Pull the switch beyond the resistance point
and hold. The pinch protection system is
limited and the window opens slightly if the
closing force exceeds a certain value.
2.Pull the switch beyond the resistance point
and hold again within approx. 4 seconds.
Page 41 of 292
Controls
39Reference
At a glance
Driving tips
Communications
Navigation
Entertainment
Mobility
The window closes without the pinch pro-
tection system.
Safety switch
With the safety switch, you can prevent the rear
windows from being opened or closed via the
switches in the rear passenger area, by chil-
dren, for example. The LED lights up when this
safety feature is activated.
Always press the safety switch when chil-
dren ride in the rear, otherwise uncon-
trolled closing of the windows could lead to
injuries.<
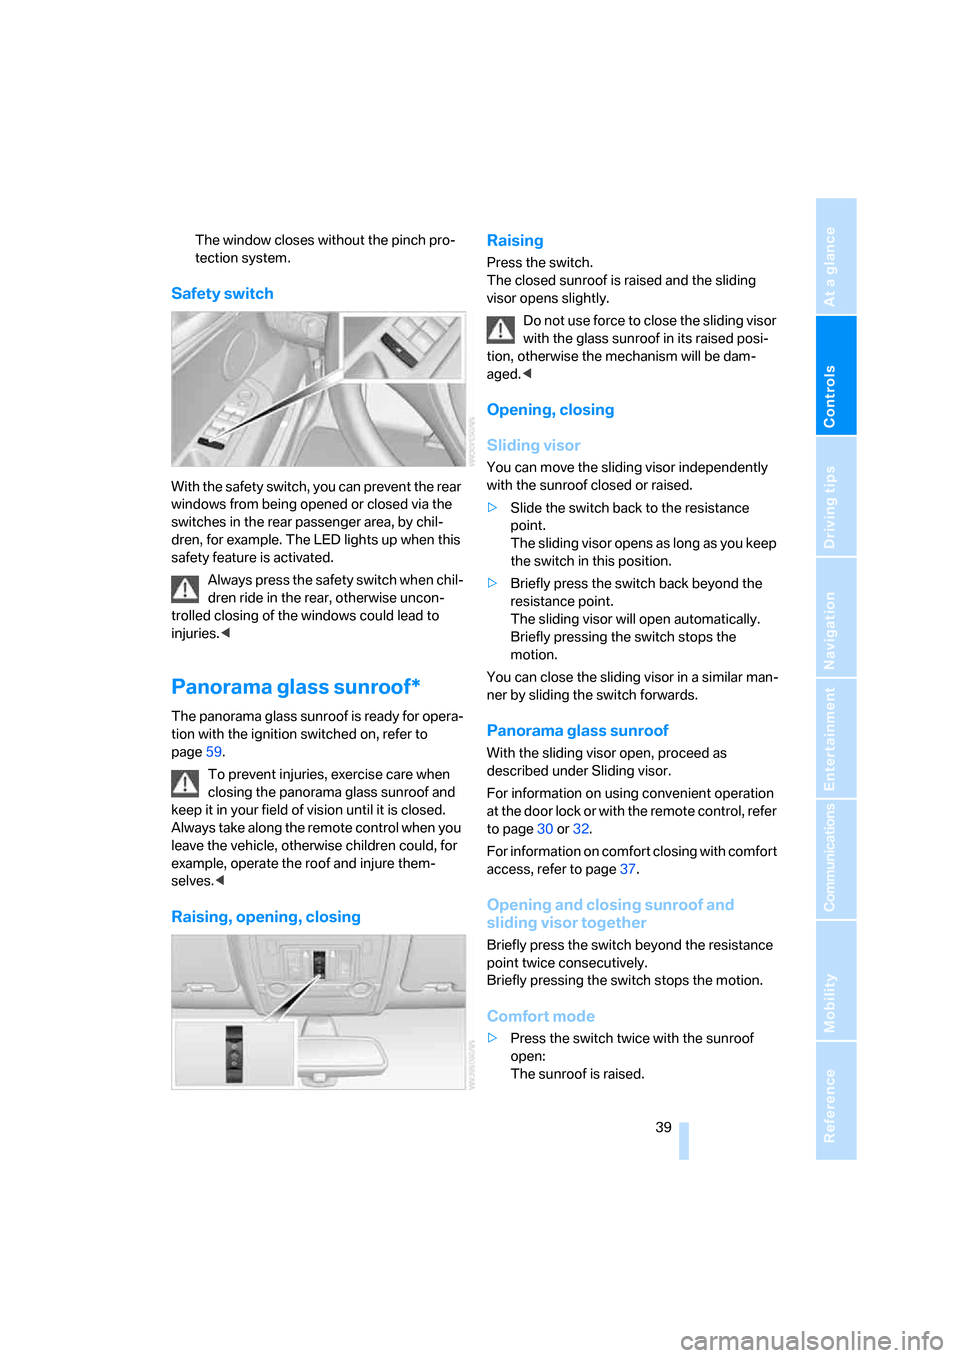
Panorama glass sunroof*
The panorama glass sunroof is ready for opera-
tion with the ignition switched on, refer to
page59.
To prevent injuries, exercise care when
closing the panorama glass sunroof and
keep it in your field of vision until it is closed.
Always take along the remote control when you
leave the vehicle, otherwise children could, for
example, operate the roof and injure them-
selves.<
Raising, opening, closingRaising
Press the switch.
The closed sunroof is raised and the sliding
visor opens slightly.
Do not use force to close the sliding visor
with the glass sunroof in its raised posi-
tion, otherwise the mechanism will be dam-
aged.<
Opening, closing
Sliding visor
You can move the sliding visor independently
with the sunroof closed or raised.
>Slide the switch back to the resistance
point.
The sliding visor opens as long as you keep
the switch in this position.
>Briefly press the switch back beyond the
resistance point.
The sliding visor will open automatically.
Briefly pressing the switch stops the
motion.
You can close the sliding visor in a similar man-
ner by sliding the switch forwards.
Panorama glass sunroof
With the sliding visor open, proceed as
described under Sliding visor.
For information on using convenient operation
at the door lock or with the remote control, refer
to page30 or32.
For information on comfort closing with comfort
access, refer to page37.
Opening and closing sunroof and
sliding visor together
Briefly press the switch beyond the resistance
point twice consecutively.
Briefly pressing the switch stops the motion.
Comfort mode
>Press the switch twice with the sunroof
open:
The sunroof is raised.
Page 60 of 292
Transporting children safely
58
On trips
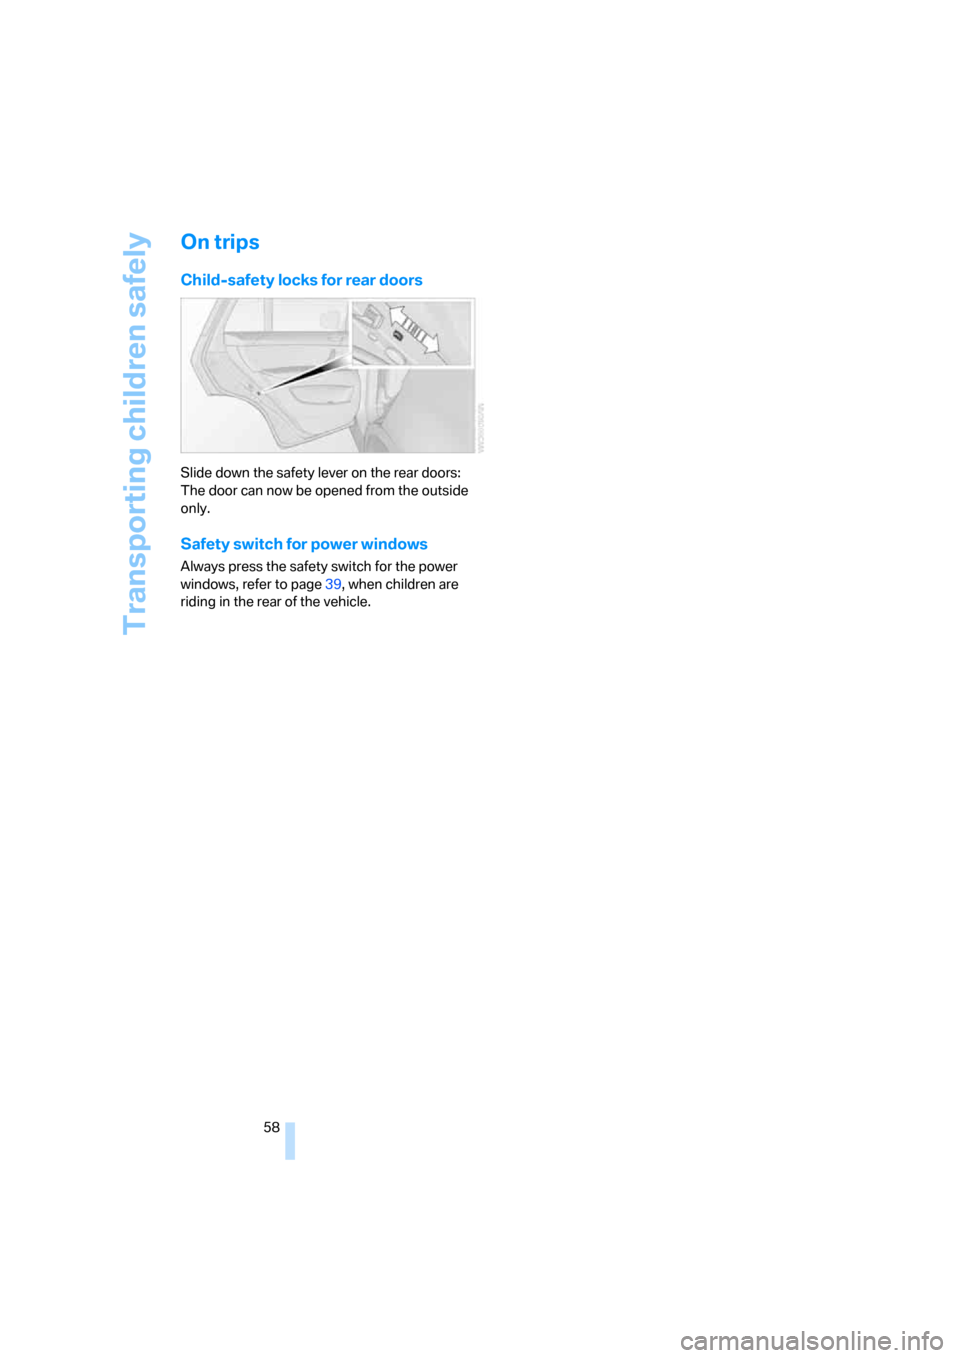
Child-safety locks for rear doors
Slide down the safety lever on the rear doors:
The door can now be opened from the outside
only.
Safety switch for power windows
Always press the safety switch for the power
windows, refer to page39, when children are
riding in the rear of the vehicle.
Page 70 of 292
Driving
68
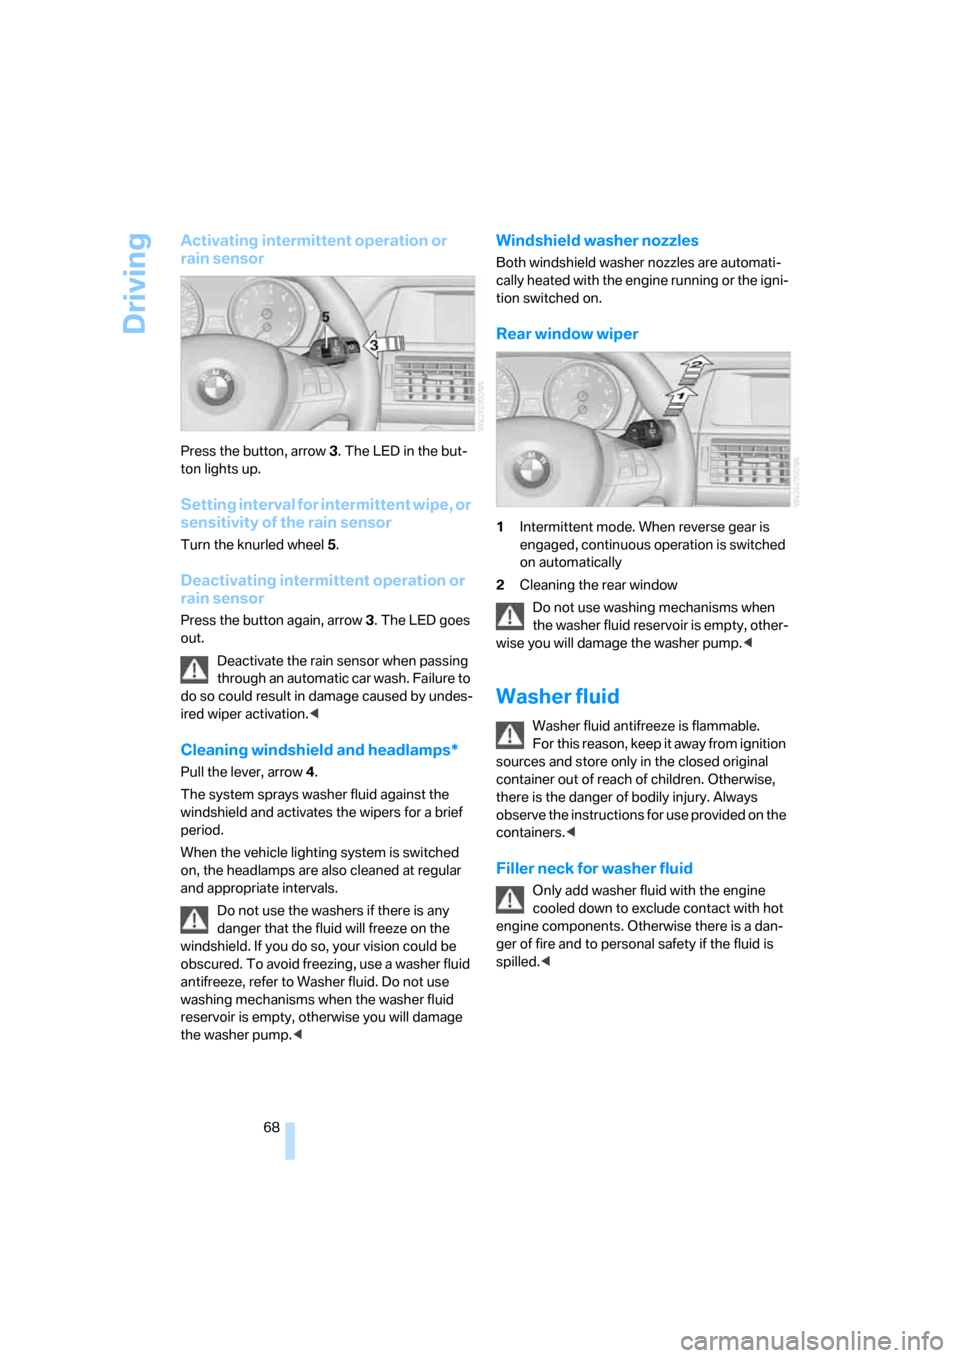
Activating intermittent operation or
rain sensor
Press the button, arrow3. The LED in the but-
ton lights up.
Setting interval for intermittent wipe, or
sensitivity of the rain sensor
Turn the knurled wheel5.
Deactivating intermittent operation or
rain sensor
Press the button again, arrow3. The LED goes
out.
Deactivate the rain sensor when passing
through an automatic car wash. Failure to
do so could result in damage caused by undes-
ired wiper activation.<
Cleaning windshield and headlamps*
Pull the lever, arrow4.
The system sprays washer fluid against the
windshield and activates the wipers for a brief
period.
When the vehicle lighting system is switched
on, the headlamps are also cleaned at regular
and appropriate intervals.
Do not use the washers if there is any
danger that the fluid will freeze on the
windshield. If you do so, your vision could be
obscured. To avoid freezing, use a washer fluid
antifreeze, refer to Washer fluid. Do not use
washing mechanisms when the washer fluid
reservoir is empty, otherwise you will damage
the washer pump.<
Windshield washer nozzles
Both windshield washer nozzles are automati-
cally heated with the engine running or the igni-
tion switched on.
Rear window wiper
1Intermittent mode. When reverse gear is
engaged, continuous operation is switched
on automatically
2Cleaning the rear window
Do not use washing mechanisms when
the washer fluid reservoir is empty, other-
wise you will damage the washer pump.<
Washer fluid
Washer fluid antifreeze is flammable.
For this reason, keep it away from ignition
sources and store only in the closed original
container out of reach of children. Otherwise,
there is the danger of bodily injury. Always
observe the instructions for use provided on the
containers.<
Filler neck for washer fluid
Only add washer fluid with the engine
cooled down to exclude contact with hot
engine components. Otherwise there is a dan-
ger of fire and to personal safety if the fluid is
spilled.<
Page 76 of 292
Everything under control
74 >Average speed
>Average fuel consumption
Resetting values
You can reset the values for the average speed
and average fuel consumption:
1.Select the respective menu item and press
the controller.
2.To confirm your selection, press the con-
troller again.
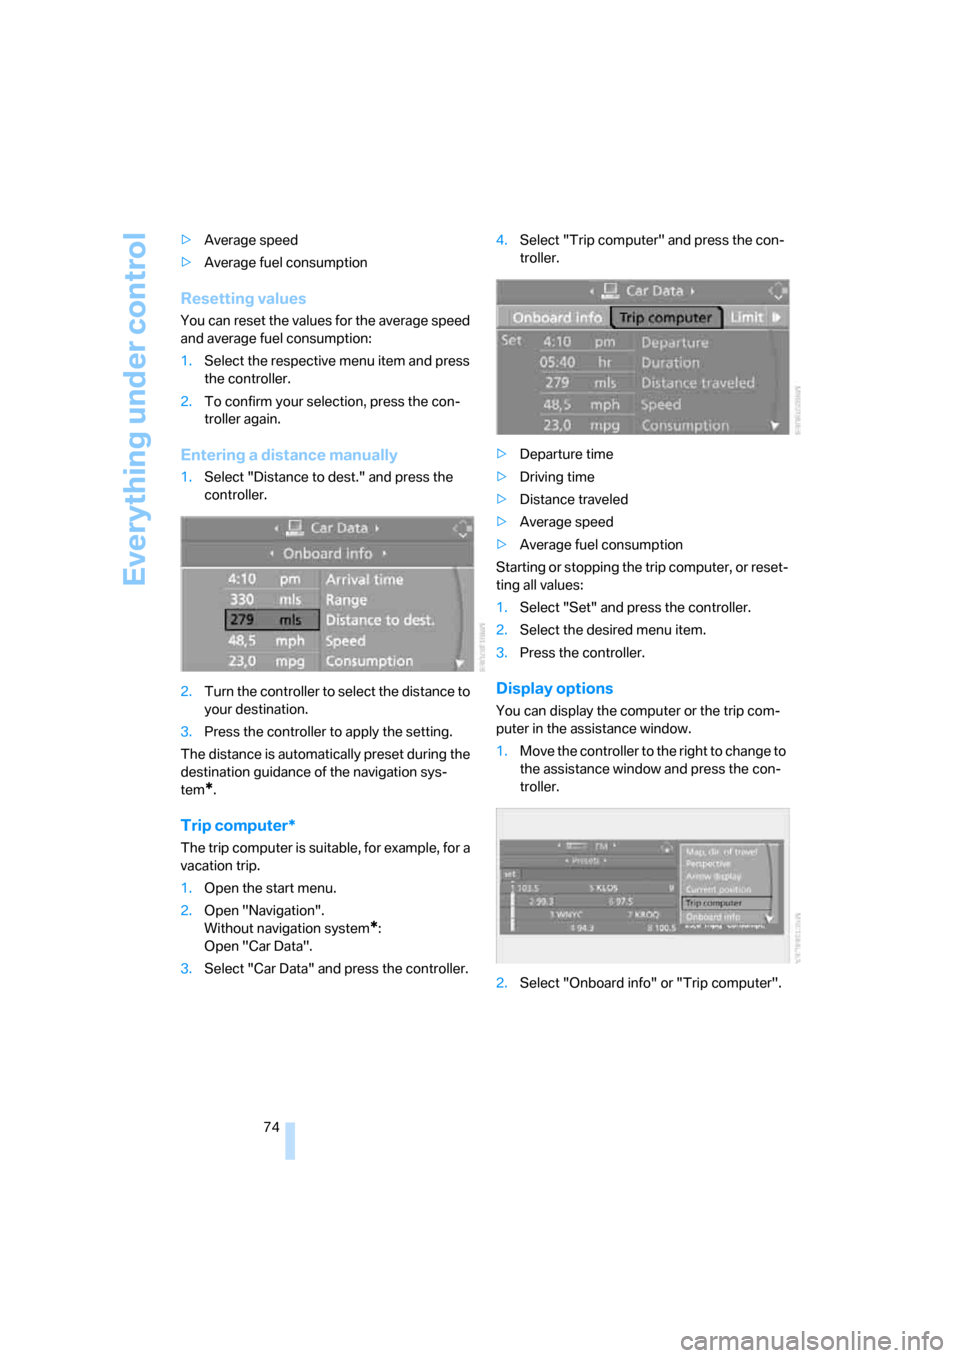
Entering a distance manually
1.Select "Distance to dest." and press the
controller.
2.Turn the controller to select the distance to
your destination.
3.Press the controller to apply the setting.
The distance is automatically preset during the
destination guidance of the navigation sys-
tem
*.
Trip computer*
The trip computer is suitable, for example, for a
vacation trip.
1.Open the start menu.
2.Open "Navigation".
Without navigation system
*:
Open "Car Data".
3.Select "Car Data" and press the controller.4.Select "Trip computer" and press the con-
troller.
>Departure time
>Driving time
>Distance traveled
>Average speed
>Average fuel consumption
Starting or stopping the trip computer, or reset-
ting all values:
1.Select "Set" and press the controller.
2.Select the desired menu item.
3.Press the controller.
Display options
You can display the computer or the trip com-
puter in the assistance window.
1.Move the controller to the right to change to
the assistance window and press the con-
troller.
2.Select "Onboard info" or "Trip computer".
Page 87 of 292
Controls
85Reference
At a glance
Driving tips
Communications
Navigation
Entertainment
Mobility
PDC with visual warning*
You can also have the system show distances
to objects on the Control Display. Objects that
are farther away are already shown there before
a signal tone sounds.
The setting is stored for the remote control cur-
rently in use.
If the vehicle is equipped with a rear view cam-
era, refer to Displays on page88.
iDrive, for operating principle refer to page16.
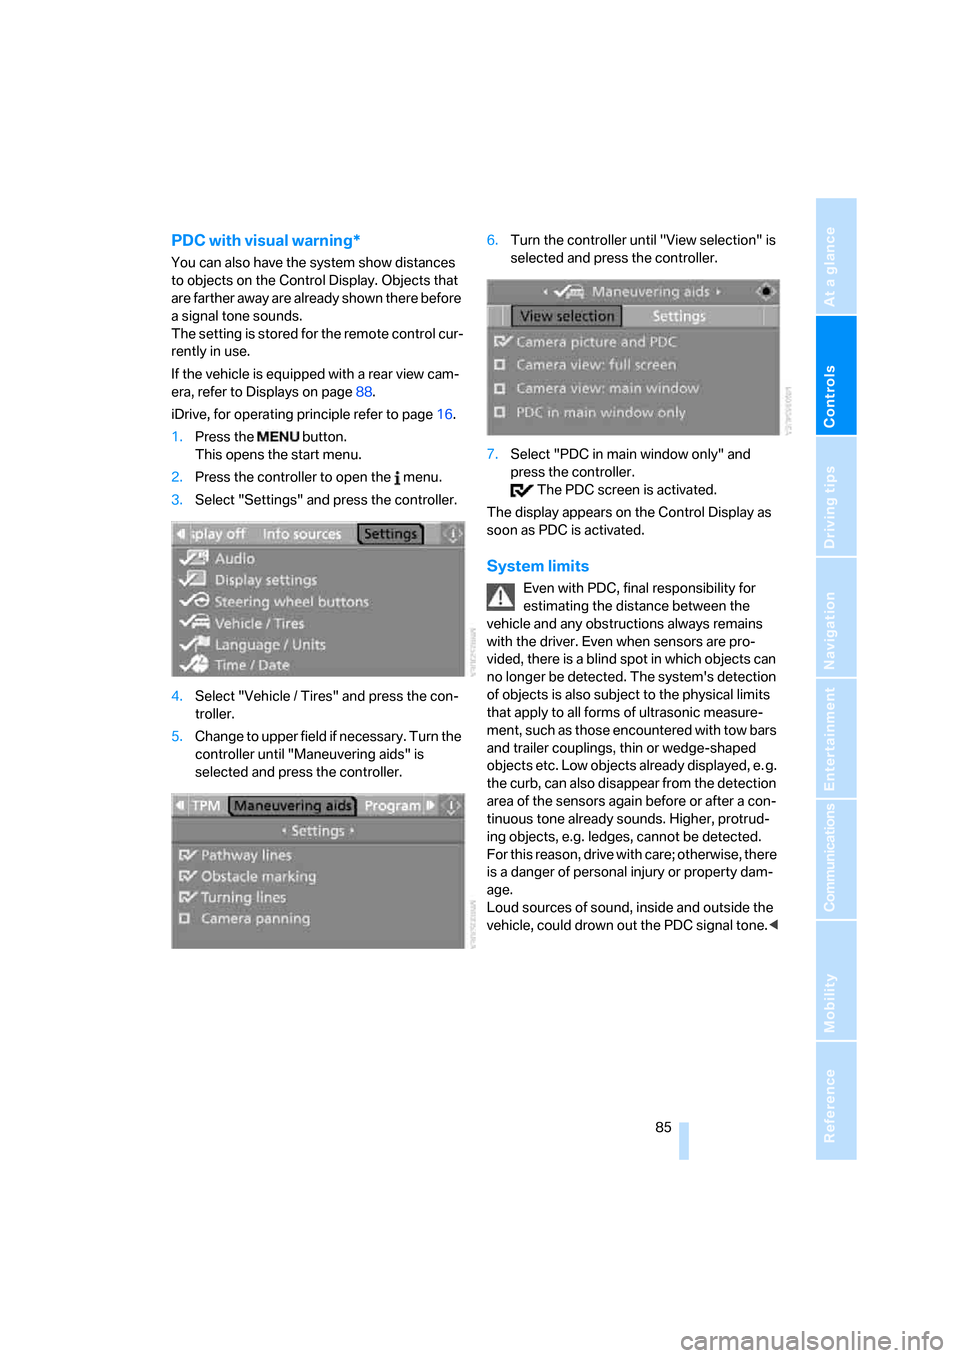
1.Press the button.
This opens the start menu.
2.Press the controller to open the menu.
3.Select "Settings" and press the controller.
4.Select "Vehicle / Tires" and press the con-
troller.
5.Change to upper field if necessary. Turn the
controller until "Maneuvering aids" is
selected and press the controller.6.Turn the controller until "View selection" is
selected and press the controller.
7.Select "PDC in main window only" and
press the controller.
The PDC screen is activated.
The display appears on the Control Display as
soon as PDC is activated.
System limits
Even with PDC, final responsibility for
estimating the distance between the
vehicle and any obstructions always remains
with the driver. Even when sensors are pro-
vided, there is a blind spot in which objects can
no longer be detected. The system's detection
of objects is also subject to the physical limits
that apply to all forms of ultrasonic measure-
ment, such as those encountered with tow bars
and trailer couplings, thin or wedge-shaped
objects etc. Low objects already displayed, e. g.
the curb, can also disappear from the detection
area of the sensors again before or after a con-
tinuous tone already sounds. Higher, protrud-
ing objects, e.g. ledges, cannot be detected.
For this reason, drive with care; otherwise, there
is a danger of personal injury or property dam-
age.
Loud sources of sound, inside and outside the
vehicle, could drown out the PDC signal tone.<
Page 90 of 292
Technology for comfort, convenience and safety
88
Displays
You can have the picture from the rear view
camera displayed in several formats and in
combination with the PDC Park Distance Con-
trol, refer to page85.
In addition, you also have the option of display-
ing only the PDC Park Distance Control.
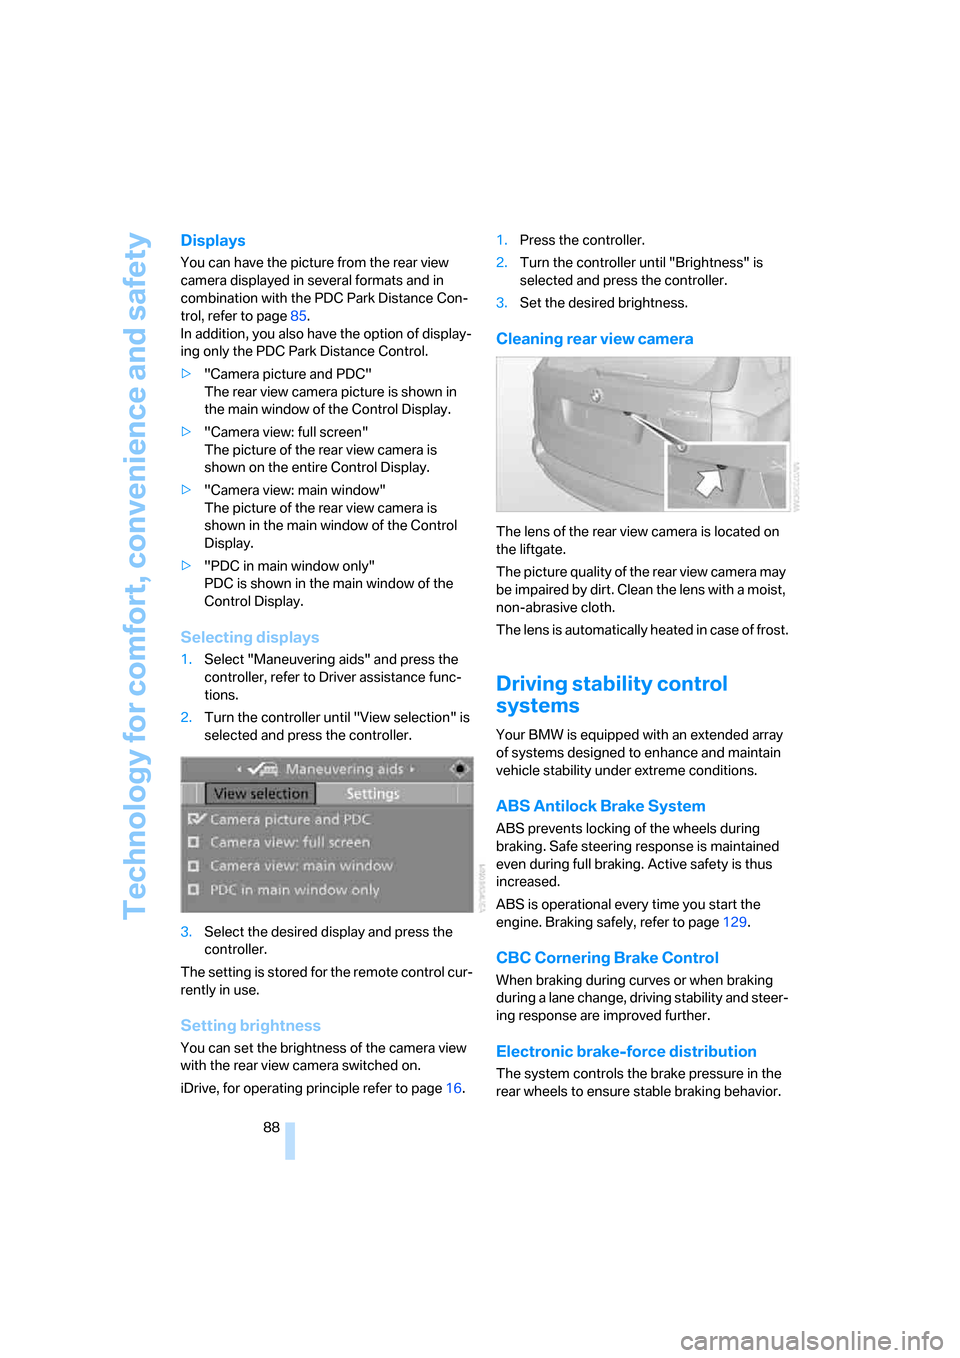
>"Camera picture and PDC"
The rear view camera picture is shown in
the main window of the Control Display.
>"Camera view: full screen"
The picture of the rear view camera is
shown on the entire Control Display.
>"Camera view: main window"
The picture of the rear view camera is
shown in the main window of the Control
Display.
>"PDC in main window only"
PDC is shown in the main window of the
Control Display.
Selecting displays
1.Select "Maneuvering aids" and press the
controller, refer to Driver assistance func-
tions.
2.Turn the controller until "View selection" is
selected and press the controller.
3.Select the desired display and press the
controller.
The setting is stored for the remote control cur-
rently in use.
Setting brightness
You can set the brightness of the camera view
with the rear view camera switched on.
iDrive, for operating principle refer to page16.1.Press the controller.
2.Turn the controller until "Brightness" is
selected and press the controller.
3.Set the desired brightness.
Cleaning rear view camera
The lens of the rear view camera is located on
the liftgate.
The picture quality of the rear view camera may
be impaired by dirt. Clean the lens with a moist,
non-abrasive cloth.
The lens is automatically heated in case of frost.
Driving stability control
systems
Your BMW is equipped with an extended array
of systems designed to enhance and maintain
vehicle stability under extreme conditions.
ABS Antilock Brake System
ABS prevents locking of the wheels during
braking. Safe steering response is maintained
even during full braking. Active safety is thus
increased.
ABS is operational every time you start the
engine. Braking safely, refer to page129.
CBC Cornering Brake Control
When braking during curves or when braking
during a lane change, driving stability and steer-
ing response are improved further.
Electronic brake-force distribution
The system controls the brake pressure in the
rear wheels to ensure stable braking behavior.
Page 108 of 292
Climate
106
Climate
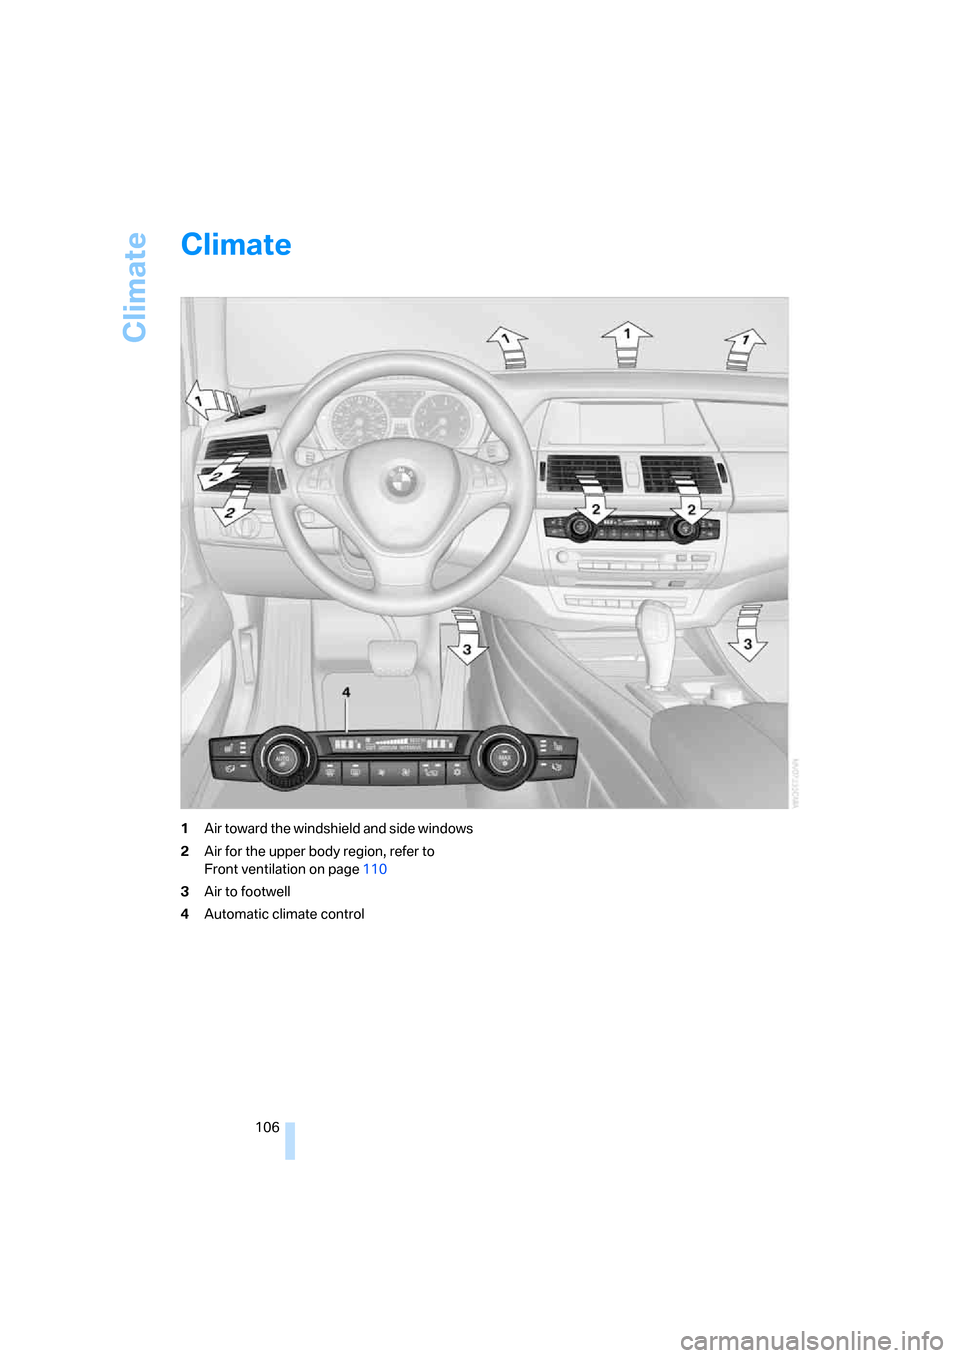
1Air toward the windshield and side windows
2Air for the upper body region, refer to
Front ventilation on page110
3Air to footwell
4Automatic climate control