Drive belt BMW X5 4.8I 2008 E70 Owner's Manual
[x] Cancel search | Manufacturer: BMW, Model Year: 2008, Model line: X5 4.8I, Model: BMW X5 4.8I 2008 E70Pages: 292, PDF Size: 9.32 MB
Page 44 of 292
Adjusting
42
Adjusting
Sitting safely
The ideal sitting position can make a vital con-
tribution to relaxed, fatigue-free driving. In the
interaction with the safety belts, the head
restraints and the airbags, the seat position
plays an important role in an accident. To
ensure that the safety systems operate with
optimal efficiency, we strongly urge you to
observe the instructions contained in the fol-
lowing section.
For additional information on transporting chil-
dren safely, refer to page55.
Airbags
Always maintain an adequate distance
between yourself and the airbags. Always
hold the steering wheel by its rim with hands at
the 9 o'clock and 3 o'clock positions, to mini-
mize the risk of injuries to your hands and arms
in the event of airbag deployment.
No one and nothing is to come between the air-
bags and the seat occupant.
Do not use the cover of the front airbag on the
front passenger side as a storage area. Make
sure that the front passenger is sitting correctly
and does not rest feet or legs on the instrument
panel, otherwise leg injuries can occur if the
front airbag is triggered.
Make sure that occupants do not rest their head
on the side or head airbag, otherwise injuries
can occur if the airbags are triggered.<
Even if you adhere to all the instructions, inju-
ries resulting from contact with airbags cannot
be fully excluded, depending on the circum-
stances. The ignition and inflation noise may
provoke a mild hearing loss in extremely sensi-
tive individuals. This effect is usually only tem-
porary.
For airbag locations and additional information
on airbags, refer to page97.
Head restraint
A correctly adjusted head restraint reduces the
risk of spinal injury in the event of an accident.
Adjust the head restraint so that its center
is approx. at ear level. Otherwise there is
increased danger of injury in the event of an
accident.<
Push the head restraints of the 3rd row seats
*
into the top position.
Head restraints, refer to page46.
Safety belts
Before every drive, make sure that safety belts
are being worn at all of the occupied seats. Air-
bags complement the safety belt as an addi-
tional safety device, but they do not represent a
substitute.
Depending on its equipment, your vehicle has
either five or seven seats, which are all provided
with a safety belt.
Never allow more than one person to
wear a single safety belt. Never allow
infants or small children to ride in a passenger's
lap. Make sure that the belt lies low around the
hips in the lap area and does not press on the
abdomen. The safety belt may not lie across the
neck, rub on sharp edges, be routed over solid
or breakable objects or be pinched. Wear the
safety belt without twisting, snugly across the
lap and shoulders, as close to the body as pos-
sible. Otherwise the belt can slip over the hips
in the lap area in a frontal impact and injure the
abdomen. Avoid wearing clothing that prevents
the belt from fitting properly and pull the belt in
the upper body area periodically to readjust the
tension, in order to avoid a reduction in the
restraint of the safety belt.
If the center safety belt in the rear is used, the
larger backrest half must be locked, refer to
page123, otherwise the center safety belt has
no restraining action.<
Safety belts, refer to page48.
Page 45 of 292
Controls
43Reference
At a glance
Driving tips
Communications
Navigation
Entertainment
Mobility
Seats
Note before adjusting
Never attempt to adjust or calibrate your
seat while the vehicle is moving. The seat
could respond with unexpected movement, and
the ensuing loss of vehicle control could lead to
an accident.
Never adjust manually adjustable seats while
the vehicle is moving, as otherwise the restrain-
ing effect of these seats during accidents could
be reduced.
Also on the passenger side, do not incline the
backrest too far to the rear while the vehicle is
being driven, otherwise there is a danger in the
event of an accident of sliding under the safety
belt, eliminating the protection normally pro-
vided by the belt.<
Also observe the information on damage to
safety belts on page49 and on the height of the
head restraints on page46.
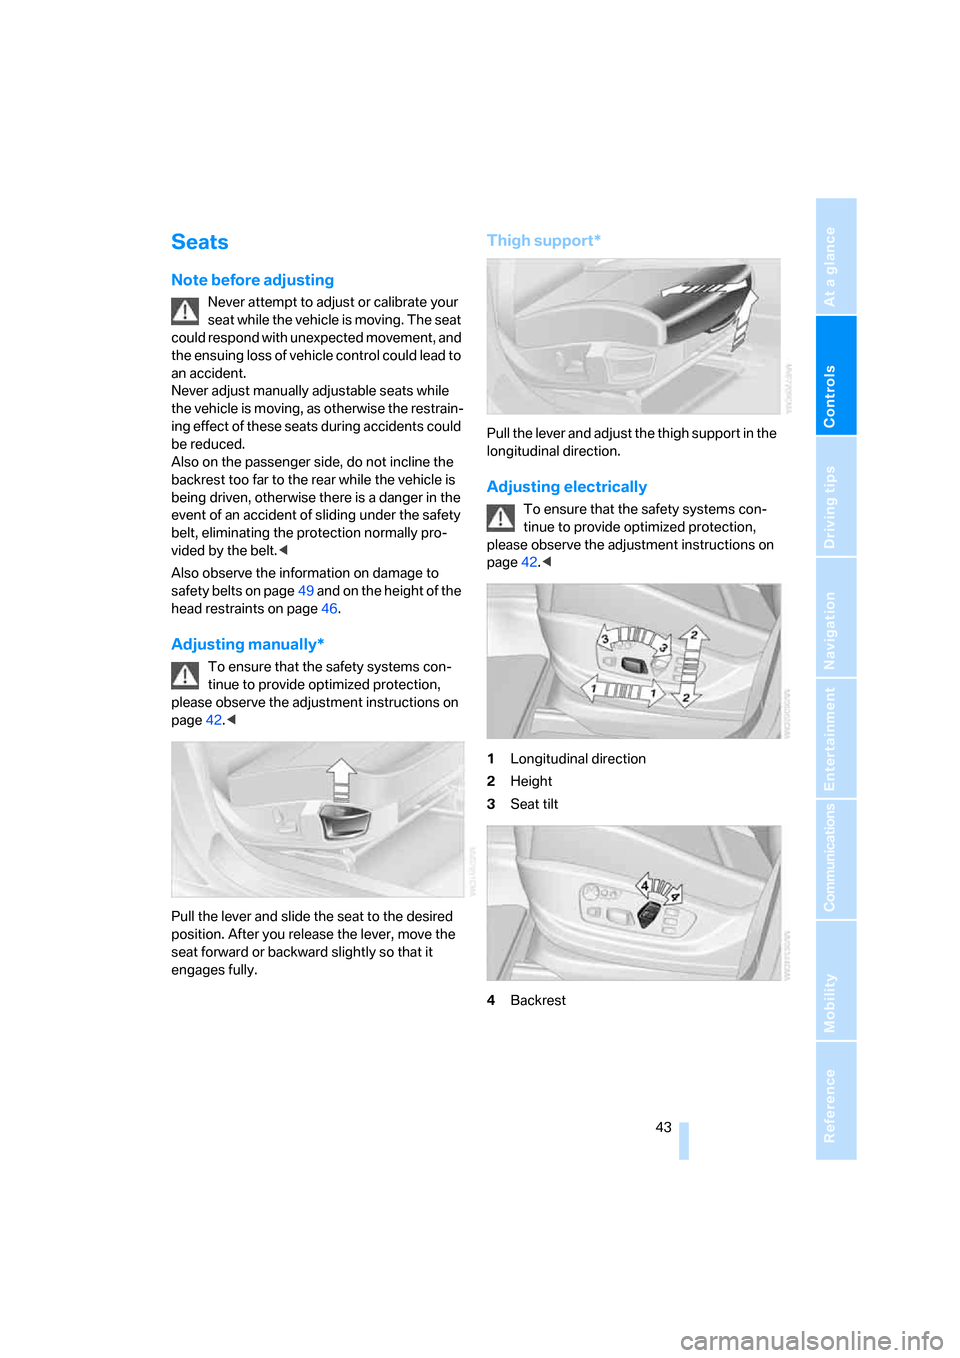
Adjusting manually*
To ensure that the safety systems con-
tinue to provide optimized protection,
please observe the adjustment instructions on
page42.<
Pull the lever and slide the seat to the desired
position. After you release the lever, move the
seat forward or backward slightly so that it
engages fully.
Thigh support*
Pull the lever and adjust the thigh support in the
longitudinal direction.
Adjusting electrically
To ensure that the safety systems con-
tinue to provide optimized protection,
please observe the adjustment instructions on
page42.<
1Longitudinal direction
2Height
3Seat tilt
4Backrest
Page 50 of 292
Adjusting
48
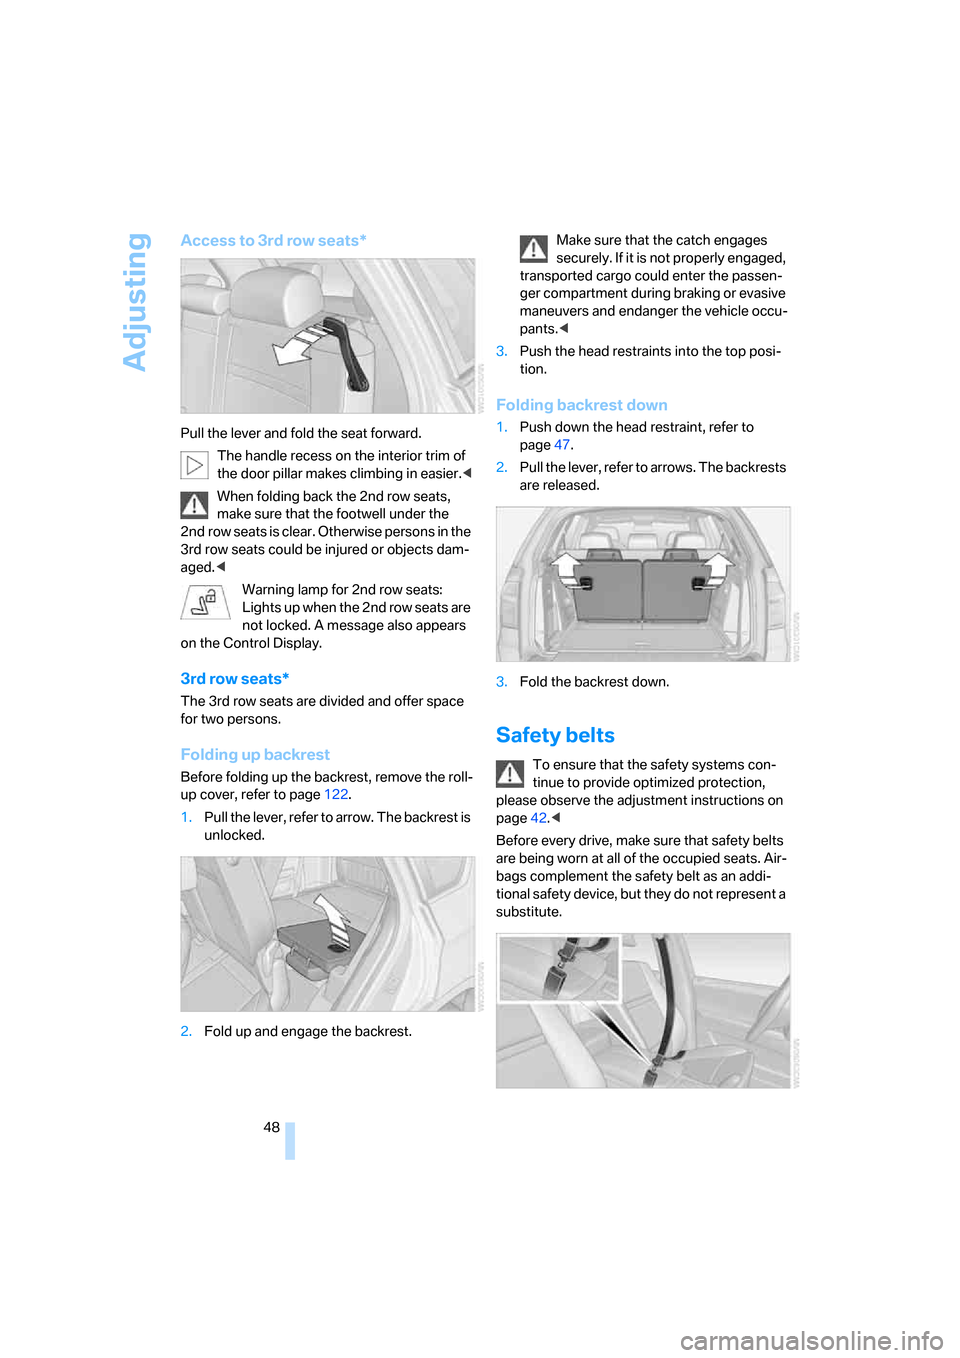
Access to 3rd row seats*
Pull the lever and fold the seat forward.
The handle recess on the interior trim of
the door pillar makes climbing in easier.<
When folding back the 2nd row seats,
make sure that the footwell under the
2nd row seats is clear. Otherwise persons in the
3rd row seats could be injured or objects dam-
aged.<
Warning lamp for 2nd row seats:
Lights up when the 2nd row seats are
not locked. A message also appears
on the Control Display.
3rd row seats*
The 3rd row seats are divided and offer space
for two persons.
Folding up backrest
Before folding up the backrest, remove the roll-
up cover, refer to page122.
1.Pull the lever, refer to arrow. The backrest is
unlocked.
2.Fold up and engage the backrest.Make sure that the catch engages
securely. If it is not properly engaged,
transported cargo could enter the passen-
ger compartment during braking or evasive
maneuvers and endanger the vehicle occu-
pants.<
3.Push the head restraints into the top posi-
tion.
Folding backrest down
1.Push down the head restraint, refer to
page47.
2.Pull the lever, refer to arrows. The backrests
are released.
3.Fold the backrest down.
Safety belts
To ensure that the safety systems con-
tinue to provide optimized protection,
please observe the adjustment instructions on
page42.<
Before every drive, make sure that safety belts
are being worn at all of the occupied seats. Air-
bags complement the safety belt as an addi-
tional safety device, but they do not represent a
substitute.
Page 51 of 292
Controls
49Reference
At a glance
Driving tips
Communications
Navigation
Entertainment
Mobility
Fastening
Make sure you hear the latch plate engage in
the belt buckle.
Safety belt reminder for driver's seat
and passenger seat
The indicator lamp lights up and a
signal sounds. A message also
appears on the Control Display.
Please check whether the safety belt is cor-
rectly fastened.
The safety belt reminder is operative at speeds
above approx. 5 mph/8 km/h. It can also be acti-
vated if objects are placed on the passenger
seat.
Releasing
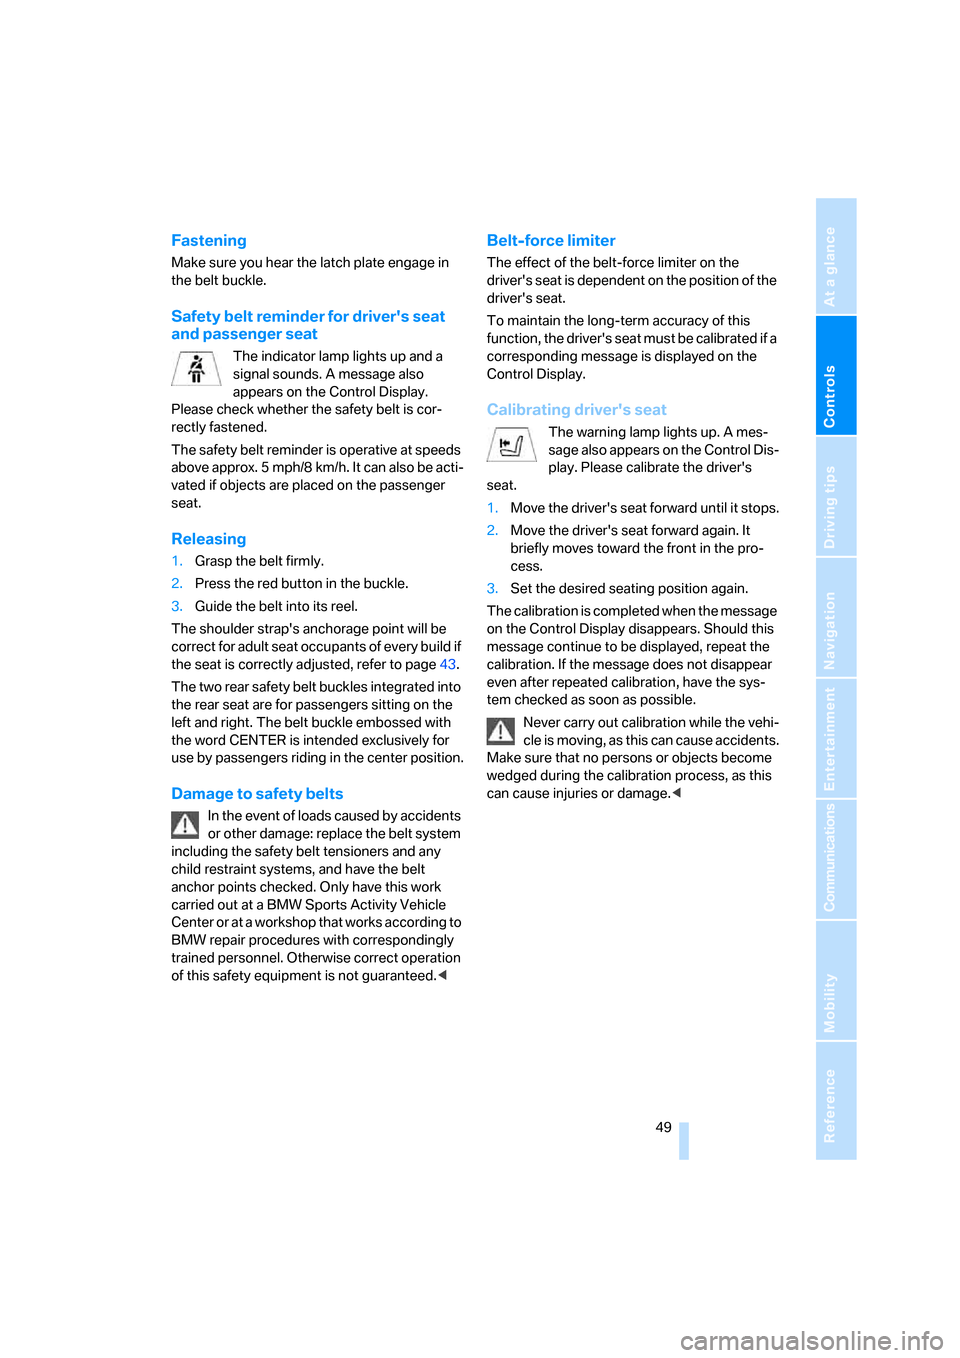
1.Grasp the belt firmly.
2.Press the red button in the buckle.
3.Guide the belt into its reel.
The shoulder strap's anchorage point will be
correct for adult seat occupants of every build if
the seat is correctly adjusted, refer to page43.
The two rear safety belt buckles integrated into
the rear seat are for passengers sitting on the
left and right. The belt buckle embossed with
the word CENTER is intended exclusively for
use by passengers riding in the center position.
Damage to safety belts
In the event of loads caused by accidents
or other damage: replace the belt system
including the safety belt tensioners and any
child restraint systems, and have the belt
anchor points checked. Only have this work
carried out at a BMW Sports Activity Vehicle
Center or at a workshop that works according to
BMW repair procedures with correspondingly
trained personnel. Otherwise correct operation
of this safety equipment is not guaranteed.<
Belt-force limiter
The effect of the belt-force limiter on the
driver's seat is dependent on the position of the
driver's seat.
To maintain the long-term accuracy of this
function, the driver's seat must be calibrated if a
corresponding message is displayed on the
Control Display.
Calibrating driver's seat
The warning lamp lights up. A mes-
sage also appears on the Control Dis-
play. Please calibrate the driver's
seat.
1.Move the driver's seat forward until it stops.
2.Move the driver's seat forward again. It
briefly moves toward the front in the pro-
cess.
3.Set the desired seating position again.
The calibration is completed when the message
on the Control Display disappears. Should this
message continue to be displayed, repeat the
calibration. If the message does not disappear
even after repeated calibration, have the sys-
tem checked as soon as possible.
Never carry out calibration while the vehi-
cle is moving, as this can cause accidents.
Make sure that no persons or objects become
wedged during the calibration process, as this
can cause injuries or damage.<
Page 66 of 292
Driving
64 Indicator lamp on Canadian models.
Any noises which occur are normal. Start-up
may take several seconds.
Automatic transmission with
Steptronic
In addition to fully automatic operation, you can
also manually shift with the Steptronic, refer to
page65.
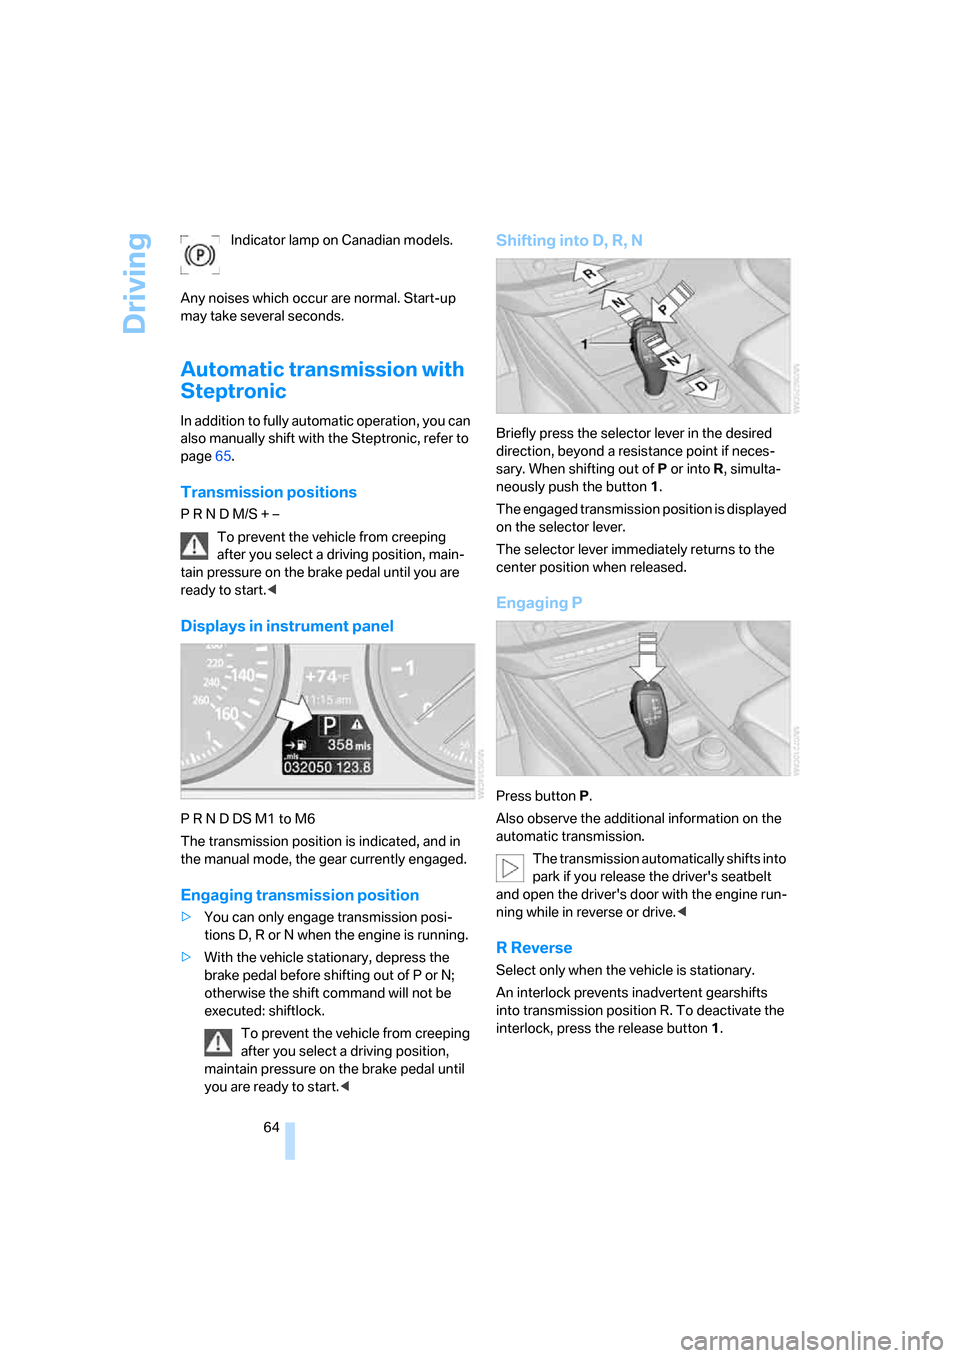
Transmission positions
P R N D M/S + –
To prevent the vehicle from creeping
after you select a driving position, main-
tain pressure on the brake pedal until you are
ready to start.<
Displays in instrument panel
P R N D DS M1 to M6
The transmission position is indicated, and in
the manual mode, the gear currently engaged.
Engaging transmission position
>You can only engage transmission posi-
tions D, R or N when the engine is running.
>With the vehicle stationary, depress the
brake pedal before shifting out of P or N;
otherwise the shift command will not be
executed: shiftlock.
To prevent the vehicle from creeping
after you select a driving position,
maintain pressure on the brake pedal until
you are ready to start.<
Shifting into D, R, N
Briefly press the selector lever in the desired
direction, beyond a resistance point if neces-
sary. When shifting out of P or into R, simulta-
neously push the button1.
The engaged transmission position is displayed
on the selector lever.
The selector lever immediately returns to the
center position when released.
Engaging P
Press button P.
Also observe the additional information on the
automatic transmission.
The transmission automatically shifts into
park if you release the driver's seatbelt
and open the driver's door with the engine run-
ning while in reverse or drive.<
R Reverse
Select only when the vehicle is stationary.
An interlock prevents inadvertent gearshifts
into transmission position R. To deactivate the
interlock, press the release button1.
Page 85 of 292
Controls
83Reference
At a glance
Driving tips
Communications
Navigation
Entertainment
Mobility
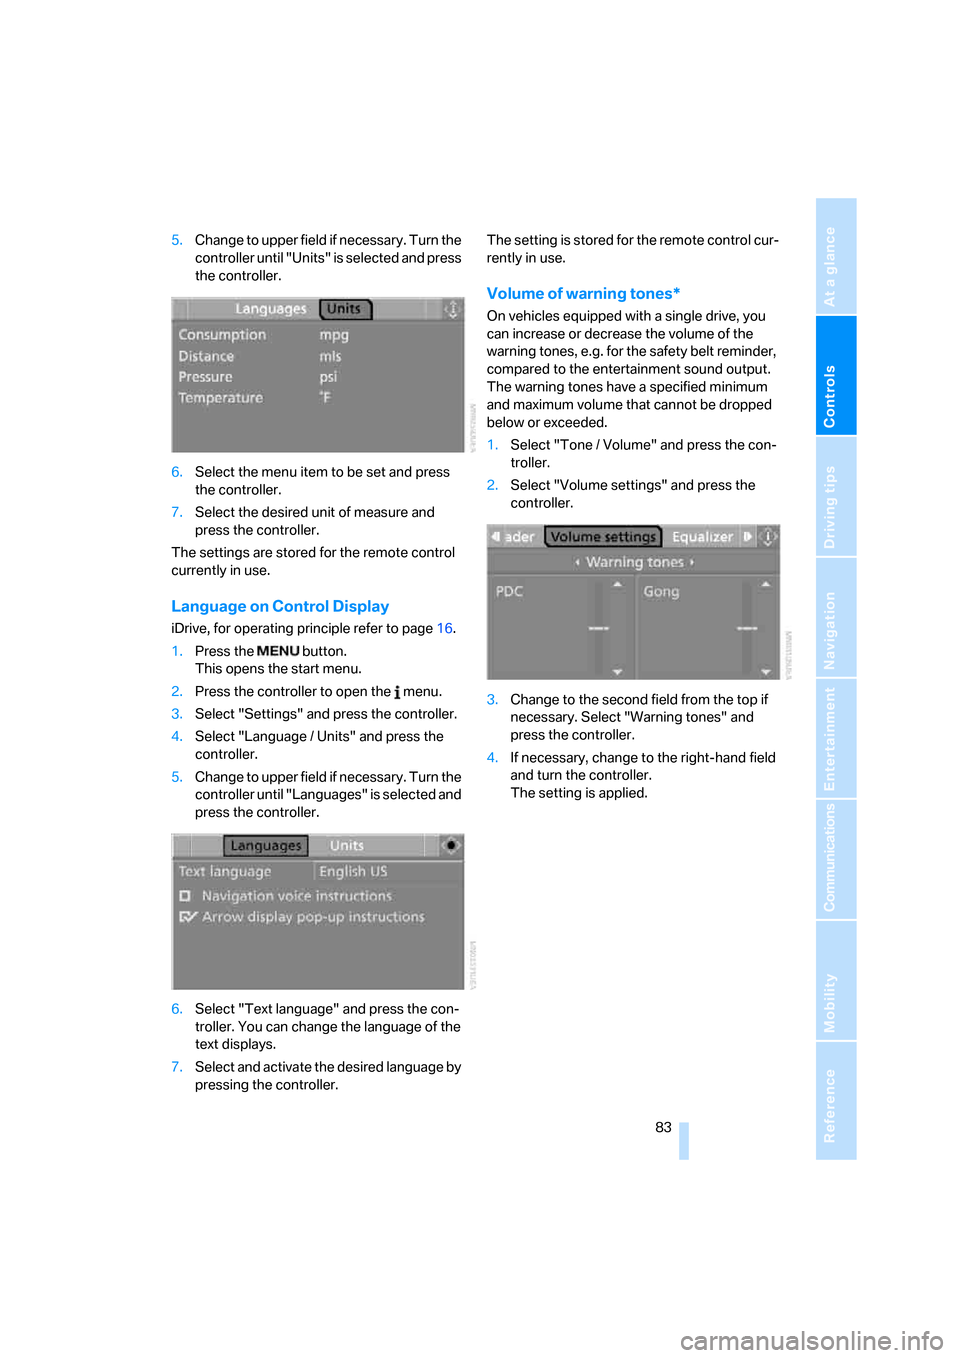
5.Change to upper field if necessary. Turn the
controller until "Units" is selected and press
the controller.
6.Select the menu item to be set and press
the controller.
7.Select the desired unit of measure and
press the controller.
The settings are stored for the remote control
currently in use.
Language on Control Display
iDrive, for operating principle refer to page16.
1.Press the button.
This opens the start menu.
2.Press the controller to open the menu.
3.Select "Settings" and press the controller.
4.Select "Language / Units" and press the
controller.
5.Change to upper field if necessary. Turn the
controller until "Languages" is selected and
press the controller.
6.Select "Text language" and press the con-
troller. You can change the language of the
text displays.
7.Select and activate the desired language by
pressing the controller.The setting is stored for the remote control cur-
rently in use.
Volume of warning tones*
On vehicles equipped with a single drive, you
can increase or decrease the volume of the
warning tones, e.g. for the safety belt reminder,
compared to the entertainment sound output.
The warning tones have a specified minimum
and maximum volume that cannot be dropped
below or exceeded.
1.Select "Tone / Volume" and press the con-
troller.
2.Select "Volume settings" and press the
controller.
3.Change to the second field from the top if
necessary. Select "Warning tones" and
press the controller.
4.If necessary, change to the right-hand field
and turn the controller.
The setting is applied.
Page 99 of 292
Controls
97Reference
At a glance
Driving tips
Communications
Navigation
Entertainment
Mobility
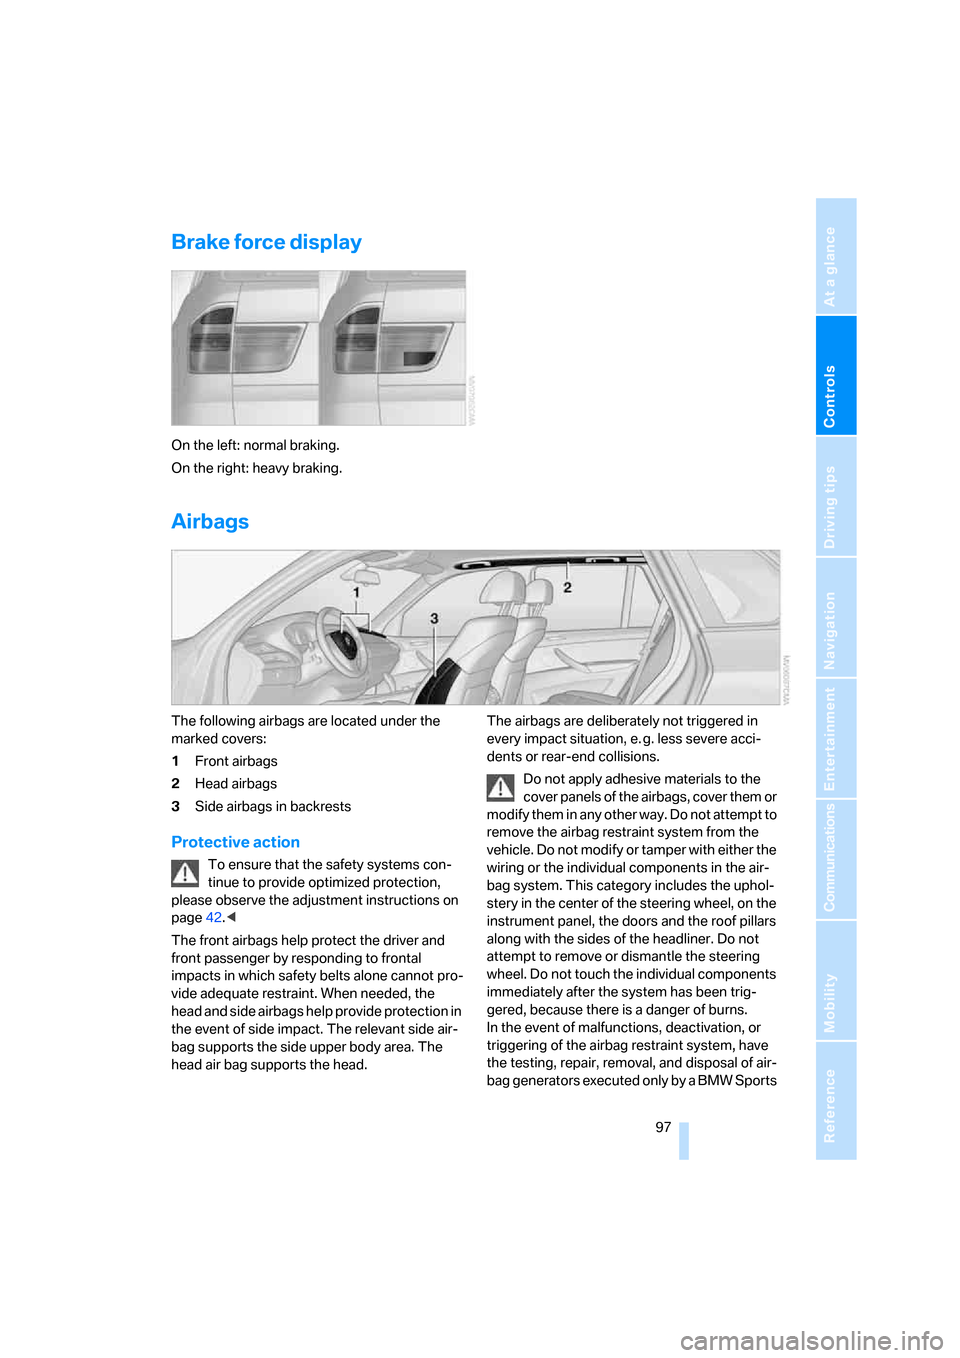
Brake force display
On the left: normal braking.
On the right: heavy braking.
Airbags
The following airbags are located under the
marked covers:
1Front airbags
2Head airbags
3Side airbags
in backrests
Protective action
To ensure that the safety systems con-
tinue to provide optimized protection,
please observe the adjustment instructions on
page42.<
The front airbags help protect the driver and
front passenger by responding to frontal
impacts in which safety belts alone cannot pro-
vide adequate restraint. When needed, the
head and side airbags help provide protection in
the event of side impact. The relevant side air-
bag supports the side upper body area. The
head air bag supports the head.The airbags are deliberately not triggered in
every impact situation, e. g. less severe acci-
dents or rear-end collisions.
Do not apply adhesive materials to the
cover panels of the airbags, cover them or
modify them in any other way. Do not attempt to
remove the airbag restraint system from the
vehicle. Do not modify or tamper with either the
wiring or the individual components in the air-
bag system. This category includes the uphol-
stery in the center of the steering wheel, on the
instrument panel, the doors and the roof pillars
along with the sides of the headliner. Do not
attempt to remove or dismantle the steering
wheel. Do not touch the individual components
immediately after the system has been trig-
gered, because there is a danger of burns.
In the event of malfunctions, deactivation, or
triggering of the airbag restraint system, have
the testing, repair, removal, and disposal of air-
bag generators executed only by a BMW Sports
Page 101 of 292
Controls
99Reference
At a glance
Driving tips
Communications
Navigation
Entertainment
Mobility
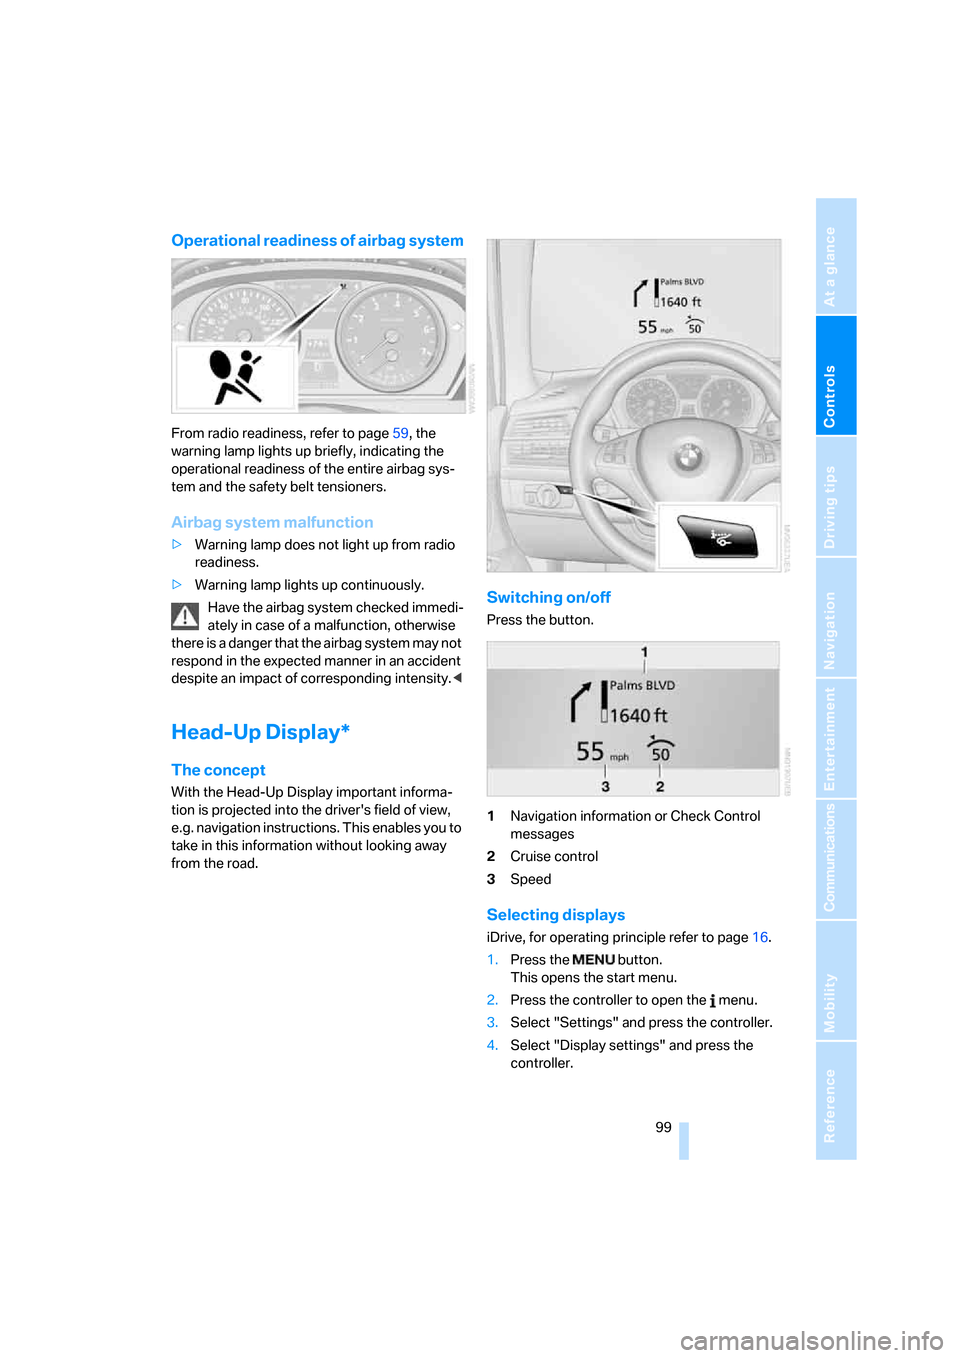
Operational readiness of airbag system
From radio readiness, refer to page59, the
warning lamp lights up briefly, indicating the
operational readiness of the entire airbag sys-
tem and the safety belt tensioners.
Airbag system malfunction
>Warning lamp does not light up from radio
readiness.
>Warning lamp lights up continuously.
Have the airbag system checked immedi-
ately in case of a malfunction, otherwise
there is a danger that the airbag system may not
respond in the expected manner in an accident
despite an impact of corresponding intensity.<
Head-Up Display*
The concept
With the Head-Up Display important informa-
tion is projected into the driver's field of view,
e.g. navigation instructions. This enables you to
take in this information without looking away
from the road.
Switching on/off
Press the button.
1Navigation information or Check Control
messages
2Cruise control
3Speed
Selecting displays
iDrive, for operating principle refer to page16.
1.Press the button.
This opens the start menu.
2.Press the controller to open the menu.
3.Select "Settings" and press the controller.
4.Select "Display settings" and press the
controller.
Page 134 of 292
Things to remember when driving
132 >Cover sharp edges and corners.
>For very heavy cargo when the rear seat is
not occupied, secure each safety belt in the
opposite buckle.
>Do not pile objects higher than the top edge
of the backrest.
>Wrap sharp-edged or pointed objects
which could strike the rear window while
driving.
Securing cargo
>Use the luggage net*, retaining straps*, or
securing straps to hold down small and
lightweight luggage and cargo.
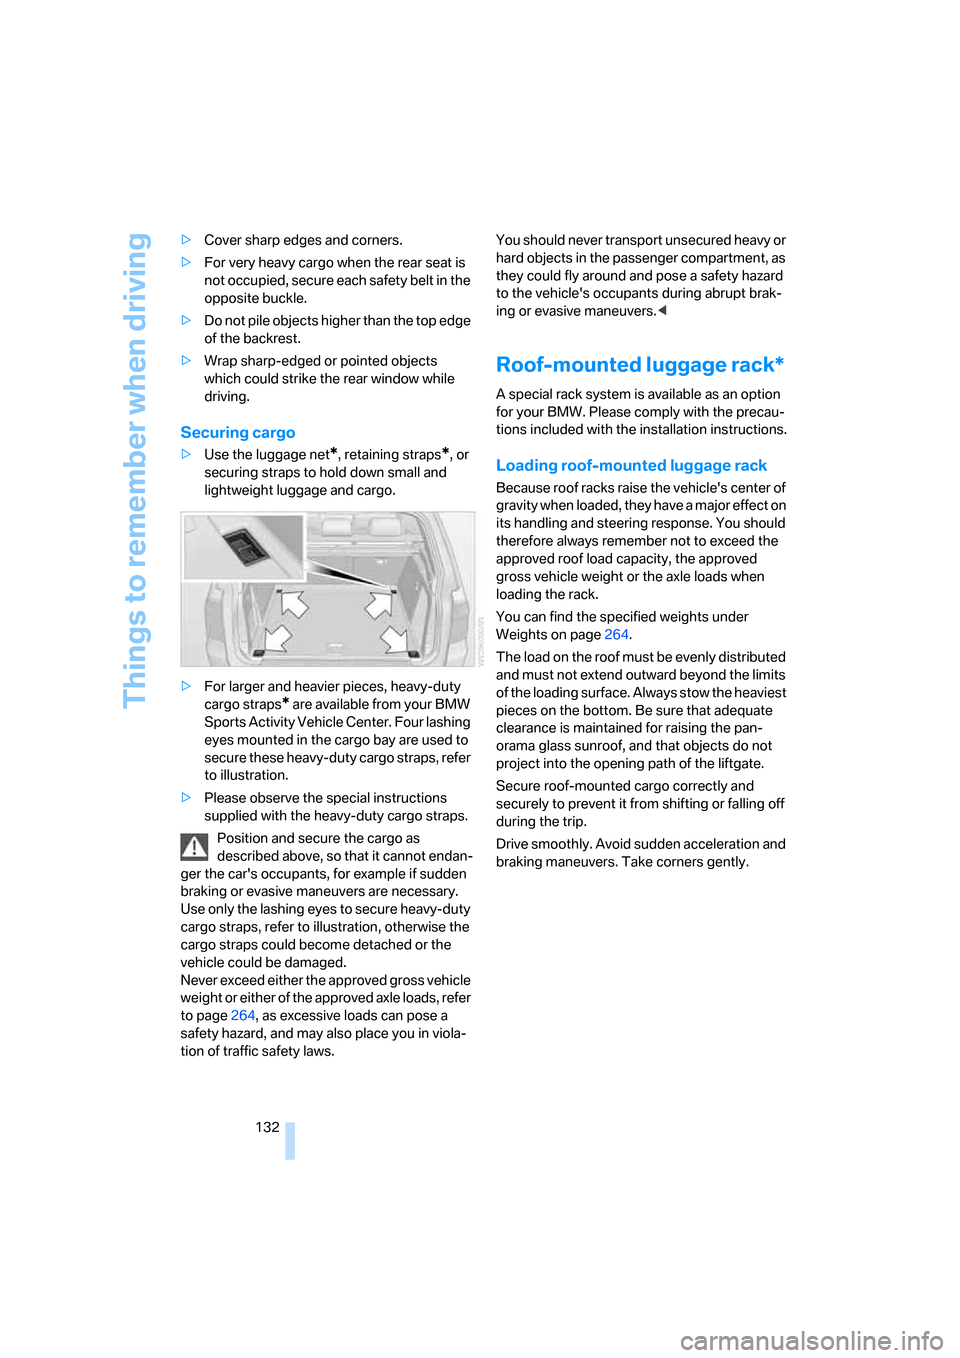
>For larger and heavier pieces, heavy-duty
cargo straps
* are available from your BMW
Sports Activity Vehicle Center. Four lashing
eyes mounted in the cargo bay are used to
secure these heavy-duty cargo straps, refer
to illustration.
>Please observe the special instructions
supplied with the heavy-duty cargo straps.
Position and secure the cargo as
described above, so that it cannot endan-
ger the car's occupants, for example if sudden
braking or evasive maneuvers are necessary.
Use only the lashing eyes to secure heavy-duty
cargo straps, refer to illustration, otherwise the
cargo straps could become detached or the
vehicle could be damaged.
Never exceed either the approved gross vehicle
weight or either of the approved axle loads, refer
to page264, as excessive loads can pose a
safety hazard, and may also place you in viola-
tion of traffic safety laws. You should never transport unsecured heavy or
hard objects in the passenger compartment, as
they could fly around and pose a safety hazard
to the vehicle's occupants during abrupt brak-
ing or evasive maneuvers.<
Roof-mounted luggage rack*
A special rack system is available as an option
for your BMW. Please comply with the precau-
tions included with the installation instructions.
Loading roof-mounted luggage rack
Because roof racks raise the vehicle's center of
gravity when loaded, they have a major effect on
its handling and steering response. You should
therefore always remember not to exceed the
approved roof load capacity, the approved
gross vehicle weight or the axle loads when
loading the rack.
You can find the specified weights under
Weights on page264.
The load on the roof must be evenly distributed
and must not extend outward beyond the limits
of the loading surface. Always stow the heaviest
pieces on the bottom. Be sure that adequate
clearance is maintained for raising the pan-
orama glass sunroof, and that objects do not
project into the opening path of the liftgate.
Secure roof-mounted cargo correctly and
securely to prevent it from shifting or falling off
during the trip.
Drive smoothly. Avoid sudden acceleration and
braking maneuvers. Take corners gently.
Page 278 of 292
Everything from A to Z
276 Engine oil
– adding243
– additives, refer to Approved
engine oils243
– approved engine oil243
– checking oil level242
– electronic oil level check242
"Engine oil level"243
Engine output, refer to Engine
data262
Engine overheating, refer to
Coolant temperature72
Engine speed262
Engine starting, refer to
Starting engine60
"Enter address"139
Entering country of
destination139
Entering destination139
Entering house number or
intersection140
Entering intersection140
Entering street140
"Entertainment"162
Entertainment sound output
on/off163
"Equalizer", refer to Tone
control165
Equalizer, refer to Tone
control165
"ESN"172
ESP Electronic Stability
Program, refer to DSC
Dynamic Stability
Control89
Event Data Recorders246
Exhaust system, refer to Hot
exhaust system129
Exterior mirrors51
– adjusting51
– automatic dimming
feature52
– automatic heating52
– folding in and out51
– tilting down passenger-side
exterior mirror52External audio device119
– refer to AUX-In
connection188
Eye for tow-starting and
towing, refer to Tow
fitting257
F
Fader, refer to Tone
control164
Failure messages, refer to
Check Control78
False alarm, refer to Avoiding
unintentional alarms36
Fastening safety belts, refer to
Safety belts48
– warning lamp49
Fastening system,
adaptive124
Fastest route for
navigation148
Fast forward
– CD changer178
– CD player178
– DVD changer183
"Fast route" for
navigation148
Fault displays, refer to Check
Control78
Filler neck for washer fluid68
First-aid kit256
Flashing during locking/
unlocking, refer to Setting
confirmation signals31
Flashlight119
Flat tire
– changing wheels251
– compact wheel251
– Flat Tire Monitor92
– run-flat tires93,95,239
– TPM Tire Pressure
Monitor94
Flat Tire Monitor FTM92
Fluid reservoir, refer to Filler
neck for washer fluid68
"FM", reception
range163,166FM, waveband166
Fog lamps105
– indicator lamp13,105
Folding display screen open/
closed, DVD system in
rear192
Folding rear seat backrest123
Footbrake, refer to Braking
safely129
Footwell lamps105
For your own safety5
4-wheel drive system, refer to
xDrive90
Fresh-air nozzles, refer to Air
vents106
Front airbags97
Front passenger airbags97
– deactivating98
– refer to Exception of front
passenger seat55
Front seat adjustment43
FTM Flat Tire Monitor92
– false alarms92
– indicating a flat tire93
– initializing the system92
– malfunction96
– snow chains240
– system limits92
– warning lamp93
Fuel233
– capacity264
– display72
– high-quality brands233
– quality233
– saving128
– specifications233
Fuel clock, refer to Fuel
gauge72
Fuel consumption display,
computer, average fuel
consumption73
Fuel display, refer to Fuel
gauge72
Fuel filler door232
– closing232
– opening232
– releasing manually232
Fuses253