seat adjustment BMW X5 4.8I 2010 E70 Owner's Manual
[x] Cancel search | Manufacturer: BMW, Model Year: 2010, Model line: X5 4.8I, Model: BMW X5 4.8I 2010 E70Pages: 300, PDF Size: 12.41 MB
Page 46 of 300
Adjusting
44 the upper body area periodically to readjust the
tension, in order to avoid a reduction in the
restraint of the safety belt.
If the center safety belt in the rear is used, the
larger backrest half must be locked, refer to
page124, otherwise the center safety belt has
no restraining action.<
Safety belts, refer to page49.
Seats
Note before adjusting
Never attempt to adjust or calibrate your
seat while the vehicle is moving. The seat
could respond with unexpected movement, and
the ensuing loss of vehicle control could lead to
an accident.
Never adjust manually adjustable seats while
the vehicle is moving, as otherwise the restrain-
ing effect of these seats during accidents could
be reduced.
Also on the passenger side, do not incline the
backrest too far to the rear while the vehicle is
being driven, otherwise there is a danger in the
event of an accident of sliding under the safety
belt, eliminating the protection normally pro-
vided by the belt.<
Also observe the information on damage to
safety belts on page50 and on the height of the
head restraints on page46.
Adjusting manually*
To ensure that the safety systems con-
tinue to provide optimized protection,
observe the adjustment instructions on
page43.
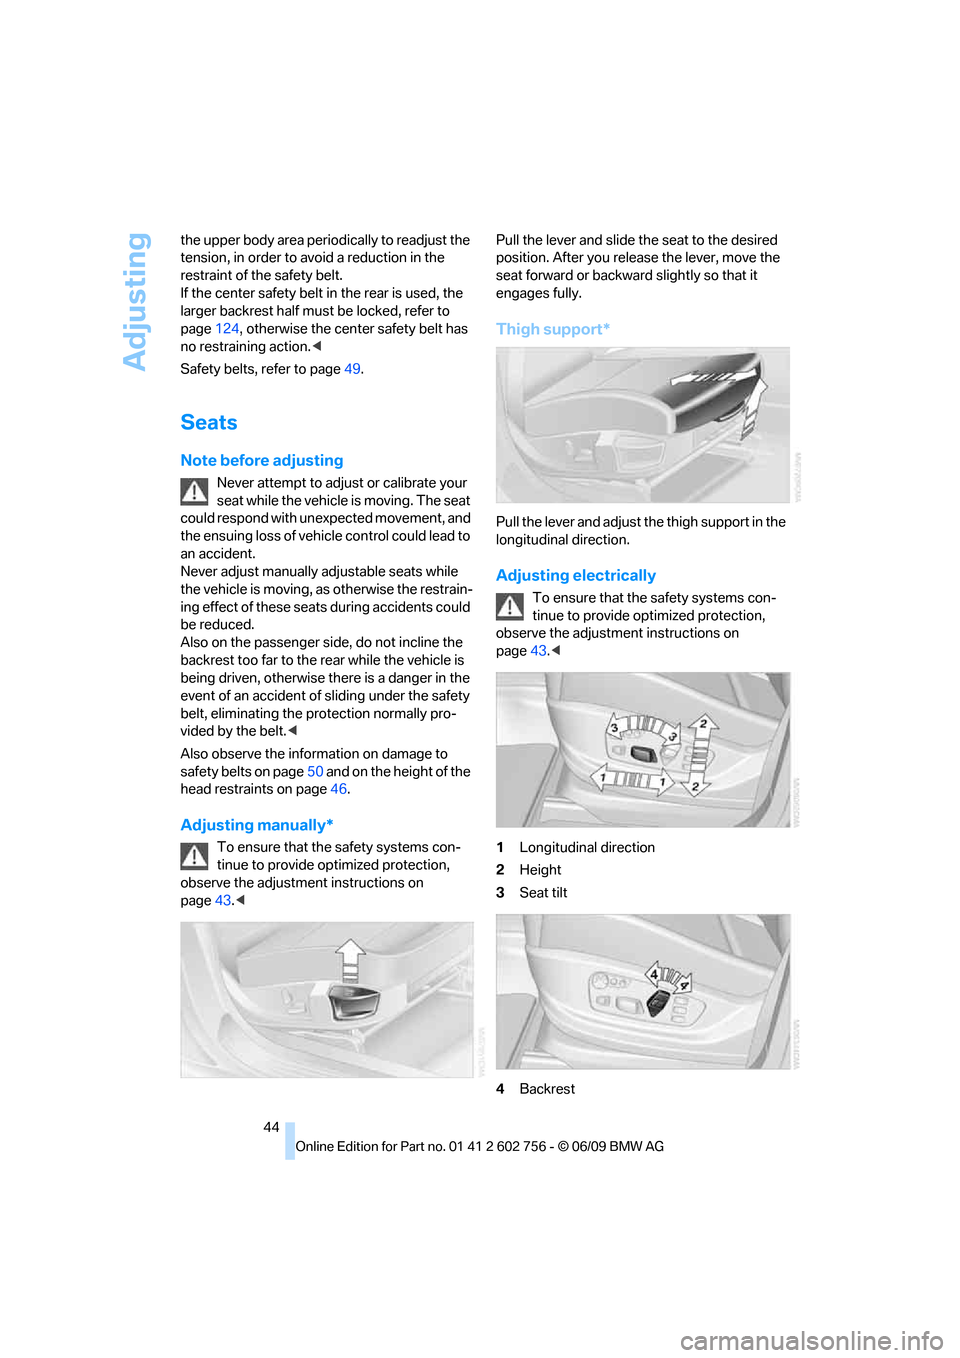
seat forward or backward slightly so that it
engages fully.
Thigh support*
Pull the lever and adjust the thigh support in the
longitudinal direction.
Adjusting electrically
To ensure that the safety systems con-
tinue to provide optimized protection,
observe the adjustment instructions on
page43.<
1Longitudinal direction
2Height
3Seat tilt
4Backrest
ba8_e70ag.book Seite 44 Freitag, 5. Juni 2009 11:42 11
Page 47 of 300
Controls
45Reference
At a glance
Driving tips
Communications
Navigation
Entertainment
Mobility
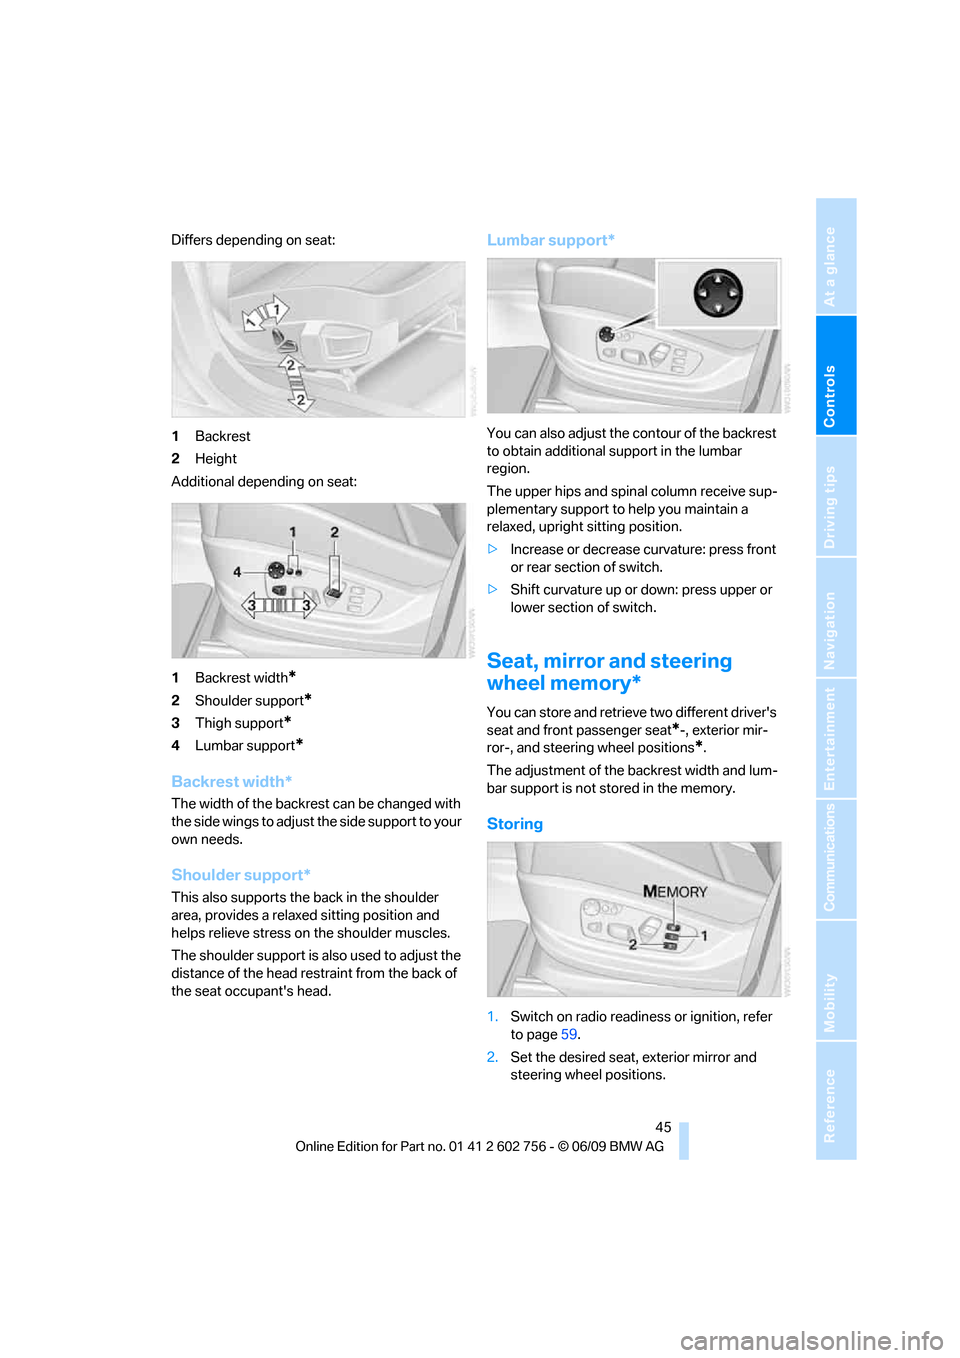
Differs depending on seat:
1Backrest
2Height
Additional depending on seat:
1Backrest width
*
2Shoulder support*
3Thigh support*
4Lumbar support*
Backrest width*
The width of the backrest can be changed with
the side wings to adjust the side support to your
own needs.
Shoulder support*
This also supports the back in the shoulder
area, provides a relaxed sitting position and
helps relieve stress on the shoulder muscles.
The shoulder support is also used to adjust the
distance of the head restraint from the back of
the seat occupant's head.
Lumbar support*
You can also adjust the contour of the backrest
to obtain additional support in the lumbar
region.
The upper hips and spinal column receive sup-
plementary support to help you maintain a
relaxed, upright sitting position.
>Increase or decrease curvature: press front
or rear section of switch.
>Shift curvature up or down: press upper or
lower section of switch.
Seat, mirror and steering
wheel memory*
You can store and retrieve two different driver's
seat and front passenger seat
*-, exterior mir-
ror-, and steering wheel positions
*.
The adjustment of the backrest width and lum-
bar support is not stored in the memory.
Storing
1.Switch on radio readiness or ignition, refer
to page59.
2.Set the desired seat, exterior mirror and
steering wheel positions.
ba8_e70ag.book Seite 45 Freitag, 5. Juni 2009 11:42 11
Page 48 of 300
Adjusting
46 3.Press the button:
The LED in the button lights up.
4.Press the desired memory button1 or2:
the LED goes out.
The positions of the driver's seat, the exte-
rior mirrors, and steering wheel are stored
for the remote control currently in use.
Activating
Do not activate the memory function
while the vehicle is moving. There is a risk
of accident from unexpected movement of the
seat or steering wheel.<
Comfort mode
1.After unlocking, open the driver's door or
switch on radio readiness, refer to page59.
2.Briefly press the desired memory button1
or 2.
The adjusting procedure is canceled if you
briefly press a seat-adjusting switch or one of
the memory buttons.
Safety feature
1.Close the driver's door and switch the igni-
tion on or off, refer to page59.
2.Press the desired memory button1 or2
and maintain pressure until the adjustment
process has been completed.
If the button was pressed inadvertently:
press the button again; the LED goes out.
Activating with the remote control
The driver's seat position last set is stored for
the remote control currently in use.
You can select whether or not the seat is reset
to that position automatically.
When using this feature, always make
sure that the footwell behind the driver's
seat is empty and unobstructed. Failure to do
so could cause injury to persons or damage to
objects behind the seat as a result of a rearward
movement of the seat.
the memory buttons.
Selecting automatic activation
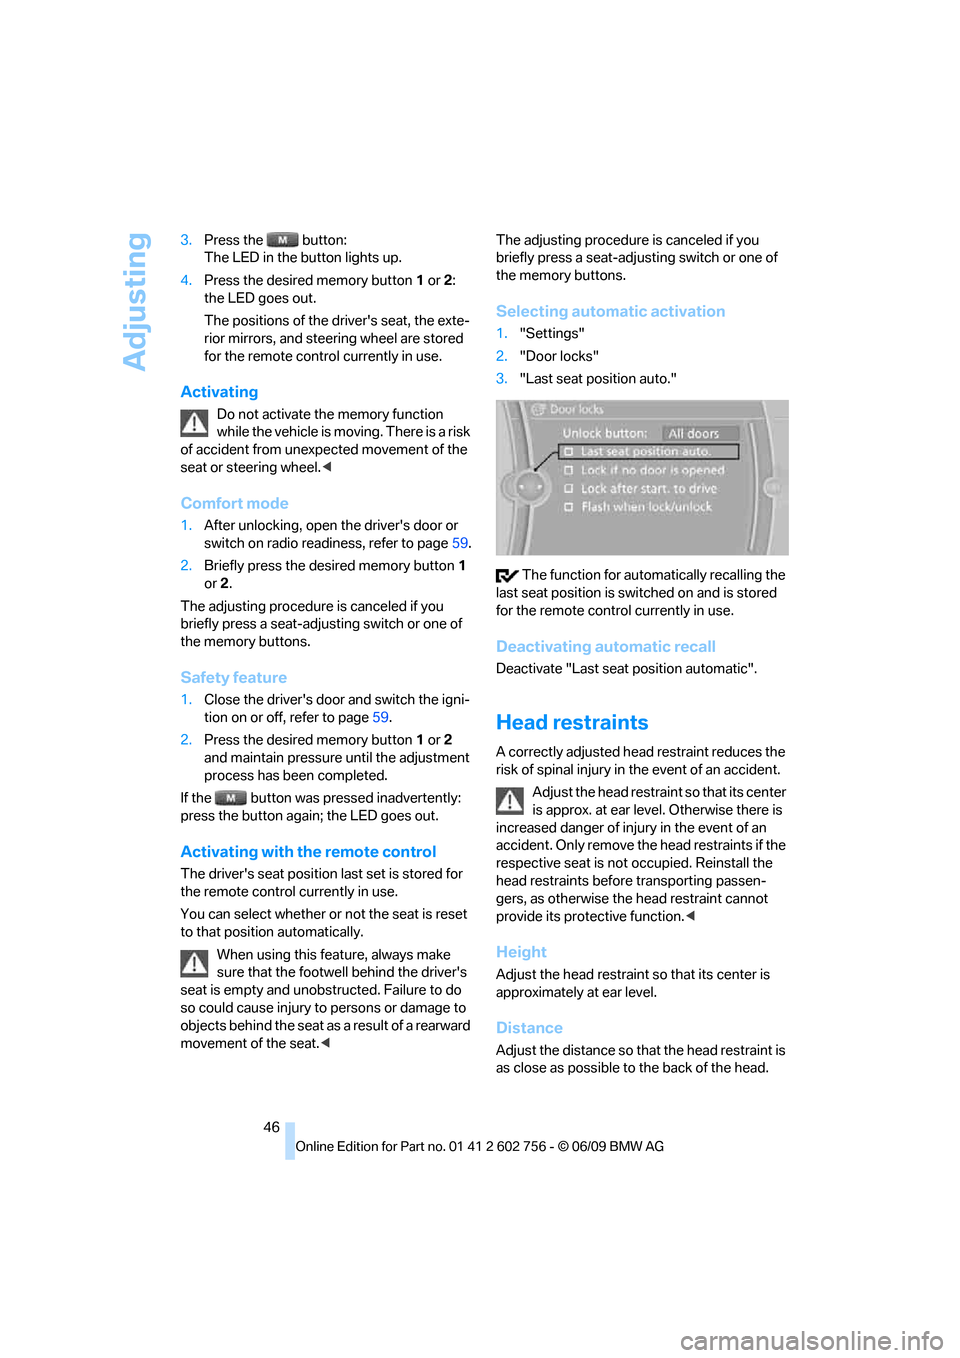
1."Settings"
2."Door locks"
3."Last seat position auto."
The function for automatically recalling the
last seat position is switched on and is stored
for the remote control currently in use.
Deactivating automatic recall
Deactivate "Last seat position automatic".
Head restraints
A correctly adjusted head restraint reduces the
risk of spinal injury in the event of an accident.
Adjust the head restraint so that its center
is approx. at ear level. Otherwise there is
increased danger of injury in the event of an
accident. Only remove the head restraints if the
respective seat is not occupied. Reinstall the
head restraints before transporting passen-
gers, as otherwise the head restraint cannot
provide its protective function.<
Height
Adjust the head restraint so that its center is
approximately at ear level.
Distance
Adjust the distance so that the head restraint is
as close as possible to the back of the head.
ba8_e70ag.book Seite 46 Freitag, 5. Juni 2009 11:42 11
Page 49 of 300
Controls
47Reference
At a glance
Driving tips
Communications
Navigation
Entertainment
Mobility
Active front head restraints
In the event of a rear-end collision of sufficient
severity, the active head restraint reduces the
distance to the head.
Do not use seat covers or head restraint
covers that could impede the proper
functioning of the active head restraint. Other-
wise, there is no assurance that the active head
restraint will perform its protective function and
it is not possible to take advantage of its injury-
reducing potential in the event of a rear-end
collision.
Have the active head restraints reset after they
are triggered in a rear-end collision. Have this
work carried out only at a BMW Sports Activity
Vehicle Center or at a workshop that works
according to BMW repair procedures with cor-
respondingly trained personnel. Otherwise,
correct operation of this safety equipment is not
guaranteed.<
Removal and installation of the front head
restraints should be performed by a BMW
Sports Activity Vehicle Center.<
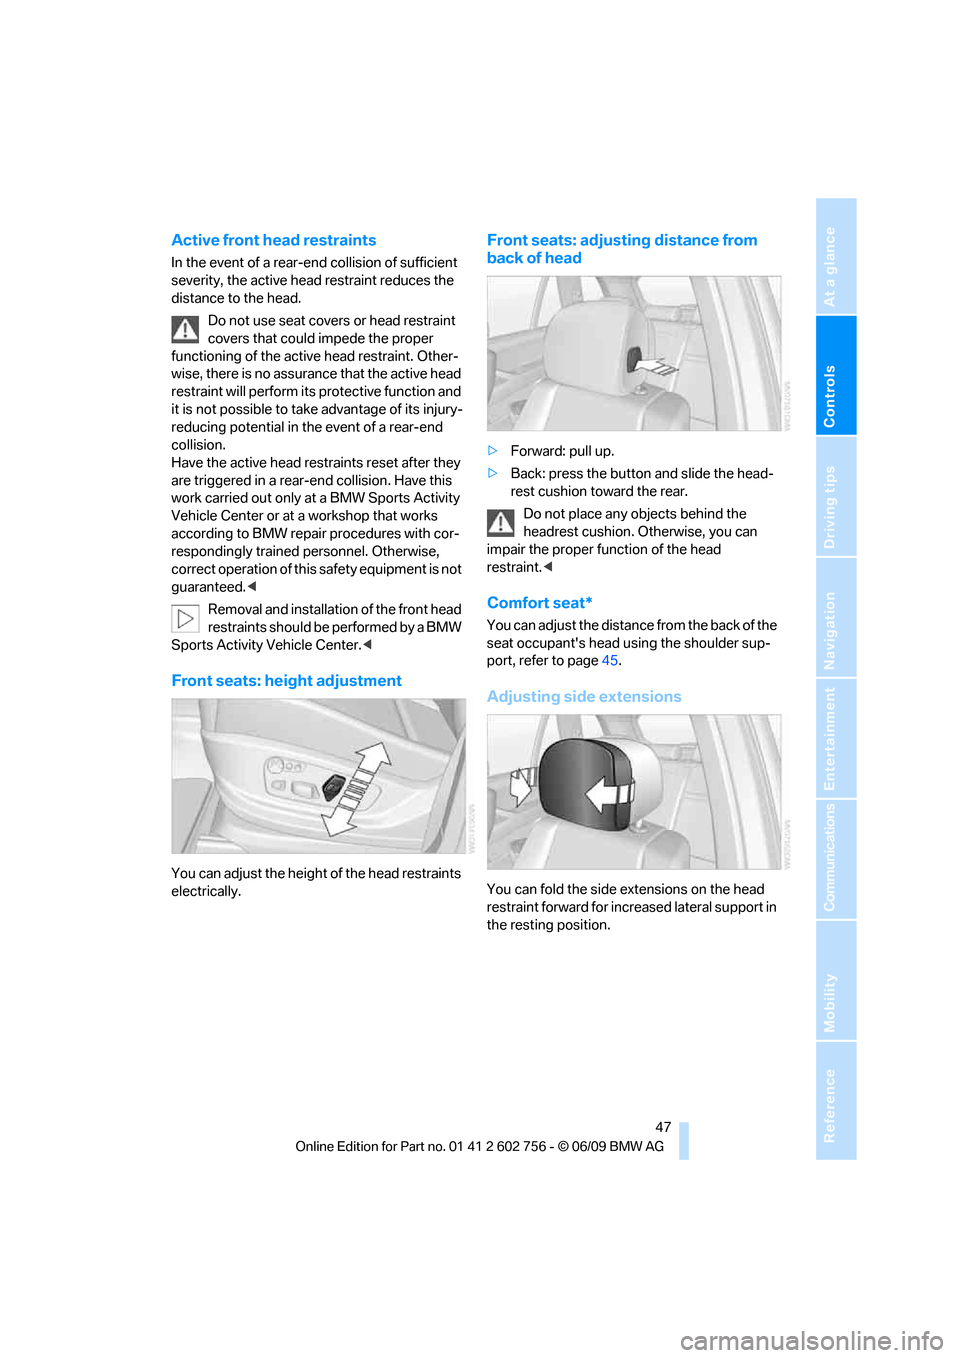
Front seats: height adjustment
You can adjust the height of the head restraints
electrically.
Front seats: adjusting distance from
back of head
>Forward: pull up.
>Back: press the button and slide the head-
rest cushion toward the rear.
Do not place any objects behind the
headrest cushion. Otherwise, you can
impair the proper function of the head
restraint.<
Comfort seat*
You can adjust the distance f r o m t h e b a c k o f t h e
seat occupant's head using the shoulder sup-
port, refer to page45.
Adjusting side extensions
You can fold the side extensions on the head
restraint forward for increased lateral support in
the resting position.
ba8_e70ag.book Seite 47 Freitag, 5. Juni 2009 11:42 11
Page 51 of 300
Controls
49Reference
At a glance
Driving tips
Communications
Navigation
Entertainment
Mobility
When folding back the 2nd row seats,
make sure that the footwell under the
2nd row seats is clear. Otherwise persons in the
3rd row seats could be injured or objects dam-
aged.<
Warning lamp for 2nd row seats:
lights up when the 2nd row seats are
not locked. A message also appears
on the Control Display.
3rd row seats*
The 3rd row seats are divided and offer space
for two persons.
Folding up backrest
Before folding the seats up, remove the roll-up
cover, refer to page122, and if need be, slide
the 2nd row seats slightly forward.
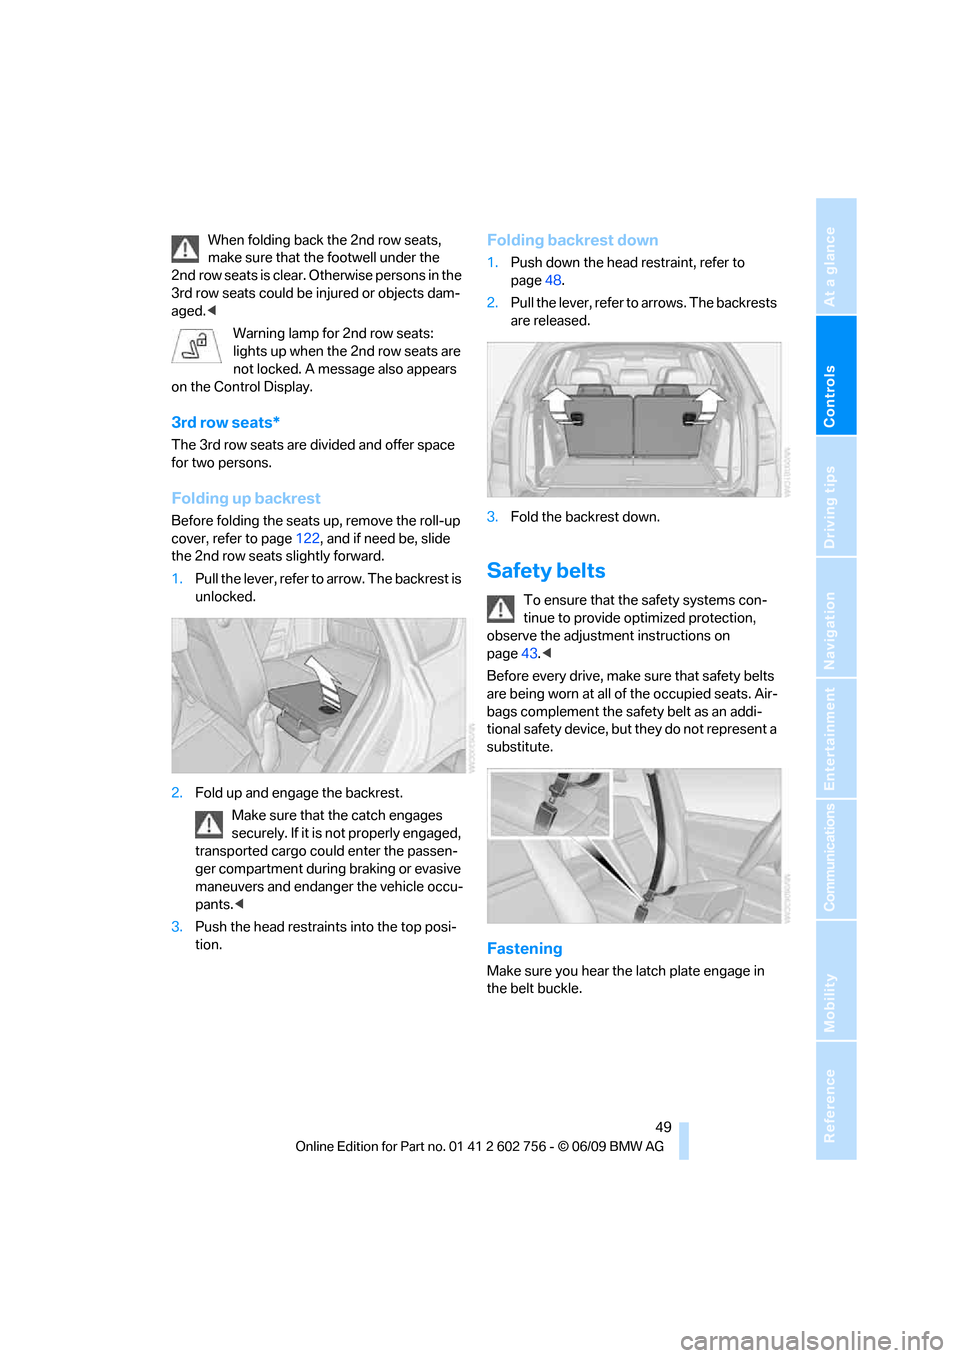
1.Pull the lever, refer to arrow. The backrest is
unlocked.
2.Fold up and engage the backrest.
Make sure that the catch engages
securely. If it is not properly engaged,
transported cargo could enter the passen-
ger compartment during braking or evasive
maneuvers and endanger the vehicle occu-
pants.<
3.Push the head restraints into the top posi-
tion.
Folding backrest down
1.Push down the head restraint, refer to
page48.
2.Pull the lever, refer to arrows. The backrests
are released.
3.Fold the backrest down.
Safety belts
To ensure that the safety systems con-
tinue to provide optimized protection,
observe the adjustment instructions on
page43.<
Before every drive, make sure that safety belts
are being worn at all of the occupied seats. Air-
bags complement the safety belt as an addi-
tional safety device, but they do not represent a
substitute.
Fastening
Make sure you hear the latch plate engage in
the belt buckle.
ba8_e70ag.book Seite 49 Freitag, 5. Juni 2009 11:42 11
Page 55 of 300
Controls
53Reference
At a glance
Driving tips
Communications
Navigation
Entertainment
Mobility
Tilting down passenger-side exterior
mirror – automatic curb monitor*
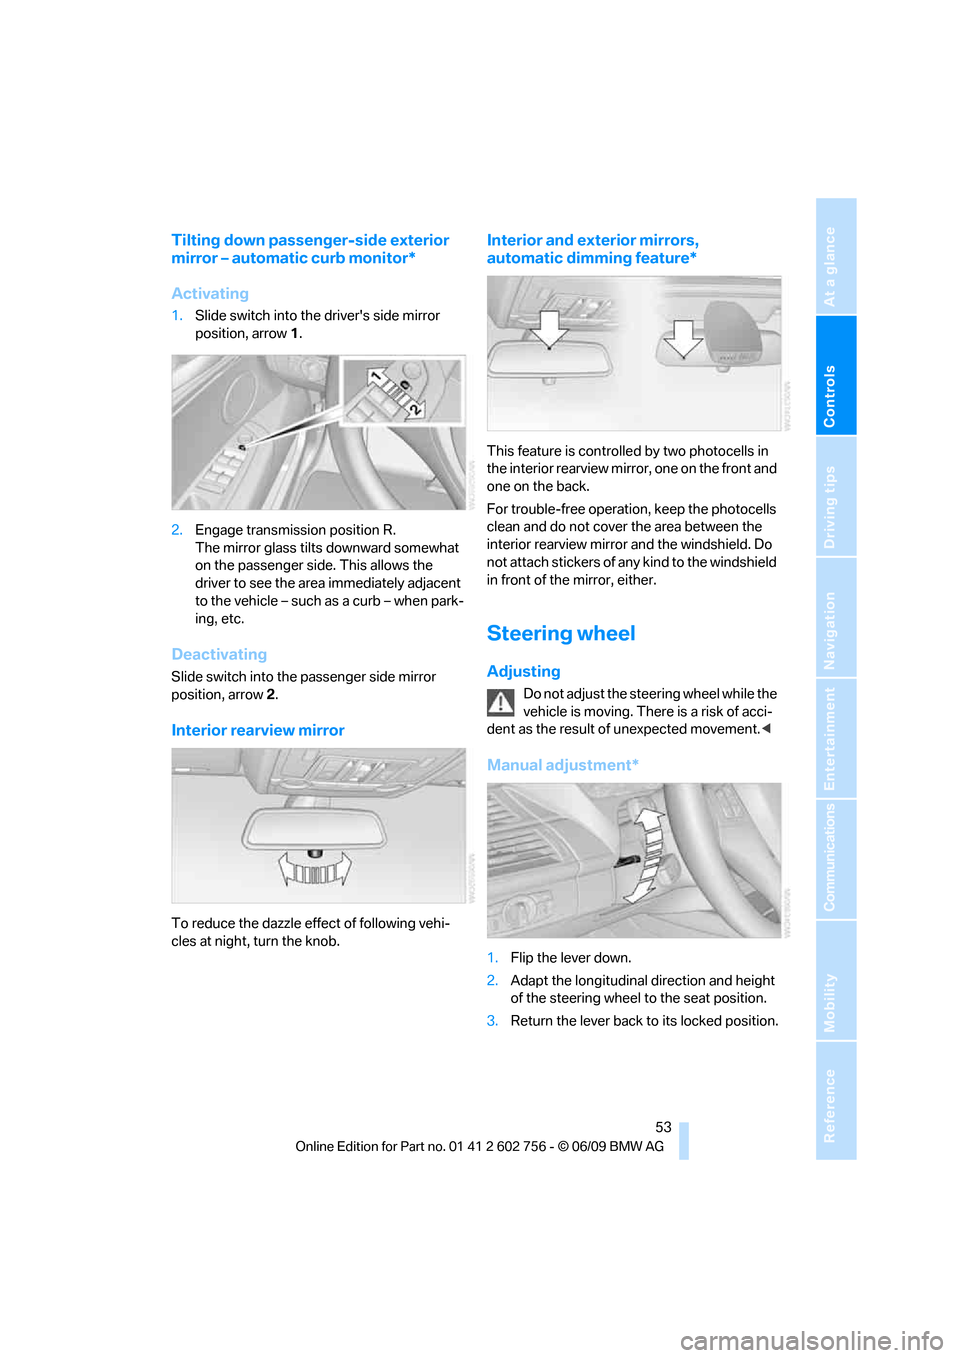
Activating
1.Slide switch into the driver's side mirror
position, arrow 1.
2.Engage transmission position R.
The mirror glass tilts downward somewhat
on the passenger side. This allows the
driver to see the area immediately adjacent
to the vehicle – such as a curb – when park-
ing, etc.
Deactivating
Slide switch into the passenger side mirror
position, arrow 2.
Interior rearview mirror
To reduce the dazzle effect of following vehi-
cles at night, turn the knob.
Interior and exterior mirrors,
automatic dimming feature*
This feature is controlled by two photocells in
the interior rearview mirror, one on the front and
one on the back.
For trouble-free operation, keep the photocells
clean and do not cover the area between the
interior rearview mirror and the windshield. Do
not attach stickers of any kind to the windshield
in front of the mirror, either.
Steering wheel
Adjusting
Do not adjust the steering wheel while the
vehicle is moving. There is a risk of acci-
dent as the result of unexpected movement.<
Manual adjustment*
1.Flip the lever down.
2.Adapt the longitudinal direction and height
of the steering wheel to the seat position.
3.Return the lever back to its locked position.
ba8_e70ag.book Seite 53 Freitag, 5. Juni 2009 11:42 11
Page 56 of 300
Adjusting
54
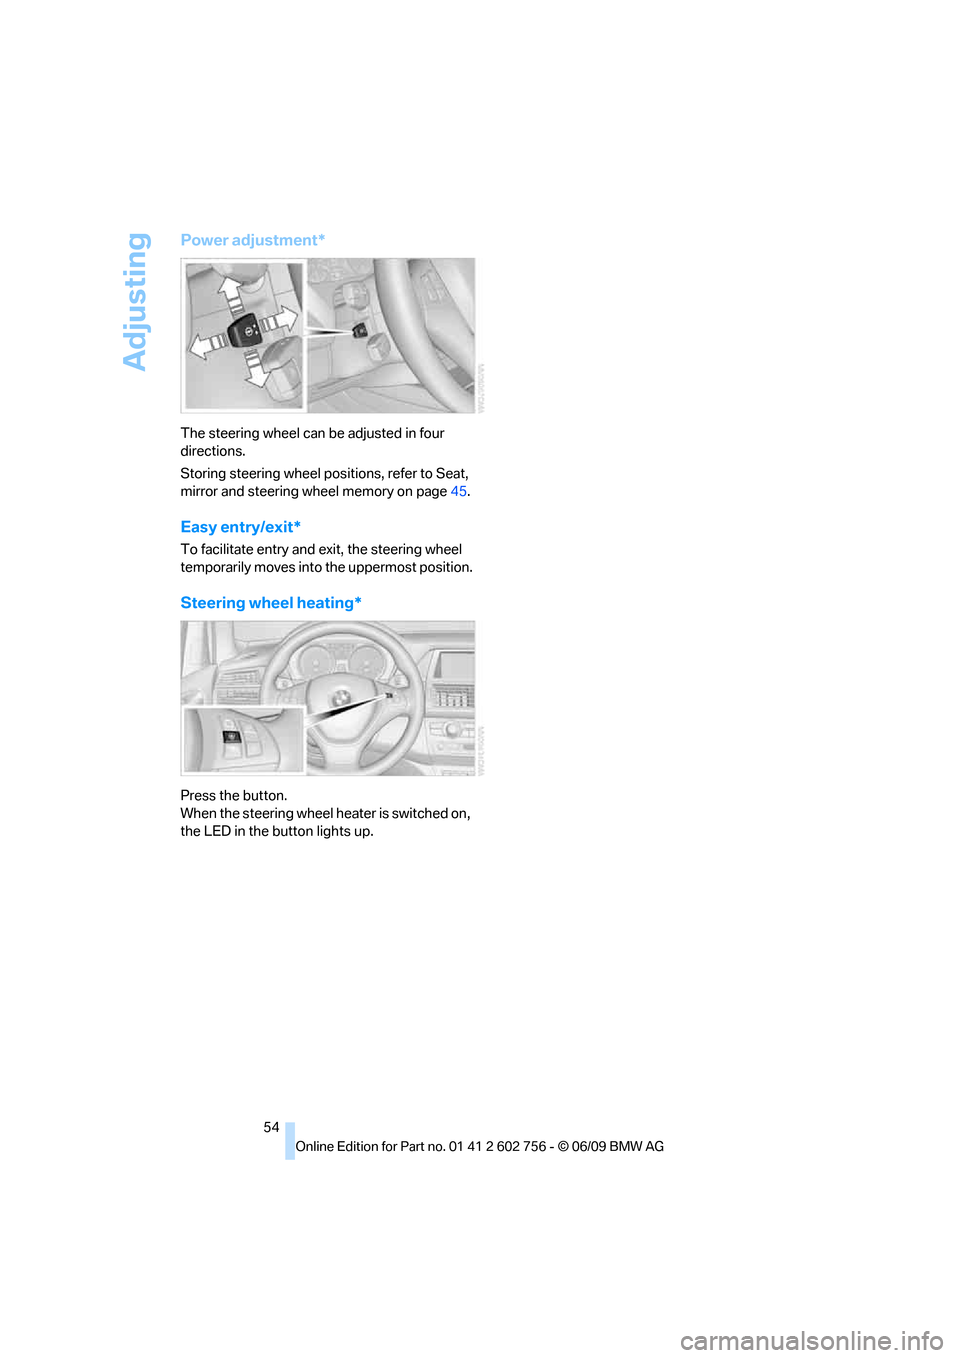
Power adjustment*
The steering wheel can be adjusted in four
directions.
Storing steering wheel positions, refer to Seat,
mirror and steering wheel memory on page45.
Easy entry/exit*
To facilitate entry and exit, the steering wheel
temporarily moves into the uppermost position.
Steering wheel heating*
Press the button.
When the steering wheel heater is switched on,
the LED in the button lights up.
ba8_e70ag.book Seite 54 Freitag, 5. Juni 2009 11:42 11
Page 57 of 300
Controls
55Reference
At a glance
Driving tips
Communications
Navigation
Entertainment
Mobility
Transporting children safely
The right place for children
Do not leave children unattended in the
vehicle, otherwise they could endanger
themselves and other persons, e.g. by opening
the doors.<
Children always in rear
Accident research shows that the safest place
for children is on the rear seat.
Children younger than 13 years of age or
with a height under 5 ft/150 cm may only
be transported on the 2nd row seats in child
restraint devices which correspond to the age,
weight and height of the child. Otherwise there
is an increased danger of injury in an accident.<
Children 13 years of age or older must wear a
safety belt as soon as a suitable child restraint
device can no longer be used due to their age,
weight and size.
Exception for front passenger seat
Should it be necessary to use a child
restraint device on the front passenger
seat, the front and side airbags on the passen-
ger side must be deactivated. Otherwise, there
is an increased risk of injury for the child if the
airbags are triggered, even with a child restraint
device.<
For more information on automatic deactivation
of the front passenger airbags, refer to page98.
Installing child restraint
devices
Follow the child restraint device manufac-
turer's instructions for selection, installa-
tion, and use of child restraint devices. Other-
wise, the degree of protection may be
reduced.
*, make sure that the seat of the 2nd
row seats on which the child restraint device is
mounted is properly locked. Otherwise there is
an increased risk of injury for the child in an
accident.
Do not mount child restraint devices on the
3rd row seats, as otherwise the protection pro-
vided by these child restraint devices may be
reduced.<
BMW X5: before mounting a child restraint
device in the center seat of the 2nd row seats,
move the outer seat cushions and backrests
into the rearmost positions.
On front passenger seat
After mounting a child restraint device on
the front passenger seat, make sure that
the front and side airbags on the front passen-
ger side are deactivated; otherwise, there is an
increased risk of injury if the airbags are trig-
gered.<
Seat position
Before installing a child restraint device, move
the passenger seat into the furthest back and
highest
* position in order to achieve the best
possible safety belt position. Do not change the
seat position after this.
Backrest width*
The backrest width adjustment of the
front passenger seat must be completely
open. After installing the child's seat, no mem-
ory position may be called up; otherwise, the
stability of the child's seat on the front passen-
ger seat is reduced.<
1.Open backrest width adjustment com-
pletely, refer to page45.
2.Install child's seat.
ba8_e70ag.book Seite 55 Freitag, 5. Juni 2009 11:42 11
Page 100 of 300
Technology for comfort, convenience and safety
98
Airbags
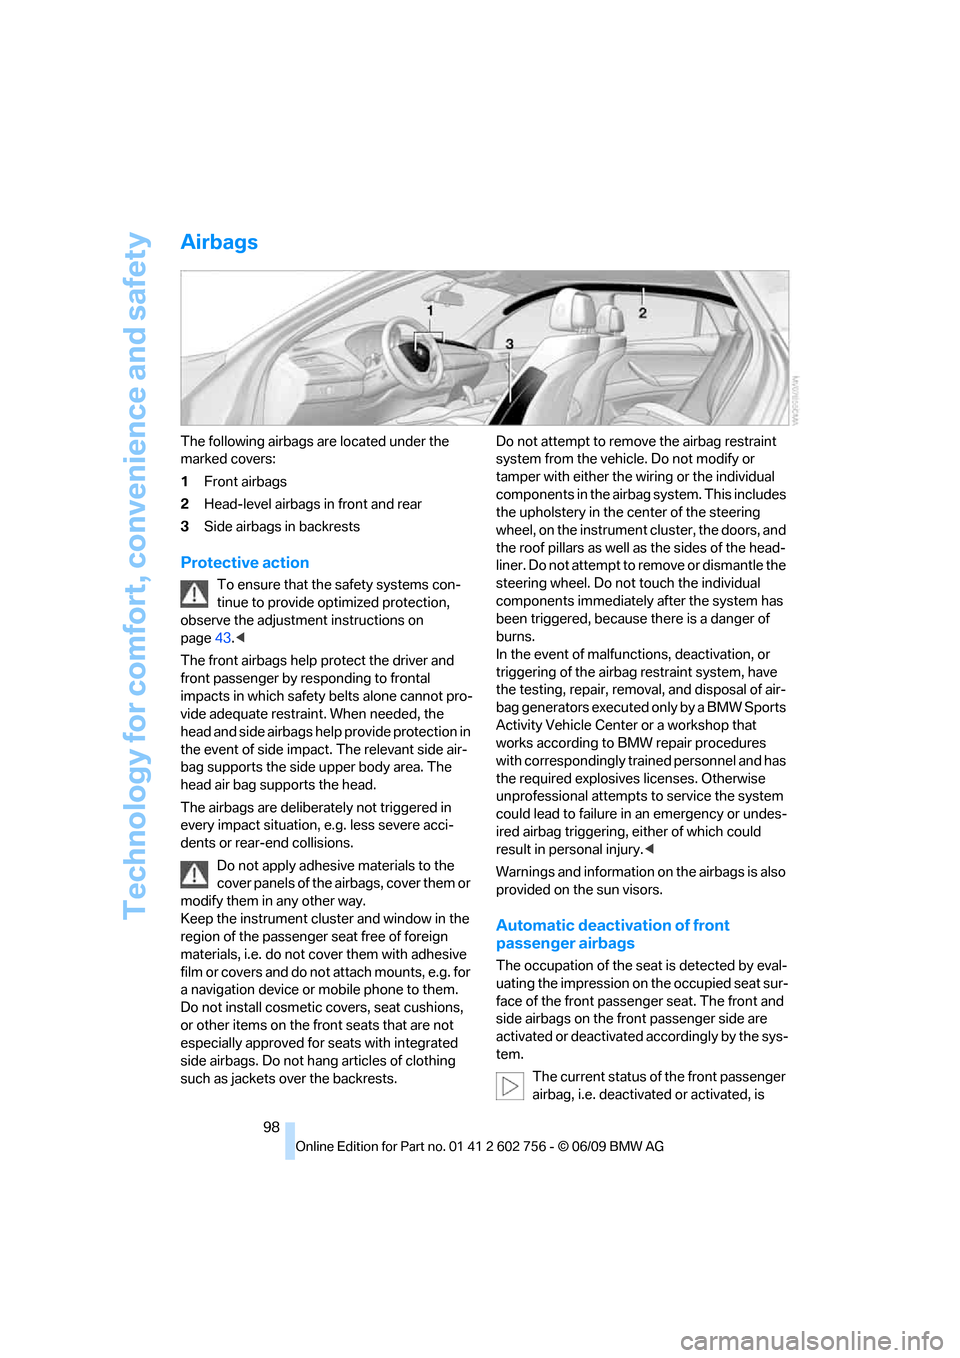
The following airbags are located under the
marked covers:
1Front airbags
2Head-level airbags in front and rear
3Side airbags in backrests
Protective action
To ensure that the safety systems con-
tinue to provide optimized protection,
observe the adjustment instructions on
page43.<
The front airbags help protect the driver and
front passenger by responding to frontal
impacts in which safety belts alone cannot pro-
vide adequate restraint. When needed, the
head and side airbags help provide protection in
the event of side impact. The relevant side air-
bag supports the side upper body area. The
head air bag supports the head.
The airbags are deliberately not triggered in
every impact situation, e.g. less severe acci-
dents or rear-end collisions.
Do not apply adhesive materials to the
cover panels of the airbags, cover them or
modify them in any other way.
Keep the instrument cluster and window in the
region of the passenger seat free of foreign
materials, i.e. do not cover them with adhesive
film or covers and do not attach mounts, e.g. for
a navigation device or mobile phone to them.
Do not install cosmetic covers, seat cushions,
or other items on the front seats that are not
especially approved for seats with integrated
side airbags. Do not hang articles of clothing
such as jackets over the backrests.Do not attempt to remove the airbag restraint
system from the vehicle. Do not modify or
tamper with either the wiring or the individual
components in the airbag system. This includes
the upholstery in the center of the steering
wheel, on the instrument cluster, the doors, and
the roof pillars as well as the sides of the head-
liner. Do not attempt to remove or dismantle the
steering wheel. Do not touch the individual
components immediately after the system has
been triggered, because there is a danger of
burns.
In the event of malfunctions, deactivation, or
triggering of the airbag restraint system, have
the testing, repair, removal, and disposal of air-
bag generators executed only by a BMW Sports
Activity Vehicle Center or a workshop that
works according to BMW repair procedures
with correspondingly trained personnel and has
the required explosives licenses. Otherwise
unprofessional attempts to service the system
could lead to failure in an emergency or undes-
ired airbag triggering, either of which could
result in personal injury.<
Warnings and information on the airbags is also
provided on the sun visors.
Automatic deactivation of front
passenger airbags
The occupation of the seat is detected by eval-
uating the impression on the occupied seat sur-
face of the front passenger seat. The front and
side airbags on the front passenger side are
activated or deactivated accordingly by the sys-
tem.
The current status of the front passenger
airbag, i.e. deactivated or activated, is
ba8_e70ag.book Seite 98 Freitag, 5. Juni 2009 11:42 11
Page 110 of 300
Climate
108
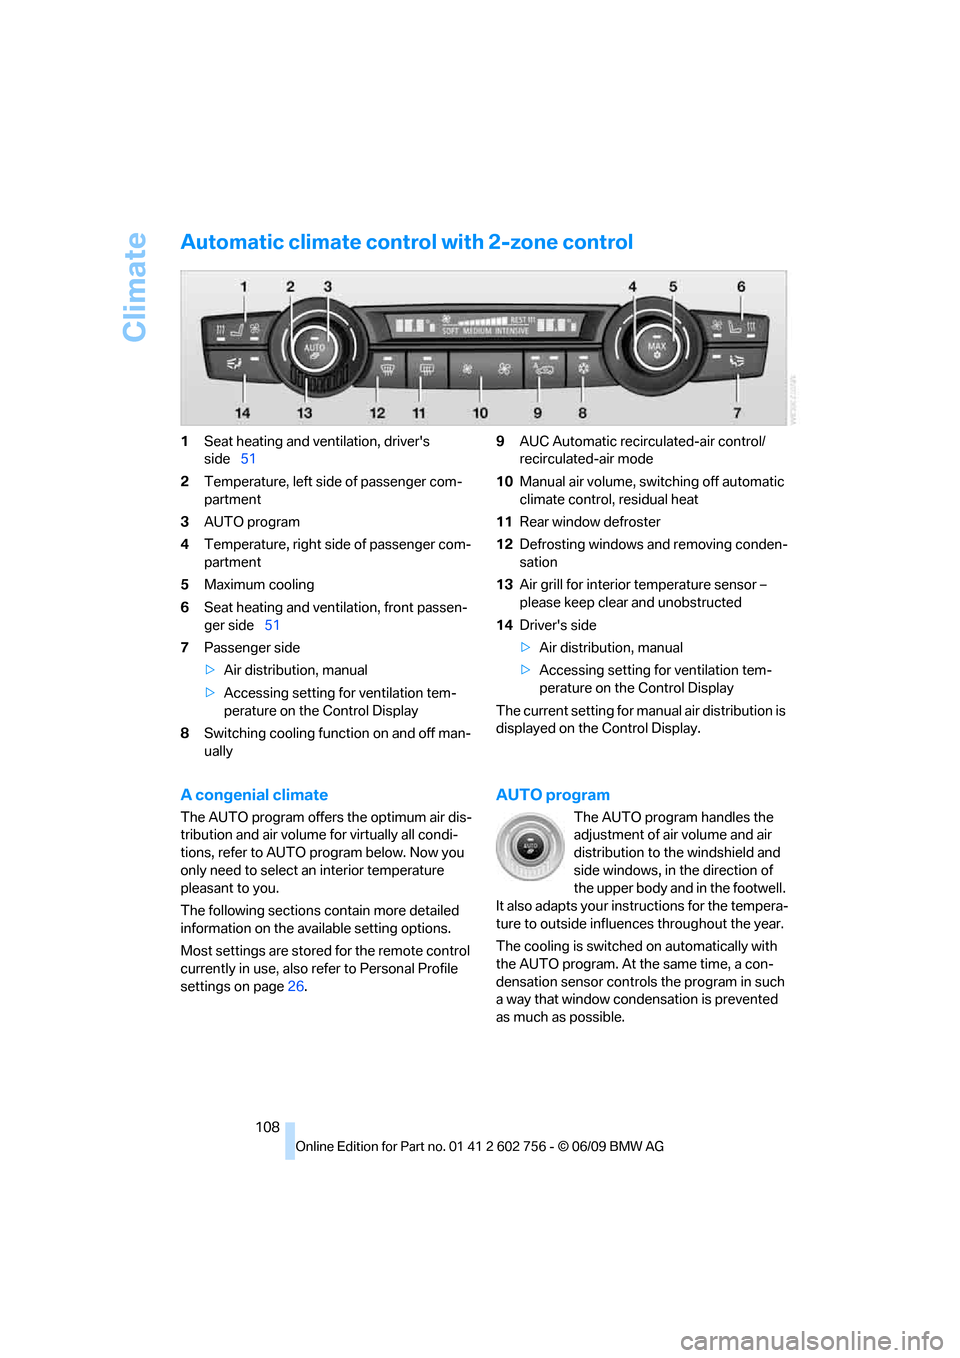
Automatic climate control with 2-zone control
1Seat heating and ventilation, driver's
side51
2Temperature, left side of passenger com-
partment
3AUTO program
4Temperature, right side of passenger com-
partment
5Maximum cooling
6Seat heating
and ventilation, front passen-
ger side51
7Passenger side
>Air distribution, manual
>Accessing setting for ventilation tem-
perature on the Control Display
8Switching cooling function on and off man-
ually9AUC Automatic recirculated-air control/
recirculated-air mode
10Manual air volume, switching off automatic
climate control, residual heat
11Rear window defroster
12Defrosting windows and removing conden-
sation
13Air grill for interior temperature sensor –
please keep clear and unobstructed
14Driver's side
>Air distribution, manual
>Accessing setting for ventilation tem-
perature on the Control Display
The current setting for manual air distribution is
displayed on the Control Display.
A congenial climate
The AUTO program offers the optimum air dis-
tribution and air volume for virtually all condi-
tions, refer to AUTO program below. Now you
only need to select an interior temperature
pleasant to you.
The following sections contain more detailed
information on the available setting options.
Most settings are stored for the remote control
currently in use, also refer to Personal Profile
settings on page26.
AUTO program
The AUTO program handles the
adjustment of air volume and air
distribution to the windshield and
side windows, in the direction of
the upper body and in the footwell.
It also adapts your instructions for the tempera-
ture to outside influences throughout the year.
The cooling is switched on automatically with
the AUTO program. At the same time, a con-
densation sensor controls the program in such
a way that window condensation is prevented
as much as possible.
ba8_e70ag.book Seite 108 Freitag, 5. Juni 2009 11:42 11