tailgate BMW X5 4.8IS 2005 E53 User Guide
[x] Cancel search | Manufacturer: BMW, Model Year: 2005, Model line: X5 4.8IS, Model: BMW X5 4.8IS 2005 E53Pages: 200, PDF Size: 3.55 MB
Page 137 of 200
137n
OverviewControlsMaintenanceRepairsDataIndex
General driving notesClosing liftgate/tailgate
Operate the vehicle only when the
tailgate and liftgate are completely
closed. Otherwise, exhaust fumes
could enter into the passenger com-
partment.<
However, if special circumstances
should make it absolutely necessary
to operate the vehicle with the liftgate/
tailgate open:
1. Close all windows and the panorama
glass sunroof
2. Increase the air supply for the air
conditioner or automatic climate
control to a high level, refer to
page108 or112.
Hot exhaust system
Extreme temperatures occur at
the catalytic converter on this and
every catalyst-equipped vehicle. Do not
remove the heat shields installed adja-
cent to various sections of the exhaust
system, and never apply undercoating
to them. When driving, standing at idle
and while parking take care to avoid
possible contact between a hot exhaust
system and any highly flammable mate-
rials such as hay, leaves, grass etc.
Otherwise there is a danger of ignition
and of a fire with the risk of serious inju-
ries and damage.
mobile radio devices such as por-
table phones inside the vehicle unless
they are directly connected to the
external antenna. Otherwise, it is
impossible to prevent a mutual interfer-
ence of the vehicle electronics with the
portable phone device. Also, there is no
guarantee that the radiation generated
by the transmission will be conveyed
out from the interior of the vehicle.<
When vehicle is parked Condensation forms in the air condi-
tioner system during operation, and
then exits under the vehicle. Traces of
water on the ground are therefore nor-
mal.Brakes
Do not drive with your foot resting
on the brake pedal. Even light but
consistent pedal pressure can lead to
excessively high temperatures, brake
wear and possibly even brake failure.<
Road hazards
If road hazards, obstacles or curbs
are unavoidable, only drive over
them very slowly and carefully, as oth-
erwise the wheels and suspension
parts, especially on vehicles fitted with
low profile tires, can be damaged.<
For more information on wheels and
tires, refer to page144.
Before driving into a car washFold in the exterior mirrors, refer to
page54, as otherwise they could be
damaged due to the width of the vehi-
cle.Hydroplaning
When driving on wet or slushy
roads, reduce road speed. If you
do not, a wedge of water can form
between tires and road surface. This
state can cause a partial or total loss of
contact with the road surface, of brak-
ing control and of control over the vehi-
cle.<
Page 162 of 200
162n
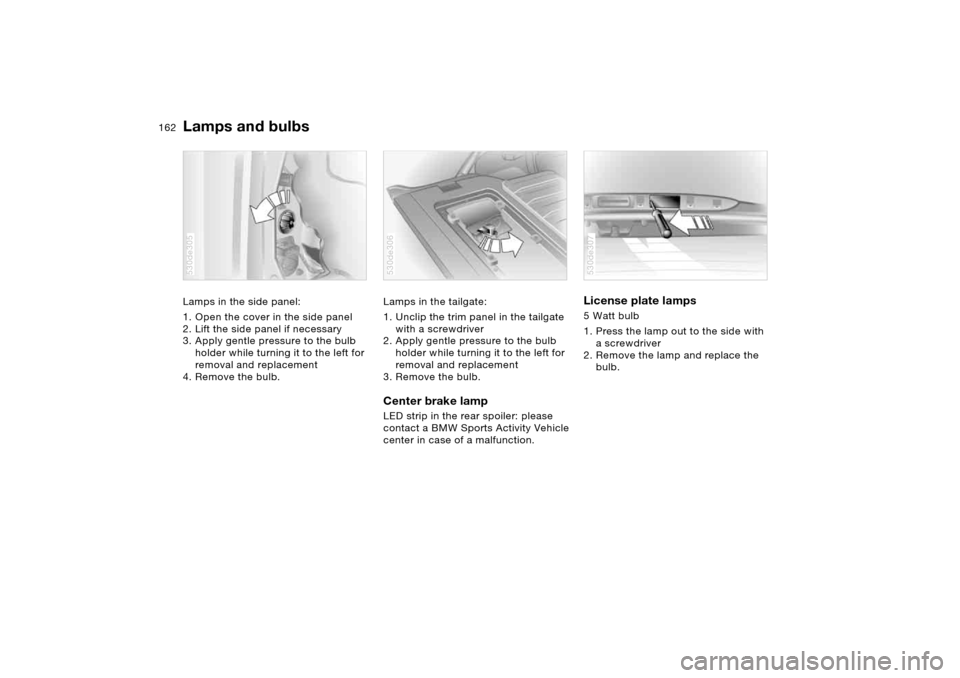
Lamps and bulbs Lamps in the side panel:
1. Open the cover in the side panel
2. Lift the side panel if necessary
3. Apply gentle pressure to the bulb
holder while turning it to the left for
removal and replacement
4. Remove the bulb. 530de305
Lamps in the tailgate:
1. Unclip the trim panel in the tailgate
with a screwdriver
2. Apply gentle pressure to the bulb
holder while turning it to the left for
removal and replacement
3. Remove the bulb. Center brake lamp LED strip in the rear spoiler: please
contact a BMW Sports Activity Vehicle
center in case of a malfunction. 530de306
License plate lamps 5 Watt bulb
1. Press the lamp out to the side with
ascrewdriver
2. Remove the lamp and replace the
bulb. 530de307
Page 164 of 200
164n
Changing a tire What you will need In order to avoid rattling noises later,
note the position of the tools when you
remove them and return them to their
original position when you are through
using them.
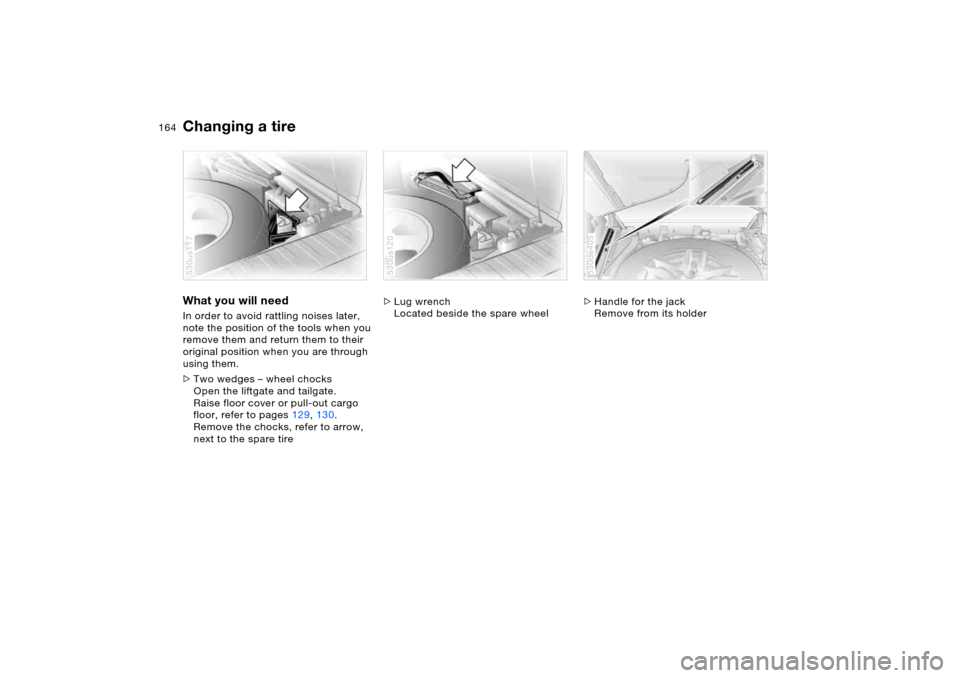
>Two wedges – wheel chocks
Open the liftgate and tailgate.
Raise floor cover or pull-out cargo
floor, refer to pages129,130.
Remove the chocks, refer to arrow,
next to the spare tire 530us117
>Lug wrench
Located beside the spare wheel 530us120
>Handle for the jack
Remove from its holder530de405
Page 165 of 200
165n
OverviewControlsMaintenanceRepairsDataIndex
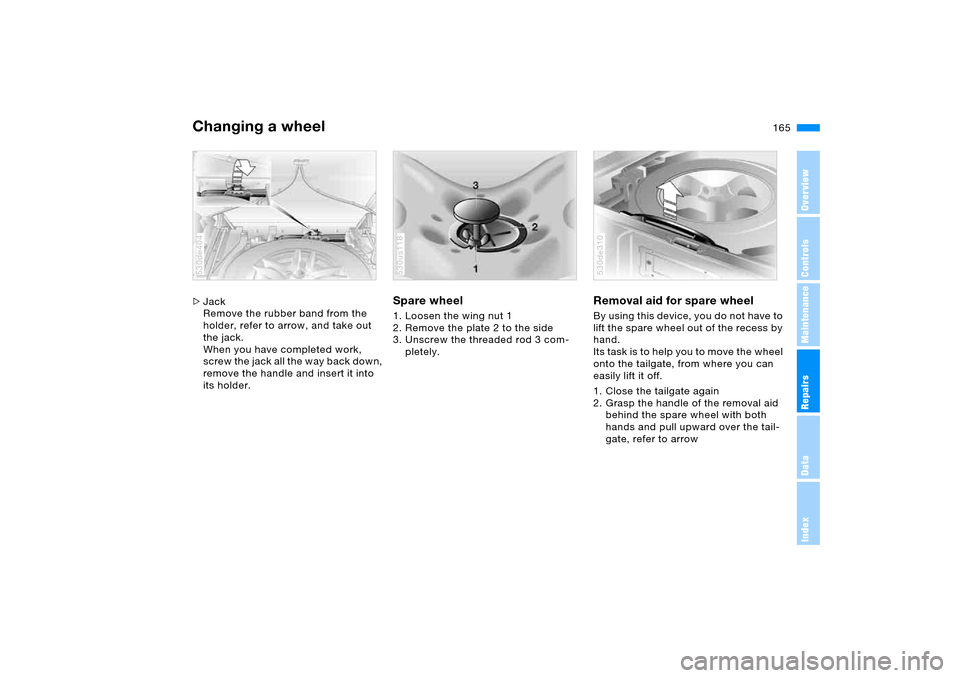
Changing a wheel >Jack
Remove the rubber band from the
holder, refer to arrow, and take out
the jack.
When you have completed work,
screw the jack all the way back down,
remove the handle and insert it into
its holder. 530de404
Spare wheel 1. Loosen the wing nut 1
2. Remove the plate 2 to the side
3. Unscrew the threaded rod 3 com-
pletely. 530us118
Removal aid for spare wheel By using this device, you do not have to
lift the spare wheel out of the recess by
hand.
Its task is to help you to move the wheel
onto the tailgate, from where you can
easily lift it off.
1. Close the tailgate again
2. Grasp the handle of the removal aid
behind the spare wheel with both
hands and pull upward over the tail-
gate, refer to arrow 530de310
Page 166 of 200
166n
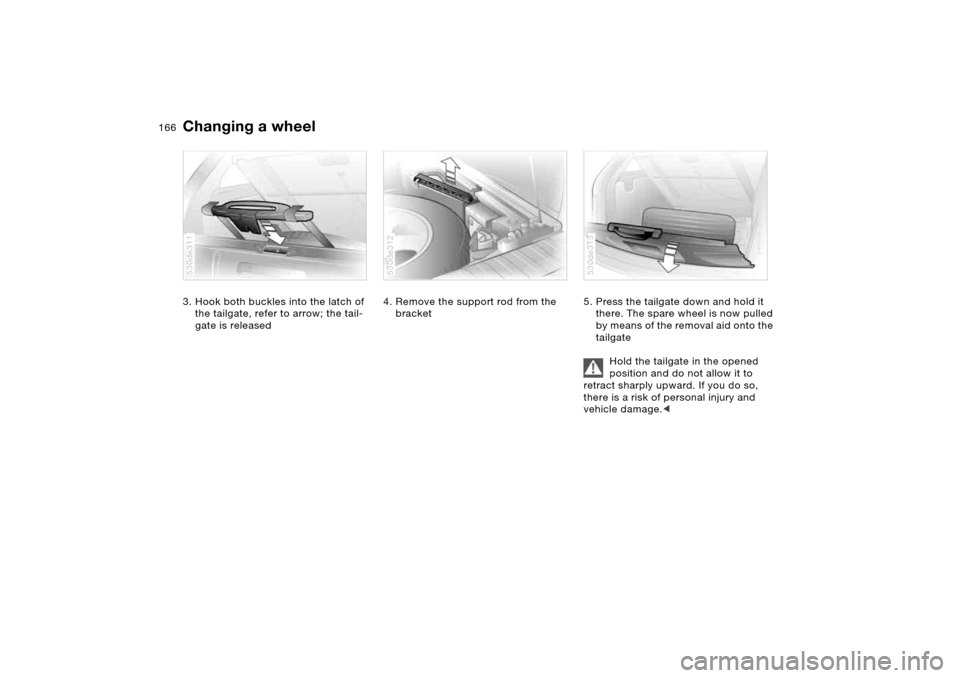
Changing a wheel 3. Hook both buckles into the latch of
the tailgate, refer to arrow; the tail-
gate is released 530de311
4. Remove the support rod from the
bracket 530de312
5. Press the tailgate down and hold it
there. The spare wheel is now pulled
by means of the removal aid onto the
tailgate
Hold the tailgate in the opened
position and do not allow it to
retract sharply upward. If you do so,
there is a risk of personal injury and
vehicle damage.<530de313
Page 167 of 200
167n
OverviewControlsMaintenanceRepairsDataIndex
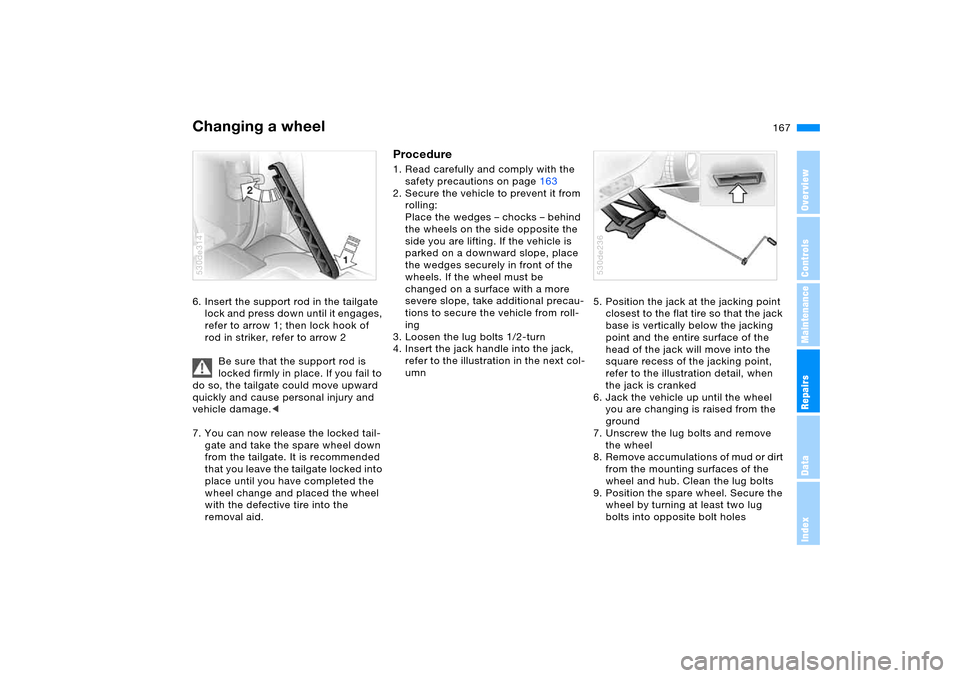
Changing a wheel 6. Insert the support rod in the tailgate
lock and press down until it engages,
refer to arrow 1; then lock hook of
rod in striker, refer to arrow 2
Be sure that the support rod is
locked firmly in place. If you fail to
do so, the tailgate could move upward
quickly and cause personal injury and
vehicle damage.<
7. You can now release the locked tail-
gate and take the spare wheel down
from the tailgate. It is recommended
that you leave the tailgate locked into
place until you have completed the
wheel change and placed the wheel
with the defective tire into the
removal aid. 530de314
Procedure1. Read carefully and comply with the
safety precautions on page163
2. Secure the vehicle to prevent it from
rolling:
Place the wedges – chocks – behind
the wheels on the side opposite the
side you are lifting. If the vehicle is
parked on a downward slope, place
the wedges securely in front of the
wheels. If the wheel must be
changed on a surface with a more
severe slope, take additional precau-
tions to secure the vehicle from roll-
ing
3. Loosen the lug bolts 1/2-turn
4. Insert the jack handle into the jack,
refer to the illustration in the next col-
umn5. Position the jack at the jacking point
closest to the flat tire so that the jack
base is vertically below the jacking
point and the entire surface of the
head of the jack will move into the
square recess of the jacking point,
refer to the illustration detail, when
the jack is cranked
6. Jack the vehicle up until the wheel
you are changing is raised from the
ground
7. Unscrew the lug bolts and remove
the wheel
8. Remove accumulations of mud or dirt
from the mounting surfaces of the
wheel and hub. Clean the lug bolts
9. Position the spare wheel. Secure the
wheel by turning at least two lug
bolts into opposite bolt holes
530de236
Page 168 of 200
168n
Changing a wheel Vehicle battery 10. Screw in the remaining lug bolts.
Tighten all the bolts securely in a
diagonal pattern
11. Lower the jack and remove it from
beneath the vehicle
12. Tighten the lug bolts in a diagonal
pattern
13. Check and correct the tire inflation
pressure at the earliest opportunity.
After mounting the spare wheel or
correcting the inflation pressure,
reinitialize the Flat Tire Monitor,
refer to page102.
Protect valve stems and valves from dirt
using screw-on valve stem caps. Dirt in
the valve stems frequently leads to slow
leaks.
The vehicle jack is designed for
changing wheels only. Do not
attempt to raise another vehicle model
with it or to raise any load of any kind.
To do so could cause accidents and
personal injury.
To ensure safety, always have the lug
bolts checked with a calibrated torque
wrench as soon as possible to ensure
that they are tightened to the specified
torque. The tightening torque is
101 ft-lb/140 Nm.<
Store the wheel and the tools in the
order opposite that for removal.
Before removing the support rod,
be sure that the tailgate is held
down firmly. If you fail to do so, it could
retract sharply upward and cause per-
sonal injury and vehicle damage.
After you remove the rod, close the tail-
gate carefully. Continue to hold it firmly
until it is completely closed.<
If light-alloy wheels other than Genuine
BMW light-alloy wheels have been
mounted, it may be necessary to use
different lug bolts for those wheels.
Replace the defective tire as soon as
possible and have the new wheel/tire
balanced. Driving with spare wheel
Do not exceed a speed of
130 mph/210 km/h, otherwise tire
damage could lead to accidents.<
With certain wheel-and-tire com-
binations the size of the spare
wheel differs from that of the other
wheels. To restore the original state,
the normal wheel should be remounted
as soon as possible.<
Battery posts, terminals and
related accessories contain lead
and lead compounds. Wash hands after
handling.<
Battery care The battery is maintenance-free, that is,
the original electrolyte will normally last
for the service life of the battery under
moderate climatic conditions. Your
BMW Sports Activity Vehicle center will
be glad to advise in all matters con-
cerning the battery.Charging battery Only charge the battery in the vehicle
via the terminals in the engine compart-
ment with the engine off. For correct
connections, refer to Jump starting on
page171. Disposal
Following replacement, have old
batteries disposed of by your
BMW Sports Activity Vehicle center or
hand them in to a recycling center.
Maintain the battery in an upright posi-
tion for transport and storage. Always
restrain the battery to prevent it from
tipping over during transport.<
Page 185 of 200
Everything from A to Z
185n
OverviewControlsMaintenanceRepairsDataIndex
B
Backrests, refer to Adjusting
seats45,46
Backup lamps67
replacing bulbs161
Bandages, refer to First-aid
kit24
Bar, towing173
Battery168
disposal168
indicator lamp19
jump starting171
power failure169
remote control30
Belts, refer to Safety belts49
Beverage holder, refer to
Cup holders121
Black ice, refer to Ice
warning76
Blower
air conditioner108
automatic climate
control112
refer to Air
supply108,112
BMW High Performance
Synthetic Oil151
BMW Maintenance
System154Bottle holder, refer to Cup
holders121
Brake fluid153
adding153
level153
replacing153
warning lamp19
Brake Force Display101
Brake hydraulic system140
warning lamp19,20
Brake lamps, replacing
bulbs161
Brake pads140
breaking-in136
warning lamp19,21
Brake rotors
brake system140
breaking-in136
Brake system
brake fluid153
brake fluid level140,153
brake pads140
breaking-in136
disc brakes140
warning lamp19
Brake wear warning
brake pads140
indicator lamp19,21Brakes140
ABS94
brake fluid153
brake pads140
breaking-in136
handbrake66
indicator/warning
lamp19,20
Breakdown assistance, refer
to Roadside
Assistance170
Breakdown, Flat Tire
Monitor101
Breaking-in136
Buttons on steering
wheel23
C
California Proposition
65 Warning9
Calling, refer to telephone
Owner's Manual
Can holders, refer to Cup
holders121
Capacities181
cargo area180
Car care, refer to Caring for
your vehicle brochure
Car keys, refer to Keys30
Car radio, refer to Owner's
Manual for Radio/Onboard
ComputerCar telephone
preparation119
Car telephone, refer to
separate Owner's Manual
Car vacuum cleaner,
connecting, refer to
Power socket122
Car wash, refer to Caring for
your vehicle brochure
Car-care products, refer to
Caring for your vehicle
brochure
Care of paintwork, refer to
Caring for your vehicle
brochure
Care, refer to Caring for your
vehicle brochure
Cargo area126
capacity180
cover, refer to Roll-up
cover126
emergency operation,
refer to Unlocking
manually35,36
floor cover129
increasing capacity126
lamps106
lid, refer to Liftgate/
tailgate35,36
opening, remote
control31
Cargo floor, pull-out130
Page 188 of 200
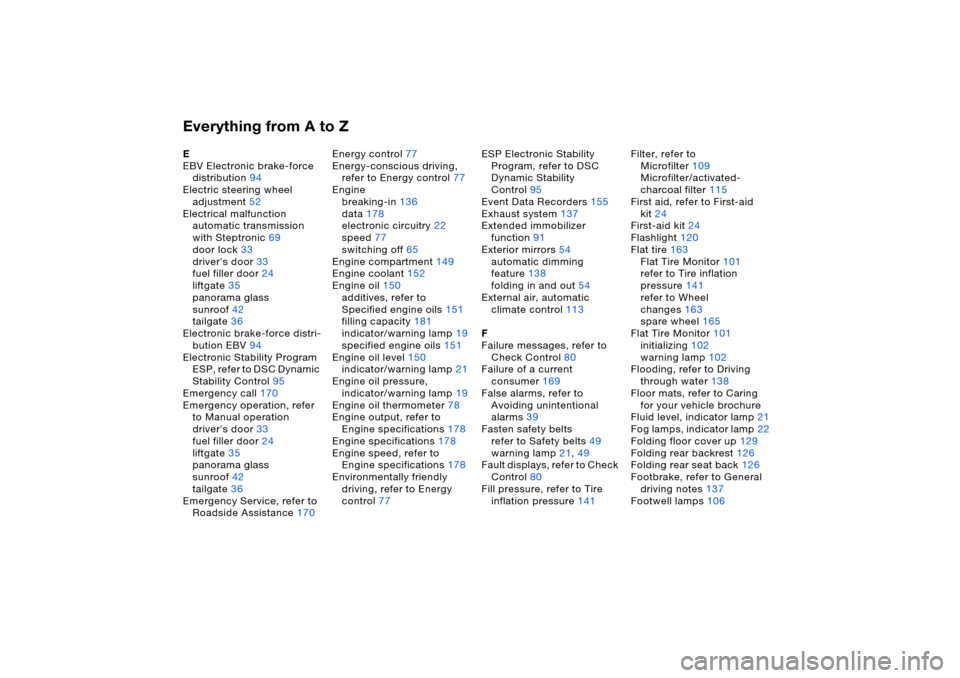
Everything from A to ZE
EBV Electronic brake-force
distribution94
Electric steering wheel
adjustment52
Electrical malfunction
automatic transmission
with Steptronic69
door lock33
driver's door33
fuel filler door24
liftgate35
panorama glass
sunroof42
tailgate36
Electronic brake-force distri-
bution EBV94
Electronic Stability Program
ESP, refer to DSC Dynamic
Stability Control95
Emergency call170
Emergency operation, refer
to Manual operation
driver's door33
fuel filler door24
liftgate35
panorama glass
sunroof42
tailgate36
Emergency Service, refer to
Roadside Assistance170Energy control77
Energy-conscious driving,
refer to Energy control77
Engine
breaking-in136
data178
electronic circuitry22
speed77
switching off65
Engine compartment149
Engine coolant152
Engine oil150
additives, refer to
Specified engine oils151
filling capacity181
indicator/warning lamp19
specified engine oils151
Engine oil level150
indicator/warning lamp21
Engine oil pressure,
indicator/warning lamp19
Engine oil thermometer78
Engine output, refer to
Engine specifications178
Engine specifications178
Engine speed, refer to
Engine specifications178
Environmentally friendly
driving, refer to Energy
control77ESP Electronic Stability
Program, refer to DSC
Dynamic Stability
Control95
Event Data Recorders155
Exhaust system137
Extended immobilizer
function91
Exterior mirrors54
automatic dimming
feature138
folding in and out54
External air, automatic
climate control113
F
Failure messages, refer to
Check Control80
Failure of a current
consumer169
False alarms, refer to
Avoiding unintentional
alarms39
Fasten safety belts
refer to Safety belts49
warning lamp21,49
Fault displays, refer to Check
Control80
Fill pressure, refer to Tire
inflation pressure141Filter, refer to
Microfilter109
Microfilter/activated-
charcoal filter115
First aid, refer to First-aid
kit24
First-aid kit24
Flashlight120
Flat tire163
Flat Tire Monitor101
refer to Tire inflation
pressure141
refer to Wheel
changes163
spare wheel165
Flat Tire Monitor101
initializing102
warning lamp102
Flooding, refer to Driving
through water138
Floor mats, refer to Caring
for your vehicle brochure
Fluid level, indicator lamp21
Fog lamps, indicator lamp22
Folding floor cover up129
Folding rear backrest126
Folding rear seat back126
Footbrake, refer to General
driving notes137
Footwell lamps106
Page 190 of 200
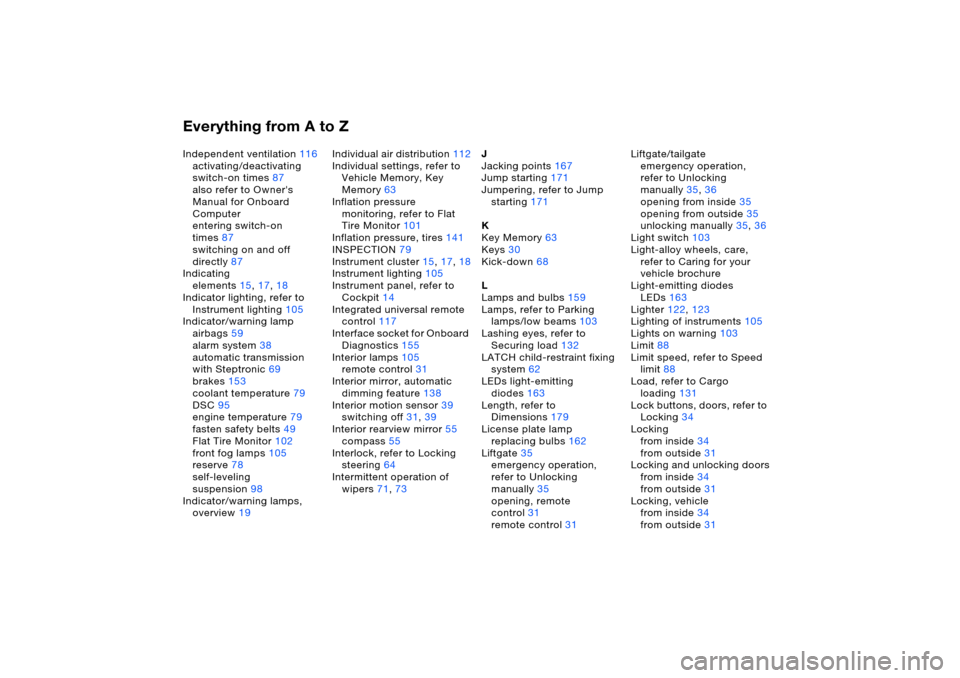
Everything from A to ZIndependent ventilation116
activating/deactivating
switch-on times87
also refer to Owner's
Manual for Onboard
Computer
entering switch-on
times87
switching on and off
directly87
Indicating
elements15,17,18
Indicator lighting, refer to
Instrument lighting105
Indicator/warning lamp
airbags59
alarm system38
automatic transmission
with Steptronic69
brakes153
coolant temperature79
DSC95
engine temperature79
fasten safety belts49
Flat Tire Monitor102
front fog lamps105
reserve78
self-leveling
suspension98
Indicator/warning lamps,
overview19Individual air distribution112
Individual settings, refer to
Vehicle Memory, Key
Memory63
Inflation pressure
monitoring, refer to Flat
Tire Monitor101
Inflation pressure, tires141
INSPECTION79
Instrument cluster15,17,18
Instrument lighting105
Instrument panel, refer to
Cockpit14
Integrated universal remote
control117
Interface socket for Onboard
Diagnostics155
Interior lamps105
remote control31
Interior mirror, automatic
dimming feature138
Interior motion sensor39
switching off31,39
Interior rearview mirror55
compass55
Interlock, refer to Locking
steering64
Intermittent operation of
wipers71,73J
Jacking points167
Jump starting171
Jumpering, refer to Jump
starting171
K
Key Memory63
Keys30
Kick-down68
L
Lamps and bulbs159
Lamps, refer to Parking
lamps/low beams103
Lashing eyes, refer to
Securing load132
LATCH child-restraint fixing
system62
LEDs light-emitting
diodes163
Length, refer to
Dimensions179
License plate lamp
replacing bulbs162
Liftgate35
emergency operation,
refer to Unlocking
manually35
opening, remote
control31
remote control31Liftgate/tailgate
emergency operation,
refer to Unlocking
manually35,36
opening from inside35
opening from outside35
unlocking manually35,36
Light switch103
Light-alloy wheels, care,
refer to Caring for your
vehicle brochure
Light-emitting diodes
LEDs163
Lighter122,123
Lighting of instruments105
Lights on warning103
Limit88
Limit speed, refer to Speed
limit88
Load, refer to Cargo
loading131
Lock buttons, doors, refer to
Locking34
Locking
from inside34
from outside31
Locking and unlocking doors
from inside34
from outside31
Locking, vehicle
from inside34
from outside31