transmission BMW X5 4.8IS 2005 E53 User Guide
[x] Cancel search | Manufacturer: BMW, Model Year: 2005, Model line: X5 4.8IS, Model: BMW X5 4.8IS 2005 E53Pages: 200, PDF Size: 3.55 MB
Page 68 of 200
68n
Automatic transmission with Steptronic
*
Range selection >The selector lever can be removed
from the P position with the ignition
switched on or the engine running:
interlock
>With the vehicle stationary, press the
footbrake before shifting out of P
or N, as otherwise the selector lever
is blocked: shiftlock.
Hold the footbrake down until starting
off. The vehicle will otherwise creep
when a drive position is engaged.
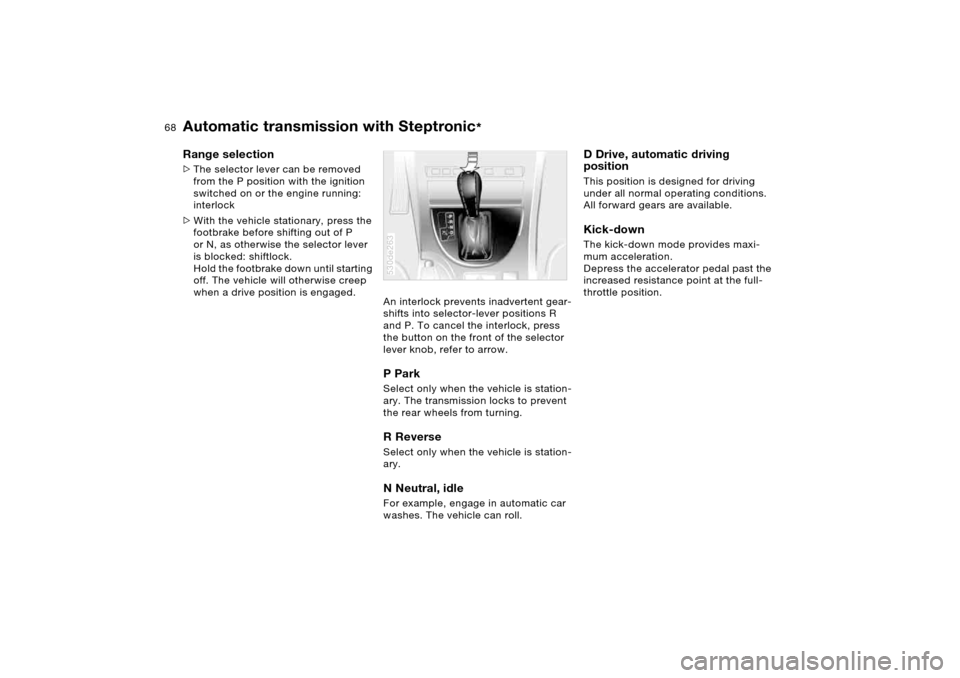
An interlock prevents inadvertent gear-
shifts into selector-lever positions R
and P. To cancel the interlock, press
the button on the front of the selector
lever knob, refer to arrow.
P Park Select only when the vehicle is station-
ary. The transmission locks to prevent
the rear wheels from turning.R Reverse Select only when the vehicle is station-
ary. N Neutral, idle For example, engage in automatic car
washes. The vehicle can roll.530de263
D Drive, automatic driving
positionThis position is designed for driving
under all normal operating conditions.
All forward gears are available. Kick-down The kick-down mode provides maxi-
mum acceleration.
Depress the accelerator pedal past the
increased resistance point at the full-
throttle position.
Page 69 of 200
OverviewControlsMaintenanceRepairsDataIndex
69n
Automatic transmission with Steptronic
*
M/S manual operation and
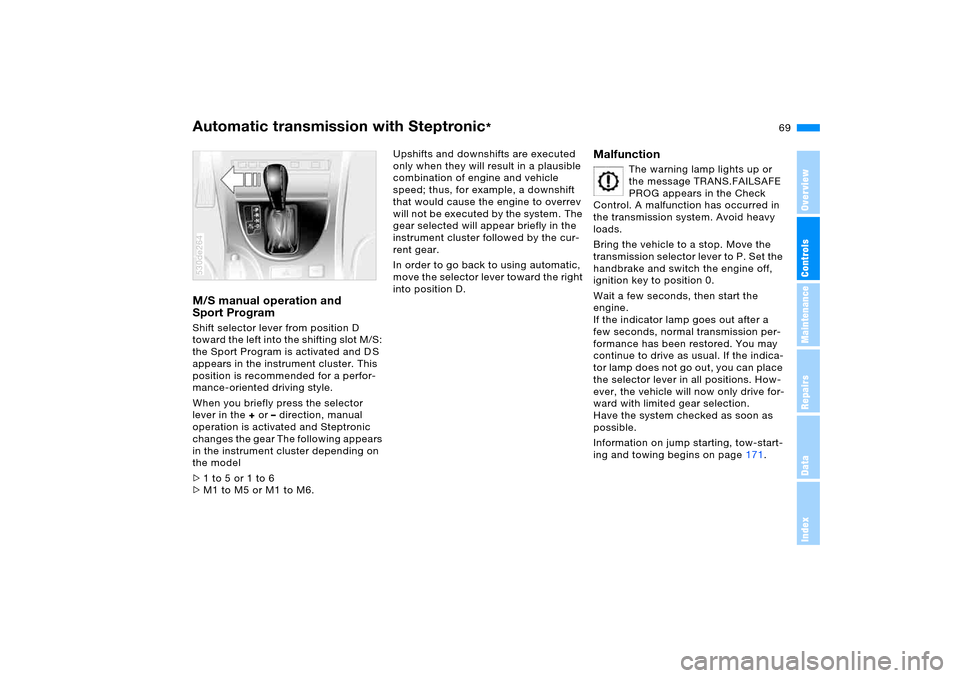
Sport Program Shift selector lever from position D
toward the left into the shifting slot M/S:
the Sport Program is activated and D S
appears in the instrument cluster. This
position is recommended for a perfor-
mance-oriented driving style.
When you briefly press the selector
lever in the + or – direction, manual
operation is activated and Steptronic
changes the gear The following appears
in the instrument cluster depending on
the model
>1 to 5 or 1 to 6
>M1 to M5 or M1 to M6. 530de264
Upshifts and downshifts are executed
only when they will result in a plausible
combination of engine and vehicle
speed; thus, for example, a downshift
that would cause the engine to overrev
will not be executed by the system. The
gear selected will appear briefly in the
instrument cluster followed by the cur-
rent gear.
In order to go back to using automatic,
move the selector lever toward the right
into position D.
Malfunction
The warning lamp lights up or
the message TRANS.FAILSAFE
PROG appears in the Check
Control. A malfunction has occurred in
the transmission system. Avoid heavy
loads.
Bring the vehicle to a stop. Move the
transmission selector lever to P. Set the
handbrake and switch the engine off,
ignition key to position 0.
Wait a few seconds, then start the
engine.
If the indicator lamp goes out after a
few seconds, normal transmission per-
formance has been restored. You may
continue to drive as usual. If the indica-
tor lamp does not go out, you can place
the selector lever in all positions. How-
ever, the vehicle will now only drive for-
ward with limited gear selection.
Have the system checked as soon as
possible.
Information on jump starting, tow-start-
ing and towing begins on page171.
Page 75 of 200
OverviewControlsMaintenanceRepairsDataIndex
75n
Cruise control* DecelerationBriefly press button
–:
When cruise control is active, every
brief touch of the button reduces the
speed by approx. 0.6 mph/1 km/h.
Press and hold button –:
With the cruise control active, the sys-
tem automatically reduces the throttle
opening to slow the vehicle. When you
release the button, the system main-
tains and stores the current speed.
Interrupting cruise control When the system is activated, press
button 1. The indicator lamp stays on.
You can use the cruise control again
whenever required by calling up the
speed that was stored last.
In addition, cruise control is interrupted
automatically:
>When you apply pressure to the
brake pedal
>When you apply pressure to the
clutch pedal or when you move the
automatic transmission selector lever
from Drive to Neutral
>If you exceed or fall below the con-
trolled speed for an extended period,
by depressing the accelerator, for
example
>When DSC Dynamic Stability Control
is set.
Recalling stored setting Press button:
The vehicle accelerates to and main-
tains the last speed stored.
Page 98 of 200
98n
HDC Hill Descent Control Self-leveling suspension
*
Using HDC With manual transmission:
Use HDC in first gear and in Reverse
since the engine's braking effect is
diminished in the higher gears.
With automatic transmission:
You can use HDC in every drive posi-
tion. In case of a malfunction If the warning lamp in the button goes
out during HDC operation or does not
light up when the HDC is activated:
HDC is temporarily not available as
brake temperature is too high. The warning lamp for the self-
leveling suspension comes on,
or the message SELFLEVEL
SUSP.INACT appears in the Check
Control: there is a malfunction in the
self-leveling suspension.
Stop and inspect the vehicle. If the rear
of the vehicle is visibly lower than the
front, possibly accompanied by a tilt
noticeable when you compare the left
rear with the right rear, please respond
by immediately proceeding to the near-
est BMW Sports Activity Vehicle center.
Drive with appropriate caution in the
meantime. The vehicle has reduced
ground clearance and driving comfort
may be noticeably reduced.
Even when the position of the vehicle
is normal, have the system checked as
soon as possible when a malfunction is
indicated.
Page 136 of 200
136n
Moving parts should be allowed to
break in. To ensure that your vehicle
provides maximum economy through-
out a long service life, we request that
you observe the following instructions:
Engine and differential Up to 1,200 miles/2,000 km:
Drive at varying engine speeds and
road speeds, but do not exceed
4,500 rpm and the following road
speeds during this initial period:
6-cylinder engines: 100 mph/160 km/h
8-cylinder engines: 106 mph/170 km/h
Obey your local and state maximum
speed limits.
Avoid full-throttle operation and use of
the transmission's kick-down mode
during these initial miles.
Once you have driven 1,200 miles/
2,000 km, the engine and vehicle
speeds can be gradually increased.Tires Due to technical factors associated with
their manufacture, tires do not achieve
their full traction potential until after an
initial break-in period. Therefore, drive
reservedly during the first 200 miles/
300 km. Obey your local and state maximum
speed limits.
When the vehicle is operated on
wet or slushy roads, a wedge of
water may form between the tire and
the road surface. This phenomenon is
referred to as hydroplaning and can
lead to partial or complete loss of trac-
tion, vehicle control and braking effec-
tiveness. Reduce your speed on wet
roads.<
Brake system Brakes require an initial break-in period
of approx. 300 miles/500 km to achieve
optimal contact and wear patterns
between brake pads and rotors.
To break in the separate handbrake
drums, apply the handbrake lightly
when coasting to a standstill at a traffic
signal, for instance, provided that traffic
conditions allow you to do so.
To avoid corrosion, repeat this proce-
dure from time to time.
The brake lamps do not light up
when the handbrake is applied.
Vacuum for the brake system servo unit
on your BMW is available only when the
engine is running. When you move the
vehicle with the engine switched off,
when towing, for instance, substantially
higher levels of pedal force will be
required to brake the vehicle.<
ClutchThe function of the clutch is only at its
optimized level after a distance driven
of approx. 300 miles/500 km. During
this break-in period, engage the clutch
gently.Following component
replacementsObserve the break-in instructions again
if previously addressed components
must be replaced again during driving
later.
Breaking-in
Page 137 of 200
137n
OverviewControlsMaintenanceRepairsDataIndex
General driving notesClosing liftgate/tailgate
Operate the vehicle only when the
tailgate and liftgate are completely
closed. Otherwise, exhaust fumes
could enter into the passenger com-
partment.<
However, if special circumstances
should make it absolutely necessary
to operate the vehicle with the liftgate/
tailgate open:
1. Close all windows and the panorama
glass sunroof
2. Increase the air supply for the air
conditioner or automatic climate
control to a high level, refer to
page108 or112.
Hot exhaust system
Extreme temperatures occur at
the catalytic converter on this and
every catalyst-equipped vehicle. Do not
remove the heat shields installed adja-
cent to various sections of the exhaust
system, and never apply undercoating
to them. When driving, standing at idle
and while parking take care to avoid
possible contact between a hot exhaust
system and any highly flammable mate-
rials such as hay, leaves, grass etc.
Otherwise there is a danger of ignition
and of a fire with the risk of serious inju-
ries and damage.
mobile radio devices such as por-
table phones inside the vehicle unless
they are directly connected to the
external antenna. Otherwise, it is
impossible to prevent a mutual interfer-
ence of the vehicle electronics with the
portable phone device. Also, there is no
guarantee that the radiation generated
by the transmission will be conveyed
out from the interior of the vehicle.<
When vehicle is parked Condensation forms in the air condi-
tioner system during operation, and
then exits under the vehicle. Traces of
water on the ground are therefore nor-
mal.Brakes
Do not drive with your foot resting
on the brake pedal. Even light but
consistent pedal pressure can lead to
excessively high temperatures, brake
wear and possibly even brake failure.<
Road hazards
If road hazards, obstacles or curbs
are unavoidable, only drive over
them very slowly and carefully, as oth-
erwise the wheels and suspension
parts, especially on vehicles fitted with
low profile tires, can be damaged.<
For more information on wheels and
tires, refer to page144.
Before driving into a car washFold in the exterior mirrors, refer to
page54, as otherwise they could be
damaged due to the width of the vehi-
cle.Hydroplaning
When driving on wet or slushy
roads, reduce road speed. If you
do not, a wedge of water can form
between tires and road surface. This
state can cause a partial or total loss of
contact with the road surface, of brak-
ing control and of control over the vehi-
cle.<
Page 138 of 200
138n
General driving notes Driving your X5 Driving through water
Do not drive through water on the
road if it is deeper than 20 in/
50 cm, and then only at walking speed
at the most. Otherwise, the vehicle's
engine, the electrical systems and the
transmission may be damaged. When
equipped with 2-axle self leveling sus-
pension
*, switch the vehicle into the
Off-Road setting before driving through,
refer to page100.<
Using handbrake on slopes
Do not hold the vehicle in place on
slopes by slipping or riding the
clutch; use the handbrake instead. Oth-
erwise, severe clutch wear will result.<
Interior and exterior mirrors,
automatic dimming feature
*
Two photocells serve to control the
automatic dimming of the interior and
exterior rearview mirrors. One photocell
is in the mirror glass, refer to arrow,
while the other is offset somewhat on
the back of the mirror.
For trouble-free operation, keep the
photocells clean and do not cover the
area between the interior rearview mir-
ror and the windshield. Do not attach
any kind of stickers on the windshield
in front of the mirror, either. 530us245
On poor roads When you are driving on poor roads,
there are a few points which you should
strictly observe — for your own safety,
for that of your passengers, and for the
safety of the vehicle:
Driving on unpaved terrain can
cause damage to the vehicle.<
>Always adapt the driving speed to the
road conditions. The rougher or
steeper the road surface is, the lower
the speed should be
>You can operate your vehicle on
uphill and downhill gradients with a
maximum slope of 50 %. If you want
to drive on uphill or downhill gradi-
ents of this kind, make sure before-
hand that the engine oil and coolant
levels are near the max mark, refer to
pages150 and152.
Use the HDC Hill Descent Control
when driving down steep grades,
refer to page97.
Starting off is possible on grades of
up to 33 %.
The permissible body roll is also 50 %
>While driving, watch carefully for
obstacles such as rocks or holes.
Try to avoid these obstacles when-
ever possible
Page 163 of 200
163n
OverviewControlsMaintenanceRepairsDataIndex
Lamps and bulbs Changing a tire LEDs light-emitting diodes Light-emitting diodes installed behind
translucent lenses serve as the light
source for many of the controls and
displays in your vehicle. The concept
behind their operation is related to that
employed for lasers.
Do not remove the covers, and
never stare into the unfiltered light
several hours, as irritation of the iris
could result.<
Safety precautions to observe in
the event of a flat and during all
tire changes:
Park the vehicle as far as possible from
passing traffic. Park on a firm, flat, sur-
face. Switch on the hazard warning
flashers.
Turn the steering wheel to the straight-
ahead position, remove the key and
engage the steering lock. Shift into 1st
or reverse, selector lever in Park with
automatic transmission, and engage the
handbrake.
All passengers should be outside the
vehicle and well away from your imme-
diate working area, behind a guardrail,
for instance.
If a warning triangle or portable hazard
warning lamp is required, set it up on
the roadside at an appropriate distance
from the rear of the vehicle. Comply
with all safety guidelines and regula-
tions.
Change the wheel only on a level, firm
surface which is not slippery. The vehi-
cle or the jack could slip to the side if
you attempt to raise the vehicle on a
soft or slippery surface such as snow,
ice, tiles, etc.
Position the jack on a firm support sur-
face.
Do not place wooden blocks or similar
objects under the jack. If this is done,
the jack might not be able to reach its
full support capacity because of the
limited height. To avoid serious or fatal
injury: never lie under the vehicle, and
never start the engine while it is sup-
ported by the jack.<
Page 173 of 200
173n
OverviewControlsMaintenanceRepairsDataIndex
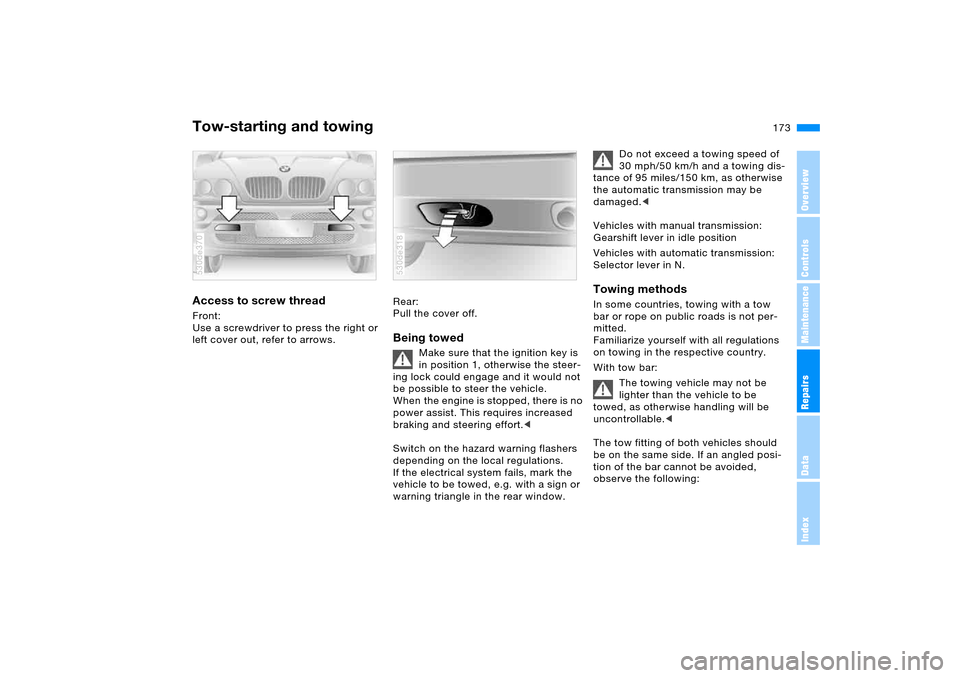
Tow-starting and towingAccess to screw thread Front:
Use a screwdriver to press the right or
left cover out, refer to arrows. 530de370
Rear:
Pull the cover off. Being towed
Make sure that the ignition key is
in position 1, otherwise the steer-
ing lock could engage and it would not
be possible to steer the vehicle.
When the engine is stopped, there is no
power assist. This requires increased
braking and steering effort.<
Switch on the hazard warning flashers
depending on the local regulations.
If the electrical system fails, mark the
vehicle to be towed, e.g. with a sign or
warning triangle in the rear window.
530de318
Do not exceed a towing speed of
30 mph/50 km/h and a towing dis-
tance of 95 miles/150 km, as otherwise
the automatic transmission may be
damaged.<
Vehicles with manual transmission:
Gearshift lever in idle position
Vehicles with automatic transmission:
Selector lever in N.
Towing methodsIn some countries, towing with a tow
bar or rope on public roads is not per-
mitted.
Familiarize yourself with all regulations
on towing in the respective country.
With tow bar:
The towing vehicle may not be
lighter than the vehicle to be
towed, as otherwise handling will be
uncontrollable.<
The tow fitting of both vehicles should
be on the same side. If an angled posi-
tion of the bar cannot be avoided,
observe the following:
Page 174 of 200
174n
Tow-starting and towing>The freedom of movement is
restricted during cornering
>The angled position of the tow bar
creates lateral forces.
Only secure the tow bar on the
tow fittings. Otherwise, damage
could result on other vehicle compo-
nent.<
With tow-rope:
When starting off in the towing vehicle,
make sure that the tow-rope is taut.
Use nylon ropes or nylon straps
for towing, and avoid all too sud-
den jerking movements. Only secure
tow-ropes on the tow fitting. Otherwise,
damage could result on other vehicle
component.<
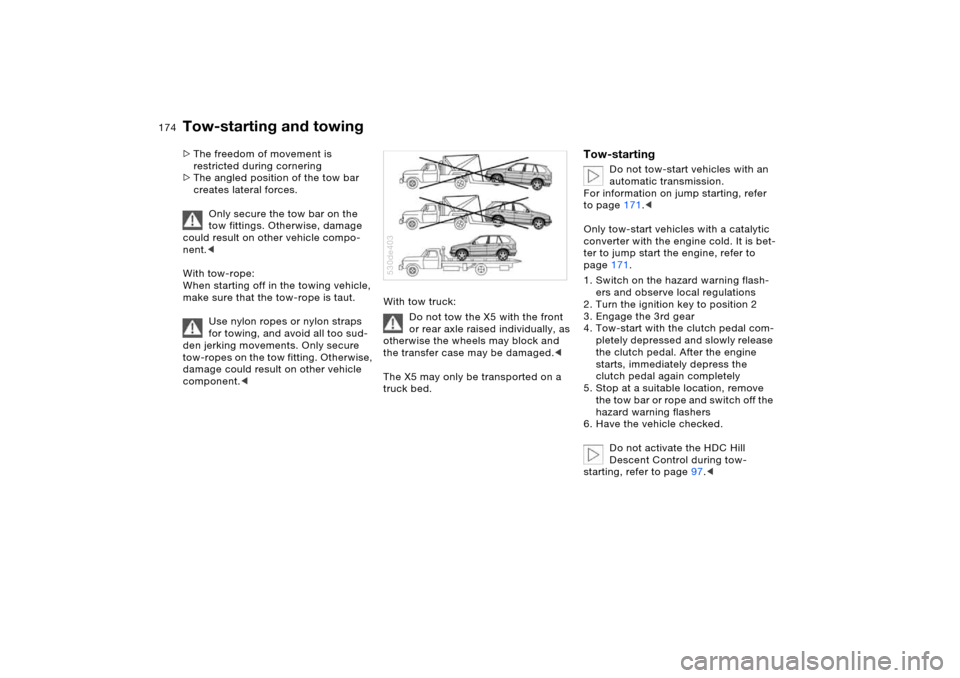
With tow truck:
Do not tow the X5 with the front
or rear axle raised individually, as
otherwise the wheels may block and
the transfer case may be damaged.<
The X5 may only be transported on a
truck bed.530de403
Tow-starting
Do not tow-start vehicles with an
automatic transmission.
For information on jump starting, refer
to page171.<
Only tow-start vehicles with a catalytic
converter with the engine cold. It is bet-
ter to jump start the engine, refer to
page171.
1. Switch on the hazard warning flash-
ers and observe local regulations
2. Turn the ignition key to position 2
3. Engage the 3rd gear
4. Tow-start with the clutch pedal com-
pletely depressed and slowly release
the clutch pedal. After the engine
starts, immediately depress the
clutch pedal again completely
5. Stop at a suitable location, remove
the tow bar or rope and switch off the
hazard warning flashers
6. Have the vehicle checked.
Do not activate the HDC Hill
Descent Control during tow-
starting, refer to page97.<