engine BMW X5 4.8IS 2006 E53 Workshop Manual
[x] Cancel search | Manufacturer: BMW, Model Year: 2006, Model line: X5 4.8IS, Model: BMW X5 4.8IS 2006 E53Pages: 202, PDF Size: 4.13 MB
Page 161 of 202
161n
OverviewControlsMaintenanceRepairsDataIndex
Lamps and bulbs The lamps and bulbs make essential
contributions to the safety of your vehi-
cle. For this reason, follow the instruc-
tions below carefully when replacing a
bulb. If you are not familiar with any of
the procedures, consult your BMW
Sports Activity Vehicle center.
Never touch the glass on new
bulbs with your bare fingers, as
even minute amounts of contamination
will burn into the bulb's surface and
reduce its service life. Use a clean
cloth, paper napkin, or a similar mate-
rial, or hold the bulb by its metallic
base.<
A replacement bulb set is available from
your BMW Sports Activity Vehicle cen-
ter.
To prevent short circuits, before
working on any electrical system,
equipment or accessory you should
always switch it off and disconnect the
cable from the battery's negative termi-
nal before starting.
To avoid possible injury or equipment
damage when replacing bulbs, follow
any instructions provided by the bulb
manufacturer.<
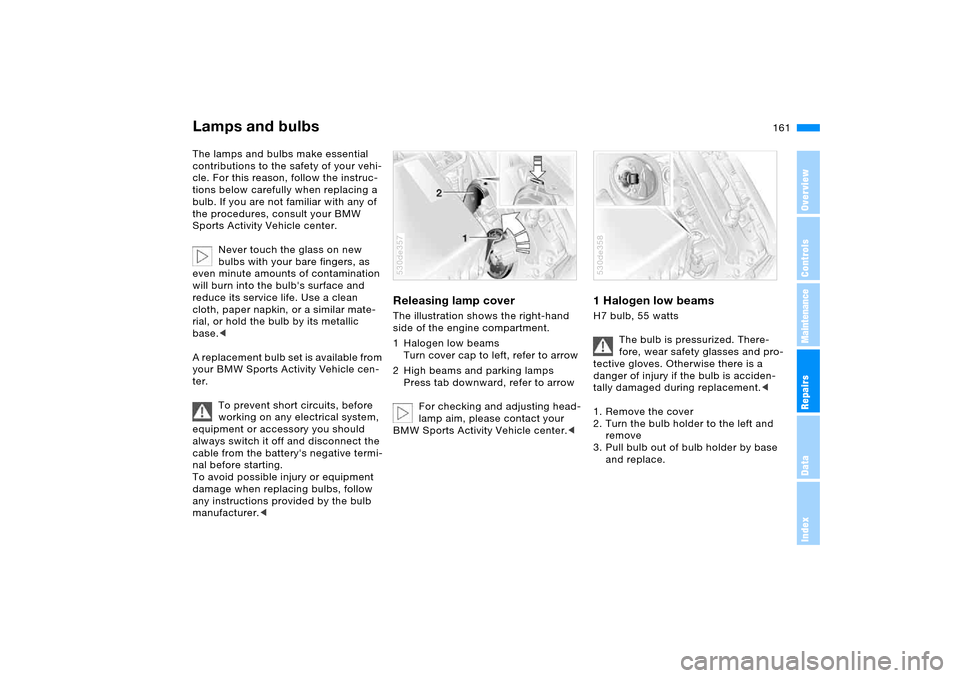
Releasing lamp cover The illustration shows the right-hand
side of the engine compartment.
1 Halogen low beams
Turn cover cap to left, refer to arrow
2 High beams and parking lamps
Press tab downward, refer to arrow
For checking and adjusting head-
lamp aim, please contact your
BMW Sports Activity Vehicle center.< 530de357
1 Halogen low beams H7 bulb, 55 watts
The bulb is pressurized. There-
fore, wear safety glasses and pro-
tective gloves. Otherwise there is a
danger of injury if the bulb is acciden-
tally damaged during replacement.<
1. Remove the cover
2. Turn the bulb holder to the left and
remove
3. Pull bulb out of bulb holder by base
and replace.530de358
Page 165 of 202
165n
OverviewControlsMaintenanceRepairsDataIndex
Lamps and bulbs Changing a wheel Light-emitting diodes LEDs Light-emitting diodes installed behind
translucent lenses serve as the light
source for many of the controls and dis-
plays in your vehicle. The concept
behind their operation is related to that
employed for lasers.
Do not remove the covers, and
never stare into the unfiltered light
several hours, as irritation of the retina
could result.<
Safety precautions to observe in
the event of a flat and during all
tire changes:
Park the vehicle as far as possible from
passing traffic. Park on a firm, flat, sur-
face. Switch on the hazard warning
flashers.
Turn the steering wheel to the straight-
ahead position, remove the key and
engage the steering lock. Shift into 1st
or reverse, selector lever in Park with
automatic transmission, and engage the
handbrake.
All passengers should be outside the
vehicle and well away from your imme-
diate working area, behind a guardrail,
for instance.
If a warning triangle or portable hazard
warning lamp is required, set it up on
the roadside at an appropriate distance
from the rear of the vehicle. Comply
with all safety guidelines and regula-
tions.
Change the wheel only on a level, firm
surface that is not slippery. The vehicle
or the jack could slip to the side if you
attempt to raise the vehicle on a soft
or slippery surface such as snow, ice,
tiles, etc.
Position the jack on a firm support sur-
face.
Do not place wooden blocks or similar
objects under the jack. If this is done,
the jack might not be able to reach its
full support capacity because of the
limited height. To avoid serious or fatal
injury: never lie under the vehicle, and
never start the engine while it is sup-
ported by the jack.<
Your BMW has either a compact wheel
for temporary use to ensure your mobil-
ity, or a spare wheel of the size 235/
65 R 17. Please observe the differences
in handling when removing the wheel
from the cargo area.
Page 171 of 202
171n
OverviewControlsMaintenanceRepairsDataIndex
Changing a wheel Vehicle battery
Only one compact wheel may be
mounted. Wheels and tires of the
original size should be mounted again
as soon as possible.<
Driving with spare wheel
*
Do not exceed a speed of
130 mph/210 km/h, otherwise tire
damage could lead to accidents.<
With certain wheel-and-tire com-
binations the size of the spare
wheel differs from that of the other
wheels. To restore the original state,
the normal wheel should be remounted
as soon as possible.<
Battery posts, terminals and
related accessories contain lead
and lead compounds. Wash hands after
handling.<
Battery care The battery is maintenance-free, that is,
the original electrolyte will normally last
for the service life of the battery under
moderate climatic conditions. Your
BMW Sports Activity Vehicle center will
be glad to advise in all matters con-
cerning the battery.Charging battery Only charge the battery in the vehicle
via the terminals in the engine compart-
ment with the engine off. For correct
connections, refer to Jump starting on
page174. Disposal
Following replacement, have old
batteries disposed of by your
BMW Sports Activity Vehicle center or
turn them over to a recycling center.
Maintain the battery in an upright posi-
tion for transport and storage. Always
restrain the battery to prevent it from
tipping over during transport.<
Power failure Following a temporary power failure,
e.g. in the case of a dead battery, some
equipment is subject to restricted use
and must be reinitialized. Individual set-
tings are also lost and must be updated
again:
>Seat, mirror and steering wheel
memory
The positions must be stored again,
refer to page50
>Time and date
Have to be updated again, refer to
page82
>Activation time for parked car
ventilation
Has to be updated again, refer to
page84.
Page 174 of 202
174n
Jump starting When your battery is discharged, you
can use two jumper cables to start your
vehicle with power from the battery in a
second vehicle. You can also use the
same method to help start another vehi-
cle. Use only jumper cables with fully-
insulated clamp handles.
To avoid the risk of potentially
fatal injury, always avoid all con-
tact with electrical components while
the engine is running. Carefully observe
the following instructions to avoid per-
sonal injury and/or damage to one or
both vehicles.<
Preparing1. Check whether the battery of the
other vehicle has a voltage of
12 Volts and approximately the same
capacitance in Ah. This information
can be found on the battery.
2. Switch off the engine of the support
vehicle.
3. Switch off any electrical systems and
components in both vehicles.
Ensure that no contact exists
between the bodywork on the two
vehicles, otherwise there is a danger of
short circuits.
sparks, always follow this
sequence when connecting jumper
cables.<
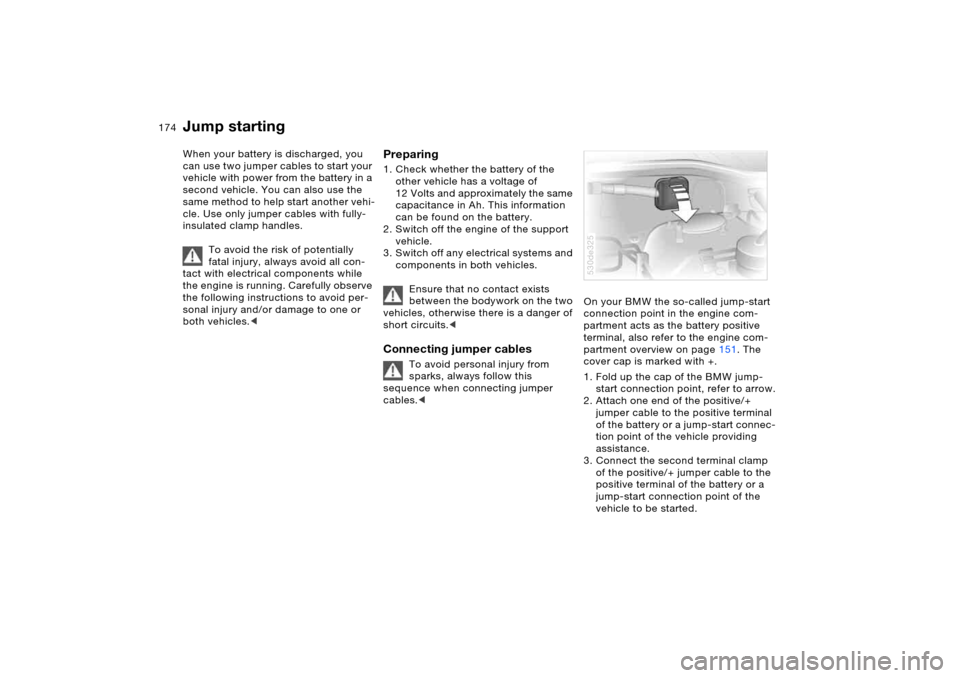
On your BMW the so-called jump-start
connection point in the engine com-
partment acts as the battery positive
terminal, also refer to the engine com-
partment overview on page151. The
cover cap is marked with +.
1. Fold up the cap of the BMW jump-
start connection point, refer to arrow.
2. Attach one end of the positive/+
jumper cable to the positive terminal
of the battery or a jump-start connec-
tion point of the vehicle providing
assistance.
3. Connect the second terminal clamp
of the positive/+ jumper cable to the
positive terminal of the battery or a
jump-start connection point of the
vehicle to be started.530de325
Page 175 of 202
175n
OverviewControlsMaintenanceRepairsDataIndex
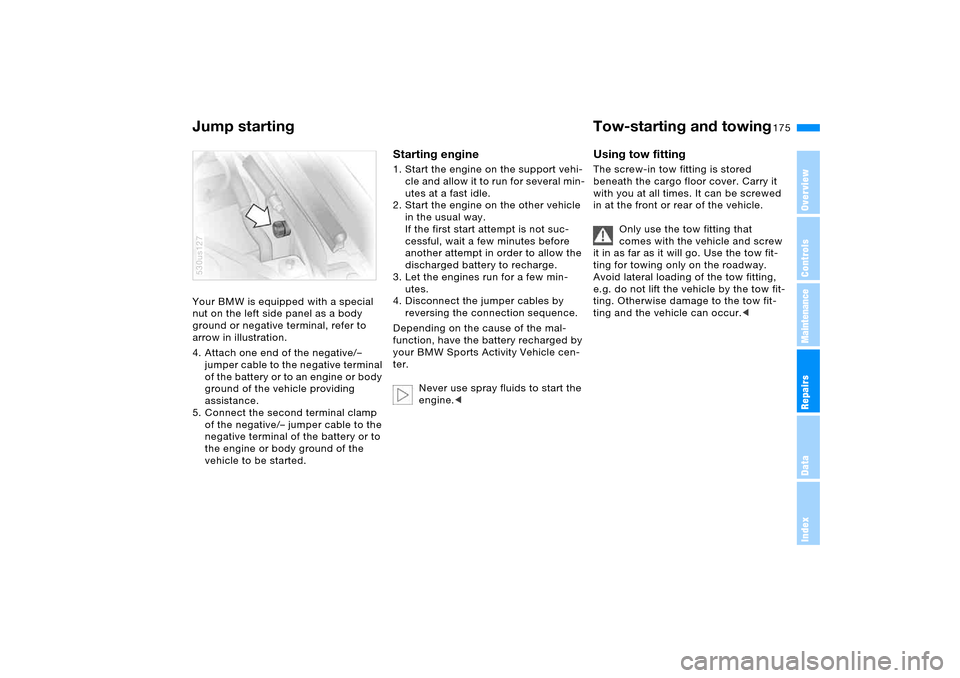
Jump starting Tow-starting and towing Your BMW is equipped with a special
nut on the left side panel as a body
ground or negative terminal, refer to
arrow in illustration.
4. Attach one end of the negative/–
jumper cable to the negative terminal
of the battery or to an engine or body
ground of the vehicle providing
assistance.
5. Connect the second terminal clamp
of the negative/– jumper cable to the
negative terminal of the battery or to
the engine or body ground of the
vehicle to be started.530us127
Starting engine1. Start the engine on the support vehi-
cle and allow it to run for several min-
utes at a fast idle.
2. Start the engine on the other vehicle
in the usual way.
If the first start attempt is not suc-
cessful, wait a few minutes before
another attempt in order to allow the
discharged battery to recharge.
3. Let the engines run for a few min-
utes.
4. Disconnect the jumper cables by
reversing the connection sequence.
Depending on the cause of the mal-
function, have the battery recharged by
your BMW Sports Activity Vehicle cen-
ter.
Never use spray fluids to start the
engine.<
Using tow fitting The screw-in tow fitting is stored
beneath the cargo floor cover. Carry it
with you at all times. It can be screwed
in at the front or rear of the vehicle.
Only use the tow fitting that
comes with the vehicle and screw
it in as far as it will go. Use the tow fit-
ting for towing only on the roadway.
Avoid lateral loading of the tow fitting,
e.g. do not lift the vehicle by the tow fit-
ting. Otherwise damage to the tow fit-
ting and the vehicle can occur.<
Page 176 of 202
176n
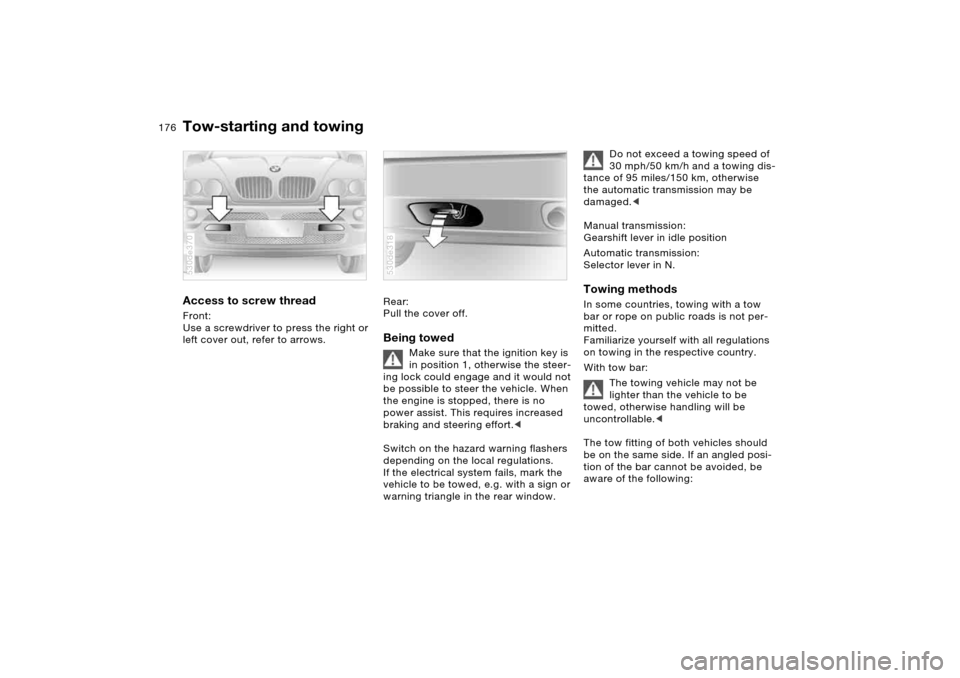
Tow-starting and towingAccess to screw thread Front:
Use a screwdriver to press the right or
left cover out, refer to arrows. 530de370
Rear:
Pull the cover off. Being towed
Make sure that the ignition key is
in position 1, otherwise the steer-
ing lock could engage and it would not
be possible to steer the vehicle. When
the engine is stopped, there is no
power assist. This requires increased
braking and steering effort.<
Switch on the hazard warning flashers
depending on the local regulations.
If the electrical system fails, mark the
vehicle to be towed, e.g. with a sign or
warning triangle in the rear window.
530de318
Do not exceed a towing speed of
30 mph/50 km/h and a towing dis-
tance of 95 miles/150 km, otherwise
the automatic transmission may be
damaged.<
Manual transmission:
Gearshift lever in idle position
Automatic transmission:
Selector lever in N.
Towing methodsIn some countries, towing with a tow
bar or rope on public roads is not per-
mitted.
Familiarize yourself with all regulations
on towing in the respective country.
With tow bar:
The towing vehicle may not be
lighter than the vehicle to be
towed, otherwise handling will be
uncontrollable.<
The tow fitting of both vehicles should
be on the same side. If an angled posi-
tion of the bar cannot be avoided, be
aware of the following:
Page 177 of 202
177n
OverviewControlsMaintenanceRepairsDataIndex
Tow-starting and towing>The freedom of movement is
restricted during cornering
>The angled position of the tow bar
creates lateral forces.
Only attach the tow bar to the tow
fittings, as attachment to other
vehicle parts can lead to damage.<
With tow-rope:
When starting off in the towing vehicle,
make sure that the tow-rope is taut.
Use nylon ropes or nylon straps
for towing, and avoid all exces-
sively sudden jerking movements. Only
attach tow ropes to the tow fittings, as
attachment to other vehicle parts can
lead to damage.<
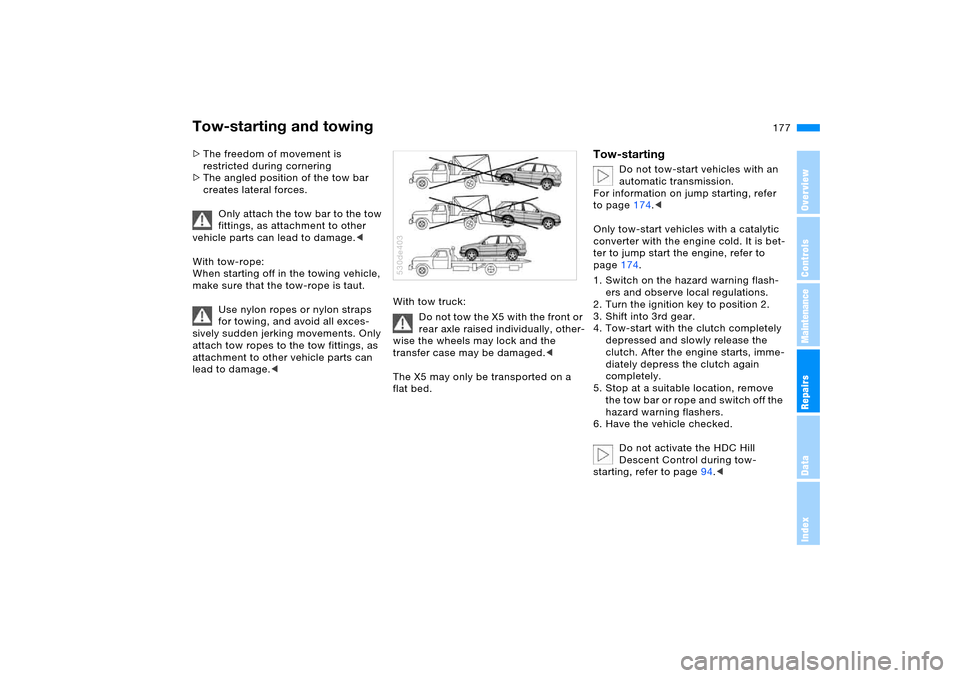
With tow truck:
Do not tow the X5 with the front or
rear axle raised individually, other-
wise the wheels may lock and the
transfer case may be damaged.<
The X5 may only be transported on a
flat bed.530de403
Tow-starting
Do not tow-start vehicles with an
automatic transmission.
For information on jump starting, refer
to page174.<
Only tow-start vehicles with a catalytic
converter with the engine cold. It is bet-
ter to jump start the engine, refer to
page174.
1. Switch on the hazard warning flash-
ers and observe local regulations.
2. Turn the ignition key to position 2.
3. Shift into 3rd gear.
4. Tow-start with the clutch completely
depressed and slowly release the
clutch. After the engine starts, imme-
diately depress the clutch again
completely.
5. Stop at a suitable location, remove
the tow bar or rope and switch off the
hazard warning flashers.
6. Have the vehicle checked.
Do not activate the HDC Hill
Descent Control during tow-
starting, refer to page94.<
Page 180 of 202
180n
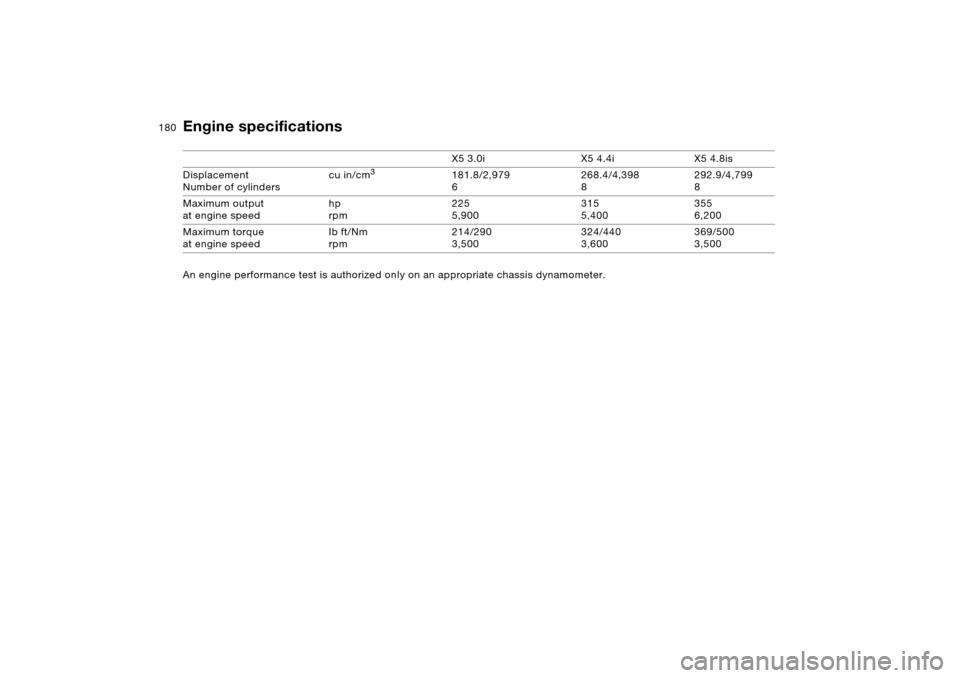
An engine performance test is authorized only on an appropriate chassis dynamometer. X5 3.0i X5 4.4i X5 4.8is
Displacement
Number of cylinders cu in/cm
3
181.8/2,979
6268.4/4,398
8292.9/4,799
8
Maximum output
at engine speed hp
rpm225
5,900315
5,400355
6,200
Maximum torque
at engine speed Ib ft/Nm
rpm214/290
3,500324/440
3,600369/500
3,500
Engine specifications
Page 183 of 202
183n
OverviewControlsMaintenanceRepairsDataIndex
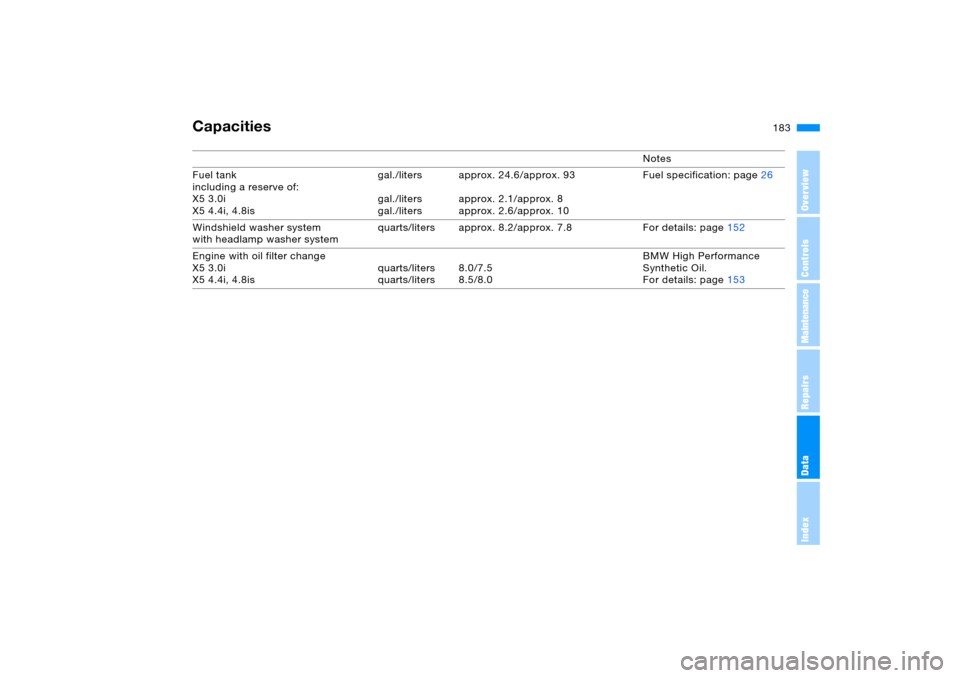
Capacities
Notes
Fuel tank
including a reserve of:
X5 3.0i
X5 4.4i, 4.8isgal./liters
gal./liters
gal./litersapprox. 24.6/approx. 93
approx. 2.1/approx. 8
approx. 2.6/approx. 10Fuel specification: page26
Windshield washer system
with headlamp washer system quarts/liters approx. 8.2/approx. 7.8 For details: page152
Engine with oil filter change
X5 3.0i
X5 4.4i, 4.8isquarts/liters
quarts/liters8.0/7.5
8.5/8.0BMW High Performance
Synthetic Oil.
For details: page153
Page 188 of 202
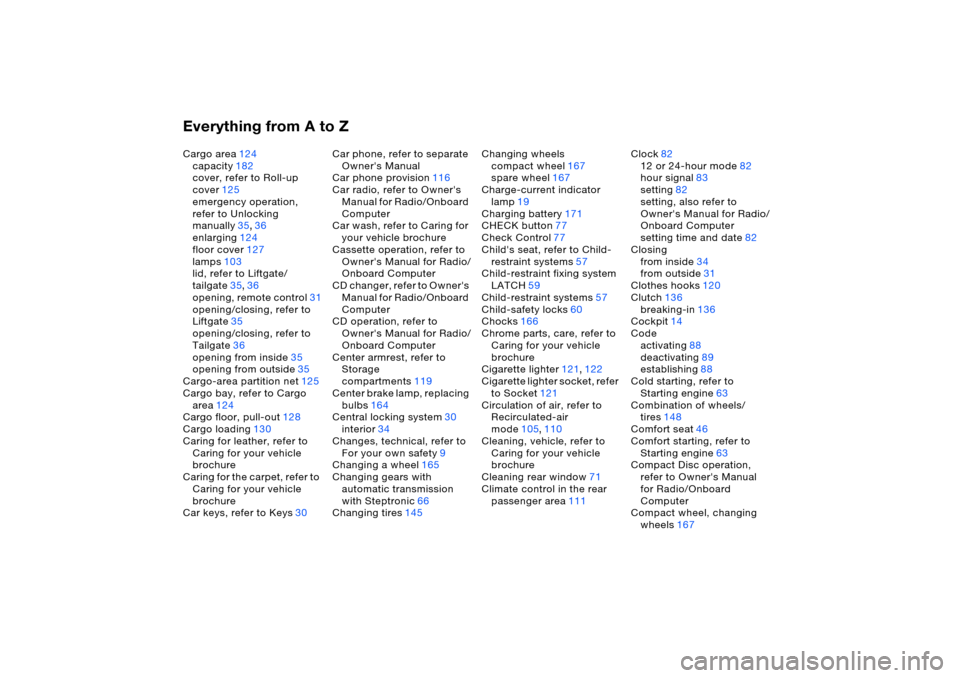
Everything from A to ZCargo area124
capacity182
cover, refer to Roll-up
cover125
emergency operation,
refer to Unlocking
manually35,36
enlarging124
floor cover127
lamps103
lid, refer to Liftgate/
tailgate35,36
opening, remote control31
opening/closing, refer to
Liftgate35
opening/closing, refer to
Tailgate36
opening from inside35
opening from outside35
Cargo-area partition net125
Cargo bay, refer to Cargo
area124
Cargo floor, pull-out128
Cargo loading130
Caring for leather, refer to
Caring for your vehicle
brochure
Caring for the carpet, refer to
Caring for your vehicle
brochure
Car keys, refer to Keys30Car phone, refer to separate
Owner's Manual
Car phone provision116
Car radio, refer to Owner's
Manual for Radio/Onboard
Computer
Car wash, refer to Caring for
your vehicle brochure
Cassette operation, refer to
Owner's Manual for Radio/
Onboard Computer
CD changer, refer to Owner's
Manual for Radio/Onboard
Computer
CD operation, refer to
Owner's Manual for Radio/
Onboard Computer
Center armrest, refer to
Storage
compartments119
Center brake lamp, replacing
bulbs164
Central locking system30
interior34
Changes, technical, refer to
For your own safety9
Changing a wheel165
Changing gears with
automatic transmission
with Steptronic66
Changing tires145Changing wheels
compact wheel167
spare wheel167
Charge-current indicator
lamp19
Charging battery171
CHECK button77
Check Control77
Child's seat, refer to Child-
restraint systems57
Child-restraint fixing system
LATCH59
Child-restraint systems57
Child-safety locks60
Chocks166
Chrome parts, care, refer to
Caring for your vehicle
brochure
Cigarette lighter121,122
Cigarette lighter socket, refer
to Socket121
Circulation of air, refer to
Recirculated-air
mode105,110
Cleaning, vehicle, refer to
Caring for your vehicle
brochure
Cleaning rear window71
Climate control in the rear
passenger area111Clock82
12 or 24-hour mode82
hour signal83
setting82
setting, also refer to
Owner's Manual for Radio/
Onboard Computer
setting time and date82
Closing
from inside34
from outside31
Clothes hooks120
Clutch136
breaking-in136
Cockpit14
Code
activating88
deactivating89
establishing88
Cold starting, refer to
Starting engine63
Combination of wheels/
tires148
Comfort seat46
Comfort starting, refer to
Starting engine63
Compact Disc operation,
refer to Owner's Manual
for Radio/Onboard
Computer
Compact wheel, changing
wheels167