warning BMW X5 XDRIVE 30I 2010 E70 User Guide
[x] Cancel search | Manufacturer: BMW, Model Year: 2010, Model line: X5 XDRIVE 30I, Model: BMW X5 XDRIVE 30I 2010 E70Pages: 300, PDF Size: 12.41 MB
Page 61 of 300
Controls
59Reference
At a glance
Driving tips
Communications
Navigation
Entertainment
Mobility
Driving
Ignition lock
Inserting remote control into ignition
lock
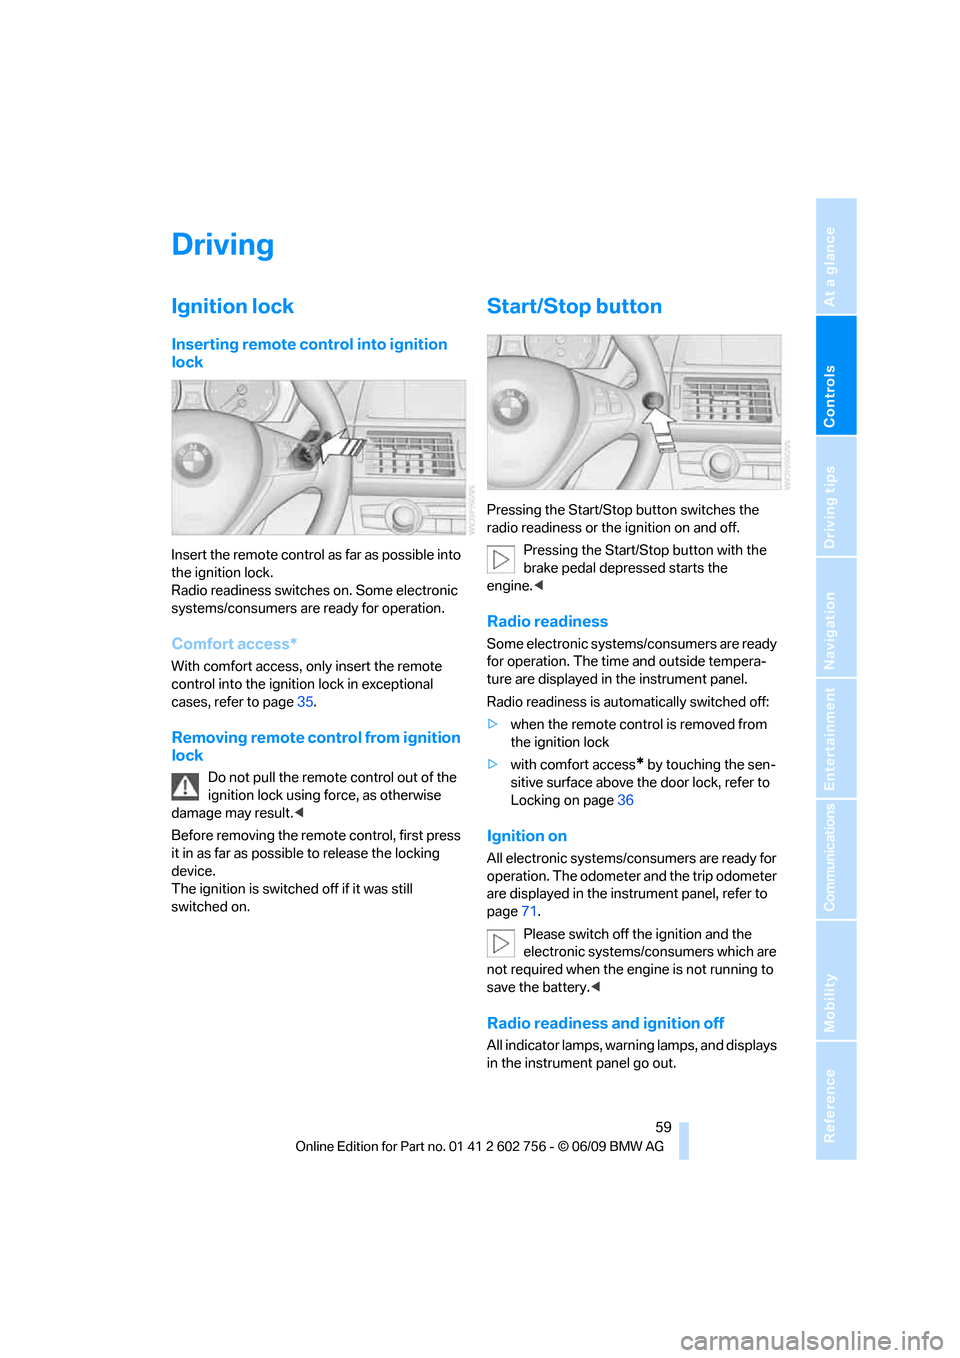
Insert the remote control as far as possible into
the ignition lock.
Radio readiness switches on. Some electronic
systems/consumers are ready for operation.
Comfort access*
With comfort access, only insert the remote
control into the ignition lock in exceptional
cases, refer to page35.
Removing remote control from ignition
lock
Do not pull the remote control out of the
ignition lock using force, as otherwise
damage may result.<
Before removing the remote control, first press
it in as far as possible to release the locking
device.
The ignition is switched off if it was still
switched on.
Start/Stop button
Pressing the Start/Stop button switches the
radio readiness or the ignition on and off.
Pressing the Start/Stop button with the
brake pedal depressed starts the
engine.<
Radio readiness
Some electronic systems/consumers are ready
for operation. The time and outside tempera-
ture are displayed in the instrument panel.
Radio readiness is automatically switched off:
>when the remote control is removed from
the ignition lock
>with comfort access
* by touching the sen-
sitive surface above the door lock, refer to
Locking on page36
Ignition on
All electronic systems/consumers are ready for
operation. The odometer and the trip odometer
are displayed in the instrument panel, refer to
page71.
Please switch off the ignition and the
electronic systems/consumers which are
not required when the engine is not running to
save the battery.<
Radio readiness and ignition off
All indicator lamps, warning lamps, and displays
in the instrument panel go out.
ba8_e70ag.book Seite 59 Freitag, 5. Juni 2009 11:42 11
Page 65 of 300
Controls
63Reference
At a glance
Driving tips
Communications
Navigation
Entertainment
Mobility
>the vehicle is braked to a stop during driving
In the instrument panel, the indicator
lamp changes from green to red and
the indication AUTO H goes out.
Indicator lamp on Canadian models.
Before you start to drive, either release the
parking brake manually, refer to page61, or
reactivate Automatic Hold, refer to page62.
Before leaving the vehicle with the engine
running, shift the selector lever into posi-
tion P of the automatic transmission and make
sure that the parking brake is set. Otherwise,
the vehicle may begin to roll.<
Malfunction
If the parking brake fails or malfunctions, secure
the vehicle against rolling, e.g. with a wheel
chock, if you leave the vehicle.
Releasing parking brake manually
In the event of an electrical power loss or elec-
trical malfunction, you can release the parking
brake manually.
Before manually releasing the parking
brake and each time you park the vehicle
without setting the parking brake, make sure
that the automatic transmission is in position P,
refer to page65. Be sure to pay attention to the
information in the instrument panel.
In addition, secure the vehicle against rolling,
e.g. with a wheel chock. Otherwise there is a
danger that the vehicle could roll if parked on a
steep slope.<
If it becomes necessary to also release the
transmission lock of the automatic transmission
manually, follow this sequence:
1.If necessary, start by releasing the parking
brake manually.
2.Then release the automatic transmission's
transmission lock manually, refer to
page66.
Jump starting and towing, refer to information
starting on page262.
Releasing
1.Open the left-hand side panel in the cargo
bay.
2.Remove the first-aid kit
* and warning trian-
gle
* if necessary. Close the bracket of the
warning triangle.
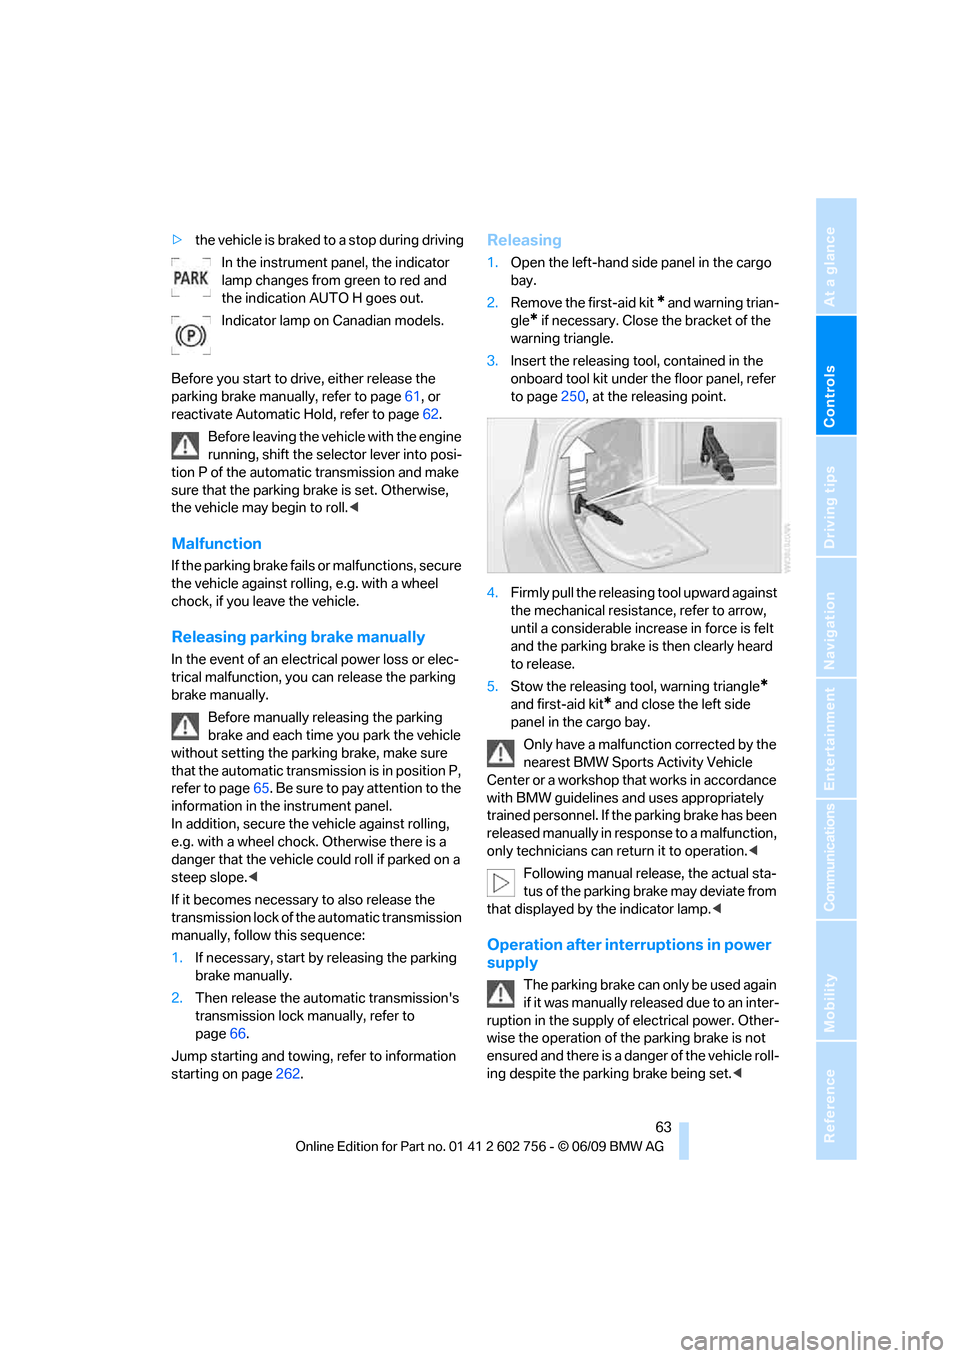
3.Insert the releasing tool, contained in the
onboard tool kit under the floor panel, refer
to page250, at the releasing point.
4.Firmly pull the releasing tool upward against
the mechanical resistance, refer to arrow,
until a considerable increase in force is felt
and the parking brake is then clearly heard
to release.
5.Stow the releasing tool, warning triangle
*
and first-aid kit* and close the left side
panel in the cargo bay.
Only have a malfunction corrected by the
nearest BMW Sports Activity Vehicle
Center or a workshop that works in accordance
with BMW guidelines and uses appropriately
trained personnel. If the parking brake has been
released manually in response to a malfunction,
only technicians can return it to operation.<
Following manual release, the actual sta-
tus of the parking brake may deviate from
that displayed by the indicator lamp.<
Operation after interruptions in power
supply
The parking brake can only be used again
if it was manually released due to an inter-
ruption in the supply of electrical power. Other-
wise the operation of the parking brake is not
ensured and there is a danger of the vehicle roll-
ing despite the parking brake being set.<
ba8_e70ag.book Seite 63 Freitag, 5. Juni 2009 11:42 11
Page 72 of 300
Driving
70 >Each time the lever is pressed beyond the
resistance point, the desired speed
increases by a maximum of 5 mph or 10 km/
h.
The system stores the setting and maintains
the set speed.
Accelerating with lever
Accelerate slightly:
Press the lever up to the resistance point,
arrow1, until the desired speed is reached.
Accelerate more rapidly:
Press the lever beyond the resistance point,
arrow1, until the desired speed is reached.
The vehicle accelerates without pressure on
the accelerator pedal. The system stores the
setting and maintains the set speed.
Reducing speed
Repeatedly pull the lever up to the resistance
point or beyond, arrow2, until the desired
speed is displayed.
>Each time the lever is pulled up to the resis-
tance point, the desired speed decreases
by approx. 1 mph or 1 km/h.
>Each time the lever is pulled beyond the
resistance point, the desired speed is
decreased by a maximum of 5 mph or
10 km/h until the minimum speed of
20 mph or 30 km/h is reached.
The system stores the setting and maintains
the set speed.
Deactivating cruise control
Briefly press the lever up or down, arrow3.
The displays in the speedometer go out.
In addition, the system is automatically deacti-
vated:
>when braking
>when transmission position N is engaged
>when DTC is activated or DSC is deacti-
vated
>when HDC is activated>when the parking brake is set
>when driving stability control systems inter-
vene
Accelerating does not deactivate the cruise
control. After releasing the accelerator pedal,
the stored speed is reached and maintained
again.
Warning lamp
The warning lamp lights up if the
cruise control has been deactivated
automatically, e.g. by a control inter-
vention of the DSC. A message appears on the
Control Display.
Resuming stored speed
Briefly press the button, arrow4. The stored
speed is resumed and maintained.
With the ignition switched off, the stored speed
value is deleted and cannot be resumed again.
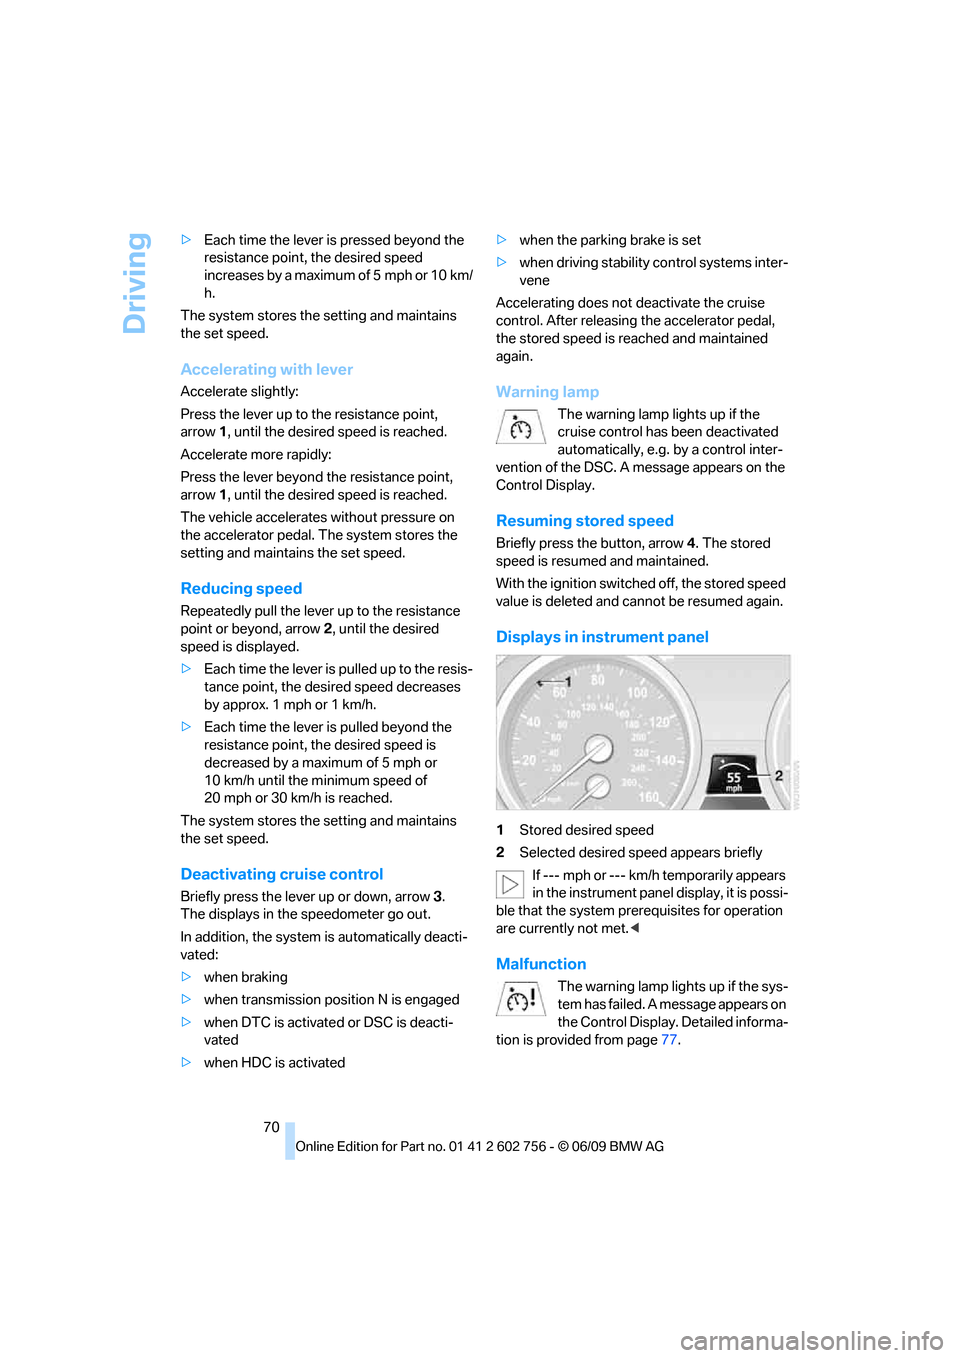
Displays in instrument panel
1Stored desired speed
2Selected desired speed appears briefly
If --- mph or --- km/h temporarily appears
in the instrument panel display, it is possi-
ble that the system prerequisites for operation
are currently not met.<
Malfunction
The warning lamp lights up if the sys-
tem has failed. A message appears on
the Control Display. Detailed informa-
tion is provided from page77.
ba8_e70ag.book Seite 70 Freitag, 5. Juni 2009 11:42 11
Page 73 of 300
Controls
71Reference
At a glance
Driving tips
Communications
Navigation
Entertainment
Mobility
Everything under control
Odometer, outside
temperature display, clock
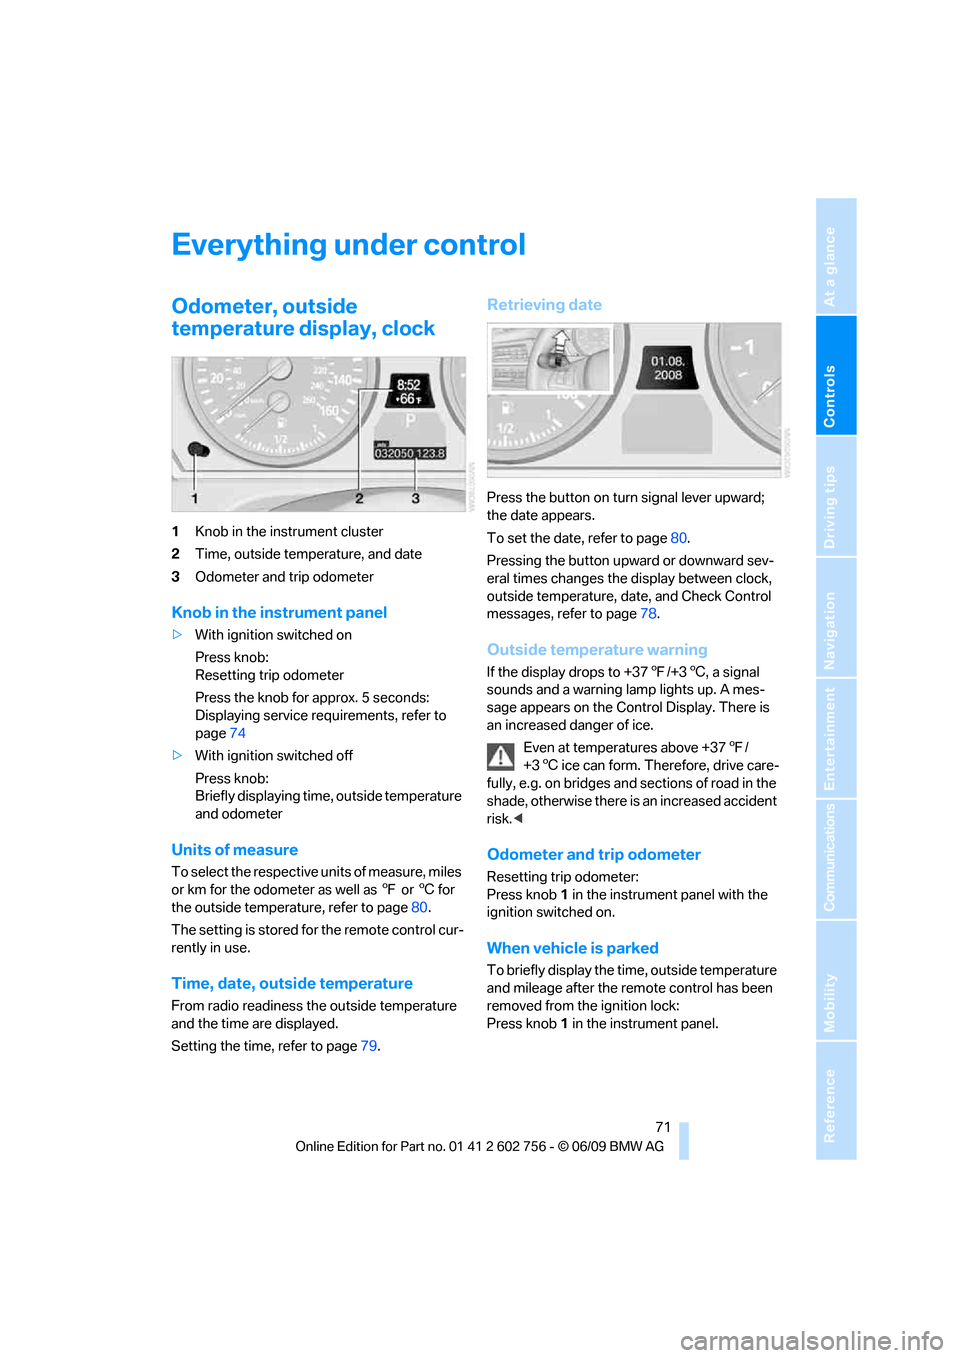
1Knob in the instrument cluster
2Time, outside temperature, and date
3Odometer and trip odometer
Knob in the instrument panel
>With ignition switched on
Press knob:
Resetting trip odometer
Press the knob for approx. 5 seconds:
Displaying service requirements, refer to
page74
>With ignition switched off
Press knob:
Briefly displaying time, outside temperature
and odometer
Units of measure
To select the respective units of measure, miles
or km for the odometer as well as 7 or 6 for
the outside temperature, refer to page80.
The setting is stored for the remote control cur-
rently in use.
Time, date, outside temperature
From radio readiness the outside temperature
and the time are displayed.
Setting the time, refer to page79.
Retrieving date
Press the button on turn signal lever upward;
the date appears.
To set the date, refer to page80.
Pressing the button upward or downward sev-
eral times changes the display between clock,
outside temperature, date, and Check Control
messages, refer to page78.
Outside temperature warning
If the display drops to +377/+36, a signal
sounds and a warning lamp lights up. A mes-
sage appears on the Control Display. There is
an increased danger of ice.
Even at temperatures above +377/
+36 ice can form. Therefore, drive care-
fully, e.g. on bridges and sections of road in the
shade, otherwise there is an increased accident
risk.<
Odometer and trip odometer
Resetting trip odometer:
Press knob 1 in the instrument panel with the
ignition switched on.
When vehicle is parked
To briefly display the time, outside temperature
and mileage after the remote control has been
removed from the ignition lock:
Press knob 1 in the instrument panel.
ba8_e70ag.book Seite 71 Freitag, 5. Juni 2009 11:42 11
Page 74 of 300
Everything under control
72
Tachometer
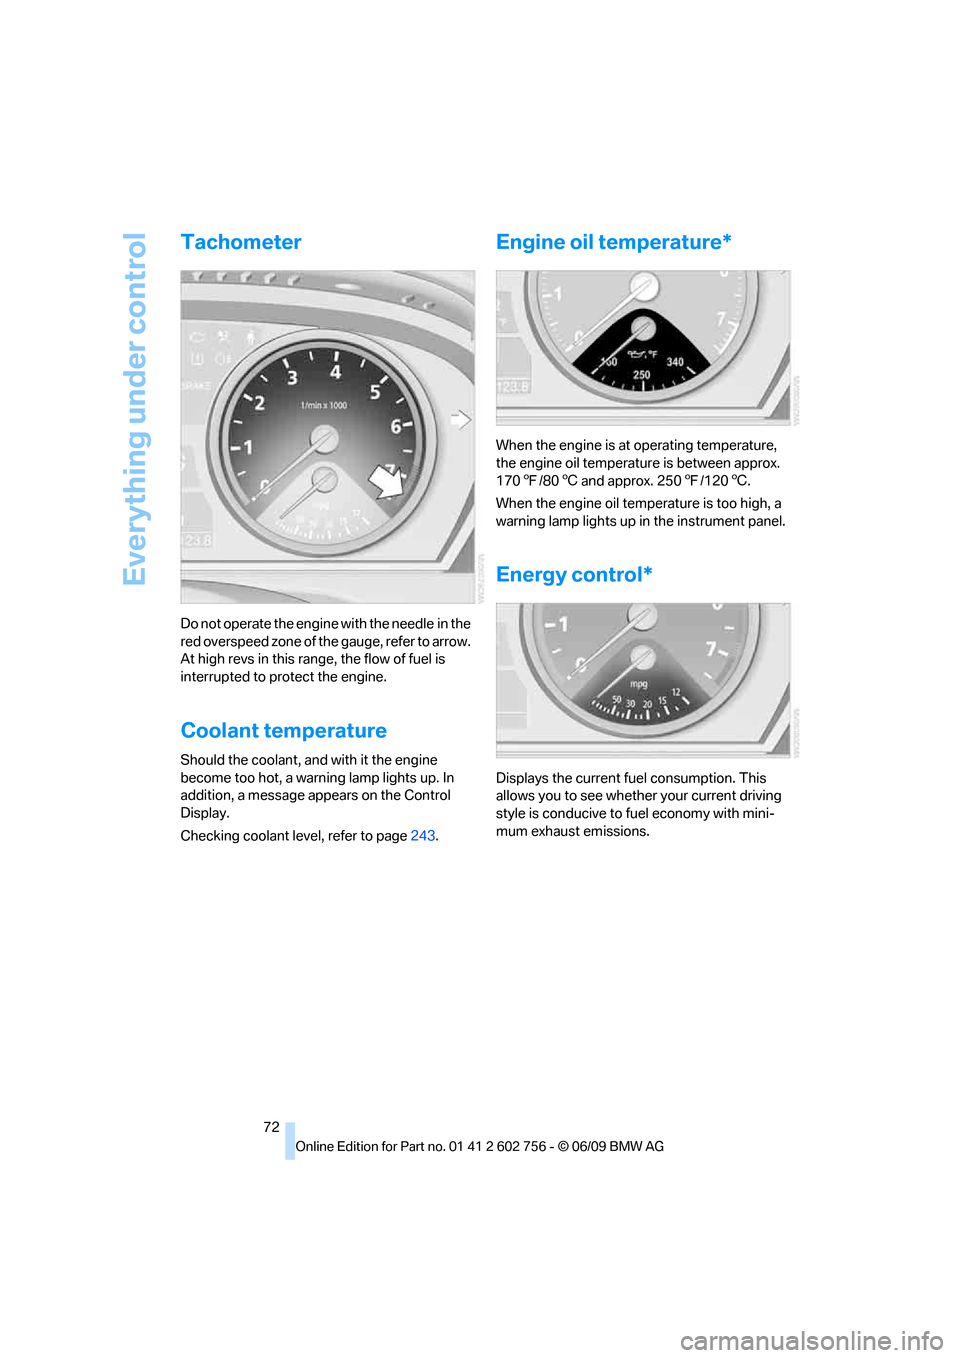
Do not operate the engine with the needle in the
red overspeed zone of the gauge, refer to arrow.
At high revs in this range, the flow of fuel is
interrupted to protect the engine.
Coolant temperature
Should the coolant, and with it the engine
become too hot, a warning lamp lights up. In
addition, a message appears on the Control
Display.
Checking coolant level, refer to page243.
Engine oil temperature*
When the engine is at operating temperature,
the engine oil temperature is between approx.
1707/806 and approx. 2507/1206.
When the engine oil temperature is too high, a
warning lamp lights up in the instrument panel.
Energy control*
Displays the current fuel consumption. This
allows you to see whether your current driving
style is conducive to fuel economy with mini-
mum exhaust emissions.
ba8_e70ag.book Seite 72 Freitag, 5. Juni 2009 11:42 11
Page 79 of 300
Controls
77Reference
At a glance
Driving tips
Communications
Navigation
Entertainment
Mobility
You can check when your BMW Sports Activity
Vehicle Center was notified.
1."Vehicle Info"
2."Vehicle status"
3."Options"
4."Last Service Request"
Check Control
The concept
The Check Control monitors functions in the
vehicle and issues a message if there is a mal-
function in the monitored systems. This kind of
Check Control message consists of indicator
and warning lamps in the instrument cluster,
and if necessary an acoustic signal and text
messages at the bottom of the Control Display.
Indicator and warning lamps
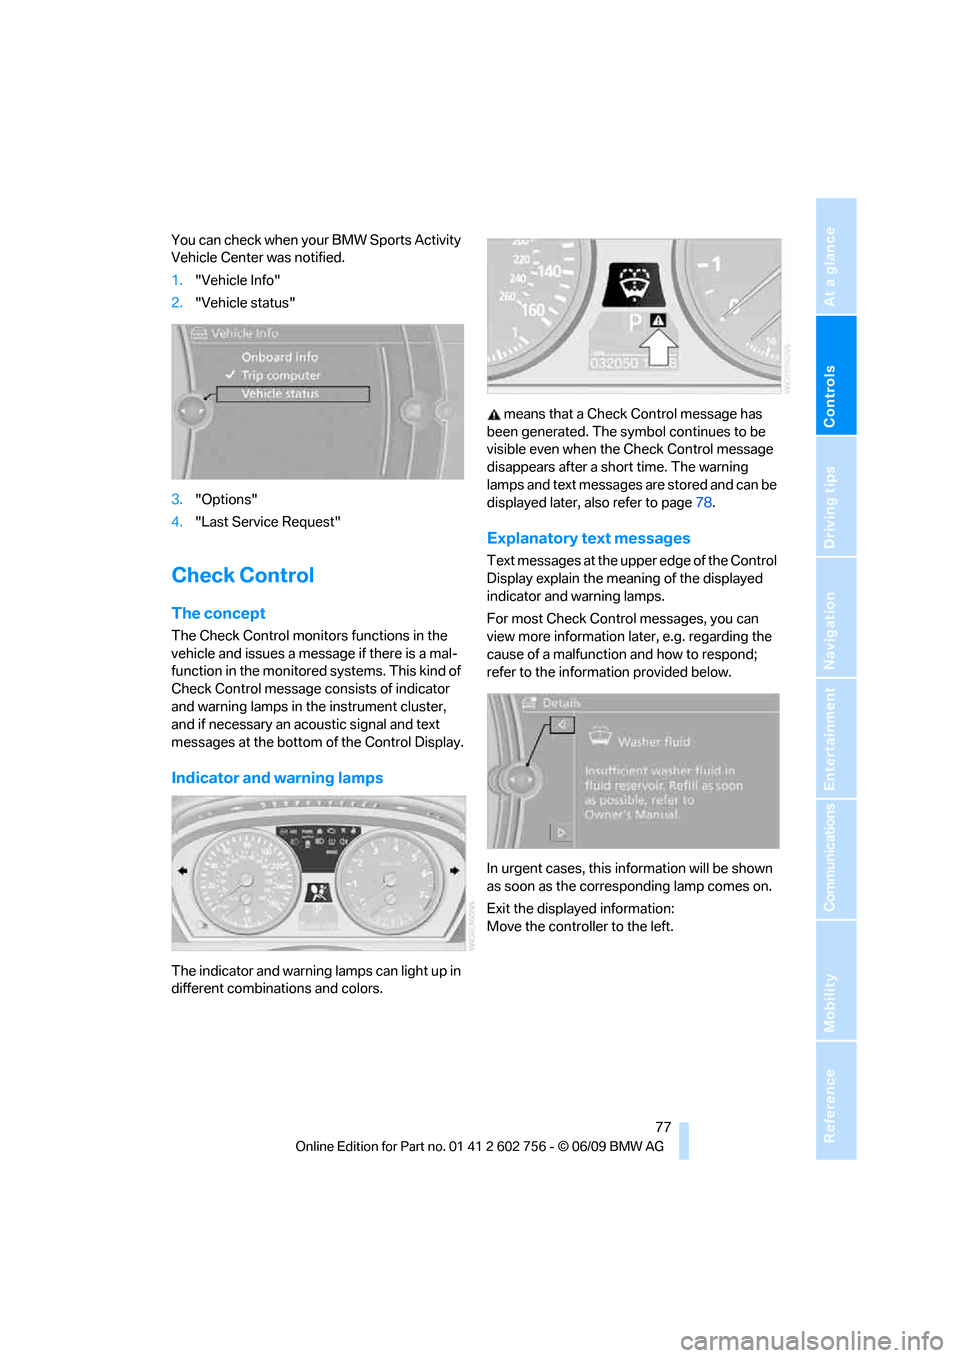
The indicator and warning lamps can light up in
different combinations and colors. means that a Check Control message has
been generated. The symbol continues to be
visible even when the Check Control message
disappears after a short time. The warning
lamps and text messages are stored and can be
displayed later, also refer to page78.
Explanatory text messages
Text messages at the upper edge of the Control
Display explain the meaning of the displayed
indicator and warning lamps.
For most Check Control messages, you can
view more information later, e.g. regarding the
cause of a malfunction and how to respond;
refer to the information provided below.
In urgent cases, this information will be shown
as soon as the corresponding lamp comes on.
Exit the displayed information:
Move the controller to the left.
ba8_e70ag.book Seite 77 Freitag, 5. Juni 2009 11:42 11
Page 80 of 300
Everything under control
78
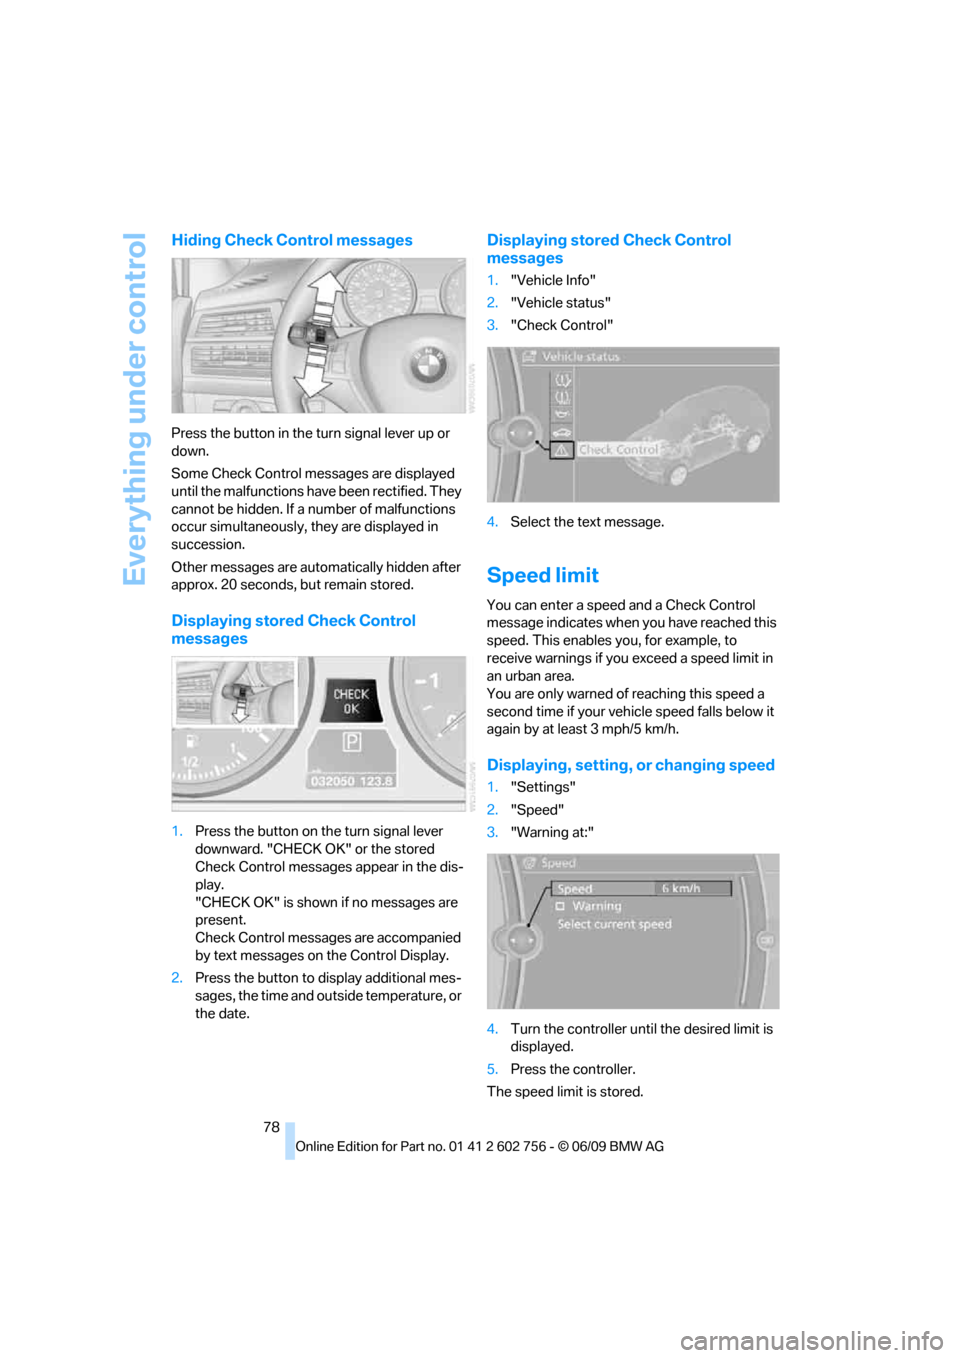
Hiding Check Control messages
Press the button in the turn signal lever up or
down.
Some Check Control messages are displayed
until the malfunctions have been rectified. They
cannot be hidden. If a number of malfunctions
occur simultaneously, they are displayed in
succession.
Other messages are automatically hidden after
approx. 20 seconds, but remain stored.
Displaying stored Check Control
messages
1.Press the button on the turn signal lever
downward. "CHECK OK" or the stored
Check Control messages appear in the dis-
play.
"CHECK OK" is shown if no messages are
present.
Check Control messages are accompanied
by text messages on the Control Display.
2.Press the button to display additional mes-
sages, the time and outside temperature, or
the date.
Displaying stored Check Control
messages
1."Vehicle Info"
2."Vehicle status"
3."Check Control"
4.Select the text message.
Speed limit
You can enter a speed and a Check Control
message indicates when you have reached this
speed. This enables you, for example, to
receive warnings if you exceed a speed limit in
an urban area.
You are only warned of reaching this speed a
second time if your vehicle speed falls below it
again by at least 3 mph/5 km/h.
Displaying, setting, or changing speed
1."Settings"
2."Speed"
3."Warning at:"
4.Turn the controller until the desired limit is
displayed.
5.Press the controller.
The speed limit is stored.
ba8_e70ag.book Seite 78 Freitag, 5. Juni 2009 11:42 11
Page 81 of 300
Controls
79Reference
At a glance
Driving tips
Communications
Navigation
Entertainment
Mobility
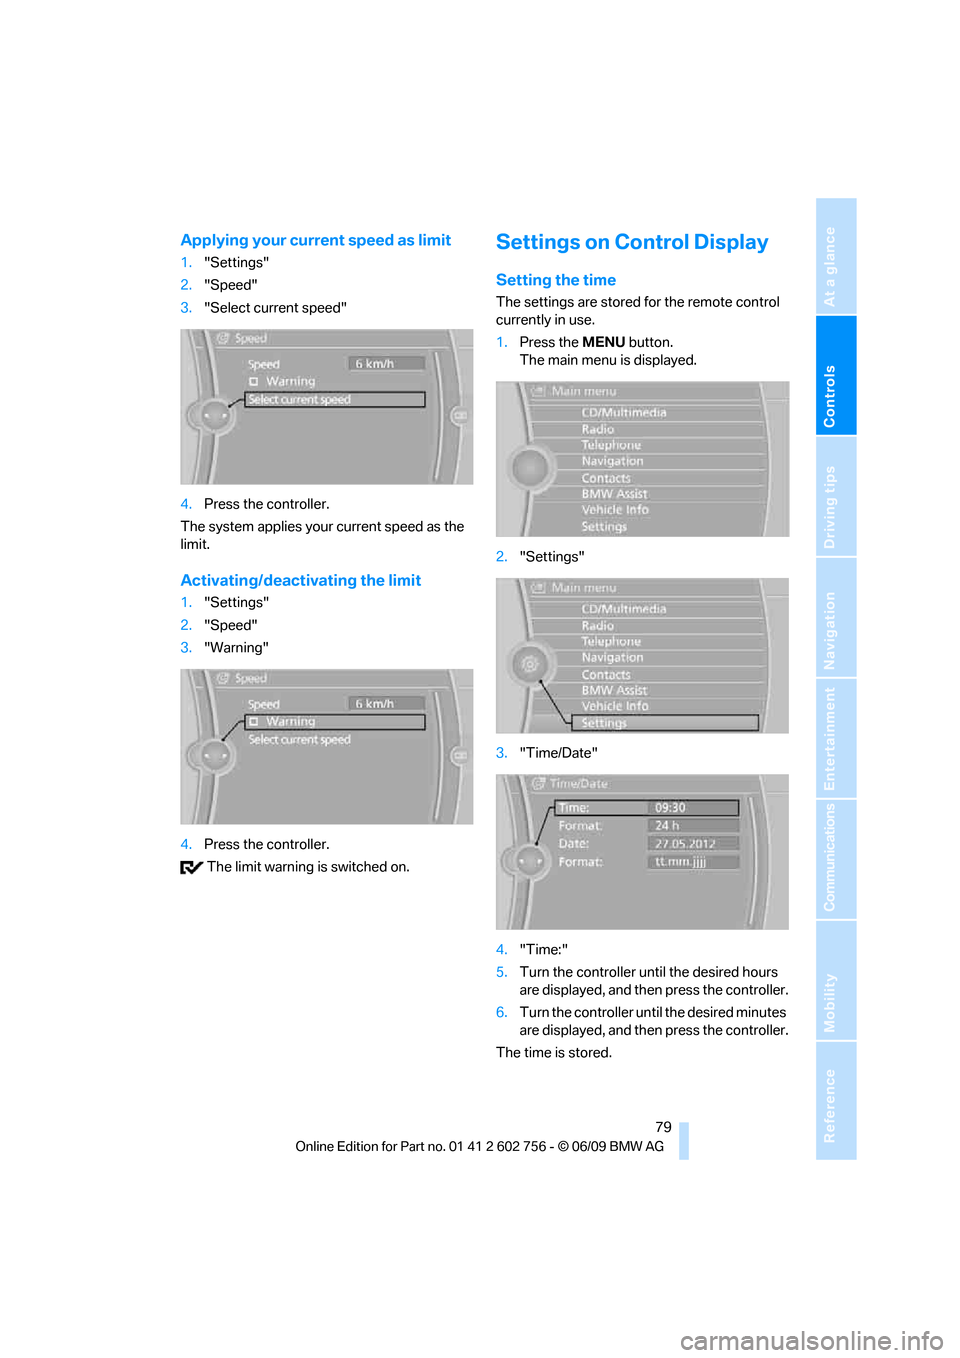
Applying your current speed as limit
1."Settings"
2."Speed"
3."Select current speed"
4.Press the controller.
The system applies your current speed as the
limit.
Activating/deactivating the limit
1."Settings"
2."Speed"
3."Warning"
4.Press the controller.
The limit warning is switched on.
Settings on Control Display
Setting the time
The settings are stored for the remote control
currently in use.
1.Press the MENUbutton.
The main menu is displayed.
2."Settings"
3."Time/Date"
4."Time:"
5.Turn the controller until the desired hours
are displayed, and then press the controller.
6.Turn the controller until the desired minutes
are displayed, and then press the controller.
The time is stored.
ba8_e70ag.book Seite 79 Freitag, 5. Juni 2009 11:42 11
Page 83 of 300
Controls
81Reference
At a glance
Driving tips
Communications
Navigation
Entertainment
Mobility
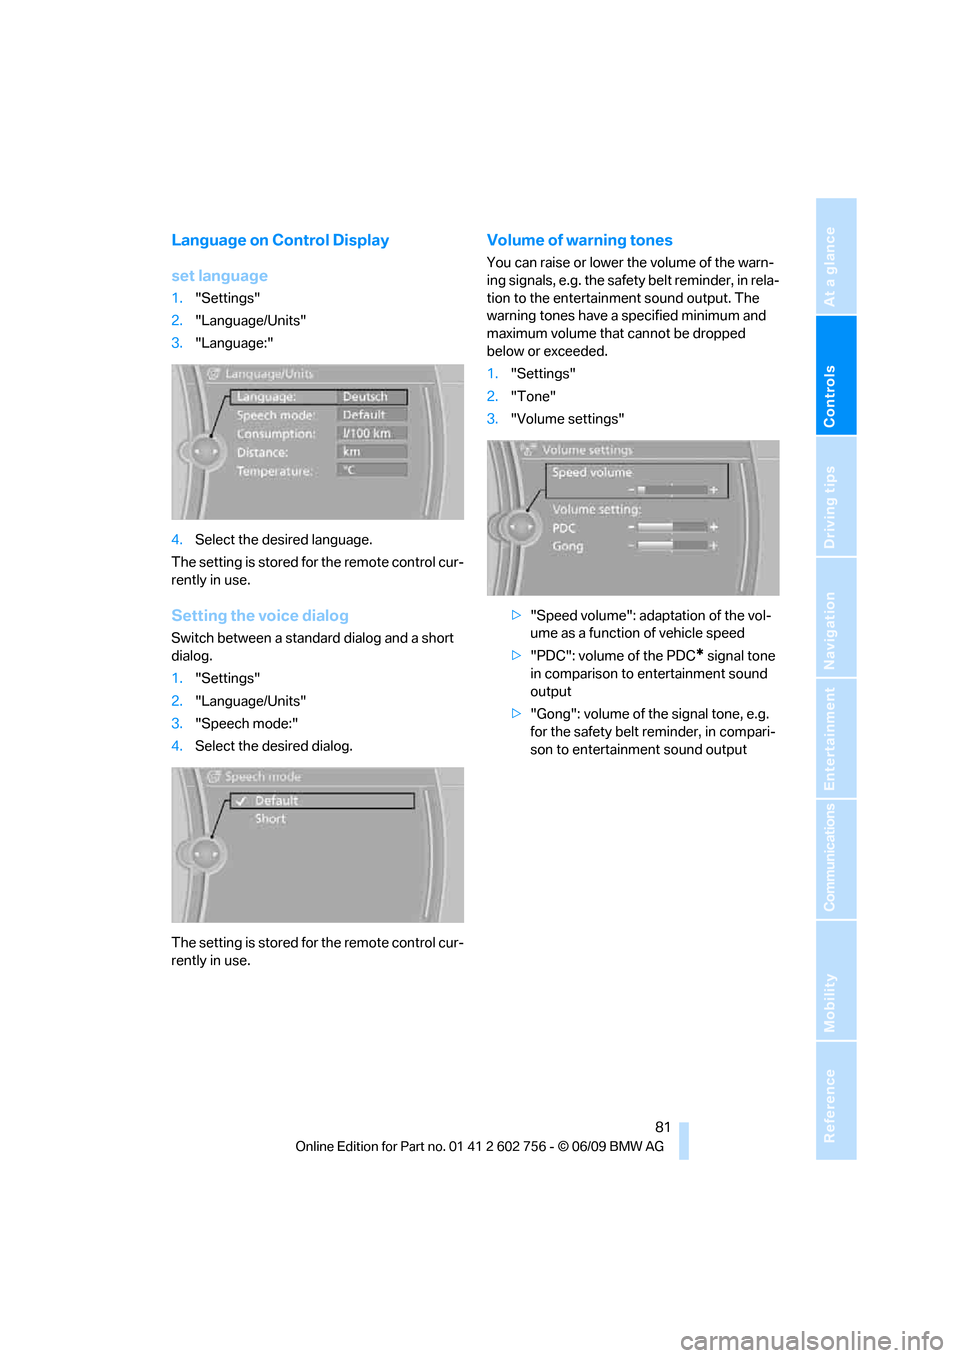
Language on Control Display
set language
1."Settings"
2."Language/Units"
3."Language:"
4.Select the desired language.
The setting is stored for the remote control cur-
rently in use.
Setting the voice dialog
Switch between a standard dialog and a short
dialog.
1."Settings"
2."Language/Units"
3."Speech mode:"
4.Select the desired dialog.
The setting is stored for the remote control cur-
rently in use.
Volume of warning tones
You can raise or lower the volume of the warn-
ing signals, e.g. the safety belt reminder, in rela-
tion to the entertainment sound output. The
warning tones have a specified minimum and
maximum volume that cannot be dropped
below or exceeded.
1."Settings"
2."Tone"
3."Volume settings"
>"Speed volume": adaptation of the vol-
ume as a function of vehicle speed
>"PDC": volume of the PDC
* signal tone
in comparison to entertainment sound
output
>"Gong": volume of the signal tone, e.g.
for the safety belt reminder, in compari-
son to entertainment sound output
ba8_e70ag.book Seite 81 Freitag, 5. Juni 2009 11:42 11
Page 84 of 300
Technology for comfort, convenience and safety
82
Technology for comfort, convenience and
safety
PDC Park Distance Control*
The concept
In addition to the PDC Park Distance Control,
the rear view camera
*, refer to page86, can
also be switched on.
PDC assists you during parking. A slow
approach to an object in front of or behind your
vehicle is announced by:
>Signal tones
>Optical displays
Measurement
Ultrasonic sensors in the bumpers carry out the
measurement.
Their range is approx. 7 ft/2 m.
The acoustic warning begins:
>at approx. 24 in/60 cm for the front
* sen-
sors and the two rear corner sensors.
>at approx. 5 ft/1.50 m for the middle sen-
sors in the rear.
System limitations
PDC cannot replace the personal assess-
ment of the traffic situation. Also make a
direct visual check of the traffic situation around
the vehicle. Otherwise, there could be a risk of
accident, for example due to other road users or
objects outside the detection range of PDC.
Loud sources of sound, inside and outside the
vehicle, could drown out the PDC signal tone.<
Avoid approaching an object too quickly.
Avoid starting off quickly while PDC is not
yet activated.
Otherwise, physical circumstances could cause
the system to issue a warning late.<
Limitations of ultrasonic measurement
The detection of objects can come up against
the limitations of physical ultrasonic measure-
ment, for example:
>when using tow bars and towing hitches
>in the presence of thin or wedge-shaped
objects
>in the presence of low objects
>in the presence of objects with corners and
sharp edges
Low objects that have already been displayed,
e.g. curbs, can disappear again from the detec-
tion area of the sensors before or after a contin-
uous tone sounds.
Higher, protruding objects, e.g. ledges, cannot
be detected.
False warnings
Under the following conditions, PDC may dis-
play a warning even though no obstacle is
present in the detection range:
>in heavy rain
>when the sensors are heavily soiled or iced-
over
>when the sensors are covered with snow
>on rough road surfaces
>in large, rectangular buildings with smooth
walls, e.g. underground garages
>in the presence of heavy exhaust
>due to the presence of other ultrasonic
sources such as street sweepers, steam
cleaners, or neon lamps.
Automatic activation
With the engine running or the ignition switched
on, shift the selector lever into position R.
ba8_e70ag.book Seite 82 Freitag, 5. Juni 2009 11:42 11