remote start BMW X5 XDRIVE 35D 2009 E70 Owner's Guide
[x] Cancel search | Manufacturer: BMW, Model Year: 2009, Model line: X5 XDRIVE 35D, Model: BMW X5 XDRIVE 35D 2009 E70Pages: 317, PDF Size: 9.56 MB
Page 113 of 317
Controls
111Reference
At a glance
Driving tips
Communications
Navigation
Entertainment
Mobility
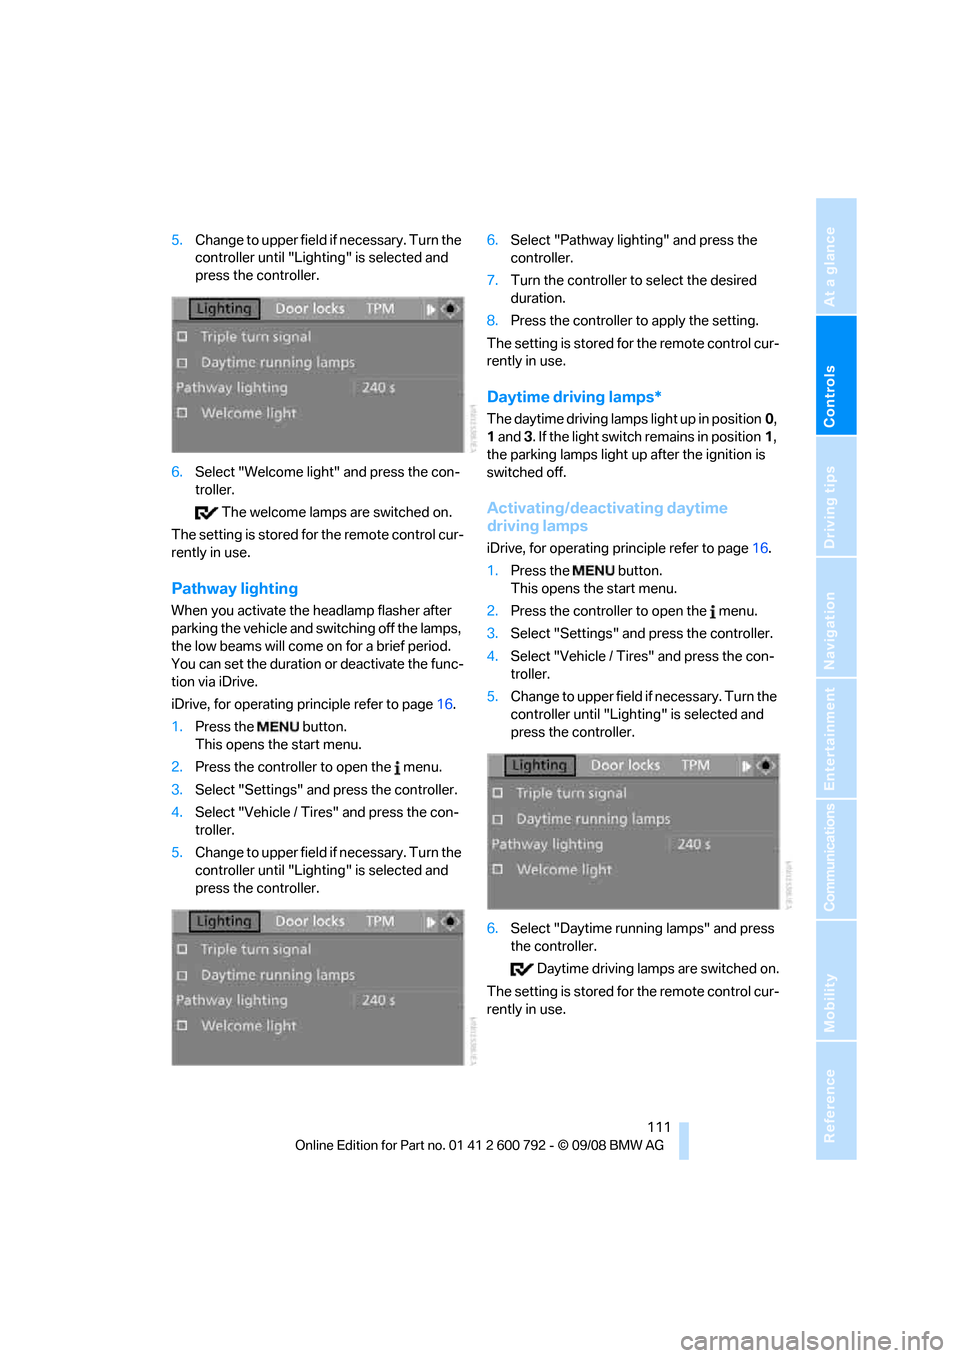
5.Change to upper field if necessary. Turn the
controller until "Lighting" is selected and
press the controller.
6. Select "Welcome light" and press the con-
troller.
The welcome lamps are switched on.
The setting is stored for the remote control cur-
rently in use.
Pathway lighting
When you activate the headlamp flasher after
parking the vehicle and sw itching off the lamps,
the low beams will come on for a brief period.
You can set the duration or deactivate the func-
tion via iDrive.
iDrive, for operating principle refer to page 16.
1. Press the button.
This opens the start menu.
2. Press the controller to open the menu.
3. Select "Settings" and press the controller.
4. Select "Vehicle / Tire s" and press the con-
troller.
5. Change to upper field if necessary. Turn the
controller until "Lighting" is selected and
press the controller. 6.
Select "Pathway lighting" and press the
controller.
7. Turn the controller to select the desired
duration.
8. Press the controller to apply the setting.
The setting is stored for the remote control cur-
rently in use.
Daytime driving lamps*
The daytime driving lamps light up in position 0,
1 and 3. If the light switch remains in position 1,
the parking lamps light up after the ignition is
switched off.
Activating/deactivating daytime
driving lamps
iDrive, for operating pr inciple refer to page16.
1. Press the button.
This opens the start menu.
2. Press the controller to open the menu.
3. Select "Settings" and press the controller.
4. Select "Vehicle / Tire s" and press the con-
troller.
5. Change to upper field if necessary. Turn the
controller until "Lighting" is selected and
press the controller.
6. Select "Daytime runn ing lamps" and press
the controller.
Daytime driving lamps are switched on.
The setting is stored for the remote control cur-
rently in use.
Page 117 of 317
Controls
115Reference
At a glance
Driving tips
Communications
Navigation
Entertainment
Mobility
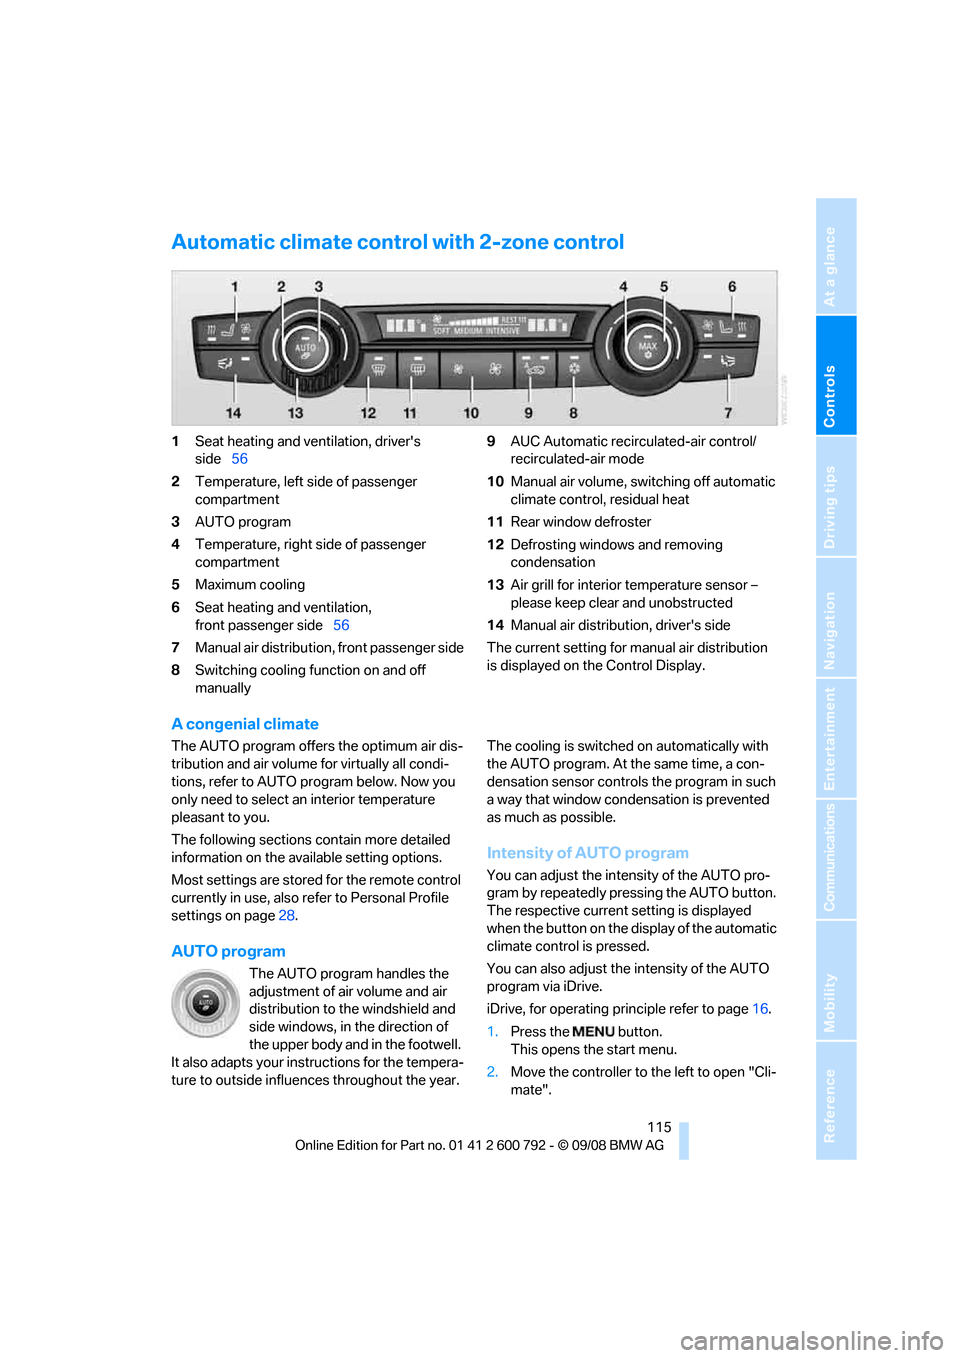
Automatic climate control with 2-zone control
1Seat heating and ventilation, driver's
side 56
2 Temperature, left side of passenger
compartment
3 AUTO program
4 Temperature, right side of passenger
compartment
5 Maximum cooling
6 Seat heating
and ventilation,
front passenger side 56
7 Manual air distribution, front passenger side
8 Switching cooling function on and off
manually 9
AUC Automatic recirculated-air control/
recirculated-air mode
10 Manual air volume, sw itching off automatic
climate control, residual heat
11 Rear window defroster
12 Defrosting windows and removing
condensation
13 Air grill for interior temperature sensor –
please keep clear and unobstructed
14 Manual air distribution, driver's side
The current setting for manual air distribution
is displayed on the Control Display.
A congenial climate
The AUTO program offers the optimum air dis-
tribution and air volume for virtually all condi-
tions, refer to AUTO pr ogram below. Now you
only need to select an interior temperature
pleasant to you.
The following sections contain more detailed
information on the available setting options.
Most settings are stored for the remote control
currently in use, also re fer to Personal Profile
settings on page 28.
AUTO program
The AUTO program handles the
adjustment of air volume and air
distribution to the windshield and
side windows, in the direction of
the upper body and in the footwell.
It also adapts your inst ructions for the tempera-
ture to outside influenc es throughout the year. The cooling is switched
on automatically with
the AUTO program. At the same time, a con-
densation sensor controls the program in such
a way that window condensation is prevented
as much as possible.
Intensity of AUTO program
You can adjust the intensity of the AUTO pro-
gram by repeatedly pr essing the AUTO button.
The respective current setting is displayed
when the button on the display of the automatic
climate control is pressed.
You can also adjust the intensity of the AUTO
program via iDrive.
iDrive, for operating pr inciple refer to page16.
1. Press the button.
This opens the start menu.
2. Move the controller to the left to open "Cli-
mate".
Page 125 of 317
Controls
123Reference
At a glance
Driving tips
Communications
Navigation
Entertainment
Mobility
Practical interior accessories
Integrated universal remote
control*
The concept
The integrated universal remote control can
replace as many as three hand-held transmit-
ters for various remote -controlled accessories,
such as garage and gate or lighting systems.
The integrated universal remote control regis-
ters and stores signals from the original hand-
held transmitters.
The signal of an original hand-held transmitter
can be programmed on one of the three mem-
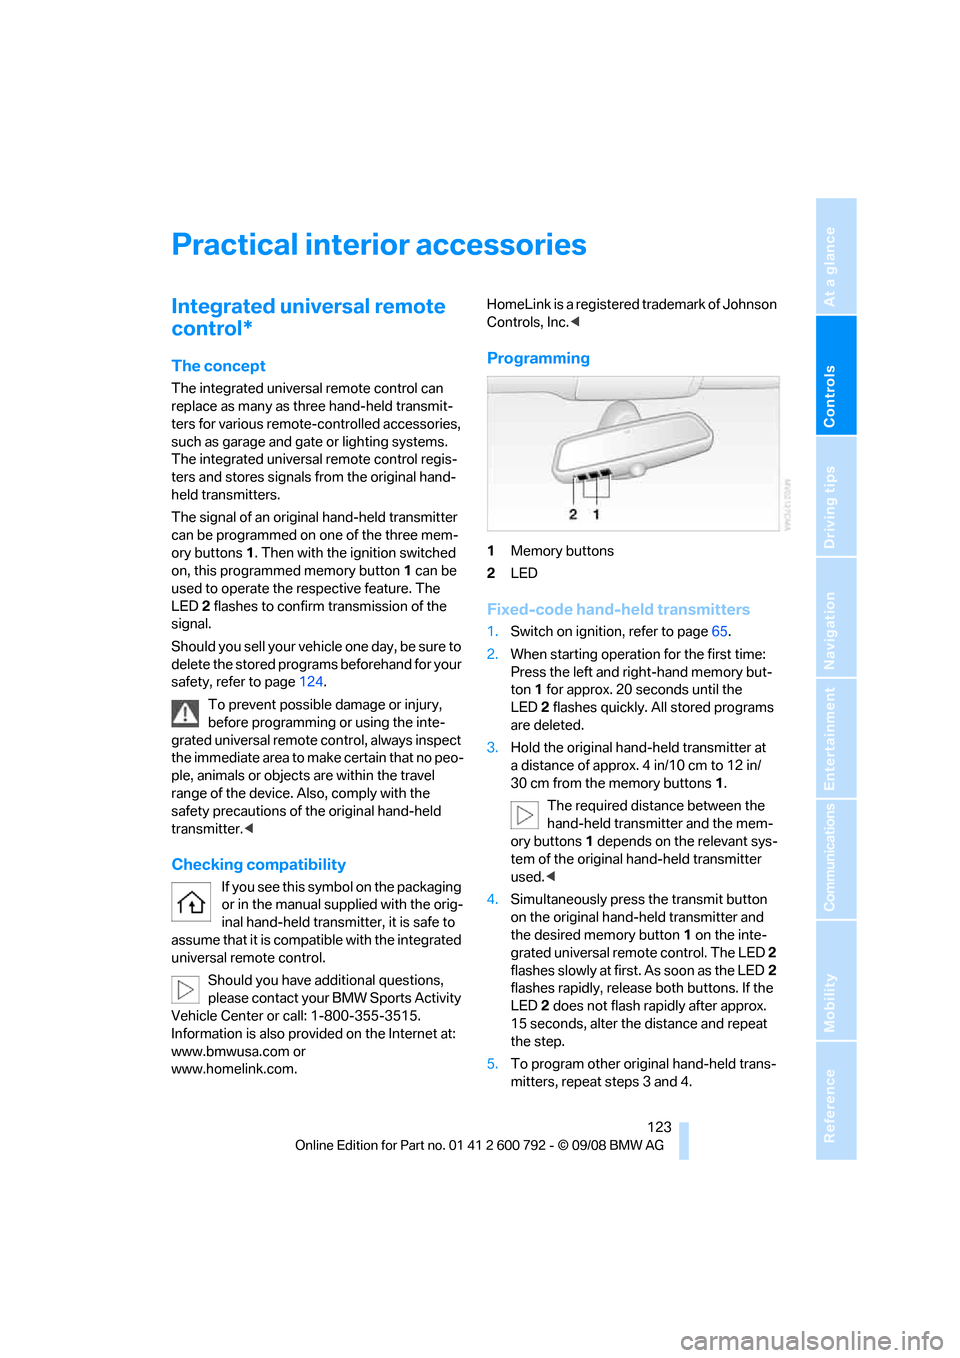
ory buttons 1. Then with the ignition switched
on, this programme d memory button1 can be
used to operate the respective feature. The
LED 2 flashes to confirm transmission of the
signal.
Should you sell your vehicl e one day, be sure to
delete the stored progra ms beforehand for your
safety, refer to page 124.
To prevent possible damage or injury,
before programming or using the inte-
grated universal remote control, always inspect
the immediate area to make certain that no peo-
ple, animals or objects are within the travel
range of the device. Also, comply with the
safety precautions of the original hand-held
transmitter. <
Checking compatibility
If you see this symbol on the packaging
or in the manual supplied with the orig-
inal hand-held transmitter, it is safe to
assume that it is compat ible with the integrated
universal remote control.
Should you have additional questions,
please contact your BMW Sports Activity
Vehicle Center or call: 1-800-355-3515.
Information is also provided on the Internet at:
www.bmwusa.com or
www.homelink.com. HomeLink is a registered trademark of Johnson
Controls, Inc.
<
Programming
1Memory buttons
2 LED
Fixed-code hand-held transmitters
1.Switch on ignition, refer to page 65.
2. When starting operation for the first time:
Press the left and ri ght-hand memory but-
ton 1 for approx. 20 seconds until the
LED 2 flashes quickly. All stored programs
are deleted.
3. Hold the original hand-held transmitter at
a distance of approx. 4 in/10 cm to 12 in/
30 cm from the memory buttons 1.
The required distance between the
hand-held transmitter and the mem-
ory buttons 1 depends on the relevant sys-
tem of the original hand-held transmitter
used. <
4. Simultaneously press the transmit button
on the original hand-held transmitter and
the desired memory button 1 on the inte-
grated universal remote control. The LED 2
flashes slowly at first. As soon as the LED 2
flashes rapidly, releas e both buttons. If the
LED 2 does not flash rapidly after approx.
15 seconds, alter the distance and repeat
the step.
5. To program other original hand-held trans-
mitters, repeat steps 3 and 4.
Page 168 of 317
Destination guidance
166
Setting volume of voice instructions
The volume can only be adjusted while a voice
instruction is being output.
1.Repeat the last voice instruction, if neces-
sary.
2. Turn the knob during the voice instruction
to select the desired volume.
This volume is independen t of the volume of the
audio sources.
The setting is stored fo r the remote control cur-
rently in use.
Changing route
During destination guidan ce, you can revise the
navigation system's route recommendations to
avoid particular stretches of road. Enter the
number of miles/kilomete rs that you want to
travel before returning to the original route.
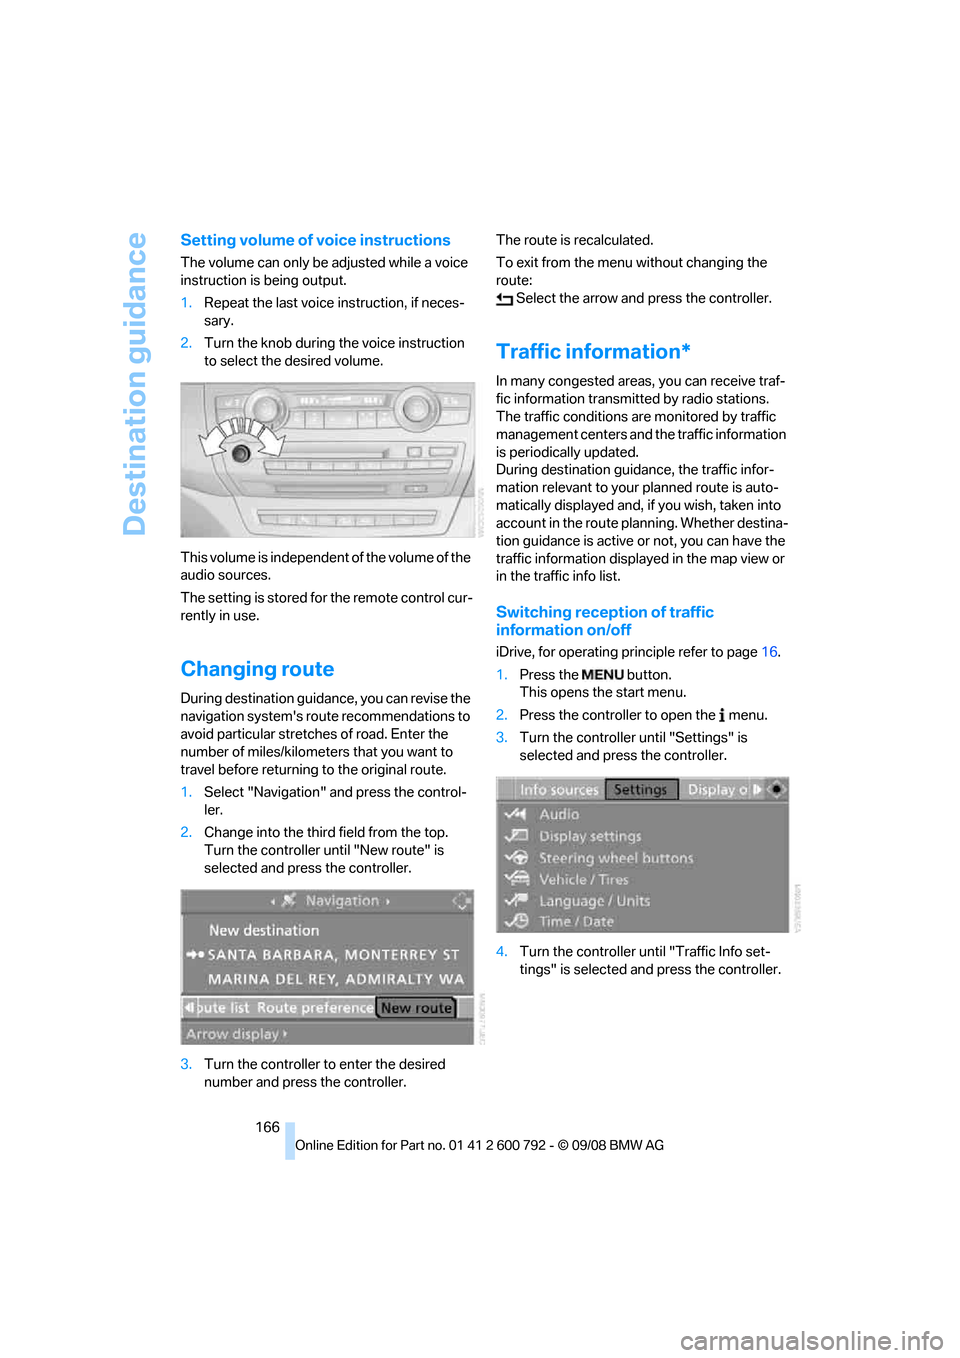
1. Select "Navigation" and press the control-
ler.
2. Change into the third field from the top.
Turn the controller until "New route" is
selected and press the controller.
3. Turn the controller to enter the desired
number and press the controller. The route is recalculated.
To exit from the menu without changing the
route:
Select the arrow and press the controller.
Traffic information*
In many congested areas, you can receive traf-
fic information transmitted by radio stations.
The traffic conditions ar e monitored by traffic
management centers and the traffic information
is periodically updated.
During destination guid ance, the traffic infor-
mation relevant to your planned route is auto-
matically displayed and, if you wish, taken into
account in the route planning. Whether destina-
tion guidance is active or not, you can have the
traffic information displayed in the map view or
in the traffic info list.
Switching reception of traffic
information on/off
iDrive, for operating pr inciple refer to page16.
1. Press the button.
This opens the start menu.
2. Press the controller to open the menu.
3. Turn the controller until "Settings" is
selected and press the controller.
4. Turn the controller until "Traffic Info set-
tings" is selected and press the controller.
Page 177 of 317
Navigation
Entertainment
Driving tips
175Reference
At a glance
Controls
Communications
Mobility
You have the following choices:
>"FM" and "AM": radio reception
> "WB": Weather Band station
> "SAT": satellite radio
*
>"CD": CD player or changer*
>"AUX": AUX-In connection, USB audio
interface
*
>"Set": depending on the audio source,
other adjustments can be made, e.g. with
the radio: update st ation with strongest
reception, store station, tone control, sam-
ple stations.
From another menu, you can change
directly to the scr een last displayed,
refer to Comfort opening of menu items,
page 18.<
From radio readiness, the selected audio
source is stored for the remote control currently
in use.
Switching on/off
To switch the Entertainment sound output on
and off:
Press knob 1 on the CD player.
This symbol on the Control Display indi-
cates that sound output is switched off.
For equipment with a single drive, the sound
output is available for approx. 20 minutes with
the ignition switched off.
Switch on the sound output again for this pur-
pose.
Adjusting volume
Turn knob 1 on the CD player until the desired
volume is set.
You can also adjust the volume with buttons on
the steering wheel, refer to page 11.
From radio readiness, the setting is stored for
the remote control currently in use.
Tone control
You can alter various tone settings, e.g. treble
and bass, or the speed-dependent volume
increase.
The tone settings are set for all audio sources at
once.
From radio readiness, the settings are stored
for the remote contro l currently in use.
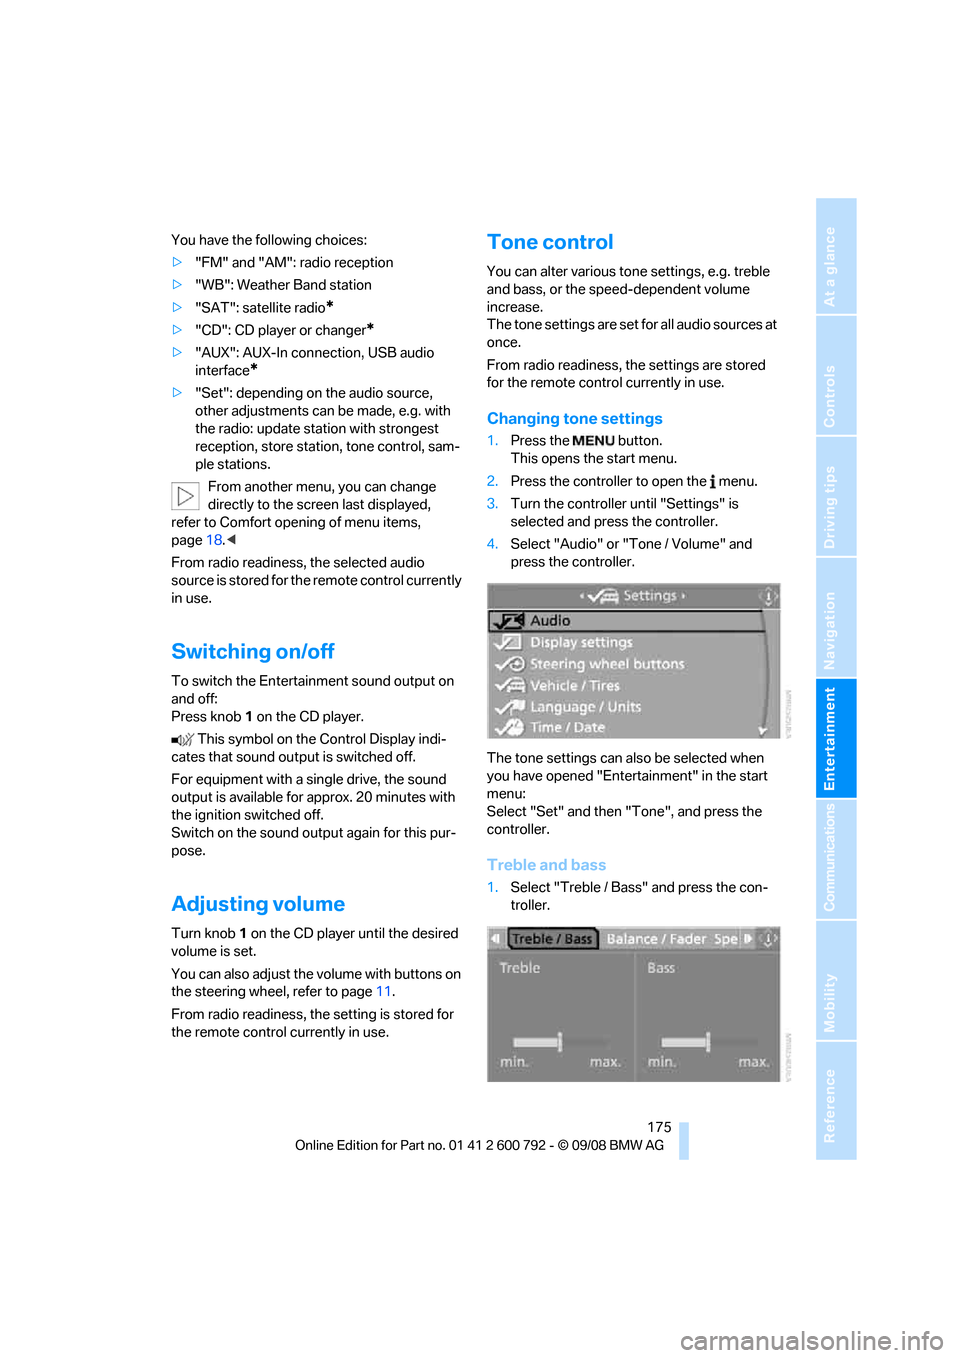
Changing tone settings
1.Press the button.
This opens the start menu.
2. Press the controller to open the menu.
3. Turn the controller until "Settings" is
selected and press the controller.
4. Select "Audio" or "Tone / Volume" and
press the controller.
The tone settings can also be selected when
you have opened "Entertainment" in the start
menu:
Select "Set" and then "Tone", and press the
controller.
Treble and bass
1. Select "Treble / Bass" and press the con-
troller.
Page 183 of 317
Navigation
Entertainment
Driving tips
181Reference
At a glance
Controls
Communications
Mobility
5.Turn the controller until the desired mem-
ory position is selected.
The number of the memory position
appears beside the na me or frequency of
the station.
6. Press the controller.
The station is stored.
RDS Radio Data System
In the FM frequency range, additional informa-
tion is transmitted via RDS. If the reception con-
ditions are good, the station names are shown
on the Control Display. If the reception is weak
or disrupted, it can take some time before the
station names are displayed.
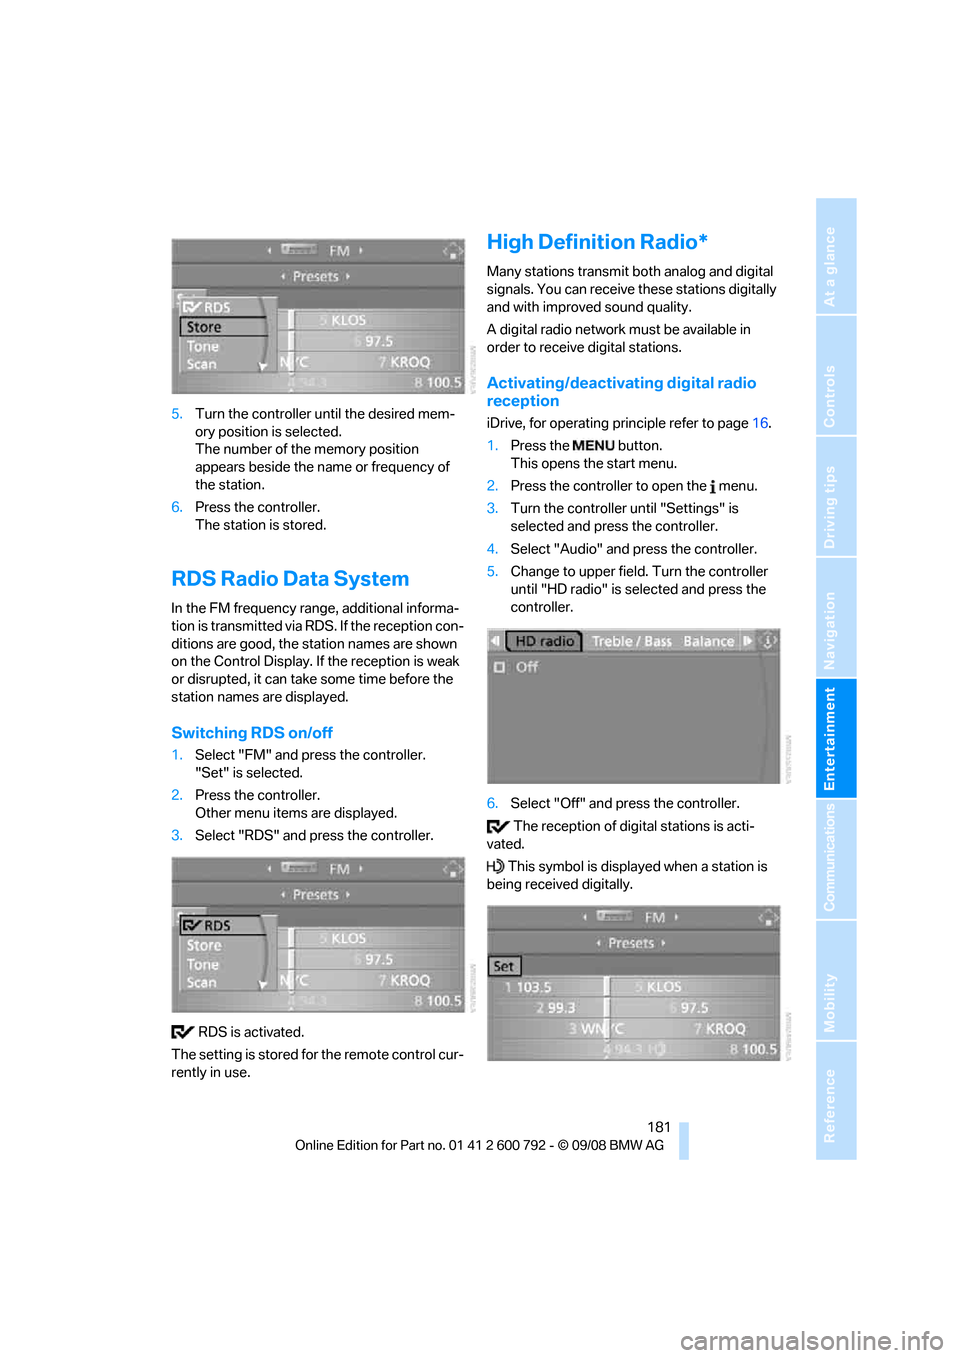
Switching RDS on/off
1. Select "FM" and press the controller.
"Set" is selected.
2. Press the controller.
Other menu items are displayed.
3. Select "RDS" and press the controller.
RDS is activated.
The setting is stored for the remote control cur-
rently in use.
High Definition Radio*
Many stations transmit both analog and digital
signals. You can receive these stations digitally
and with improved sound quality.
A digital radio network must be available in
order to receive digital stations.
Activating/deactivating digital radio
reception
iDrive, for operating pr inciple refer to page16.
1. Press the button.
This opens the start menu.
2. Press the controller to open the menu.
3. Turn the controller until "Settings" is
selected and press the controller.
4. Select "Audio" and press the controller.
5. Change to upper field. Turn the controller
until "HD radio" is se lected and press the
controller.
6. Select "Off" and press the controller.
The reception of digital stations is acti-
vated.
This symbol is displa yed when a station is
being received digitally.
Page 206 of 317
DVD system in rear
204
DVD system in rear
With the DVD system in the rear you can play
CDs and DVDs with audio, video and image
data. External audio and video devices can also
be connected and played via the DVD system in
the rear.
Tone output is possible both via headphones
and via the vehicle speakers.
You can operate the DVD system in the rear
with the buttons on the CD/DVD player or with
the remote control.
Some functions can only be operated
with the remote control. <
Enabling DVD system
Enable the DVD system with iDrive.
For operating principle refer to page 16.
1. Press the button.
This opens the start menu.
2. Press the controller to open the menu.
3. Select "Settings" and press the controller.
4. Select "Unlock rear menu" and press the
controller.
5. Select "Rear enabled" and press the con-
troller.
The DVD system is enabled.
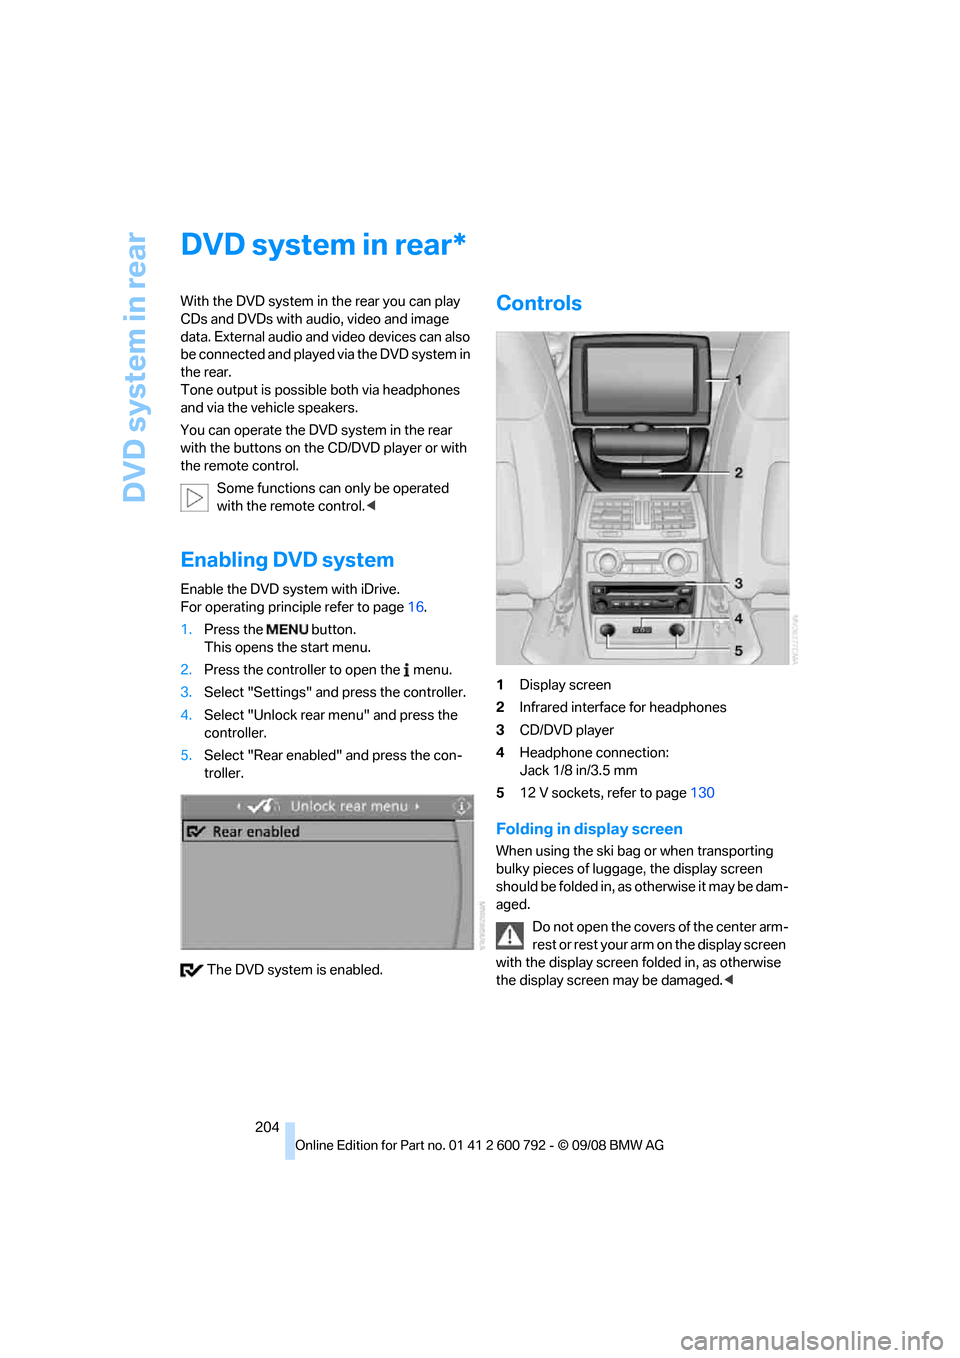
Controls
1 Display screen
2 Infrared interface for headphones
3 CD/DVD player
4 Headphone connection:
Jack 1/8 in/3.5 mm
5 12 V sockets, refer to page 130
Folding in display screen
When using the ski bag or when transporting
bulky pieces of luggage, the display screen
should be folded in, as otherwise it may be dam-
aged.
Do not open the covers of the center arm-
rest or rest your arm on the display screen
with the display screen folded in, as otherwise
the display screen may be damaged. <
*
Page 207 of 317
Navigation
Entertainment
Driving tips
205Reference
At a glance
Controls
Communications
Mobility
1.Turn display screen, arrow 1.
The display screen switches off.
2. Fold in display screen, arrow 2.
The display screen is folded out in the reverse
order.
CD/DVD player
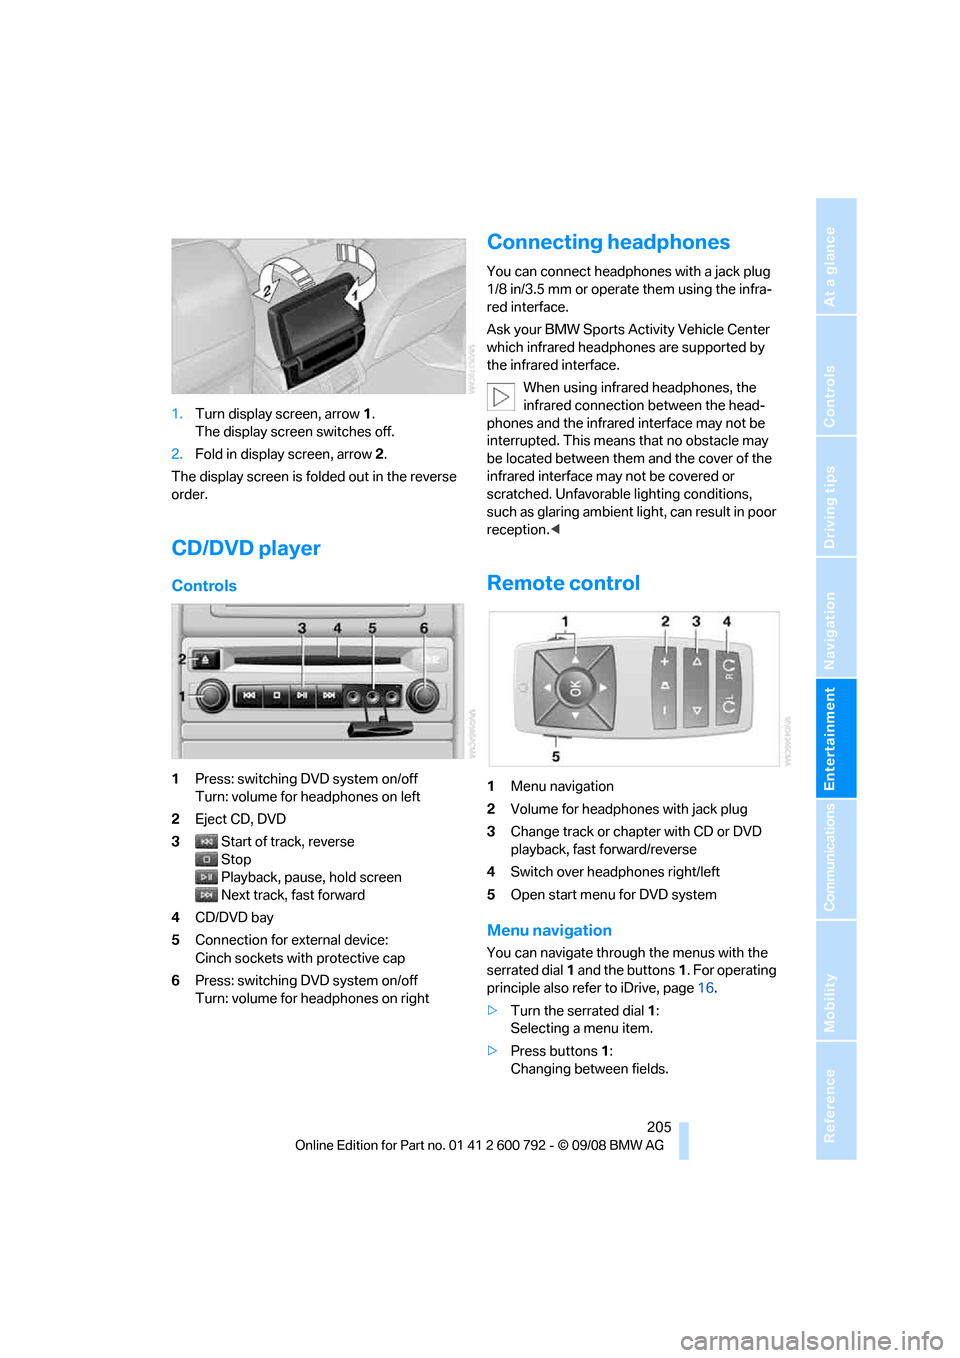
Controls
1 Press: switching DVD system on/off
Turn: volume for he adphones on left
2 Eject CD, DVD
3 Start of track, reverse
Stop
Playback, pause, hold screen
Next track, fast forward
4 CD/DVD bay
5 Connection for external device:
Cinch sockets with protective cap
6 Press: switching DVD system on/off
Turn: volume for he adphones on right
Connecting headphones
You can connect headphones with a jack plug
1/8 in/3.5 mm or operate them using the infra-
red interface.
Ask your BMW Sports Activity Vehicle Center
which infrared headphones are supported by
the infrared interface.
When using infrared headphones, the
infrared connection between the head-
phones and the infrared interface may not be
interrupted. This means that no obstacle may
be located between them and the cover of the
infrared interface may not be covered or
scratched. Unfavorable lighting conditions,
such as glaring ambient lig ht, can result in poor
reception. <
Remote control
1Menu navigation
2 Volume for headphones with jack plug
3 Change track or chapter with CD or DVD
playback, fast forward/reverse
4 Switch over headphones right/left
5 Open start menu for DVD system
Menu navigation
You can navigate throug h the menus with the
serrated dial 1 and the buttons 1. For operating
principle also refer to iDrive, page 16.
> Turn the serrated dial 1:
Selecting a menu item.
> Press buttons 1:
Changing between fields.
Page 209 of 317
Navigation
Entertainment
Driving tips
207Reference
At a glance
Controls
Communications
Mobility
An overview of the coding zones:
Starting playback
1.Push the CD/DVD into the drive with the
labeled side facing upward.
The CD/DVD is automa tically pulled in.
> Playback usually begins automatically
after a few seconds.
> If playback does no t begin automatically:
Select "DVD".
Press the button.
2. If the DVD controller or the DVD-specific
menu is displayed fo r a DVD, select the
desired option for menu guidance with the
remote control buttons.
Or:
Press the button on the CD/DVD player.
You can control the playback with the buttons
on the CD/DVD player or the DVD control. Video CDs, VCD, and Super Video CDs,
SVCD, can be played like DVDs if they do
not have a DVD menu of their own. <
Ejecting CD/DVD
Press the button on the CD/DVD player.
The DVD emerges slightly from the drive.
DVD control
With the DVD control, you can select the title
and chapter, open the DVD-specific menu and
operate functions such as Language, Fast for-
ward and Reverse or Freeze frame.
A DVD can briefly deacti vate functions of the
DVD control, under certain circumstances while the entire DVD is being played. It is not possible
to operate the DVD control under these circum-
stances. In this case, tr
y to make the selection
using the DVD-specific menu.
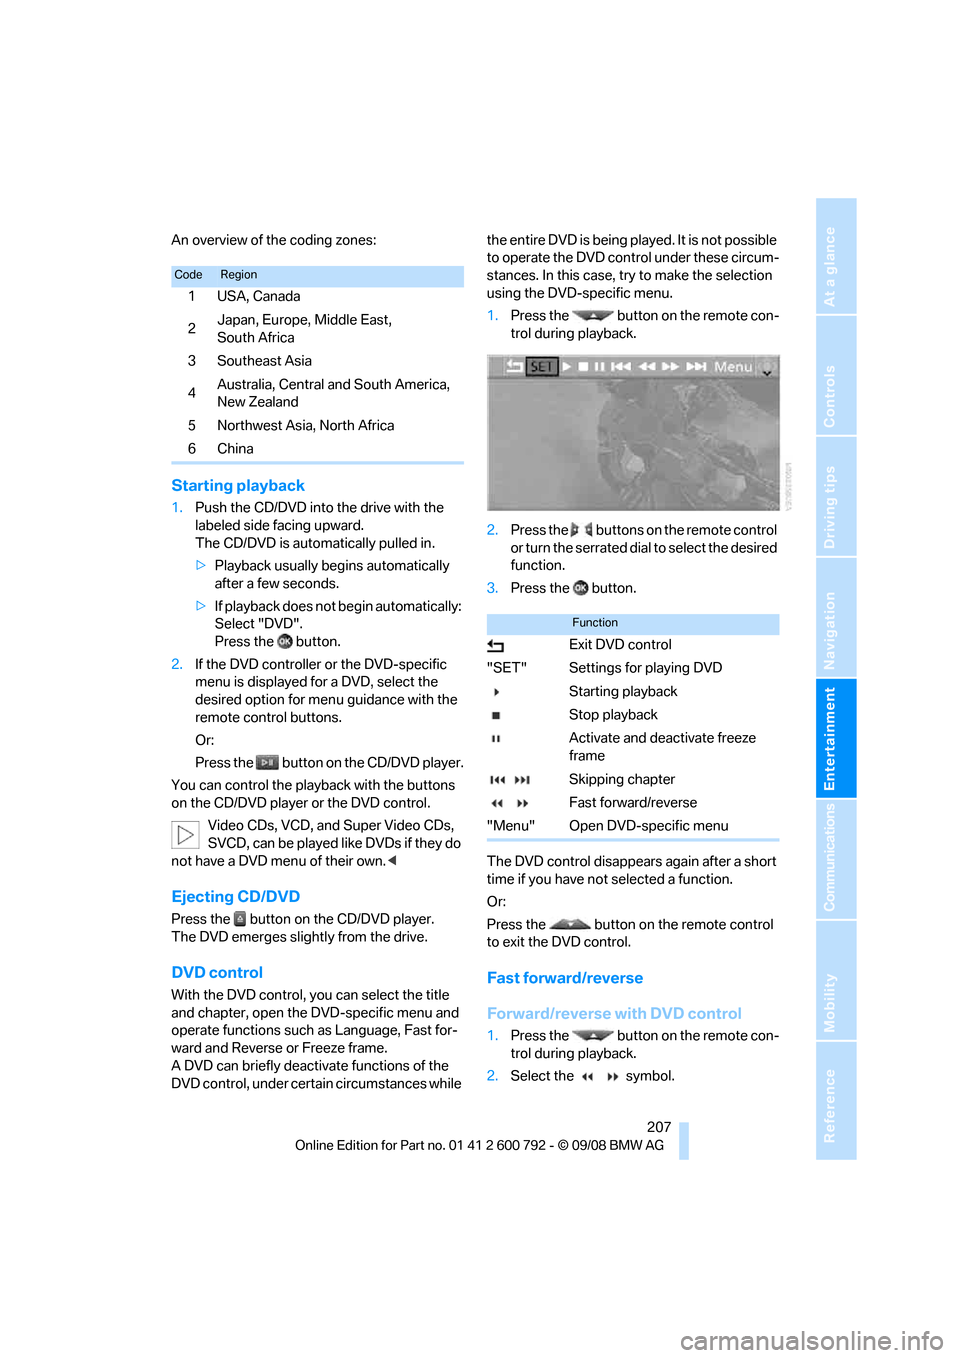
1. Press the button on the remote con-
trol during playback.
2. Press the buttons on the remote control
or turn the serrated dial to select the desired
function.
3. Press the button.
The DVD control disappears again after a short
time if you have not selected a function.
Or:
Press the button on the remote control
to exit the DVD control.
Fast forward/reverse
Forward/reverse with DVD control
1. Press the button on the remote con-
trol during playback.
2. Select the symbol.
CodeRegion
1USA, Canada
2 Japan, Europe, Middle East,
South Africa
3 Southeast Asia
4 Australia, Central and South America,
New Zealand
5Northwest Asia, North Africa
6China
Function
Exit DVD control
"SET" Settings for playing DVD Starting playback
Stop playback
Activate and deactivate freeze
frame
Skipping chapter
Fast forward/reverse
"Menu" Open DVD-specific menu
Page 210 of 317
DVD system in rear
208
3.
Press the button.
4. Press the button several times to
increase the fast forward/reverse speed.
The DVD playback will be distorted.
To cancel fast forward/reverse:
1. Select the symbol.
2. Press the button.
Or:
Press the button on the CD/DVD player.
The DVD will start play at the point selected.
Forward/reverse with remote control
Press and hold the button until you reach
the desired point.
Or:
1. During playback, turn the serrated dial.
Fast forward/reverse is interrupted.
2. Continue to turn the serrated dial.
The speed is increased.
3. Press the button on the CD/DVD player.
Fast forward/reverse is interrupted.
The DVD will start play at the point selected.
Skipping chapter
You can change to the next or previous chapter
during playback.
1. Press the button on the remote con-
trol during playback.
2. Select the symbol.
3. Press the button repeatedly, continuing
until you reach the desired chapter.
Or:
Press the button on the left or right on the
remote control repeated ly until you reach the
desired chapter.
Freeze frame
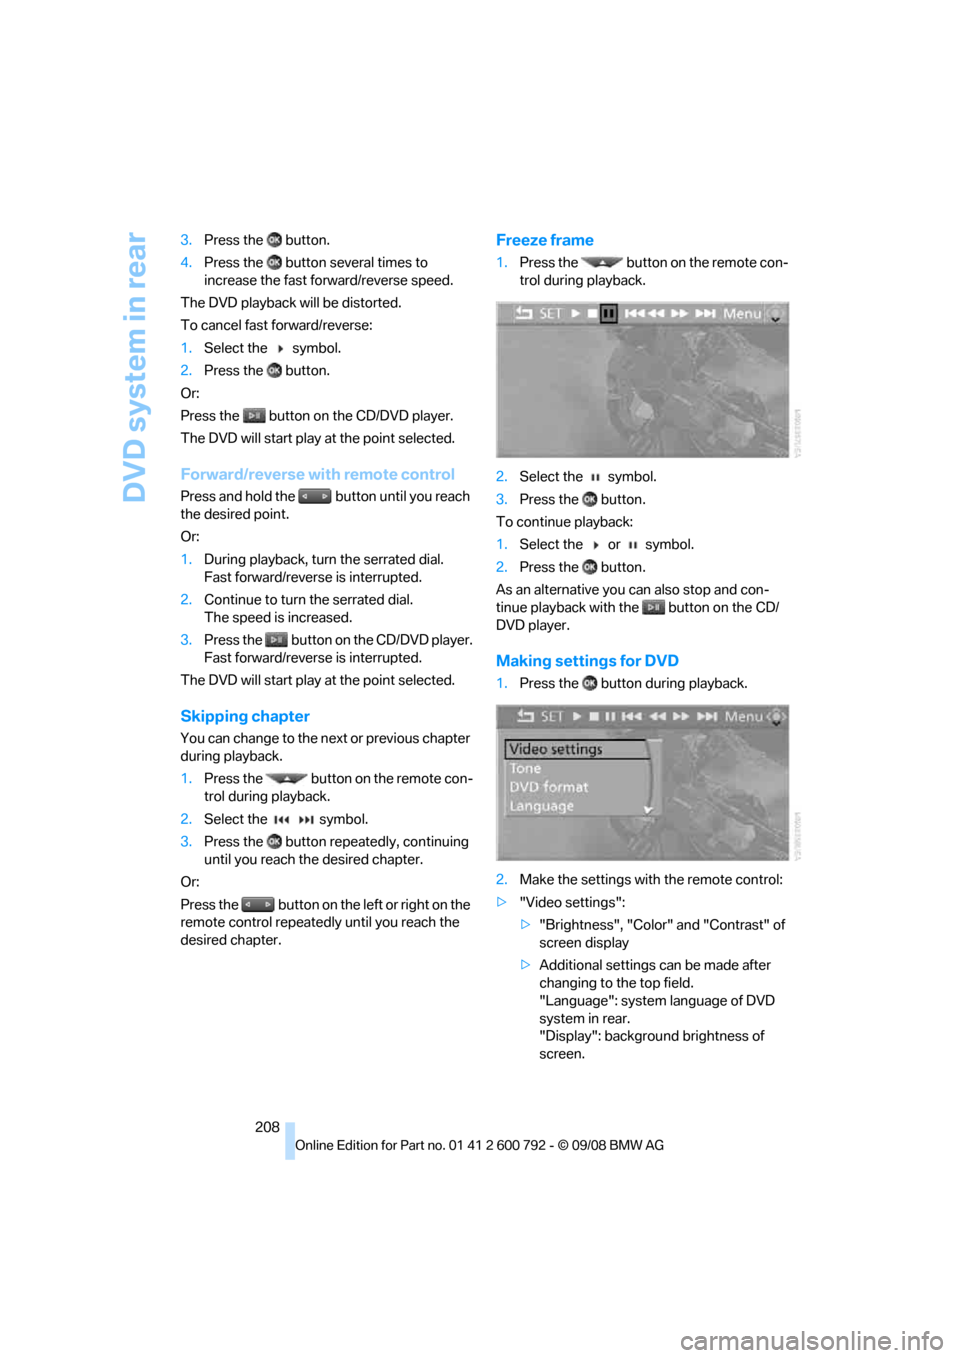
1. Press the button on the remote con-
trol during playback.
2. Select the symbol.
3. Press the button.
To continue playback:
1. Select the or symbol.
2. Press the button.
As an alternative you can also stop and con-
tinue playback with the button on the CD/
DVD player.
Making settings for DVD
1. Press the button during playback.
2. Make the settings with the remote control:
> "Video settings":
>"Brightness", "Color" and "Contrast" of
screen display
> Additional settings can be made after
changing to the top field.
"Language": system language of DVD
system in rear.
"Display": backgrou nd brightness of
screen.