navigation BMW X5 XDRIVE 35D 2009 E70 Workshop Manual
[x] Cancel search | Manufacturer: BMW, Model Year: 2009, Model line: X5 XDRIVE 35D, Model: BMW X5 XDRIVE 35D 2009 E70Pages: 317, PDF Size: 9.56 MB
Page 97 of 317
Controls
95Reference
At a glance
Driving tips
Communications
Navigation
Entertainment
Mobility
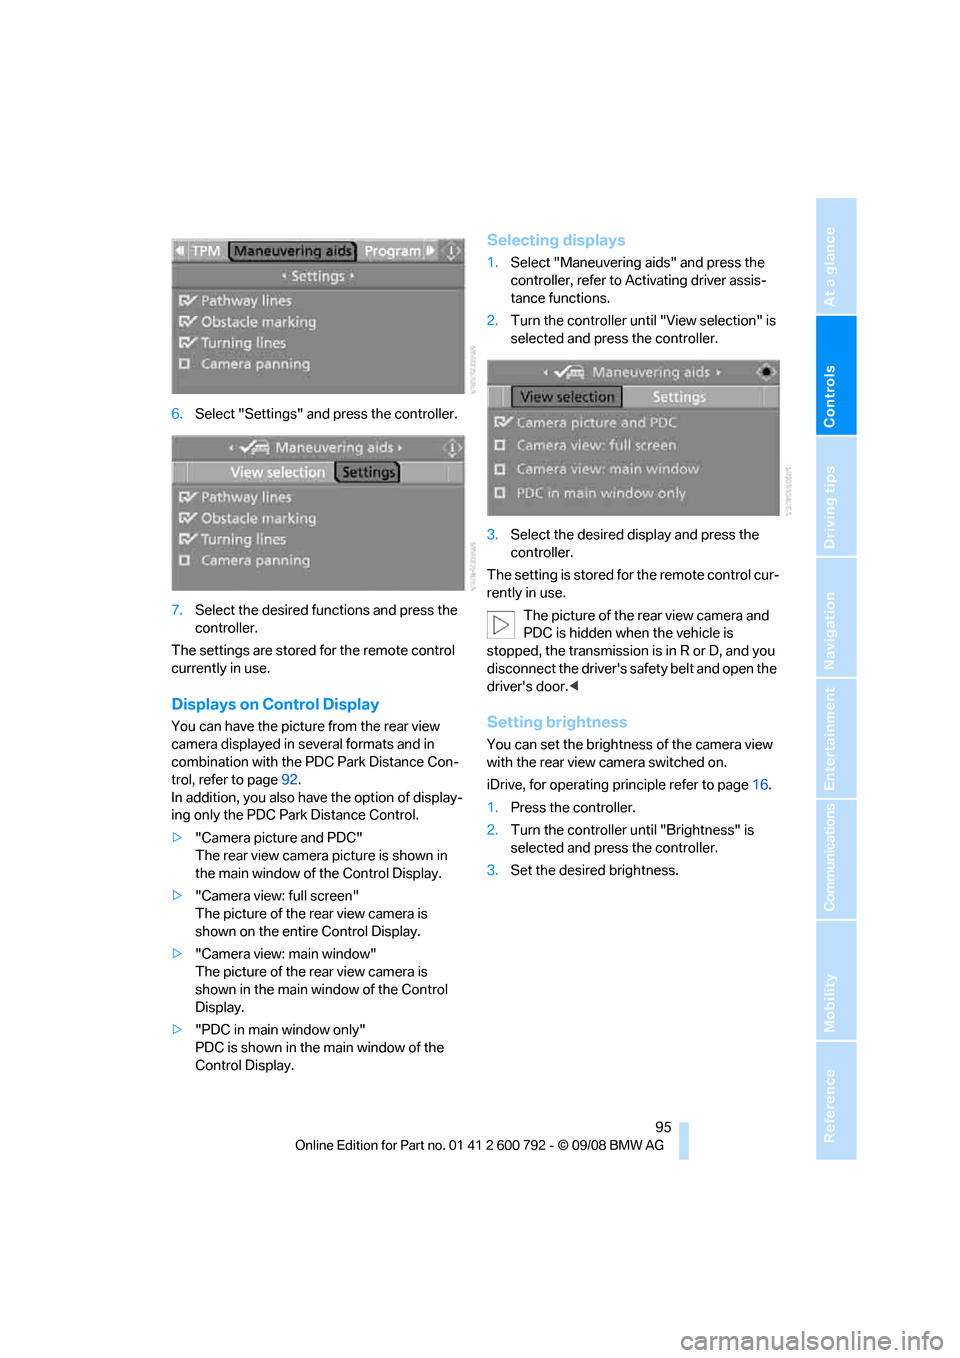
6.Select "Settings" and press the controller.
7. Select the desired fu nctions and press the
controller.
The settings are stored for the remote control
currently in use.
Displays on Control Display
You can have the picture from the rear view
camera displayed in se veral formats and in
combination with the PDC Park Distance Con-
trol, refer to page 92.
In addition, you also have the option of display-
ing only the PDC Park Distance Control.
> "Camera picture and PDC"
The rear view camera picture is shown in
the main window of the Control Display.
> "Camera view: full screen"
The picture of the rear view camera is
shown on the entire Control Display.
> "Camera view: main window"
The picture of the rear view camera is
shown in the main window of the Control
Display.
> "PDC in main window only"
PDC is shown in the main window of the
Control Display.
Selecting displays
1.Select "Maneuvering aids" and press the
controller, refer to Activating driver assis-
tance functions.
2. Turn the controller until "View selection" is
selected and press the controller.
3. Select the desired display and press the
controller.
The setting is stored for the remote control cur-
rently in use. The picture of the rear view camera and
PDC is hidden when the vehicle is
stopped, the transmission is in R or D, and you
disconnect the driver's safety belt and open the
driver's door. <
Setting brightness
You can set the brightness of the camera view
with the rear view camera switched on.
iDrive, for operating pr inciple refer to page16.
1. Press the controller.
2. Turn the controller until "Brightness" is
selected and press the controller.
3. Set the desired brightness.
Page 99 of 317
Controls
97Reference
At a glance
Driving tips
Communications
Navigation
Entertainment
Mobility
Activating DSC
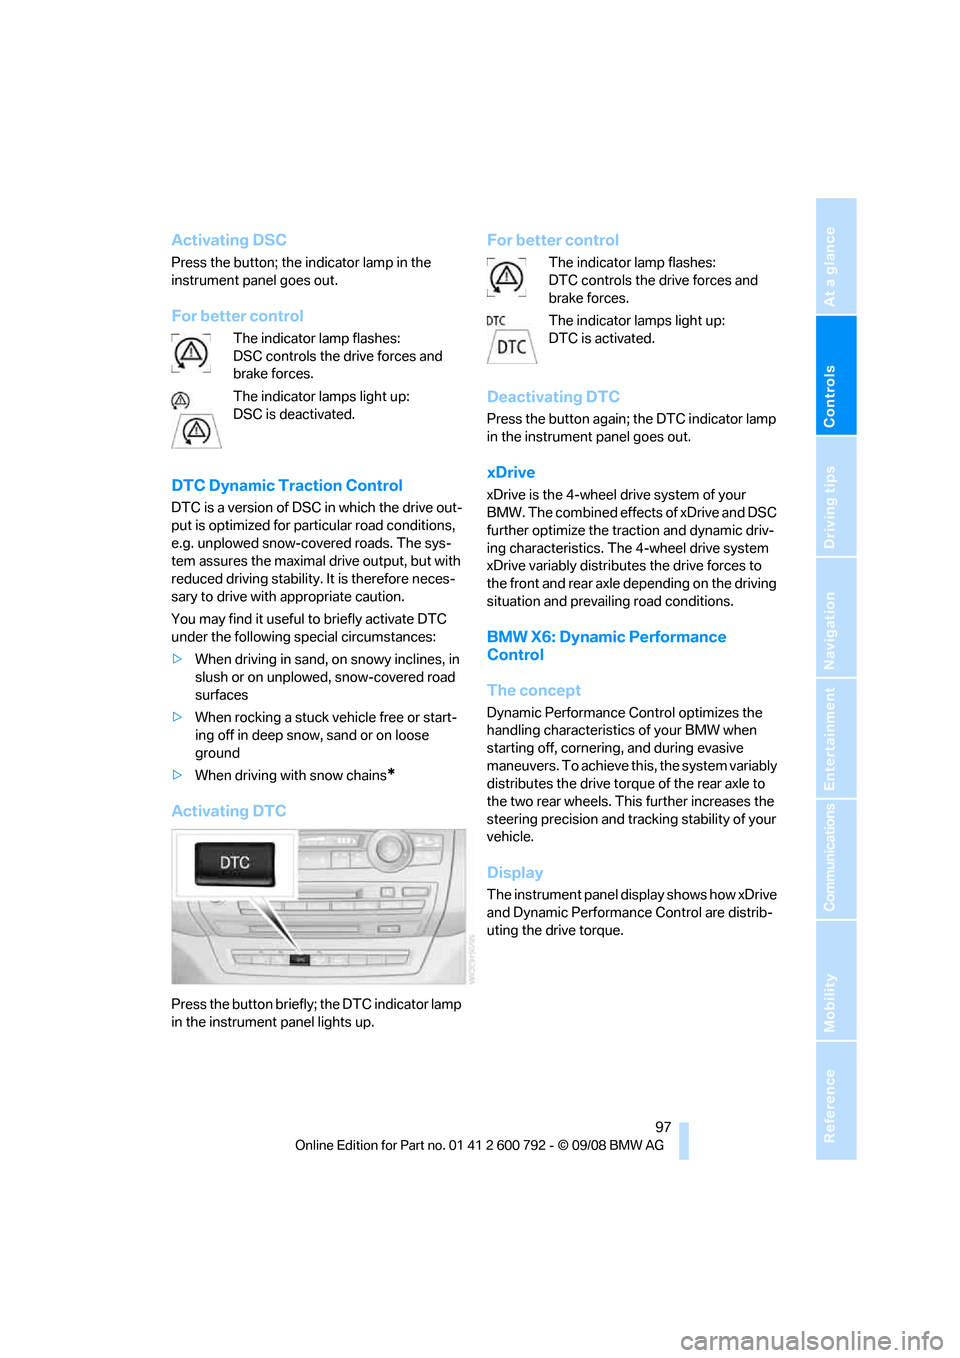
Press the button; the indicator lamp in the
instrument panel goes out.
For better control
The indicator lamp flashes:
DSC controls the drive forces and
brake forces.
The indicator lamps light up:
DSC is deactivated.
DTC Dynamic Traction Control
DTC is a version of DSC in which the drive out-
put is optimized for particular road conditions,
e.g. unplowed snow-covered roads. The sys-
tem assures the maximal drive output, but with
reduced driving stability. It is therefore neces-
sary to drive with appropriate caution.
You may find it useful to briefly activate DTC
under the following special circumstances:
> When driving in sand, on snowy inclines, in
slush or on unplowed, snow-covered road
surfaces
> When rocking a stuck vehicle free or start-
ing off in deep snow, sand or on loose
ground
> When driving with snow chains
*
Activating DTC
Press the button briefly; the DTC indicator lamp
in the instrument panel lights up.
For better control
The indicator lamp flashes:
DTC controls the drive forces and
brake forces.
The indicator lamps light up:
DTC is activated.
Deactivating DTC
Press the button again; the DTC indicator lamp
in the instrument panel goes out.
xDrive
xDrive is the 4-wheel drive system of your
BMW. The combined effects of xDrive and DSC
further optimize the traction and dynamic driv-
ing characteristics. The 4-wheel drive system
xDrive variably distributes the drive forces to
the front and rear axle depending on the driving
situation and prevailing road conditions.
BMW X6: Dynamic Performance
Control
The concept
Dynamic Performance Control optimizes the
handling characteristic s of your BMW when
starting off, cornering, and during evasive
maneuvers. To achieve this, the system variably
distributes the drive torque of the rear axle to
the two rear wheels. This further increases the
steering precision and tracking stability of your
vehicle.
Display
The instrument panel display shows how xDrive
and Dynamic Performanc e Control are distrib-
uting the drive torque.
Page 101 of 317
Controls
99Reference
At a glance
Driving tips
Communications
Navigation
Entertainment
Mobility
Displays* in instrument panel
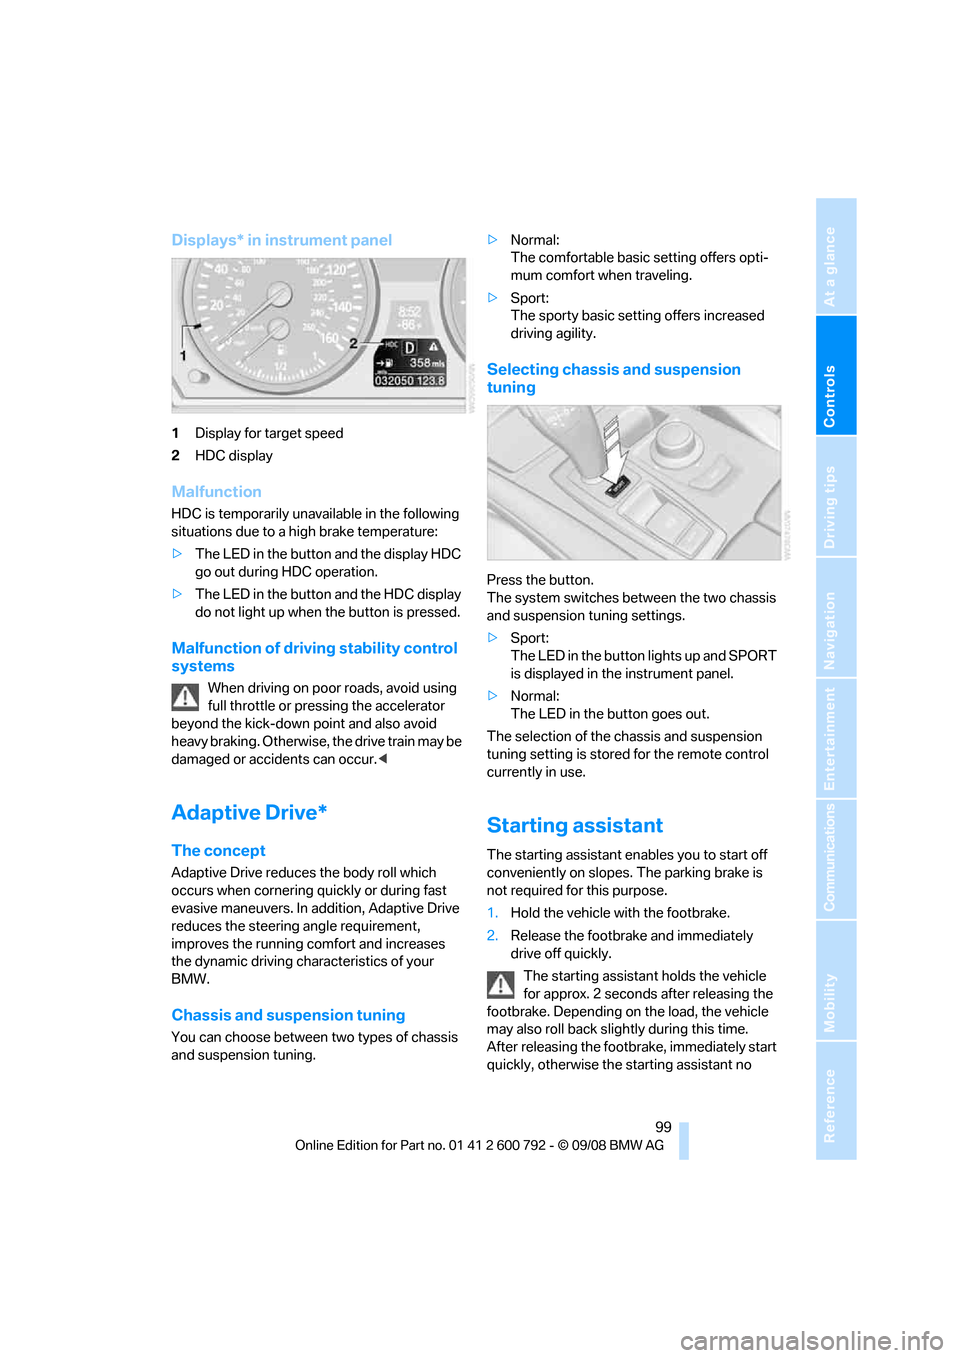
1Display for target speed
2 HDC display
Malfunction
HDC is temporarily unavailable in the following
situations due to a high brake temperature:
>The LED in the button and the display HDC
go out during HDC operation.
> The LED in the button and the HDC display
do not light up when the button is pressed.
Malfunction of driving stability control
systems
When driving on poor roads, avoid using
full throttle or pressing the accelerator
beyond the kick-down point and also avoid
heavy braking. Otherwise, the drive train may be
damaged or accidents can occur. <
Adaptive Drive*
The concept
Adaptive Drive reduces the body roll which
occurs when cornering qu ickly or during fast
evasive maneuvers. In addition, Adaptive Drive
reduces the steering angle requirement,
improves the running comfort and increases
the dynamic driving characteristics of your
BMW.
Chassis and susp ension tuning
You can choose between two types of chassis
and suspension tuning. >
Normal:
The comfortable basic setting offers opti-
mum comfort when traveling.
> Sport:
The sporty basic setting offers increased
driving agility.
Selecting chassis and suspension
tuning
Press the button.
The system switches between the two chassis
and suspension tuning settings.
>Sport:
The LED in the button lights up and SPORT
is displayed in the instrument panel.
> Normal:
The LED in the button goes out.
The selection of the chassis and suspension
tuning setting is stored for the remote control
currently in use.
Starting assistant
The starting assistant en ables you to start off
conveniently on slopes. The parking brake is
not required fo r this purpose.
1. Hold the vehicle with the footbrake.
2. Release the footbrake and immediately
drive off quickly.
The starting assistant holds the vehicle
for approx. 2 seconds after releasing the
footbrake. Depending on the load, the vehicle
may also roll back slight ly during this time.
After releasing the footbrake, immediately start
quickly, otherwise the starting assistant no
Page 103 of 317
Controls
101Reference
At a glance
Driving tips
Communications
Navigation
Entertainment
Mobility
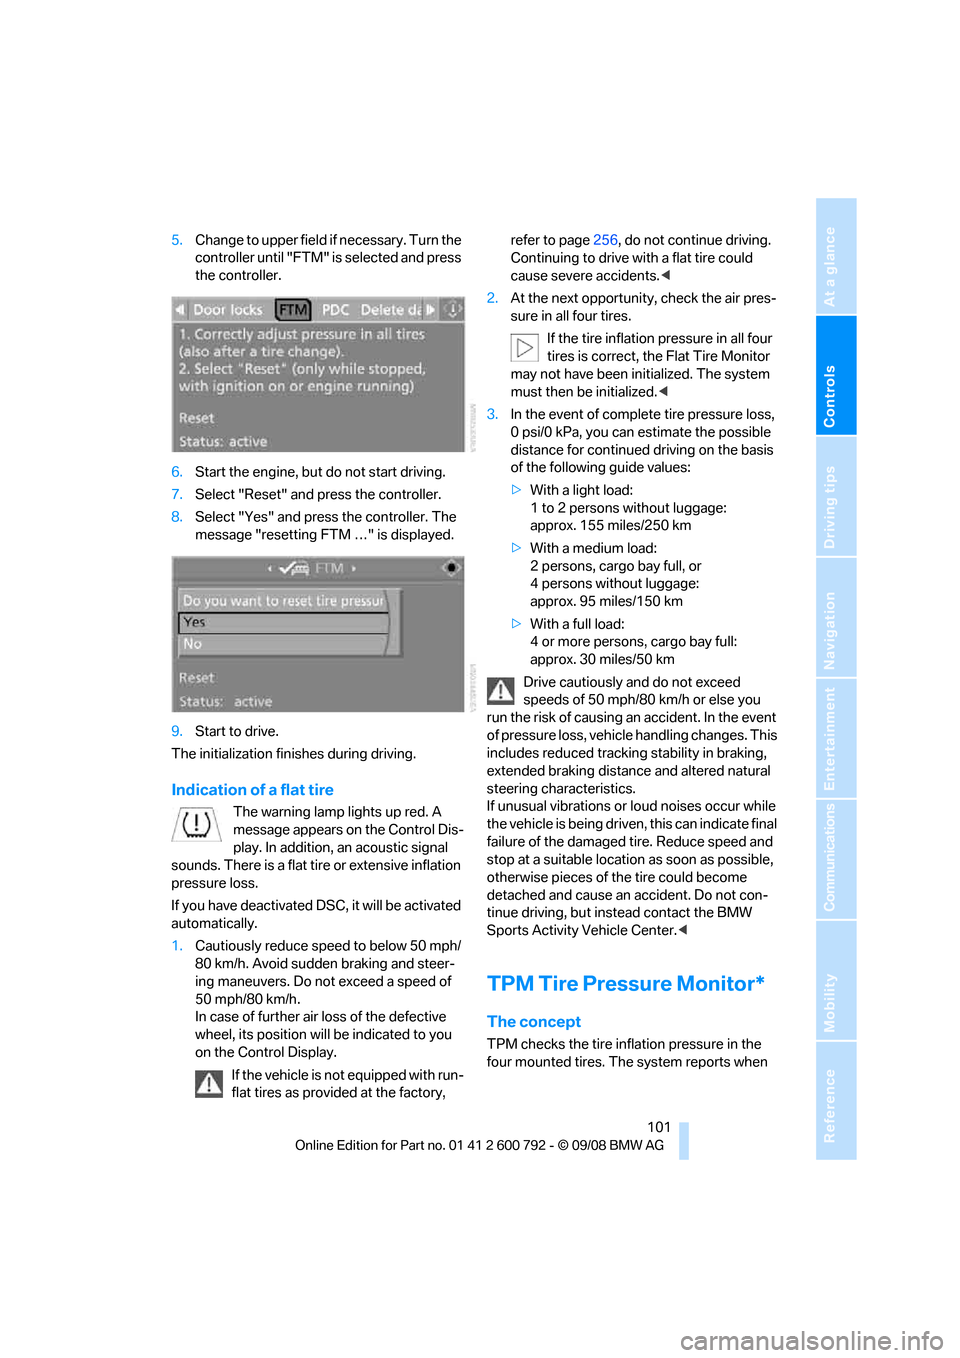
5.Change to upper field if necessary. Turn the
controller until "FTM" is selected and press
the controller.
6. Start the engine, but do not start driving.
7. Select "Reset" and press the controller.
8. Select "Yes" and press the controller. The
message "resetting FTM …" is displayed.
9. Start to drive.
The initialization finishes during driving.
Indication of a flat tire
The warning lamp lights up red. A
message appears on the Control Dis-
play. In addition, an acoustic signal
sounds. There is a flat tire or extensive inflation
pressure loss.
If you have deactivated DS C, it will be activated
automatically.
1. Cautiously reduce speed to below 50 mph/
80 km/h. Avoid sudden braking and steer-
ing maneuvers. Do not exceed a speed of
50 mph/80 km/h.
In case of further air loss of the defective
wheel, its position will be indicated to you
on the Control Display.
If the vehicle is not equipped with run-
flat tires as provided at the factory, refer to page
256, do not continue driving.
Continuing to drive with a flat tire could
cause severe accidents. <
2. At the next opportunity, check the air pres-
sure in all four tires.
If the tire inflation pressure in all four
tires is correct, the Flat Tire Monitor
may not have been initialized. The system
must then be initialized. <
3. In the event of complete tire pressure loss,
0 psi/0 kPa, you can estimate the possible
distance for continued driving on the basis
of the following guide values:
> With a light load:
1 to 2 persons without luggage:
approx. 155 miles/250 km
> With a medium load:
2 persons, cargo bay full, or
4 persons without luggage:
approx. 95 miles/150 km
> With a full load:
4 or more persons, cargo bay full:
approx. 30 miles/50 km
Drive cautiously and do not exceed
speeds of 50 mph/80 km/h or else you
run the risk of causing an accident. In the event
of pressure loss, vehicl e handling changes. This
includes reduced tracking stability in braking,
extended braking distance and altered natural
steering characteristics.
If unusual vibrations or loud noises occur while
the vehicle is being driven , this can indicate final
failure of the damaged tire. Reduce speed and
stop at a suitable location as soon as possible,
otherwise pieces of the tire could become
detached and cause an accident. Do not con-
tinue driving, but instead contact the BMW
Sports Activity Vehicle Center. <
TPM Tire Pressure Monitor*
The concept
TPM checks the tire inflation pressure in the
four mounted tires. The system reports when
Page 105 of 317
Controls
103Reference
At a glance
Driving tips
Communications
Navigation
Entertainment
Mobility
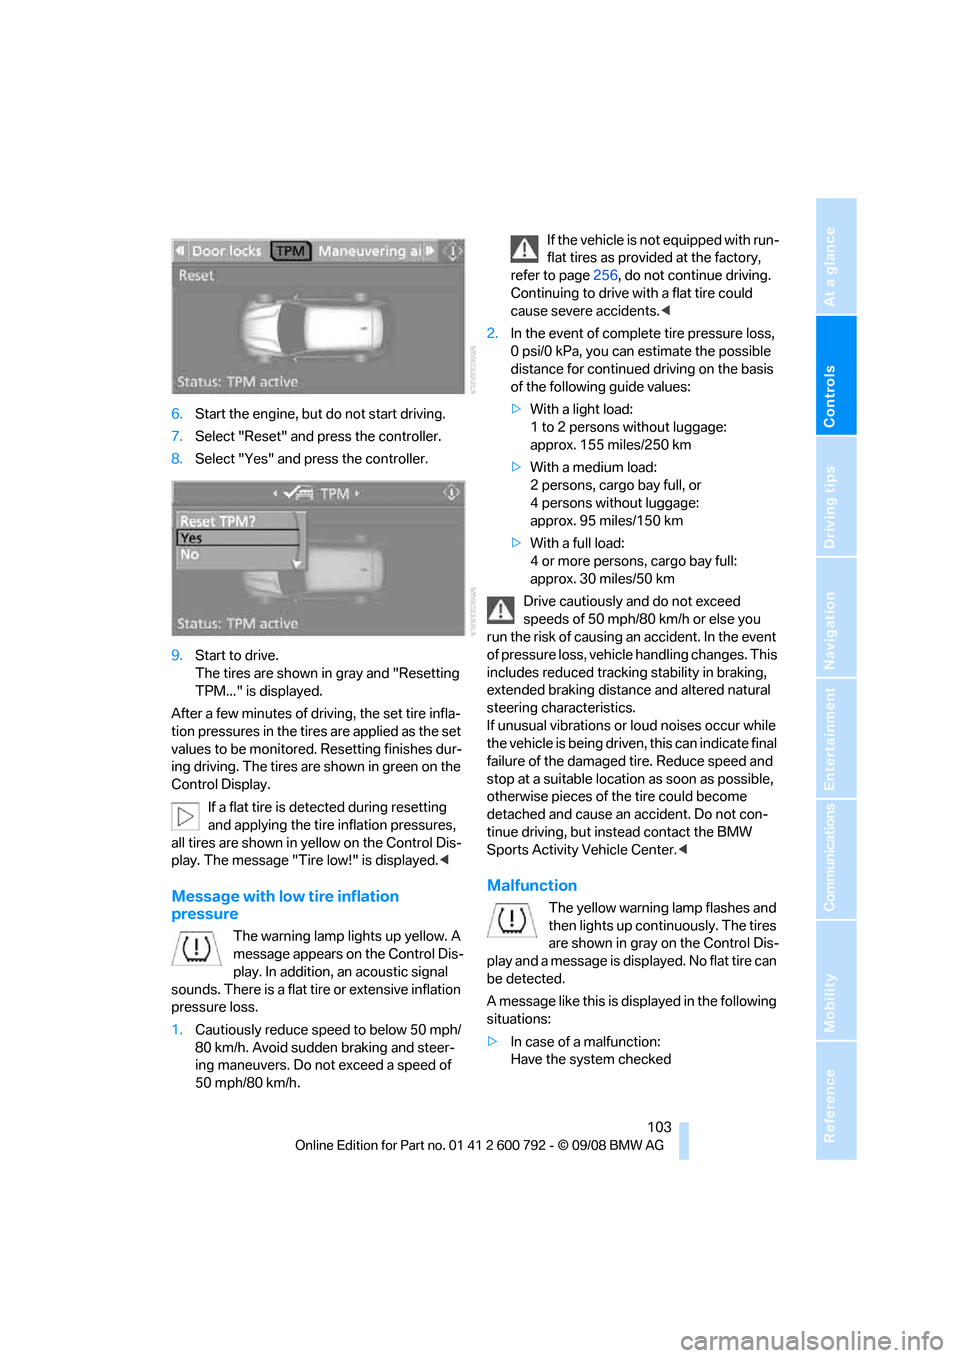
6.Start the engine, but do not start driving.
7. Select "Reset" and press the controller.
8. Select "Yes" and press the controller.
9. Start to drive.
The tires are shown in gray and "Resetting
TPM..." is displayed.
After a few minutes of driving, the set tire infla-
tion pressures in the tire s are applied as the set
values to be monitored. Resetting finishes dur-
ing driving. The tires ar e shown in green on the
Control Display.
If a flat tire is detected during resetting
and applying the tire inflation pressures,
all tires are shown in yellow on the Control Dis-
play. The message "Tir e low!" is displayed.<
Message with low tire inflation
pressure
The warning lamp lights up yellow. A
message appears on the Control Dis-
play. In addition, an acoustic signal
sounds. There is a flat tire or extensive inflation
pressure loss.
1. Cautiously reduce speed to below 50 mph/
80 km/h. Avoid sudden braking and steer-
ing maneuvers. Do not exceed a speed of
50 mph/80 km/h. If the vehicle is not equipped with run-
flat tires as provided at the factory,
refer to page 256, do not continue driving.
Continuing to drive with a flat tire could
cause severe accidents. <
2. In the event of complete tire pressure loss,
0 psi/0 kPa, you can estimate the possible
distance for continued driving on the basis
of the following guide values:
> With a light load:
1 to 2 persons without luggage:
approx. 155 miles/250 km
> With a medium load:
2 persons, cargo bay full, or
4 persons without luggage:
approx. 95 miles/150 km
> With a full load:
4 or more persons, cargo bay full:
approx. 30 miles/50 km
Drive cautiously and do not exceed
speeds of 50 mph/80 km/h or else you
run the risk of causing an accident. In the event
of pressure loss, vehicl e handling changes. This
includes reduced tracking stability in braking,
extended braking distance and altered natural
steering characteristics.
If unusual vibrations or loud noises occur while
the vehicle is being driven , this can indicate final
failure of the damaged tire. Reduce speed and
stop at a suitable location as soon as possible,
otherwise pieces of the tire could become
detached and cause an accident. Do not con-
tinue driving, but instead contact the BMW
Sports Activity Vehicle Center. <
Malfunction
The yellow warning lamp flashes and
then lights up continuously. The tires
are shown in gray on the Control Dis-
play and a message is displayed. No flat tire can
be detected.
A message like this is displayed in the following
situations:
> In case of a malfunction:
Have the system checked
Page 107 of 317
Controls
105Reference
At a glance
Driving tips
Communications
Navigation
Entertainment
Mobility
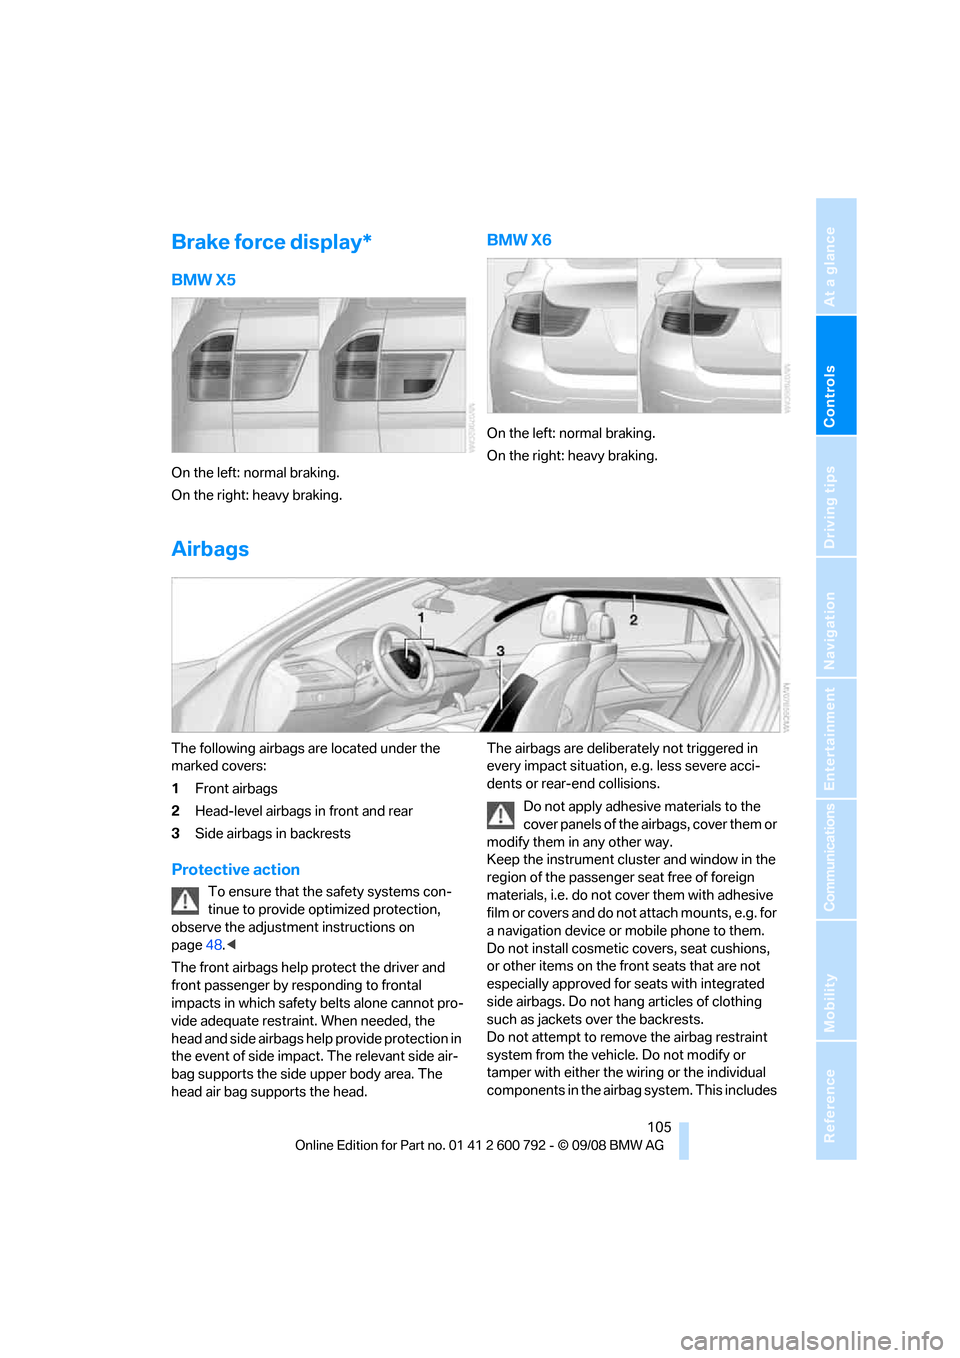
Brake force display*
BMW X5
On the left: normal braking.
On the right: heavy braking.
BMW X6
On the left: normal braking.
On the right: heavy braking.
Airbags
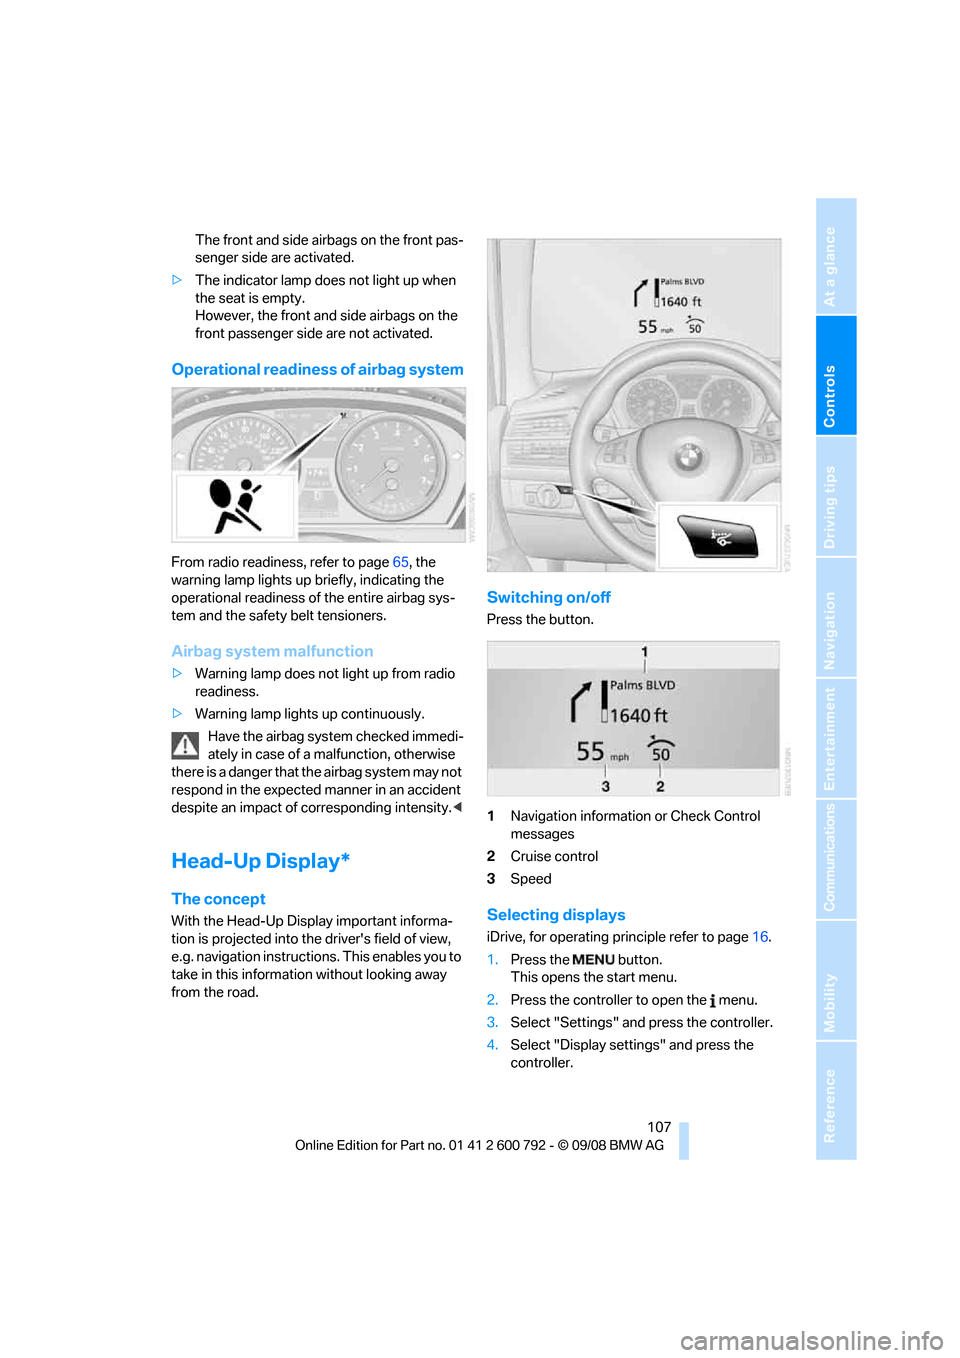
The following airbags are located under the
marked covers:
1Front airbags
2 Head-level airbags in front and rear
3 Side airbags in backrests
Protective action
To ensure that the safety systems con-
tinue to provide optimized protection,
observe the adjustment instructions on
page 48.<
The front airbags help protect the driver and
front passenger by re sponding to frontal
impacts in which safety belts alone cannot pro-
vide adequate restraint. When needed, the
head and side airbags help provide protection in
the event of side impact. The relevant side air-
bag supports the side upper body area. The
head air bag supports the head. The airbags are deliberately not triggered in
every impact situation, e.g. less severe acci-
dents or rear-end collisions.
Do not apply adhesive materials to the
cover panels of the airbags, cover them or
modify them in any other way.
Keep the instrument cluster and window in the
region of the passenger seat free of foreign
materials, i.e. do not co ver them with adhesive
film or covers and do not attach mounts, e.g. for
a navigation device or mobile phone to them.
Do not install cosmetic covers, seat cushions,
or other items on the fr ont seats that are not
especially approved for seats with integrated
side airbags. Do not hang articles of clothing
such as jackets over the backrests.
Do not attempt to remove the airbag restraint
system from the vehicle. Do not modify or
tamper with either the wiring or the individual
components in the airbag system. This includes
Page 109 of 317
Controls
107Reference
At a glance
Driving tips
Communications
Navigation
Entertainment
Mobility
The front and side airbags on the front pas-
senger side are activated.
> The indicator lamp does not light up when
the seat is empty.
However, the front and side airbags on the
front passenger side are not activated.
Operational readiness of airbag system
From radio readiness, refer to page 65, the
warning lamp lights up br iefly, indicating the
operational readiness of the entire airbag sys-
tem and the safety belt tensioners.
Airbag system malfunction
> Warning lamp does not light up from radio
readiness.
> Warning lamp lights up continuously.
Have the airbag system checked immedi-
ately in case of a malfunction, otherwise
there is a danger that the airbag system may not
respond in the expected manner in an accident
despite an impact of corresponding intensity. <
Head-Up Display*
The concept
With the Head-Up Display important informa-
tion is projected into the driver's field of view,
e.g. navigation instructions. This enables you to
take in this information without looking away
from the road.
Switching on/off
Press the button.
1 Navigation information or Check Control
messages
2 Cruise control
3 Speed
Selecting displays
iDrive, for operating pr inciple refer to page16.
1. Press the button.
This opens the start menu.
2. Press the controller to open the menu.
3. Select "Settings" and press the controller.
4. Select "Display settings" and press the
controller.
Page 111 of 317
Controls
109Reference
At a glance
Driving tips
Communications
Navigation
Entertainment
Mobility
Care instructions
Important information on this topic is provided
on page 268.
Only clean the cover of the Head-Up Dis-
play with a soft, lint-free cloth or with a
display cleaning cloth, otherwise damage may
result. <
Page 113 of 317
Controls
111Reference
At a glance
Driving tips
Communications
Navigation
Entertainment
Mobility
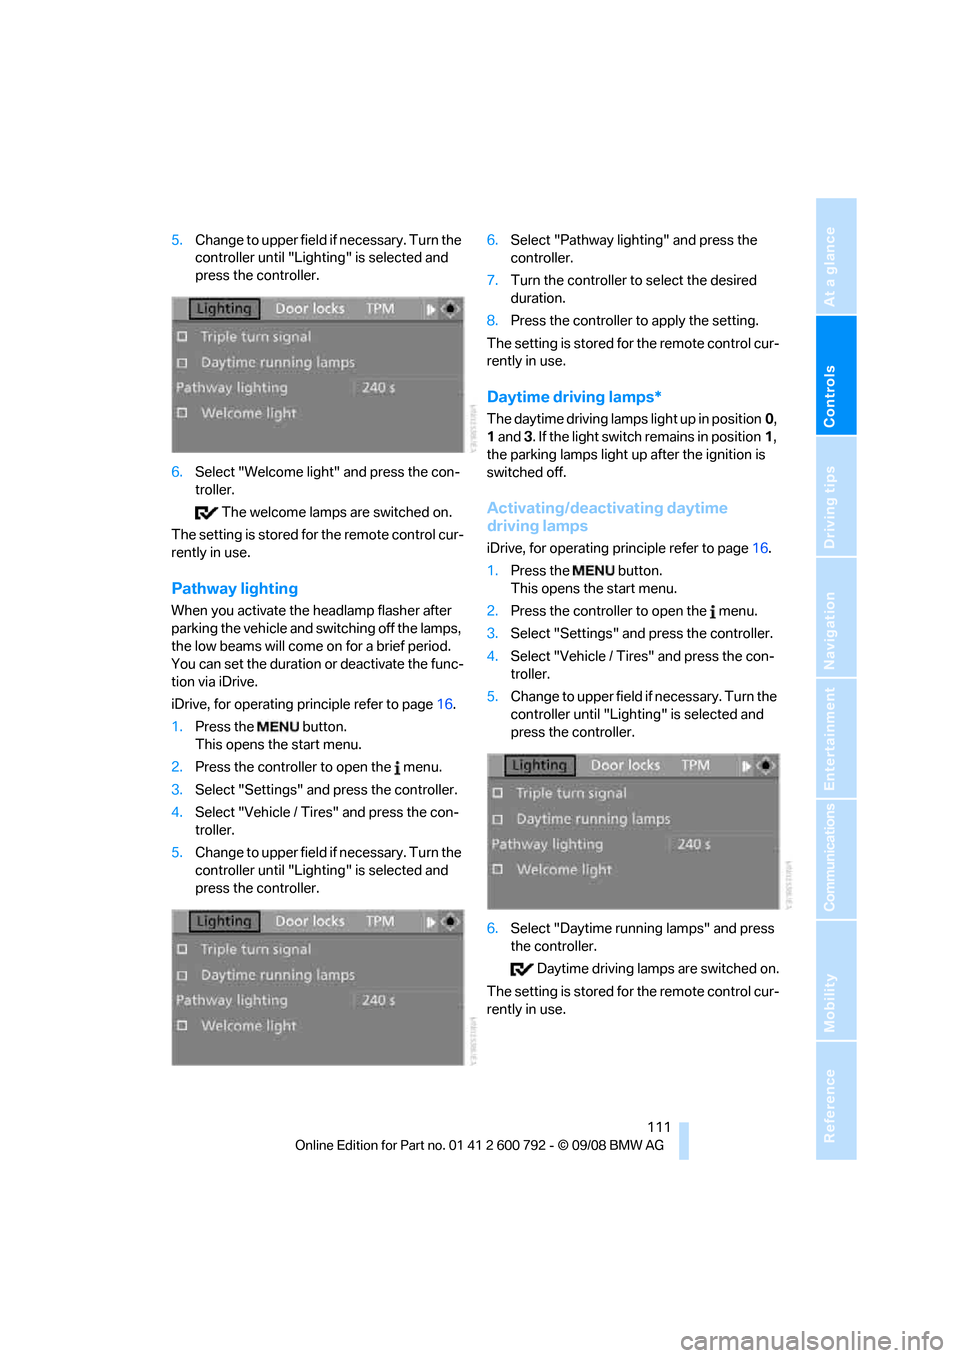
5.Change to upper field if necessary. Turn the
controller until "Lighting" is selected and
press the controller.
6. Select "Welcome light" and press the con-
troller.
The welcome lamps are switched on.
The setting is stored for the remote control cur-
rently in use.
Pathway lighting
When you activate the headlamp flasher after
parking the vehicle and sw itching off the lamps,
the low beams will come on for a brief period.
You can set the duration or deactivate the func-
tion via iDrive.
iDrive, for operating principle refer to page 16.
1. Press the button.
This opens the start menu.
2. Press the controller to open the menu.
3. Select "Settings" and press the controller.
4. Select "Vehicle / Tire s" and press the con-
troller.
5. Change to upper field if necessary. Turn the
controller until "Lighting" is selected and
press the controller. 6.
Select "Pathway lighting" and press the
controller.
7. Turn the controller to select the desired
duration.
8. Press the controller to apply the setting.
The setting is stored for the remote control cur-
rently in use.
Daytime driving lamps*
The daytime driving lamps light up in position 0,
1 and 3. If the light switch remains in position 1,
the parking lamps light up after the ignition is
switched off.
Activating/deactivating daytime
driving lamps
iDrive, for operating pr inciple refer to page16.
1. Press the button.
This opens the start menu.
2. Press the controller to open the menu.
3. Select "Settings" and press the controller.
4. Select "Vehicle / Tire s" and press the con-
troller.
5. Change to upper field if necessary. Turn the
controller until "Lighting" is selected and
press the controller.
6. Select "Daytime runn ing lamps" and press
the controller.
Daytime driving lamps are switched on.
The setting is stored for the remote control cur-
rently in use.
Page 115 of 317
Controls
113Reference
At a glance
Driving tips
Communications
Navigation
Entertainment
Mobility
Instrument lighting
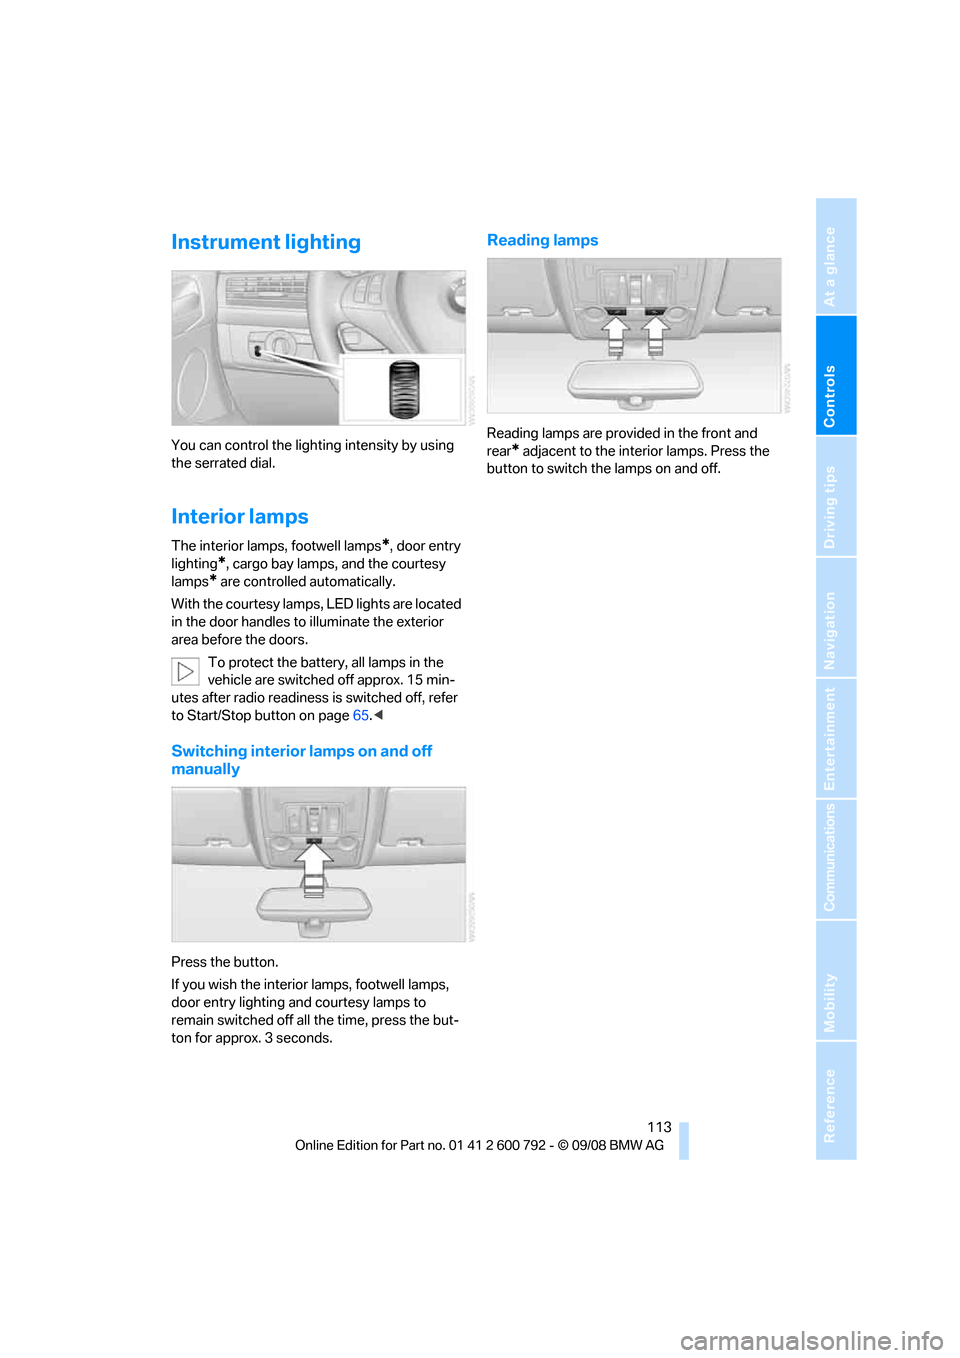
You can control the lighting intensity by using
the serrated dial.
Interior lamps
The interior lamps, footwell lamps*, door entry
lighting
*, cargo bay lamps, and the courtesy
lamps
* are controlled automatically.
With the courtesy lamps, LED lights are located
in the door handles to illuminate the exterior
area before the doors.
To protect the battery, all lamps in the
vehicle are switched off approx. 15 min-
utes after radio readiness is switched off, refer
to Start/Stop button on page 65.<
Switching interior lamps on and off
manually
Press the button.
If you wish the interior lamps, footwell lamps,
door entry lighting and courtesy lamps to
remain switched off all the time, press the but-
ton for approx. 3 seconds.
Reading lamps
Reading lamps are provided in the front and
rear
* adjacent to the inte rior lamps. Press the
button to switch the lamps on and off.