ECU BMW X5 XDRIVE 35I PREMIUM 2011 User Guide
[x] Cancel search | Manufacturer: BMW, Model Year: 2011, Model line: X5 XDRIVE 35I PREMIUM, Model: BMW X5 XDRIVE 35I PREMIUM 2011Pages: 312, PDF Size: 8.91 MB
Page 128 of 312
Practical interior accessories
126 The display indicates the cardinal or intercardi-
nal direction in which you are currently driving.
Operating principle
You can run various functions by pressing the
adjustment button with a pointed object, e.g. a
ball-point pen etc. The following setting options
are displayed consecutively, depending on how
long the adjustment button is pressed:>Press briefly: switch display on/off
>3 to 6 seconds: set compass zone
>6 to 9 seconds: calibrate compass
>9 to 12 seconds: set left/right-hand drive
vehicle
>12 to 15 seconds: setting language
Setting compass zones
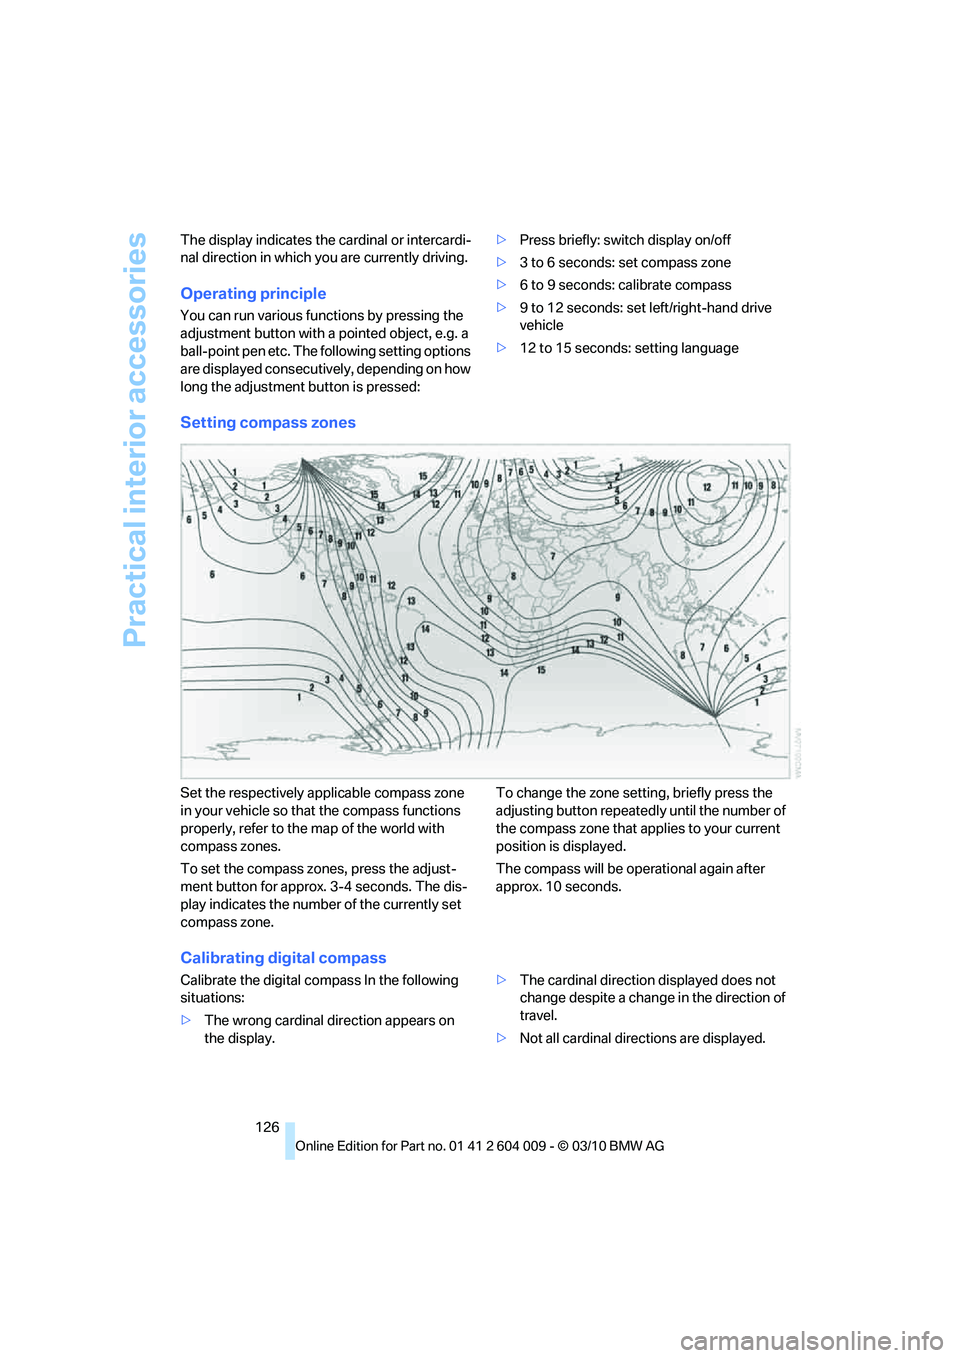
Set the respectively applicable compass zone
in your vehicle so that the compass functions
properly, refer to the map of the world with
compass zones.
To set the compass zones, press the adjust-
ment button for approx. 3-4 seconds. The dis-
play indicates the number of the currently set
compass zone.To change the zone setting, briefly press the
adjusting button repeatedly until the number of
the compass zone that applies to your current
position is displayed.
The compass will be operational again after
approx. 10 seconds.
Calibrating digital compass
Calibrate the digital compass In the following
situations:
>The wrong cardinal direction appears on
the display.>The cardinal direction displayed does not
change despite a change in the direction of
travel.
>Not all cardinal directions are displayed.
Page 135 of 312
Controls
133Reference
At a glance
Driving tips
Communications
Navigation
Entertainment
Mobility
Reach into the recess and pull toward the front.
When you fold back the backrest, be sure
that the catch engages securely. The red
warning indicator disappears in the recess
when the catch is engaged. If it is not properly
engaged, transported cargo could enter the
passenger compartment during braking or eva-
sive maneuvers and endanger the vehicle occu-
pants.<
To ensure that the safety systems con-
tinue to provide optimized protection,
observe the safety belt information on
page42.<
Storage compartments in
cargo area
Depending on the vehicle's equipment, the fol-
lowing storage compartments are provided in
the cargo area.
>Storage compartments behind the remov-
able side panels on the right and left side of
the cargo area
* and under the floor panel
flap, storage compartment
* right side of
cargo area.
>Storage tray
* under the floor panel flap,
capacity approx. 21 gal/80 liters.
>Retaining straps
* on the left and right side
panel for securing small objects.
>Lashing rail with lashing eyes
*. You can
secure heavy-duty cargo straps on the lash-
ing eyes.
They can be removed at the notches in the
rails. To move the lashing eyes, press the
button.Read and comply with the information
enclosed with the heavy-duty cargo
straps.<
Floor panel flap
To access the onboard vehicle tool kit etc.
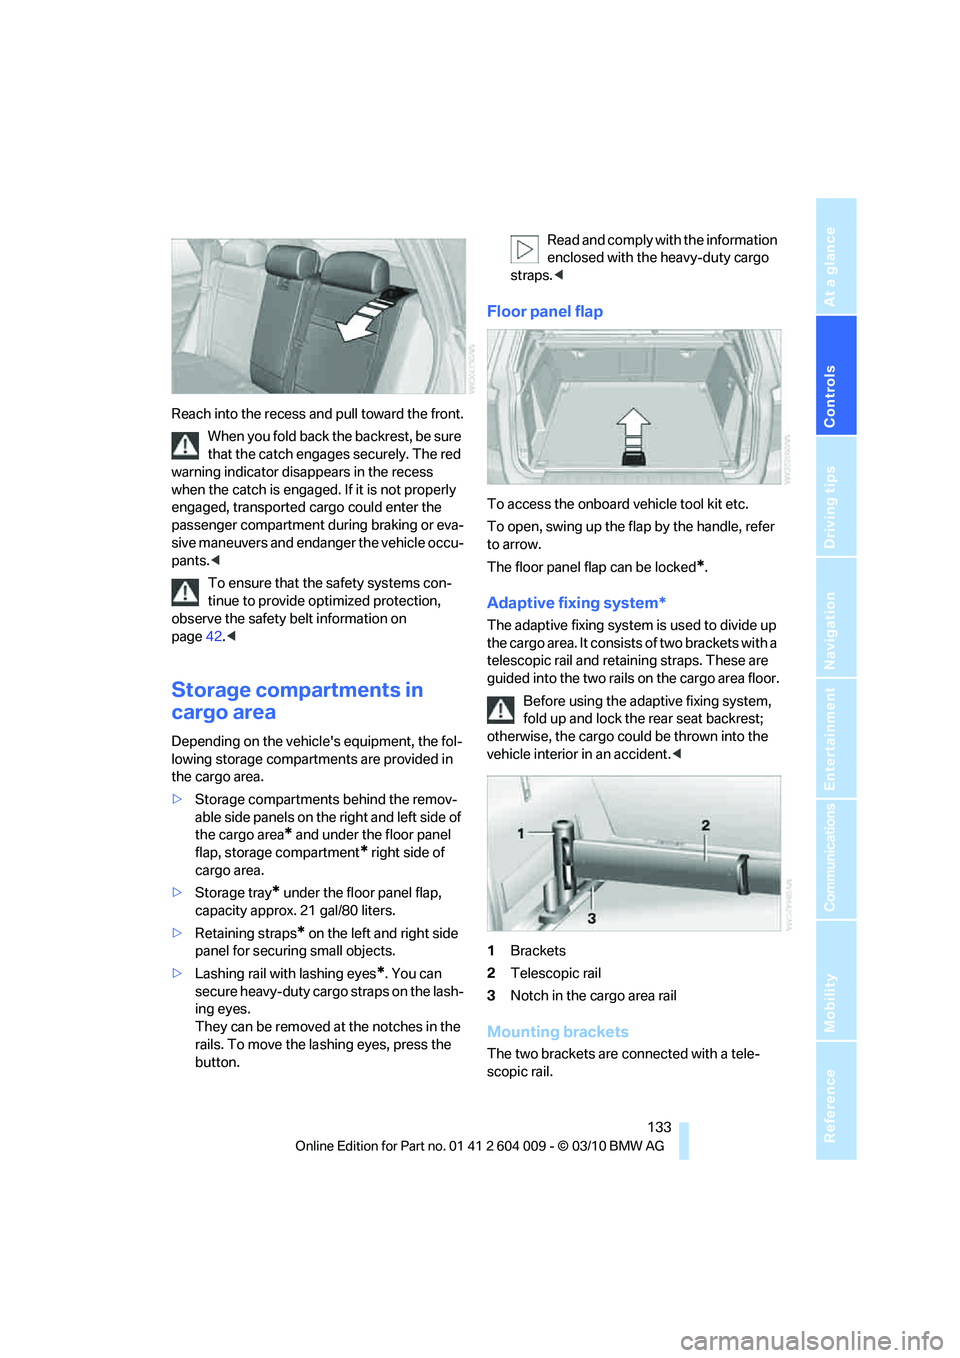
To open, swing up the flap by the handle, refer
to arrow.
The floor panel flap can be locked
*.
Adaptive fixing system*
The adaptive fixing system is used to divide up
the cargo area. It consists of two brackets with a
telescopic rail and retaining straps. These are
guided into the two rails on the cargo area floor.
Before using the adaptive fixing system,
fold up and lock the rear seat backrest;
otherwise, the cargo could be thrown into the
vehicle interior in an accident.<
1Brackets
2Telescopic rail
3Notch in the cargo area rail
Mounting brackets
The two brackets are connected with a tele-
scopic rail.
Page 137 of 312
Controls
135Reference
At a glance
Driving tips
Communications
Navigation
Entertainment
Mobility
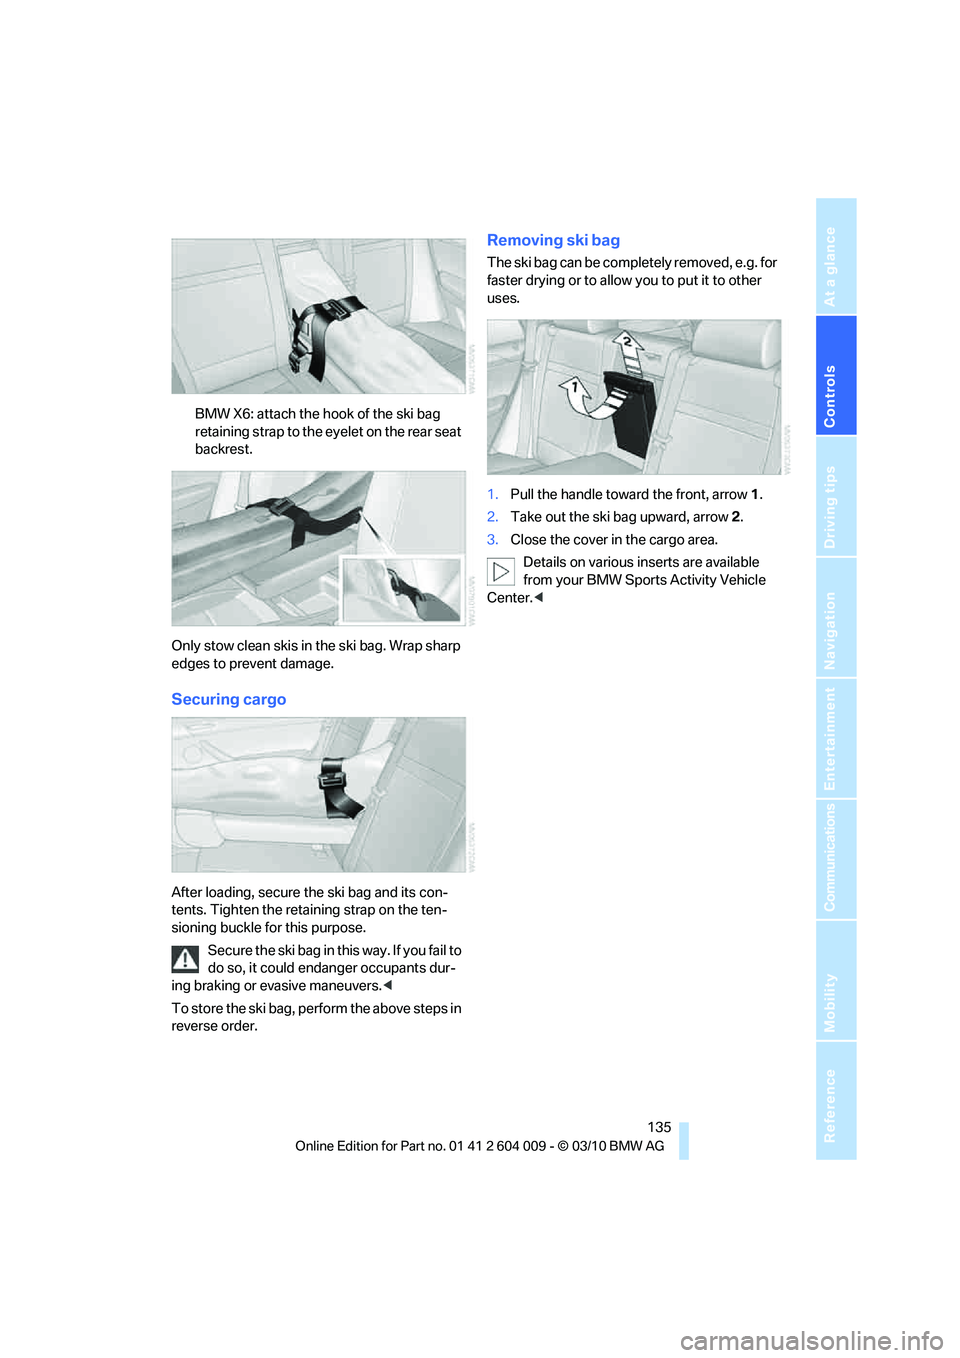
BMW X6: attach the hook of the ski bag
retaining strap to the eyelet on the rear seat
backrest.
Only stow clean skis in the ski bag. Wrap sharp
edges to prevent damage.
Securing cargo
After loading, secure the ski bag and its con-
tents. Tighten the retaining strap on the ten-
sioning buckle for this purpose.
Secure the ski bag in this way. If you fail to
do so, it could endanger occupants dur-
ing braking or evasive maneuvers.<
To store the ski bag, perform the above steps in
reverse order.
Removing ski bag
The ski bag can be completely removed, e.g. for
faster drying or to allow you to put it to other
uses.
1.Pull the handle toward the front, arrow1.
2.Take out the ski bag upward, arrow2.
3.Close the cover in the cargo area.
Details on various inserts are available
from your BMW Sports Activity Vehicle
Center.<
Page 144 of 312
Things to remember when driving
142
Stowing cargo
BMW X5
BMW X6
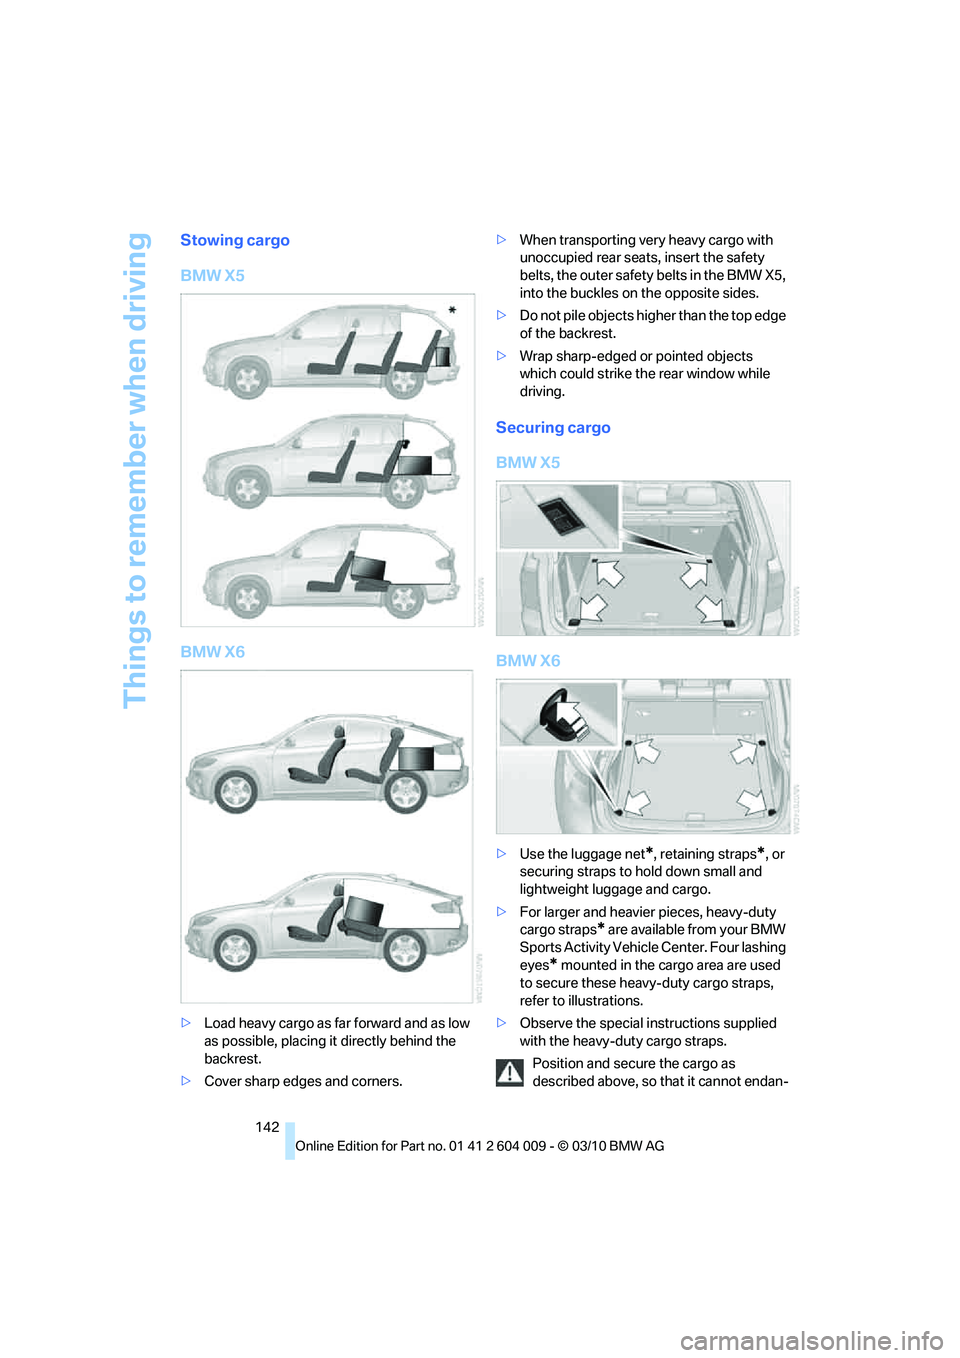
>Load heavy cargo as far forward and as low
as possible, placing it directly behind the
backrest.
>Cover sharp edges and corners.>When transporting very heavy cargo with
unoccupied rear seats, insert the safety
belts, the outer safety belts in the BMW X5,
into the buckles on the opposite sides.
>Do not pile objects higher than the top edge
of the backrest.
>Wrap sharp-edged or pointed objects
which could strike the rear window while
driving.
Securing cargo
BMW X5
BMW X6
>Use the luggage net*, retaining straps*, or
securing straps to hold down small and
lightweight luggage and cargo.
>For larger and heavier pieces, heavy-duty
cargo straps
* are available from your BMW
Sports Activity Vehicle Center. Four lashing
eyes
* mounted in the cargo area are used
to secure these heavy-duty cargo straps,
refer to illustrations.
>Observe the special instructions supplied
with the heavy-duty cargo straps.
Position and secure the cargo as
described above, so that it cannot endan-
Page 145 of 312
Driving tips
143Reference
At a glance
Controls
Communications
Navigation
Entertainment
Mobility
ger the car's occupants, for example if sudden
braking or evasive maneuvers are necessary.
Never exceed either the approved gross vehicle
weight or either of the approved axle weights,
refer to page283, as excessive loads can pose
a safety hazard, and may also place you in viola-
tion of traffic safety laws.
You should never transport unsecured heavy or
hard objects in the passenger compartment, as
they could fly around and pose a safety hazard
to the vehicle's occupants during abrupt brak-
ing or evasive maneuvers.
Use only the lashing eyes pictured to fasten the
heavy-duty cargo straps. Do not secure cargo
with the attachment points for the top tether,
refer to page55; otherwise they could be dam-
aged.<
Roof-mounted luggage rack*
A special rack system is available as an option
for your BMW. Please comply with the precau-
tions included with the installation instructions.
Loading roof-mounted luggage rack
Because roof racks raise the vehicle's center of
gravity when loaded, they have a major effect on
its handling and steering response. You should
therefore always remember not to exceed the
approved roof load capacity, the approved
gross vehicle weight or the axle weights when
loading the rack.
You can find the specified weights under
Weights on page283.
The load on the roof must be evenly distributed
and must not extend outward beyond the limits
of the loading surface. Always stow the heaviest
pieces on the bottom. Be sure that adequate
clearance is maintained for raising the glass
sunroof
*/panoramic glass sunroof* and that
objects do not project into the opening path of
the liftgate.
Secure roof-mounted cargo correctly and
securely to prevent it from shifting or falling off
during the trip.
Drive smoothly. Avoid sudden acceleration and
braking maneuvers. Take corners gently.
Driving on poor roads
Y our B MW is at hom e on a ll r oa ds a nd surfac e s.
It combines a 4-wheel drive system with the
advantages of a normal passenger car.
Do not drive on unpaved terrain, as other-
wise the vehicle may be damaged.<
When you are driving on poor roads, there are a
few points which you should strictly observe for
your own safety, for that of your passengers,
and for the safety of the vehicle:
>Familiarize yourself with the vehicle before
driving off and avoid taking risks at all costs.
>Adapt your driving speed to the road condi-
tions. The steeper and rougher the road
surface is, the lower the speed should be.
>If you want to drive on very steep uphill or
downhill gradients, make sure beforehand
that the engine oil and coolant levels are
near the MAX mark, refer to page252.
BMW X5: you can operate your vehicle on
uphill and downhill gradients with a maxi-
mum slope of 50 %.
>On very steep downhill slopes, use Hill
Descent Control HDC, refer to page97.
BMW X5: it is possible to start off on inclines
of up to 33 %. The permissible body roll is
50 %.
>While driving, watch carefully for obstacles
such as rocks or holes. Try to avoid these
obstacles whenever possible.
>Make sure that the undercarriage does not
touch the ground, for example on crests and
bumpy roads. The ground clearance of the
vehicle is a maximum of approx. 8 in/20 cm.
Please note that the ground clearance can
vary depending on loading and the driving
conditions of the vehicle.
>Only drive through road surface water up to
a maximum water depth of
>BMW X5 20 in/50 cm
>BMW X6 17 in/45 cm
And only drive at walking speed; do not
remain stationary.
Page 215 of 312
213
Entertainment
Reference
At a glance
Controls
Driving tips Communications
Navigation
Mobility
>Depending on the mobile phone, certain
settings may be necessary on the mobile
phone, e.g. via the following menu items:
>Bluetooth activated
>Connection must be allowed without
requiring further confirmation
>Reconnect
>Depending on the mobile phone model, the
setting energy saving mode can, for exam-
ple, result in vehicle failing to detect the
paired mobile phone.
>For pairing purposes, define any 4 to 16-
digit number as a Bluetooth passkey,
e.g. 25081107. A long and complex number
offers the best protection against unautho-
rized access. This Bluetooth passkey is no
longer required following successful pair-
ing.
>The ignition is switched on.
Only pair the mobile phone with the vehi-
cle stationary, otherwise the passengers
and other road users can be endangered due to
a lack of attentiveness on the part of the
driver.<
Switching on ignition
1.Insert the remote control as far as possible
into the ignition lock.
2.Switch on ignition without operating the
brake or clutch or pressing the Start/Stop
button.
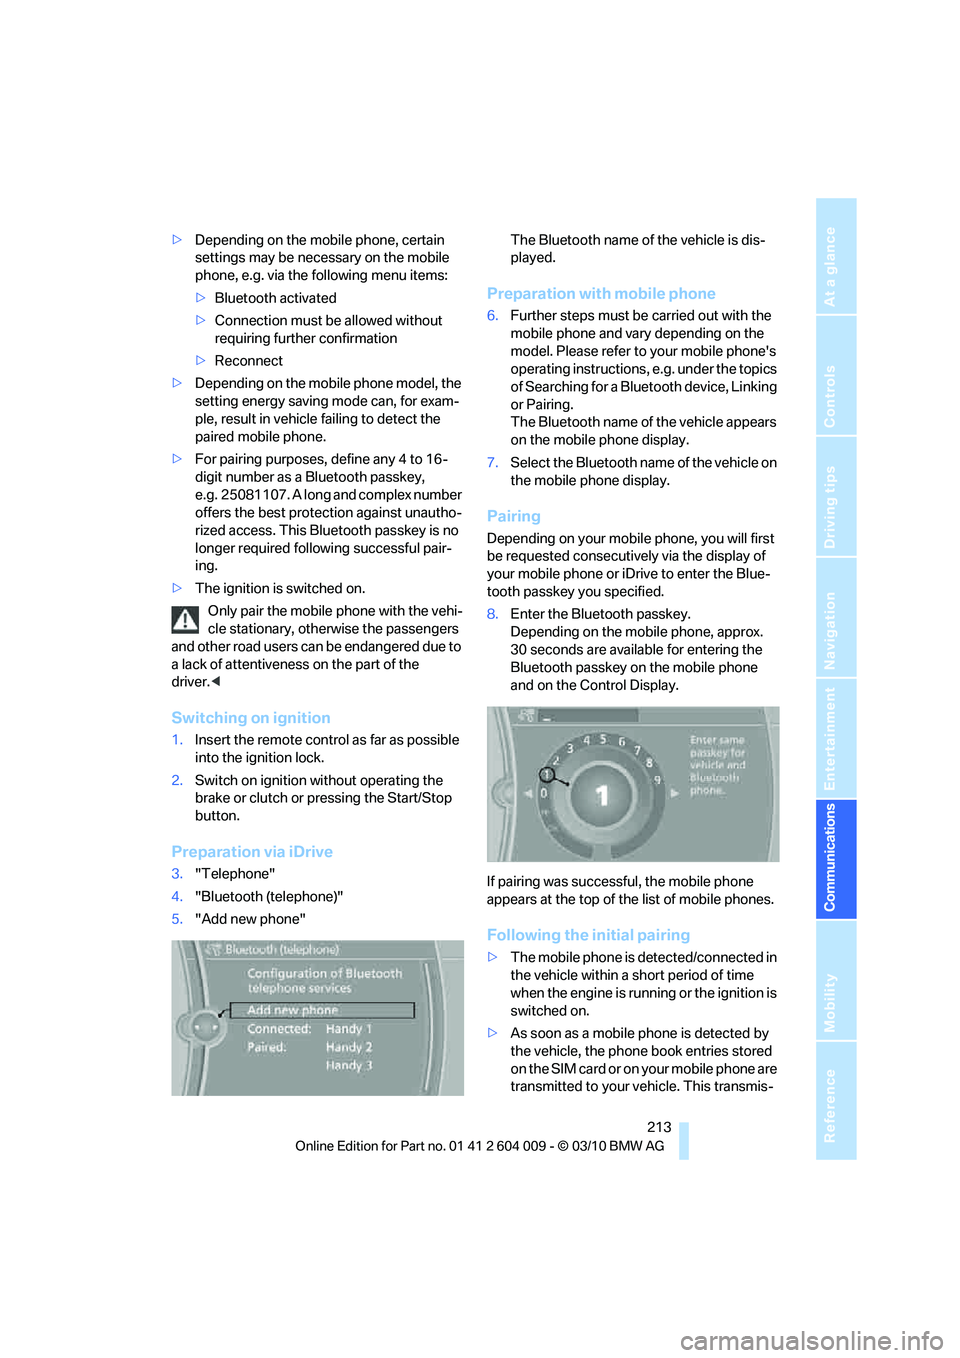
Preparation via iDrive
3."Telephone"
4."Bluetooth (telephone)"
5."Add new phone"The Bluetooth name of the vehicle is dis-
played.
Preparation with mobile phone
6.Further steps must be carried out with the
mobile phone and vary depending on the
model. Please refer to your mobile phone's
operating instructions, e.g. under the topics
of Searching for a Bluetooth device, Linking
or Pairing.
The Bluetooth name of the vehicle appears
on the mobile phone display.
7.Select the Bluetooth name of the vehicle on
the mobile phone display.
Pairing
Depending on your mobile phone, you will first
be requested consecutively via the display of
your mobile phone or iDrive to enter the Blue-
tooth passkey you specified.
8.Enter the Bluetooth passkey.
Depending on the mobile phone, approx.
30 seconds are available for entering the
Bluetooth passkey on the mobile phone
and on the Control Display.
If pairing was successful, the mobile phone
appears at the top of the list of mobile phones.
Following the initial pairing
>The mobile phone is detected/connected in
the vehicle within a short period of time
when the engine is running or the ignition is
switched on.
>As soon as a mobile phone is detected by
the vehicle, the phone book entries stored
on the SIM card or on your mobile phone are
transmitted to your vehicle. This transmis-
Page 216 of 312
Telephone
214 sion is dependent on your mobile phone,
refer to the operating instructions of the
mobile phone if necessary, and can take
several minutes.
>Four mobile phones can be paired.
>Specific settings may be necessary in some
mobile phones, e.g. authorization or a
secure connection, refer to the mobile
phone operating instructions.
If not all phone book entries are displayed:
>Transfer all phone book entries from the
SIM card to the mobile phone if necessary.
>It may not be possible to display phone
book entries with special characters.
Checking if pairing is unsuccessful
>Is the mobile phone supported by the
mobile phone preparation package? Infor-
mation on this subject is also provided on
the Internet at: www.bmw.com/bluetooth
>Do the Bluetooth passkeys on the mobile
phone and the vehicle match? The same
Bluetooth passkey must be entered both on
the mobile phone display and via iDrive.
>Have you required longer than 30 seconds
to enter the Bluetooth passkey? Then
repeat the pairing procedure.
>Are too many Bluetooth devices connected
to the mobile phone? If so, delete the con-
nections with other devices on the mobile
phone.
>The mobile phone no longer reacts? Switch
the mobile phone off and then on again or
disconnect the power supply.
>Repeat the pairing procedure.
>If all items on the list have been checked
and the mobile phone still cannot be paired,
please contact Customer Relations.
Connecting a particular mobile phone
If more than one mobile phone is detected by
the vehicle, the mobile phone at the top of the
list is connected. A different mobile phone can
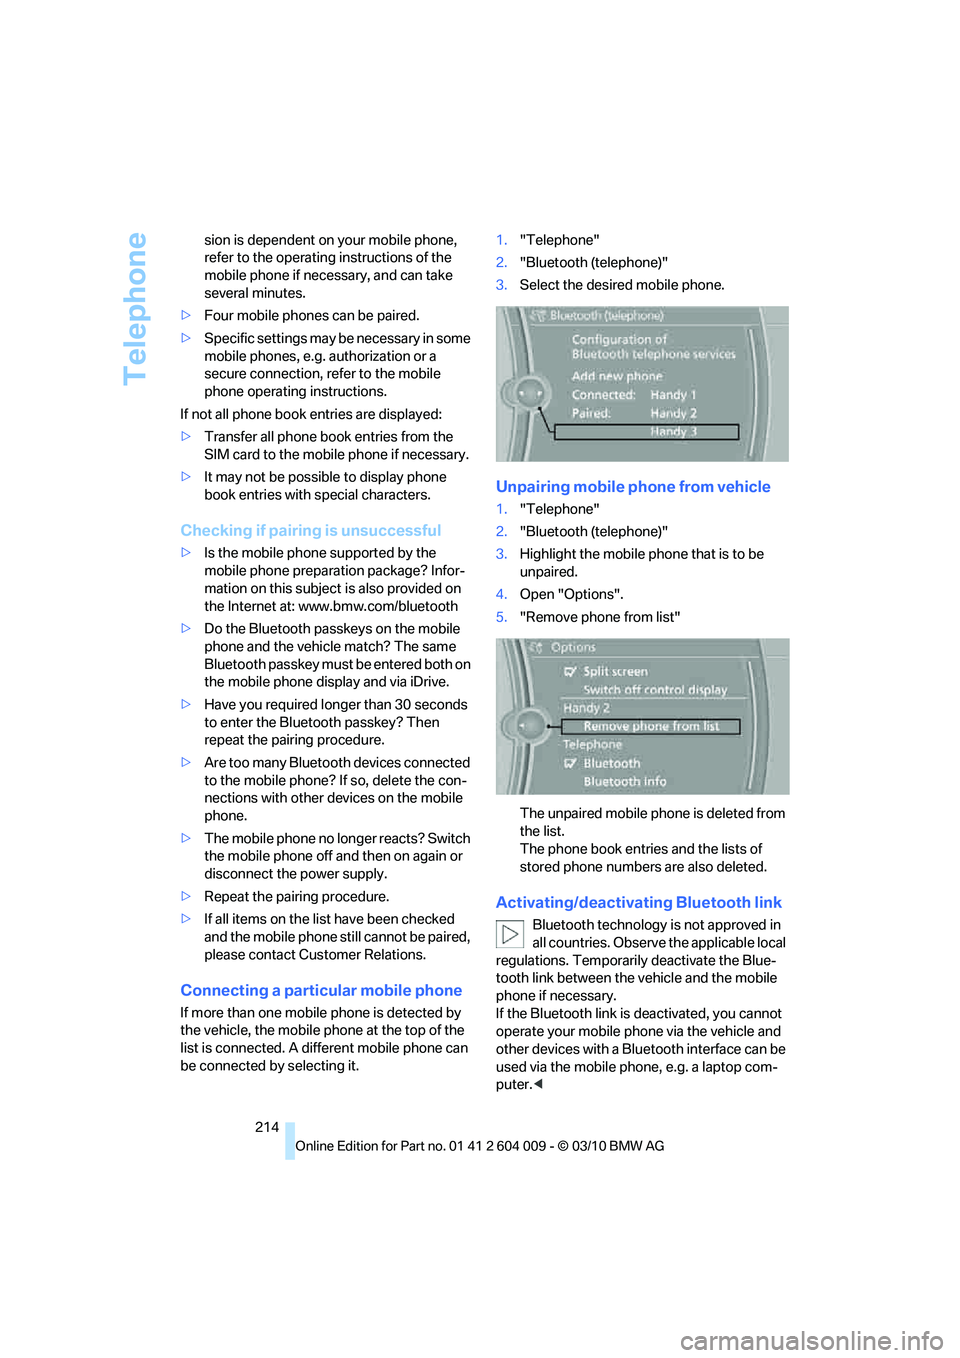
be connected by selecting it.1."Telephone"
2."Bluetooth (telephone)"
3.Select the desired mobile phone.
Unpairing mobile phone from vehicle
1."Telephone"
2."Bluetooth (telephone)"
3.Highlight the mobile phone that is to be
unpaired.
4.Open "Options".
5."Remove phone from list"
The unpaired mobile phone is deleted from
the list.
The phone book entries and the lists of
stored phone numbers are also deleted.
Activating/deactivating Bluetooth link
Bluetooth technology is not approved in
all countries. Observe the applicable local
regulations. Temporarily deactivate the Blue-
tooth link between the vehicle and the mobile
phone if necessary.
If the Bluetooth link is deactivated, you cannot
operate your mobile phone via the vehicle and
other devices with a Bluetooth interface can be
used via the mobile phone, e.g. a laptop com-
puter.<
Page 253 of 312
Mobility
251Reference
At a glance
Controls
Driving tips
Communications
Navigation
Entertainment
Under the hood
Never attempt to perform any service or
repair operations on your vehicle without
the required professional technical training. If
you do not know what repair procedures to fol-
low, have work on your vehicle done only by
your BMW Sports Activity Vehicle Center or a
workshop that works according to BMW repair
procedures with correspondingly trained per-
sonnel. If this work is not carried out properly,
there is a danger of subsequent damage and
related safety hazards.<
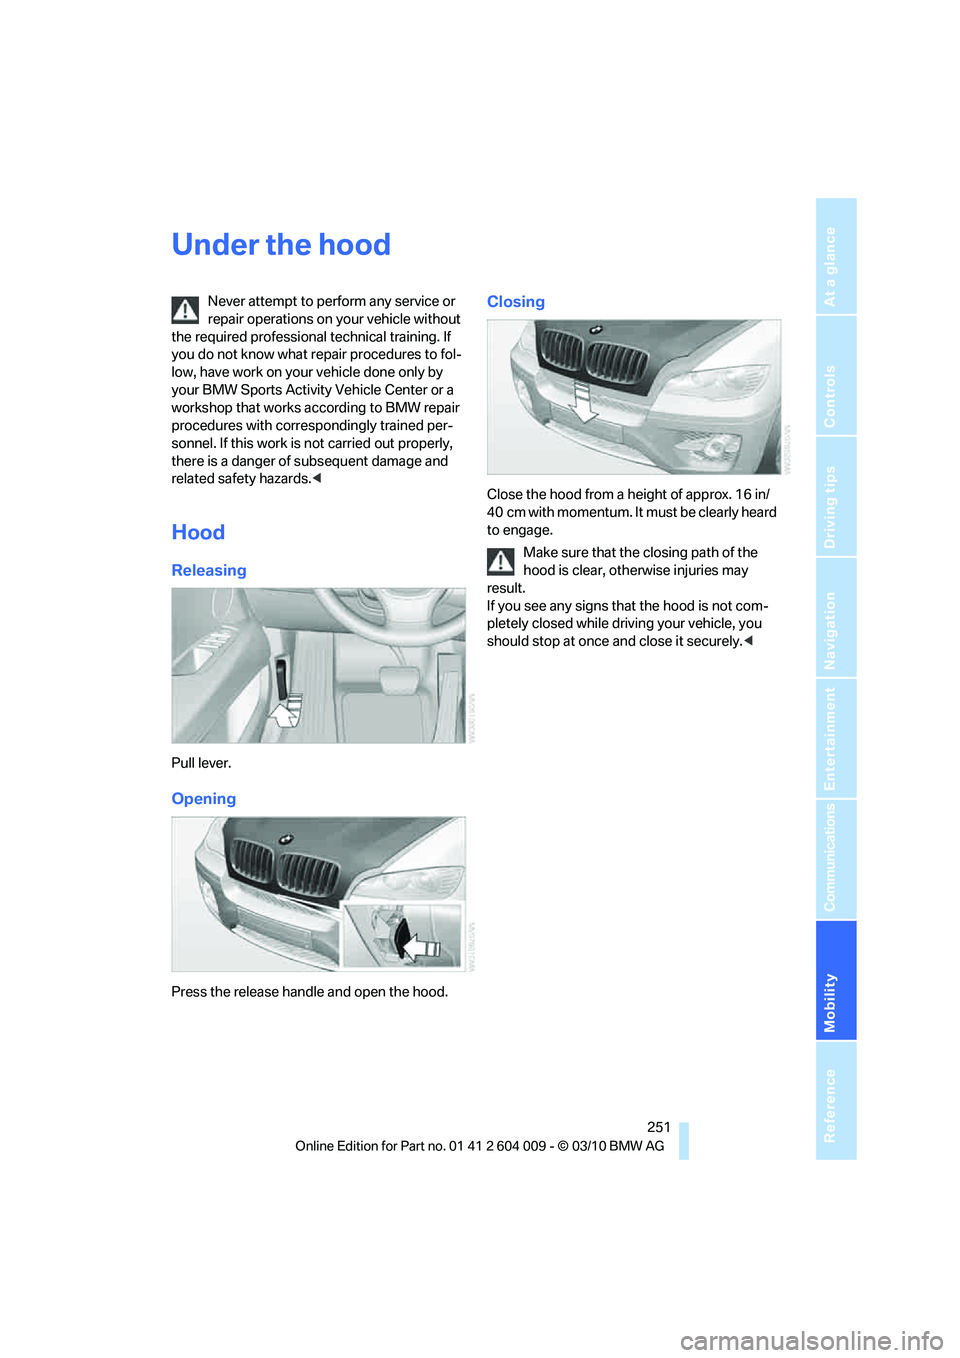
Hood
Releasing
Pull lever.
Opening
Press the release handle and open the hood.
Closing
Close the hood from a height of approx. 16 in/
40 cm with momentum. It must be clearly heard
to engage.
Make sure that the closing path of the
hood is clear, otherwise injuries may
result.
If you see any signs that the hood is not com-
pletely closed while driving your vehicle, you
should stop at once and close it securely.<
Page 272 of 312
Replacing components
270 3.Position the new wheel or compact wheel.
Secure the wheel by screwing at least two
lug bolts into opposite bolt holes.
When you mount wheels other than Genu-
ine BMW light-alloy wheels, different lug
bolts may also be required.
4.Screw in the remaining lug bolts. Tighten all
the bolts securely in a diagonal pattern.
5.Lower the vehicle and remove the jack from
beneath the vehicle.
After mounting
1.Tighten the lug bolts in a diagonal pattern.
To ensure safety, always have the
lug bolts checked with a calibrated
torque wrench as soon as possible to
ensure that they are tightened to the speci-
fied torque. Otherwise, incorrectly tight-
ened lug bolts are a hidden safety risk. The
tightening torque is 101 lb ft/140 Nm.<
2.Stow the defective wheel in the cargo area.
The defective wheel cannot be stored
under the floor panel flap due to its
size.<
3.Check and correct the tire inflation pressure
at the earliest opportunity.
Protect valve stems with valve screw
caps against dirt and contamination.
Dirt in valve stems is a frequent source of
gradual air loss.<
4.Initialize the Flat Tire Monitor, refer to
page100, or reset the Tire Pressure Moni-
tor, refer to page102.
5.Replace the damaged tire as soon as possi-
ble and have the new wheel/tire balanced.
Driving with compact wheel
Drive reservedly and do not exceed a
speed of 50 mph/80 km/h. Otherwise,
changes in the driving characteristics could
result, for example reduced track stability on
braking, extended braking distance, and altered
self-steering characteristics in the limit range.
In conjunction with winter tires, these charac-
teristics are more pronounced.
their original size as quickly as possible. Failure
to do so is a safety risk.<
Vehicle battery
Battery care
The battery is 100 % maintenance-free, i.e., the
electrolyte will last for the life of the battery
when the vehicle is operated in a temperate cli-
mate. Your BMW Sports Activity Vehicle Center
will be glad to advise in all matters concerning
the battery.
Replacing battery
Only use vehicle batteries that have been
approved for your vehicle by the manu-
facturer; otherwise, the vehicle could be dam-
aged and systems or functions may not be fully
available.<
After a battery replacement, have the battery
registered on the vehicle by your BMW Sports
Activity Vehicle Center to ensure that all com-
fort functions are fully available.
Charging battery
Only charge the battery in the vehicle via the
terminals in the engine compartment with the
engine switched off. Connections, refer to
Jump starting on page274.
Disposal
Have old batteries disposed of following
replacement at your BMW Sports Activity
Vehicle Center or bring them to a recycling cen-
ter. Maintain the battery in an upright position
for transport and storage. Always restrain the
battery to prevent it from tipping over during
transport.<
Power failure
Following a temporary power failure, e.g. due to
a discharged battery, the use of some equip-
ment will be restricted, requiring its reinitializa-
Page 273 of 312
Mobility
271Reference
At a glance
Controls
Driving tips
Communications
Navigation
Entertainment
tion. In the same way, individual settings are lost
and must be updated again:
>Seat, mirror and steering wheel memory
The positions must be stored again, refer to
page44.
>Time and Date
The values must be updated again, refer to
pages85, 85.
>Radio
Radio stations must be stored again, refer
to page171.
>Navigation system
You must wait until the system becomes
functional again, refer to page165.
>Glass sunroof/panoramic glass sunroof
It may only be possible to raise the glass
sunroof/panoramic glass sunroof. The sys-
tem must be initialized, refer to page41.
>Digital compass
The system must be calibrated, refer to
page126.
>Active steering
The system automatically initializes for a
short time as you drive. During this time, the
system is deactivated, refer to page106.
>xDrive
The system automatically initializes as you
drive. During this time, indicator lamps light
up. If the lamps do not disappear during the
current trip, have the system checked.
Before removing the vehicle from stor-
age, consult your BMW Sports Activity
Vehicle Center.<
Fuses
Never attempt to repair a blown fuse and
do not replace a defective fuse with a sub-
stitute of another color or amperage rating, as
this could lead to a circuit overload, ultimately
resulting in a fire in the vehicle.<
A pair of plastic tweezers and instructions for
fuse allocation is stored with the fuses in the
cargo area.Spare fuses can be obtained from your BMW
Sports Activity Vehicle.
In interior
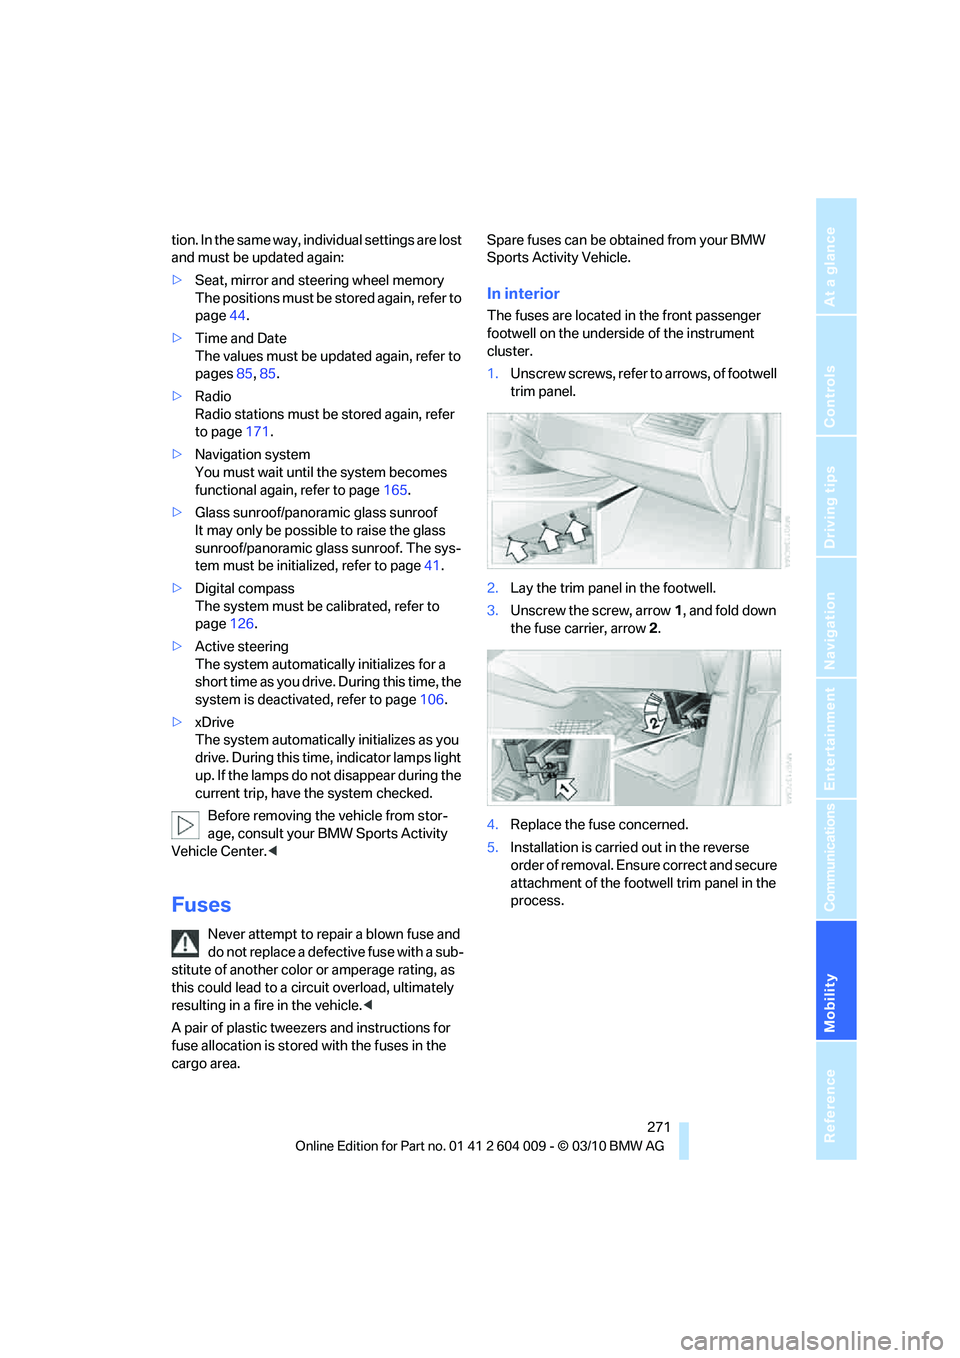
The fuses are located in the front passenger
footwell on the underside of the instrument
cluster.
1.Unscrew screws, refer to arrows, of footwell
trim panel.
2.Lay the trim panel in the footwell.
3.Unscrew the screw, arrow1, and fold down
the fuse carrier, arrow2.
4.Replace the fuse concerned.
5.Installation is carried out in the reverse
order of removal. Ensure correct and secure
attachment of the footwell trim panel in the
process.