mirror BMW X5 XDRIVE 35I PREMIUM 2011 User Guide
[x] Cancel search | Manufacturer: BMW, Model Year: 2011, Model line: X5 XDRIVE 35I PREMIUM, Model: BMW X5 XDRIVE 35I PREMIUM 2011Pages: 312, PDF Size: 8.91 MB
Page 92 of 312
Technology for comfort, convenience and safety
90
Malfunction
A Check Control message appears in the
instrument panel, refer to page82.
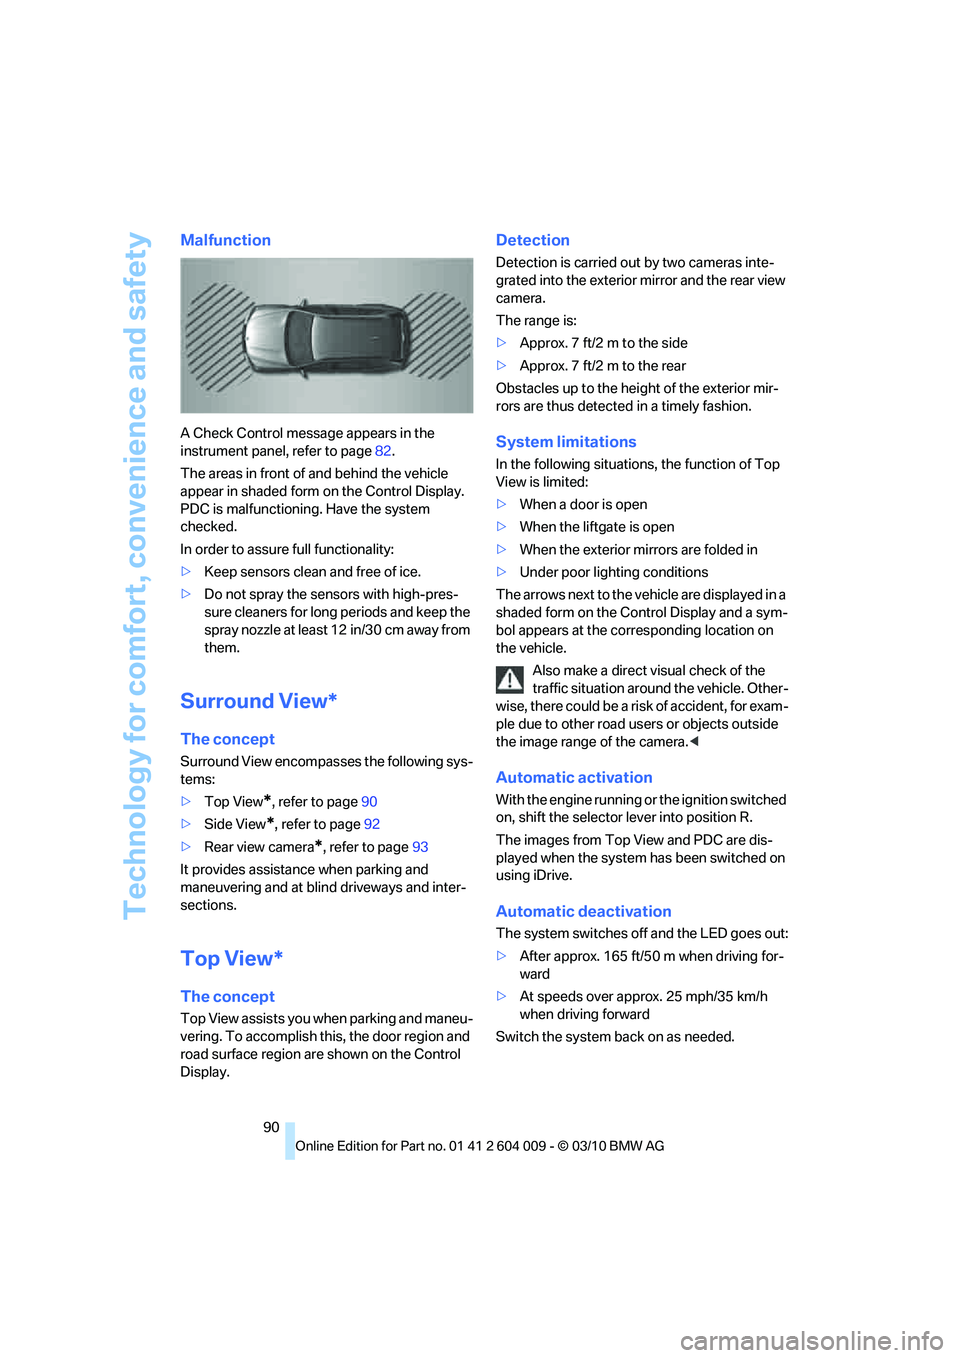
The areas in front of and behind the vehicle
appear in shaded form on the Control Display.
PDC is malfunctioning. Have the system
checked.
In order to assure full functionality:
>Keep sensors clean and free of ice.
>Do not spray the sensors with high-pres-
sure cleaners for long periods and keep the
spray nozzle at least 12 in/30 cm away from
them.
Surround View*
The concept
Surround View encompasses the following sys-
tems:
>Top View
*, refer to page90
>Side View
*, refer to page92
>Rear view camera
*, refer to page93
It provides assistance when parking and
maneuvering and at blind driveways and inter-
sections.
Top View*
The concept
Top View assists you when parking and maneu-
vering. To accomplish this, the door region and
road surface region are shown on the Control
Display.
Detection
Detection is carried out by two cameras inte-
grated into the exterior mirror and the rear view
camera.
The range is:
>Approx. 7 ft/2 m to the side
>Approx. 7 ft/2 m to the rear
Obstacles up to the height of the exterior mir-
rors are thus detected in a timely fashion.
System limitations
In the following situations, the function of Top
View is limited:
>When a door is open
>When the liftgate is open
>When the exterior mirrors are folded in
>Under poor lighting conditions
The arrows next to the vehicle are displayed in a
shaded form on the Control Display and a sym-
bol appears at the corresponding location on
the vehicle.
Also make a direct visual check of the
traffic situation around the vehicle. Other-
wise, there could be a risk of accident, for exam-
ple due to other road users or objects outside
the image range of the camera.<
Automatic activation
With the engine running or the ignition switched
on, shift the selector lever into position R.
The images from Top View and PDC are dis-
played when the system has been switched on
using iDrive.
Automatic deactivation
The system switches off and the LED goes out:
>After approx. 165 ft/50 m when driving for-
ward
>At speeds over approx. 25 mph/35 km/h
when driving forward
Switch the system back on as needed.
Page 94 of 312
Technology for comfort, convenience and safety
92
Cameras
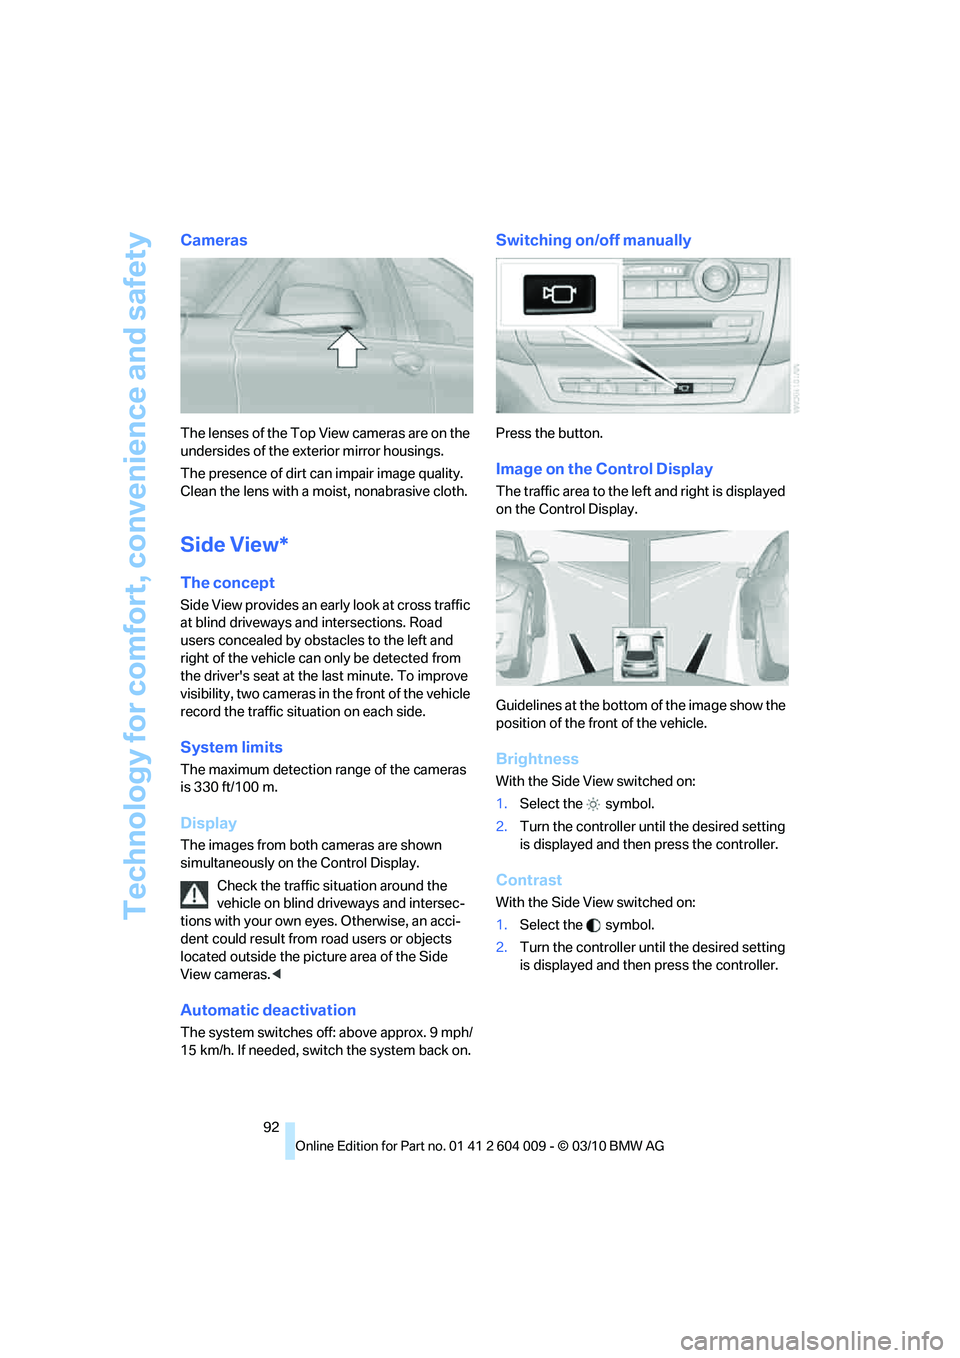
The lenses of the Top View cameras are on the
undersides of the exterior mirror housings.
The presence of dirt can impair image quality.
Clean the lens with a moist, nonabrasive cloth.
Side View*
The concept
Side View provides an early look at cross traffic
at blind driveways and intersections. Road
users concealed by obstacles to the left and
right of the vehicle can only be detected from
the driver's seat at the last minute. To improve
visibility, two cameras in the front of the vehicle
record the traffic situation on each side.
System limits
The maximum detection range of the cameras
is 330 ft/100 m.
Display
The images from both cameras are shown
simultaneously on the Control Display.
Check the traffic situation around the
vehicle on blind driveways and intersec-
tions with your own eyes. Otherwise, an acci-
dent could result from road users or objects
located outside the picture area of the Side
View cameras.<
Automatic deactivation
The system switches off: above approx. 9 mph/
15 km/h. If needed, switch the system back on.
Switching on/off manually
Press the button.
Image on the Control Display
The traffic area to the left and right is displayed
on the Control Display.
Guidelines at the bottom of the image show the
position of the front of the vehicle.
Brightness
With the Side View switched on:
1.Select the symbol.
2.Turn the controller until the desired setting
is displayed and then press the controller.
Contrast
With the Side View switched on:
1.Select the symbol.
2.Turn the controller until the desired setting
is displayed and then press the controller.
Page 107 of 312
Controls
105Reference
At a glance
Driving tips
Communications
Navigation
Entertainment
Mobility
>When the turn signal flashes.
System limits
The system cannot replace the driver's
personal judgment of the course of the
road and the traffic situation.
In the event of a warning, do not jerk the steer-
ing wheel; otherwise, you may lose control over
the vehicle.<
The system may not be fully functional in the
following situations:
>In heavy fog, rain or snowfall.
>When the lane markings are worn away,
poorly visible, convergent, divergent or
unclear, as in road construction areas.
>When the limit lines are covered by snow,
ice, dirt or water.
>In tight curves or on narrow lanes.
>When the limit lines are not white.
>When the limit lines are covered by objects.
>When driving very close to the vehicle in
front of you.
>When driving toward bright lights.
>When the windshield is fogged over, dirty or
covered by a sticker, etc., in front of the
interior rearview mirror.
Malfunctions
Steering wheel vibration
Frequent activation of the steering wheel vibra-
tion causes the system to overheat.
This causes the lane departure warning to
become deactivated.
Let the system cool and reactivate it by press-
ing the button.
Camera
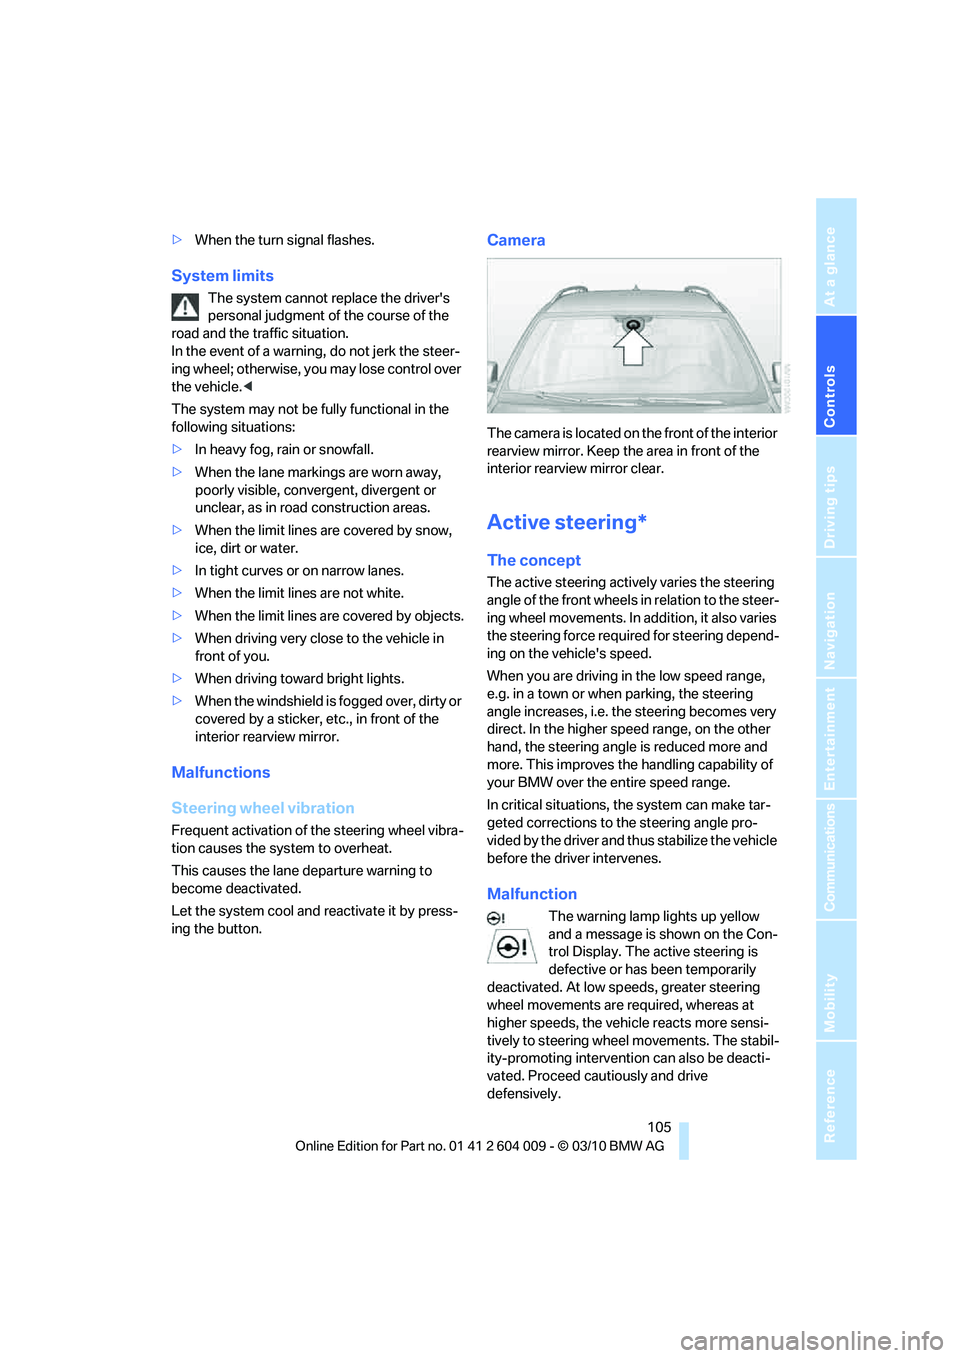
The camera is located on the front of the interior
rearview mirror. Keep the area in front of the
interior rearview mirror clear.
Active steering*
The concept
The active steering actively varies the steering
angle of the front wheels in relation to the steer-
ing wheel movements. In addition, it also varies
the steering force required for steering depend-
ing on the vehicle's speed.
When you are driving in the low speed range,
e.g. in a town or when parking, the steering
angle increases, i.e. the steering becomes very
direct. In the higher speed range, on the other
hand, the steering angle is reduced more and
more. This improves the handling capability of
your BMW over the entire speed range.
In critical situations, the system can make tar-
geted corrections to the steering angle pro-
vided by the driver and thus stabilize the vehicle
before the driver intervenes.
Malfunction
The warning lamp lights up yellow
and a message is shown on the Con-
trol Display. The active steering is
defective or has been temporarily
deactivated. At low speeds, greater steering
wheel movements are required, whereas at
higher speeds, the vehicle reacts more sensi-
tively to steering wheel movements. The stabil-
ity-promoting intervention can also be deacti-
vated. Proceed cautiously and drive
defensively.
Page 110 of 312
Technology for comfort, convenience and safety
108 indicated by the indicator lamp over the interior
rearview mirror, refer to Operating state of front
passenger airbags in the following.<
Before transporting a child on the front
passenger seat, read the safety informa-
tion and follow the instructions under Trans-
porting children safely, refer to page54.
When teenagers and adults assume certain sit-
ting positions, this can cause the front and side
airbags to deactivate. The indicator lamp for the
front passenger airbags lights up when this
occurs. In these cases, change the sitting posi-
tion so that the front passenger airbags are acti-
vated and the indicator lamp goes out. If the
desired status cannot be produced by changing
the sitting position, transport the correspond-
ing person on the rear seat. Do not fit seat cov-
ers, seat cushion padding, ball mats or other
items onto the front passenger seat unless they
are specifically recommended by BMW. Do not
lay objects under the seat which could press
against the seat from below. Otherwise a cor-
rect evaluation of the occupied seat surface
cannot be ensured.<
Operating state of front passenger
airbags
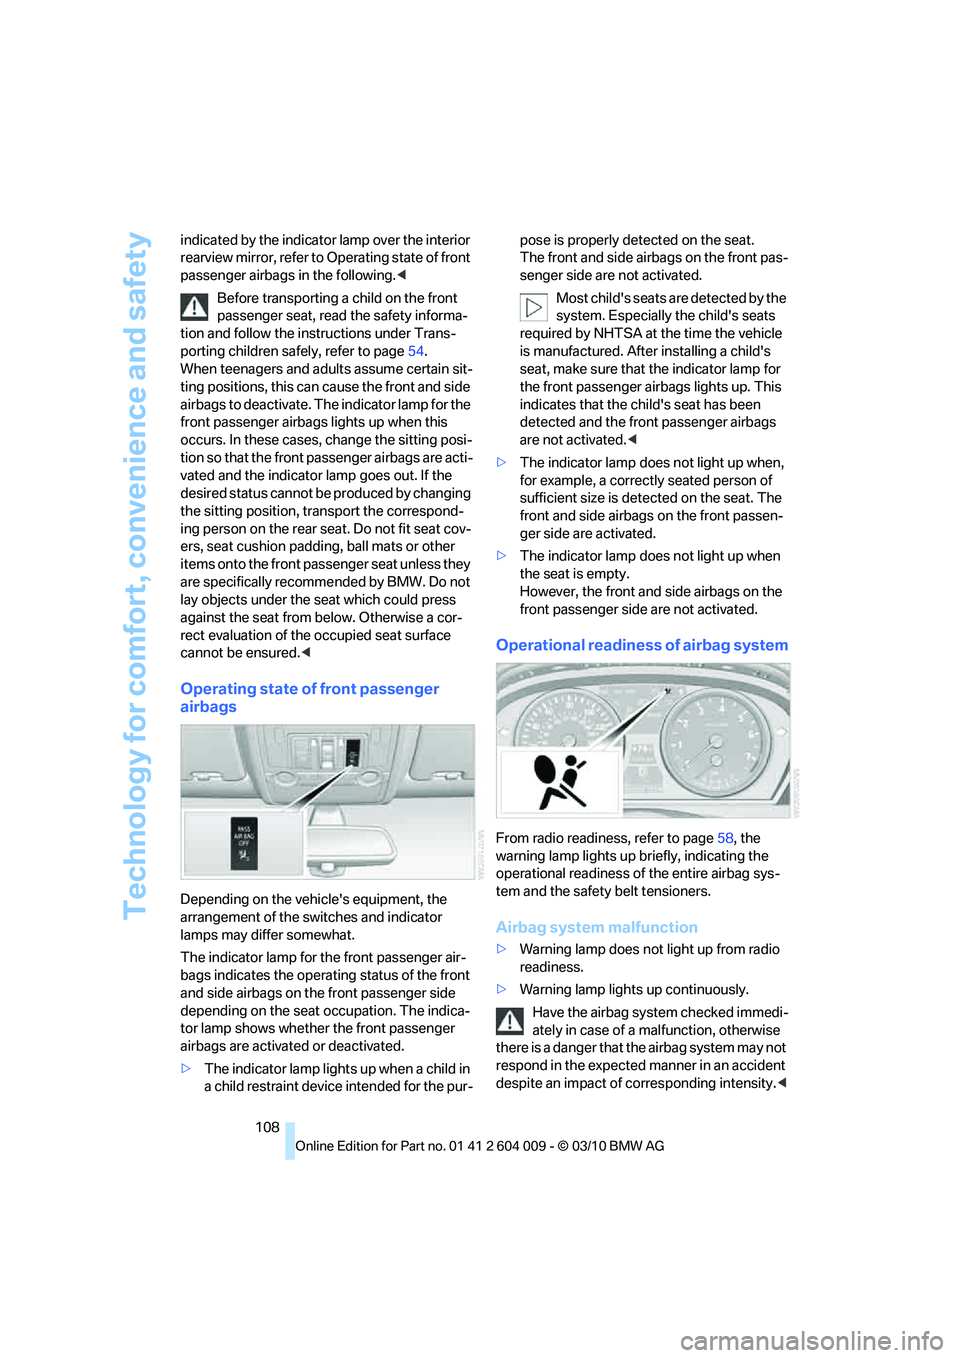
Depending on the vehicle's equipment, the
arrangement of the switches and indicator
lamps may differ somewhat.
The indicator lamp for the front passenger air-
bags indicates the operating status of the front
and side airbags on the front passenger side
depending on the seat occupation. The indica-
tor lamp shows whether the front passenger
airbags are activated or deactivated.
>The indicator lamp lights up when a child in
a child restraint device intended for the pur-pose is properly detected on the seat.
The front and side airbags on the front pas-
senger side are not activated.
Most child's seats are detected by the
system. Especially the child's seats
required by NHTSA at the time the vehicle
is manufactured. After installing a child's
seat, make sure that the indicator lamp for
the front passenger airbags lights up. This
indicates that the child's seat has been
detected and the front passenger airbags
are not activated.<
>The indicator lamp does not light up when,
for example, a correctly seated person of
sufficient size is detected on the seat. The
front and side airbags on the front passen-
ger side are activated.
>The indicator lamp does not light up when
the seat is empty.
However, the front and side airbags on the
front passenger side are not activated.
Operational readiness of airbag system
From radio readiness, refer to page58, the
warning lamp lights up briefly, indicating the
operational readiness of the entire airbag sys-
tem and the safety belt tensioners.
Airbag system malfunction
>Warning lamp does not light up from radio
readiness.
>Warning lamp lights up continuously.
Have the airbag system checked immedi-
ately in case of a malfunction, otherwise
there is a danger that the airbag system may not
respond in the expected manner in an accident
despite an impact of corresponding intensity.<
Page 115 of 312
Controls
113Reference
At a glance
Driving tips
Communications
Navigation
Entertainment
Mobility
High beams/
roadside parking lamps
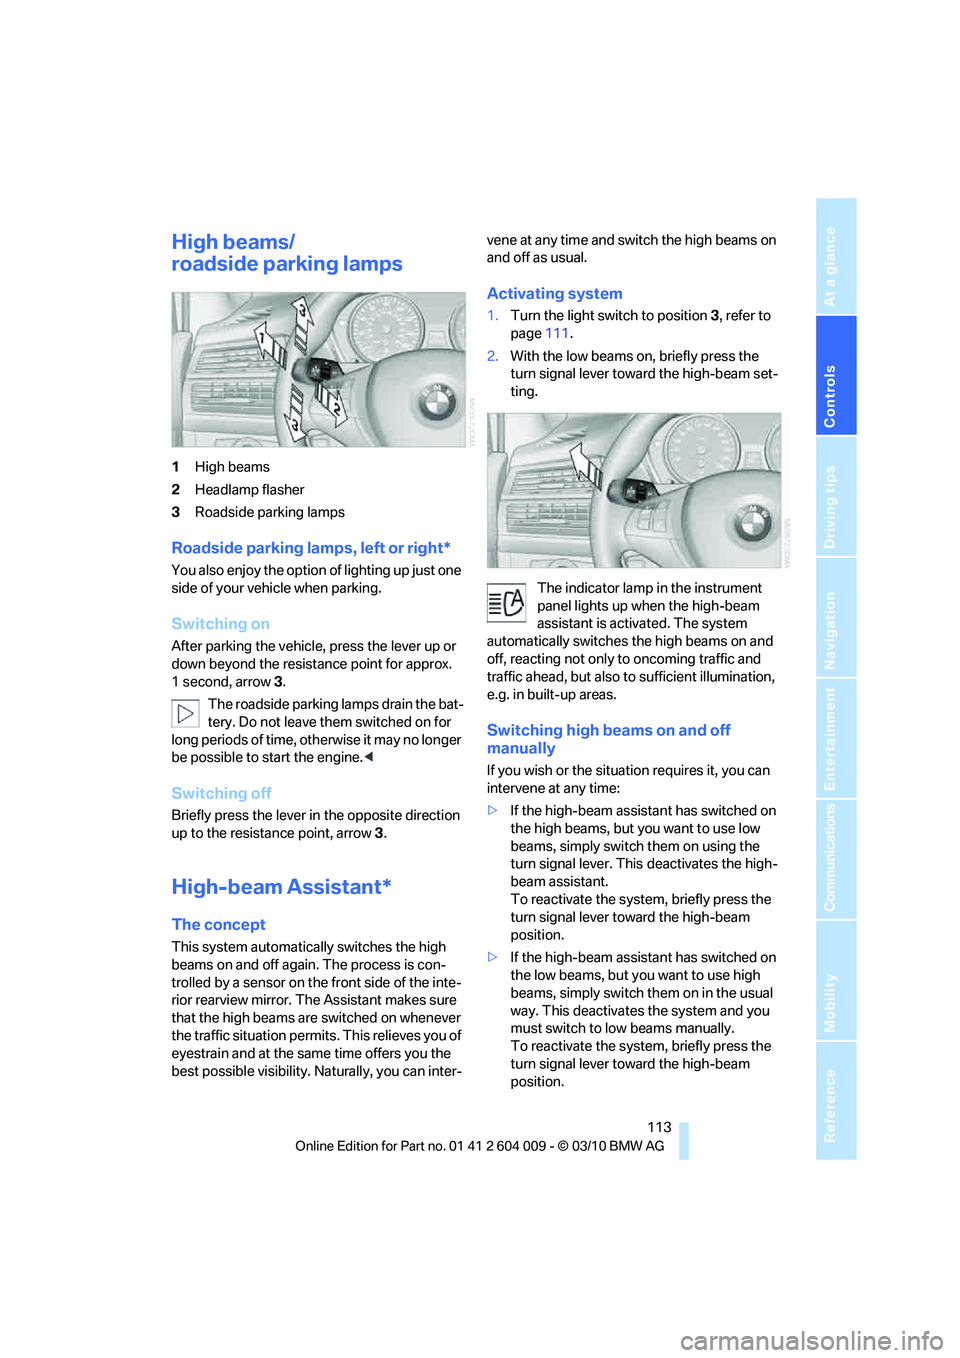
1High beams
2Headlamp flasher
3Roadside parking lamps
Roadside parking lamps, left or right*
You also enjoy the option of lighting up just one
side of your vehicle when parking.
Switching on
After parking the vehicle, press the lever up or
down beyond the resistance point for approx.
1 second, arrow3.
The roadside parking lamps drain the bat-
tery. Do not leave them switched on for
long periods of time, otherwise it may no longer
be possible to start the engine.<
Switching off
Briefly press the lever in the opposite direction
up to the resistance point, arrow 3.
High-beam Assistant*
The concept
This system automatically switches the high
beams on and off again. The process is con-
trolled by a sensor on the front side of the inte-
rior rearview mirror. The Assistant makes sure
that the high beams are switched on whenever
the traffic situation permits. This relieves you of
eyestrain and at the same time offers you the
best possible visibility. Naturally, you can inter-vene at any time and switch the high beams on
and off as usual.
Activating system
1.Turn the light switch to position3, refer to
page111.
2.With the low beams on, briefly press the
turn signal lever toward the high-beam set-
ting.
The indicator lamp in the instrument
panel lights up when the high-beam
assistant is activated. The system
automatically switches the high beams on and
off, reacting not only to oncoming traffic and
traffic ahead, but also to sufficient illumination,
e.g. in built-up areas.
Switching high beams on and off
manually
If you wish or the situation requires it, you can
intervene at any time:
>If the high-beam assistant has switched on
the high beams, but you want to use low
beams, simply switch them on using the
turn signal lever. This deactivates the high-
beam assistant.
To reactivate the system, briefly press the
turn signal lever toward the high-beam
position.
>If the high-beam assistant has switched on
the low beams, but you want to use high
beams, simply switch them on in the usual
way. This deactivates the system and you
must switch to low beams manually.
To reactivate the system, briefly press the
turn signal lever toward the high-beam
position.
Page 116 of 312
Lamps
114 >Use the headlamp flasher as usual when the
low beams are on.
System limits
The high-beam assistant cannot replace
personal judgment about the use of high
beams. In situations that require it, you should
therefore switch to low beams manually; failure
to do so can constitute a safety hazard.<
In the following sample situations, the system
will not function or will only function to a limited
degree, possibly requiring the driver to react
personally:
>In extremely unfavorable weather condi-
tions such as fog or heavy precipitation
>When you perceive poorly illuminated road
users such as pedestrians, cyclists, horse-
back riders, carriages, when rail or shipping
traffic is close to the road, or at deer cross-
ings
>In sharp curves, on steep hilltops or dips,
when there cross-traffic, or in the presence
of half-concealed oncoming traffic on the
highway
>In poorly lit areas and in the presence of
highly reflective signs
>In the low speed range
>When the windshield in the region of the
interior rearview mirror is fogged, dirty, or
covered by stickers, decals, etc.
>When the sensor is dirty. Clean the sensor
on the front side of the interior rearview mir-
ror with a cloth moistened with a little glass
cleaner.
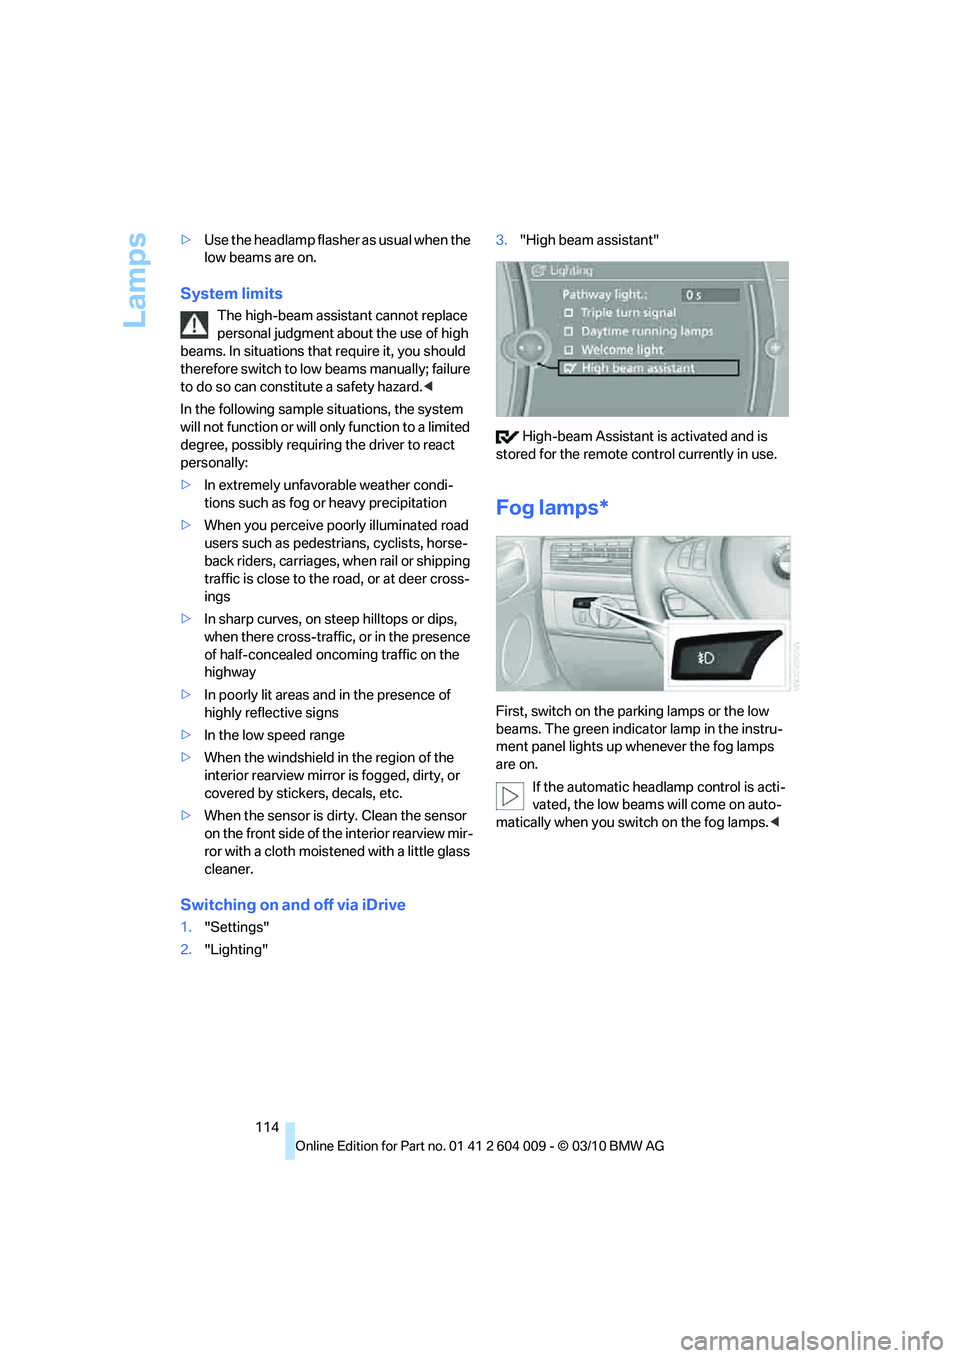
Switching on and off via iDrive
1."Settings"
2."Lighting"3."High beam assistant"
High-beam Assistant is activated and is
stored for the remote control currently in use.
Fog lamps*
First, switch on the parking lamps or the low
beams. The green indicator lamp in the instru-
ment panel lights up whenever the fog lamps
are on.
If the automatic headlamp control is acti-
vated, the low beams will come on auto-
matically when you switch on the fog lamps.<
Page 140 of 312
Things to remember when driving
138
Things to remember when driving
Break-in period
Moving parts need breaking-in time to adjust to
each other. To ensure that your vehicle contin-
ues to provide optimized economy of operation
throughout an extended service life, we request
that you devote careful attention to the follow-
ing section.
Engine and rear axle differential
Always obey all official speed limits.
Up to 1,200 miles/2,000 km
Drive at various engine and vehicle speeds, but
do not exceed:
>Gasoline engine
4,500 rpm or 100 mph/160 km/h
>Diesel engine
3,500 rpm or 90 mph/150 km/h
Avoid full-throttle operation and use of the
transmission's kickdown mode during these
initial miles.
From 1,200 miles/2,000 km
The engine and vehicle speed can gradually be
increased.
Tires
Due to technical factors associated with their
manufacture, tires do not achieve their full trac-
tion potential until after an initial break-in
period. Therefore, drive reservedly during the
first 200 miles/300 km.
Brake system
Brakes require an initial break-in period of
approx. 300 miles/500 km to achieve optimized
contact and wear patterns between brake pads
and rotors. Drive in a reserved manner during
this break-in period.
Following part replacement
Observe the break-in instructions again if com-
ponents mentioned above must be replaced
after subsequent driving operation.
Saving fuel
The fuel consumption of your vehicle depends
on various factors. Through a few simple steps,
your driving style, and regular maintenance, you
can have a positive influence on your fuel con-
sumption and environmental impact.
Removing unnecessary cargo
Additional weight increases fuel consumption.
Removing add-on parts after use
Remove unneeded auxiliary mirrors, roof or rear
luggage racks after use. Add-on parts attached
to the vehicle impede the aerodynamics and
increase the fuel consumption.
Closing windows and glass sunroof*/
panoramic glass sunroof*
An open glass sunroof/panoramic glass sunroof
or open windows likewise increase the drag
coefficient and therefore the fuel consumption.
Checking tire inflation pressures
regularly
Check and correct the tire inflation pressure as
needed at least twice a month and before long
trips.
An insufficient tire inflation pressure increases
the rolling resistance and thus increases the
fuel consumption and tire wear.
Driving off immediately
Do not allow the engine to warm up by leaving it
running while the vehicle remains stationary.
Instead, begin to drive at a moderate engine
Page 260 of 312
Care
258
Care
Car-care products
For the cleaning and care of your vehicle, BMW
recommends using only products that BMW
has approved for this purpose.
Regular cleaning and care make a significant
contribution to retaining your BMW's value.
The BMW Sports Activity Vehicle Center will be
happy to consult you on products and services
for the cleaning and care of your BMW.
Genuine BMW Care Products are materi-
als tested, laboratory tested, and tested in
actual use. They offer optimum care and pro-
tection for your vehicle.<
Do not use cleaners that contain alcohol
or solvents; they can damage your vehi-
cle.<
Cleaning agents can contain substances
that are dangerous or pose health risks.
You should therefore heed the warnings and
hazard indications on the packaging. Open the
doors or windows on your vehicle whenever
cleaning the interior. Make sure there is suffi-
cient ventilation in enclosed spaces. Use only
products that are formulated for vehicle clean-
ing.<
Exterior care
Washing your vehicle
In the winter months, it is especially
important to ensure that the vehicle is
washed on a regular basis. Otherwise, signifi-
cant soiling and road salt can cause damage to
the vehicle.<
After washing the vehicle, apply the
brakes briefly to dry them. Failure to do so
may lead to a reduction in braking efficiency and
also to corrosion of the brake rotors.<
Car washes
Give preference to cloth car washes.Before driving into the car wash, make sure that
it is suitable for your BMW. Pay attention to the
following points:
>Dimensions of your vehicle, refer to
page281.
>If necessary, fold in exterior mirrors, refer to
page51.
>Maximum permissible tire width.
Avoid car washes with guide rails higher
than 4 in/10 cm as these may damage
parts of the vehicle body.<
Preparations for driving into the car wash:
>Deactivate the rain sensor to prevent
undesired wiper operation.
>BMW X5: deactivate rear window wiper and
protect it from damage. Take appropriate
protective measures; inquiring with the car
wash operator as needed.
>Remove add-on parts such as spoilers or
phone antennas if they risk being damaged.
Before driving into the car wash, observe the
following so that the vehicle is able to roll:
1.Insert the remote control into the ignition
lock, even with Comfort Access.
2.Shift into transmission position N.
3.Release the parking brake.
4.Deactivate Automatic Hold, refer to
page61.
5.Switch off the engine.
6.Leave the remote control in the ignition lock
so that the vehicle can roll.
Mixed tires*
Before driving into a car wash, make sure
that the vehicle width is not too large for
the car wash, as otherwise the vehicle and the
car wash could be damaged.<
Page 261 of 312
Mobility
259Reference
At a glance
Controls
Driving tips
Communications
Navigation
Entertainment
Steam cleaners/high-pressure
cleaning jets
When using steam cleaners or high-pres-
sure cleaning jets, make sure to maintain
a sufficient distance and stay below a maximum
temperature of 1407/606.
Insufficient distance or excessive pressure or
temperature can damage parts of the vehicle or
can result in water penetration. Follow the oper-
ating instructions for the high-pressure clean-
ing jets.<
Do not spray the sensors and cameras,
e.g. of Park Distance Control, Top View,
or rear view camera, with high-pressure clean-
ers for long periods and keep the spray nozzle
at least 12 in/30 cm away from them.<
Hand washing
When washing the vehicle by hand, use plenty
of water and car washing shampoo. Clean the
vehicle with gentle pressure using a sponge or a
washing brush.
Before cleaning the windshield, deacti-
vate the rain sensor or switch off the igni-
tion to prevent unwanted wiper operation.<
Follow local guidelines for washing vehi-
cles by hand.<
Headlamps
Do not rub dry and never use abrasives or
strong solvents to clean the covers.
Loosen dirt, e.g. insects, with shampoo or
insect remover and wash away with plenty of
water.
Use a window de-icer to remove accumulated
ice and snow, not a scraper.
Windows
Use a glass cleaner to clean the inside and out-
side surfaces of the windows and the glass sur-
faces of the mirrors.
Do not use quartz-containing cleansers
to clean glass surfaces of the mirrors.<
Caring for the vehicle finish
Regular care helps your vehicle retain its value
and protects the paint from the long-term
effects of aggressive substances.
Regionally occurring environmental factors can
affect and damage vehicle finish. It is therefore
important to tailor the frequency and extent of
your car care accordingly.
Immediately remove particularly aggressive
substances such as spilled fuel, oil, grease,
brake fluid, tree resin, or bird droppings; other-
wise, they may damage your paint.
Repairing paint damage
Repair stone damage or scratches imme-
diately, depending on the severity of the
damage, to prevent the formation of rust.<
BMW recommends having paint damage pro-
fessionally repaired using Genuine BMW finish
materials in accordance with factory guidelines.
Waxing
Sealant is required when water no longer beads
on the clean surface of the paint. Use only prod-
ucts that contain carnauba wax or synthetic wax
to seal your finish.
Rubber gaskets
Treat only with water or a rubber care product.
To avoid noise or damage, do not use
products that contain silicone to care for
rubber gaskets.<
Chrome components
Particularly after exposure to road salt, thor-
oughly cleanse parts like the radiator grille, door
handles, or window frames with plenty of water
with shampoo added to it. For additional treat-
ment, use chrome polish.
Alloy wheels
Depending on your system, braking can gener-
ate dust, which settles on the light-alloy wheels.
Remove this dust regularly with acid-free wheel
cleaner.
Page 273 of 312
Mobility
271Reference
At a glance
Controls
Driving tips
Communications
Navigation
Entertainment
tion. In the same way, individual settings are lost
and must be updated again:
>Seat, mirror and steering wheel memory
The positions must be stored again, refer to
page44.
>Time and Date
The values must be updated again, refer to
pages85, 85.
>Radio
Radio stations must be stored again, refer
to page171.
>Navigation system
You must wait until the system becomes
functional again, refer to page165.
>Glass sunroof/panoramic glass sunroof
It may only be possible to raise the glass
sunroof/panoramic glass sunroof. The sys-
tem must be initialized, refer to page41.
>Digital compass
The system must be calibrated, refer to
page126.
>Active steering
The system automatically initializes for a
short time as you drive. During this time, the
system is deactivated, refer to page106.
>xDrive
The system automatically initializes as you
drive. During this time, indicator lamps light
up. If the lamps do not disappear during the
current trip, have the system checked.
Before removing the vehicle from stor-
age, consult your BMW Sports Activity
Vehicle Center.<
Fuses
Never attempt to repair a blown fuse and
do not replace a defective fuse with a sub-
stitute of another color or amperage rating, as
this could lead to a circuit overload, ultimately
resulting in a fire in the vehicle.<
A pair of plastic tweezers and instructions for
fuse allocation is stored with the fuses in the
cargo area.Spare fuses can be obtained from your BMW
Sports Activity Vehicle.
In interior
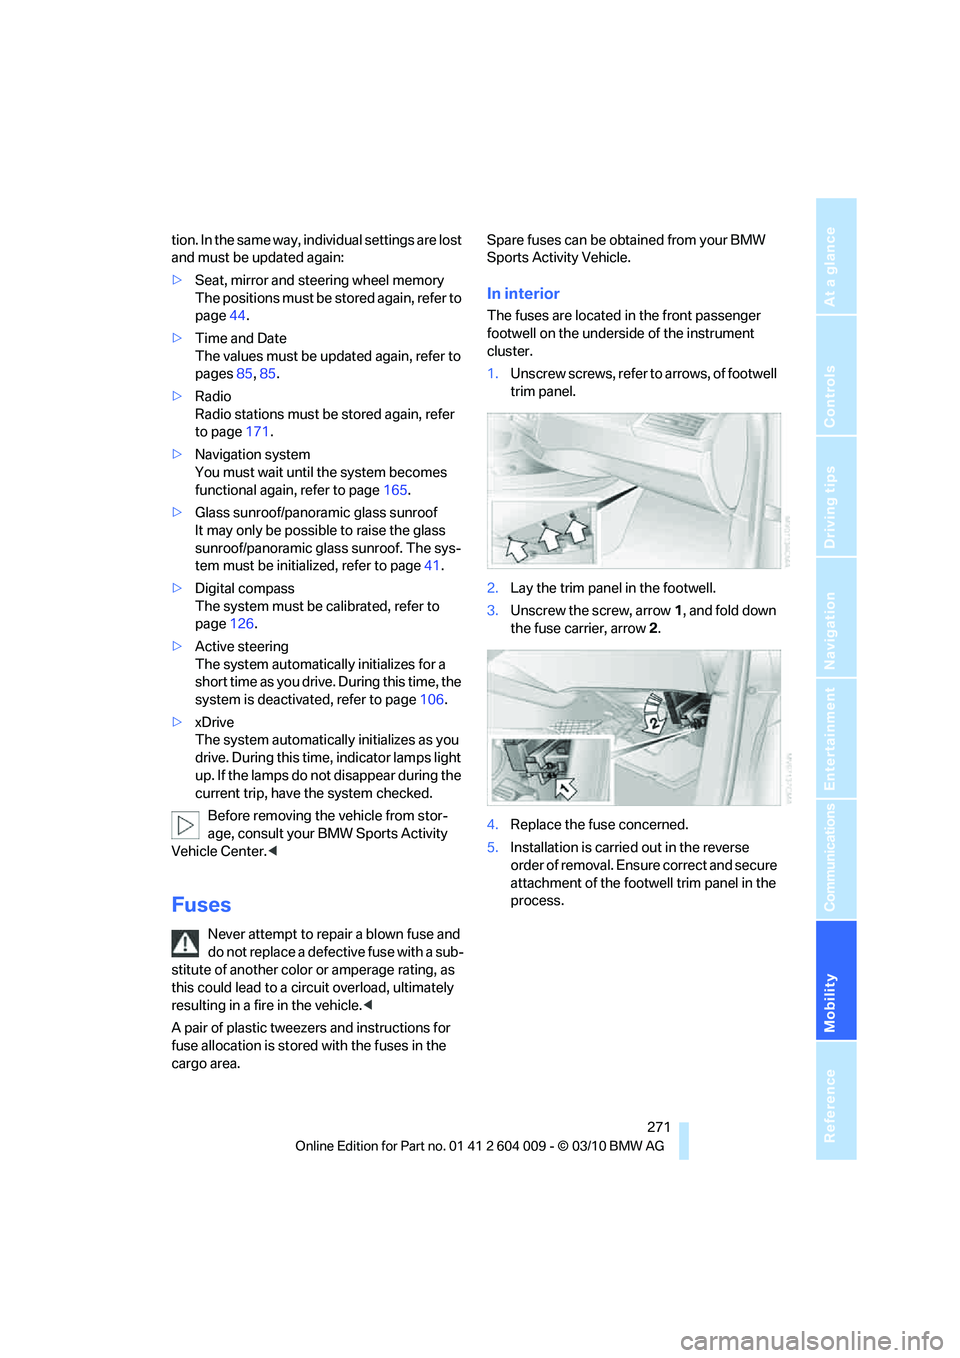
The fuses are located in the front passenger
footwell on the underside of the instrument
cluster.
1.Unscrew screws, refer to arrows, of footwell
trim panel.
2.Lay the trim panel in the footwell.
3.Unscrew the screw, arrow1, and fold down
the fuse carrier, arrow2.
4.Replace the fuse concerned.
5.Installation is carried out in the reverse
order of removal. Ensure correct and secure
attachment of the footwell trim panel in the
process.