rear entertainment BMW X5 XDRIVE 35I PREMIUM 2012 User Guide
[x] Cancel search | Manufacturer: BMW, Model Year: 2012, Model line: X5 XDRIVE 35I PREMIUM, Model: BMW X5 XDRIVE 35I PREMIUM 2012Pages: 317, PDF Size: 8.83 MB
Page 59 of 317
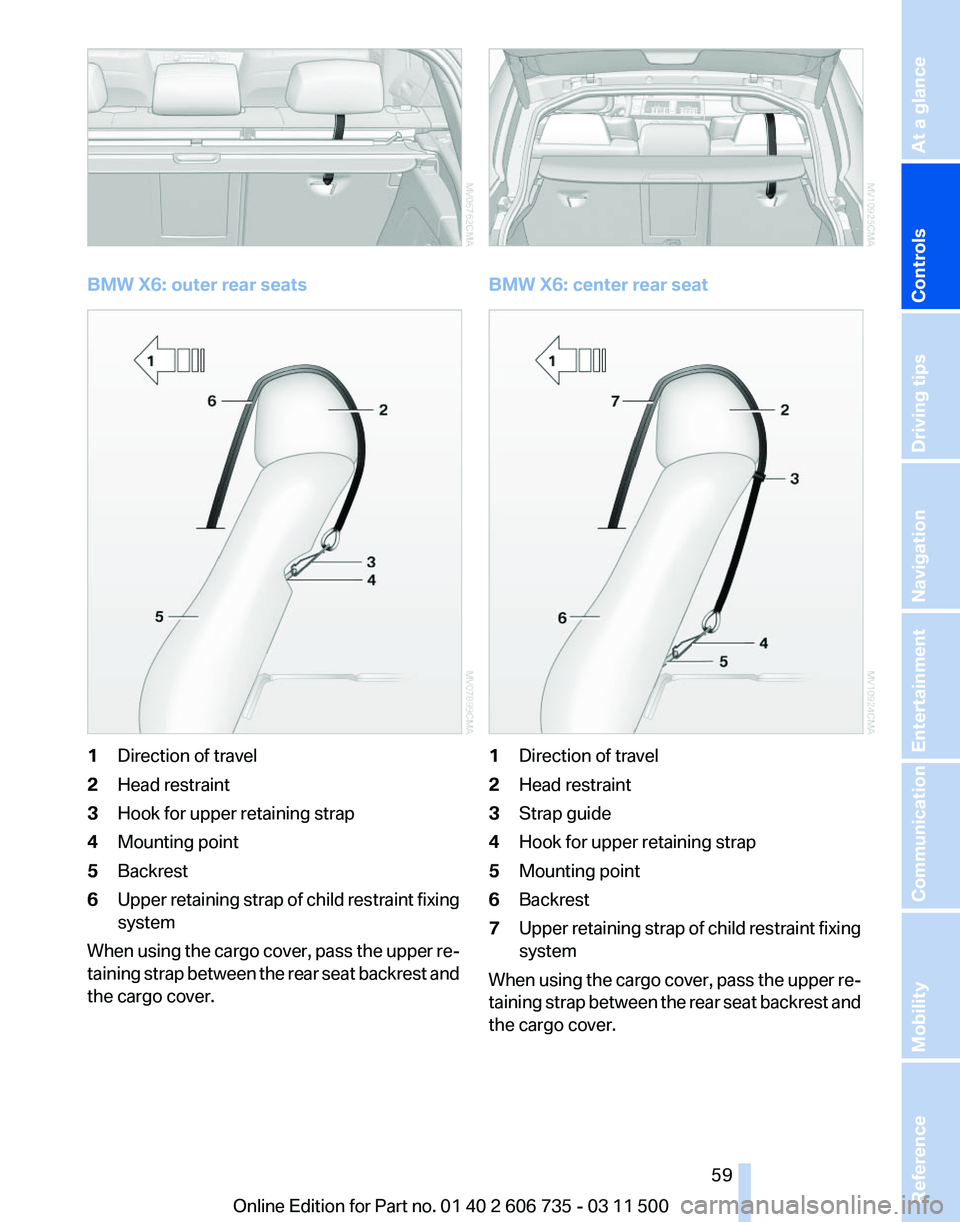
BMW X6: outer rear seats
1
Direction of travel
2 Head restraint
3 Hook for upper retaining strap
4 Mounting point
5 Backrest
6 Upper retaining strap of child restraint fixing
system
When using the cargo cover, pass the upper re‐
taining strap between the rear seat backrest and
the cargo cover. BMW X6: center rear seat
1
Direction of travel
2 Head restraint
3 Strap guide
4 Hook for upper retaining strap
5 Mounting point
6 Backrest
7 Upper retaining strap of child restraint fixing
system
When using the cargo cover, pass the upper re‐
taining
strap between the rear seat backrest and
the cargo cover.
Seite 59
59Online Edition for Part no. 01 40 2 606 735 - 03 11 500
Reference Mobility Communication Entertainment Navigation Driving tips
Controls At a glance
Page 63 of 317
Switching off the engine
Procedure
1.
Engage transmission position P with the ve‐
hicle stopped.
2. Press the Start/Stop button.
3. Set the parking brake.
4. Remove the remote control from the ignition
lock, refer to page 61.
Before driving into a car wash
The vehicle is able to roll when the following
steps are adhered to:
1. With Comfort Access*: insert the remote
control in the ignition lock.
2. Depress the brake pedal.
3. Engage transmission position N.
4. Release the parking brake or deactivate Au‐
tomatic Hold.
5. Switch the engine off.
Transmission position P will be engaged:
▷ Automatically after approx. 30 minutes.
▷ If you remove the remote control from the
ignition lock.
Parking brake
The concept
The parking brake is primarily intended to pre‐
vent the vehicle from rolling while parked; it
brakes the rear wheels.
The parking brake can be set manually or auto‐
matically:
▷ Manual: by pulling and pushing the switch.
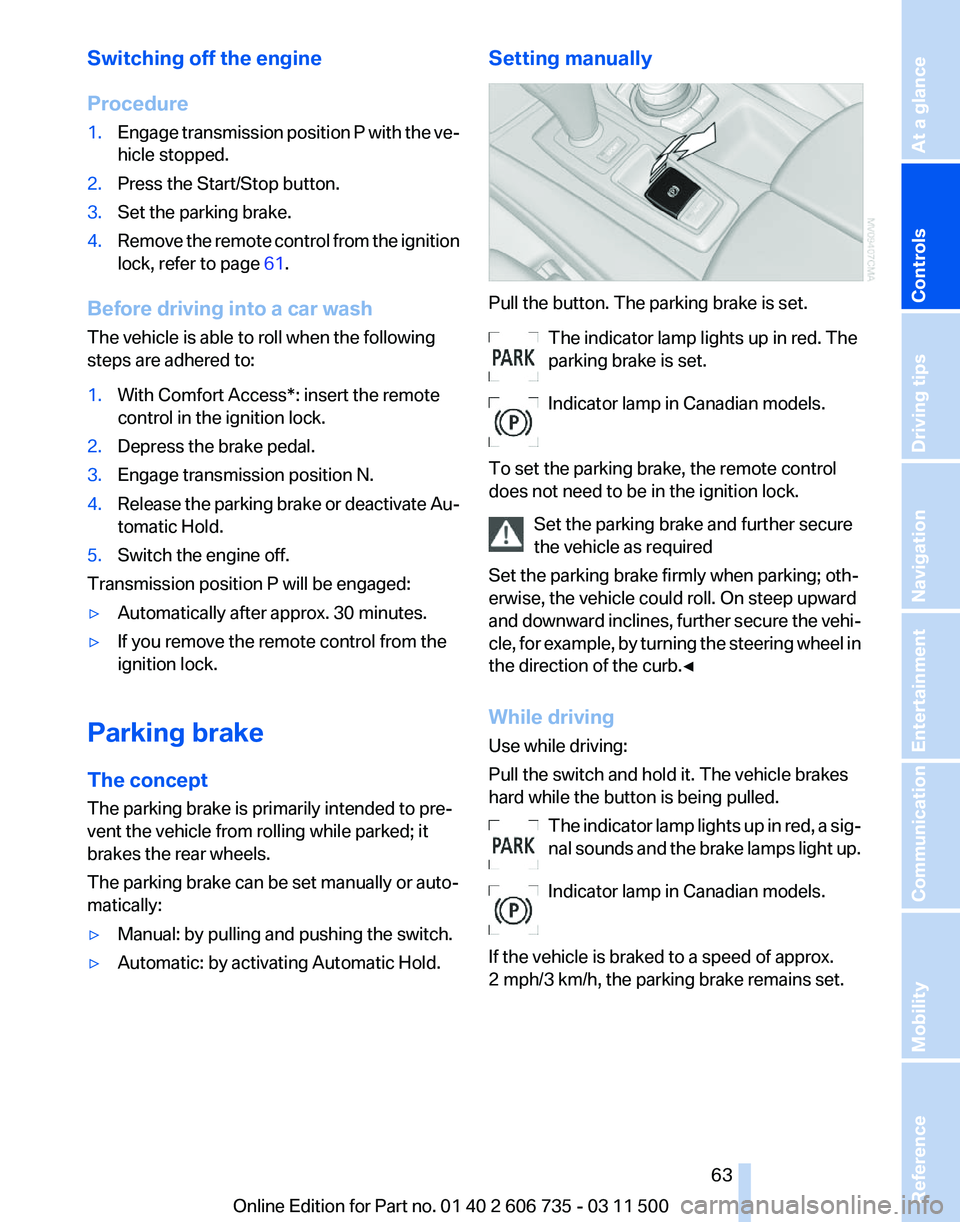
▷ Automatic: by activating Automatic Hold. Setting manually Pull the button. The parking brake is set.
The indicator lamp lights up in red. The
parking brake is set.
Indicator lamp in Canadian models.
To set the parking brake, the remote control
does not need to be in the ignition lock. Set the parking brake and further secure
the vehicle as required
Set the parking brake firmly when parking; oth‐
erwise, the vehicle could roll. On steep upward
and
downward inclines, further secure the vehi‐
cle, for example, by turning the steering wheel in
the direction of the curb.◀
While driving
Use while driving:
Pull the switch and hold it. The vehicle brakes
hard while the button is being pulled.
The indicator lamp lights up in red, a sig‐
nal sounds and the brake lamps light up.
Indicator lamp in Canadian models.
If the vehicle is braked to a speed of approx.
2 mph/3 km/h, the parking brake remains set. Seite 63
63Online Edition for Part no. 01 40 2 606 735 - 03 11 500
Reference Mobility Communication Entertainment Navigation Driving tips
Controls At a glance
Page 67 of 317
The setting is stored for the remote control cur‐
rently in use.
Washer/wiper system
Do not switch on the wipers if frozen
Do
not switch on the wipers if they are fro‐
zen onto the windshield; otherwise, the wiper
blades and the windshield wiper motor may be
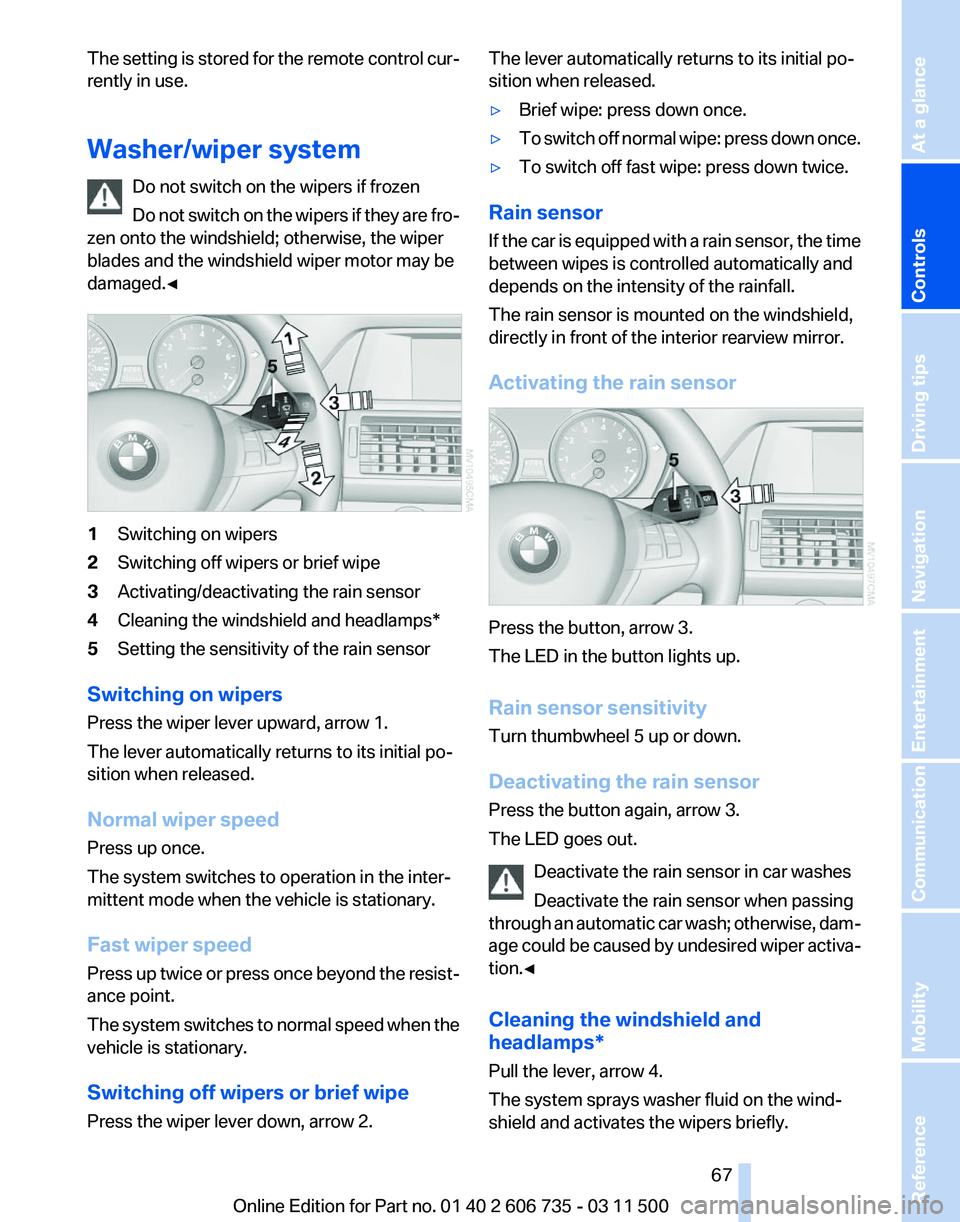
damaged.◀ 1
Switching on wipers
2 Switching off wipers or brief wipe
3 Activating/deactivating the rain sensor
4 Cleaning the windshield and headlamps*
5 Setting the sensitivity of the rain sensor
Switching on wipers
Press the wiper lever upward, arrow 1.
The lever automatically returns to its initial po‐
sition when released.
Normal wiper speed
Press up once.
The system switches to operation in the inter‐
mittent mode when the vehicle is stationary.
Fast wiper speed
Press
up twice or press once beyond the resist‐
ance point.
The system switches to normal speed when the
vehicle is stationary.
Switching off wipers or brief wipe
Press the wiper lever down, arrow 2. The lever automatically returns to its initial po‐
sition when released.
▷
Brief wipe: press down once.
▷ To switch off normal wipe: press down once.
▷ To switch off fast wipe: press down twice.
Rain sensor
If
the car is equipped with a rain sensor, the time
between wipes is controlled automatically and
depends on the intensity of the rainfall.
The rain sensor is mounted on the windshield,
directly in front of the interior rearview mirror.
Activating the rain sensor Press the button, arrow 3.
The LED in the button lights up.
Rain sensor sensitivity
Turn thumbwheel 5 up or down.
Deactivating the rain sensor
Press the button again, arrow 3.
The LED goes out.
Deactivate the rain sensor in car washes
Deactivate the rain sensor when passing
through
an automatic car wash; otherwise, dam‐
age could be caused by undesired wiper activa‐
tion.◀
Cleaning the windshield and
headlamps*
Pull the lever, arrow 4.
The system sprays washer fluid on the wind‐
shield and activates the wipers briefly. Seite 67
67Online Edition for Part no. 01 40 2 606 735 - 03 11 500
Reference Mobility Communication Entertainment Navigation Driving tips
Controls At a glance
Page 75 of 317
Service requirements
The remaining driving distance and the date of
the
next scheduled service are displayed briefly
immediately after you start the engine or switch
on the ignition.
The current service requirements can be read
out from the remote control by the service spe‐
cialist.
For certain maintenance operations, you can
view the distance remaining or the due date for
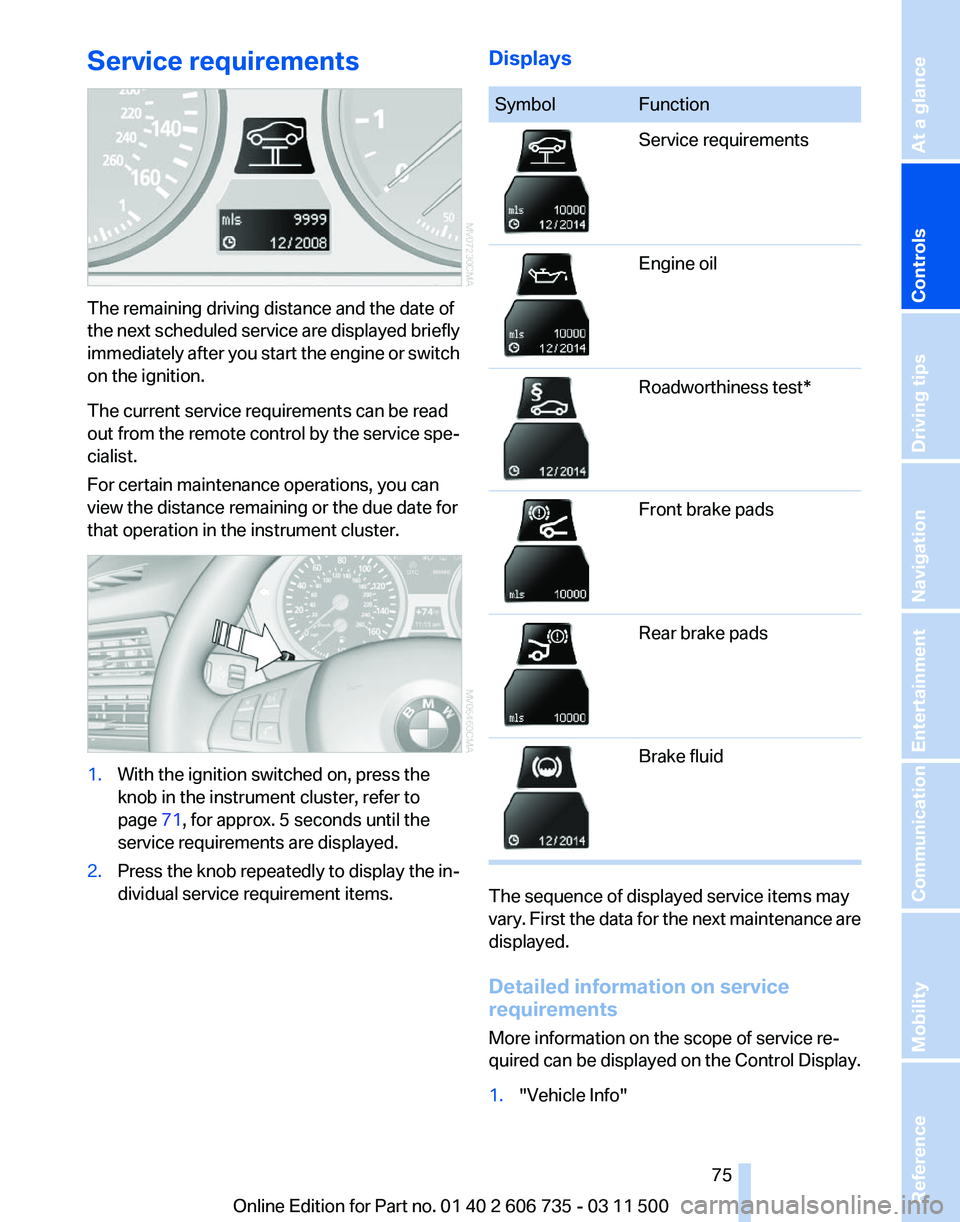
that operation in the instrument cluster. 1.
With the ignition switched on, press the
knob in the instrument cluster, refer to
page 71, for approx. 5 seconds until the
service requirements are displayed.
2. Press the knob repeatedly to display the in‐
dividual service requirement items. Displays Symbol Function
Service requirements
Engine oil
Roadworthiness test*
Front brake pads
Rear brake pads
Brake fluid
The sequence of displayed service items may
vary.
First the data for the next maintenance are
displayed.
Detailed information on service
requirements
More information on the scope of service re‐
quired can be displayed on the Control Display.
1. "Vehicle Info"
Seite 75
75Online Edition for Part no. 01 40 2 606 735 - 03 11 500
Reference Mobility Communication Entertainment Navigation Driving tips
Controls At a glance
Page 83 of 317
Malfunction
A message is displayed.
Adaptive light control is malfunctioning or has
failed.
Have the system checked as soon as pos‐
sible.
High beams/roadside parking
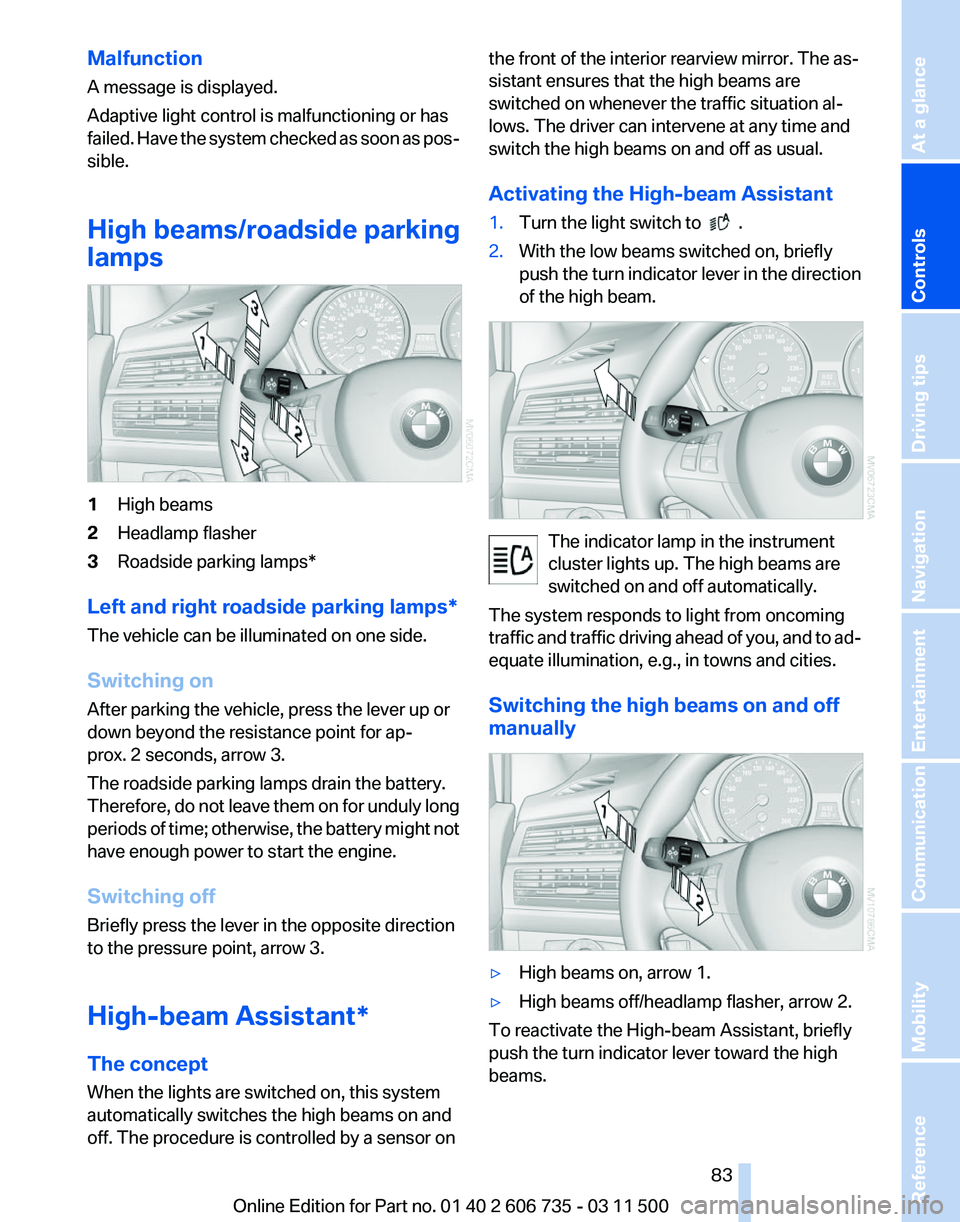
lamps 1
High beams
2 Headlamp flasher
3 Roadside parking lamps*
Left and right roadside parking lamps*
The vehicle can be illuminated on one side.
Switching on
After parking the vehicle, press the lever up or
down beyond the resistance point for ap‐
prox. 2 seconds, arrow 3.
The roadside parking lamps drain the battery.
Therefore,
do not leave them on for unduly long
periods of time; otherwise, the battery might not
have enough power to start the engine.
Switching off
Briefly press the lever in the opposite direction
to the pressure point, arrow 3.
High-beam Assistant*
The concept
When the lights are switched on, this system
automatically switches the high beams on and
off. The procedure is controlled by a sensor on the front of the interior rearview mirror. The as‐
sistant ensures that the high beams are
switched on whenever the traffic situation al‐
lows. The driver can intervene at any time and
switch the high beams on and off as usual.
Activating the High-beam Assistant
1.
Turn the light switch to .
2. With the low beams switched on, briefly
push
the turn indicator lever in the direction
of the high beam. The indicator lamp in the instrument
cluster lights up. The high beams are
switched on and off automatically.
The system responds to light from oncoming
traffic
and traffic driving ahead of you, and to ad‐
equate illumination, e.g., in towns and cities.
Switching the high beams on and off
manually ▷
High beams on, arrow 1.
▷ High beams off/headlamp flasher, arrow 2.
To reactivate the High-beam Assistant, briefly
push the turn indicator lever toward the high
beams. Seite 83
83Online Edition for Part no. 01 40 2 606 735 - 03 11 500
Reference Mobility Communication Entertainment Navigation Driving tips
Controls At a glance
Page 85 of 317
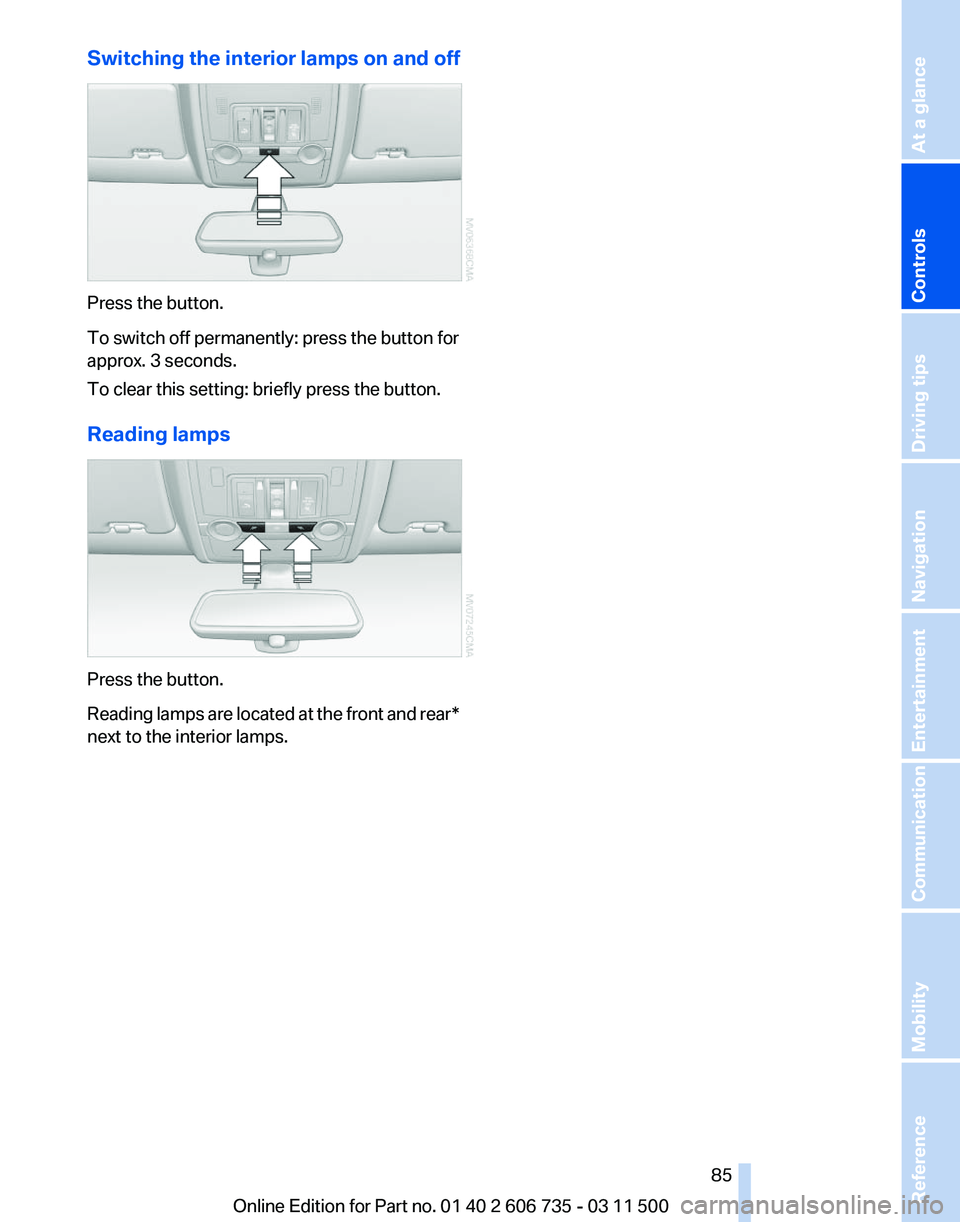
Switching the interior lamps on and off
Press the button.
To switch off permanently: press the button for
approx. 3 seconds.
To clear this setting: briefly press the button.
Reading lamps
Press the button.
Reading
lamps are located at the front and rear*
next to the interior lamps.
Seite 85
85Online Edition for Part no. 01 40 2 606 735 - 03 11 500
Reference Mobility Communication Entertainment Navigation Driving tips
Controls At a glance
Page 87 of 317
▷
Do not apply adhesive materials to the air‐
bag cover panels, cover them or modify
them in any way.
▷ Never modify either the individual compo‐
nents
or the wiring in the airbag system. This
also applies to steering wheel covers, the
dashboard, the seats, the roof pillars and the
sides of the headliner.◀
Even when all instructions are followed closely,
injury from contact with the airbags cannot be
ruled out in certain situations.
The ignition and inflation noise may lead to
short-term
and, in most cases, temporary hear‐
ing impairment in sensitive individuals.
In the case of a malfunction, deactivation
and after triggering of the airbags
Do not touch the individual components imme‐
diately after the system has been triggered; oth‐
erwise, there is the danger of burns.
Only have the airbags checked, repaired or dis‐
mantled and the airbag generator scrapped by
your service center or a workshop that has the
necessary authorization for handling explosives.
Non-professional attempts to service the sys‐
tem could lead to failure in an emergency or un‐
desired triggering of the airbag, either of which
could result in injury.◀
Warnings and information on the airbags are
also found on the sun visors.
Automatic deactivation of the front
passenger airbags
The occupation of the seat is detected by eval‐
uating the impression on the occupied seat sur‐
face of the front passenger seat.
The front and side airbags on the front passen‐
ger side are activated or deactivated accordingly
by the system.
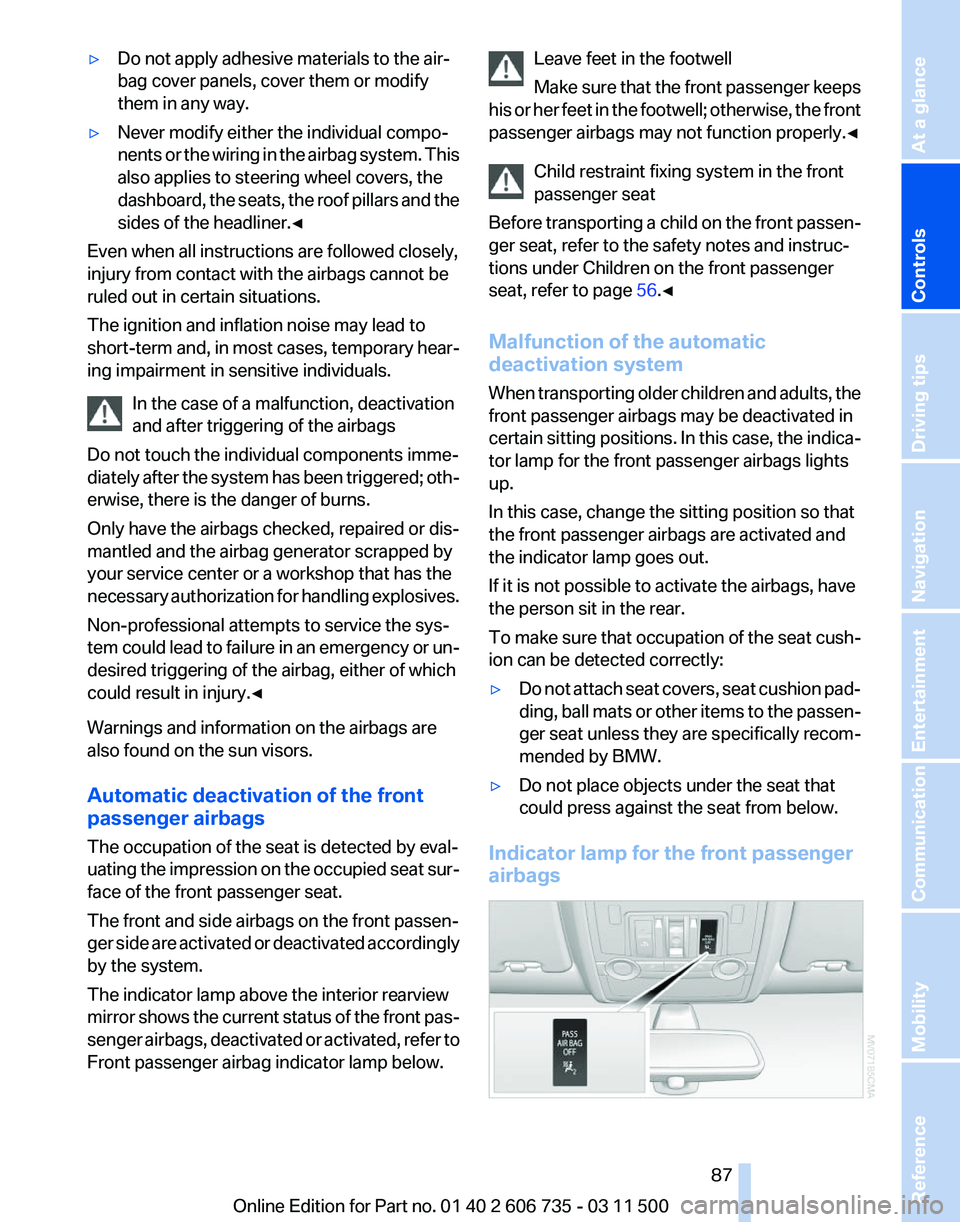
The indicator lamp above the interior rearview
mirror shows the current status of the front pas‐
senger airbags, deactivated or activated, refer to
Front passenger airbag indicator lamp below. Leave feet in the footwell
Make
sure that the front passenger keeps
his or her feet in the footwell; otherwise, the front
passenger airbags may not function properly.◀
Child restraint fixing system in the front
passenger seat
Before transporting a child on the front passen‐
ger seat, refer to the safety notes and instruc‐
tions under Children on the front passenger
seat, refer to page 56.◀
Malfunction of the automatic
deactivation system
When transporting older children and adults, the
front passenger airbags may be deactivated in
certain sitting positions. In this case, the indica‐
tor lamp for the front passenger airbags lights
up.
In this case, change the sitting position so that
the front passenger airbags are activated and
the indicator lamp goes out.
If it is not possible to activate the airbags, have
the person sit in the rear.
To make sure that occupation of the seat cush‐
ion can be detected correctly:
▷ Do not attach seat covers, seat cushion pad‐
ding,
ball mats or other items to the passen‐
ger seat unless they are specifically recom‐
mended by BMW.
▷ Do not place objects under the seat that
could press against the seat from below.
Indicator lamp for the front passenger
airbags Seite 87
87Online Edition for Part no. 01 40 2 606 735 - 03 11 500
Reference Mobility Communication Entertainment Navigation Driving tips
Controls At a glance
Page 111 of 317
Switching on automatically
With
the engine running or the ignition switched
on, shift the selector lever into position R.
Switching off automatically
The system switches off and the LED goes out:
▷ After approx. 165 ft/50 m when driving for‐
ward.
▷ After approx. 22 mph/35 km/h when driving
forward.
Switch on the system again if necessary.
Switching on/off manually Press the button.
▷
On: the LED lights up.
▷ Off: the LED goes out.
Signal tones
When approaching an object, an intermittent
tone
is sounded that indicates the position of the
object. For example, if an object is detected to
the left rear of the vehicle, a signal tone sounds
from the left rear speaker.
The shorter the distance to the object becomes,
the shorter the intervals.
If the distance to a detected object is less than
approx. 12 in/30 cm, a continuous tone is
sounded.
If objects are located both in front of and behind
the vehicle, an alternating continuous signal is
sounded.
The intermittent tone is interrupted after approx.
3 seconds: ▷
If the vehicle stops in front of an object that
is detected by only one of the corner sen‐
sors.
▷ If moving parallel to a wall.
The signal tone is switched off:
▷ When the vehicle moves away from an ob‐
ject by more than approx. 4 in/10 cm.
▷ When transmission position P is engaged.
Volume
You can set the volume of the PDC signal tone,
refer to page 173.
The
setting is stored for the remote control cur‐
rently in use.
Visual warning
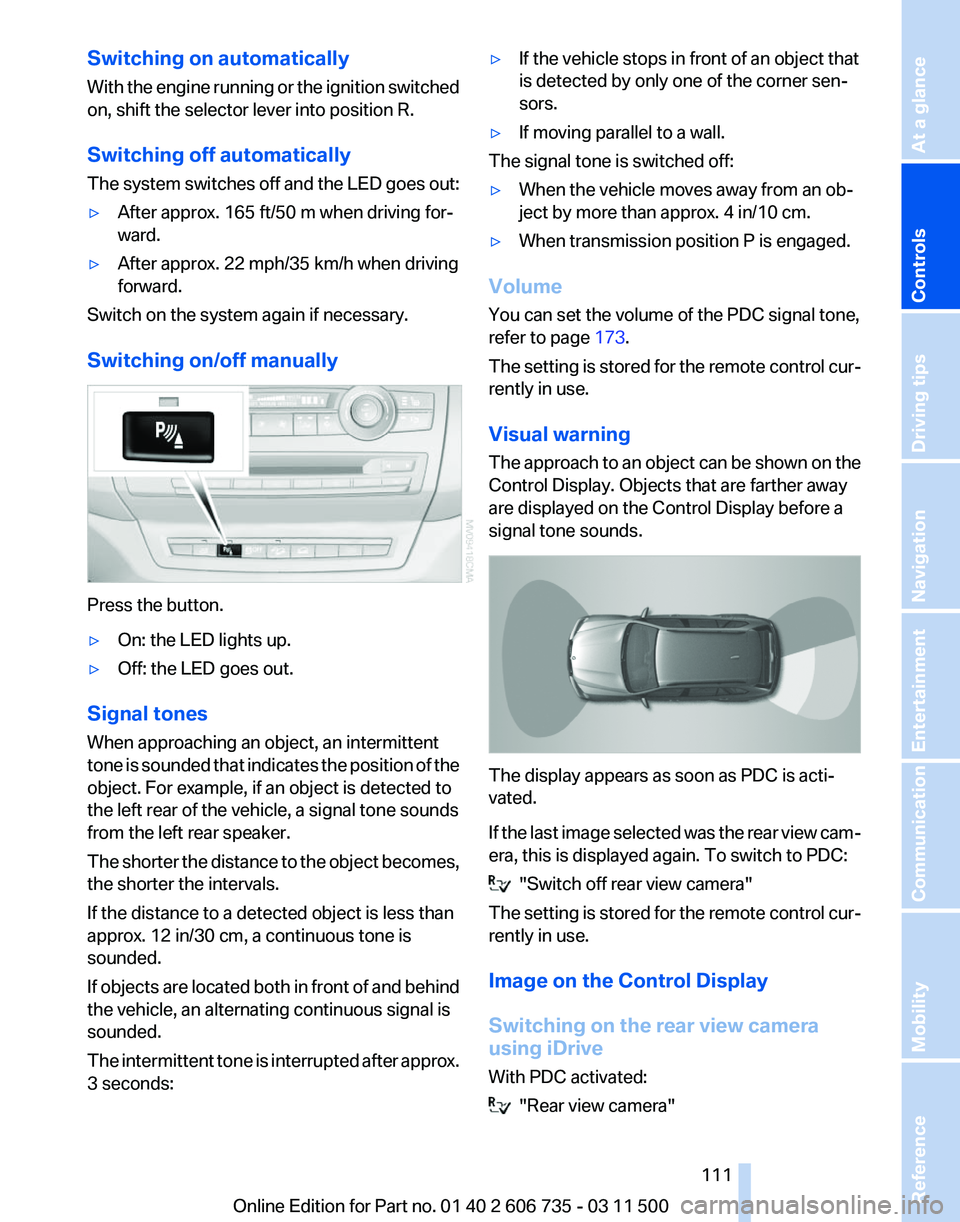
The approach to an object can be shown on the
Control Display. Objects that are farther away
are displayed on the Control Display before a
signal tone sounds. The display appears as soon as PDC is acti‐
vated.
If
the last image selected was the rear view cam‐
era, this is displayed again. To switch to PDC: "Switch off rear view camera"
The
setting is stored for the remote control cur‐
rently in use.
Image on the Control Display
Switching on the rear view camera
using iDrive
With PDC activated: "Rear view camera"
Seite 111
111Online Edition for Part no. 01 40 2 606 735 - 03 11 500
Reference Mobility Communication Entertainment Navigation Driving tips
Controls At a glance
Page 113 of 317
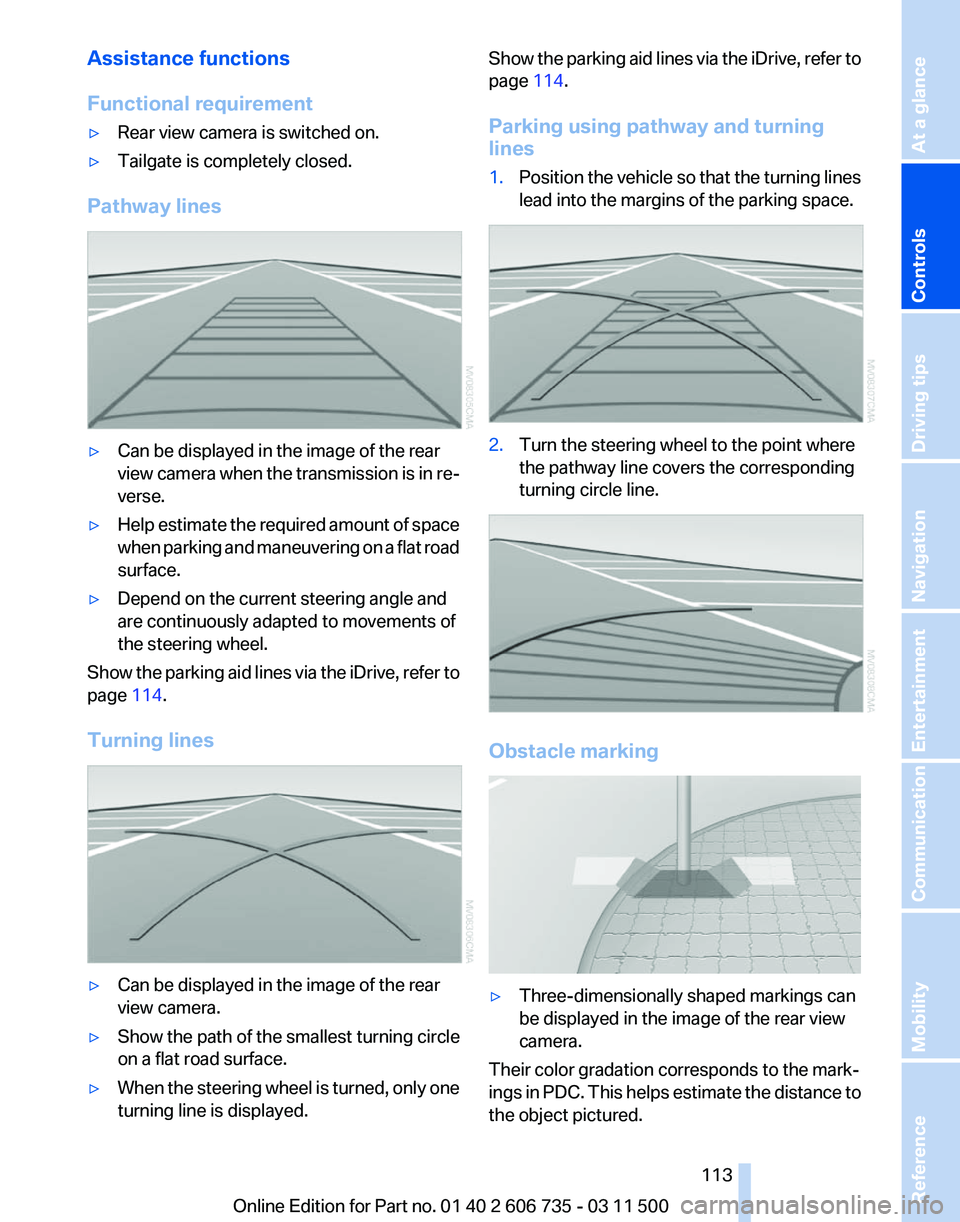
Assistance functions
Functional requirement
▷
Rear view camera is switched on.
▷ Tailgate is completely closed.
Pathway lines ▷
Can be displayed in the image of the rear
view
camera when the transmission is in re‐
verse.
▷ Help estimate the required amount of space
when
parking and maneuvering on a flat road
surface.
▷ Depend on the current steering angle and
are continuously adapted to movements of
the steering wheel.
Show the parking aid lines via the iDrive, refer to
page 114.
Turning lines ▷
Can be displayed in the image of the rear
view camera.
▷ Show the path of the smallest turning circle
on a flat road surface.
▷ When the steering wheel is turned, only one
turning line is displayed. Show the parking aid lines via the iDrive, refer to
page
114.
Parking using pathway and turning
lines
1. Position the vehicle so that the turning lines
lead into the margins of the parking space. 2.
Turn the steering wheel to the point where
the pathway line covers the corresponding
turning circle line. Obstacle marking
▷
Three-dimensionally shaped markings can
be displayed in the image of the rear view
camera.
Their color gradation corresponds to the mark‐
ings
in PDC. This helps estimate the distance to
the object pictured.
Seite 113
113Online Edition for Part no. 01 40 2 606 735 - 03 11 500
Reference Mobility Communication Entertainment Navigation Driving tips
Controls At a glance
Page 115 of 317
bol appears at the corresponding location on the
vehicle.
Check the traffic situation as well
Check the traffic situation around the ve‐
hicle
with your own eyes. Otherwise, an accident
could result from road users or objects located
outside the picture area of the cameras.◀
Switching on automatically
Select transmission position R with the engine
running.
The images from Top View and PDC are dis‐
played when the system has been switched on
using iDrive.
Switching off automatically
The system switches off and the LED goes out:
▷ After approx. 165 ft/50 m when driving for‐
ward.
▷ After approx. 22 mph/35 km/h when driving
forward.
Switch on the system again if necessary.
Switching on/off manually Press the button.
▷
On: the LED lights up.
▷ Off: the LED goes out.
If Top View is displayed, switch on the backup
camera via the iDrive, refer to page 114.
Visual warning
The
approach to an object can be shown on the
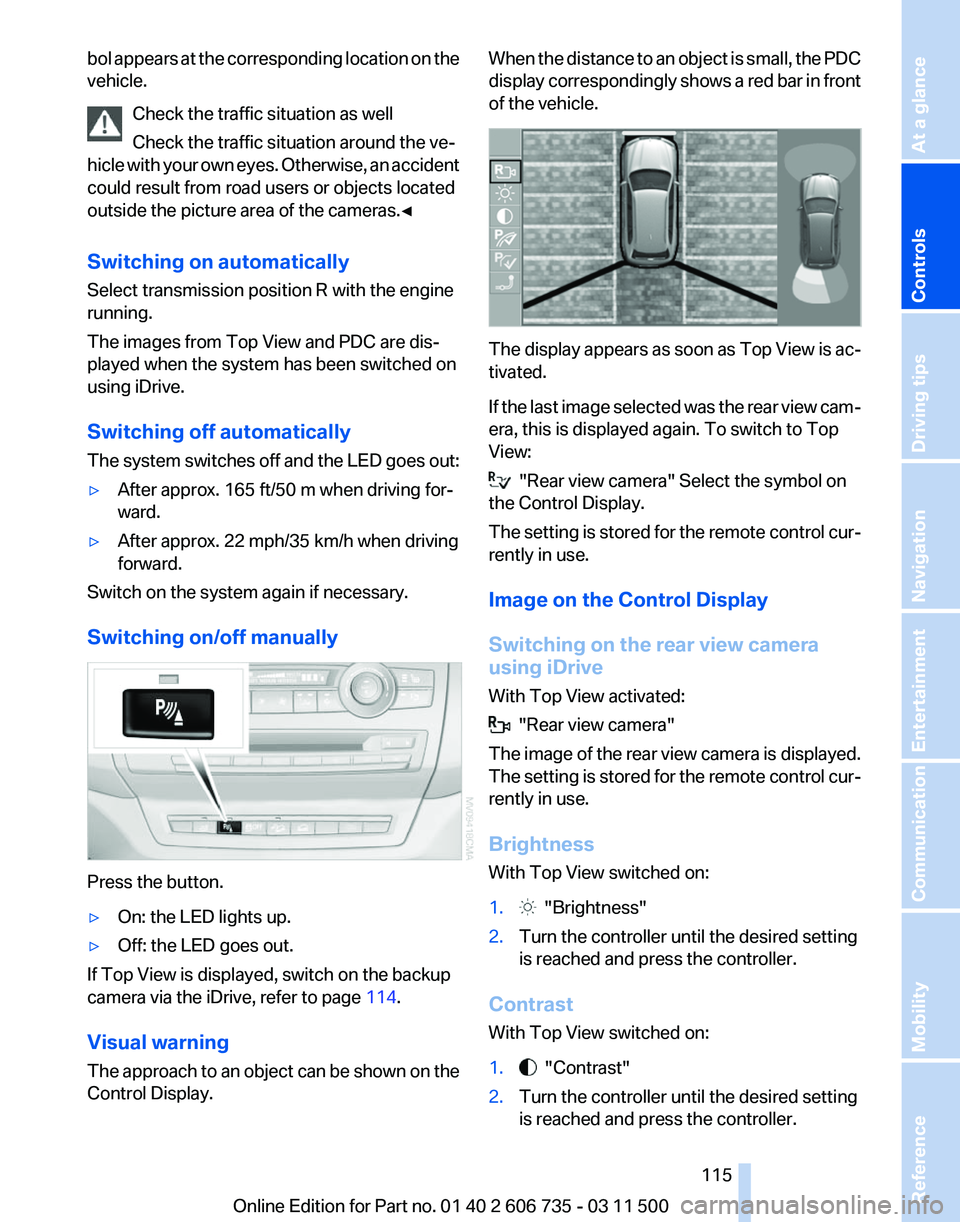
Control Display. When the distance to an object is small, the PDC
display
correspondingly shows a red bar in front
of the vehicle. The display appears as soon as Top View is ac‐
tivated.
If
the last image selected was the rear view cam‐
era, this is displayed again. To switch to Top
View: "Rear view camera" Select the symbol on
the Control Display.
The
setting is stored for the remote control cur‐
rently in use.
Image on the Control Display
Switching on the rear view camera
using iDrive
With Top View activated: "Rear view camera"
The
image of the rear view camera is displayed.
The setting is stored for the remote control cur‐
rently in use.
Brightness
With Top View switched on:
1. "Brightness"
2. Turn the controller until the desired setting
is reached and press the controller.
Contrast
With Top View switched on:
1. "Contrast"
2. Turn the controller until the desired setting
is reached and press the controller.
Seite 115
115Online Edition for Part no. 01 40 2 606 735 - 03 11 500
Reference Mobility Communication Entertainment Navigation Driving tips
Controls At a glance