display BMW X5 XDRIVE 35I PREMIUM 2012 Owners Manual
[x] Cancel search | Manufacturer: BMW, Model Year: 2012, Model line: X5 XDRIVE 35I PREMIUM, Model: BMW X5 XDRIVE 35I PREMIUM 2012Pages: 317, PDF Size: 8.83 MB
Page 5 of 317
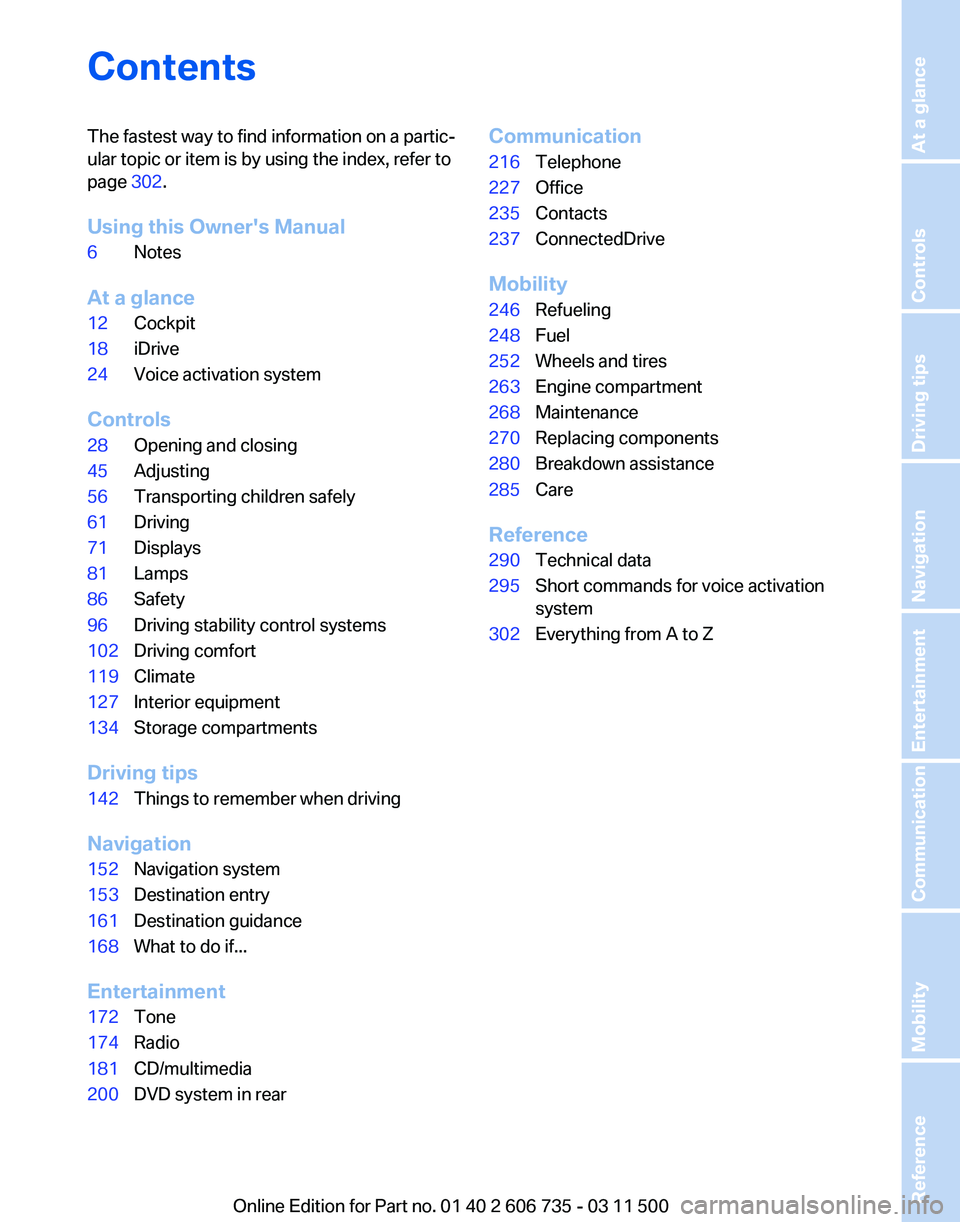
Contents
The fastest way to find information on a partic‐
ular topic or item is by using the index, refer to
page
302.
Using this Owner's Manual
6 Notes
At a glance
12 Cockpit
18 iDrive
24 Voice activation system
Controls
28 Opening and closing
45 Adjusting
56 Transporting children safely
61 Driving
71 Displays
81 Lamps
86 Safety
96 Driving stability control systems
102 Driving comfort
119 Climate
127 Interior equipment
134 Storage compartments
Driving tips
142 Things to remember when driving
Navigation
152 Navigation system
153 Destination entry
161 Destination guidance
168 What to do if...
Entertainment
172 Tone
174 Radio
181 CD/multimedia
200 DVD system in rear Communication
216
Telephone
227 Office
235 Contacts
237 ConnectedDrive
Mobility
246 Refueling
248 Fuel
252 Wheels and tires
263 Engine compartment
268 Maintenance
270 Replacing components
280 Breakdown assistance
285 Care
Reference
290 Technical data
295 Short commands for voice activation
system
302 Everything from A to Z
Seite 5
Online Edition for Part no. 01 40 2 606 735 - 03 11 500 Reference Mobility Communication Entertainment Navigation Driving tips Controls At a glance
Page 6 of 317
Notes
Using this Owner's Manual
The fastest way to find information on a partic‐
ular topic is by using the index.
An initial overview of the vehicle is provided in
the first chapter.
Additional sources of information
Should you have any questions, your service
center will be glad to advise you at any time.
Information on BMW, e.g., on technology, is
available on the Internet: bmwusa.com.
Symbols
Indicates precautions that must be followed
precisely in order to avoid the possibility of per‐
sonal injury and serious damage to the vehicle.
◄ Marks the end of a specific item of informa‐
tion.
* Indicates special equipment, country-specific
equipment and optional accessories, as well as
equipment and functions not yet available at the
time of printing.
"..." Identifies Control Display texts used to se‐
lect individual functions.
›...‹ Verbal instructions to use with the voice ac‐
tivation system.
››...‹‹ Identifies the answers generated by the
voice activation system. Refers to measures that can be taken to help
protect the environment.
Symbols on vehicle components Indicates that you should consult the rele‐
vant section of this Owner's Manual for infor‐
mation on a particular part or assembly. Your individual vehicle
You
have decided in favor of a vehicle with indi‐
vidualized equipment and features.
This Owner's Manual describes the entire array
of options and equipment available for a specific
model.
As a result, the manual may contain accessories
and equipment that you may not have specified
for your own vehicle.
All options and special equipment are marked
with an asterisk*.
For options and equipment not described in this
Owner's Manual, please refer to the Supple‐
mentary Owner's Manuals.
Status of this Owner's Manual
at time of printing
The manufacturer of your vehicle pursues a pol‐
icy of constant development that is conceived
to ensure that our vehicles continue to embody
the highest quality and safety standards. In rare
cases, therefore, the features described in this
Owner's Manual may differ from those in your
vehicle.
Updates made after the editorial
deadline
Any updates made after the editorial deadline for
the Owner's Manuals are located in the appen‐
dix of the printed quick reference for the vehicle.
For your own safety
Maintenance and repairs
Advanced technology, e.g., the use of modern
materials and high-performance electronics, re‐
quires suitable maintenance and repair meth‐
ods.
Seite 6
6 Online Edition for Part no. 01 40 2 606 735 - 03 11 500Notes
Page 11 of 317
At a glance
These overviews of buttons, switches and
displays are intended to familiarize you with your
vehicle. You will also become quickly acquainted with the available control concepts and options.
Online Edition for Part no. 01 40 2 606 735 - 03 11 500
Page 12 of 317
Cockpit
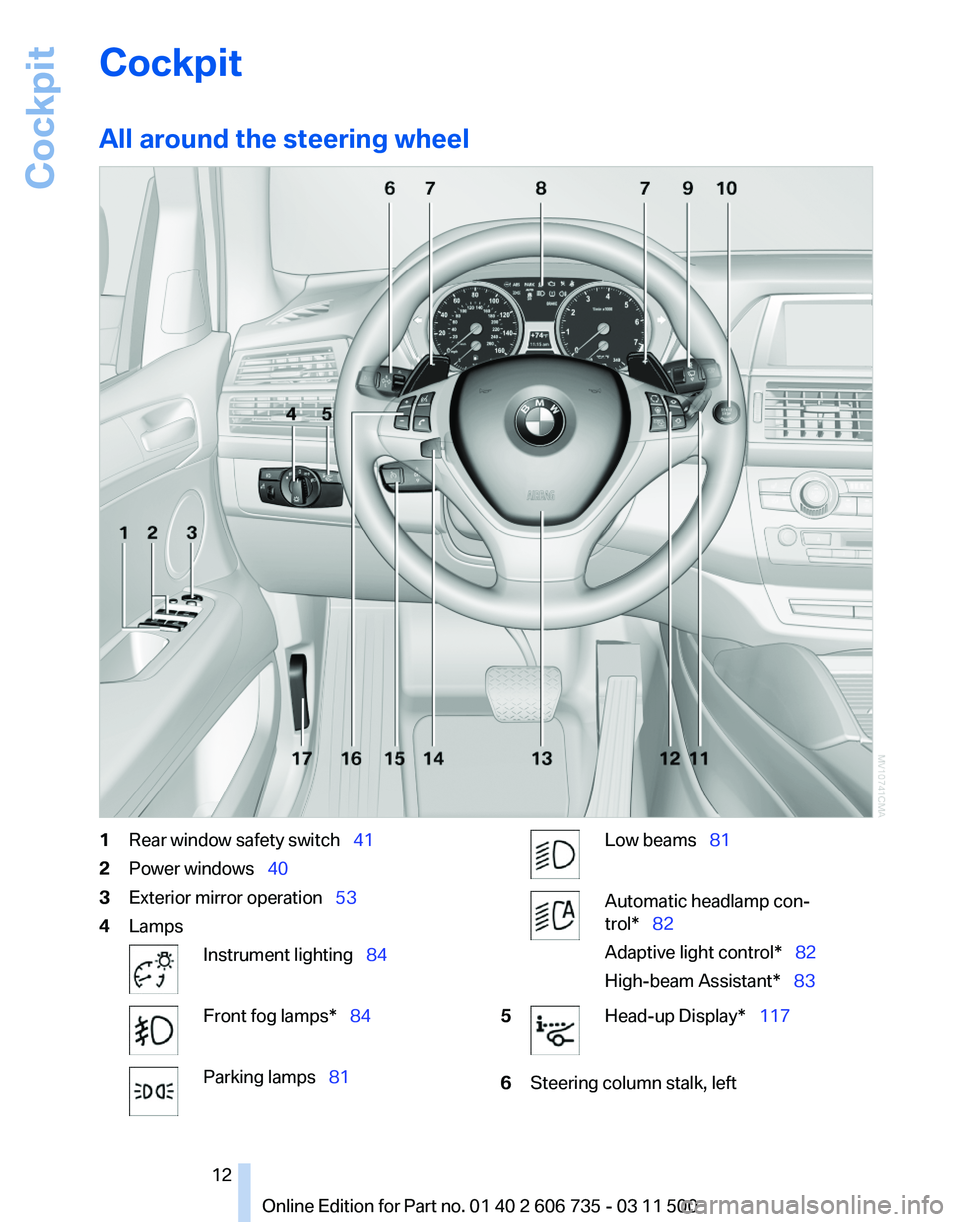
All around the steering wheel
1
Rear window safety switch 41
2 Power windows 40
3 Exterior mirror operation 53
4 Lamps Instrument lighting 84
Front fog lamps* 84
Parking lamps
81 Low beams 81
Automatic headlamp con‐
trol* 82
Adaptive light control
* 82
High-beam Assistant* 83
5 Head-up Display*
117
6 Steering column stalk, left
Seite 12
12 Online Edition for Part no. 01 40 2 606 735 - 03 11 500
Cockpit
Page 14 of 317
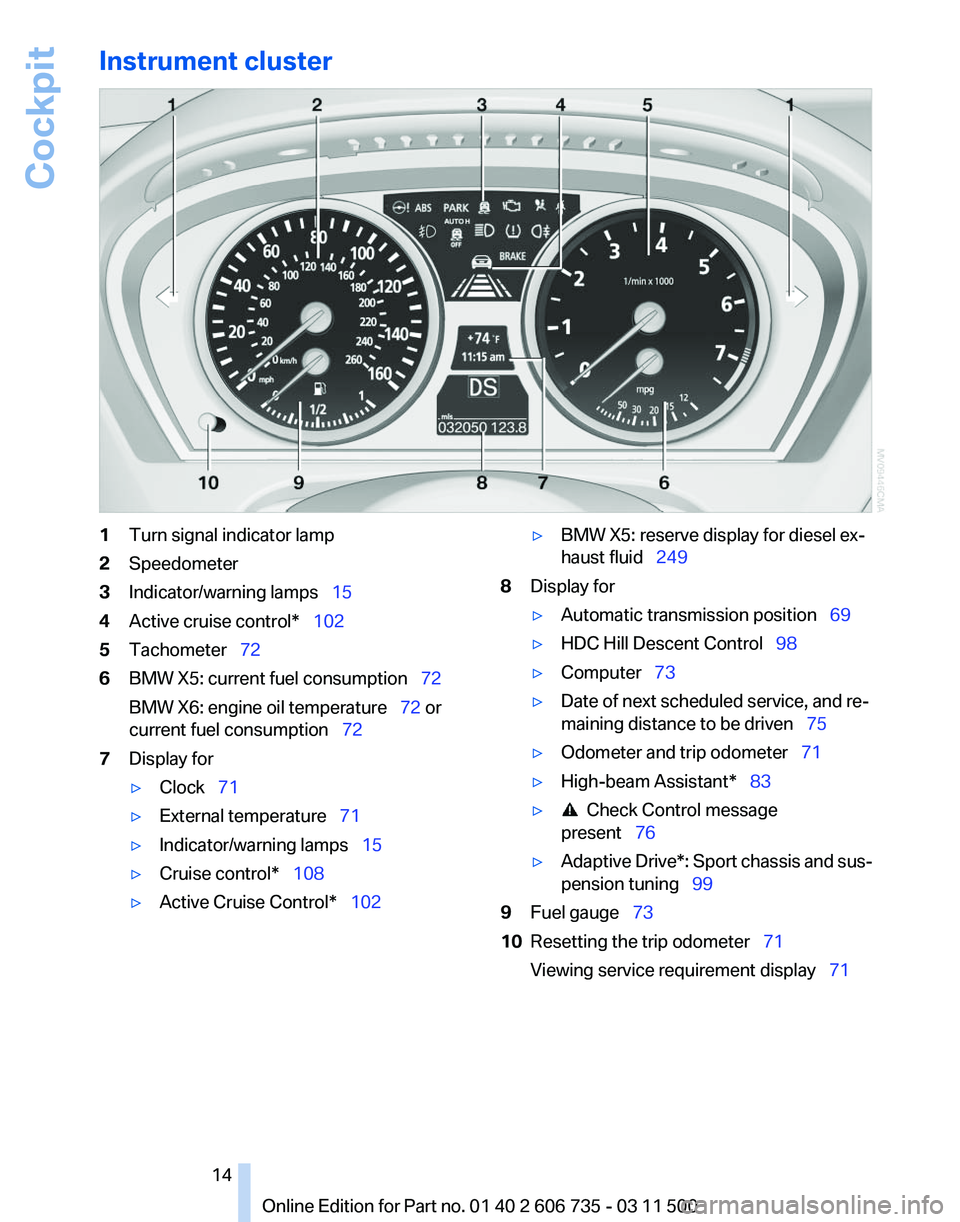
Instrument cluster
1
Turn signal indicator lamp
2 Speedometer
3 Indicator/warning lamps 15
4 Active cruise control* 102
5 Tachometer 72
6 BMW X5: current fuel consumption 72
BMW X6: engine oil temperature
72 or
current fuel consumption 72
7 Display for
▷Clock 71
▷ External temperature 71
▷ Indicator/warning lamps 15
▷ Cruise control* 108
▷ Active Cruise Control* 102 ▷
BMW X5: reserve display for diesel ex‐
haust fluid 249
8 Display for
▷Automatic transmission position 69
▷ HDC Hill Descent Control 98
▷ Computer 73
▷ Date of next scheduled service, and re‐
maining distance to be driven
75
▷ Odometer and trip odometer 71
▷ High-beam Assistant* 83
▷ Check Control message
present 76
▷ Adaptive Drive*:
Sport chassis and sus‐
pension tuning 99
9 Fuel gauge 73
10 Resetting the trip odometer 71
Viewing service requirement display 71
Seite 14
14 Online Edition for Part no. 01 40 2 606 735 - 03 11 500
Cockpit
Page 15 of 317
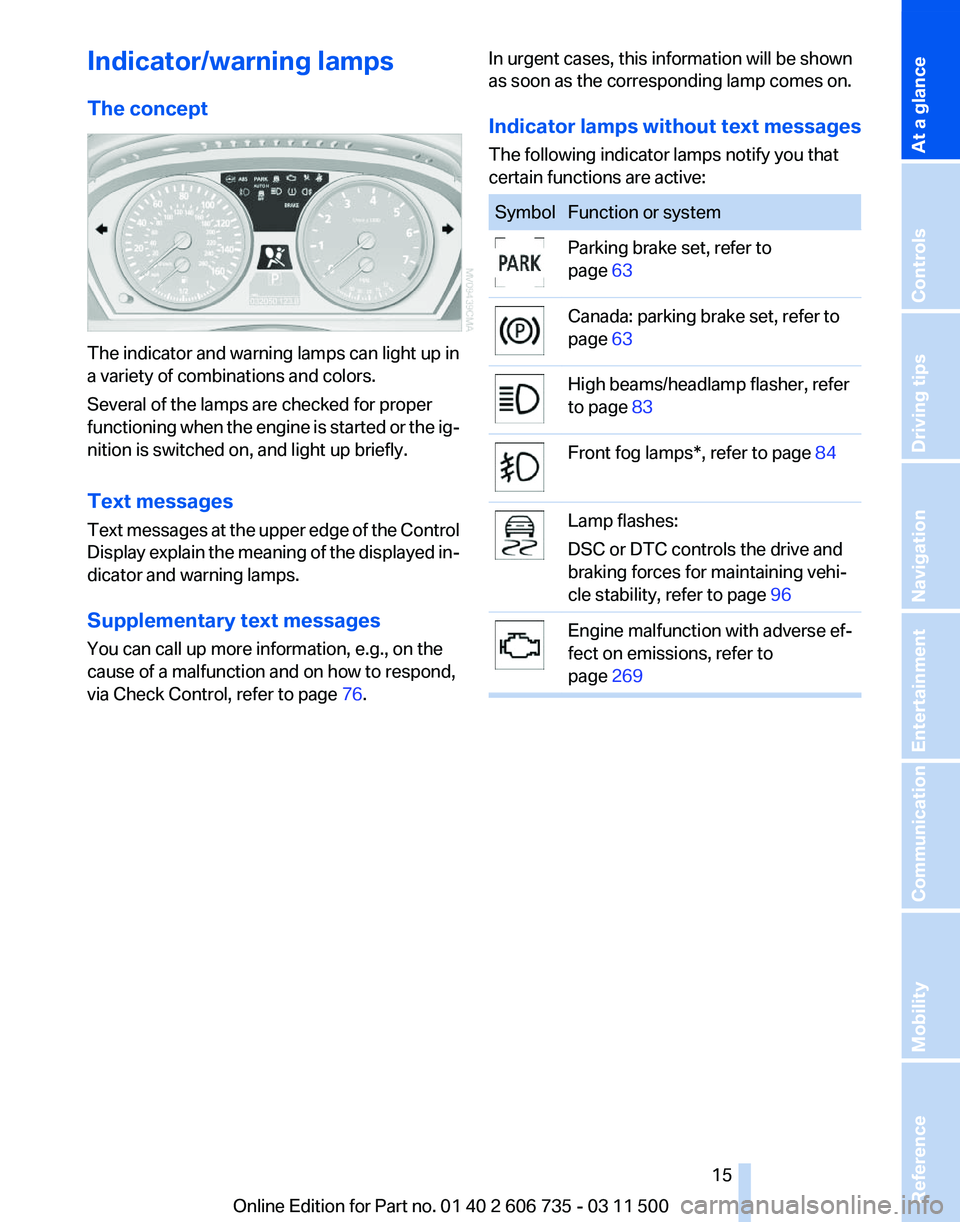
Indicator/warning lamps
The concept
The indicator and warning lamps can light up in
a variety of combinations and colors.
Several of the lamps are checked for proper
functioning
when the engine is started or the ig‐
nition is switched on, and light up briefly.
Text messages
Text messages at the upper edge of the Control
Display explain the meaning of the displayed in‐
dicator and warning lamps.
Supplementary text messages
You can call up more information, e.g., on the
cause of a malfunction and on how to respond,
via Check Control, refer to page 76.In urgent cases, this information will be shown
as soon as the corresponding lamp comes on.
Indicator lamps without text messages
The following indicator lamps notify you that
certain functions are active: Symbol Function or system
Parking brake set, refer to
page
63 Canada: parking brake set, refer to
page
63 High beams/headlamp flasher, refer
to page
83 Front fog lamps*, refer to page
84 Lamp flashes:
DSC or DTC controls the drive and
braking forces for maintaining vehi‐
cle stability, refer to page
96 Engine malfunction with adverse ef‐
fect on emissions, refer to
page
269 Seite 15
15Online Edition for Part no. 01 40 2 606 735 - 03 11 500
Reference Mobility Communication Entertainment Navigation Driving tips Controls
At a glance
Page 16 of 317
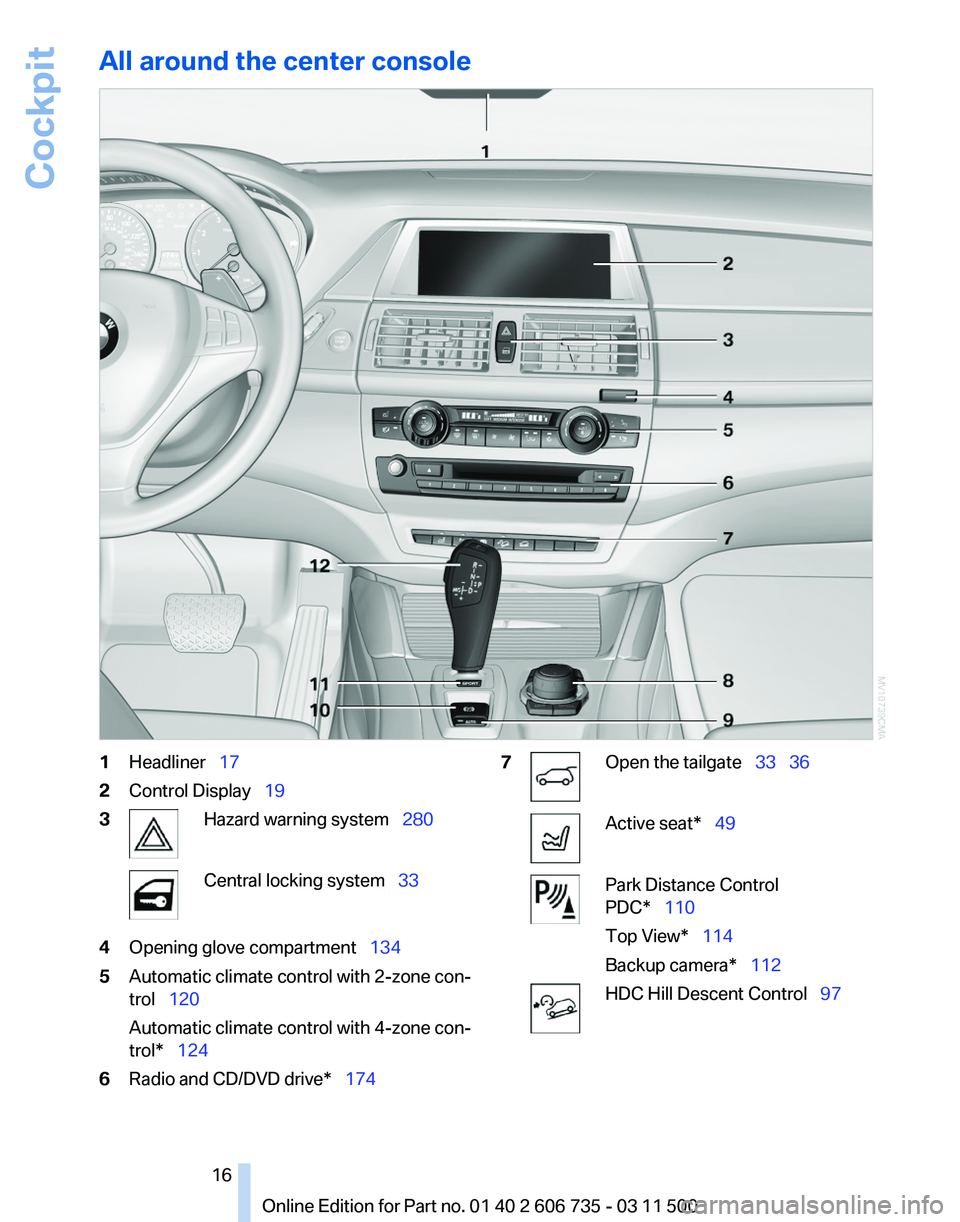
All around the center console
1
Headliner 17
2 Control Display 19
3 Hazard warning system 280
Central locking system 33
4 Opening glove compartment 134
5 Automatic climate control with 2-zone con‐
trol 120
Automatic climate control with 4-zone con‐
trol* 124
6 Radio and CD/DVD drive* 174 7 Open the tailgate
33 36 Active seat* 49
Park Distance Control
PDC* 110
Top View* 114
Backup camera* 112
HDC Hill Descent Control
97
Seite 16
16 Online Edition for Part no. 01 40 2 606 735 - 03 11 500Cockpit
Page 18 of 317
iDrive
The concept
The
iDrive combines the functions of a multitude
of switches. Thus, these functions can be oper‐
ated from a central location. Using the iDrive during a trip
To
avoid becoming distracted and posing
an unnecessary hazard to your vehicle's occu‐
pants and to other road users, never attempt to
use the controls or enter information unless traf‐
fic and road conditions allow this.◀ Controls at a glance
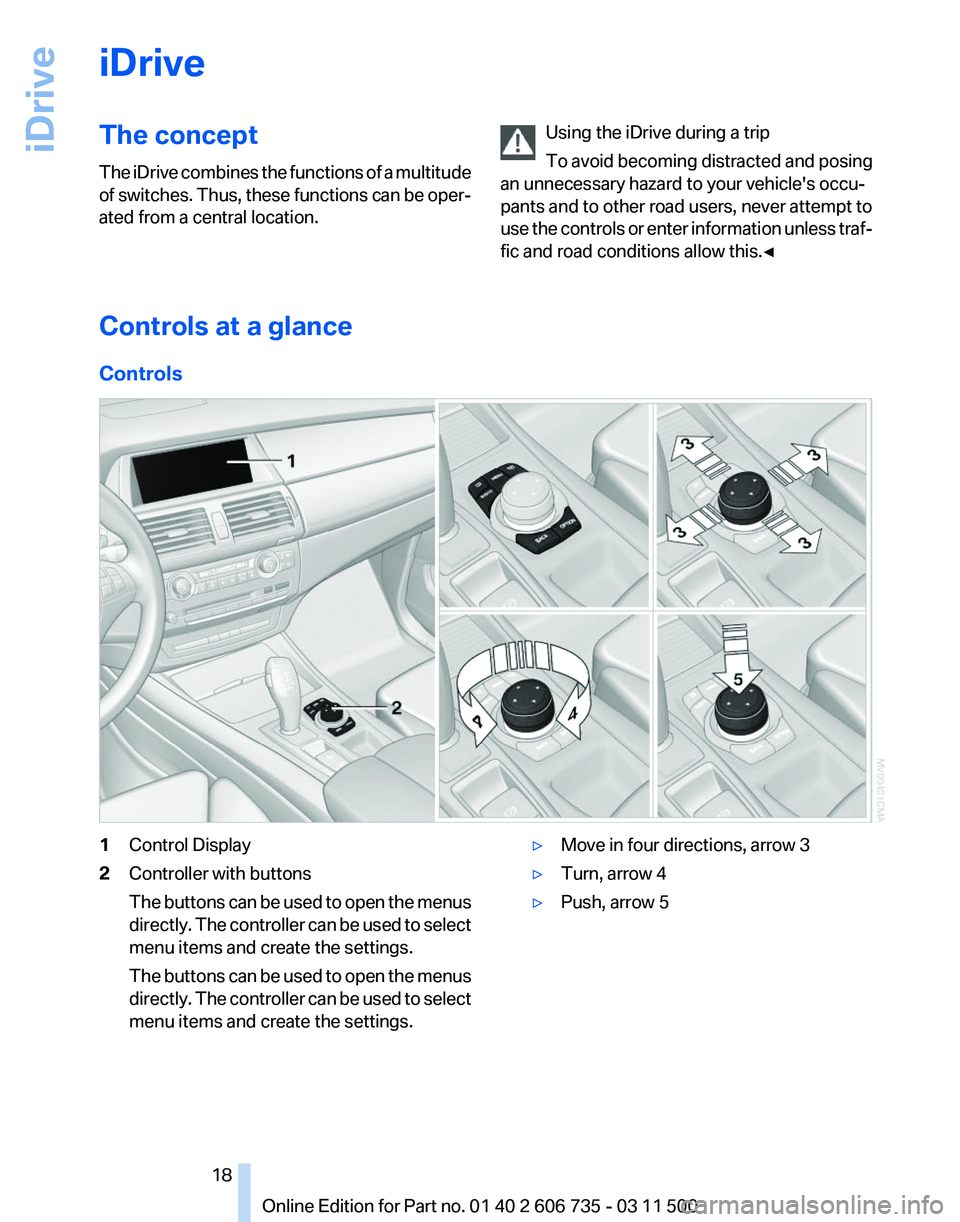
Controls
1
Control Display
2 Controller with buttons
The
buttons can be used to open the menus
directly. The controller can be used to select
menu items and create the settings.
The buttons can be used to open the menus
directly. The controller can be used to select
menu items and create the settings. ▷
Move in four directions, arrow 3
▷ Turn, arrow 4
▷ Push, arrow 5
Seite 18
18 Online Edition for Part no. 01 40 2 606 735 - 03 11 500
iDrive
Page 19 of 317
Buttons on controller
Press the button Function
MENU
Opens the main menu.
RADIO Opens the Radio menu.
CD Opens the CD/Multimedia
menu.
NAV Opens the Navigation
menu.
TEL Opens the Telephone
menu.
BACK Displays the previous
panel.
OPTION Opens the Options menu. Control Display
Notes
▷
To clean the Control Display, follow the care
instructions, refer to page 287.
▷ Do not place objects close to the Control
Display; otherwise, the Control Display can
be damaged.
Switching off
1. Press the button.
2. "Switch off control display" Switching on
Press the controller again to switch the screen
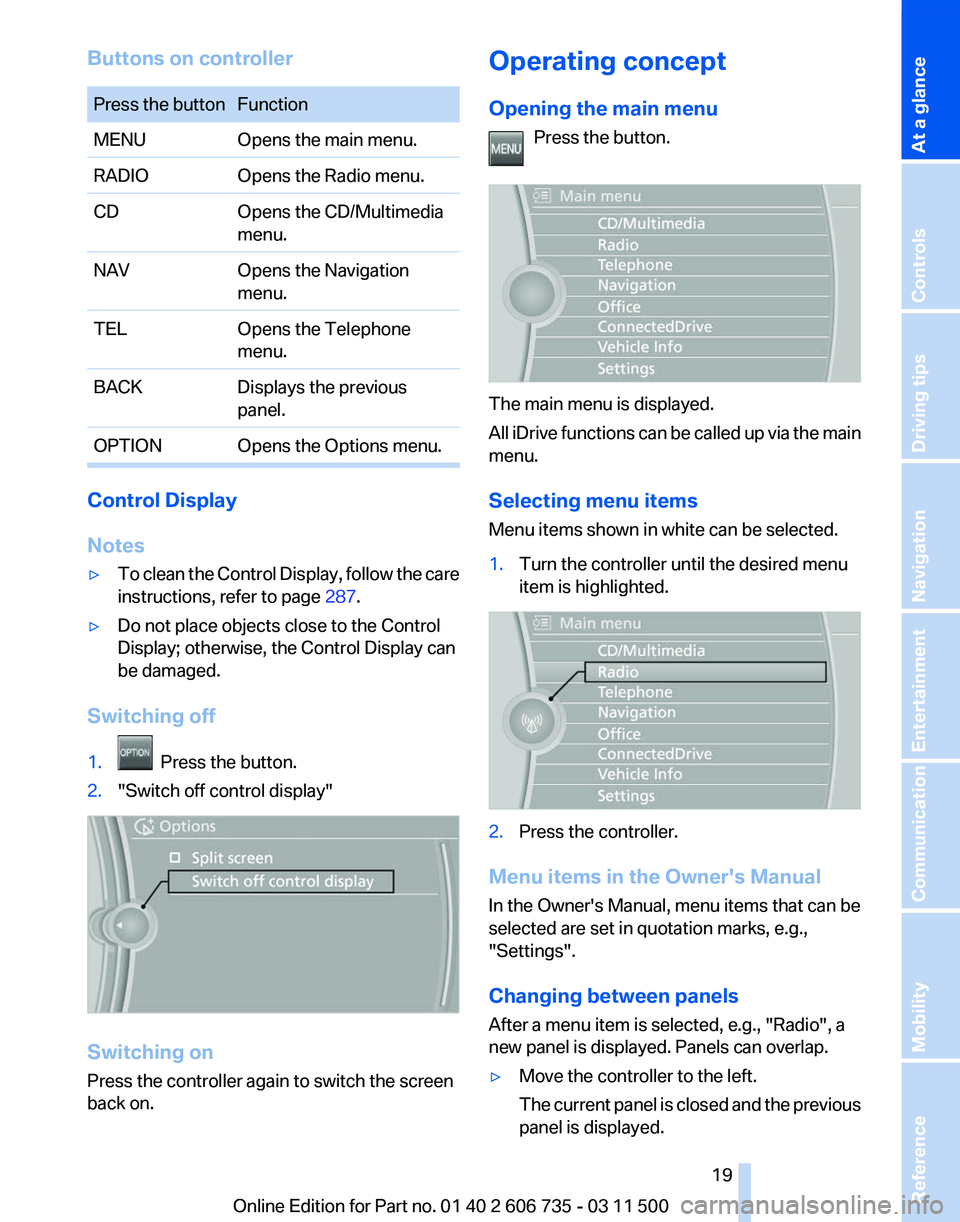
back on. Operating concept
Opening the main menu
Press the button. The main menu is displayed.
All
iDrive functions can be called up via the main
menu.
Selecting menu items
Menu items shown in white can be selected.
1. Turn the controller until the desired menu
item is highlighted. 2.
Press the controller.
Menu items in the Owner's Manual
In the Owner's Manual, menu items that can be
selected are set in quotation marks, e.g.,
"Settings".
Changing between panels
After a menu item is selected, e.g.,
"Radio", a
new panel is displayed. Panels can overlap.
▷ Move the controller to the left.
The
current panel is closed and the previous
panel is displayed. Seite 19
19Online Edition for Part no. 01 40 2 606 735 - 03 11 500
Reference Mobility Communication Entertainment Navigation Driving tips Controls
At a glance
Page 20 of 317
The previous panel is opened again by
pressing the BACK button. In this case, the
current panel is not closed.
▷ Move the controller to the right.
A
new panel is opened on top of the previous
display. White arrows pointing to the left or right indicate
that additional panels can be opened.
View of an opened menu
When
a menu is opened, it generally opens with
the panel that was last selected in that menu. To
display the first panel of a menu:
▷ Move the controller to the left repeatedly
until the first panel is displayed.
▷ Press the menu button on the controller
twice.
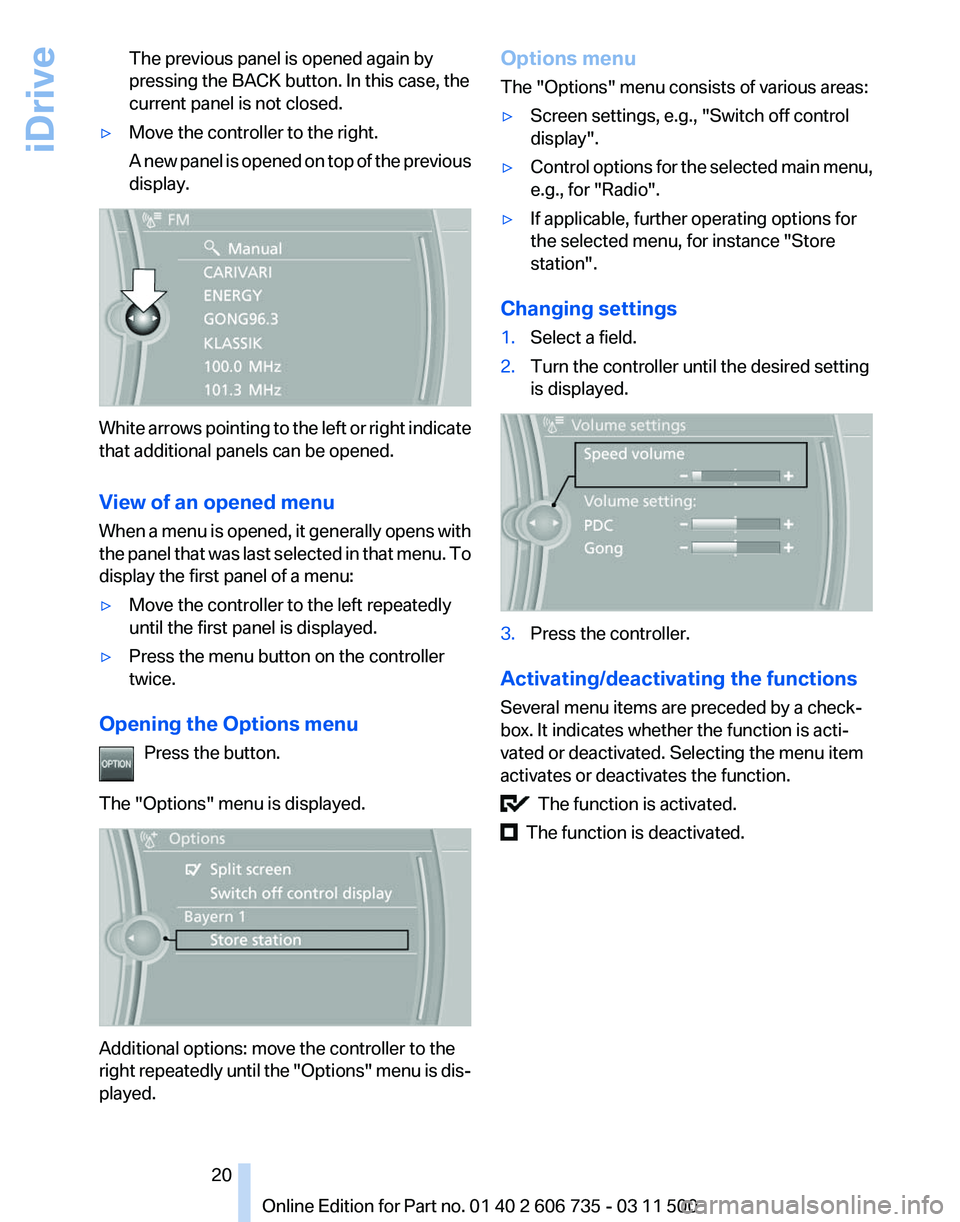
Opening the Options menu Press the button.
The "Options" menu is displayed. Additional options: move the controller to the
right
repeatedly until the "Options" menu is dis‐
played. Options menu
The "Options" menu consists of various areas:
▷
Screen settings, e.g., "Switch off control
display".
▷ Control options for the selected main menu,
e.g., for "Radio".
▷ If applicable, further operating options for
the selected menu, for instance "Store
station".
Changing settings
1. Select a field.
2. Turn the controller until the desired setting
is displayed. 3.
Press the controller.
Activating/deactivating the functions
Several menu items are preceded by a check‐
box. It indicates whether the function is acti‐
vated or deactivated. Selecting the menu item
activates or deactivates the function. The function is activated.
The function is deactivated.
Seite 20
20 Online Edition for Part no. 01 40 2 606 735 - 03 11 500
iDrive