parking brake BMW X5 XDRIVE 35I SPORT ACTIVITY 2012 Owners Manual
[x] Cancel search | Manufacturer: BMW, Model Year: 2012, Model line: X5 XDRIVE 35I SPORT ACTIVITY, Model: BMW X5 XDRIVE 35I SPORT ACTIVITY 2012Pages: 317, PDF Size: 8.83 MB
Page 15 of 317
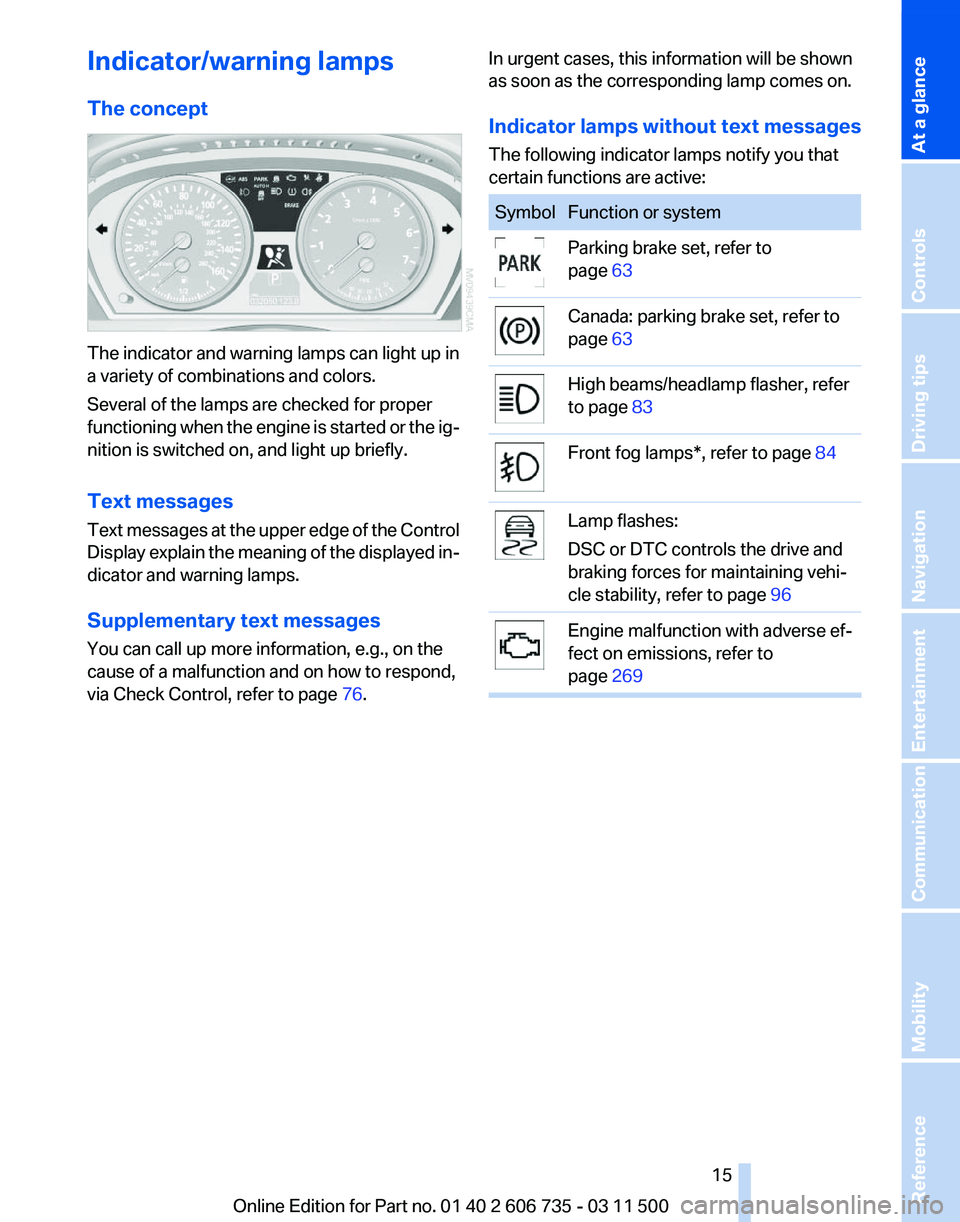
Indicator/warning lamps
The concept
The indicator and warning lamps can light up in
a variety of combinations and colors.
Several of the lamps are checked for proper
functioning
when the engine is started or the ig‐
nition is switched on, and light up briefly.
Text messages
Text messages at the upper edge of the Control
Display explain the meaning of the displayed in‐
dicator and warning lamps.
Supplementary text messages
You can call up more information, e.g., on the
cause of a malfunction and on how to respond,
via Check Control, refer to page 76.In urgent cases, this information will be shown
as soon as the corresponding lamp comes on.
Indicator lamps without text messages
The following indicator lamps notify you that
certain functions are active: Symbol Function or system
Parking brake set, refer to
page
63 Canada: parking brake set, refer to
page
63 High beams/headlamp flasher, refer
to page
83 Front fog lamps*, refer to page
84 Lamp flashes:
DSC or DTC controls the drive and
braking forces for maintaining vehi‐
cle stability, refer to page
96 Engine malfunction with adverse ef‐
fect on emissions, refer to
page
269 Seite 15
15Online Edition for Part no. 01 40 2 606 735 - 03 11 500
Reference Mobility Communication Entertainment Navigation Driving tips Controls
At a glance
Page 17 of 317
DSC Dynamic Stability Con‐
trol 96
DTC Dynamic Traction Con‐
trol 97
Side View* 116
8 Controller with buttons 18
9 Automatic Hold
64 10 Parking brake
63
11 Adaptive Drive* 99
12 Selector lever for automatic transmis‐
sion 69
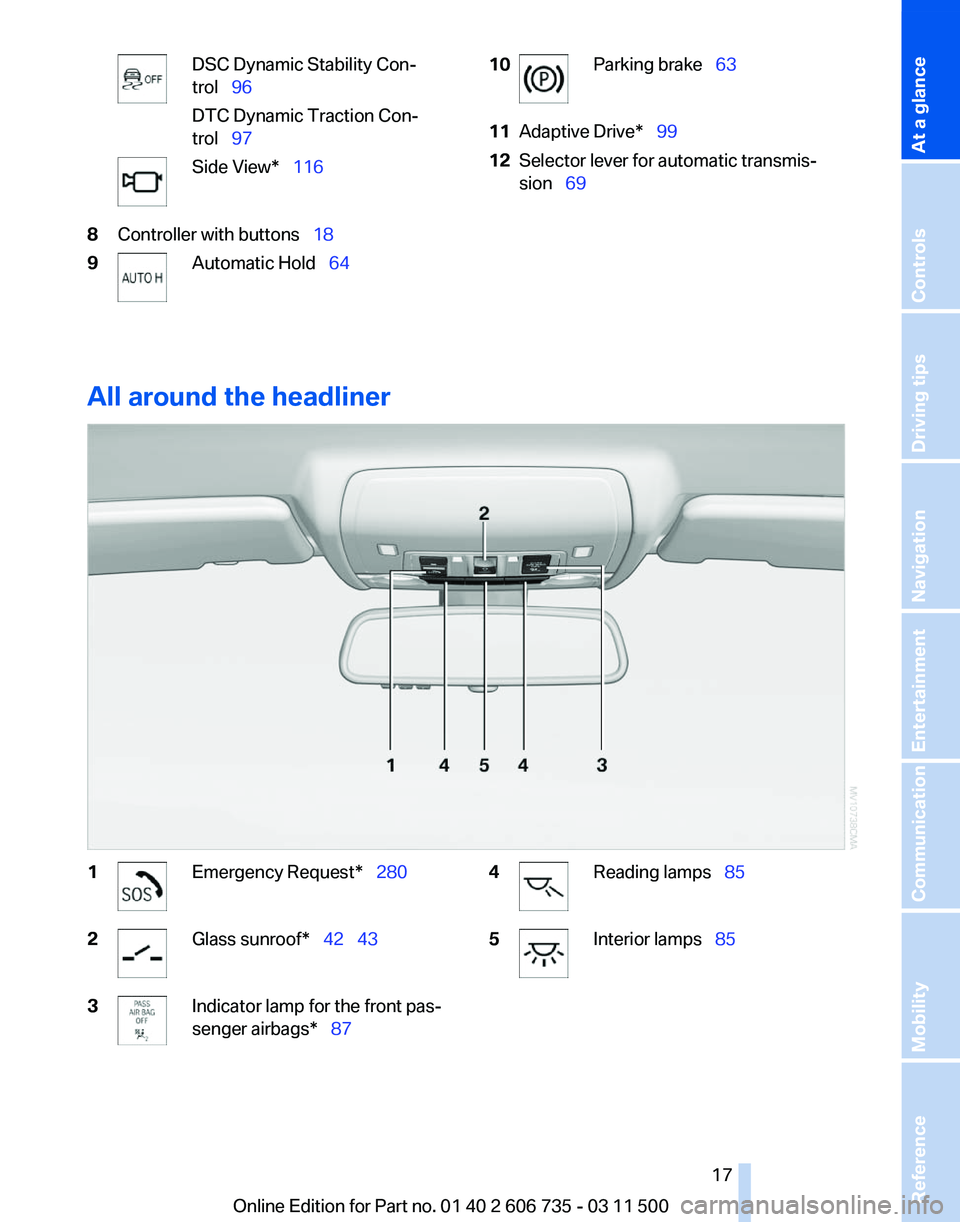
All around the headliner 1 Emergency Request* 280
2 Glass sunroof*
42 43
3 Indicator lamp for the front pas‐
senger airbags* 87
4 Reading lamps
85
5 Interior lamps 85
Seite 17
17Online Edition for Part no. 01 40 2 606 735 - 03 11 500
Reference Mobility Communication Entertainment Navigation Driving tips Controls
At a glance
Page 62 of 317
car wash, for example, ensure that the ignition is
not switched off accidentally.◀
For example, the ignition is not switched off in
the following situations:
▷
The brake is applied.
▷ The low beams are switched on
Starting the engine
General information Enclosed areas
Do not let the engine run in enclosed
areas; otherwise, breathing of exhaust fumes
may lead to loss of consciousness and death.
The
exhaust gases contain carbon monoxide, an
odorless and colorless but highly toxic gas.◀
Unattended vehicle
Do not leave the car unattended with the
engine running; otherwise, it presents a poten‐
tial source of danger.
Before leaving the car with the engine running,
set the parking brake and place the transmission
in position P or neutral to prevent the car from
moving.◀
Frequent starting in quick succession
Avoid repeated futile attempts at starting
the car and avoid starting the car frequently in
quick succession. Otherwise, the fuel is not
burned or is inadequately burned, and there is
the danger of overheating and damaging the
catalytic converter.◀
Do not wait for the engine to warm up while the
vehicle remains stationary. Start driving right
away, but at moderate engine speeds. Starting the engine
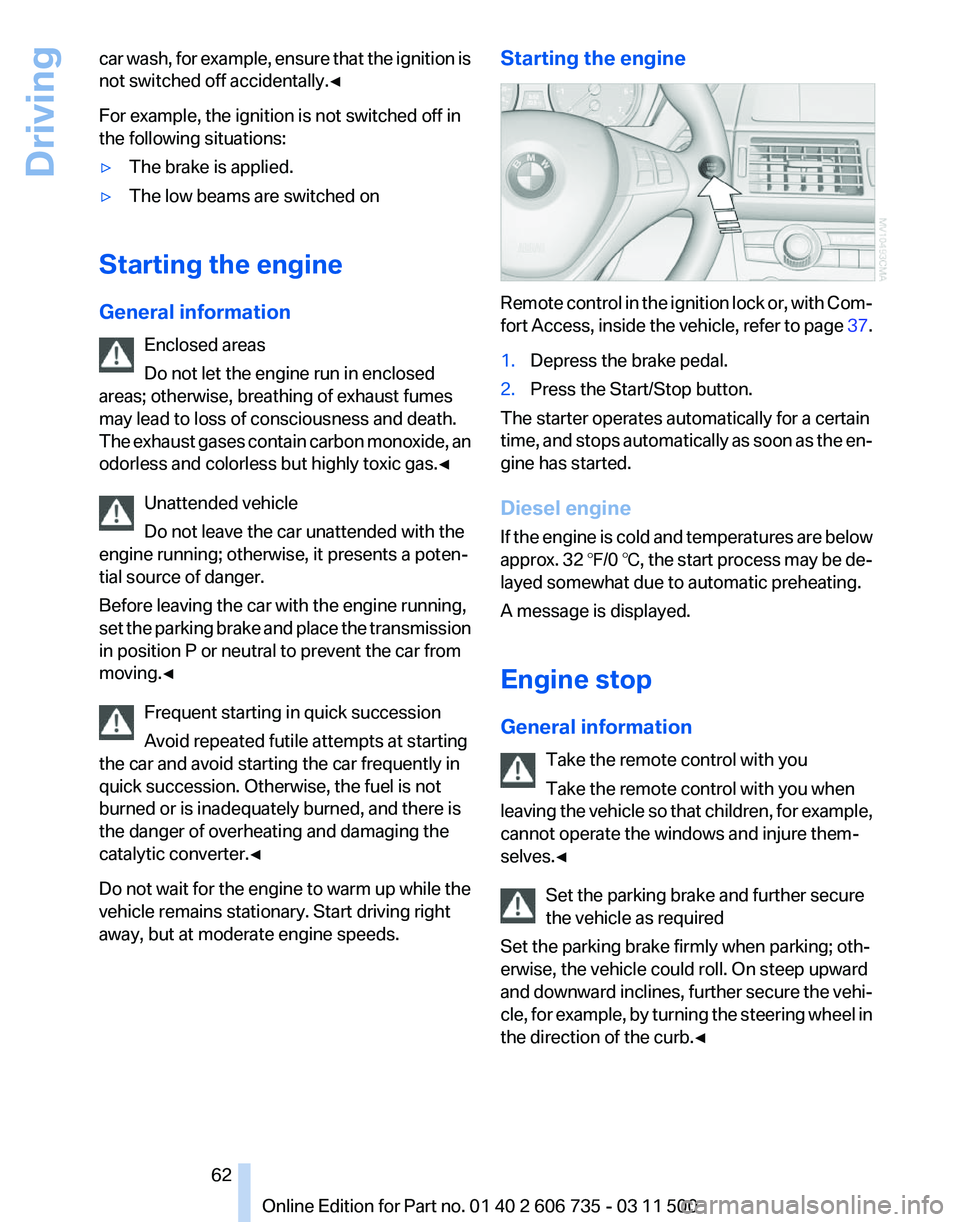
Remote control in the ignition lock or, with Com‐
fort
Access, inside the vehicle, refer to page 37.
1. Depress the brake pedal.
2. Press the Start/Stop button.
The starter operates automatically for a certain
time,
and stops automatically as soon as the en‐
gine has started.
Diesel engine
If the engine is cold and temperatures are below
approx. 32 ℉/0 ℃, the start process may be de‐
layed somewhat due to automatic preheating.
A message is displayed.
Engine stop
General information
Take the remote control with you
Take the remote control with you when
leaving the vehicle so that children, for example,
cannot operate the windows and injure them‐
selves.◀
Set the parking brake and further secure
the vehicle as required
Set the parking brake firmly when parking; oth‐
erwise, the vehicle could roll. On steep upward
and downward inclines, further secure the vehi‐
cle, for example, by turning the steering wheel in
the direction of the curb.◀ Seite 62
62 Online Edition for Part no. 01 40 2 606 735 - 03 11 500
Driving
Page 63 of 317
Switching off the engine
Procedure
1.
Engage transmission position P with the ve‐
hicle stopped.
2. Press the Start/Stop button.
3. Set the parking brake.
4. Remove the remote control from the ignition
lock, refer to page 61.
Before driving into a car wash
The vehicle is able to roll when the following
steps are adhered to:
1. With Comfort Access*: insert the remote
control in the ignition lock.
2. Depress the brake pedal.
3. Engage transmission position N.
4. Release the parking brake or deactivate Au‐
tomatic Hold.
5. Switch the engine off.
Transmission position P will be engaged:
▷ Automatically after approx. 30 minutes.
▷ If you remove the remote control from the
ignition lock.
Parking brake
The concept
The parking brake is primarily intended to pre‐
vent the vehicle from rolling while parked; it
brakes the rear wheels.
The parking brake can be set manually or auto‐
matically:
▷ Manual: by pulling and pushing the switch.
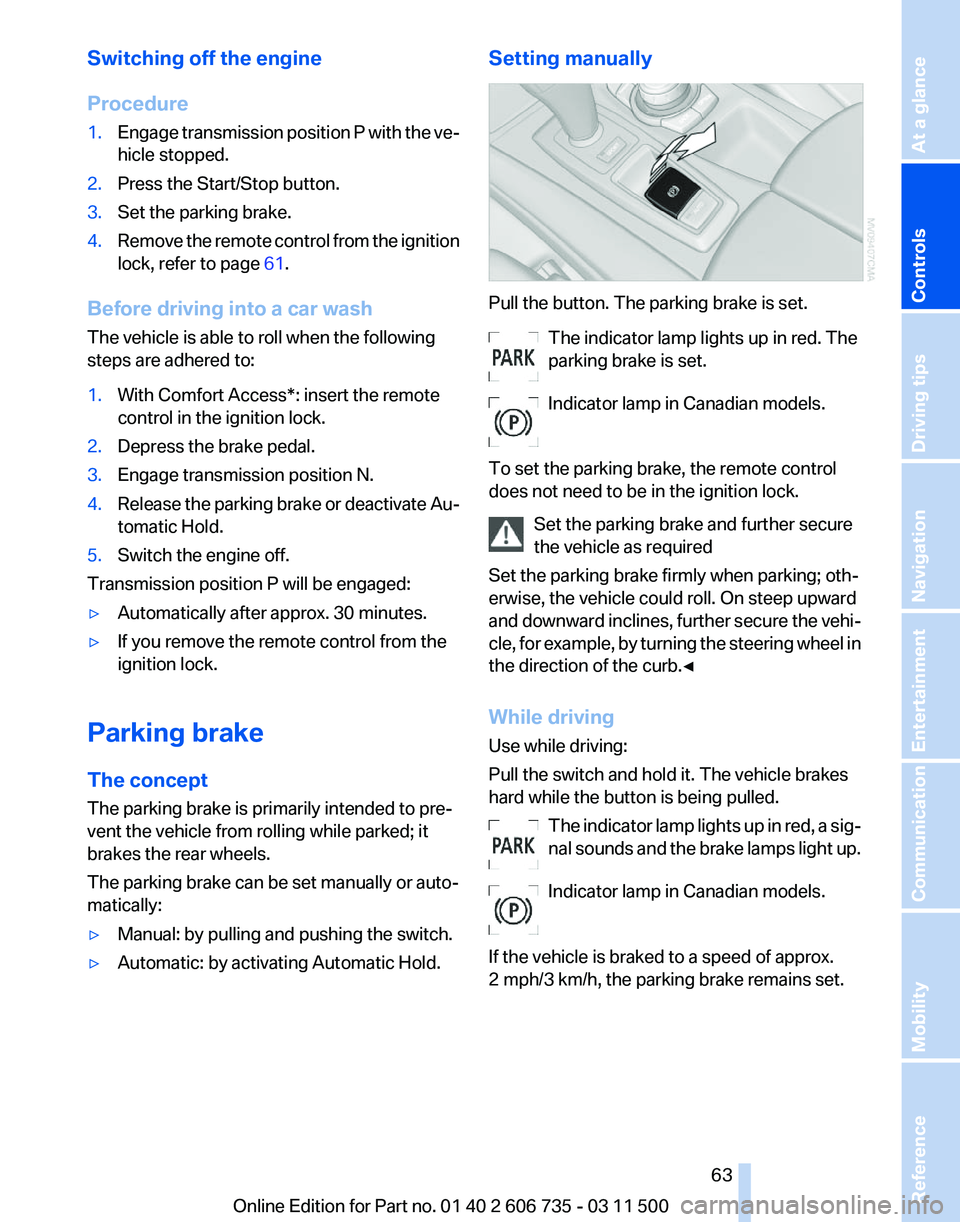
▷ Automatic: by activating Automatic Hold. Setting manually Pull the button. The parking brake is set.
The indicator lamp lights up in red. The
parking brake is set.
Indicator lamp in Canadian models.
To set the parking brake, the remote control
does not need to be in the ignition lock. Set the parking brake and further secure
the vehicle as required
Set the parking brake firmly when parking; oth‐
erwise, the vehicle could roll. On steep upward
and
downward inclines, further secure the vehi‐
cle, for example, by turning the steering wheel in
the direction of the curb.◀
While driving
Use while driving:
Pull the switch and hold it. The vehicle brakes
hard while the button is being pulled.
The indicator lamp lights up in red, a sig‐
nal sounds and the brake lamps light up.
Indicator lamp in Canadian models.
If the vehicle is braked to a speed of approx.
2 mph/3 km/h, the parking brake remains set. Seite 63
63Online Edition for Part no. 01 40 2 606 735 - 03 11 500
Reference Mobility Communication Entertainment Navigation Driving tips
Controls At a glance
Page 64 of 317
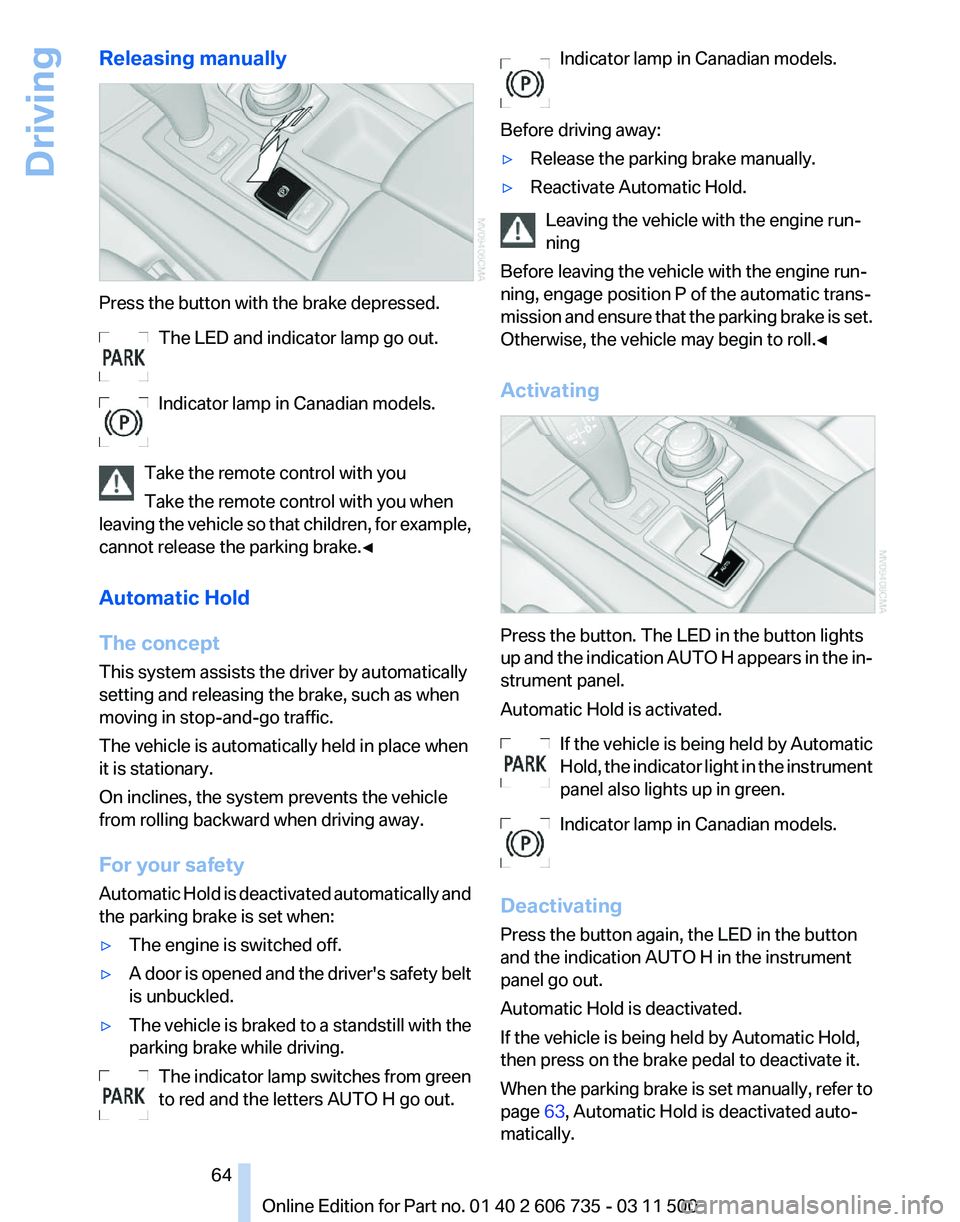
Releasing manually
Press the button with the brake depressed.
The LED and indicator lamp go out.
Indicator lamp in Canadian models.
Take the remote control with you
Take the remote control with you when
leaving
the vehicle so that children, for example,
cannot release the parking brake.◀
Automatic Hold
The concept
This system assists the driver by automatically
setting and releasing the brake, such as when
moving in stop-and-go traffic.
The vehicle is automatically held in place when
it is stationary.
On inclines, the system prevents the vehicle
from rolling backward when driving away.
For your safety
Automatic Hold is deactivated automatically and
the parking brake is set when:
▷ The engine is switched off.
▷ A door is opened and the driver's safety belt
is unbuckled.
▷ The vehicle is braked to a standstill with the
parking brake while driving.
The indicator lamp switches from green
to red and the letters AUTO H go out. Indicator lamp in Canadian models.
Before driving away:
▷ Release the parking brake manually.
▷ Reactivate Automatic Hold.
Leaving the vehicle with the engine run‐
ning
Before leaving the vehicle with the engine run‐
ning, engage position P of the automatic trans‐
mission
and ensure that the parking brake is set.
Otherwise, the vehicle may begin to roll.◀
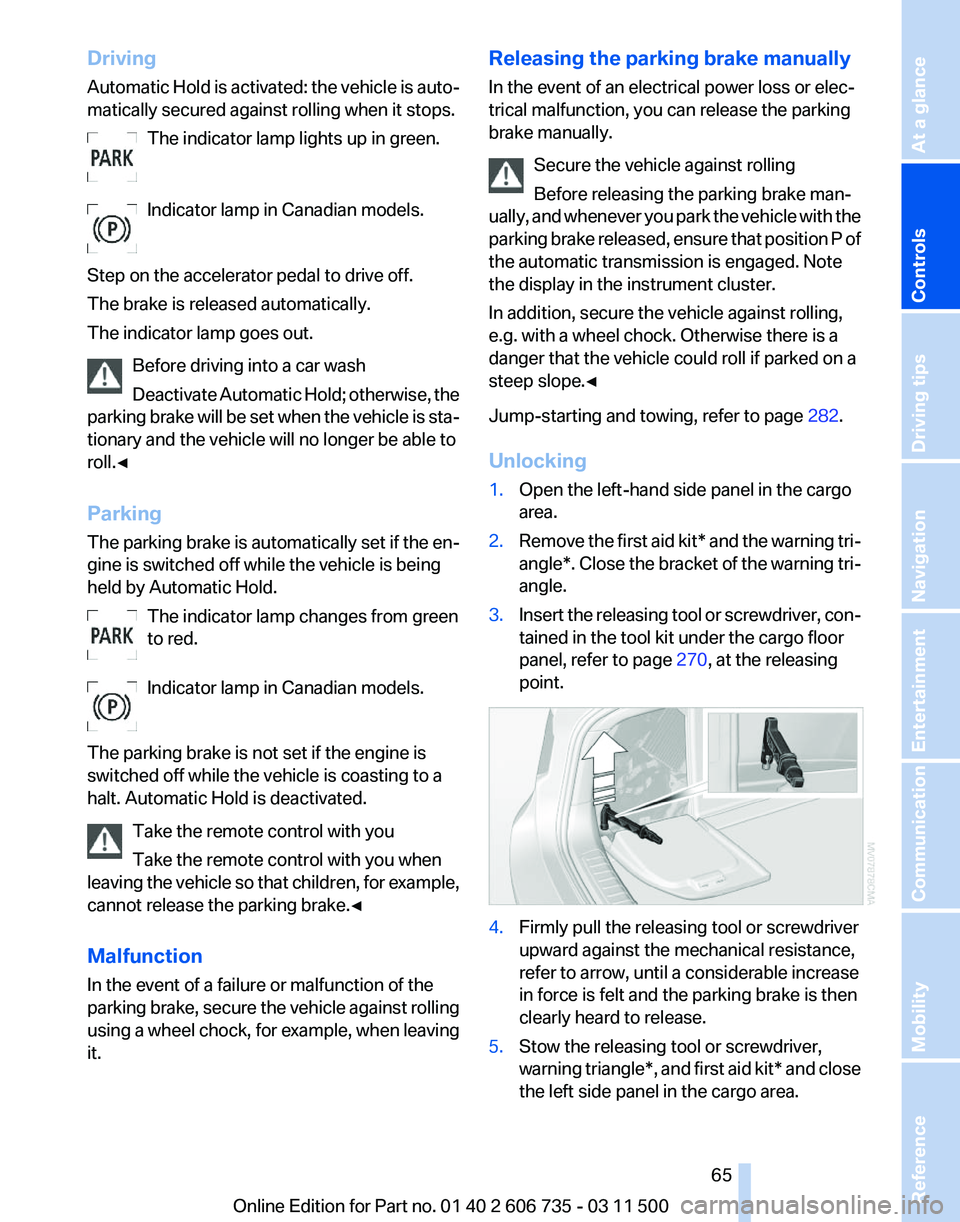
Activating Press the button. The LED in the button lights
up
and the indication AUTO H appears in the in‐
strument panel.
Automatic Hold is activated.
If the vehicle is being held by Automatic
Hold, the indicator light in the instrument
panel also lights up in green.
Indicator lamp in Canadian models.
Deactivating
Press the button again, the LED in the button
and the indication AUTO H in the instrument
panel go out.
Automatic Hold is deactivated.
If the vehicle is being held by Automatic Hold,
then press on the brake pedal to deactivate it.
When the parking brake is set manually, refer to
page 63, Automatic Hold is deactivated auto‐
matically. Seite 64
64 Online Edition for Part no. 01 40 2 606 735 - 03 11 500
Driving
Page 65 of 317
Driving
Automatic
Hold is activated: the vehicle is auto‐
matically secured against rolling when it stops.
The indicator lamp lights up in green.
Indicator lamp in Canadian models.
Step on the accelerator pedal to drive off.
The brake is released automatically.
The indicator lamp goes out. Before driving into a car wash
Deactivate Automatic Hold; otherwise, the
parking brake will be set when the vehicle is sta‐
tionary and the vehicle will no longer be able to
roll.◀
Parking
The parking brake is automatically set if the en‐
gine is switched off while the vehicle is being
held by Automatic Hold.
The indicator lamp changes from green
to red.
Indicator lamp in Canadian models.
The parking brake is not set if the engine is
switched off while the vehicle is coasting to a
halt. Automatic Hold is deactivated. Take the remote control with you
Take the remote control with you when
leaving the vehicle so that children, for example,
cannot release the parking brake.◀
Malfunction
In the event of a failure or malfunction of the
parking brake, secure the vehicle against rolling
using a wheel chock, for example, when leaving
it. Releasing the parking brake manually
In the event of an electrical power loss or elec‐
trical malfunction, you can release the parking
brake manually.
Secure the vehicle against rolling
Before releasing the parking brake man‐
ually,
and whenever you park the vehicle with the
parking brake released, ensure that position P of
the automatic transmission is engaged. Note
the display in the instrument cluster.
In addition, secure the vehicle against rolling,
e.g. with a wheel chock. Otherwise there is a
danger that the vehicle could roll if parked on a
steep slope.◀
Jump-starting and towing, refer to page 282.
Unlocking
1. Open the left-hand side panel in the cargo
area.
2. Remove the first aid kit* and the warning tri‐
angle*.
Close the bracket of the warning tri‐
angle.
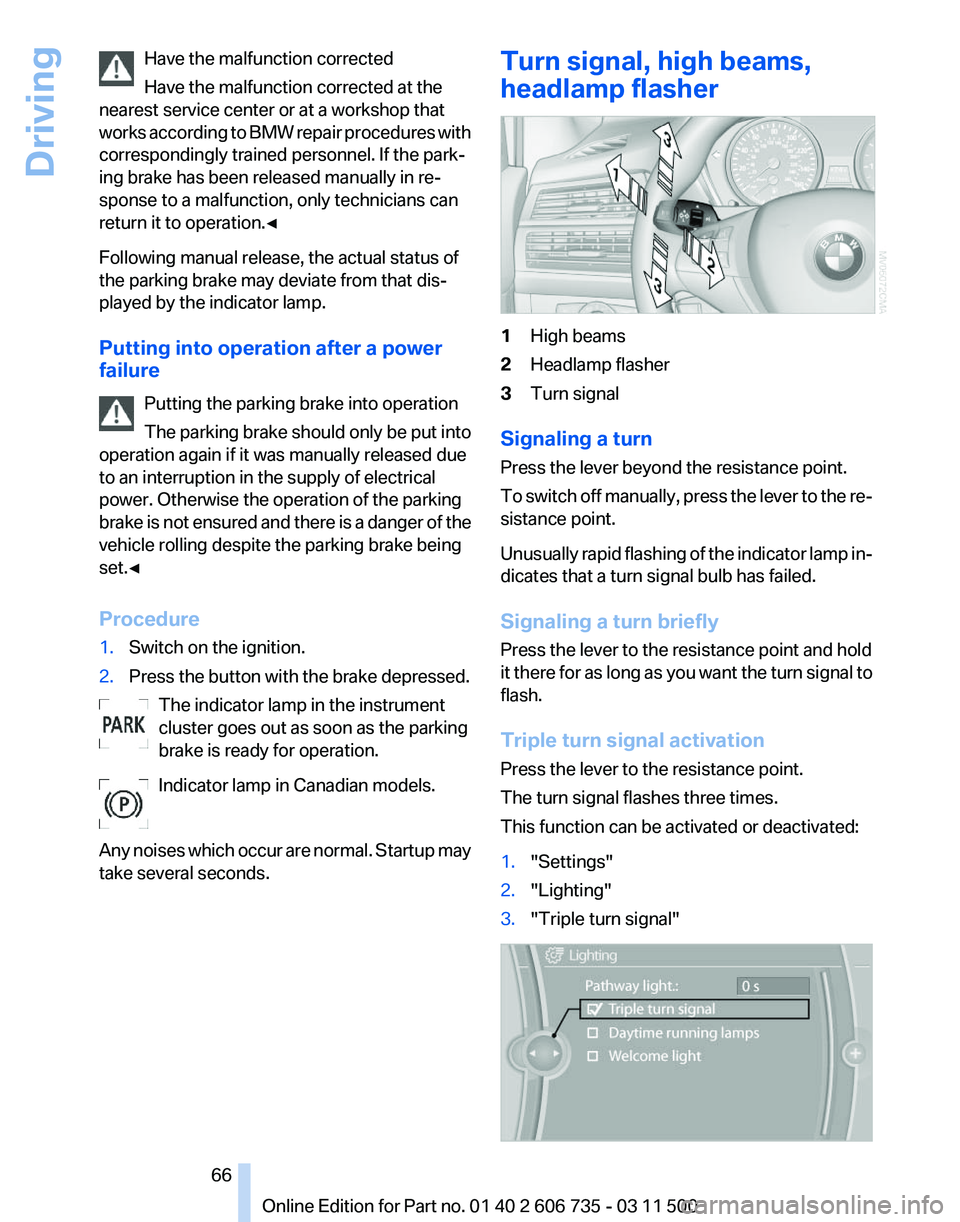
3. Insert the releasing tool or screwdriver, con‐
tained in the tool kit under the cargo floor
panel, refer to page 270, at the releasing
point. 4.
Firmly pull the releasing tool or screwdriver
upward against the mechanical resistance,
refer to arrow, until a considerable increase
in force is felt and the parking brake is then
clearly heard to release.
5. Stow the releasing tool or screwdriver,
warning
triangle*, and first aid kit* and close
the left side panel in the cargo area. Seite 65
65Online Edition for Part no. 01 40 2 606 735 - 03 11 500
Reference Mobility Communication Entertainment Navigation Driving tips
Controls At a glance
Page 66 of 317
Have the malfunction corrected
Have the malfunction corrected at the
nearest service center or at a workshop that
works
according to BMW repair procedures with
correspondingly trained personnel. If the park‐
ing brake has been released manually in re‐
sponse to a malfunction, only technicians can
return it to operation.◀
Following manual release, the actual status of
the parking brake may deviate from that dis‐
played by the indicator lamp.
Putting into operation after a power
failure
Putting the parking brake into operation
The parking brake should only be put into
operation again if it was manually released due
to an interruption in the supply of electrical
power. Otherwise the operation of the parking
brake is not ensured and there is a danger of the
vehicle rolling despite the parking brake being
set.◀
Procedure
1. Switch on the ignition.
2. Press the button with the brake depressed.
The indicator lamp in the instrument
cluster goes out as soon as the parking
brake is ready for operation.
Indicator lamp in Canadian models.
Any
noises which occur are normal. Startup may
take several seconds. Turn signal, high beams,
headlamp flasher
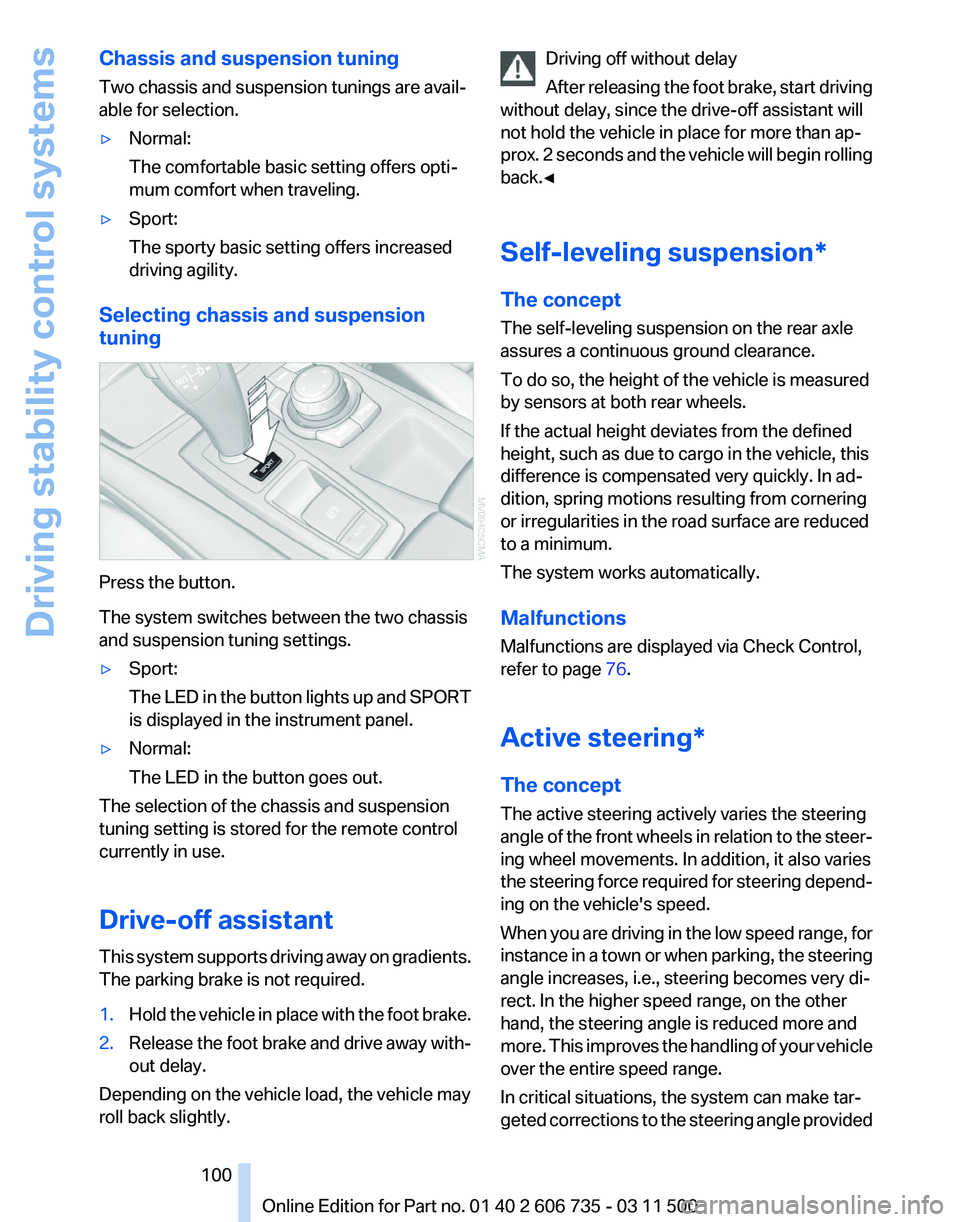
1
High beams
2 Headlamp flasher
3 Turn signal
Signaling a turn
Press the lever beyond the resistance point.
To
switch off manually, press the lever to the re‐
sistance point.
Unusually rapid flashing of the indicator lamp in‐
dicates that a turn signal bulb has failed.
Signaling a turn briefly
Press the lever to the resistance point and hold
it there for as long as you want the turn signal to
flash.
Triple turn signal activation
Press the lever to the resistance point.
The turn signal flashes three times.
This function can be activated or deactivated:
1. "Settings"
2. "Lighting"
3. "Triple turn signal" Seite 66
66 Online Edition for Part no. 01 40 2 606 735 - 03 11 500
Driving
Page 100 of 317
Chassis and suspension tuning
Two chassis and suspension tunings are avail‐
able for selection.
▷
Normal:
The comfortable basic setting offers opti‐
mum comfort when traveling.
▷ Sport:
The sporty basic setting offers increased
driving agility.
Selecting chassis and suspension
tuning Press the button.
The system switches between the two chassis
and suspension tuning settings.
▷
Sport:
The
LED in the button lights up and SPORT
is displayed in the instrument panel.
▷ Normal:
The LED in the button goes out.
The selection of the chassis and suspension
tuning setting is stored for the remote control
currently in use.
Drive-off assistant
This
system supports driving away on gradients.
The parking brake is not required.
1. Hold the vehicle in place with the foot brake.
2. Release the foot brake and drive away with‐
out delay.
Depending on the vehicle load, the vehicle may
roll back slightly. Driving off without delay
After
releasing the foot brake, start driving
without delay, since the drive-off assistant will
not hold the vehicle in place for more than ap‐
prox. 2 seconds and the vehicle will begin rolling
back.◀
Self-leveling suspension*
The concept
The self-leveling suspension on the rear axle
assures a continuous ground clearance.
To do so, the height of the vehicle is measured
by sensors at both rear wheels.
If the actual height deviates from the defined
height, such as due to cargo in the vehicle, this
difference is compensated very quickly. In ad‐
dition, spring motions resulting from cornering
or irregularities in the road surface are reduced
to a minimum.
The system works automatically.
Malfunctions
Malfunctions are displayed via Check Control,
refer to page 76.
Active steering*
The concept
The active steering actively varies the steering
angle of the front wheels in relation to the steer‐
ing wheel movements. In addition, it also varies
the steering force required for steering depend‐
ing on the vehicle's speed.
When you are driving in the low speed range, for
instance in a town or when parking, the steering
angle increases, i.e., steering becomes very di‐
rect. In the higher speed range, on the other
hand, the steering angle is reduced more and
more. This improves the handling of your vehicle
over the entire speed range.
In critical situations, the system can make tar‐
geted corrections to the steering angle provided Seite 100
100 Online Edition for Part no. 01 40 2 606 735 - 03 11 500
Driving stability control systems
Page 103 of 317
As with conventional cruise control systems, ac‐
tive cruise control in no way reduces or substi‐
tutes for the driver's own personal experience,
responsibility, alertness and awareness in ad‐
justing speed, braking or otherwise controlling
the vehicle. The driver should decide when to
use the system on the basis of road, traffic, vis‐
ibility, and weather conditions. Active cruise
control is intended for use on highway-type
roadways where traffic is moving relatively
smoothly as well as in slow-moving traffic con‐
gestion.
Do not use the system in city driving; in
complex driving situations; heavy traffic such as
during rush hour; on curvy, winding roads, slip‐
pery roads or roads with sharp curves such as
highway off-ramps; during inclement weather
such as snow, strong rain or fog; or when enter‐
ing interchanges, service/parking areas or toll
booths. It is also important to regulate your ve‐
hicle's speed and distance setting within appli‐
cable legal limits. Always be ready to take action
or apply the brakes if necessary, especially when
the system is actively following a vehicle in front
of you. Otherwise, driving conditions can result
which lead to a violation of the law or elevated
risk of an accident.
The minimum initial activation speed is
20 mph/ 30 km/h, and the maximum speed is
110 mph/ 180 km/h. The system can also be ac‐
tivated while the vehicle is stationary, refer to
page 105.
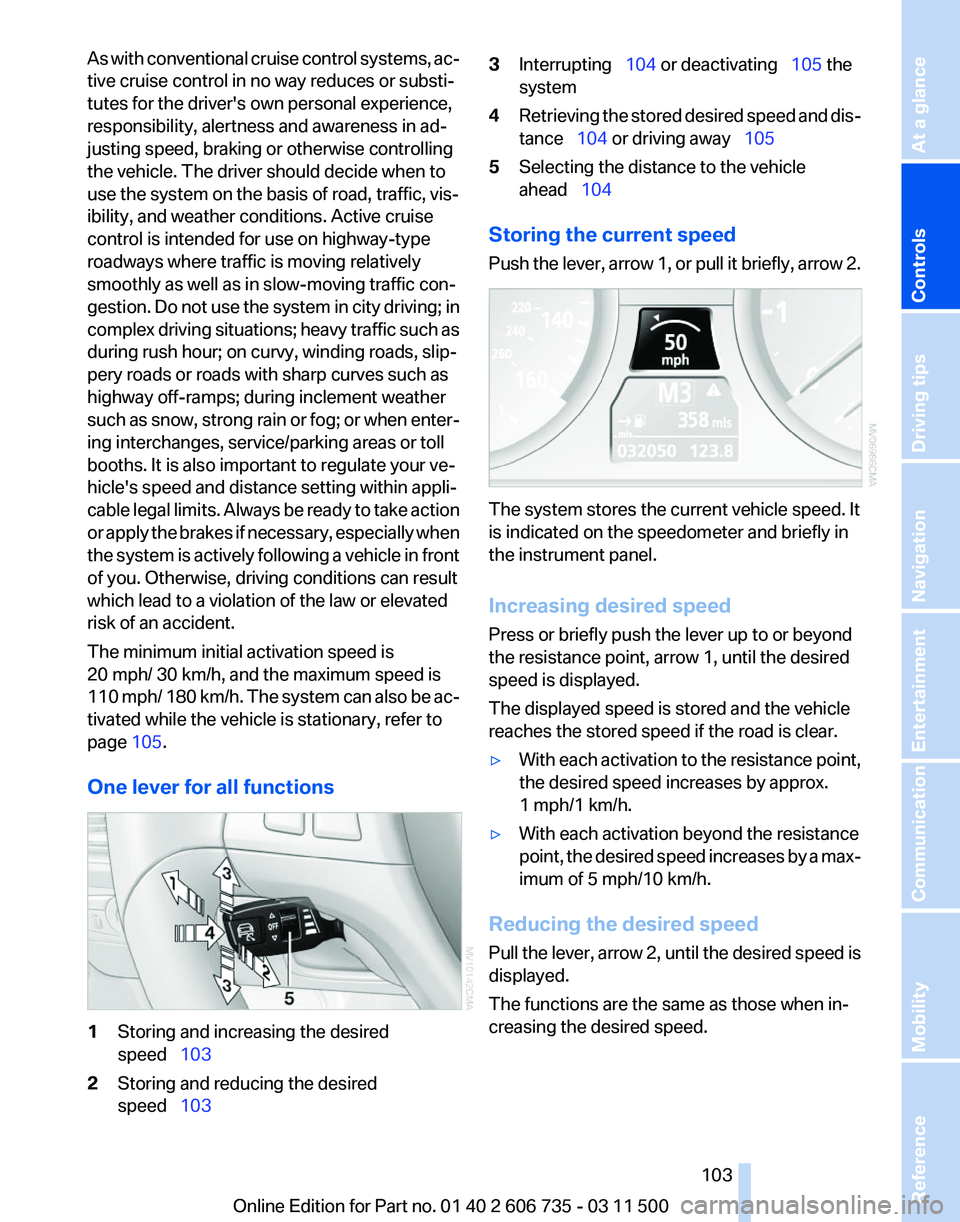
One lever for all functions 1
Storing and increasing the desired
speed 103
2 Storing and reducing the desired
speed 103 3
Interrupting 104 or deactivating 105 the
system
4 Retrieving the stored desired speed and dis‐
tance 104 or driving away 105
5 Selecting the distance to the vehicle
ahead 104
Storing the current speed
Push
the lever, arrow 1, or pull it briefly, arrow 2. The system stores the current vehicle speed. It
is indicated on the speedometer and briefly in
the instrument panel.
Increasing desired speed
Press or briefly push the lever up to or beyond
the resistance point, arrow 1, until the desired
speed is displayed.
The displayed speed is stored and the vehicle
reaches the stored speed if the road is clear.
▷
With each activation to the resistance point,
the desired speed increases by approx.
1 mph/1 km/h.
▷ With each activation beyond the resistance
point,
the desired speed increases by a max‐
imum of 5 mph/10 km/h.
Reducing the desired speed
Pull
the lever, arrow 2, until the desired speed is
displayed.
The functions are the same as those when in‐
creasing the desired speed.
Seite 103
103Online Edition for Part no. 01 40 2 606 735 - 03 11 500
Reference Mobility Communication Entertainment Navigation Driving tips
Controls At a glance
Page 105 of 317
While standing
Before leaving the vehicle
Before
leaving the vehicle with the engine
running, engage position P of the automatic
transmission and apply the parking brake. Oth‐
erwise, the vehicle may begin to roll.◀
If a vehicle detected ahead of you slows to a halt
and your vehicle is also brought to a halt by the
system:
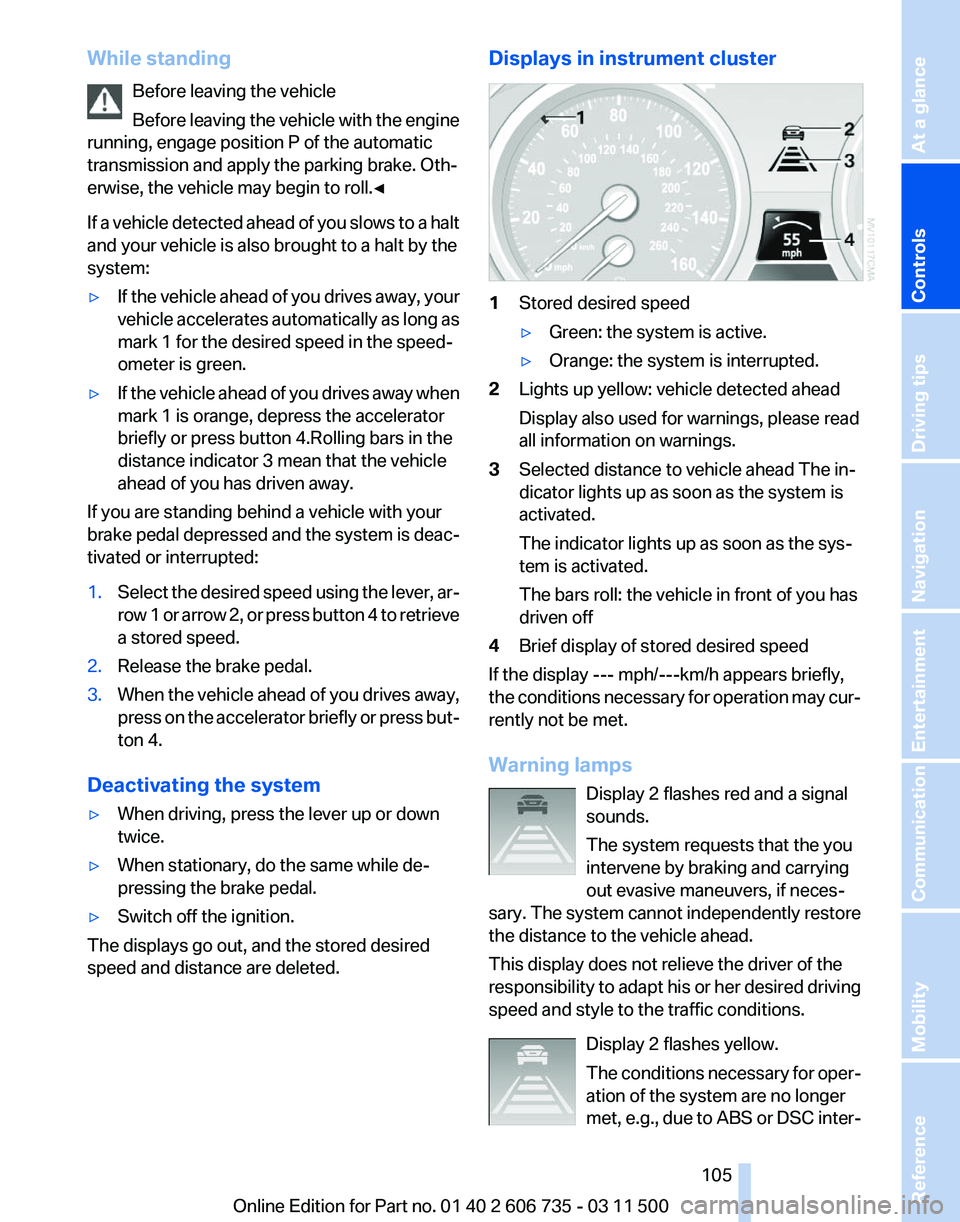
▷ If the vehicle ahead of you drives away, your
vehicle
accelerates automatically as long as
mark 1 for the desired speed in the speed‐
ometer is green.
▷ If the vehicle ahead of you drives away when
mark 1 is orange, depress the accelerator
briefly or press button 4.Rolling bars in the
distance indicator 3 mean that the vehicle
ahead of you has driven away.
If you are standing behind a vehicle with your
brake
pedal depressed and the system is deac‐
tivated or interrupted:
1. Select the desired speed using the lever, ar‐
row
1 or arrow 2, or press button 4 to retrieve
a stored speed.
2. Release the brake pedal.
3. When the vehicle ahead of you drives away,
press
on the accelerator briefly or press but‐
ton 4.
Deactivating the system
▷ When driving, press the lever up or down
twice.
▷ When stationary, do the same while de‐
pressing the brake pedal.
▷ Switch off the ignition.
The displays go out, and the stored desired
speed and distance are deleted. Displays in instrument cluster
1
Stored desired speed
▷Green: the system is active.
▷ Orange: the system is interrupted.
2 Lights up yellow: vehicle detected ahead
Display also used for warnings, please read
all information on warnings.
3 Selected distance to vehicle ahead The in‐
dicator lights up as soon as the system is
activated.
The indicator lights up as soon as the sys‐
tem is activated.
The bars roll: the vehicle in front of you has
driven off
4 Brief display of stored desired speed
If the display --- mph/---km/h appears briefly,
the conditions necessary for operation may cur‐
rently not be met.
Warning lamps
Display 2 flashes red and a signal
sounds.
The system requests that the you
intervene by braking and carrying
out evasive maneuvers, if neces‐
sary. The system cannot independently restore
the distance to the vehicle ahead.
This display does not relieve the driver of the
responsibility to adapt his or her desired driving
speed and style to the traffic conditions.
Display 2 flashes yellow.
The conditions necessary for oper‐
ation of the system are no longer
met, e.g., due to ABS or DSC inter‐ Seite 105
105Online Edition for Part no. 01 40 2 606 735 - 03 11 500
Reference Mobility Communication Entertainment Navigation Driving tips
Controls At a glance