navigation system BMW X5 XDRIVE 48I 2009 E70 Workshop Manual
[x] Cancel search | Manufacturer: BMW, Model Year: 2009, Model line: X5 XDRIVE 48I, Model: BMW X5 XDRIVE 48I 2009 E70Pages: 317, PDF Size: 9.56 MB
Page 171 of 317
Navigation
Driving tips
169Reference
At a glance
Controls
Communications
Entertainment
Mobility
Traffic information during destination
guidance
If there are traffic obstructions on the planned
route, the traffic information symbols are dis-
played with a red border.
System response will vary depending on
whether or not "Dynamic route" is selected,
refer to page 160.
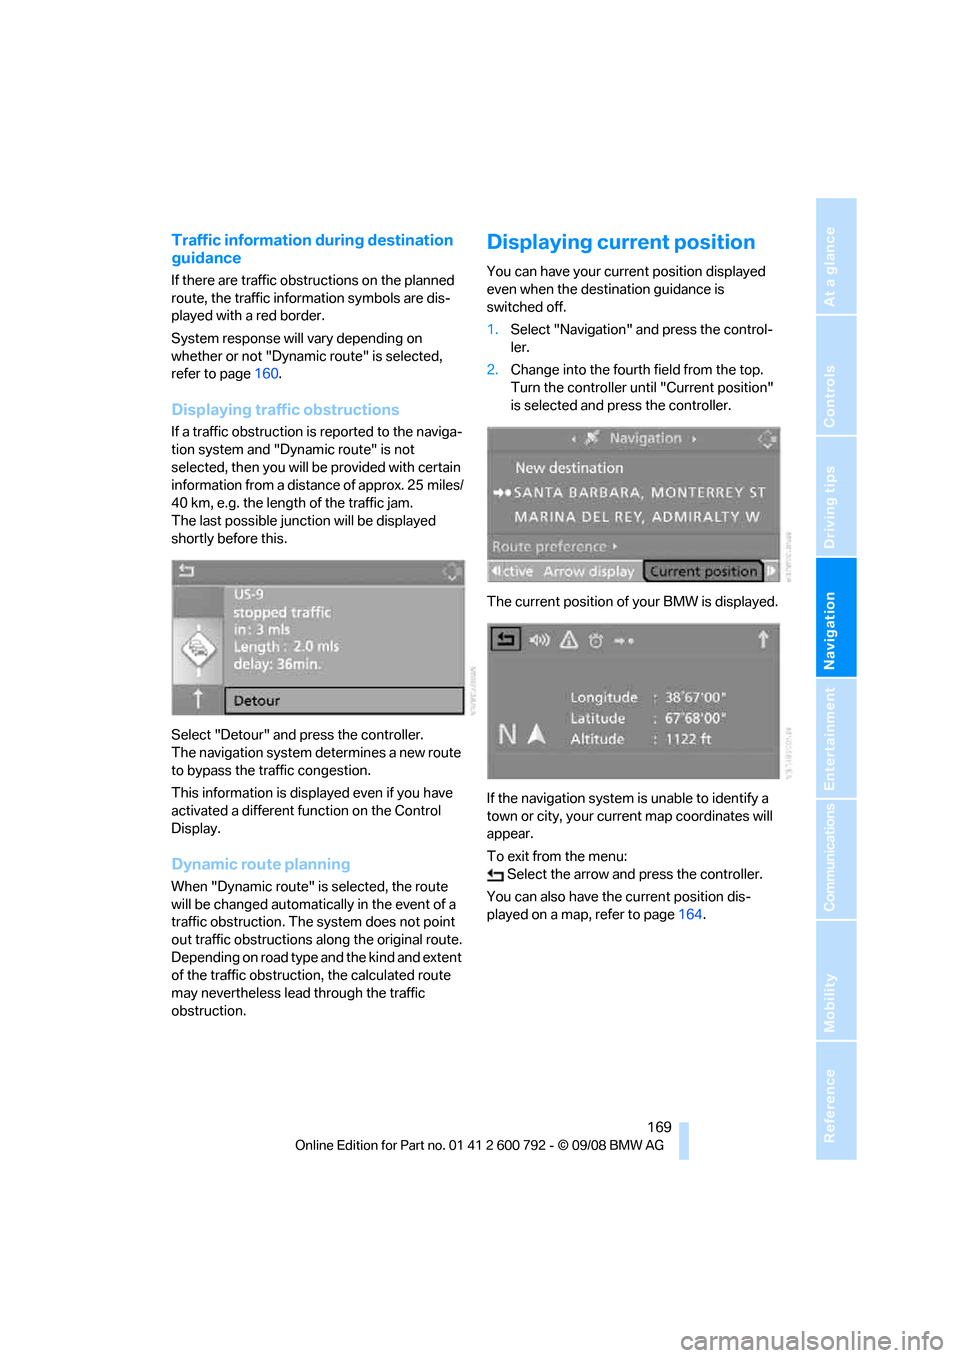
Displaying traffic obstructions
If a traffic obstruction is reported to the naviga-
tion system and "Dynamic route" is not
selected, then you will be provided with certain
information from a distance of approx. 25 miles/
40 km, e.g. the length of the traffic jam.
The last possible junction will be displayed
shortly before this.
Select "Detour" and press the controller.
The navigation system determines a new route
to bypass the traffic congestion.
This information is disp layed even if you have
activated a different fu nction on the Control
Display.
Dynamic route planning
When "Dynamic route" is selected, the route
will be changed automatica lly in the event of a
traffic obstruction. The system does not point
out traffic obstructions along the original route.
Depending on road type and the kind and extent
of the traffic obstruction, the calculated route
may nevertheless lead through the traffic
obstruction.
Displaying current position
You can have your current position displayed
even when the destination guidance is
switched off.
1. Select "Navigation" and press the control-
ler.
2. Change into the fourth field from the top.
Turn the controller until "Current position"
is selected and pr ess the controller.
The current position of your BMW is displayed.
If the navigation system is unable to identify a
town or city, your current map coordinates will
appear.
To exit from the menu: Select the arrow an d press the controller.
You can also have the current position dis-
played on a map, refer to page 164.
Page 172 of 317
What to do if …
170
What to do if …
What to do if …
>a navigation DVD is inserted, but an instruc-
tion to insert the DVD appears on the Con-
trol Display?
The navigation DVD ma y not be the correct
DVD for the navigation system. This infor-
mation is indicated on the DVD label.
> you request the current position of your
vehicle, but do not receive a precise dis-
play?
The system is unable to receive enough
GPS signals at your cu rrent position due to
obstructions, your position is not yet avail-
able on your navigation DVD, or the system
is in the process of calculating your posi-
tion. Reception is best when you have an
unobstructed view to the sky.
> the destination guidance does not accept a
destination?
The data of the destination is not stored on
the navigation DVD that is loaded. Select a
destination that is as close as possible to
the original.
> the destination guidance does not accept
an address without the street name?
On the navigation DVD, no downtown area
can be determined fo r the city or town
entered. Enter any street, or a destination
such as the railway st ation in the selected
town, and then start the destination guid-
ance.
> you want to enter a de stination for the des-
tination guidance, but it is not possible to
select the letters fo r your desired entry?
The data of the destination is not stored on
the navigation DVD that is loaded. In this
case, the system will not offer you any let-
ters to choose from. Select a destination
that is as close as possible to the original. >
the system stops furnishing directions on
which way to turn as you approach intersec-
tions?
You are driving in an area that has not yet
been completely reco rded on the naviga-
tion DVD. Instead of an arrow indicating a
turn, you will see an arrow which indicates
the general direction of your planned route.
Or you have left the recommended route
and the system requires a few seconds to
calculate a new recommended route.
> the navigation system does not react to
entries?
If the battery was disconnected, it takes
about 10 minutes before the system is once
again operational.
Page 176 of 317
On/Off and settings
174
On/Off and settings
The following audio sources have shared con-
trols and setting options:
> Radio
> CD player
> CD changer
*
Controls
The audio sources can be controlled using:
>Buttons in the area of the CD player
> iDrive
> Buttons
on steering wheel, refer to page 11
> Programmable memory buttons, refer to
page 21
Buttons on CD player
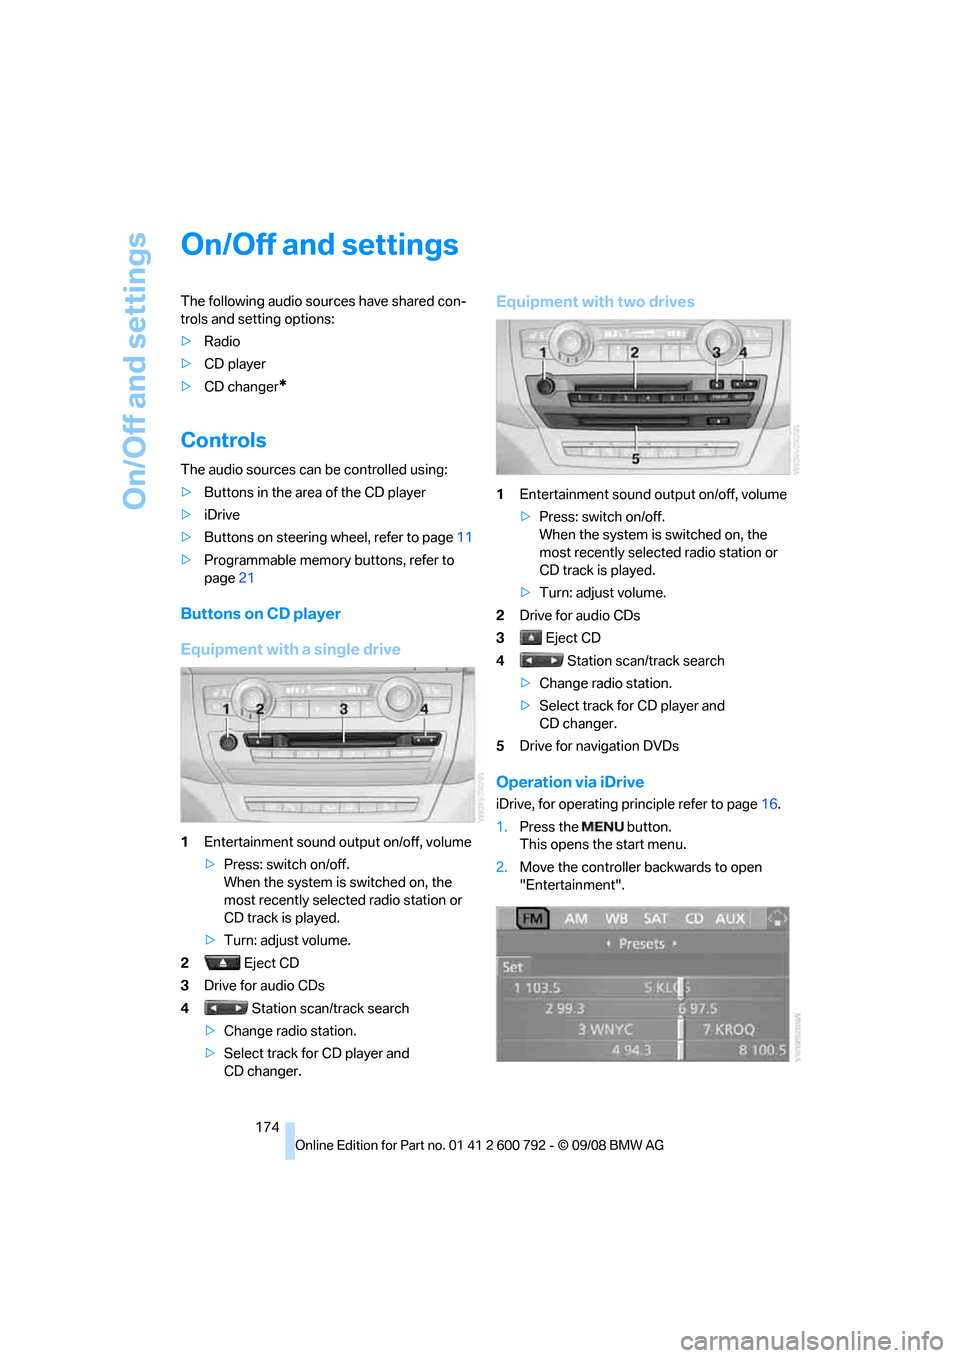
Equipment with a single drive
1Entertainment sound output on/off, volume
>Press: switch on/off.
When the system is switched on, the
most recently select ed radio station or
CD track is played.
> Turn: adjust volume.
2 Eject CD
3 Drive for audio CDs
4 Station scan/track search
> Change radio station.
> Select track for CD player and
CD changer.
Equipment with two drives
1 Entertainment sound output on/off, volume
>Press: switch on/off.
When the system is switched on, the
most recently select ed radio station or
CD track is played.
> Turn: adjust volume.
2 Drive for audio CDs
3 Eject CD
4 Station scan/track search
> Change radio station.
> Select track for CD player and
CD changer.
5 Drive for navigation DVDs
Operation via iDrive
iDrive, for operating pr inciple refer to page16.
1. Press the button.
This opens the start menu.
2. Move the controller backwards to open
"Entertainment".
Page 179 of 317
Navigation
Entertainment
Driving tips
177Reference
At a glance
Controls
Communications
Mobility
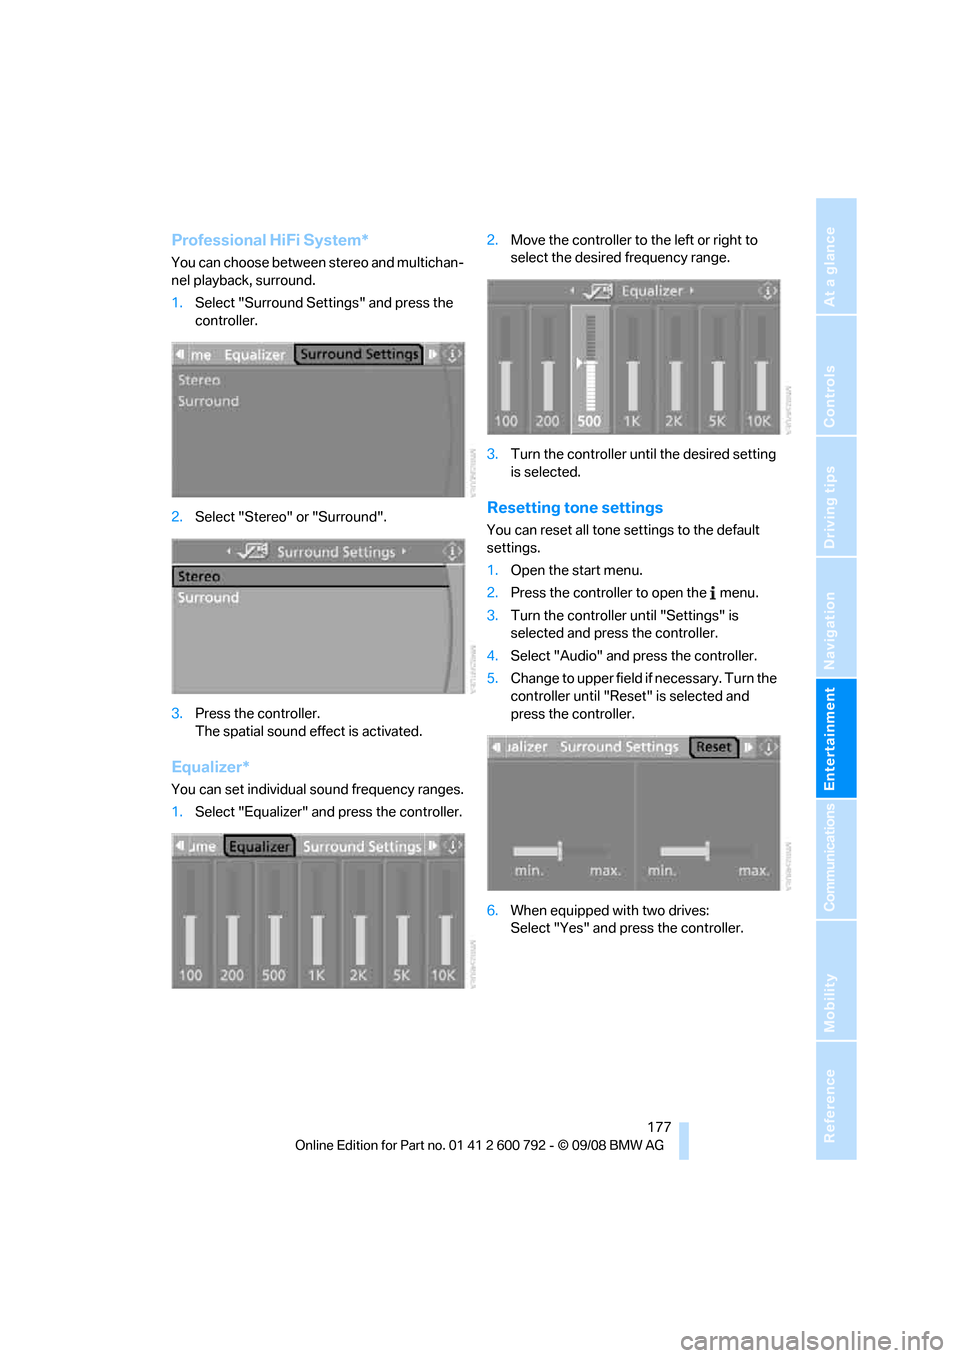
Professional HiFi System*
You can choose between stereo and multichan-
nel playback, surround.
1.Select "Surround Settings" and press the
controller.
2. Select "Stereo" or "Surround".
3. Press the controller.
The spatial sound effect is activated.
Equalizer*
You can set individual sound frequency ranges.
1.Select "Equalizer" and press the controller. 2.
Move the controller to the left or right to
select the desired frequency range.
3. Turn the controller until the desired setting
is selected.
Resetting tone settings
You can reset all tone settings to the default
settings.
1.Open the start menu.
2. Press the controller to open the menu.
3. Turn the controller until "Settings" is
selected and press the controller.
4. Select "Audio" and press the controller.
5. Change to upper field if necessary. Turn the
controller until "Reset" is selected and
press the controller.
6. When equipped with two drives:
Select "Yes" and press the controller.
Page 181 of 317
Navigation
Entertainment
Driving tips
179Reference
At a glance
Controls
Communications
Mobility
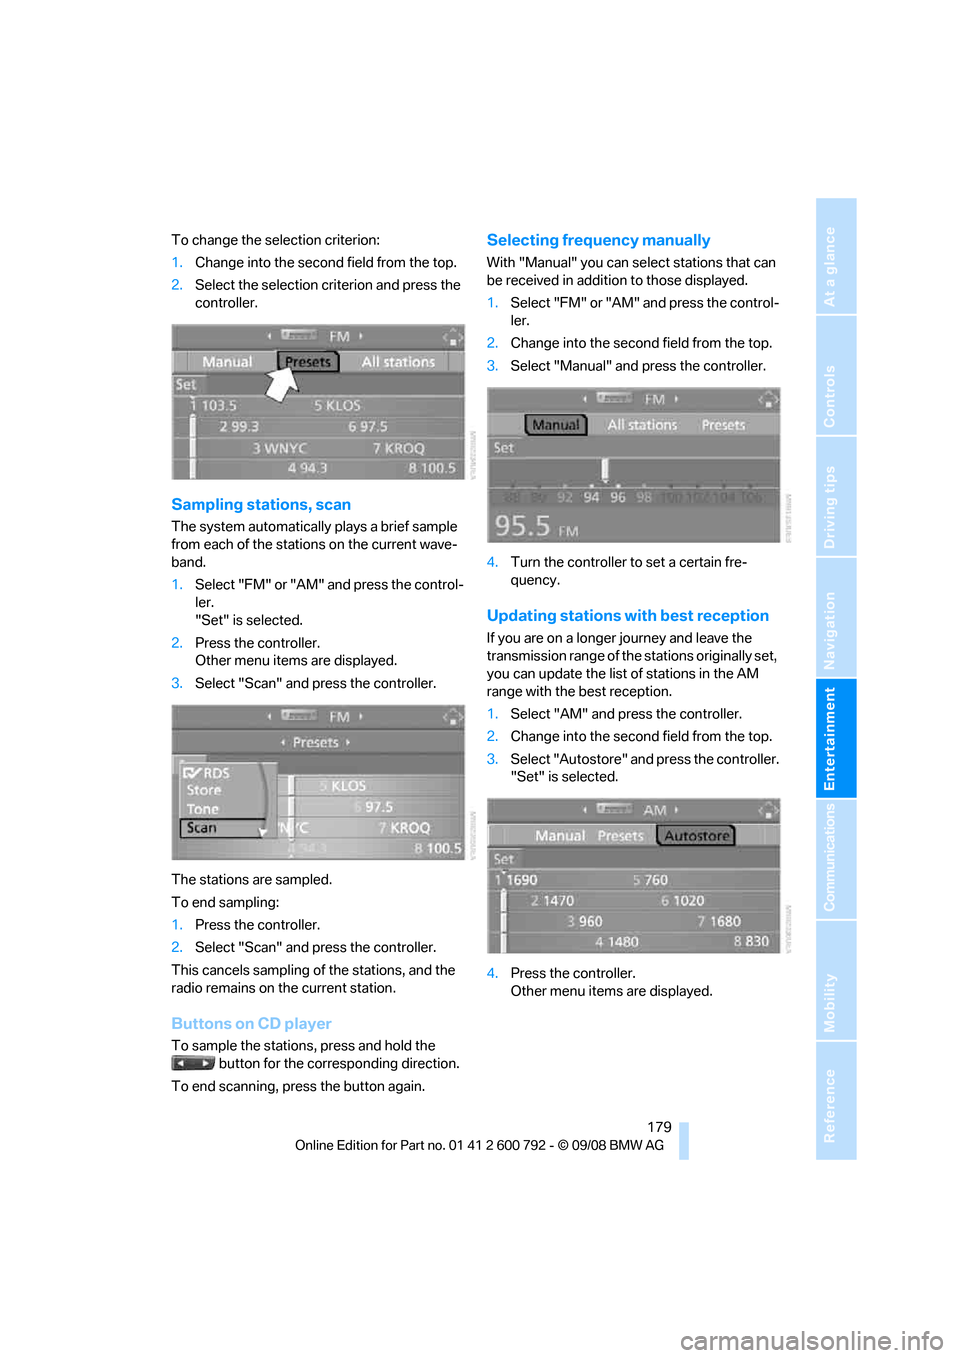
To change the selection criterion:
1.Change into the second field from the top.
2. Select the selection criterion and press the
controller.
Sampling stations, scan
The system automatically plays a brief sample
from each of the stations on the current wave-
band.
1.Select "FM" or "AM" and press the control-
ler.
"Set" is selected.
2. Press the controller.
Other menu items are displayed.
3. Select "Scan" and press the controller.
The stations are sampled.
To end sampling:
1. Press the controller.
2. Select "Scan" and press the controller.
This cancels sampling of the stations, and the
radio remains on the current station.
Buttons on CD player
To sample the stations, press and hold the button for the corresponding direction.
To end scanning, press the button again.
Selecting frequency manually
With "Manual" you can se lect stations that can
be received in additi on to those displayed.
1. Select "FM" or "AM" and press the control-
ler.
2. Change into the second field from the top.
3. Select "Manual" and press the controller.
4. Turn the controller to set a certain fre-
quency.
Updating stations with best reception
If you are on a longer journey and leave the
transmission range of the stations originally set,
you can update the list of stations in the AM
range with the best reception.
1.Select "AM" and pr ess the controller.
2. Change into the second field from the top.
3. Select "Autostore" and press the controller.
"Set" is selected.
4. Press the controller.
Other menu items are displayed.
Page 183 of 317
Navigation
Entertainment
Driving tips
181Reference
At a glance
Controls
Communications
Mobility
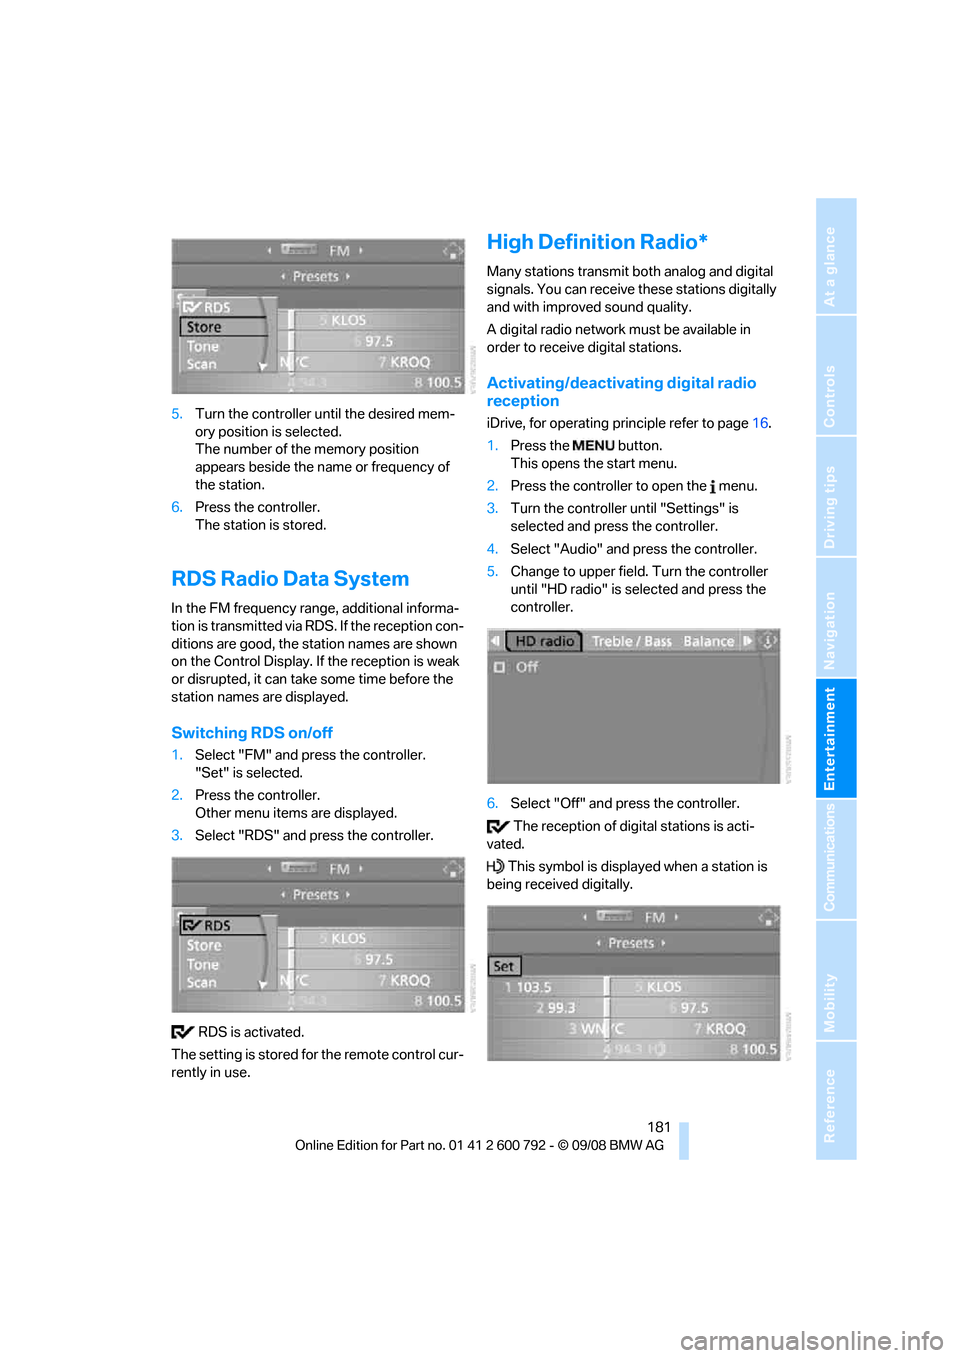
5.Turn the controller until the desired mem-
ory position is selected.
The number of the memory position
appears beside the na me or frequency of
the station.
6. Press the controller.
The station is stored.
RDS Radio Data System
In the FM frequency range, additional informa-
tion is transmitted via RDS. If the reception con-
ditions are good, the station names are shown
on the Control Display. If the reception is weak
or disrupted, it can take some time before the
station names are displayed.
Switching RDS on/off
1. Select "FM" and press the controller.
"Set" is selected.
2. Press the controller.
Other menu items are displayed.
3. Select "RDS" and press the controller.
RDS is activated.
The setting is stored for the remote control cur-
rently in use.
High Definition Radio*
Many stations transmit both analog and digital
signals. You can receive these stations digitally
and with improved sound quality.
A digital radio network must be available in
order to receive digital stations.
Activating/deactivating digital radio
reception
iDrive, for operating pr inciple refer to page16.
1. Press the button.
This opens the start menu.
2. Press the controller to open the menu.
3. Turn the controller until "Settings" is
selected and press the controller.
4. Select "Audio" and press the controller.
5. Change to upper field. Turn the controller
until "HD radio" is se lected and press the
controller.
6. Select "Off" and press the controller.
The reception of digital stations is acti-
vated.
This symbol is displa yed when a station is
being received digitally.
Page 191 of 317
Navigation
Entertainment
Driving tips
189Reference
At a glance
Controls
Communications
Mobility
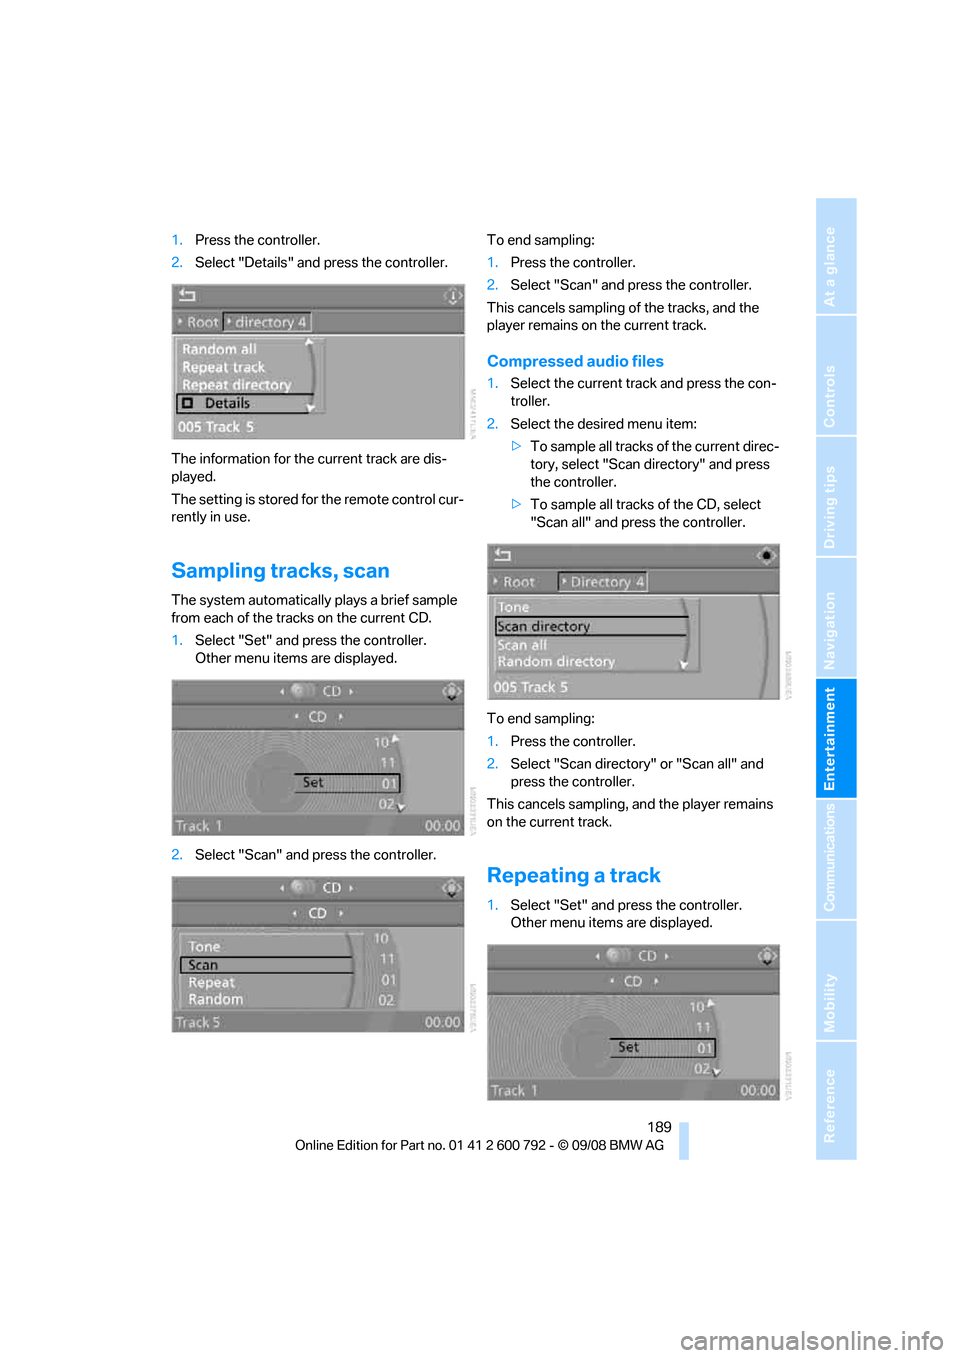
1.Press the controller.
2. Select "Details" and press the controller.
The information for the current track are dis-
played.
The setting is stored for the remote control cur-
rently in use.
Sampling tracks, scan
The system automatically plays a brief sample
from each of the trac ks on the current CD.
1. Select "Set" and press the controller.
Other menu items are displayed.
2. Select "Scan" and press the controller. To end sampling:
1.
Press the controller.
2. Select "Scan" and press the controller.
This cancels sampling of the tracks, and the
player remains on the current track.
Compressed audio files
1. Select the current track and press the con-
troller.
2. Select the desired menu item:
>To sample all tracks of the current direc-
tory, select "Scan directory" and press
the controller.
> To sample all tracks of the CD, select
"Scan all" and press the controller.
To end sampling:
1. Press the controller.
2. Select "Scan directory" or "Scan all" and
press the controller.
This cancels sampling, and the player remains
on the current track.
Repeating a track
1. Select "Set" and press the controller.
Other menu items are displayed.
Page 197 of 317
Navigation
Entertainment
Driving tips
195Reference
At a glance
Controls
Communications
Mobility
ward and reverse, or freeze frame.
A DVD can briefly deactivate functions of the
DVD control, under certain circumstances even
while the entire DVD is being played. It is not
possible to operate the DVD control under
these circumstances. In this case, try to make
the selection using the DVD-specific menu.
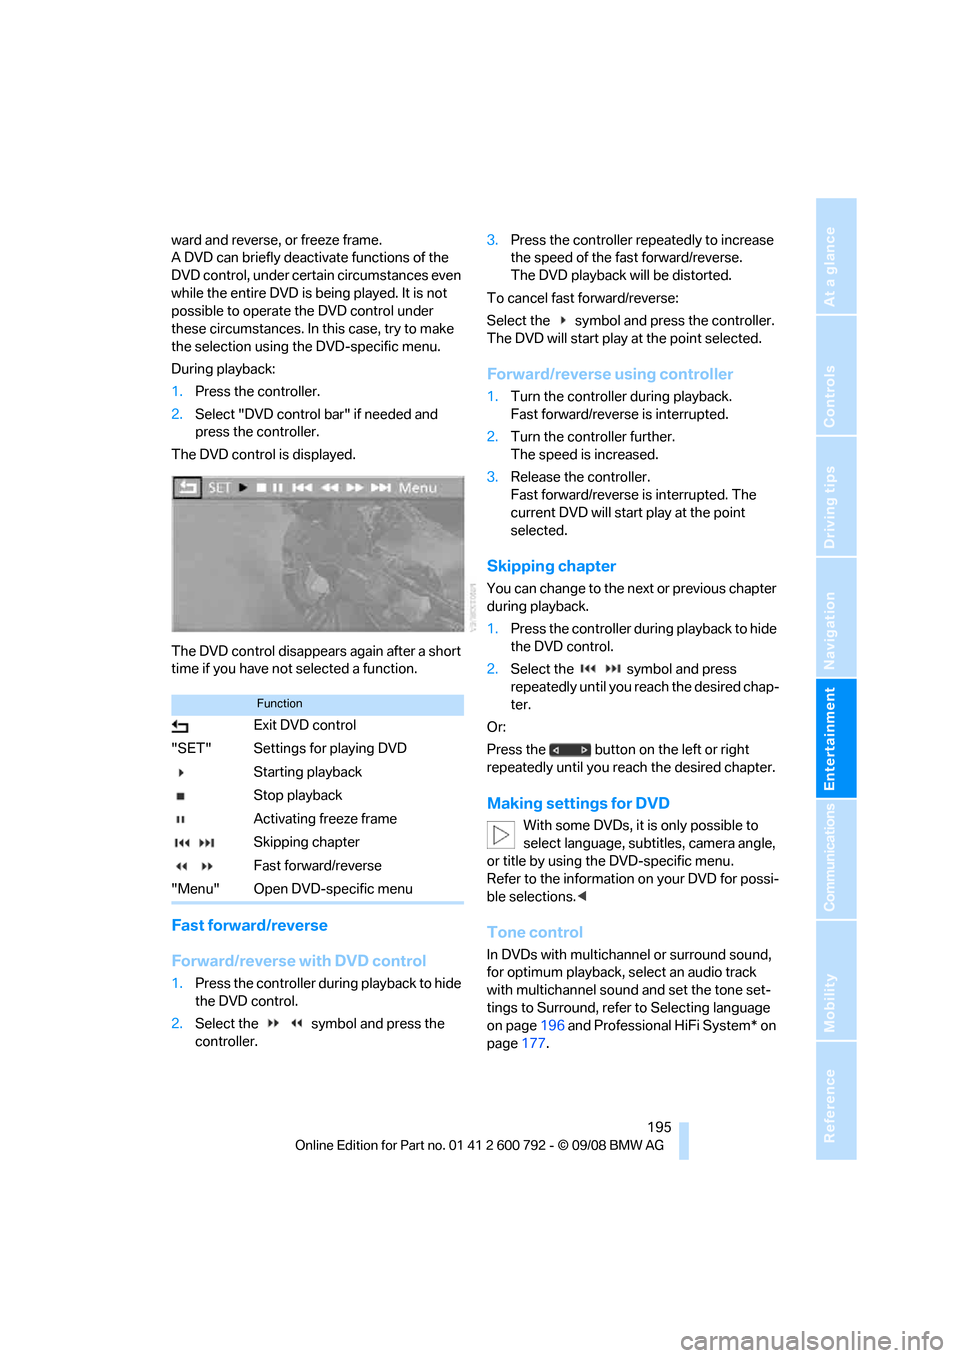
During playback:
1. Press the controller.
2. Select "DVD control bar" if needed and
press the controller.
The DVD control is displayed.
The DVD control disappears again after a short
time if you have not selected a function.
Fast forward/reverse
Forward/reverse with DVD control
1.Press the controller during playback to hide
the DVD control.
2. Select the symbol and press the
controller. 3.
Press the controller repe atedly to increase
the speed of the fast forward/reverse.
The DVD playback will be distorted.
To cancel fast forward/reverse:
Select the symbol and press the controller.
The DVD will start play at the point selected.
Forward/reverse using controller
1. Turn the controller during playback.
Fast forward/reverse is interrupted.
2. Turn the controller further.
The speed is increased.
3. Release the controller.
Fast forward/reverse is interrupted. The
current DVD will start play at the point
selected.
Skipping chapter
You can change to the ne xt or previous chapter
during playback.
1. Press the controller during playback to hide
the DVD control.
2. Select the symbol and press
repeatedly until you reach the desired chap-
ter.
Or:
Press the button on the left or right
repeatedly until you reach the desired chapter.
Making settings for DVD
With some DVDs, it is only possible to
select language, subtit les, camera angle,
or title by using the DVD-specific menu.
Refer to the information on your DVD for possi-
ble selections. <
Tone control
In DVDs with multichanne l or surround sound,
for optimum playback, select an audio track
with multichannel sound and set the tone set-
tings to Surround, refer to Selecting language
on page 196 and Professional HiFi System* on
page 177.
Function
Exit DVD control
"SET" Settings for playing DVD
Starting playback
Stop playback
Activating freeze frame
Skipping chapter
Fast forward/reverse
"Menu" Open DVD-specific menu
Page 203 of 317
Navigation
Entertainment
Driving tips
201Reference
At a glance
Controls
Communications
Mobility
USB audio interface
You can connect an external audio device or
USB device to the USB audio interface.
> MP3 player
> USB memory stick
> iPod/iPhone
> Suitable mobile phone:
You can operate these devices via iDrive, if they
are supported by the USB audio interface.
If equipped with an addi tional connection of the
music player in the mobile phone, connect the
phone by means of the snap-in adapter
*, refer
to page 233. The phone can then be used for
the hands-free system and audio playback. The
audio playback is only po ssible if no device is
connected to the USB audio interface.
The common audio files, e.g. MP3, WMA, WAV
(PCM) and AAC, as well as playback lists in the
M3U format can be played back.
Due to the large number of audio devices avail-
able on the market, operation via the vehicle
cannot be ensured for every audio device.
Ask your BMW Sports Activity Vehicle Center,
which audio devices, mo bile phones, or USB
devices are suitable.
Connecting
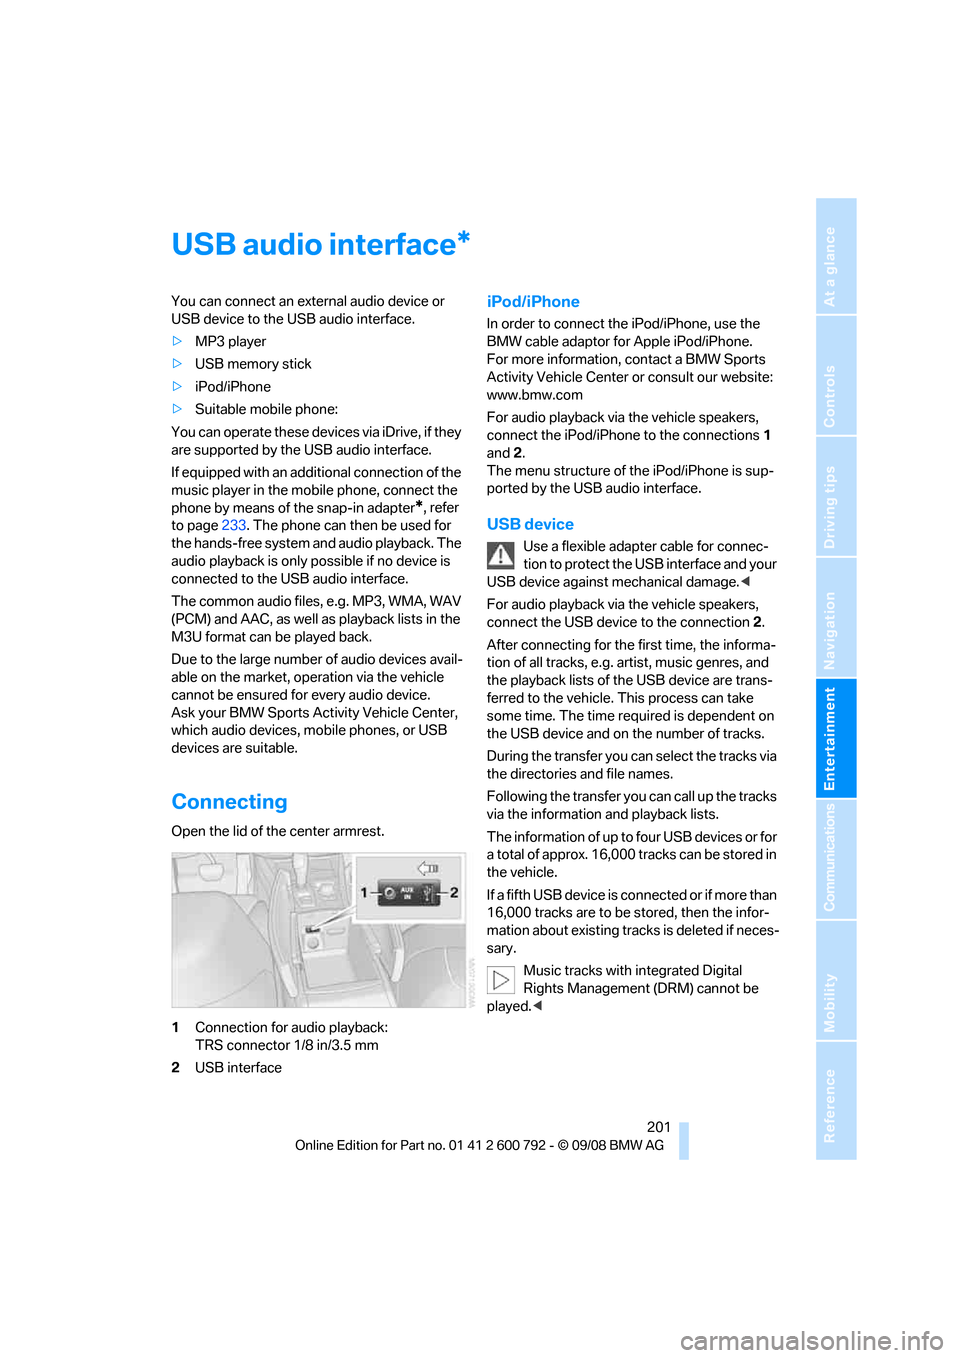
Open the lid of the center armrest.
1 Connection for audio playback:
TRS connector 1/8 in/3.5 mm
2 USB interface
iPod/iPhone
In order to connect th e iPod/iPhone, use the
BMW cable adaptor for Apple iPod/iPhone.
For more information, contact a BMW Sports
Activity Vehicle Center or consult our website:
www.bmw.com
For audio playback via the vehicle speakers,
connect the iPod/iPhone to the connections 1
and 2.
The menu structure of the iPod/iPhone is sup-
ported by the USB audio interface.
USB device
Use a flexible adapter cable for connec-
tion to protect the USB interface and your
USB device against mechanical damage.<
For audio playback via the vehicle speakers,
connect the USB device to the connection 2.
After connecting for the first time, the informa-
tion of all tracks, e.g. artist, music genres, and
the playback lists of the USB device are trans-
ferred to the vehicle. This process can take
some time. The time required is dependent on
the USB device and on the number of tracks.
During the transfer you can select the tracks via
the directories and file names.
Following the transfer you can call up the tracks
via the information and playback lists.
The information of up to four USB devices or for
a total of approx. 16,000 tracks can be stored in
the vehicle.
I f a f i f t h U S B d e v i c e i s c o n n e c t e d o r i f m o r e t h a n
16,000 tracks are to be stored, then the infor-
mation about existing trac ks is deleted if neces-
sary.
Music tracks with integrated Digital
Rights Management (DRM) cannot be
played. <
*
Page 207 of 317
Navigation
Entertainment
Driving tips
205Reference
At a glance
Controls
Communications
Mobility
1.Turn display screen, arrow 1.
The display screen switches off.
2. Fold in display screen, arrow 2.
The display screen is folded out in the reverse
order.
CD/DVD player
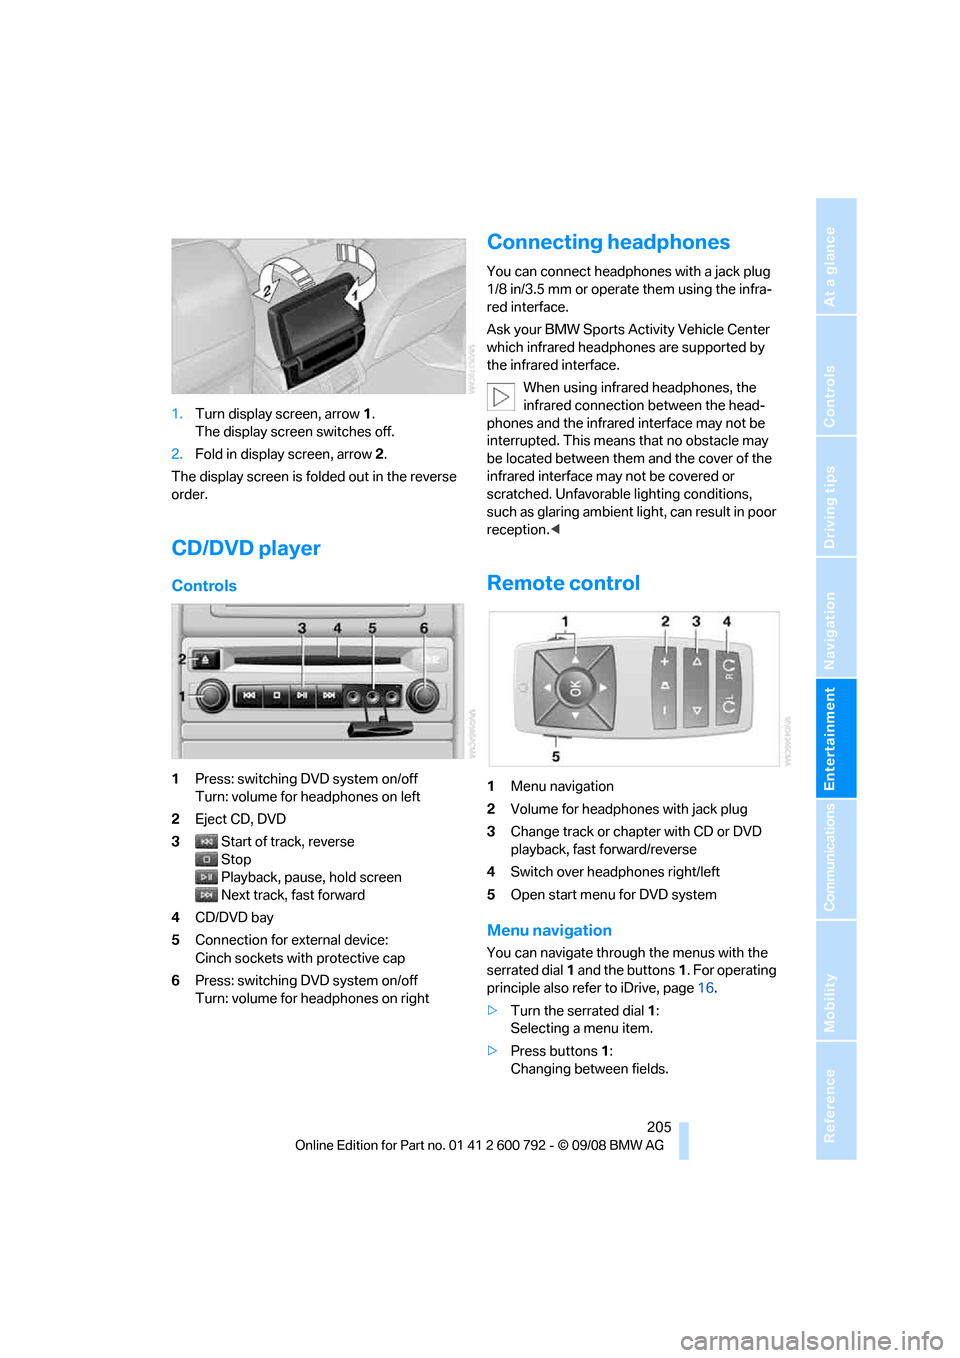
Controls
1 Press: switching DVD system on/off
Turn: volume for he adphones on left
2 Eject CD, DVD
3 Start of track, reverse
Stop
Playback, pause, hold screen
Next track, fast forward
4 CD/DVD bay
5 Connection for external device:
Cinch sockets with protective cap
6 Press: switching DVD system on/off
Turn: volume for he adphones on right
Connecting headphones
You can connect headphones with a jack plug
1/8 in/3.5 mm or operate them using the infra-
red interface.
Ask your BMW Sports Activity Vehicle Center
which infrared headphones are supported by
the infrared interface.
When using infrared headphones, the
infrared connection between the head-
phones and the infrared interface may not be
interrupted. This means that no obstacle may
be located between them and the cover of the
infrared interface may not be covered or
scratched. Unfavorable lighting conditions,
such as glaring ambient lig ht, can result in poor
reception. <
Remote control
1Menu navigation
2 Volume for headphones with jack plug
3 Change track or chapter with CD or DVD
playback, fast forward/reverse
4 Switch over headphones right/left
5 Open start menu for DVD system
Menu navigation
You can navigate throug h the menus with the
serrated dial 1 and the buttons 1. For operating
principle also refer to iDrive, page 16.
> Turn the serrated dial 1:
Selecting a menu item.
> Press buttons 1:
Changing between fields.