center console BMW X5 XDRIVE 50I 2013 Owners Manual
[x] Cancel search | Manufacturer: BMW, Model Year: 2013, Model line: X5 XDRIVE 50I, Model: BMW X5 XDRIVE 50I 2013Pages: 345, PDF Size: 9.45 MB
Page 16 of 345
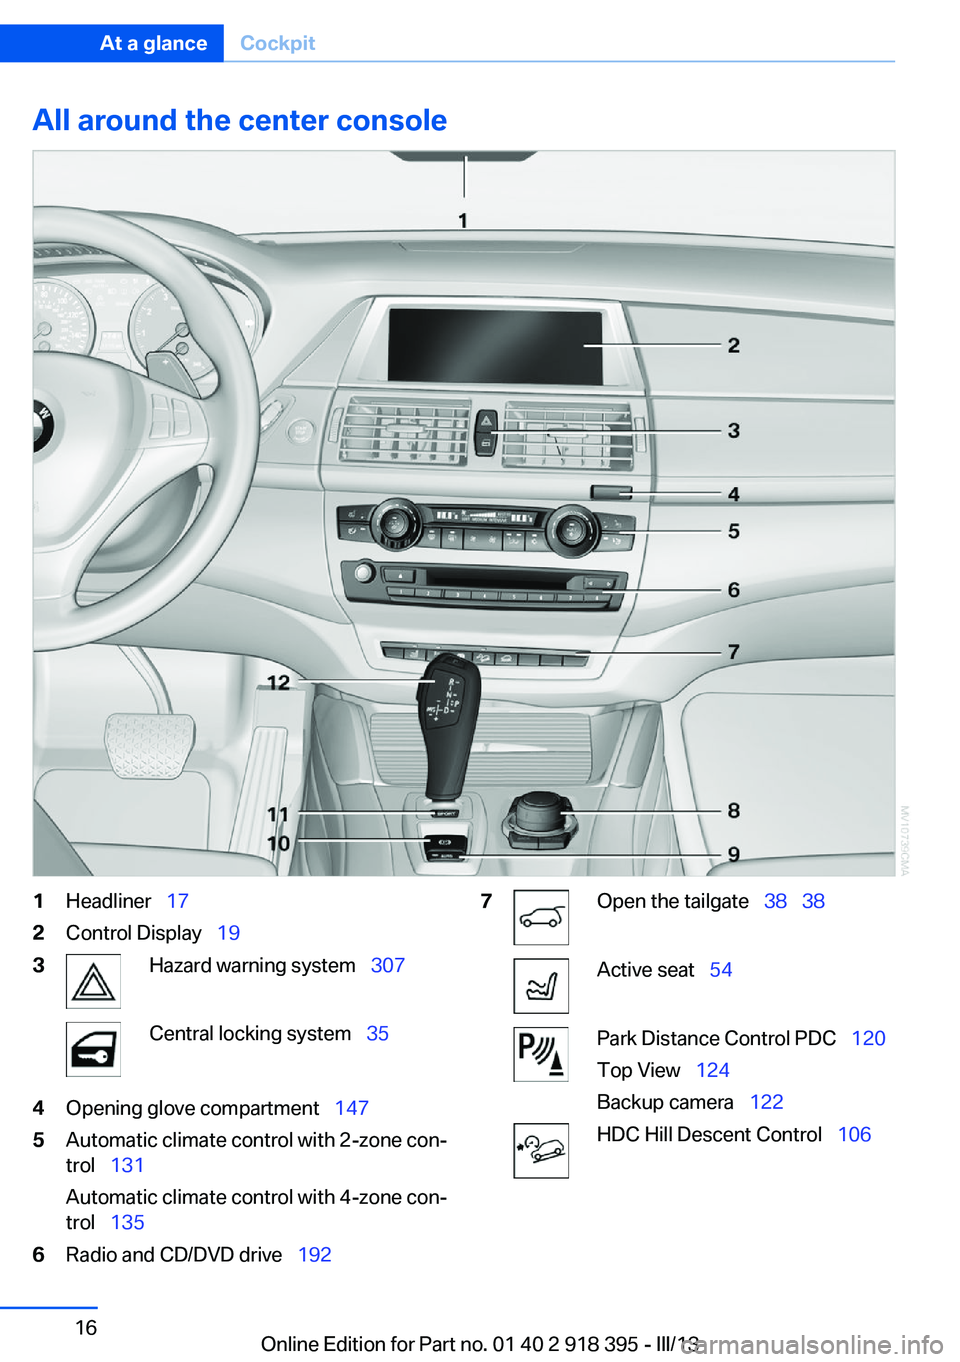
All around the center console1Headliner 172Control Display 193Hazard warning system 307Central locking system 354Opening glove compartment 1475Automatic climate control with 2-zone con‐
trol 131
Automatic climate control with 4-zone con‐
trol 1356Radio and CD/DVD drive 1927Open the tailgate 38 38Active seat 54Park Distance Control PDC 120
Top View 124
Backup camera 122HDC Hill Descent Control 106Seite 16At a glanceCockpit16
Online Edition for Part no. 01 40 2 918 395 - III/13
Page 37 of 345
Keep the closing area clear
Make sure that the closing area of the
tailgate is clear; otherwise, injuries or damage
may result.◀
Automatic tailgate operation
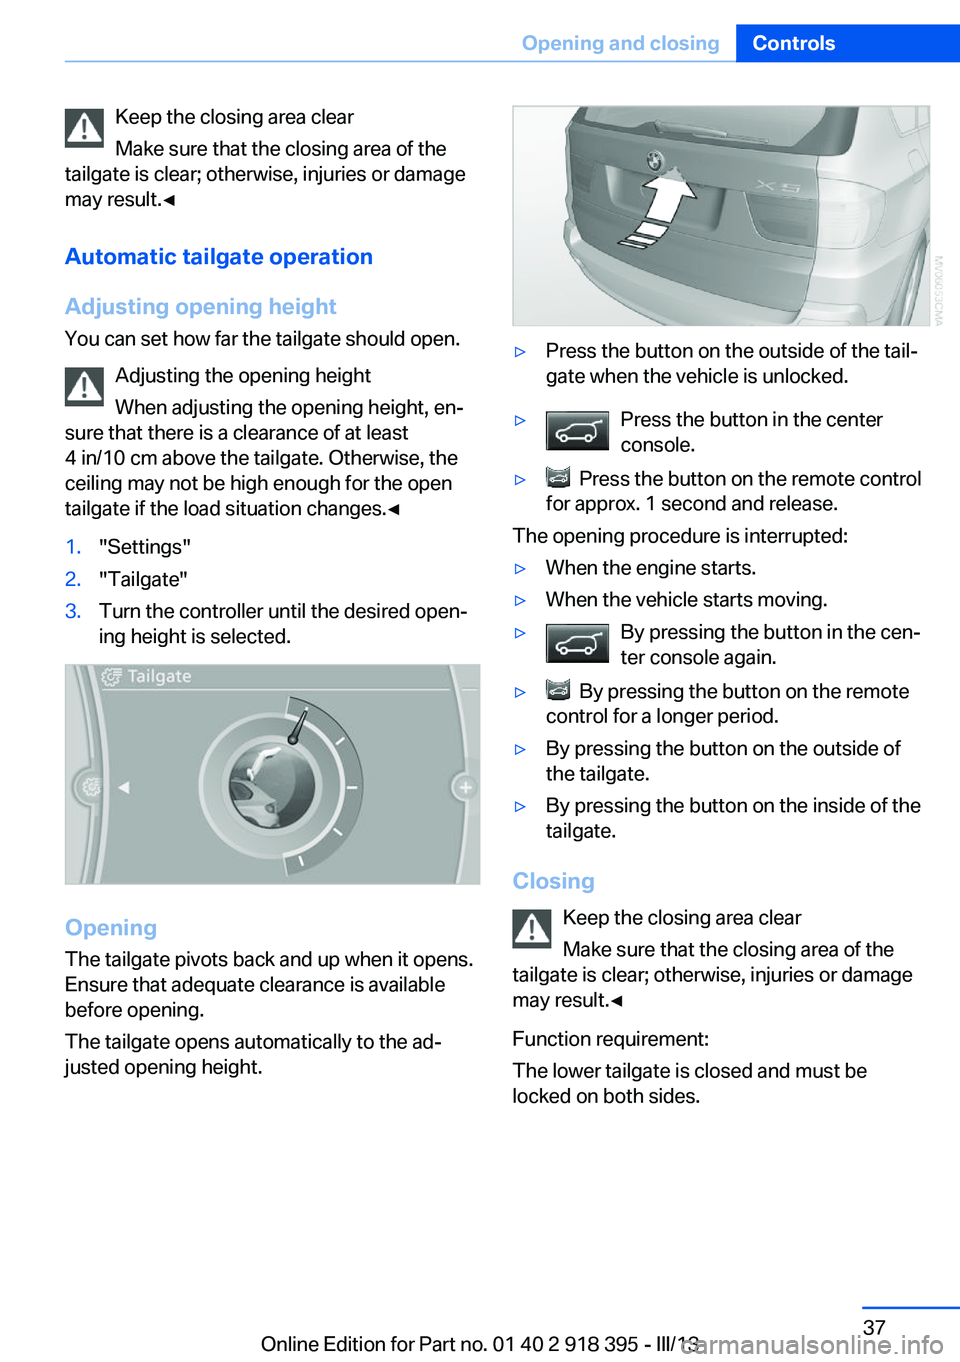
Adjusting opening height You can set how far the tailgate should open.
Adjusting the opening height
When adjusting the opening height, en‐
sure that there is a clearance of at least
4 in/10 cm above the tailgate. Otherwise, the
ceiling may not be high enough for the open
tailgate if the load situation changes.◀1."Settings"2."Tailgate"3.Turn the controller until the desired open‐
ing height is selected.
Opening
The tailgate pivots back and up when it opens.
Ensure that adequate clearance is available
before opening.
The tailgate opens automatically to the ad‐
justed opening height.
▷Press the button on the outside of the tail‐
gate when the vehicle is unlocked.▷Press the button in the center
console.▷ Press the button on the remote control
for approx. 1 second and release.
The opening procedure is interrupted:
▷When the engine starts.▷When the vehicle starts moving.▷By pressing the button in the cen‐
ter console again.▷ By pressing the button on the remote
control for a longer period.▷By pressing the button on the outside of
the tailgate.▷By pressing the button on the inside of the
tailgate.
Closing
Keep the closing area clear
Make sure that the closing area of the
tailgate is clear; otherwise, injuries or damage
may result.◀
Function requirement:
The lower tailgate is closed and must be
locked on both sides.
Seite 37Opening and closingControls37
Online Edition for Part no. 01 40 2 918 395 - III/13
Page 39 of 345
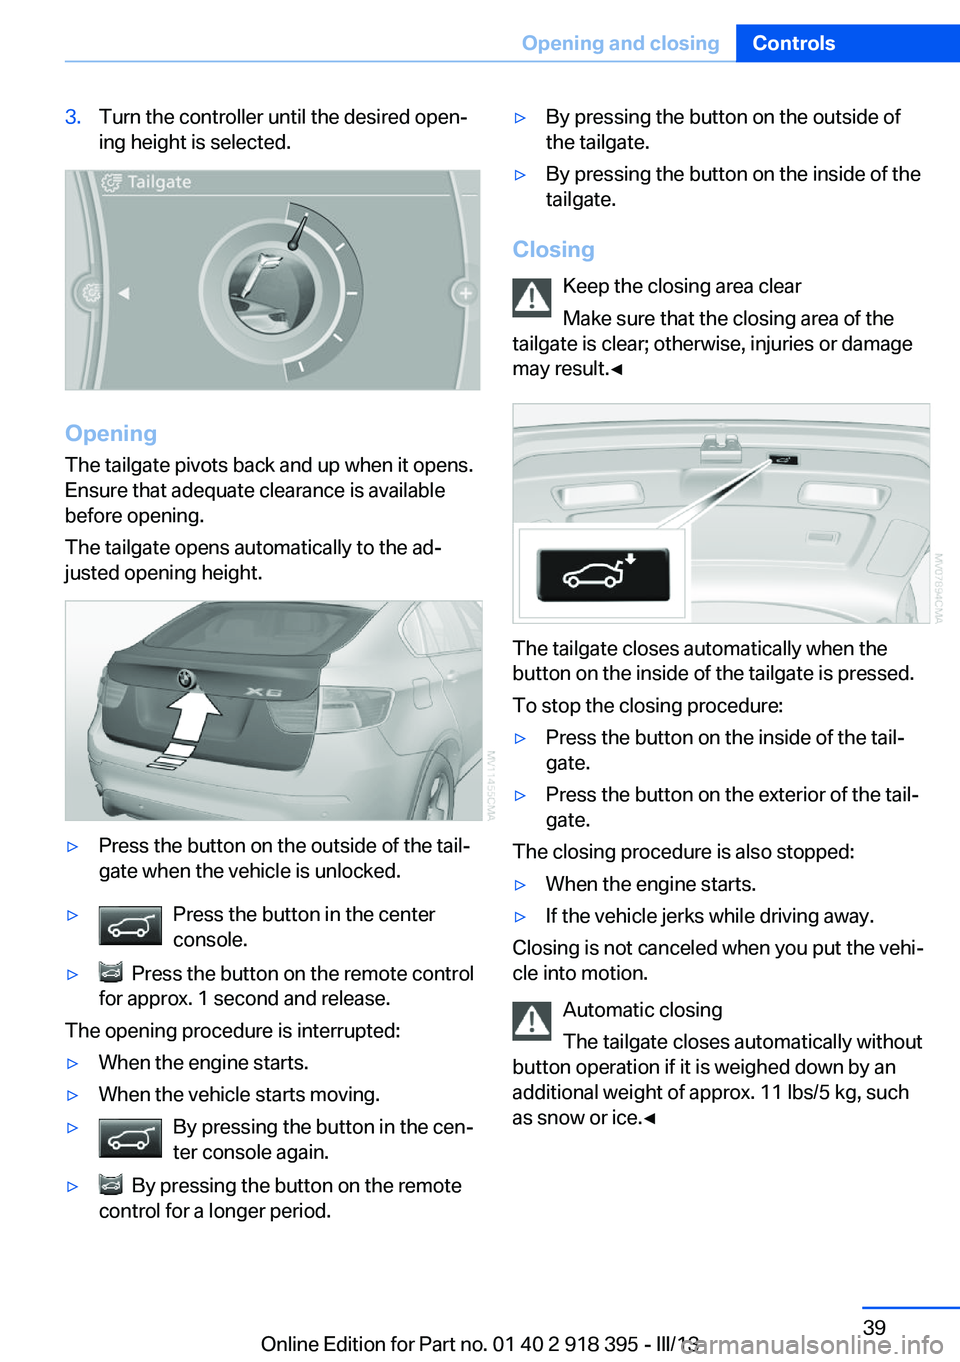
3.Turn the controller until the desired open‐
ing height is selected.
Opening
The tailgate pivots back and up when it opens.
Ensure that adequate clearance is available
before opening.
The tailgate opens automatically to the ad‐
justed opening height.
▷Press the button on the outside of the tail‐
gate when the vehicle is unlocked.▷Press the button in the center
console.▷ Press the button on the remote control
for approx. 1 second and release.
The opening procedure is interrupted:
▷When the engine starts.▷When the vehicle starts moving.▷By pressing the button in the cen‐
ter console again.▷ By pressing the button on the remote
control for a longer period.▷By pressing the button on the outside of
the tailgate.▷By pressing the button on the inside of the
tailgate.
Closing
Keep the closing area clear
Make sure that the closing area of the
tailgate is clear; otherwise, injuries or damage
may result.◀
The tailgate closes automatically when the
button on the inside of the tailgate is pressed.
To stop the closing procedure:
▷Press the button on the inside of the tail‐
gate.▷Press the button on the exterior of the tail‐
gate.
The closing procedure is also stopped:
▷When the engine starts.▷If the vehicle jerks while driving away.
Closing is not canceled when you put the vehi‐
cle into motion.
Automatic closing
The tailgate closes automatically without
button operation if it is weighed down by an
additional weight of approx. 11 lbs/5 kg, such
as snow or ice.◀
Seite 39Opening and closingControls39
Online Edition for Part no. 01 40 2 918 395 - III/13
Page 144 of 345
total load of all sockets must not exceed
140 watts at 12 volt.
Avoid damaging the sockets by attempting to
insert plugs of unsuitable shape or size.
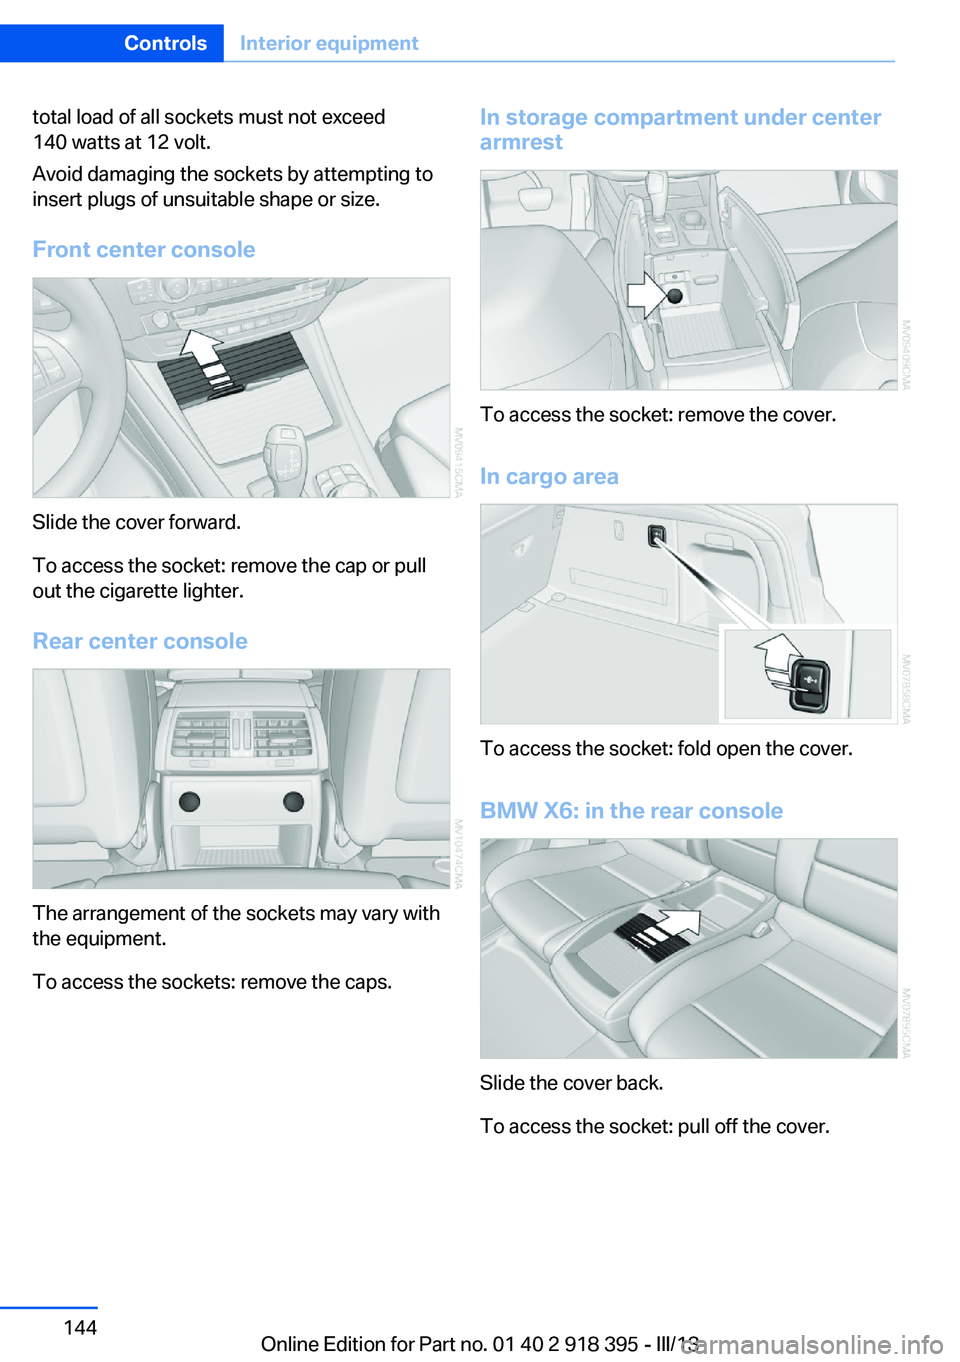
Front center console
Slide the cover forward.
To access the socket: remove the cap or pull
out the cigarette lighter.
Rear center console
The arrangement of the sockets may vary with
the equipment.
To access the sockets: remove the caps.
In storage compartment under center
armrest
To access the socket: remove the cover.
In cargo area
To access the socket: fold open the cover.
BMW X6: in the rear console
Slide the cover back.
To access the socket: pull off the cover.
Seite 144ControlsInterior equipment144
Online Edition for Part no. 01 40 2 918 395 - III/13
Page 148 of 345
▷Do not use force when plugging the con‐
nector into the USB interface.▷Do not connect devices such as fans or
lamps to the USB interface.▷Do not connect a USB hard drive.▷Do not use the USB interface to recharge
external devices.
Center armrest front
Storage compartment A storage compartment is located under the
armrest between the front seats and, depend‐
ing on the vehicle's equipment, also a cover for
the mobile phone cradle or the snap-in
adapter.
Details on this mobile phone cradle, refer to
page 247.
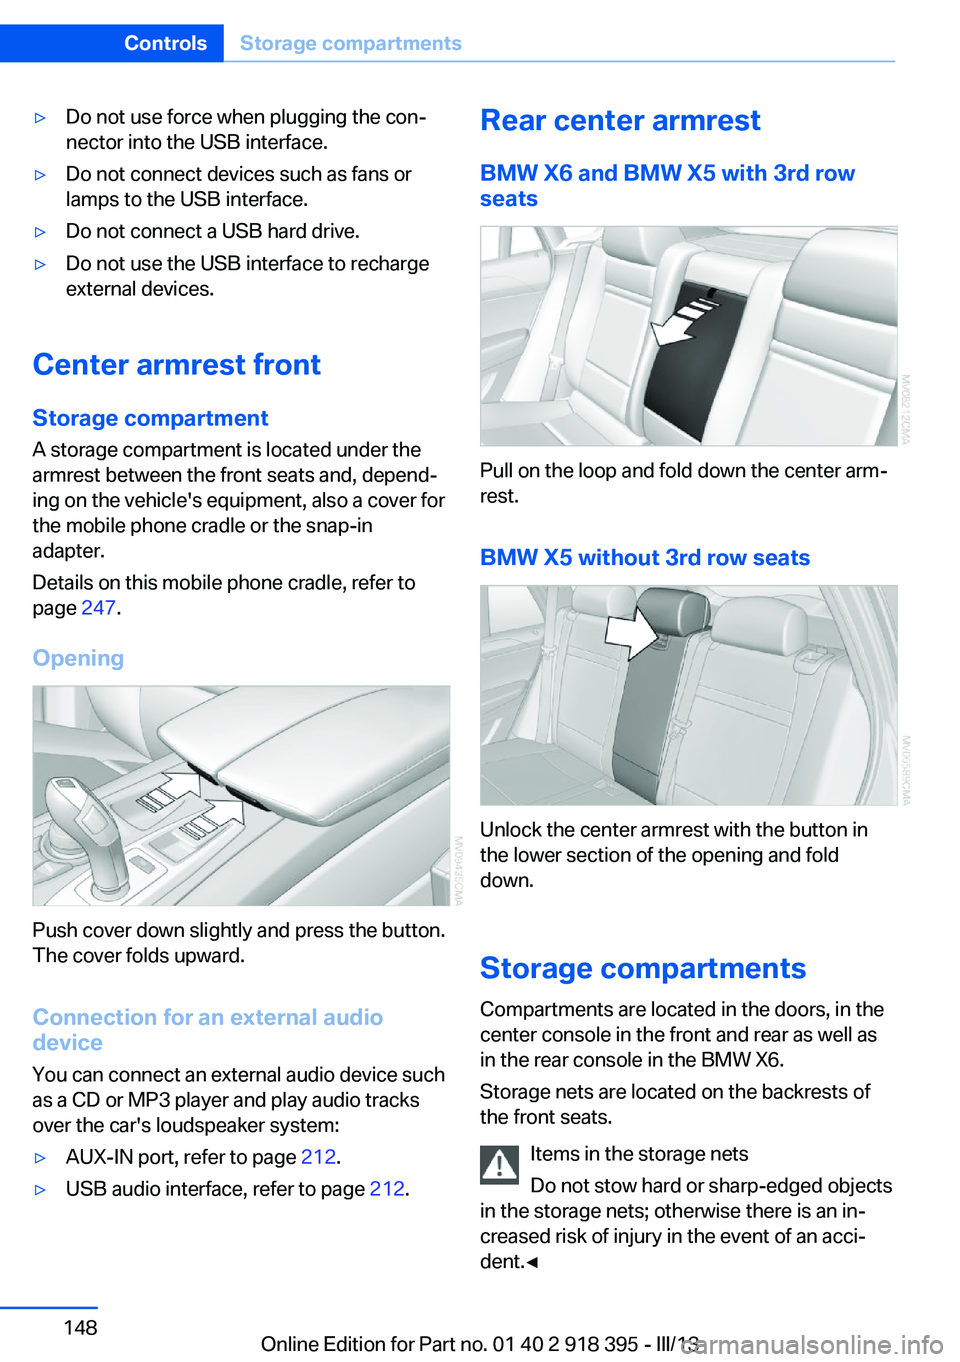
Opening
Push cover down slightly and press the button.
The cover folds upward.
Connection for an external audio
device
You can connect an external audio device such
as a CD or MP3 player and play audio tracks over the car's loudspeaker system:
▷AUX-IN port, refer to page 212.▷USB audio interface, refer to page 212.Rear center armrest
BMW X6 and BMW X5 with 3rd row
seats
Pull on the loop and fold down the center arm‐
rest.
BMW X5 without 3rd row seats
Unlock the center armrest with the button in
the lower section of the opening and fold
down.
Storage compartments Compartments are located in the doors, in the
center console in the front and rear as well as
in the rear console in the BMW X6.
Storage nets are located on the backrests of
the front seats.
Items in the storage nets
Do not stow hard or sharp-edged objects
in the storage nets; otherwise there is an in‐
creased risk of injury in the event of an acci‐ dent.◀
Seite 148ControlsStorage compartments148
Online Edition for Part no. 01 40 2 918 395 - III/13
Page 150 of 345
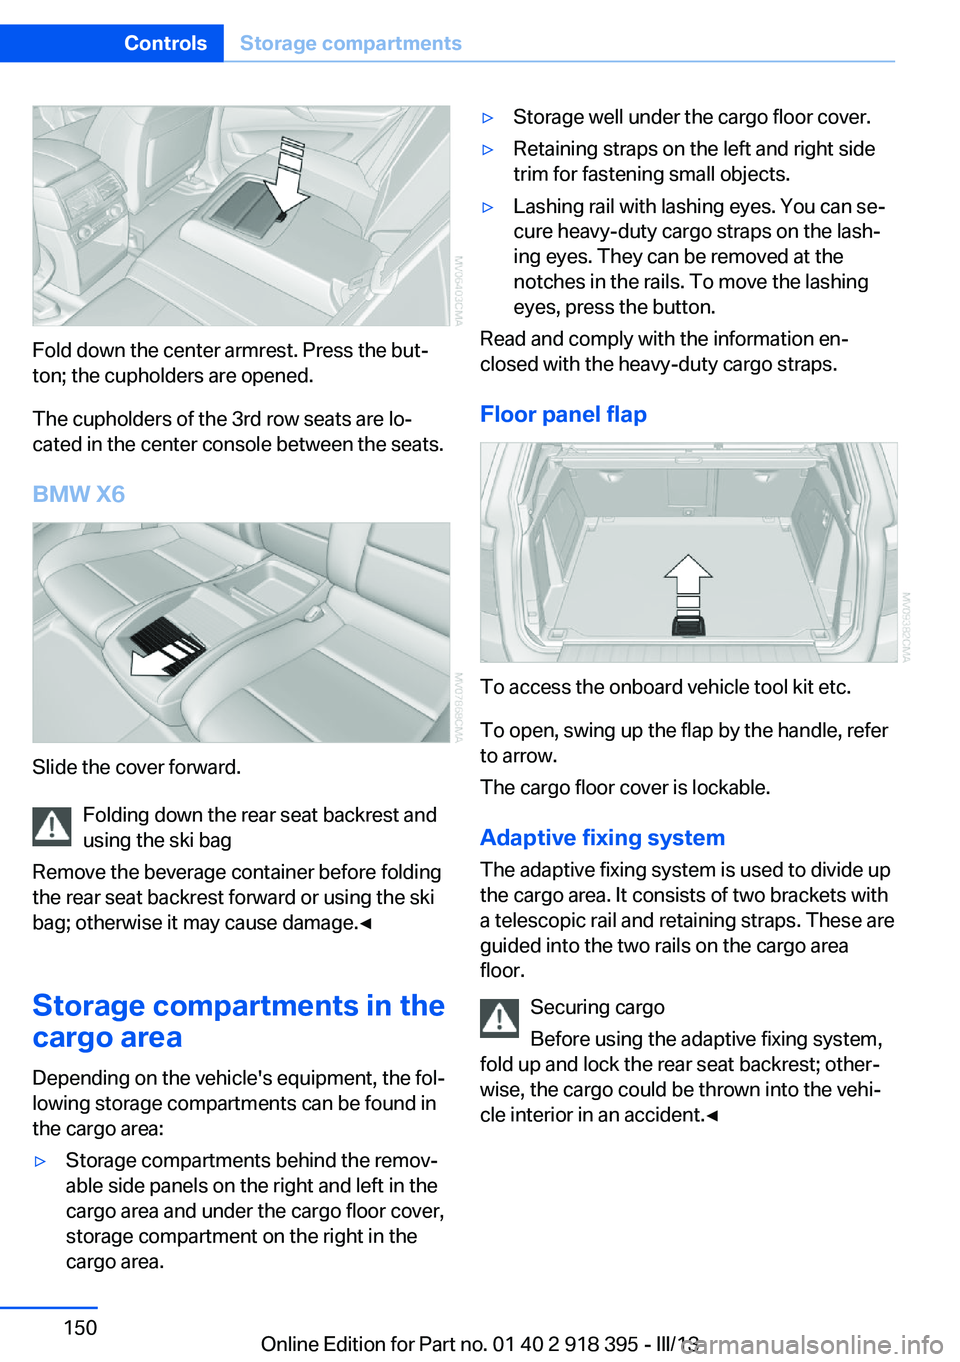
Fold down the center armrest. Press the but‐
ton; the cupholders are opened.
The cupholders of the 3rd row seats are lo‐
cated in the center console between the seats.
BMW X6
Slide the cover forward. Folding down the rear seat backrest and
using the ski bag
Remove the beverage container before folding
the rear seat backrest forward or using the ski
bag; otherwise it may cause damage.◀
Storage compartments in the
cargo area
Depending on the vehicle's equipment, the fol‐
lowing storage compartments can be found in
the cargo area:
▷Storage compartments behind the remov‐
able side panels on the right and left in the
cargo area and under the cargo floor cover,
storage compartment on the right in the
cargo area.▷Storage well under the cargo floor cover.▷Retaining straps on the left and right side
trim for fastening small objects.▷Lashing rail with lashing eyes. You can se‐
cure heavy-duty cargo straps on the lash‐
ing eyes. They can be removed at the
notches in the rails. To move the lashing
eyes, press the button.
Read and comply with the information en‐
closed with the heavy-duty cargo straps.
Floor panel flap
To access the onboard vehicle tool kit etc.
To open, swing up the flap by the handle, refer
to arrow.
The cargo floor cover is lockable.
Adaptive fixing system The adaptive fixing system is used to divide up
the cargo area. It consists of two brackets with
a telescopic rail and retaining straps. These are
guided into the two rails on the cargo area
floor.
Securing cargo
Before using the adaptive fixing system,
fold up and lock the rear seat backrest; other‐
wise, the cargo could be thrown into the vehi‐
cle interior in an accident.◀
Seite 150ControlsStorage compartments150
Online Edition for Part no. 01 40 2 918 395 - III/13
Page 240 of 345
nected mobile phone from the vehicle and
pair and connect only one mobile phone.
The mobile phone no longer reacts.
▷Switch the mobile phone off and on again.▷Is the ambient temperature too high or
low? Do not expose the mobile phone to
extreme environmental conditions.
The telephone functions are not available.
▷Is the mobile phone paired as an additional
telephone and is the additional telephone
function deactivated? Activate the func‐
tion.▷Is an outgoing call not possible? Connect
the mobile phone as a telephone.
No phone book entries or only some phone
book entries are displayed, or they are incom‐
plete.
▷Transmission of the phone book entries is
not yet complete.▷It is possible that only the phone book en‐
tries of the mobile phone or the SIM card
are transmitted.▷It may not be possible to display phone
book entries with special characters.▷The number of phone book entries to be
stored is too high.▷Is the data volume of the contact too large,
e. g., due to stored information such as
notes? Reduce the data volume of the con‐
tact.▷Is the mobile phone connected as an audio
source or additional telephone? The mo‐
bile phone must be connected as a tele‐
phone.
The phone connection quality is poor.
▷The strength of the Bluetooth signal on the
mobile phone can be adjusted, depending
on the mobile phone.▷Insert the mobile phone into the snap-in
adapter or place it in the area of the center
console.▷Adjust the volume of the microphone and
loudspeakers separately.
If all points in this list have been checked and
the required function is still not available, con‐
tact Customer Relations or the service center.
Controls
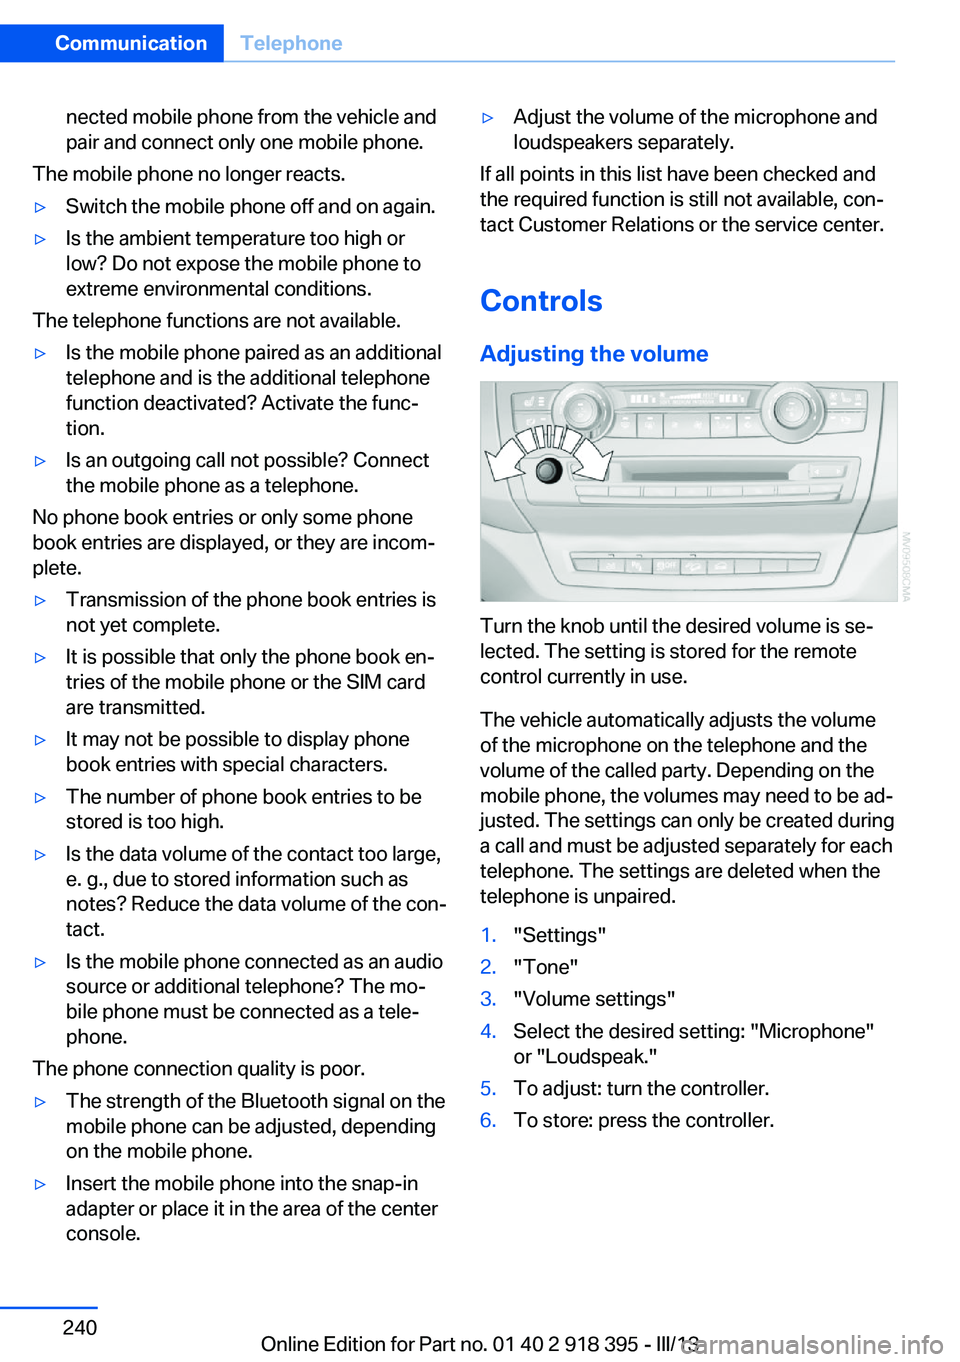
Adjusting the volume
Turn the knob until the desired volume is se‐
lected. The setting is stored for the remote
control currently in use.
The vehicle automatically adjusts the volume
of the microphone on the telephone and the
volume of the called party. Depending on the
mobile phone, the volumes may need to be ad‐
justed. The settings can only be created during
a call and must be adjusted separately for each
telephone. The settings are deleted when the
telephone is unpaired.
1."Settings"2."Tone"3."Volume settings"4.Select the desired setting: "Microphone"
or "Loudspeak."5.To adjust: turn the controller.6.To store: press the controller.Seite 240CommunicationTelephone240
Online Edition for Part no. 01 40 2 918 395 - III/13
Page 307 of 345
Breakdown assistanceVehicle equipment
This chapter describes all series equipment as
well as country-specific and special equipment
offered for this model series.Therefore, it also
describes equipment that may not be found in
your vehicle, for instance due to the selected
special equipment or the country version. This
also applies to safety-related functions and
systems.
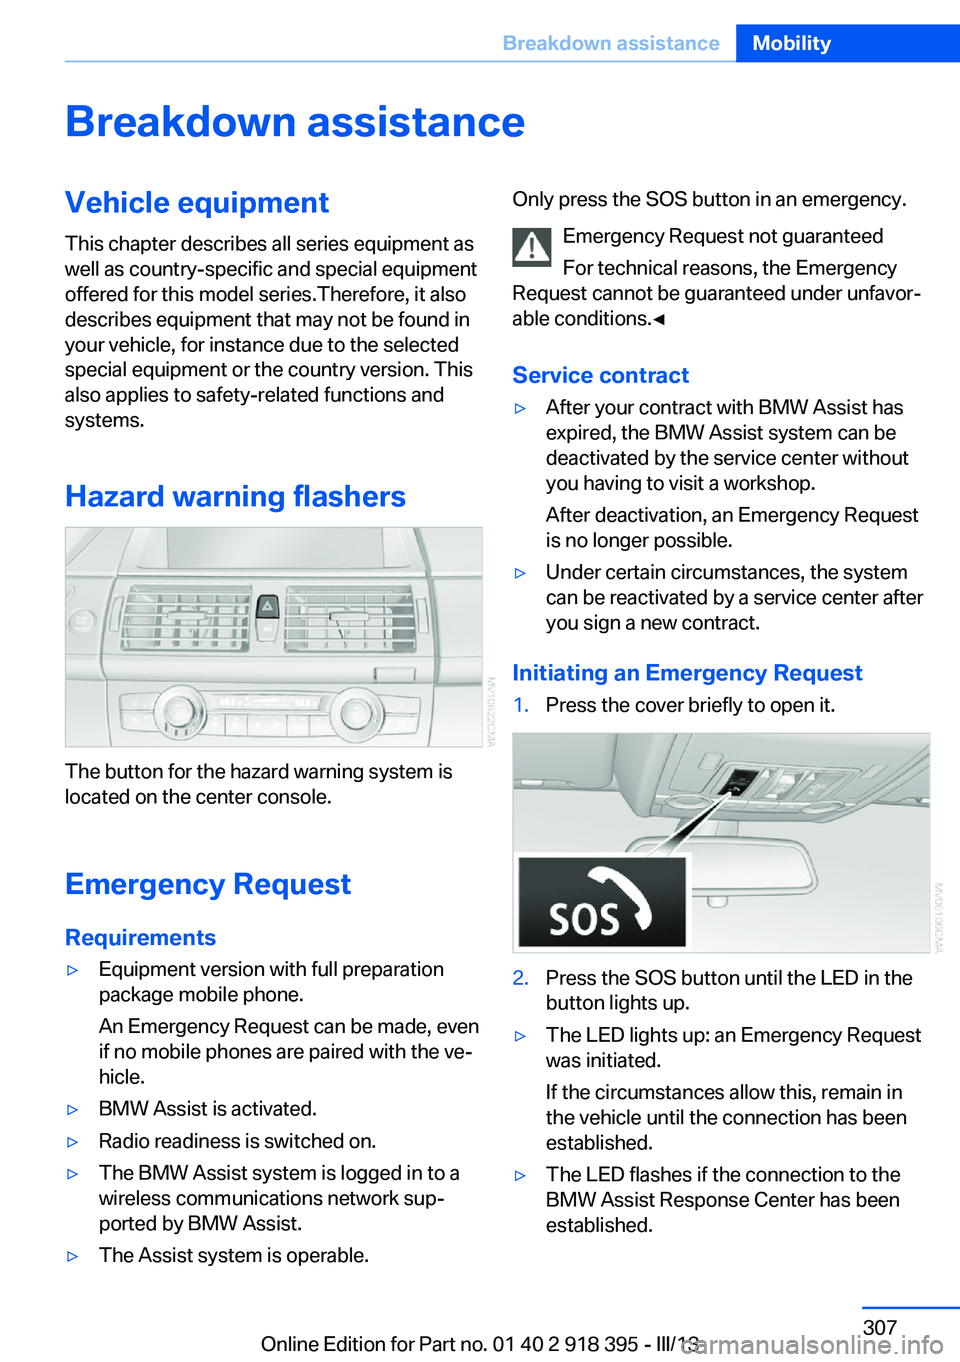
Hazard warning flashers
The button for the hazard warning system is
located on the center console.
Emergency RequestRequirements
▷Equipment version with full preparation
package mobile phone.
An Emergency Request can be made, even
if no mobile phones are paired with the ve‐
hicle.▷BMW Assist is activated.▷Radio readiness is switched on.▷The BMW Assist system is logged in to a
wireless communications network sup‐
ported by BMW Assist.▷The Assist system is operable.Only press the SOS button in an emergency.
Emergency Request not guaranteed
For technical reasons, the Emergency
Request cannot be guaranteed under unfavor‐
able conditions.◀
Service contract▷After your contract with BMW Assist has
expired, the BMW Assist system can be
deactivated by the service center without
you having to visit a workshop.
After deactivation, an Emergency Request
is no longer possible.▷Under certain circumstances, the system
can be reactivated by a service center after
you sign a new contract.
Initiating an Emergency Request
1.Press the cover briefly to open it.2.Press the SOS button until the LED in the
button lights up.▷The LED lights up: an Emergency Request
was initiated.
If the circumstances allow this, remain in
the vehicle until the connection has been
established.▷The LED flashes if the connection to the
BMW Assist Response Center has been
established.Seite 307Breakdown assistanceMobility307
Online Edition for Part no. 01 40 2 918 395 - III/13
Page 332 of 345
Bulb replacement, refer toLamp and bulb replace‐
ment 295
Button for starting the engine, refer to Start/Stop but‐
ton 67
C
Calendar 254
Calibration, driver's seat 55
California Proposition 65 Warning 7
Camera, care 315
Camera, refer to Backup cam‐ era 122
Camera, Side View 127
Camera, Top View 126
Can holder, refer to Cu‐ pholder 149
Car battery, refer to Vehicle battery 304
Car care products 313
Care 312
Care, displays 315
Care, vehicle 313
Cargo 160
Cargo area– Comfort Access 41
Cargo area, capacities 320
Cargo area, enlarging 146
Cargo area lamp, refer to Inte‐ rior lamps 94
Cargo area lid, refer to Tail‐ gate 36, 38
Cargo area, opening/closing, refer to Lower tailgate 38
Cargo area, opening/closing, refer to Tailgate 36, 38
Cargo area, opening from the inside 36
Cargo area, opening from the outside 36
Cargo area, refer to Cargo area 145
Cargo cover, refer to Luggage
compartment roller
cover 145
Cargo, securing with ski bag, refer to Securing cargo 152
Cargo straps, securing cargo 162
Car key, refer to Integrated key/remote control 30
Carpet, care 315
Car phone, installation loca‐ tion, refer to Center arm‐
rest 148
Car phone, refer to Tele‐ phone 236
Car vacuum cleaner, connect‐ ing, refer to Connecting
electrical devices 143
Car wash 312
Catalytic converter, refer to Hot exhaust system 157
CBC, refer to Cornering Brake Control 105
CBS Condition Based Serv‐ ice 293
CD/DVD 200
CD/DVD changer 204
CD/DVD in rear 221
CD/DVD notes 206
CD, refer to Playing audio tracks, rear DVD sys‐
tem 226
CDs, storing 207
Cell phone 236
Cell phone, installation loca‐ tion, refer to Center arm‐
rest 148
Center armrest, front 148
Center armrest, rear 148
Center brake lamp 298, 301
Center console, refer to Around the center con‐
sole 16 Central locking– Comfort Access 40– From the inside 35– Setting the unlocking char‐
acteristics 32
Central locking system
– From the outside 32– Principle 32
Central screen, refer to Con‐
trol Display 19
Changes, technical, refer to Safety 6
Changing wheels/tires 285
Chassis number, refer to En‐ gine compartment 288
Check Control 85
Children, transporting 61
Child restraint fixing system LATCH 62
Child restraint fixing sys‐ tems 61
Child restraint fixing systems, mounting 61
Child safety locks 66
Child seat, mounting 61
Child seats, refer to Trans‐ porting children safely 61
Chrome parts, care 314
Cigarette lighter, connecting electrical devices 143
Cigarette lighter, refer to Lighter 143
Cigarette lighter socket 143
Circulation of air, refer to Re‐ circulated air mode 133
Cleaning, displays 315
Cleaning your BMW, refer to Care 312
Clock 79
Clock, 12h/24h mode 87
Closing
– From the inside 35– From the outside 32
Clothes hooks 149
Cockpit 12
Cold start, refer to Starting the engine 68
Seite 332ReferenceEverything from A to Z332
Online Edition for Part no. 01 40 2 918 395 - III/13
Page 333 of 345
Combination instrument, referto Instrument cluster 14
Combination switch, refer to Turn signal/high beams/
headlamp flasher 72
Combination switch, refer to Washer/wiper system 73
Comfort Access– Battery replacement 42
Comfort area, refer to Around
the center console 16
Compact wheel, inflation pressure 275, 276
Compartment for remote control, refer to Ignition
lock 67
Compartments, refer to Stor‐ age compart‐
ments 147, 148
Compass, digital 141
Computer 81
Computer, displaying infor‐ mation 81
Computer, displays on the Control Display 82
Concierge service 261
Condensation on windows, removing 132
Condensation under the vehi‐ cle 158
Condition Based Service CBS 293
Confirmation signals for lock‐ ing/unlocking the vehicle 33
Connecting, mobile phone, refer to Pairing the mobile
phone 237
Consumption, refer to Aver‐ age fuel consumption 82
Contacts 250, 258
Control Display 19
Control Display, care 315
Control Display, setting the brightness 88
Controller, refer to Con‐ trols 18
Controls and displays 12
Controls, rear DVD sys‐
tem 220
Control systems, driving sta‐ bility 105
Convenient operation– Glass sunroof 33– Window 33
Coolant 292
Coolant, checking the level 292
Coolant temperature 80
Cooling function, switching on and off 133
Cooling, maximum 133
Cooling system, refer to Cool‐ ant 292
Cornering Brake Control CBC 105
Corrosion on brake discs 158
Courtesy lamps, refer to Inte‐ rior lamps 94
Cradle for telephone or mo‐ bile phone, refer to Snap-in
adapter 247
Cruise control 118
Cruise control
– Malfunction 119
Cruise control, active 111
Cupholder 149
Curb weight, refer to Weights 320
Current fuel consumption 80
Current location, storing 172
Curve lights, refer to Adaptive Light Control 91
D
Dashboard lighting, refer to Instrument lighting 94
Dashboard, refer to Cock‐ pit 12
Data, technical 318
Date 79
Date, display format 88
Date, retrieving 79
Date, setting 87
Daytime running lights 91
Defroster, rear window 132
Defrosting windows 132
Defrost setting, refer to De‐ frosting windows 132
Destination entry via the ad‐ dress book 172
Destination guidance 179
Destination guidance with in‐ termediate destinations 177
Destination input, naviga‐ tion 170
Diesel exhaust fluid, at low temperatures 272
Diesel exhaust fluid, at mini‐ mum 272
Diesel exhaust fluid, having refilled 272
Diesel exhaust fluid, refilling yourself 272
Diesel particulate filter 157
Digital clock 79
Digital compass 141
Digital radio 193
Dimming mirrors 59
Directional indicators, refer to Turn signals 72
Display in front wind‐ shield 127
Display lighting, refer to In‐ strument lighting 94
Displays and controls 12
Displays, care 315
Displays, cleaning 315
Displays, refer to Instrument cluster 14
Disposal, coolant 292
Disposal, vehicle battery 305
Distance control, refer to Ac‐ tive Cruise Control 111
Distance, selecting, with Ac‐ tive Cruise Control 113
Distance warning, refer to Park Distance Control
PDC 120 Seite 333Everything from A to ZReference333
Online Edition for Part no. 01 40 2 918 395 - III/13