navigation BMW X5 XDRIVE35D 2012 Owners Manual
[x] Cancel search | Manufacturer: BMW, Model Year: 2012, Model line: X5 XDRIVE35D, Model: BMW X5 XDRIVE35D 2012Pages: 317, PDF Size: 8.83 MB
Page 281 of 317
▷
If the LED is flashing but the BMW Assist
Response Center cannot be heard on the
hands-free system, the hands-free system
may be malfunctioning. However, the BMW
Assist
Response Center may still be able to
hear you.
Initiating an Emergency Request
automatically
Under certain conditions, an Emergency Re‐
quest
is automatically initiated immediately after
a severe accident. Automatic Collision Notifica‐
tion is not affected by pressing the SOS button.
Roadside Assistance*
Service availability
Roadside Assistance can be reached around the
clock in many countries. You can obtain assis‐
tance there in the event of a vehicle breakdown.
Roadside Assistance
The Roadside Assistance, refer to page 238
phone number can be viewed on the iDrive or a
connection to Roadside Assistance* can be es‐
tablished directly.
Warning triangle*
The warning triangle is located in the cargo area.
First aid kit*
The first aid kit is located in a storage compart‐
ment on the right side in the cargo area.
Some of the articles contained in the first aid
pouch have a limited service life.
Check the expiration dates of the contents reg‐
ularly and replace any items promptly. Jump-starting
Notes
If the battery is discharged, an engine can be
started using the battery of another vehicle and
two jumper cables*. Only use jumper cables
with fully insulated clamp handles.
To prevent personal injury or damage to both
vehicles, adhere strictly to the following proce‐
dure.
Do not touch live parts
To avoid the risk of potentially fatal injury,
always avoid all contact with electrical compo‐
nents while the engine is running.◀
Preparation
1. Check whether the battery of the other ve‐
hicle has a voltage of 12 volts and approxi‐
mately
the same capacitance in Ah. This in‐
formation can be found on the battery.
2. Switch off the engine of the assisting vehi‐
cle.
3. Switch off any electronic systems/power
consumers in both vehicles.
Bodywork contact between vehicles
There must not be any contact between
the bodies of the two vehicles, otherwise there
is a danger of shorting.◀
Starting aid terminals
Connecting order
Connect the jumper cables in the correct
order; otherwise, there is the danger of injury
from sparking.◀ Seite 281
281Online Edition for Part no. 01 40 2 606 735 - 03 11 500
Reference
Mobility Communication Entertainment Navigation Driving tips Controls At a glance
Page 283 of 317
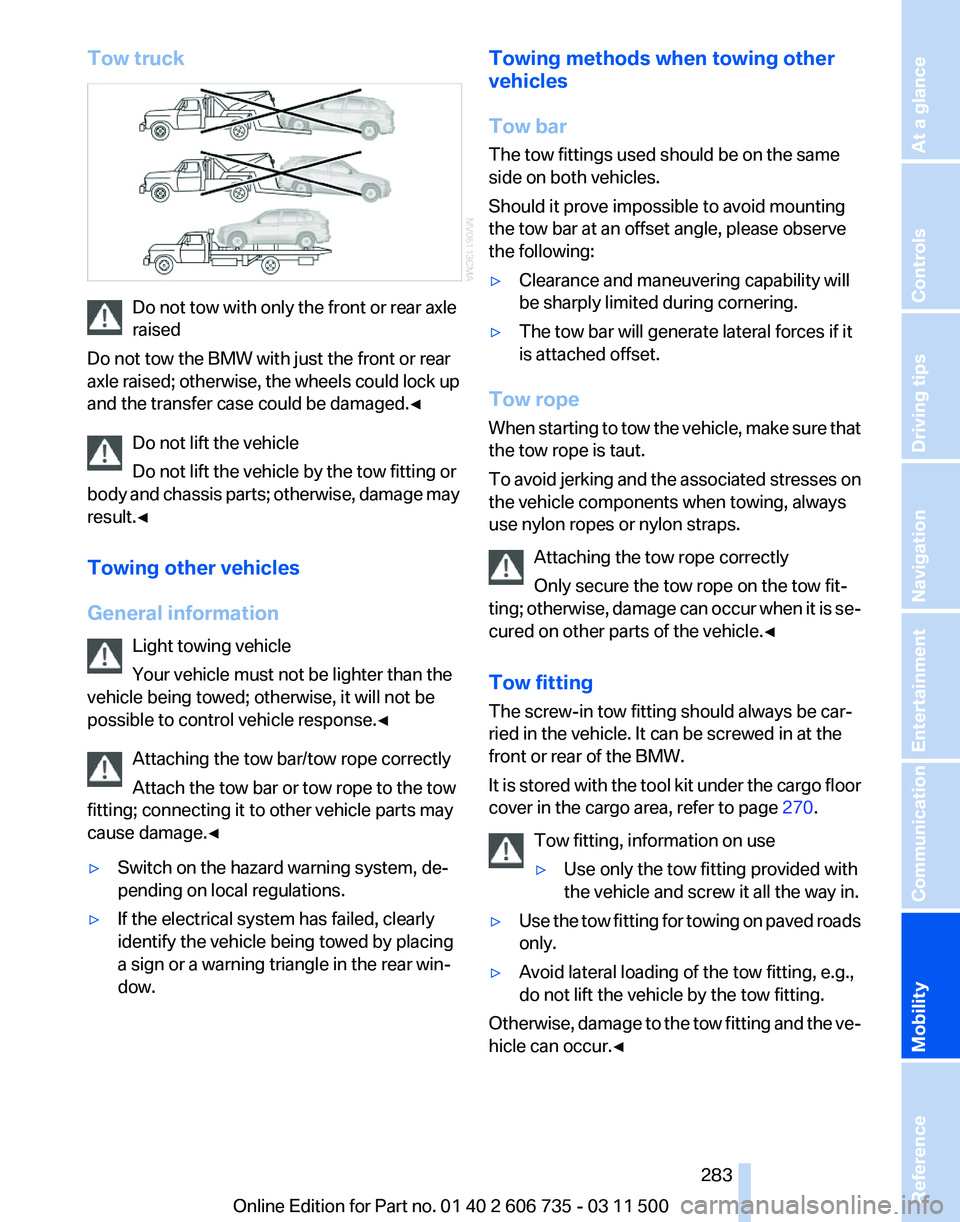
Tow truck
Do not tow with only the front or rear axle
raised
Do not tow the BMW with just the front or rear
axle
raised; otherwise, the wheels could lock up
and the transfer case could be damaged.◀
Do not lift the vehicle
Do not lift the vehicle by the tow fitting or
body and chassis parts; otherwise, damage may
result.◀
Towing other vehicles
General information
Light towing vehicle
Your vehicle must not be lighter than the
vehicle being towed; otherwise, it will not be
possible to control vehicle response.◀
Attaching the tow bar/tow rope correctly
Attach the tow bar or tow rope to the tow
fitting; connecting it to other vehicle parts may
cause damage.◀
▷ Switch on the hazard warning system, de‐
pending on local regulations.
▷ If the electrical system has failed, clearly
identify the vehicle being towed by placing
a sign or a warning triangle in the rear win‐
dow. Towing methods when towing other
vehicles
Tow bar
The tow fittings used should be on the same
side on both vehicles.
Should it prove impossible to avoid mounting
the tow bar at an offset angle, please observe
the following:
▷
Clearance and maneuvering capability will
be sharply limited during cornering.
▷ The tow bar will generate lateral forces if it
is attached offset.
Tow rope
When
starting to tow the vehicle, make sure that
the tow rope is taut.
To avoid jerking and the associated stresses on
the vehicle components when towing, always
use nylon ropes or nylon straps.
Attaching the tow rope correctly
Only secure the tow rope on the tow fit‐
ting; otherwise, damage can occur when it is se‐
cured on other parts of the vehicle.◀
Tow fitting
The screw-in tow fitting should always be car‐
ried in the vehicle. It can be screwed in at the
front or rear of the BMW.
It is stored with the tool kit under the cargo floor
cover in the cargo area, refer to page 270.
Tow fitting, information on use
▷ Use only the tow fitting provided with
the vehicle and screw it all the way in.
▷ Use the tow fitting for towing on paved roads
only.
▷ Avoid lateral loading of the tow fitting, e.g.,
do not lift the vehicle by the tow fitting.
Otherwise, damage to the tow fitting and the ve‐
hicle can occur.◀ Seite 283
283Online Edition for Part no. 01 40 2 606 735 - 03 11 500
Reference
Mobility Communication Entertainment Navigation Driving tips Controls At a glance
Page 285 of 317
Care
Car washes
Notes
Steam jets or high-pressure washers
When using steam jets or high-pressure
washers, hold them a sufficient distance away
and use a maximum temperature of 140 ℉/
60 ℃.
Holding them too close or using excessively
high
pressures or temperatures can cause dam‐
age or preliminary damage that may then lead to
long-term damage.
Follow the operating instructions for the high-
pressure washer.◀
Cleaning sensors/cameras with high-
pressure washers
When using high-pressure washers, do not
spray the exterior sensors and cameras, for Park
Distance Control* or the backup camera*, for
instance, for extended periods of time and only
from a distance of at least 12 in/30 cm.◀
Wash your vehicle frequently, particularly in win‐
ter.
Intense soiling and road salt can damage the ve‐
hicle.
Washing in automatic car washes
Your vehicle can be washed in automatic car
washes right from the start.
Give preference to cloth car washes or those
that use soft brushes in order to avoid paint
damage.
Notes
Note the following:
▷ Make sure that the wheels and tires are not
damaged by the transport mechanisms.
▷ Fold in the exterior mirrors; otherwise, they
may
be damaged, depending on the width of
the vehicle. ▷
Deactivate rain sensor, refer to page 67, to
prevent unintentional wiper action.
▷ BMW X5: deactivate the rear window wiper
and protect it from damage. Ask the car
wash
operator about any necessary protec‐
tive measures.
▷ Remove additional attachments, for in‐
stance a spoiler or telephone antenna, if
there is a risk that these may be damaged.
Guide rails in car washes
Avoid car washes with guide rails higher
than 4 in/10 cm; otherwise, the vehicle body
could be damaged.
◀
Before driving into a car wash
The vehicle is able to roll if the following steps
are taken.
1. Insert the remote control into the ignition
lock, even with Comfort Access.
2. Engage transmission position N.
3. Release the parking brake.
4. Deactivating Automatic Hold, refer to
page 64.
5. Switch the engine off.
6. Leave the remote control in the ignition lock
so that the vehicle can roll.
Mixed tires* Note the vehicle width
Before driving into a car wash, make sure
that
the vehicle width is not too large for the car
wash, as otherwise the vehicle and the car wash
could be damaged.◀
Headlamps
▷ Do not rub dry and do not use abrasive or
caustic cleansers.
▷ Soak areas that have been soiled e.g. due to
insects, with shampoo and wash off with
water. Seite 285
285Online Edition for Part no. 01 40 2 606 735 - 03 11 500
Reference
Mobility Communication Entertainment Navigation Driving tips Controls At a glance
Page 287 of 317
Fine wood parts*
Clean fine wood facing and fine wood compo‐
nents
only with a moist rag. Then dry with a soft
cloth.
Plastic components
These include:
▷ Imitation leather surfaces.
▷ Headliner.
▷ Lamp lenses.
▷ Instrument cluster cover.
▷ Matte black spray-coated components.
Clean with a microfiber cloth.
Moisten the cloth lightly and use plastic
cleanser, if necessary.
Do not soak the headliner.
Do not use cleansers that contain alcohol
or solvents
Do
not use cleansers that contain alcohol or sol‐
vents, such as lacquer thinners, heavy-duty
grease removers, fuel, or such; this could lead to
surface damage.◀
Safety belts
Dirty belt straps impede the reeling action and
thus have a negative impact on safety.
No chemical cleaning
Do not clean chemically; this can destroy
the webbing.◀
Use only a mild soapy solution, with the safety
belts clipped into their buckles.
Do not allow the reels to retract the safety belts
until they are dry.
Carpets and floor mats*
No objects in the area around the pedals
Keep floor mats, carpets, and any other
objects out of the area of motion of the pedals;
otherwise, the function of the pedals could be
impeded while driving
Do not place additional floor mats over existing
mats or other objects. Only use floor mats that have been approved for
the vehicle and can be properly fixed in place.
Ensure
that the floor mats are securely fastened
again when they are returned after being re‐
moved, such as for cleaning.◀
Floor mats can be removed from the passenger
compartment for cleaning.
When returning the floor mats, secure them
again to prevent slipping.
If the floor carpets are very dirty, clean with a
microfiber cloth and water or a textile cleaner. To
prevent matting of the carpet, rub back and forth
in the direction of travel only.
Sensors/cameras
To clean sensors or cameras, use a cloth mois‐
tened with a small amount of glass cleaner.
Displays/screens
Use a microfiber cloth to clean the Control Dis‐
play or instrument cluster, for example.
Cleaning displays
Do not use chemical or household cleans‐
ers.
Keep all fluids and moisture away from the unit.
Otherwise, they could affect or damage surfa‐
ces or electrical components.
Avoid pressing too hard when cleaning and do
not use abrasive materials; otherwise, damage
can result.◀
Long-term vehicle storage
Your service center can advise you on what to
consider when storing the vehicle for longer
than three months. Seite 287
287Online Edition for Part no. 01 40 2 606 735 - 03 11 500
Reference
Mobility Communication Entertainment Navigation Driving tips Controls At a glance
Page 291 of 317
Dimensions
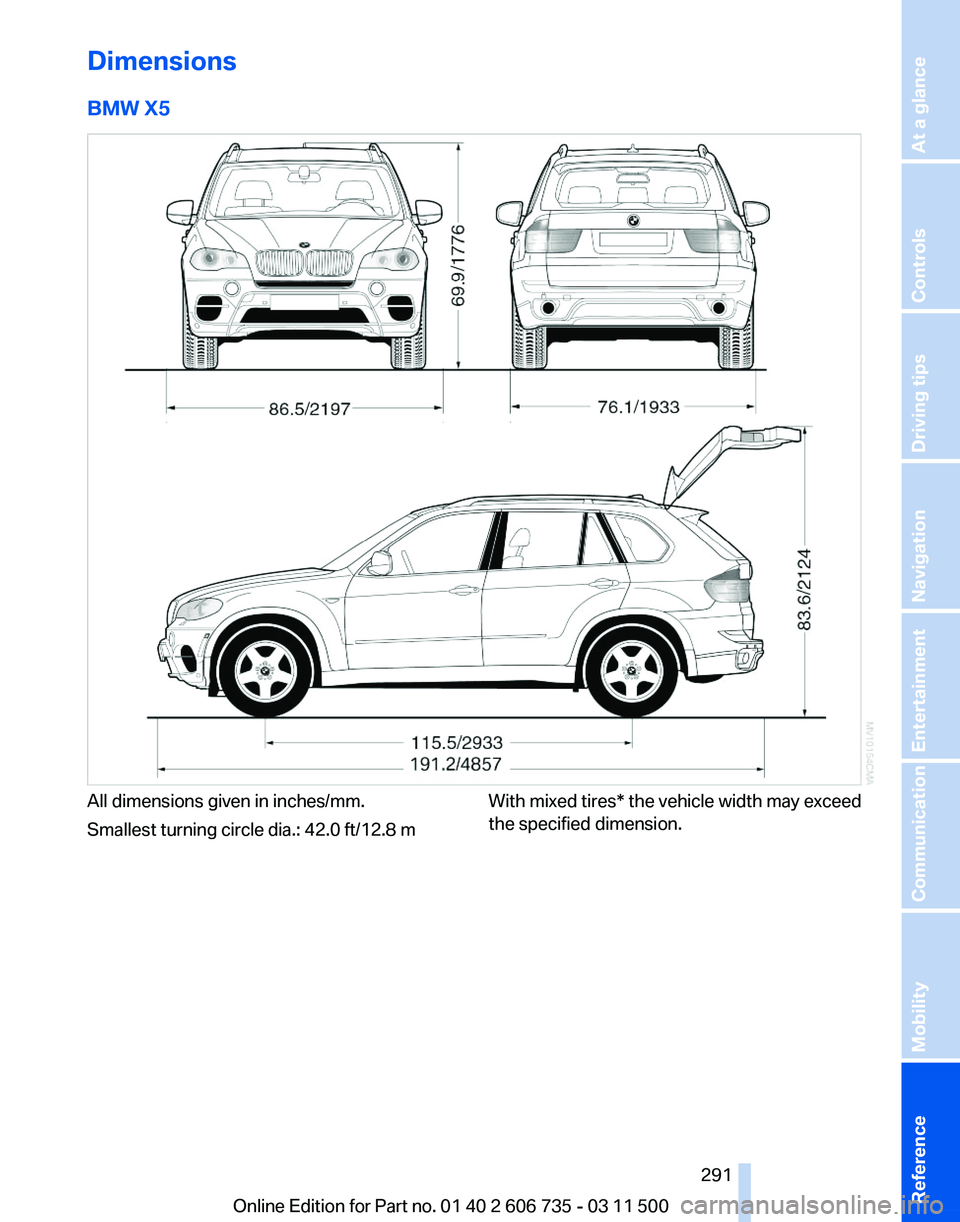
BMW X5
All dimensions given in inches/mm.
Smallest turning circle dia.: 42.0 ft/12.8 m
With mixed tires* the vehicle width may exceed
the specified dimension.
Seite 291
291Online Edition for Part no. 01 40 2 606 735 - 03 11 500
Reference Mobility Communication Entertainment Navigation Driving tips Controls At a glance
Page 293 of 317
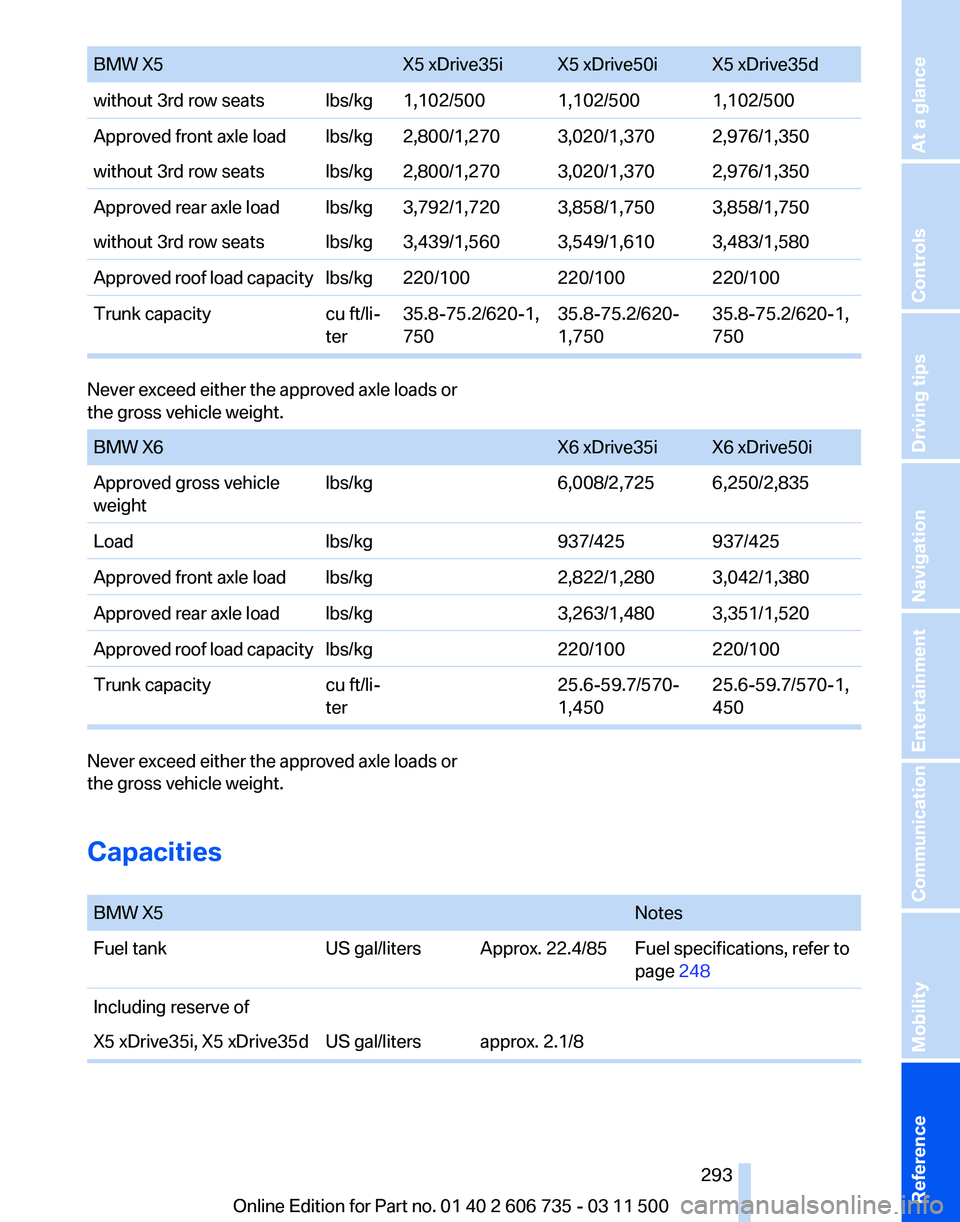
BMW X5
X5 xDrive35i X5 xDrive50i X5 xDrive35d
without 3rd row seats lbs/kg 1,102/500 1,102/500 1,102/500
Approved front axle load lbs/kg 2,800/1,270 3,020/1,370 2,976/1,350
without 3rd row seats lbs/kg 2,800/1,270 3,020/1,370 2,976/1,350
Approved rear axle load lbs/kg 3,792/1,720 3,858/1,750 3,858/1,750
without 3rd row seats lbs/kg 3,439/1,560 3,549/1,610 3,483/1,580
Approved roof load capacity lbs/kg 220/100 220/100220/100
Trunk capacity cu ft/li‐
ter35.8-75.2/620-1,
750 35.8-75.2/620‐
1,75035.8-75.2/620-1,
750Never exceed either the approved axle loads or
the gross vehicle weight.
BMW X6
X6 xDrive35i X6 xDrive50i
Approved gross vehicle
weight lbs/kg
6,008/2,725 6,250/2,835
Load lbs/kg937/425937/425
Approved front axle load lbs/kg 2,822/1,280 3,042/1,380
Approved rear axle load lbs/kg 3,263/1,480 3,351/1,520
Approved roof load capacity lbs/kg 220/100220/100
Trunk capacity cu ft/li‐
ter25.6-59.7/570‐
1,45025.6-59.7/570-1,
450Never exceed either the approved axle loads or
the gross vehicle weight.
Capacities
BMW X5
Notes
Fuel tank US gal/liters Approx. 22.4/85 Fuel specifications, refer to
page 248
Including reserve of
X5 xDrive35i, X5 xDrive35d US gal/liters approx. 2.1/8 Seite 293
293Online Edition for Part no. 01 40 2 606 735 - 03 11 500
Reference Mobility Communication Entertainment Navigation Driving tips Controls At a glance
Page 295 of 317
Short commands for voice activation
system*
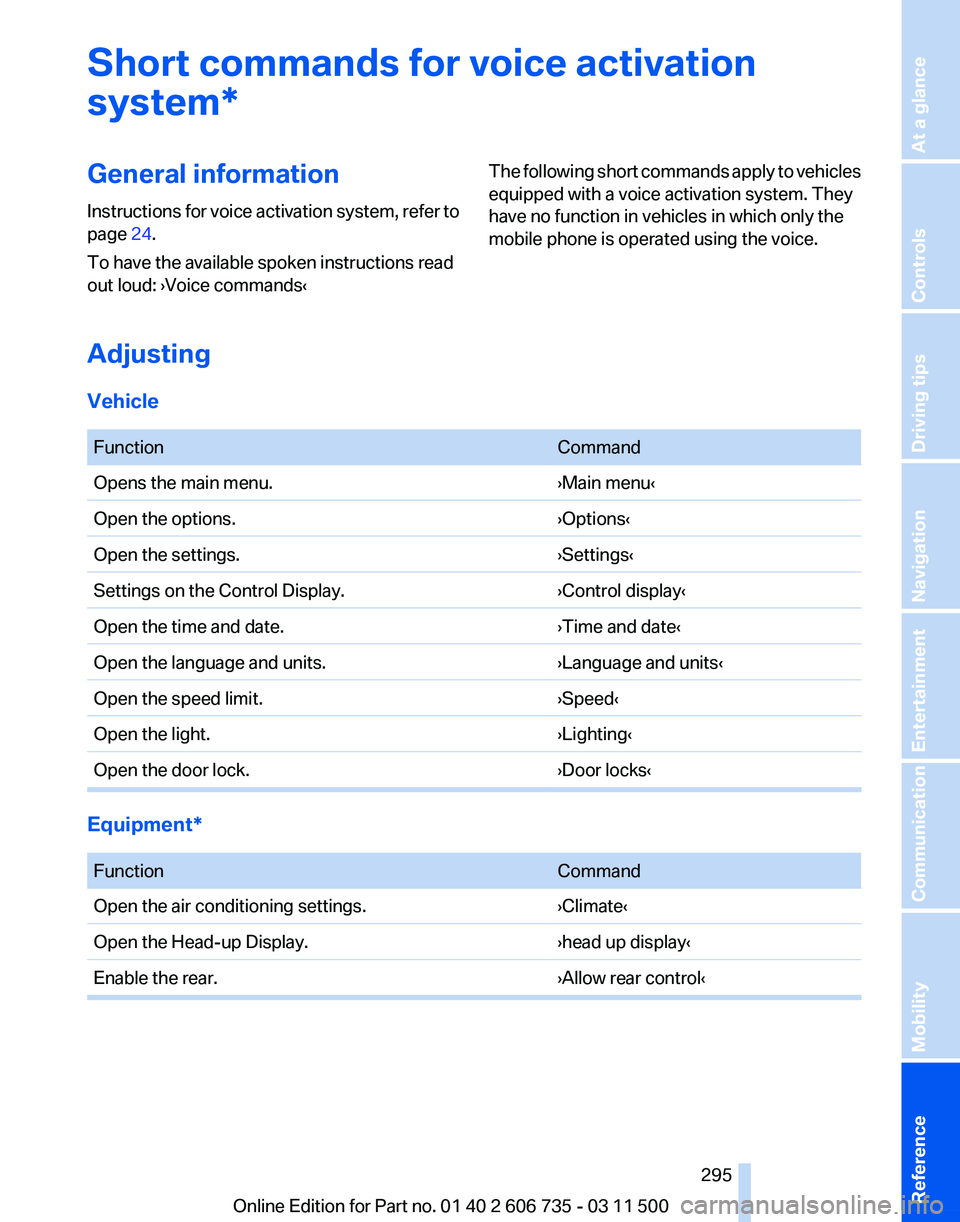
General information
Instructions
for voice activation system, refer to
page 24.
To have the available spoken instructions read
out loud: ›Voice commands‹ The following short commands apply to vehicles
equipped with a voice activation system. They
have no function in vehicles in which only the
mobile phone is operated using the voice.
Adjusting
Vehicle
Function
Command
Opens the main menu. ›Main menu‹
Open the options. ›Options‹
Open the settings. ›Settings‹
Settings on the Control Display. ›Control display‹
Open the time and date. ›Time and date‹
Open the language and units. ›Language and units‹
Open the speed limit. ›Speed‹
Open the light. ›Lighting‹
Open the door lock. ›Door locks‹Equipment*
Function
Command
Open the air conditioning settings. ›Climate‹
Open the Head-up Display. ›head up display‹
Enable the rear. ›Allow rear control‹ Seite 295
295Online Edition for Part no. 01 40 2 606 735 - 03 11 500
Reference Mobility Communication Entertainment Navigation Driving tips Controls At a glance
Page 296 of 317

Vehicle information
Computer
Function
Command
Open the computer. ›Onboard info‹
Open the trip computer. ›Trip computer‹Vehicle
Function
Command
Open the vehicle information. ›Vehicle info‹
Open the vehicle status. ›Vehicle status‹Navigation*
General information
Function
Command
Navigation menu. ›Navigation‹
Open the destination entry. ›Enter address‹
Enter the address. ›Enter address‹
Open destination guidance. ›Guidance‹
Start destination guidance. ›Start guidance‹
Terminate destination guidance. ›Stop guidance‹
Open the home address. ›Home address‹
Open the route criteria. ›Route preference‹
Open the route. ›Route information‹
Switch on the spoken instruction. ›Switch on voice instructions‹
Repeat the spoken instruction. ›Repeat voice instructions‹
Switch off the spoken instruction. ›Switch off voice instructions‹
Display the address book. ›Address book‹
Display the most recent destinations. ›Last destinations‹ Seite 296
296 Online Edition for Part no. 01 40 2 606 735 - 03 11 500Short commands for voice activation system
Page 297 of 317
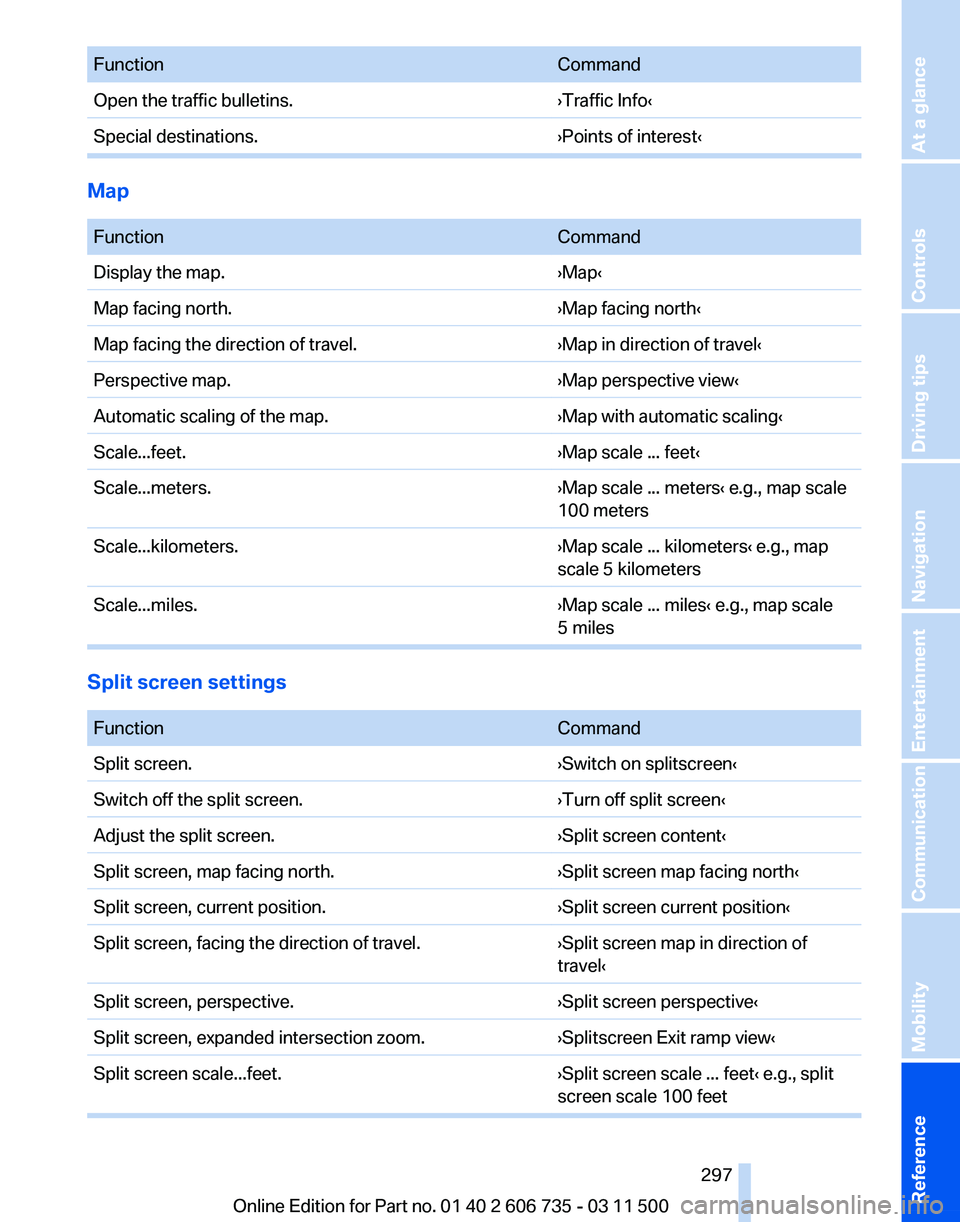
Function
Command
Open the traffic bulletins. ›Traffic Info‹
Special destinations. ›Points of interest‹Map
Function
Command
Display the map. ›Map‹
Map facing north. ›Map facing north‹
Map facing the direction of travel. ›Map in direction of travel‹
Perspective map. ›Map perspective view‹
Automatic scaling of the map. ›Map with automatic scaling‹
Scale...feet. ›Map scale ... feet‹
Scale...meters. ›Map scale ... meters‹ e.g., map scale
100 meters
Scale...kilometers. ›Map scale ... kilometers‹ e.g., map
scale 5 kilometers
Scale...miles. ›Map scale ... miles‹ e.g., map scale
5 milesSplit screen settings
Function
Command
Split screen. ›Switch on splitscreen‹
Switch off the split screen. ›Turn off split screen‹
Adjust the split screen. ›Split screen content‹
Split screen, map facing north. ›Split screen map facing north‹
Split screen, current position. ›Split screen current position‹
Split screen, facing the direction of travel. ›Split screen map in direction of
travel‹
Split screen, perspective. ›Split screen perspective‹
Split screen, expanded intersection zoom. ›Splitscreen Exit ramp view‹
Split screen scale...feet. ›Split screen scale ... feet‹ e.g., split
screen scale 100 feet Seite 297
297Online Edition for Part no. 01 40 2 606 735 - 03 11 500
Reference Mobility Communication Entertainment Navigation Driving tips Controls At a glance
Page 299 of 317
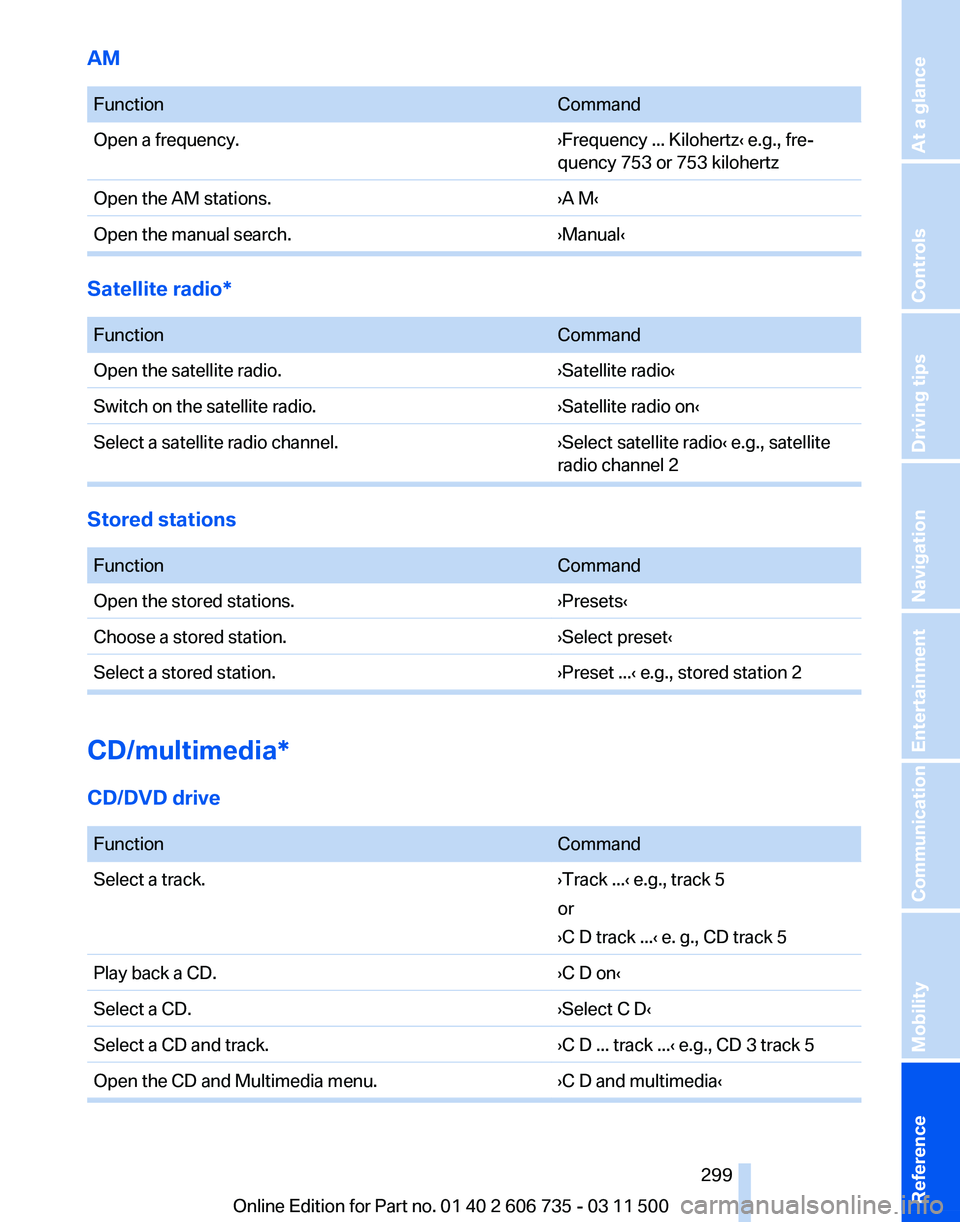
AM
Function
Command
Open a frequency. ›Frequency ... Kilohertz‹ e.g., fre‐
quency 753 or 753 kilohertz
Open the AM stations. ›A M‹
Open the manual search. ›Manual‹Satellite radio*
Function
Command
Open the satellite radio. ›Satellite radio‹
Switch on the satellite radio. ›Satellite radio on‹
Select a satellite radio channel. ›Select satellite radio‹ e.g., satellite
radio channel 2Stored stations
Function
Command
Open the stored stations. ›Presets‹
Choose a stored station. ›Select preset‹
Select a stored station. ›Preset ...‹ e.g., stored station 2CD/multimedia*
CD/DVD drive
Function
Command
Select a track. ›Track ...‹ e.g., track 5
or
›C D track ...
‹ e. g., CD track 5
Play back a CD. ›C D on‹
Select a CD. ›Select C D‹
Select a CD and track. ›C D ... track ...‹ e.g., CD 3 track 5
Open the CD and Multimedia menu. ›C D and multimedia‹ Seite 299
299Online Edition for Part no. 01 40 2 606 735 - 03 11 500
Reference Mobility Communication Entertainment Navigation Driving tips Controls At a glance