run flat BMW X5 XDRIVE35I 2012 Owners Manual
[x] Cancel search | Manufacturer: BMW, Model Year: 2012, Model line: X5 XDRIVE35I, Model: BMW X5 XDRIVE35I 2012Pages: 317, PDF Size: 8.83 MB
Page 89 of 317
▷
When the system has not been initialized.
▷ When driving on a snowy or slippery road
surface.
▷ Sporty driving style: slip in the drive wheels,
high lateral acceleration.
▷ When driving with snow chains*.
When driving with a compact wheel*, the Flat
Tire Monitor is unable to function.
Status display
The current status of the Flat Tire Monitor can
be displayed on the Control Display, e.g.,
whether or not the FTM is active.
1. "Vehicle Info"
2. "Vehicle status"
3. "Flat Tire Monitor"
The status is displayed.
Initialization
The
initialization process adopts the set inflation
tire pressures as reference values for the detec‐
tion of a flat tire. Initialization is started by con‐
firming the inflation pressures.
Do not initialize the system when driving with
snow chains* or with a compact wheel*.
1. "Vehicle Info"
2. "Vehicle status"
3. "Reset"
4. Start the engine - do not drive away.
5. Start the initialization with "Reset".
6. Drive away.
The initialization is completed while driving,
which can be interrupted at any time.
The initialization automatically continues when
driving resumes.
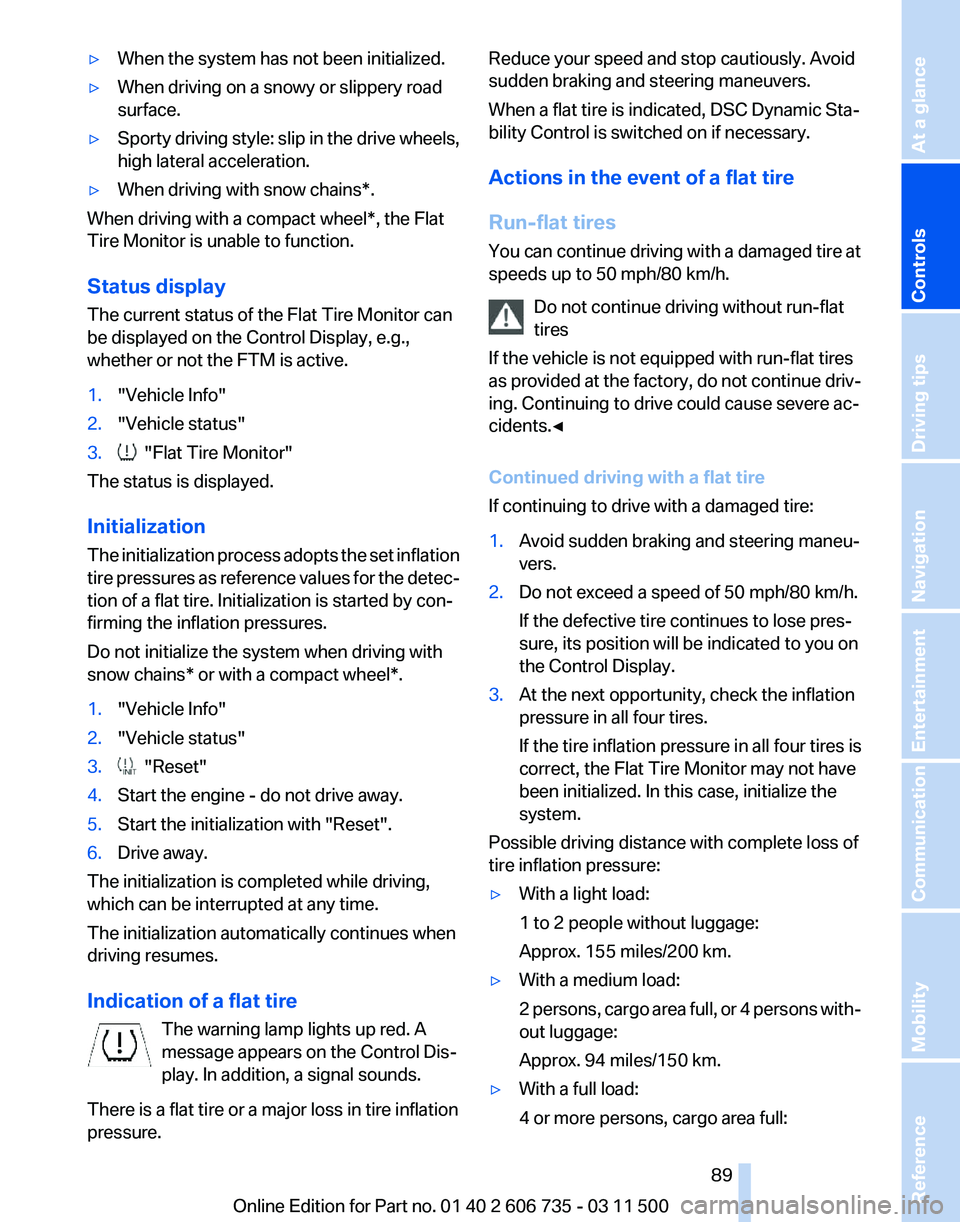
Indication of a flat tire The warning lamp lights up red. A
message appears on the Control Dis‐
play. In addition, a signal sounds.
There is a flat tire or a major loss in tire inflation
pressure. Reduce your speed and stop cautiously. Avoid
sudden braking and steering maneuvers.
When a flat tire is indicated, DSC Dynamic Sta‐
bility Control is switched on if necessary.
Actions in the event of a flat tire
Run-flat tires
You
can continue driving with a damaged tire at
speeds up to 50 mph/80 km/h.
Do not continue driving without run-flat
tires
If the vehicle is not equipped with run-flat tires
as provided at the factory, do not continue driv‐
ing. Continuing to drive could cause severe ac‐
cidents.◀
Continued driving with a flat tire
If continuing to drive with a damaged tire:
1. Avoid sudden braking and steering maneu‐
vers.
2. Do not exceed a speed of 50 mph/80 km/h.
If the defective tire continues to lose pres‐
sure, its position will be indicated to you on
the Control Display.
3. At the next opportunity, check the inflation
pressure in all four tires.
If the tire inflation pressure in all four tires is
correct, the Flat Tire Monitor may not have
been initialized. In this case, initialize the
system.
Possible driving distance with complete loss of
tire inflation pressure:
▷ With a light load:
1 to 2 people without luggage:
Approx. 155 miles/200 km.
▷ With a medium load:
2
persons, cargo area full, or 4 persons with‐
out luggage:
Approx. 94 miles/150 km.
▷ With a full load:
4 or more persons, cargo area full: Seite 89
89Online Edition for Part no. 01 40 2 606 735 - 03 11 500
Reference Mobility Communication Entertainment Navigation Driving tips
Controls At a glance
Page 91 of 317
All wheels are yellow
▷
A flat tire or major drop in inflation pressure
in several tires.
▷ The system was not reset after a wheel
change
and thus issues a warning based on
the inflation pressures initialized last.
▷ A flat tire in one or more tires while the sys‐
tem is being reset.
Wheels, gray
The system cannot detect a flat tire.
Reasons for this may be:
▷ TPM is being reset.
▷ Disturbance by systems or devices with the
same radio frequency.
▷ Malfunction.
Resetting the system
Reset the system after each correction of the
tire inflation pressure and after every tire or
wheel change.
1. "Vehicle Info"
2. "Vehicle status"
3. "Reset"
4. Start the engine - do not drive away.
5. Reset the tire pressure using "Reset".
6. Drive away.
The tires are shown in gray and "Resetting
TPM..." is displayed.
After driving for a few minutes, the set tire infla‐
tion
pressures are applied as set values. The re‐
setting process is completed automatically as
you drive. The tires are shown in green and
"TPM active" is shown on the Control Display.
The trip can be interrupted at any time. If you
drive away again, the process resumes auto‐
matically. Do not reset the system when driving
with a compact wheel*.
If a flat tire is detected while the system is re‐
setting, all tires on the Control Display are dis‐
played in yellow. The message "Low tire!" is
shown. Low tire pressure message
The small warning lamp lights up yel‐
low and the large warning lamp lights
up red. A message appears on the
Control Display. In addition, a signal
sounds.
▷ There is a flat tire or a major loss in tire in‐
flation pressure.
▷ The system was not reset after a wheel
change and thus issues warnings based on
the inflation pressures initialized last.
Reduce your speed and stop cautiously. Avoid
sudden braking and steering maneuvers.
When
a low inflation pressure is indicated, DSC
Dynamic Stability Control is switched on if nec‐
essary.
Actions in the event of a flat tire
Run-flat tires
You can continue driving with a damaged tire at
speeds up to 50 mph/80 km/h.
Do not continue driving without run-flat
tires
If the vehicle is not equipped with run-flat tires
as provided at the factory, do not continue driv‐
ing. Continuing to drive could cause severe ac‐
cidents.◀
Continued driving with a flat tire
If continuing to drive with a damaged tire:
1. Avoid sudden braking and steering maneu‐
vers.
2. Do not exceed a speed of 50 mph/80 km/h.
3. Check the air pressure in all four tires at the
next opportunity.
If the tire inflation pressure in all four tires is
correct, the Tire Pressure Monitor may not
have been reset. Reset the system.
Possible driving distance with complete loss of
tire inflation pressure:
▷ With a light load:
1 to 2 people without luggage: Seite 91
91Online Edition for Part no. 01 40 2 606 735 - 03 11 500
Reference Mobility Communication Entertainment Navigation Driving tips
Controls At a glance
Page 252 of 317
Wheels and tires
Tire inflation pressure
Safety information
It is not merely the tires' service life, but also
driving comfort and, to a great extent, driving
safety that depend on the condition of the tires
and the maintenance of the specified tire pres‐
sure.
Checking the pressure
Only check the tire inflation pressure when the
tires are cold. This means after a maximum of
1.25
miles/2 km driving or when the vehicle has
been parked for at least 2 hours. When the tires
are warm, the tire inflation pressure is higher.
Check the tire inflation pressure regularly
Check the tire inflation pressure regularly
and correct it if necessary, even in the compact
wheel*: usually twice monthly or before embark‐
ing on a long trip. If you fail to observe this pre‐
caution, you may be driving on tires with incor‐
rect tire pressures, a condition that may not only
compromise your vehicle's driving stability, but
also lead to tire damage and the risk of an acci‐
dent.
Do not drive with depressurized or flat tires, ex‐
cept for run-flat tires. A flat tire will seriously im‐
pair your vehicle's handling and braking re‐
sponse. Attempts to drive on a flat tire can lead
to a loss of control over the vehicle.◀
After adjusting the tire inflation pressure, reset
the Tire Pressure Monitor, refer to page 90, or
reinitialize the Flat Tire Monitor, refer to
page 88.
Pressure specifications
The tables below provide all the correct inflation
pressures for the specified tire sizes at ambient
temperature.
The inflation pressures apply to the tire sizes
approved and tire brands recommended by BMW; a list of these is available from your serv‐
ice center.
For
correct identification of the right tire inflation
pressures, observe the following:
▷ Tire sizes of your vehicle.
▷ Maximum allowable driving speed.
Tire inflation pressures for driving up to
100 mph or 160 km/h
For
normal driving up to 100 mph/160 km/h, ad‐
just pressures to the respective tire inflation
pressures listed on the following pages in the
column for traveling speeds up to 100 mph/
160 km/h to achieve optimum driving comfort.
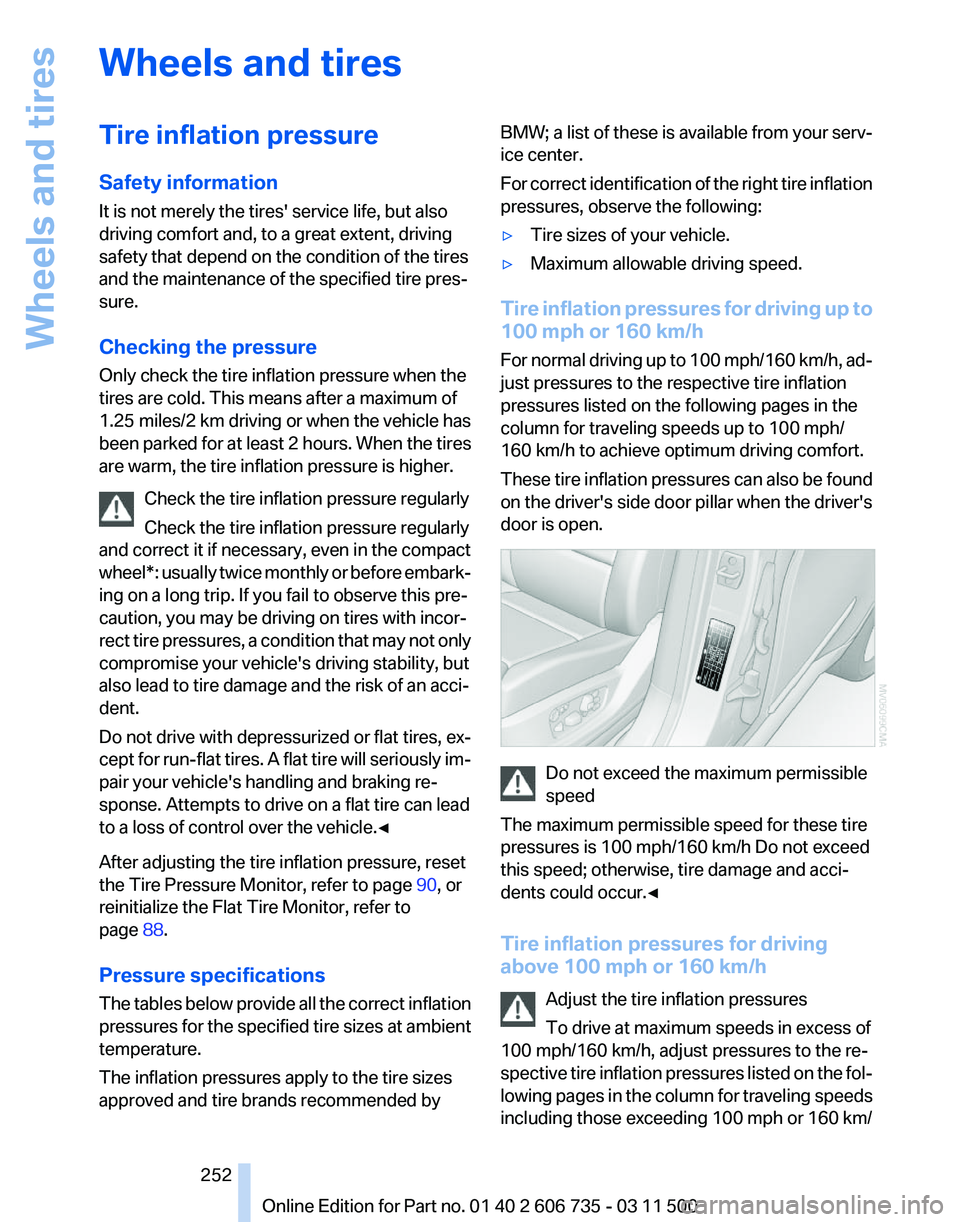
These tire inflation pressures can also be found
on the driver's side door pillar when the driver's
door is open. Do not exceed the maximum permissible
speed
The maximum permissible speed for these tire
pressures is 100 mph/160 km/h Do not exceed
this speed; otherwise, tire damage and acci‐
dents could occur.◀
Tire inflation pressures for driving
above 100 mph or 160 km/h
Adjust the tire inflation pressures
To drive at maximum speeds in excess of
100 mph/160 km/h, adjust pressures to the re‐
spective
tire inflation pressures listed on the fol‐
lowing pages in the column for traveling speeds
including those exceeding 100 mph or 160 km/ Seite 252
252 Online Edition for Part no. 01 40 2 606 735 - 03 11 500
Wheels and tires
Page 259 of 317
ernment test course. For example, a tire graded
150 would wear one and one-half (11/2) times
as well on the government course as a tire
graded 100. The relative performance of tires
depends
upon the actual conditions of their use,
however, and may depart significantly from the
norm due to variations in driving habits, service
practices and differences in road characteristics
and climate.
Traction
The traction grades, from highest to lowest, are
AA, A, B, and C.
Those grades represent the tire’s ability to stop
on wet pavement as measured under controlled
conditions on specified government test surfa‐
ces of asphalt and concrete. A tire marked C may
have poor traction performance.
The traction grade assigned to this tire is based
on straight-ahead braking traction tests, and
does not include acceleration, cornering, hydro‐
planing, or peak traction characteristics.
Temperature
The temperature grades are A, the highest, B,
and C, representing the tire’s resistance to the
generation of heat and its ability to dissipate
heat when tested under controlled conditions
on a specified indoor laboratory test wheel. Sus‐
tained high temperature can cause the material
of the tire to degenerate and reduce tire life, and
excessive temperature can lead to sudden tire
failure. The grade C corresponds to a level of
performance which all passenger car tires must
meet under the Federal Motor Vehicle Safety
Standard No. 109. Grades B and A represent
higher levels of performance on the laboratory
test wheel than the minimum required by law.
Temperature grade for this tire
The temperature grade for this tire is es‐
tablished for a tire that is properly inflated and
not overloaded. Excessive speed, underinfla‐
tion, or excessive loading, either separately or in
combination, can cause heat buildup and pos‐
sible tire failure.◀ RSC – Run-flat tires
The symbol identifying run-flat tires is a circle
with the letters RSC on the sidewall, refer to
page
261.
M+S
Winter and all-season tires.
These have better winter properties than
summer tires.
XL
Designation for specially reinforced tires.
Tire tread
Summer tires
Do not drive with a tire tread depth of less than
0.12 in/3 mm.
There is an increased danger of hydroplaning if
the tread depth is less than 0.12 in/3 mm.
Winter tires
Do not drive with a tire tread depth of less than
0.16 in/4 mm.
Below a tread depth of 0.16 in/4 mm, tires are
less suitable for winter operation.
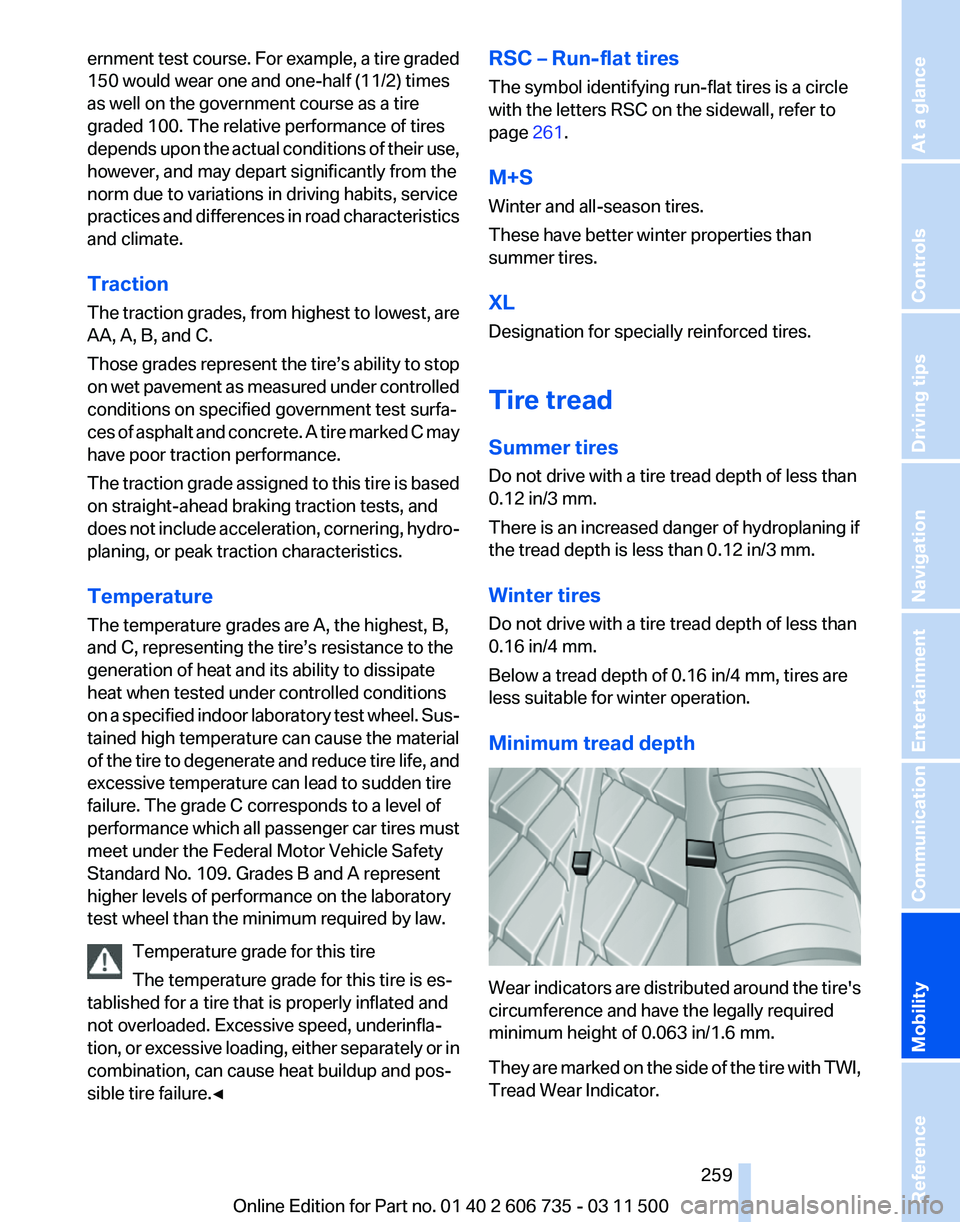
Minimum tread depth Wear indicators are distributed around the tire's
circumference and have the legally required
minimum height of 0.063 in/1.6 mm.
They
are marked on the side of the tire with TWI,
Tread Wear Indicator.
Seite 259
259Online Edition for Part no. 01 40 2 606 735 - 03 11 500
Reference
Mobility Communication Entertainment Navigation Driving tips Controls At a glance
Page 261 of 317
With proper use, these tires meet the highest
standards for safety and handling.
Retreaded tires
The manufacturer of your vehicle does not rec‐
ommend the use of retreaded tires.
Retreaded tires
Possibly substantial variations in the de‐
sign and age of the tire casing structures can
limit service life and have a negative impact on
road safety.◀
Winter tires
The manufacturer of your vehicle recommends
winter tires for winter roads or at temperatures
below +45 ℉/+7 ℃.
Although
so-called all-season M+S tires do pro‐
vide better winter traction than summer tires,
they do not provide the same level of perform‐
ance as winter tires.
Maximum speed of winter tires
If the maximum speed of the vehicle is higher
than the permissible speed for the winter tires,
then display a corresponding sign in the field of
vision. You can obtain this sign from the tire spe‐
cialist or from your service center.
Maximum speed for winter tires
Do not exceed the maximum speed for the
winter tires; otherwise, tire damage and acci‐
dents can occur.◀
Run-flat tires
For your own safety, only use run-flat tires. Your
service center will be glad to advise you.
Rotating wheels between axles
The manufacturer of your vehicle advises
against swapping wheels between the front and
rear axles.
This can impair the handling characteristics.
Rotating the tires is not permissible when using
different types of tires*. Storage
Store wheels and tires in a cool, dry place with
as little exposure to light as possible.
Always protect tires against all contact with oil,
grease and fuels.
Do not exceed the maximum tire inflation pres‐
sure indicated on the side wall of the tire.
Run-flat tires
Label
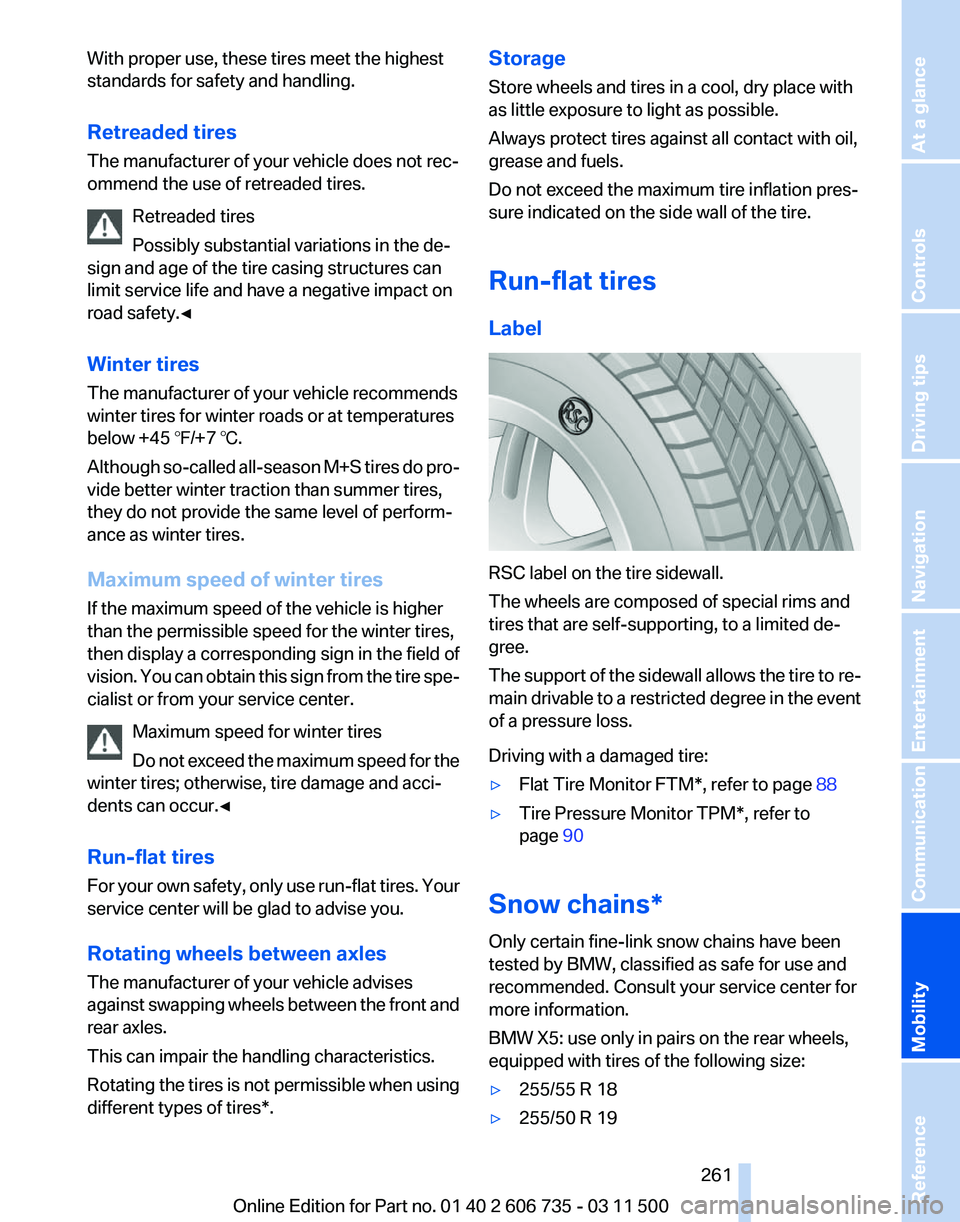
RSC label on the tire sidewall.
The wheels are composed of special rims and
tires that are self-supporting, to a limited de‐
gree.
The
support of the sidewall allows the tire to re‐
main drivable to a restricted degree in the event
of a pressure loss.
Driving with a damaged tire:
▷ Flat Tire Monitor FTM*, refer to page 88
▷ Tire Pressure Monitor TPM*, refer to
page 90
Snow chains*
Only certain fine-link snow chains have been
tested by BMW, classified as safe for use and
recommended. Consult your service center for
more information.
BMW X5: use only in pairs on the rear wheels,
equipped with tires of the following size:
▷ 255/55 R 18
▷ 255/50 R 19
Seite 261
261Online Edition for Part no. 01 40 2 606 735 - 03 11 500
Reference
Mobility Communication Entertainment Navigation Driving tips Controls At a glance
Page 275 of 317
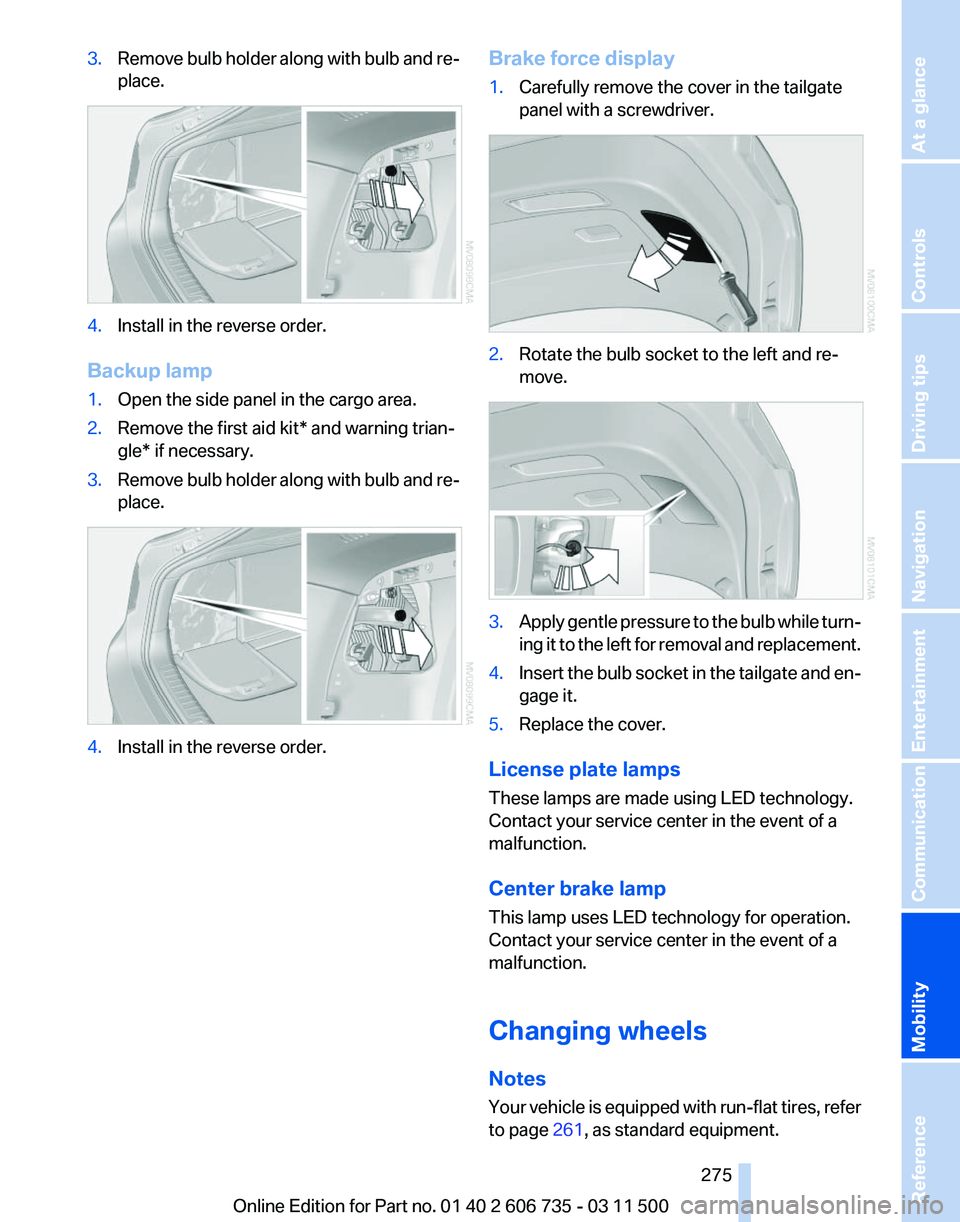
3.
Remove bulb holder along with bulb and re‐
place. 4.
Install in the reverse order.
Backup lamp
1. Open the side panel in the cargo area.
2. Remove the first aid kit* and warning trian‐
gle* if necessary.
3. Remove bulb holder along with bulb and re‐
place. 4.
Install in the reverse order. Brake force display
1.
Carefully remove the cover in the tailgate
panel with a screwdriver. 2.
Rotate the bulb socket to the left and re‐
move. 3.
Apply gentle pressure to the bulb while turn‐
ing
it to the left for removal and replacement.
4. Insert the bulb socket in the tailgate and en‐
gage it.
5. Replace the cover.
License plate lamps
These lamps are made using LED technology.
Contact your service center in the event of a
malfunction.
Center brake lamp
This lamp uses LED technology for operation.
Contact your service center in the event of a
malfunction.
Changing wheels
Notes
Your
vehicle is equipped with run-flat tires, refer
to page 261, as standard equipment.
Seite 275
275Online Edition for Part no. 01 40 2 606 735 - 03 11 500
Reference
Mobility Communication Entertainment Navigation Driving tips Controls At a glance
Page 276 of 317
They do not need to be replaced immediately in
the event of a puncture.
When mounting new tires or changing from
summer
to winter tires or vice versa, use run-flat
tires for your own safety.
BMW X6: do not rotate the front wheels to the
rear or vice versa, as otherwise the handling
characteristics will be negatively affected.
The tools for changing wheels are available as
accessories from your service center.
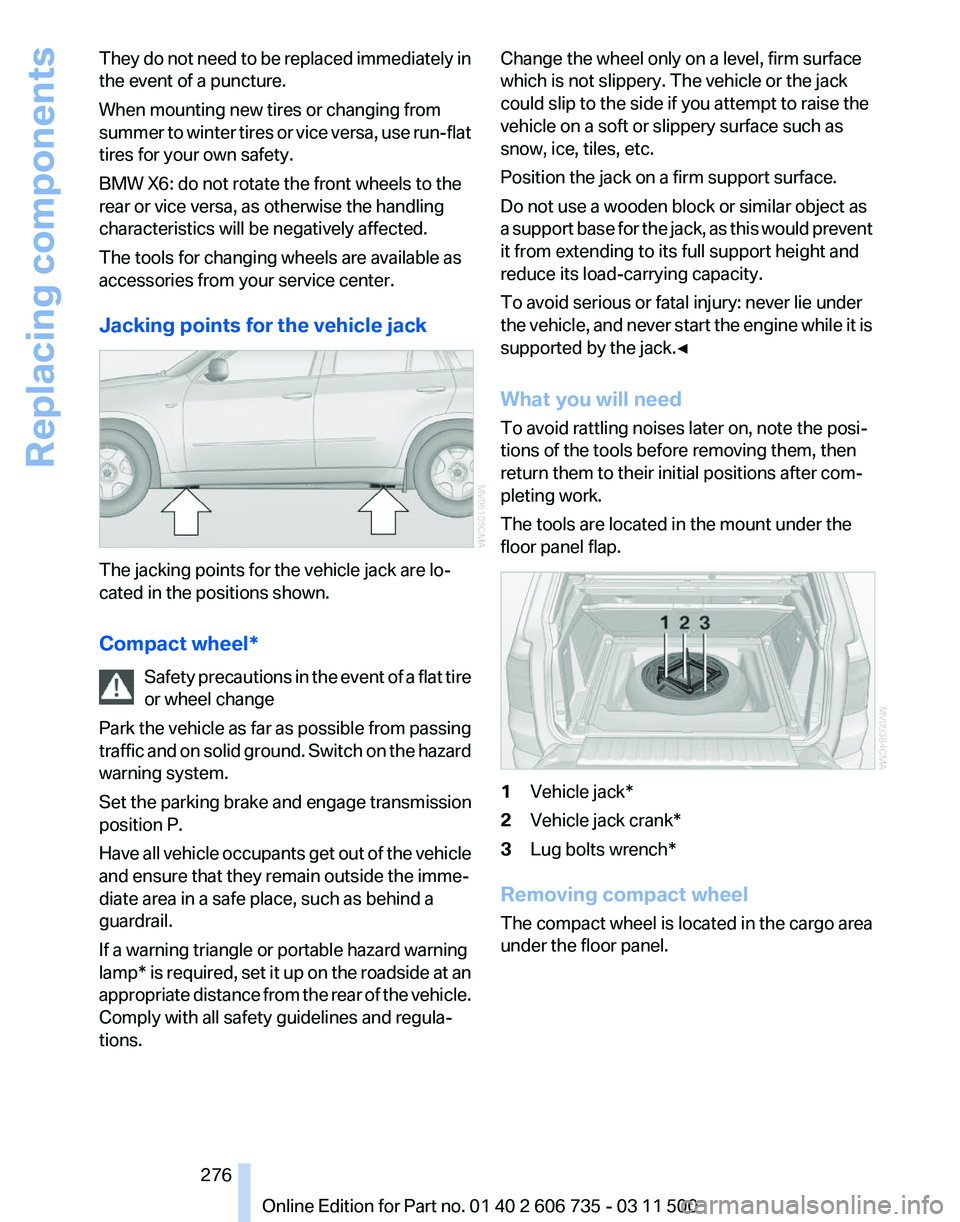
Jacking points for the vehicle jack The jacking points for the vehicle jack are lo‐
cated in the positions shown.
Compact wheel*
Safety
precautions in the event of a flat tire
or wheel change
Park the vehicle as far as possible from passing
traffic and on solid ground. Switch on the hazard
warning system.
Set the parking brake and engage transmission
position P.
Have all vehicle occupants get out of the vehicle
and ensure that they remain outside the imme‐
diate area in a safe place, such as behind a
guardrail.
If a warning triangle or portable hazard warning
lamp* is required, set it up on the roadside at an
appropriate distance from the rear of the vehicle.
Comply with all safety guidelines and regula‐
tions. Change the wheel only on a level, firm surface
which is not slippery. The vehicle or the jack
could slip to the side if you attempt to raise the
vehicle on a soft or slippery surface such as
snow, ice, tiles, etc.
Position the jack on a firm support surface.
Do not use a wooden block or similar object as
a
support base for the jack, as this would prevent
it from extending to its full support height and
reduce its load-carrying capacity.
To avoid serious or fatal injury: never lie under
the vehicle, and never start the engine while it is
supported by the jack.◀
What you will need
To avoid rattling noises later on, note the posi‐
tions of the tools before removing them, then
return them to their initial positions after com‐
pleting work.
The tools are located in the mount under the
floor panel flap. 1
Vehicle jack*
2 Vehicle jack crank*
3 Lug bolts wrench*
Removing compact wheel
The compact wheel is located in the cargo area
under the floor panel.
Seite 276
276 Online Edition for Part no. 01 40 2 606 735 - 03 11 500
Replacing components
Page 307 of 317
Flat Tire Monitor FTM, snow
chains 261
Flat tire, run-flat tires 261
Flat
tire, Tire Pressure Monitor
TPM 90
Flat tire, warning lamp 89, 91
Flat tire, wheel change 275
Flooding, refer to Driving through water 143
Floor carpet, care 287
Floor mats, care 287
FM/AM station 174
Fog on windows, remov‐ ing 121
Foldable rear seat back‐ rest 133
Foot brake 143
Footwell lamps, refer to Inte‐ rior lamps 84
For your own safety 6
Four-wheel drive, refer to xDrive 98
Front airbags 86
Front fog lamps 84
Front fog lamps, indicator lamp 84
FTM Flat Tire Monitor 88
Fuel 248
Fuel
– Refer to Average fuel con‐ sumption 74
Fuel, average consump‐
tion 74
Fuel cap 246
Fuel cap, closing 246
Fuel consumption display
– Average fuel consump‐ tion 74
Fuel consumption display,
current fuel consumption 72
Fuel-efficient driving, refer to Current
fuel consumption 72
Fuel filler flap, closing 246
Fuel filler flap, opening 246
Fuel filler flap, unlocking in case of an electrical malfunc‐
tion 246
Fuel gauge 73
Fuel, high-quality brands 248 Fuel, quality
248
Fuel, saving 148
Fuel, specifications 248
Fuel
tank capacity, refer to Fill‐
ing capacities 293
Fuel tank contents, refer to Filling capacities 293
Fuel tank, refer to Filling ca‐ pacities 293
Fuse 279
G
Garage door opener, refer to Integrated universal remote
control 127
Gasoline gauge, refer to Fuel gauge 73
Gasoline, refer to Required fuel 248
Gas station recommenda‐ tion 162
Gear change, automatic trans‐ mission with Steptronic 70
Gear change, via shift pad‐ dles 70
General driving notes 142
Glass sunroof, closing 43
Glass sunroof, electric
– Convenient operation 30
– Remote control 30
Glass sunroof, initializing 44
Glass sunroof, opening 43
Glass sunroof, pinch protec‐
tion 44
Glass sunroof, power fail‐ ure 44
Glass sunroof, refer to Panor‐ amic glass sunroof 42
Glass sunroof, tilting 43
Glove compartment 134
Glove compartment
– USB interface 134
Glove compartment, light‐
ing 134
GPS navigation, refer to Navi‐ gation system 152
Gross vehicle weight, refer to Weights 292 H
Handbrake, refer to Parking
brake 63
Hand-held transmitter, alter‐ nating code 128
Hands-free microphone 16
Hazard warning sys‐ tem 16, 280
HDC Hill Descent Control 98
HD Radio 175
Head airbags 86
Headlamp control, auto‐ matic 81, 82
Headlamp courtesy delay fea‐ ture 81
Headlamp flasher 66, 83
Headlamp flasher, indicator lamp 15
Headlamps 81
Headlamps, care 285
Headlamps, cleaning 67
Headlamps, cleaning, washer fluid 68
Headliner 17
Headphones,
connecting, rear
DVD system 201
Head restraints 51
Head-up Display 117
Head-up Display, care 287
Heatable rear window 121
Heating 119
Heating
– Seats 48
Heating, interior 119
Heating, mirrors 54
Heating, residual heat 122
Heating with the engine switched off, refer to Resid‐
ual heat 122
Heavy cargo, refer to Stowing cargo 145
Height, refer to Dimen‐ sions 291
High-beam Assistant 83
High beams 83
High beams/low beams, auto‐ matic, refer to High-beam
Assistant 83
Seite 307
307Online Edition for Part no. 01 40 2 606 735 - 03 11 500
Reference Mobility Communication Entertainment Navigation Driving tips Controls At a glance
Page 308 of 317
High beams, indicator
lamp 15
High-pressure washers 285
Hill Descent Control HDC 98
Hill drive-off assistant, refer to Drive-off assistant 100
Hills 144
Holder for beverages 135
Holder for remote control, re‐ fer to Ignition lock 61
Homepage 6
Hood 264
Hood, opening 264
Horn 12
Hot exhaust system 142
Hotline 240
House number, entering for navigation 154
Hydraulic brake assistant 96
Hydroplaning 143
I
Ice warning, refer to External temperature warning 71
Icy roads, refer to External temperature warning 71
Identification marks, tires 258
iDrive 18
iDrive, changing settings 78
iDrive, changing the lan‐ guage 80
iDrive, changing the units of measure and display for‐
mat 80
iDrive, setting the bright‐ ness 80
iDrive, setting the date 79
iDrive, setting the time 79
Ignition 61
Ignition
key position 1, refer to
Radio ready state 61
Ignition key position 2, refer to Ignition on 61
Ignition key, refer to Remote control with integrated
key 28
Ignition lock 61 Ignition, switched off 61
Ignition, switched on 61
Images, displaying, rear DVD
system 208
Indication of a flat tire 89, 91
Indicator and warning lamps 15
Inflation pressure monitor, re‐ fer to Flat Tire Monitor 88
Inflation
pressure, refer to Tire
inflation pressure 252
Information on the navigation data 152
Initialization after power fail‐ ure 278
Initializing
– Compass, refer to Calibrat‐ ing 129
– Panoramic glass sunroof 43
Initializing, Flat Tire Monitor
FTM 89
Initializing, glass sunroof 44
Initializing, refer to Setting the date 79
Initializing, refer to Setting the time 79
Initializing,
Tire Pressure Mon‐
itor TPM 91
Installation location, tele‐ phone 134
Instrument cluster 14
Instrument lighting 84
Instrument panel, refer to In‐ strument cluster 14
Instruments, refer to Cock‐ pit 12
Integrated key 28
Integrated universal remote control 127
Interactive map 157
Interior equipment 127
Interior lamps 84
Interior lamps
– Remote control 30
Interior mirror 54
Interior rearview mirror, auto‐ matic dimming 55
Interior rearview mirror, com‐ pass 129 Interior temperature, setting,
automatic climate con‐
trol 119
Intermediate
destinations 159
Internet page 6
Intersection, entering for navi‐ gation 154
iPod/iPhone 193
J
Jacking points for the vehicle jack 276
Jack, refer to Vehicle jack 276
Joystick, refer to Selector lever 69
Jump-starting 281
K
Keyless Go, refer to Comfort Access 37
Keyless opening and closing, refer to Comfort Access 37
Key Memory, refer to Personal Profile 28
Key, refer to Integrated key/re‐ mote control 28
Kickdown
– Automatic transmission with Steptronic 69
Knocking control 248
L
Label, run-flat tire 261
Lamp and bulb replacement, lamp replacement 270
Lamps 81
Lamps, automatic headlamp control 81, 82
Lamps, High-beam Assis‐ tant 83
Lamps, parking lamps/low beams 81
Lamps, replacing, refer to Lamp and bulb replace‐
ment 270
Lane departure warning 93
Seite 308
308 Online Edition for Part no. 01 40 2 606 735 - 03 11 500
Everything from A to Z
Page 311 of 317
Protective function, refer to
Pinch protection
– Windows 41
Push-and-turn switch, refer to
Controls 18
R
Radiator fluid, refer to Cool‐ ant 267
Radio-operated key, refer to Remote control with
integrated key 28
Radio ready state 61
Radio ready state, switched off 61
Radio ready state, switched on 61
Radio setting, refer to Radio ready state 61
Rain sensor 67
Random 182
Random playback 182
Range 73
RDS 175
Reading lamps 85
Reading out loud 234
Rear entertainment, refer to DVD system in rear 200
Rear lamps, refer to Tail lamps 271, 274
Rear seat backrest, folda‐ ble 133
Rear seats, adjusting 47
Rear
seats, adjusting the head
restraints 52
Rear seats, heating 48
Rear socket 131
Rear ventilation 123
Rear ventilation, 3rd row seats 123
Rear ventilation, automatic cli‐ mate control in rear 124
Rearview mirror, refer to Mir‐ rors 53
Rear window defroster 121
Rear window, washing 68
Rear window wiper 68
Recirculated air mode 122 Recommended tire
brands 260
Redialing 222
Refueling 246
Remaining distance to desti‐ nation,
refer to Computer 74
Remaining range for service, refer to Service require‐
ments 75
Remaining range, refer to Range 73
Reminders 233
Remote control
– Battery replacement 39
– Comfort Access 37
– Malfunction 31, 38
– Tailgate 31
Remote control, garage door
opener 127
Remote
control, rear DVD sys‐
tem 201
Remote control, removing from the ignition lock 61
Remote control, service data 268
Remote control, universal 127
Remote inquiry 222
Replacement fuse 279
Replacement remote con‐ trol 28
Replacing wheels/tires 260
Reporting safety defects 8
Reserve warning, refer to Fuel gauge 73
Reservoir for washer fluid, re‐ fer to Washer fluid reser‐
voir 68
Resetting, Tire Pressure Mon‐ itor TPM 91
Residual heat 122
Restraining systems
– Refer to Safety belts 50
Restraint systems for chil‐
dren 56
Retaining straps, securing cargo 146
Retreaded tires 261
Road, avoiding 161
Road detour 161 Roadside Assistance 238
Roadside parking lamps
83
Roller sunblinds 41
Roof load capacity 292
Roof-mounted luggage rack 147
Rope, refer to Towing 283
Route 162
Route criteria, route 161
Route, displaying 162
Route
section, bypassing 162
RPM, refer to Engine data 290
RSC Runflat System Compo‐ nent, refer to Run-flat
tires 261
Rubber components, care 286
Run-flat tires 261
Run-flat tires, tire inflation pressure 252
Running lights, refer to Parking lamps/low beams 81
S
Safe braking 143
Safety 6
Safety belts 50
Safety belts
– Damage 50
Safety belts, care 287
Safety
belts, indicator/warning
lamp 50
Safety belts, reminder 50
Safety switch for rear win‐ dows 41
Safety systems
– Safety belts 50
Safety systems, airbags 86
Safety tires, refer to Run-flat tires 261
Satellite radio 176
Saving fuel 148
Scale, changing during navi‐ gation 164
Screen, folding open/closed, rear DVD system 200
Seite 311
311Online Edition for Part no. 01 40 2 606 735 - 03 11 500
Reference Mobility Communication Entertainment Navigation Driving tips Controls At a glance