remote control BMW X5M 2009 E70 Owner's Guide
[x] Cancel search | Manufacturer: BMW, Model Year: 2009, Model line: X5M, Model: BMW X5M 2009 E70Pages: 317, PDF Size: 9.56 MB
Page 69 of 317
Controls
67Reference
At a glance
Driving tips
Communications
Navigation
Entertainment
Mobility
Transmission position P will be engaged:
>automatically after approx. 30 minutes
> if you remove the remo te control from the
ignition lock
Parking brake
The concept
Your BMW is equipped with an electromechan-
ical parking brake.
The parking brake is primarily intended to pre-
vent the vehicle from rolling while parked.
You can use the parking brake in two ways:
> manually, by pulling an d pushing the button
> automatically, by ac tivating Automatic
Hold, refer to page 67
With the engine stopped, the parking brake acts
on the rear wheels via an electromechanical
system. When the engine is running, the park-
ing brake acts on the disk brakes of the front
and rear wheels via the brake hydraulics.
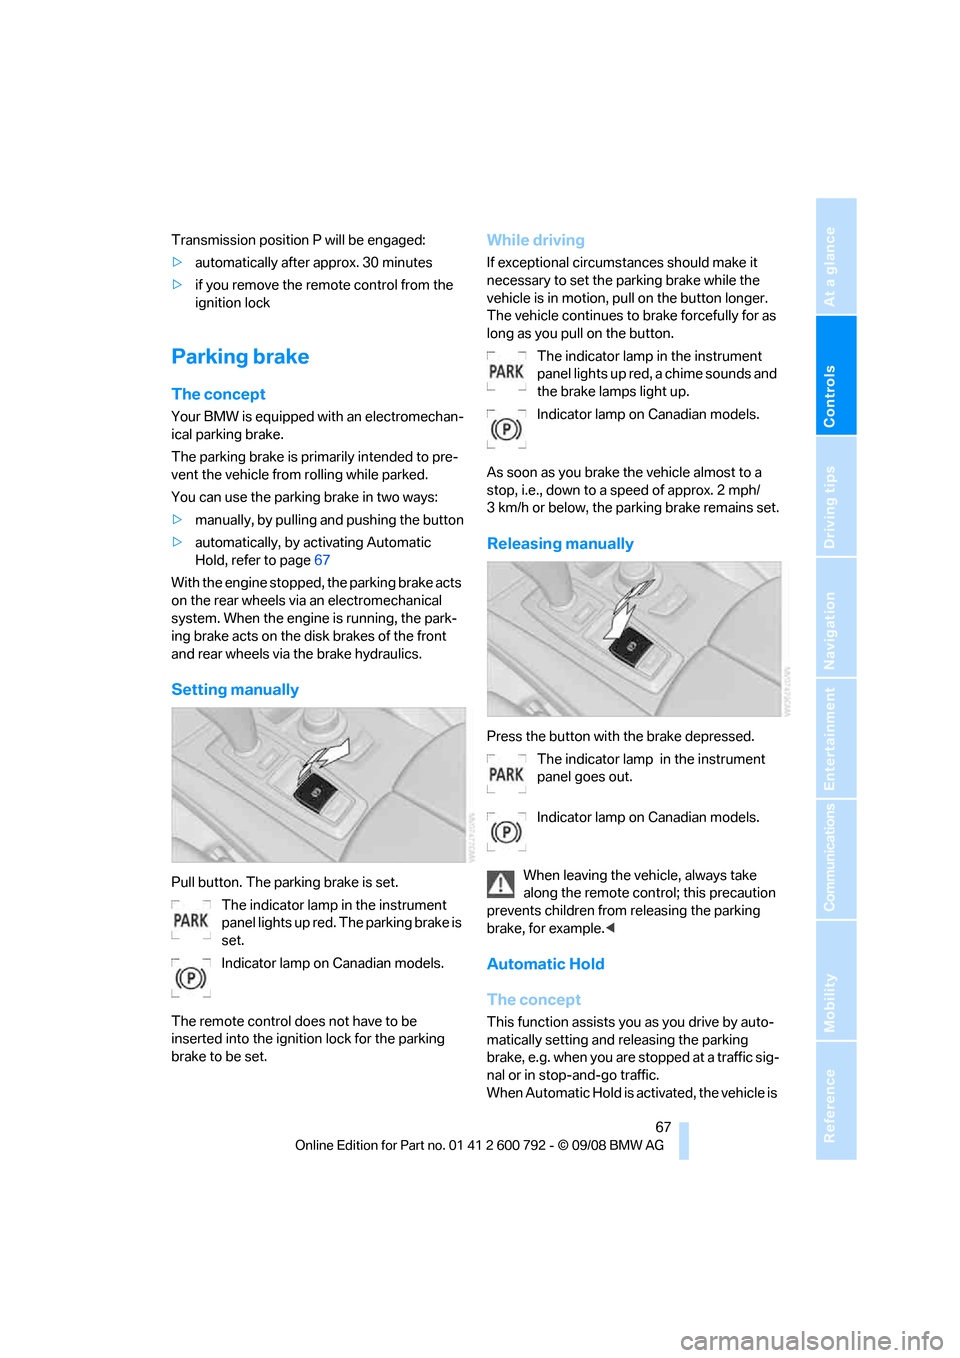
Setting manually
Pull button. The parking brake is set. The indicator lamp in the instrument
panel lights up red. The parking brake is
set.
Indicator lamp on Canadian models.
The remote control do es not have to be
inserted into the ignition lock for the parking
brake to be set.
While driving
If exceptional circumst ances should make it
necessary to set the pa rking brake while the
vehicle is in motion, pull on the button longer.
The vehicle continues to brake forcefully for as
long as you pull on the button.
The indicator lamp in the instrument
panel lights up red, a chime sounds and
the brake lamps light up.
Indicator lamp on Canadian models.
As soon as you brake the vehicle almost to a
stop, i.e., down to a speed of approx. 2 mph/
3 km/h or below, the pa rking brake remains set.
Releasing manually
Press the button with the brake depressed.
The indicator lamp in the instrument
panel goes out.
Indicator lamp on Canadian models.
When leaving the vehicle, always take
along the remote control; this precaution
prevents children from releasing the parking
brake, for example. <
Automatic Hold
The concept
This function assists yo u as you drive by auto-
matically setting and releasing the parking
brake, e.g. when you are stopped at a traffic sig-
nal or in stop-and-go traffic.
When Automatic Hold is ac tivated, the vehicle is
Page 70 of 317
Driving
68
automatically held in place when standing.
When driving up inclines, the system prevents
your vehicle from rolling
backward in an undes-
ired way.
After the engine is star ted, the system can be
activated and deactiva ted at any time the
driver's seat is occupied until the next time the
engine is switched off.
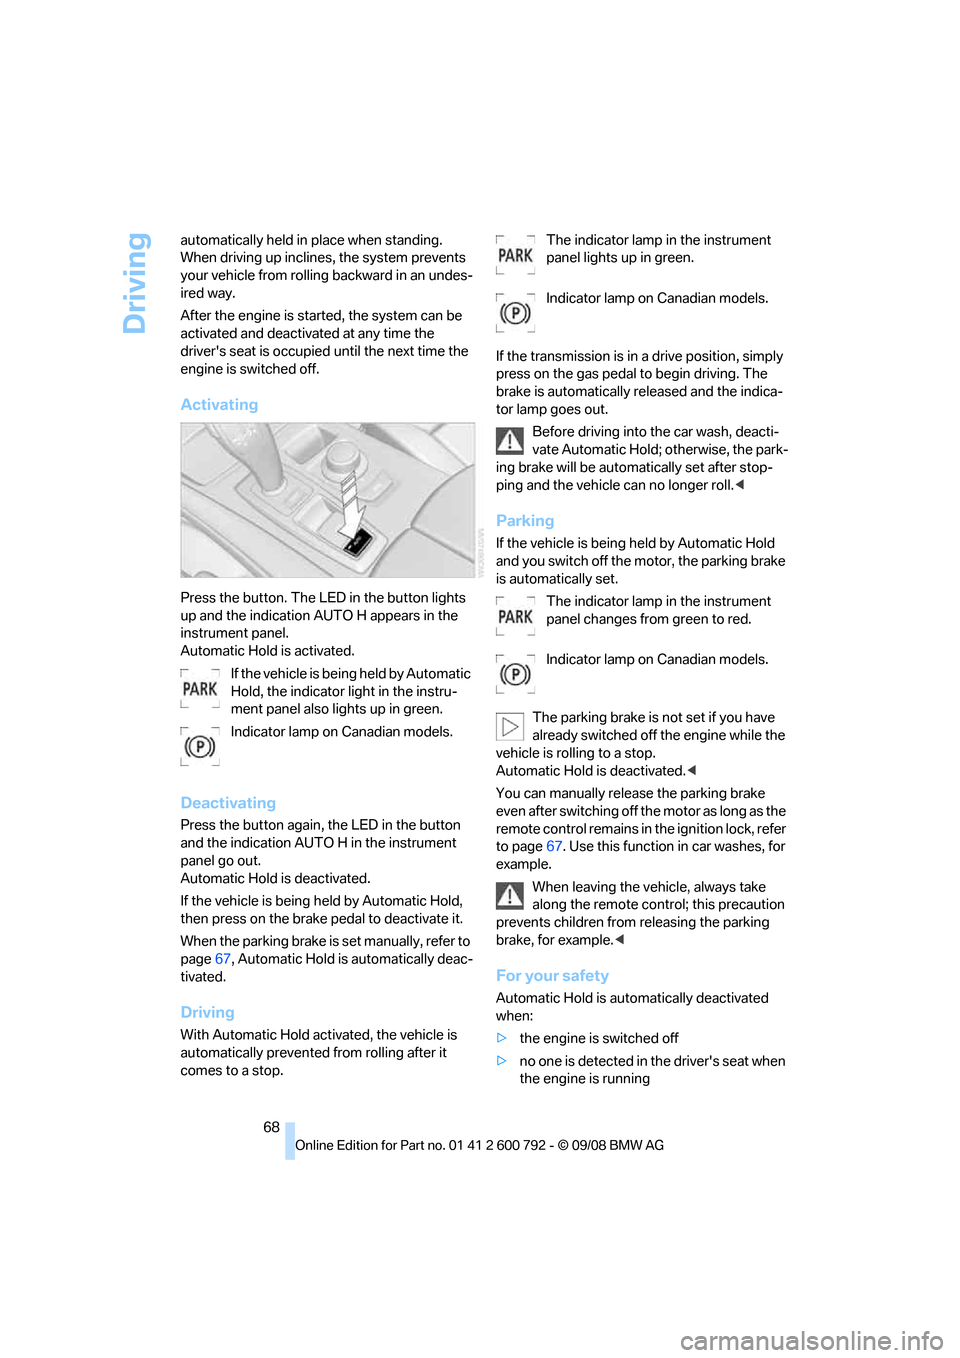
Activating
Press the button. The LED in the button lights
up and the indication AUTO H appears in the
instrument panel.
Automatic Hold is activated.
If the vehicle is bein g held by Automatic
Hold, the indicator light in the instru-
ment panel also lights up in green.
Indicator lamp on Canadian models.
Deactivating
Press the button again, the LED in the button
and the indication AUTO H in the instrument
panel go out.
Automatic Hold is deactivated.
If the vehicle is being held by Automatic Hold,
then press on the brake pedal to deactivate it.
When the parking brake is set manually, refer to
page 67, Automatic Hold is automatically deac-
tivated.
Driving
With Automatic Hold acti vated, the vehicle is
automatically prevented from rolling after it
comes to a stop. The indicator lamp in the instrument
panel lights up in green.
Indicator lamp on Canadian models.
If the transmission is in a drive position, simply
press on the gas pedal to begin driving. The
brake is automatically re leased and the indica-
tor lamp goes out.
Before driving into the car wash, deacti-
vate Automatic Hold; otherwise, the park-
ing brake will be automatically set after stop-
ping and the vehicle can no longer roll. <
Parking
If the vehicle is being held by Automatic Hold
and you switch off the motor, the parking brake
is automatically set.
The indicator lamp in the instrument
panel changes from green to red.
Indicator lamp on Canadian models.
The parking brake is not set if you have
already switched off the engine while the
vehicle is rolling to a stop.
Automatic Hold is deactivated. <
You can manually rele ase the parking brake
even after switching off th e motor as long as the
remote control remains in the ignition lock, refer
to page 67. Use this function in car washes, for
example.
When leaving the vehicle, always take
along the remote control; this precaution
prevents children from releasing the parking
brake, for example. <
For your safety
Automatic Hold is auto matically deactivated
when:
> the engine is switched off
> no one is detected in the driver's seat when
the engine is running
Page 73 of 317
Controls
71Reference
At a glance
Driving tips
Communications
Navigation
Entertainment
Mobility
The transmission automatically shifts into
park if you release the driver's safety belt
and open the driver's door with the engine run-
ning while in re verse or drive.
The picture from the rear view camera
* and
PDC Park Distance Control
* on the Control
Display is hidden. <
R Reverse
Select only with the vehicle stationary.
An interlock prevents inadvertent gearshifts
into transmission position R. To deactivate the
interlock, press the release button 1.
P Park
Select only with the vehicle stationary. The rear
wheels are locked.
P is engaged automatically as soon as
you switch off the engine unless N is
engaged and on vehicles with comfort access
the remote control is inserted in the ignition
lock, refer to page 65.<
N Neutral
Can, for example, be engaged in automatic car
washes. The vehicle can roll.
N remains engaged even after the engine
is switched off whenever you leave the
remote control in the ignition lock. This function
is used, for example, in a car wash, refer to
page 66. After approx. 30 minutes P is auto-
matically engaged. <
D Drive, automatic position
Position for normal vehi cle operation. All for-
ward gears are available.
Under normal operating conditions, the fuel
consumption is lowest when driving in posi-
tion D.
Kick-down
The kick-down mode provides maximum accel-
eration.
Press the accelerato r pedal beyond the
increased resistance at full throttle.
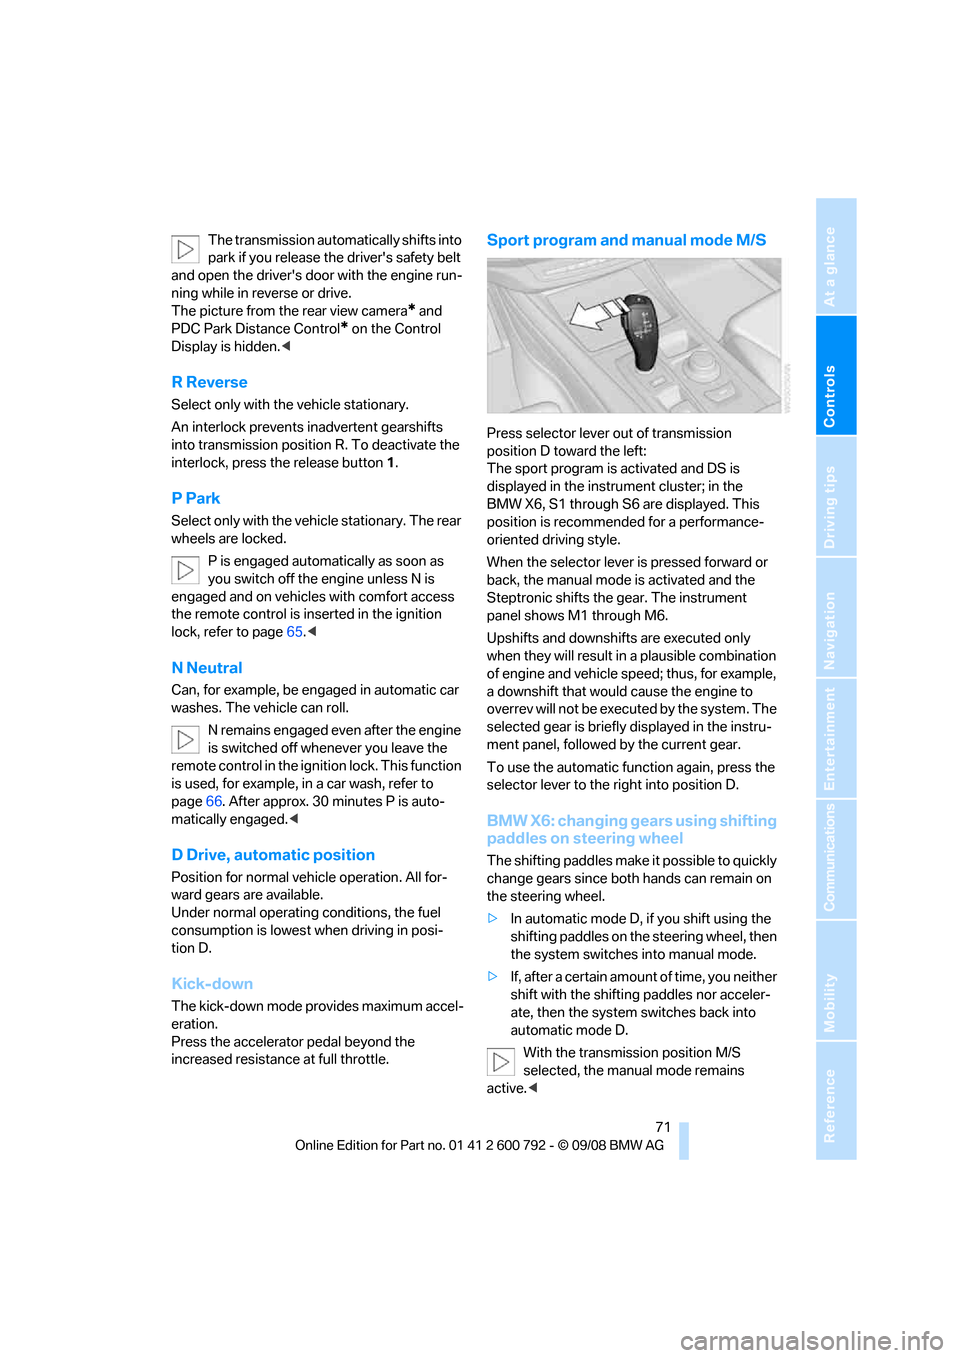
Sport program and manual mode M/S
Press selector lever out of transmission
position D toward the left:
The sport program is activated and DS is
displayed in the instru ment cluster; in the
BMW X6, S1 through S6 are displayed. This
position is recommend ed for a performance-
oriented driving style.
When the selector lever is pressed forward or
back, the manual mode is activated and the
Steptronic shifts the gear. The instrument
panel shows M1 through M6.
Upshifts and downshifts are executed only
when they will result in a plausible combination
of engine and vehicle speed; thus, for example,
a downshift that would cause the engine to
overrev will not be executed by the system. The
selected gear is briefly displayed in the instru-
ment panel, followed by the current gear.
To use the automatic func tion again, press the
selector lever to the right into position D.
BMW X6: changing gears using shifting
paddles on steering wheel
The shifting paddles make it possible to quickly
change gears since both hands can remain on
the steering wheel.
> In automatic mode D, if you shift using the
shifting paddles on the steering wheel, then
the system switches into manual mode.
> If, after a certain amount of time, you neither
shift with the shifting paddles nor acceler-
ate, then the system switches back into
automatic mode D.
With the transmission position M/S
selected, the manual mode remains
active.<
Page 74 of 317
Driving
72
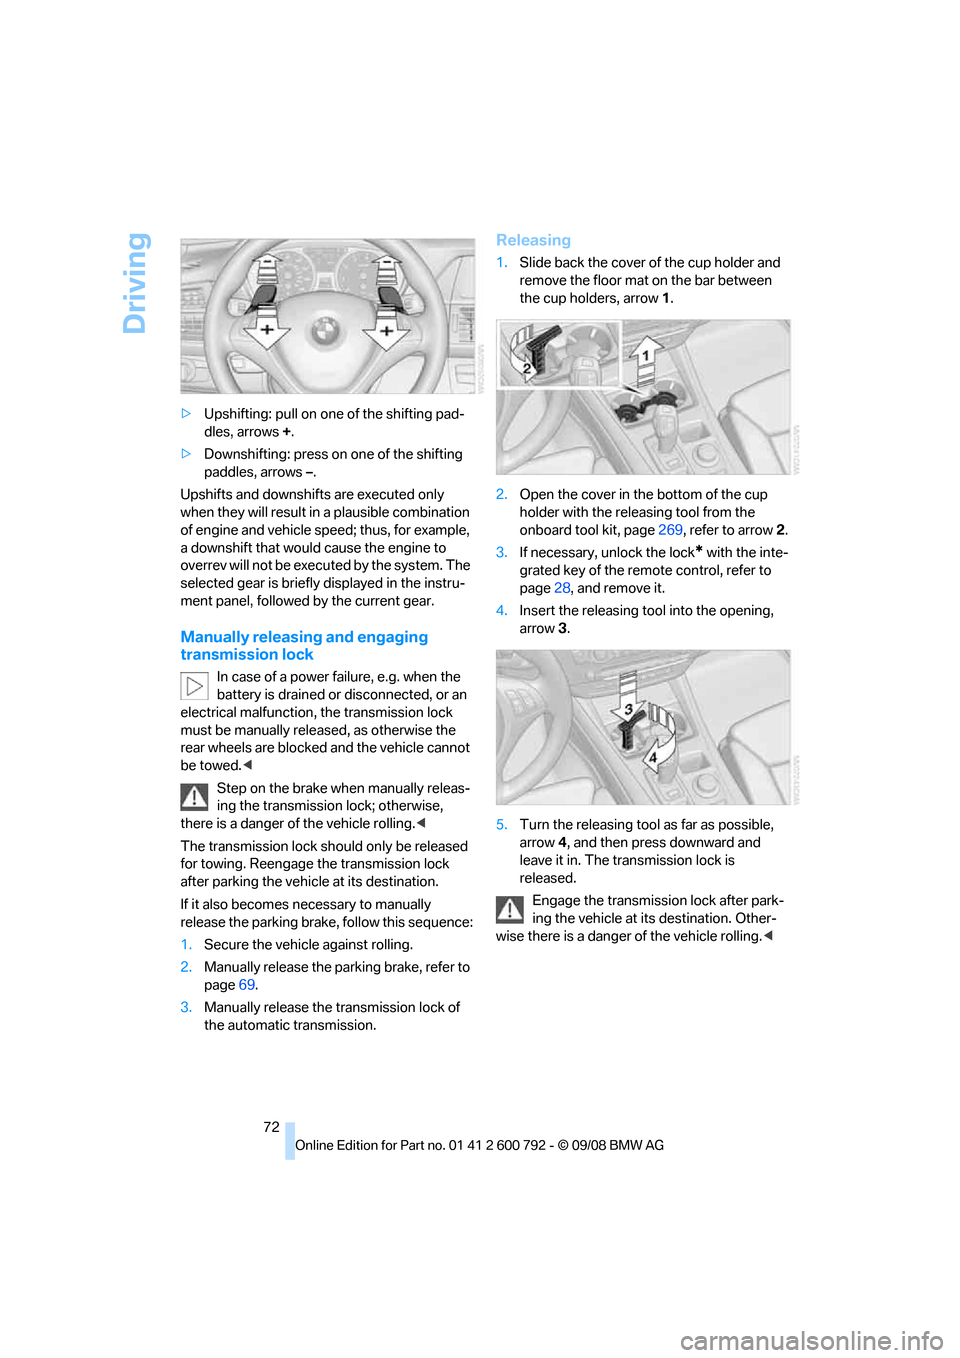
>
Upshifting: pull on one of the shifting pad-
dles, arrows +.
> Downshifting: press on one of the shifting
paddles, arrows –.
Upshifts and downshifts are executed only
when they will result in a plausible combination
of engine and vehicle speed; thus, for example,
a downshift that would cause the engine to
overrev will not be executed by the system. The
selected gear is briefly displayed in the instru-
ment panel, followed by the current gear.
Manually releasing and engaging
transmission lock
In case of a power failure, e.g. when the
battery is drained or disconnected, or an
electrical malfunction, the transmission lock
must be manually rele ased, as otherwise the
rear wheels are blocked and the vehicle cannot
be towed. <
Step on the brake when manually releas-
ing the transmission lock; otherwise,
there is a danger of the vehicle rolling. <
The transmission lock sh ould only be released
for towing. Reengage th e transmission lock
after parking the vehicle at its destination.
If it also becomes ne cessary to manually
release the parking brake, follow this sequence:
1. Secure the vehicle against rolling.
2. Manually release the parking brake, refer to
page 69.
3. Manually releas e the transmission lock of
the automatic transmission.
Releasing
1. Slide back the cover of the cup holder and
remove the floor mat on the bar between
the cup holders, arrow 1.
2. Open the cover in th e bottom of the cup
holder with the rele asing tool from the
onboard tool kit, page 269, refer to arrow 2.
3. If necessary, unlock the lock
* with the inte-
grated key of the remote control, refer to
page 28, and remove it.
4. Insert the releasing tool into the opening,
arrow 3.
5. Turn the releasing tool as far as possible,
arrow 4, and then press downward and
leave it in. The transmission lock is
released.
Engage the transmission lock after park-
ing the vehicle at its destination. Other-
wise there is a danger of the vehicle rolling.<
Page 75 of 317
Controls
73Reference
At a glance
Driving tips
Communications
Navigation
Entertainment
Mobility
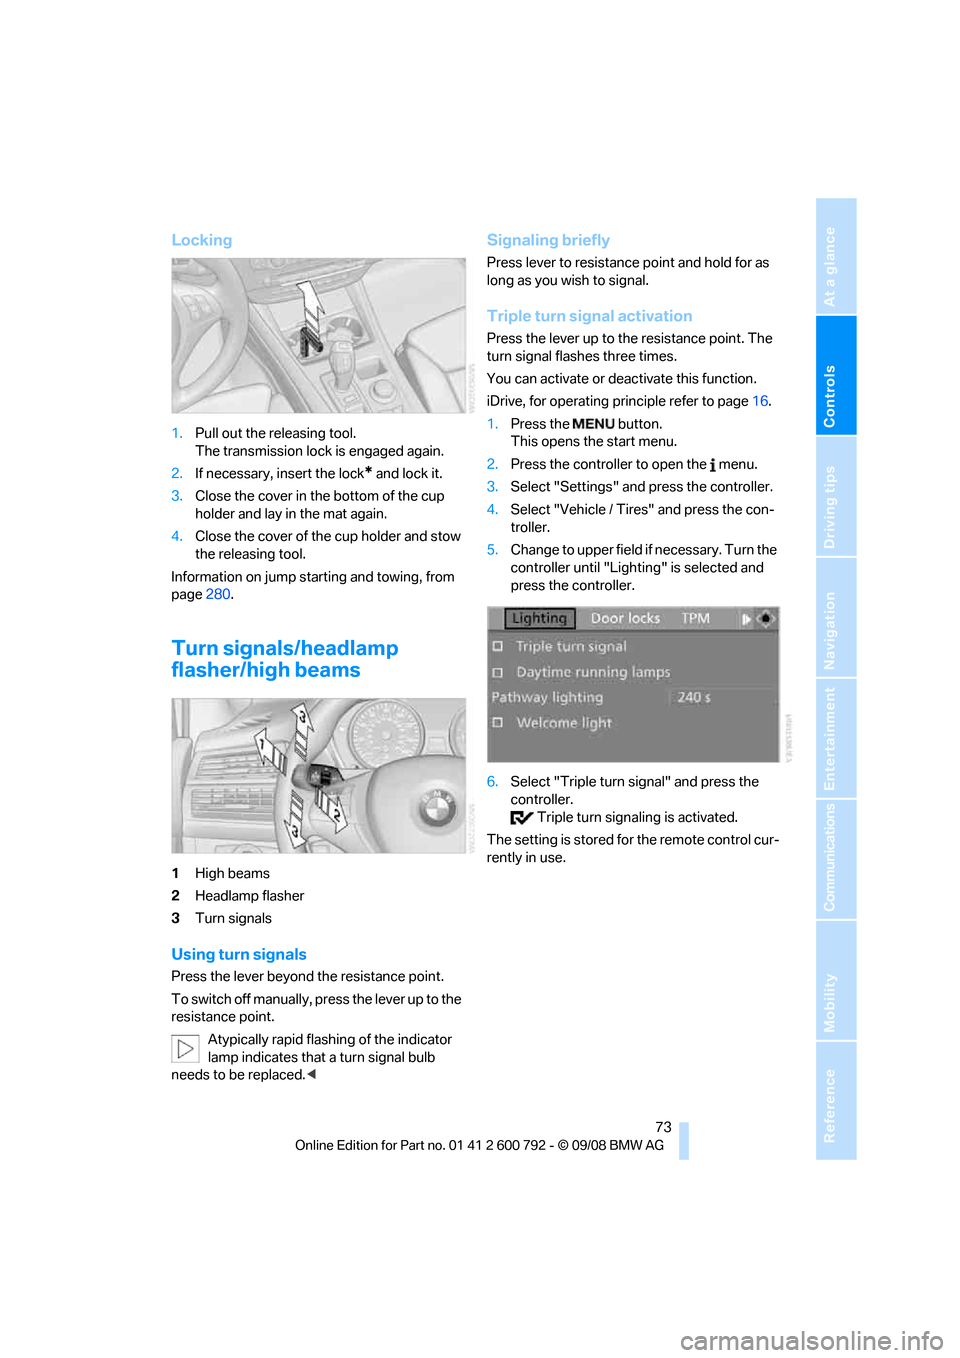
Locking
1.Pull out the releasing tool.
The transmission lock is engaged again.
2. If necessary, insert the lock
* and lock it.
3. Close the cover in th e bottom of the cup
holder and lay in the mat again.
4. Close the cover of the cup holder and stow
the releasing tool.
Information on jump starting and towing, from
page 280.
Turn signals/headlamp
flasher/high beams
1High beams
2 Headlamp flasher
3 Turn signals
Using turn signals
Press the lever beyond the resistance point.
To switch off manually, pr ess the lever up to the
resistance point.
Atypically rapid flashi ng of the indicator
lamp indicates that a turn signal bulb
needs to be replaced. <
Signaling briefly
Press lever to resistance point and hold for as
long as you wish to signal.
Triple turn signal activation
Press the lever up to the resistance point. The
turn signal flashes three times.
You can activate or deac tivate this function.
iDrive, for operating pr inciple refer to page16.
1. Press the button.
This opens the start menu.
2. Press the controller to open the menu.
3. Select "Settings" and press the controller.
4. Select "Vehicle / Tire s" and press the con-
troller.
5. Change to upper field if necessary. Turn the
controller until "Lighting" is selected and
press the controller.
6. Select "Triple turn signal" and press the
controller.
Triple turn sign aling is activated.
The setting is stored for the remote control cur-
rently in use.
Page 80 of 317
Everything under control
78
Everything under control
Odometer, outside
temperature display, clock
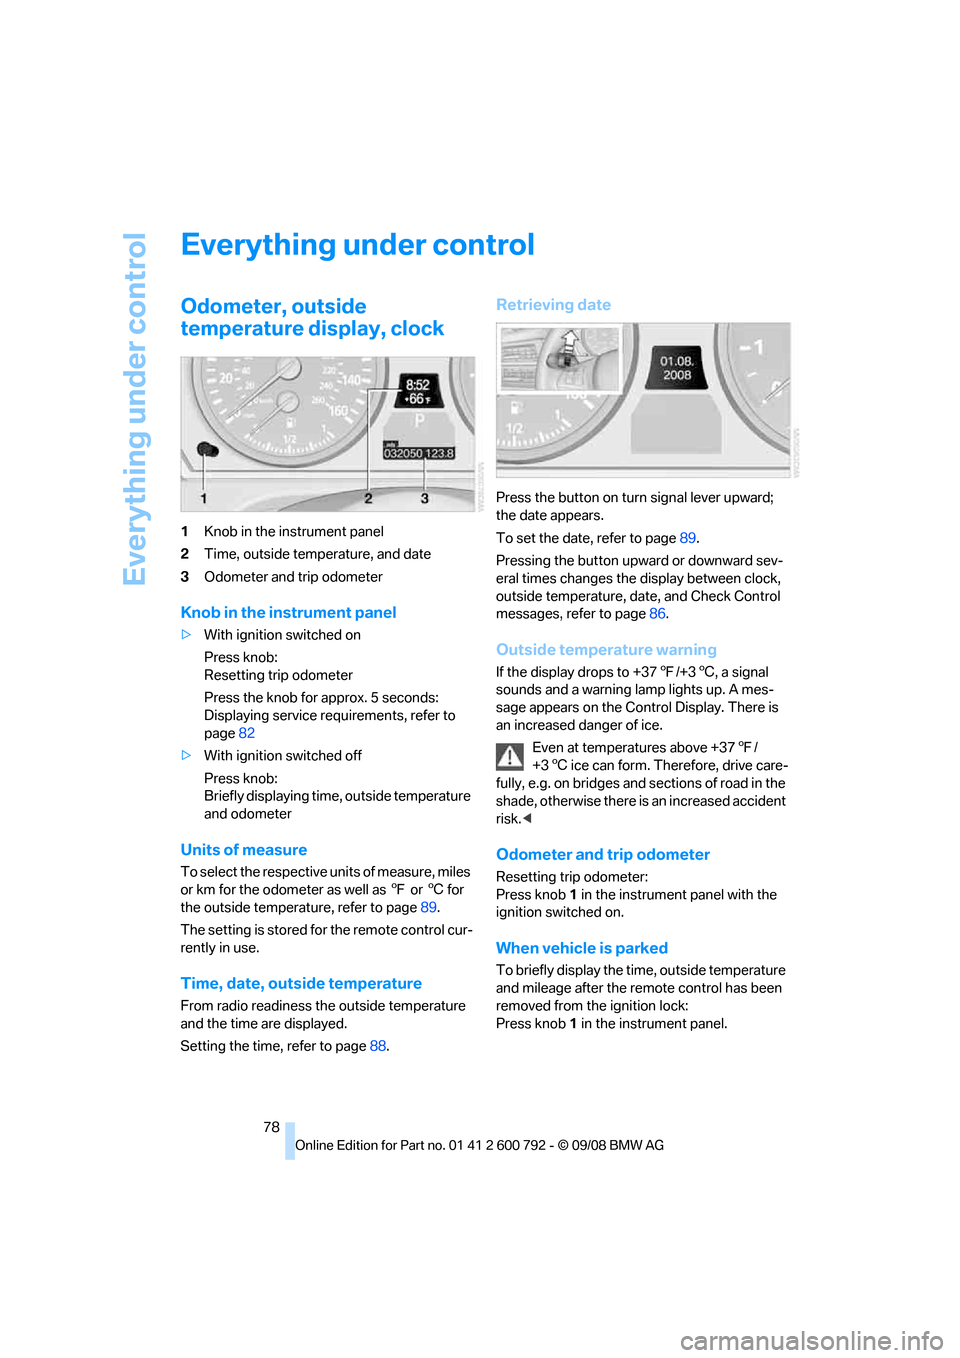
1Knob in the instrument panel
2 Time, outside temperature, and date
3 Odometer and trip odometer
Knob in the instrument panel
>With ignition switched on
Press knob:
Resetting trip odometer
Press the knob for approx. 5 seconds:
Displaying service requirements, refer to
page 82
> With ignition switched off
Press knob:
Briefly displaying time, outside temperature
and odometer
Units of measure
To select the respective units of measure, miles
or km for the odometer as well as 7 or 6 for
the outside temperat ure, refer to page89.
The setting is stored fo r the remote control cur-
rently in use.
Time, date, outside temperature
From radio readiness the outside temperature
and the time are displayed.
Setting the time, refer to page 88.
Retrieving date
Press the button on turn signal lever upward;
the date appears.
To set the date, refer to page 89.
Pressing the button upward or downward sev-
eral times changes the display between clock,
outside temperature, da te, and Check Control
messages, refer to page 86.
Outside temperature warning
If the display drops to +37 7/+3 6, a signal
sounds and a warning lamp lights up. A mes-
sage appears on the Control Display. There is
an increased danger of ice.
Even at temperatures above +37 7/
+3 6 ice can form. Therefore, drive care-
fully, e.g. on bridges and sections of road in the
shade, otherwise there is an increased accident
risk.<
Odometer and trip odometer
Resetting trip odometer:
Press knob 1 in the instrument panel with the
ignition switched on.
When vehicle is parked
To briefly display the time, outside temperature
and mileage after the re mote control has been
removed from the ignition lock:
Press knob 1 in the instrument panel.
Page 90 of 317
Everything under control
88
Settings on Control Display
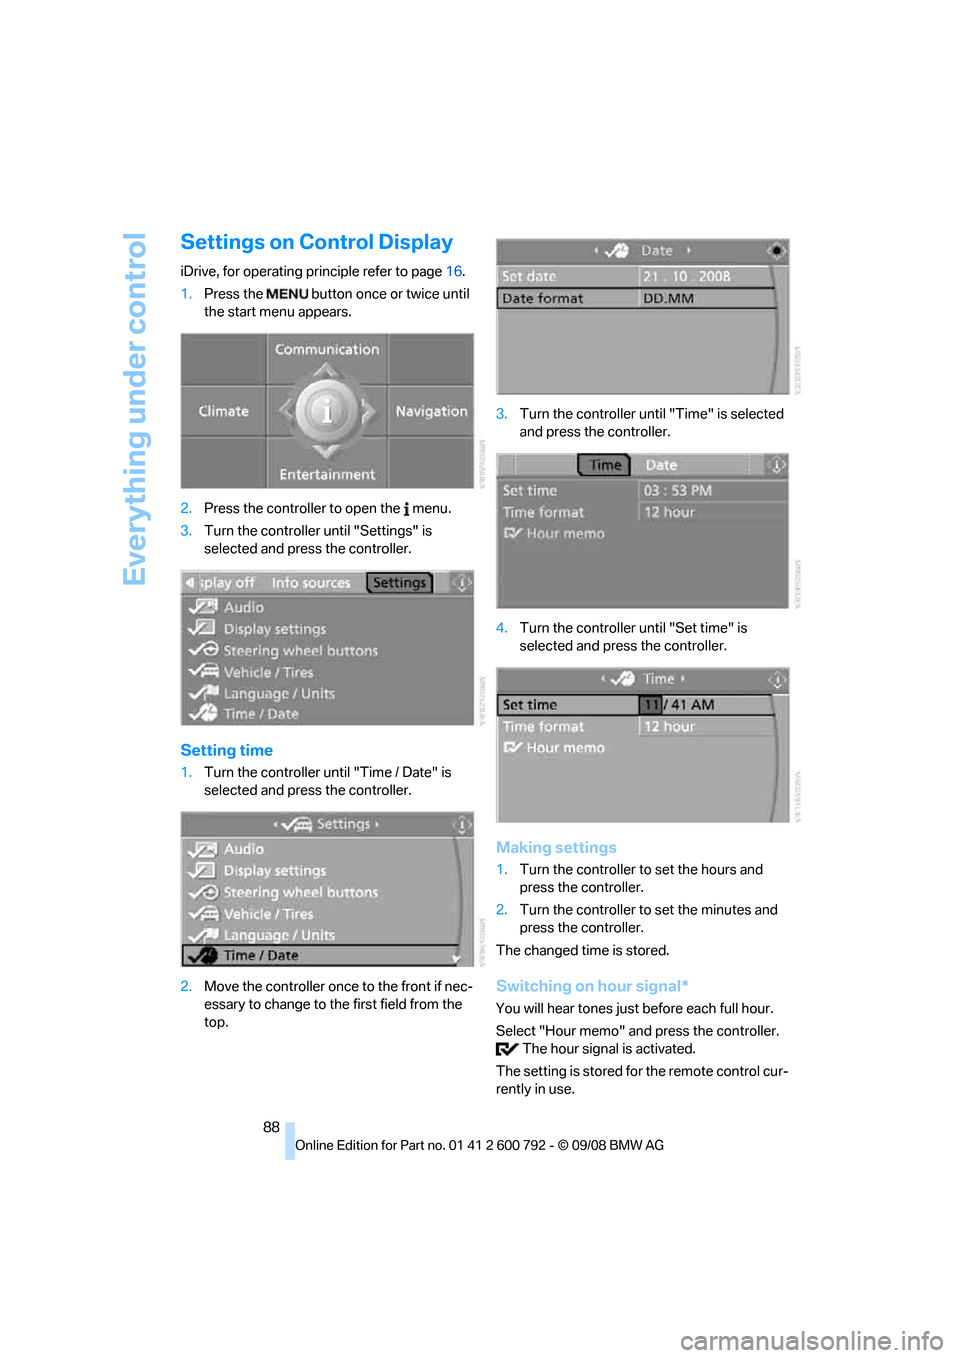
iDrive, for operating principle refer to page16.
1. Press the button once or twice until
the start menu appears.
2. Press the controller to open the menu.
3. Turn the controller until "Settings" is
selected and press the controller.
Setting time
1.Turn the controller until "Time / Date" is
selected and press the controller.
2. Move the controller once to the front if nec-
essary to change to th e first field from the
top. 3.
Turn the controller until "Time" is selected
and press the controller.
4. Turn the controller until "Set time" is
selected and press the controller.
Making settings
1.Turn the controller to set the hours and
press the controller.
2. Turn the controller to set the minutes and
press the controller.
The changed time is stored.
Switching on hour signal*
You will hear tones just before each full hour.
Select "Hour memo" and press the controller. The hour signal is activated.
The setting is stored fo r the remote control cur-
rently in use.
Page 91 of 317
Controls
89Reference
At a glance
Driving tips
Communications
Navigation
Entertainment
Mobility
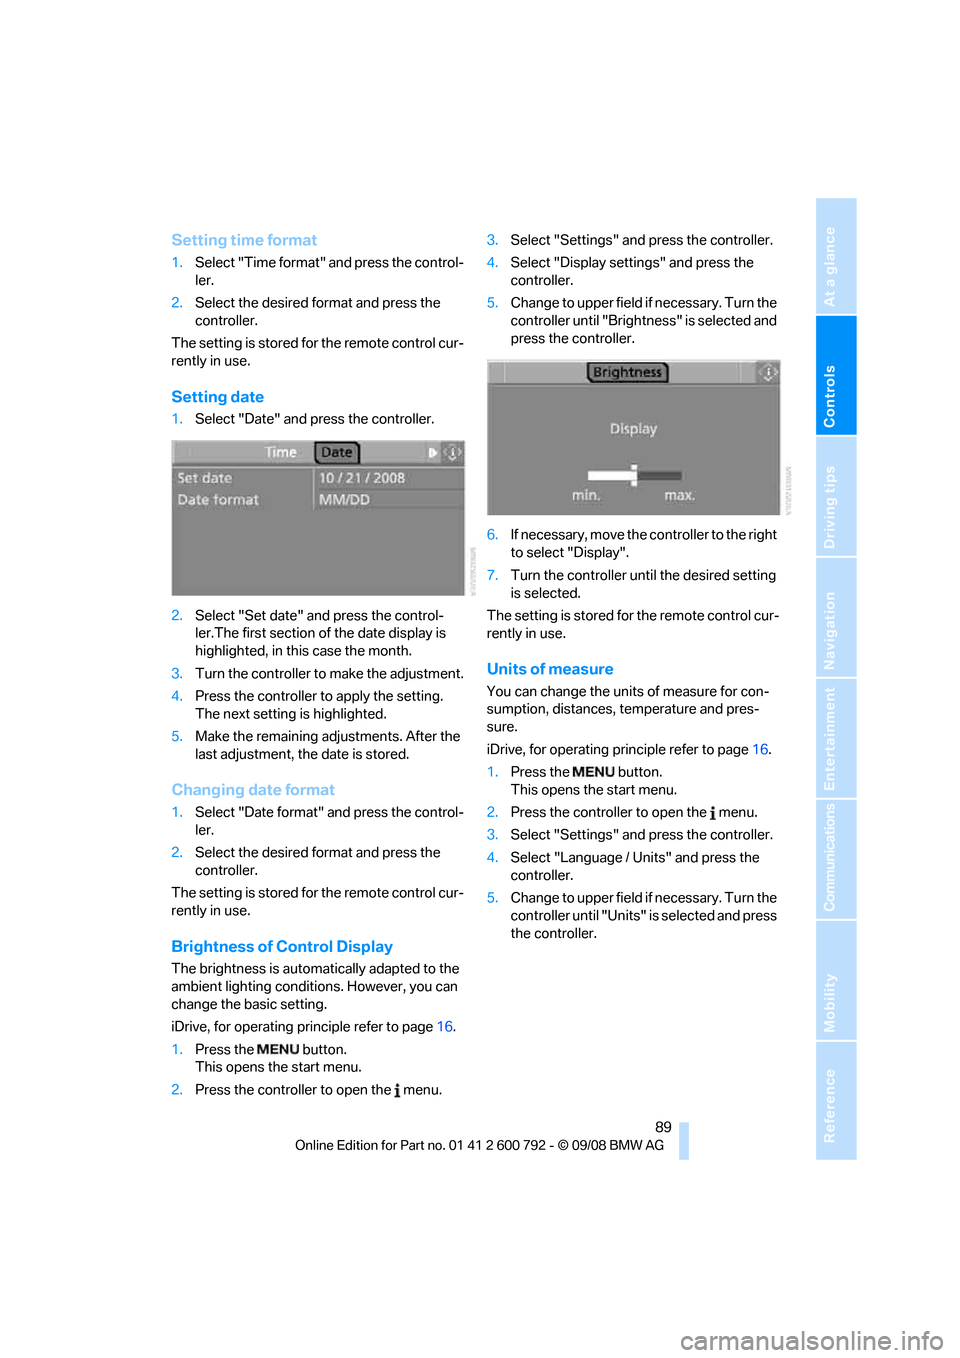
Setting time format
1.Select "Time format" and press the control-
ler.
2. Select the desired format and press the
controller.
The setting is stored for the remote control cur-
rently in use.
Setting date
1. Select "Date" and press the controller.
2. Select "Set date" and press the control-
ler.The first section of the date display is
highlighted, in this case the month.
3. Turn the controller to make the adjustment.
4. Press the controller to apply the setting.
The next setting is highlighted.
5. Make the remaining ad justments. After the
last adjustment, the date is stored.
Changing date format
1. Select "Date format" and press the control-
ler.
2. Select the desired format and press the
controller.
The setting is stored for the remote control cur-
rently in use.
Brightness of Control Display
The brightness is automatically adapted to the
ambient lighting conditions. However, you can
change the basic setting.
iDrive, for operating principle refer to page 16.
1. Press the button.
This opens the start menu.
2. Press the controller to open the menu. 3.
Select "Settings" and press the controller.
4. Select "Display settings" and press the
controller.
5. Change to upper field if necessary. Turn the
controller until "Brightn ess" is selected and
press the controller.
6. If necessary, move the controller to the right
to select "Display".
7. Turn the controller until the desired setting
is selected.
The setting is stored for the remote control cur-
rently in use.
Units of measure
You can change the units of measure for con-
sumption, distances, temperature and pres-
sure.
iDrive, for operating pr inciple refer to page16.
1. Press the button.
This opens the start menu.
2. Press the controller to open the menu.
3. Select "Settings" and press the controller.
4. Select "Language / Units" and press the
controller.
5. Change to upper field if necessary. Turn the
controller until "Units" is selected and press
the controller.
Page 92 of 317
Everything under control
90
6.
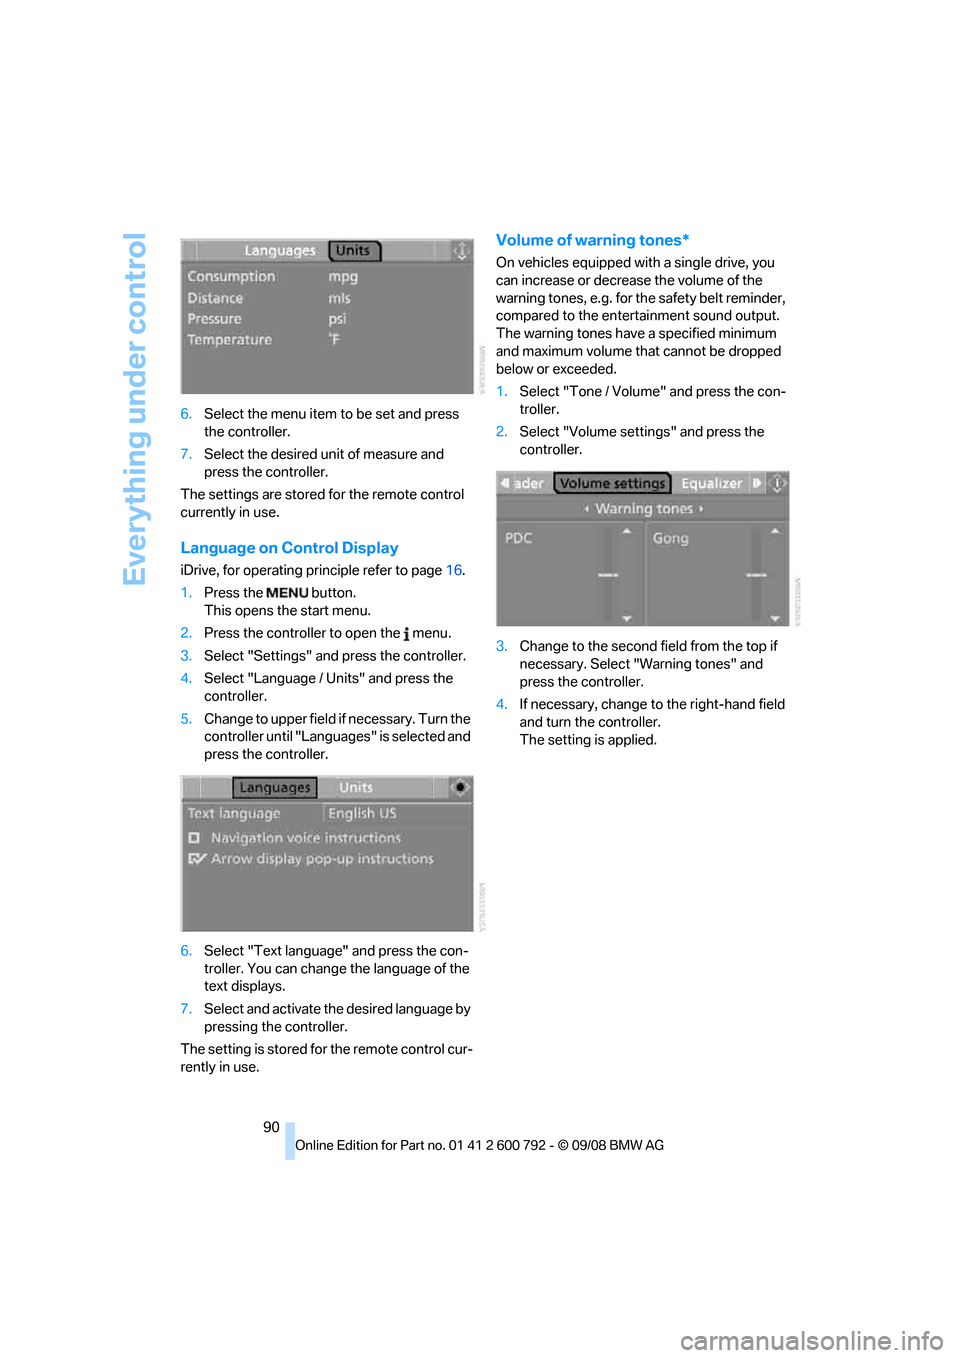
Select the menu item to be set and press
the controller.
7. Select the desired unit of measure and
press the controller.
The settings are stored for the remote control
currently in use.
Language on Control Display
iDrive, for operating pr inciple refer to page16.
1. Press the button.
This opens the start menu.
2. Press the controller to open the menu.
3. Select "Settings" and press the controller.
4. Select "Language / Units" and press the
controller.
5. Change to upper field if necessary. Turn the
controller until "Languages" is selected and
press the controller.
6. Select "Text language" and press the con-
troller. You can change the language of the
text displays.
7. Select and activate th e desired language by
pressing the controller.
The setting is stored fo r the remote control cur-
rently in use.
Volume of warning tones*
On vehicles equipped with a single drive, you
can increase or decrease the volume of the
warning tones, e.g. for th e safety belt reminder,
compared to the entert ainment sound output.
The warning tones have a specified minimum
and maximum volume th at cannot be dropped
below or exceeded.
1. Select "Tone / Volume" and press the con-
troller.
2. Select "Volume settings" and press the
controller.
3. Change to the second field from the top if
necessary. Select "Warning tones" and
press the controller.
4. If necessary, change to the right-hand field
and turn the controller.
The setting is applied.
Page 94 of 317
Technology for comfort, convenience and safety
92
PDC with visual warning
You can also have the system show distances
to objects on the Control Display. Objects that
are farther away are already shown there before
a signal tone sounds.
The setting is stored for the remote control cur-
rently in use.
If the vehicle is equipped with a rear view cam-
era, refer to Displays on page 95.
iDrive, for operating pr inciple refer to page16.
1. Press the button.
This opens the start menu.
2. Press the controller to open the menu.
3. Select "Settings" and press the controller.
4. Select "Vehicle / Tire s" and press the con-
troller.
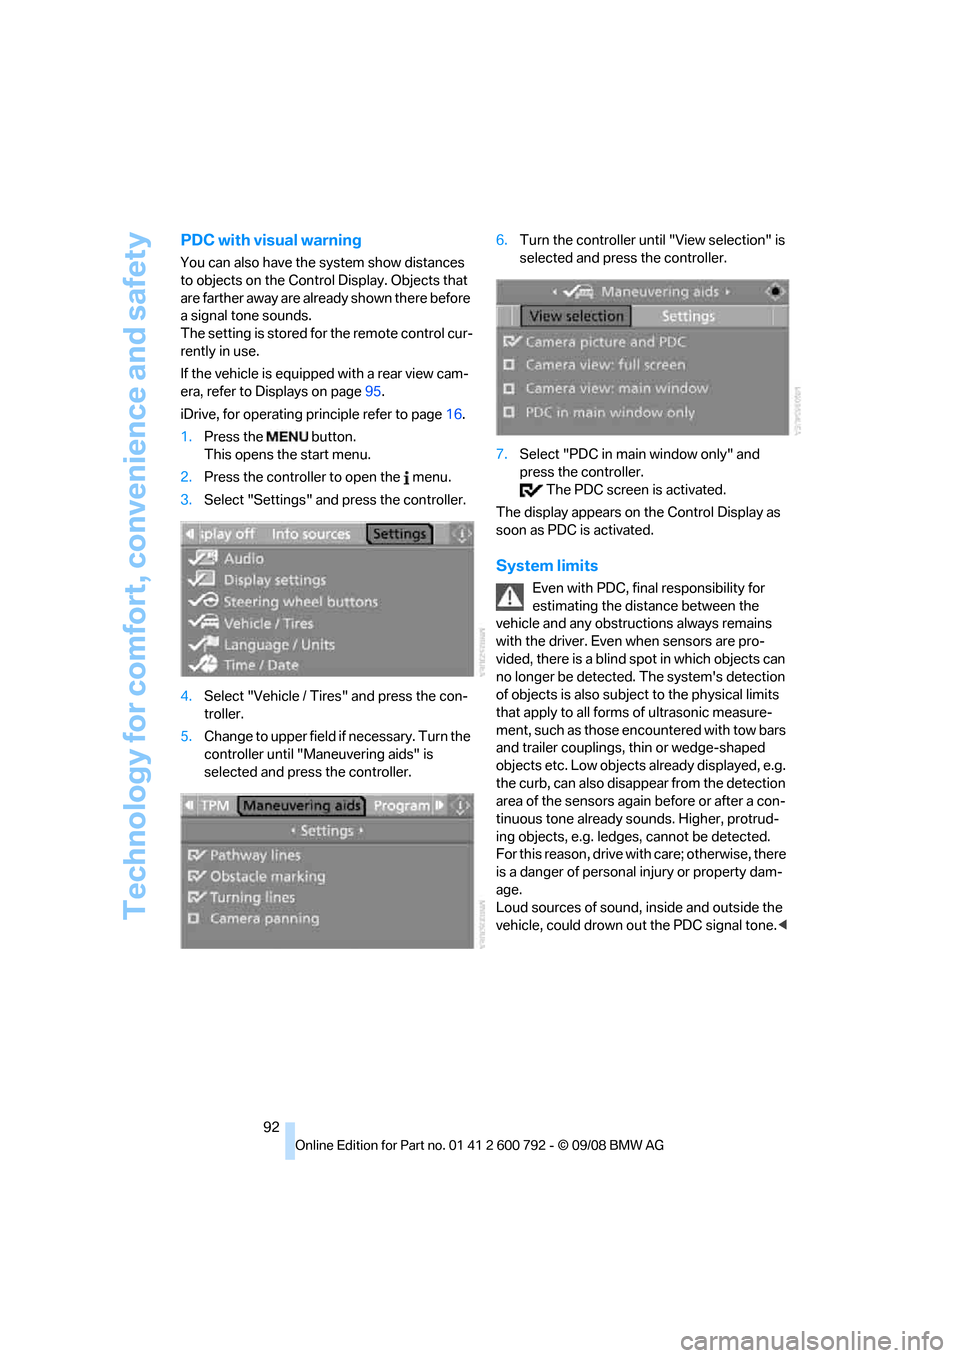
5. Change to upper field if necessary. Turn the
controller until "Maneuvering aids" is
selected and press the controller. 6.
Turn the controller until "View selection" is
selected and press the controller.
7. Select "PDC in main window only" and
press the controller.
The PDC screen is activated.
The display appears on the Control Display as
soon as PDC is activated.
System limits
Even with PDC, final responsibility for
estimating the distance between the
vehicle and any obstructions always remains
with the driver. Even when sensors are pro-
vided, there is a blind sp ot in which objects can
no longer be detected. The system's detection
of objects is also subjec t to the physical limits
that apply to all forms of ultrasonic measure-
ment, such as those encountered with tow bars
and trailer couplings, th in or wedge-shaped
objects etc. Low objects already displayed, e.g.
the curb, can also disappear from the detection
area of the sensors again before or after a con-
tinuous tone already sounds. Higher, protrud-
ing objects, e.g. ledg es, cannot be detected.
For this reason, drive with care; otherwise, there
is a danger of personal injury or property dam-
age.
Loud sources of sound, inside and outside the
vehicle, could drown ou t the PDC signal tone.<