ESP BMW X5M 2009 E70 Workshop Manual
[x] Cancel search | Manufacturer: BMW, Model Year: 2009, Model line: X5M, Model: BMW X5M 2009 E70Pages: 317, PDF Size: 9.56 MB
Page 163 of 317
Navigation
Driving tips
161Reference
At a glance
Controls
Communications
Entertainment
Mobility
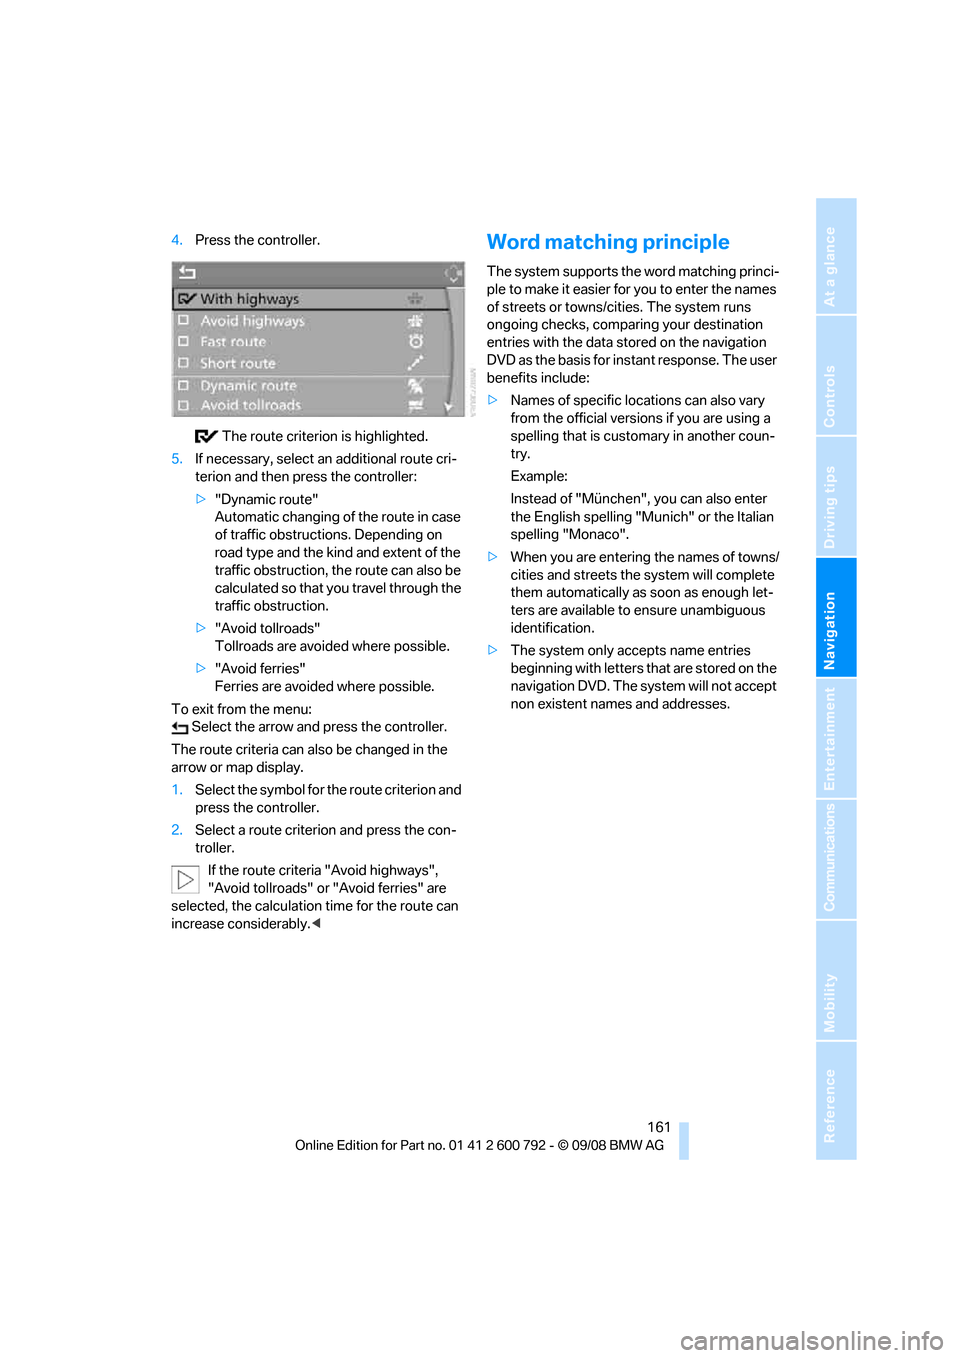
4.Press the controller.
The route criterion is highlighted.
5. If necessary, select an additional route cri-
terion and then press the controller:
>"Dynamic route"
Automatic changing of the route in case
of traffic obstructions. Depending on
road type and the kind and extent of the
traffic obstruction, the route can also be
calculated so that yo u travel through the
traffic obstruction.
> "Avoid tollroads"
Tollroads are avoi ded where possible.
> "Avoid ferries"
Ferries are avoided where possible.
To exit from the menu: Select the arrow and press the controller.
The route criteria can also be changed in the
arrow or map display.
1. Select the symbol for the route criterion and
press the controller.
2. Select a route criterion and press the con-
troller.
If the route criteria "Avoid highways",
"Avoid tollroads" or "Avoid ferries" are
selected, the calculation time for the route can
increase considerably.
ple to make it easier for you to enter the names
of streets or towns/cities. The system runs
ongoing checks, comparing your destination
entries with the data stored on the navigation
DVD as the basis for instant response. The user
benefits include:
>Names of specific loca tions can also vary
from the official versions if you are using a
spelling that is customary in another coun-
try.
Example:
Instead of "München", you can also enter
the English spelling "Mun ich" or the Italian
spelling "Monaco".
> When you are entering the names of towns/
cities and streets the system will complete
them automatically as soon as enough let-
ters are available to ensure unambiguous
identification.
> The system only accepts name entries
beginning with letters that are stored on the
navigation DVD. The system will not accept
non existent names and addresses.
Page 166 of 317
Destination guidance
164
To exit from the menu:
Select the arrow and press the controller.
Displaying map view
You can have your current position displayed on
a map. After starting th e destination guidance,
the planned route is shown on the map.
1. Select "Navigation" and press the control-
ler.
2. Change into the fourth field from the top.
Turn the controller until the desired map
view is selected:
>"Map facing north"
> "Map direction of travel"
> "Perspective"
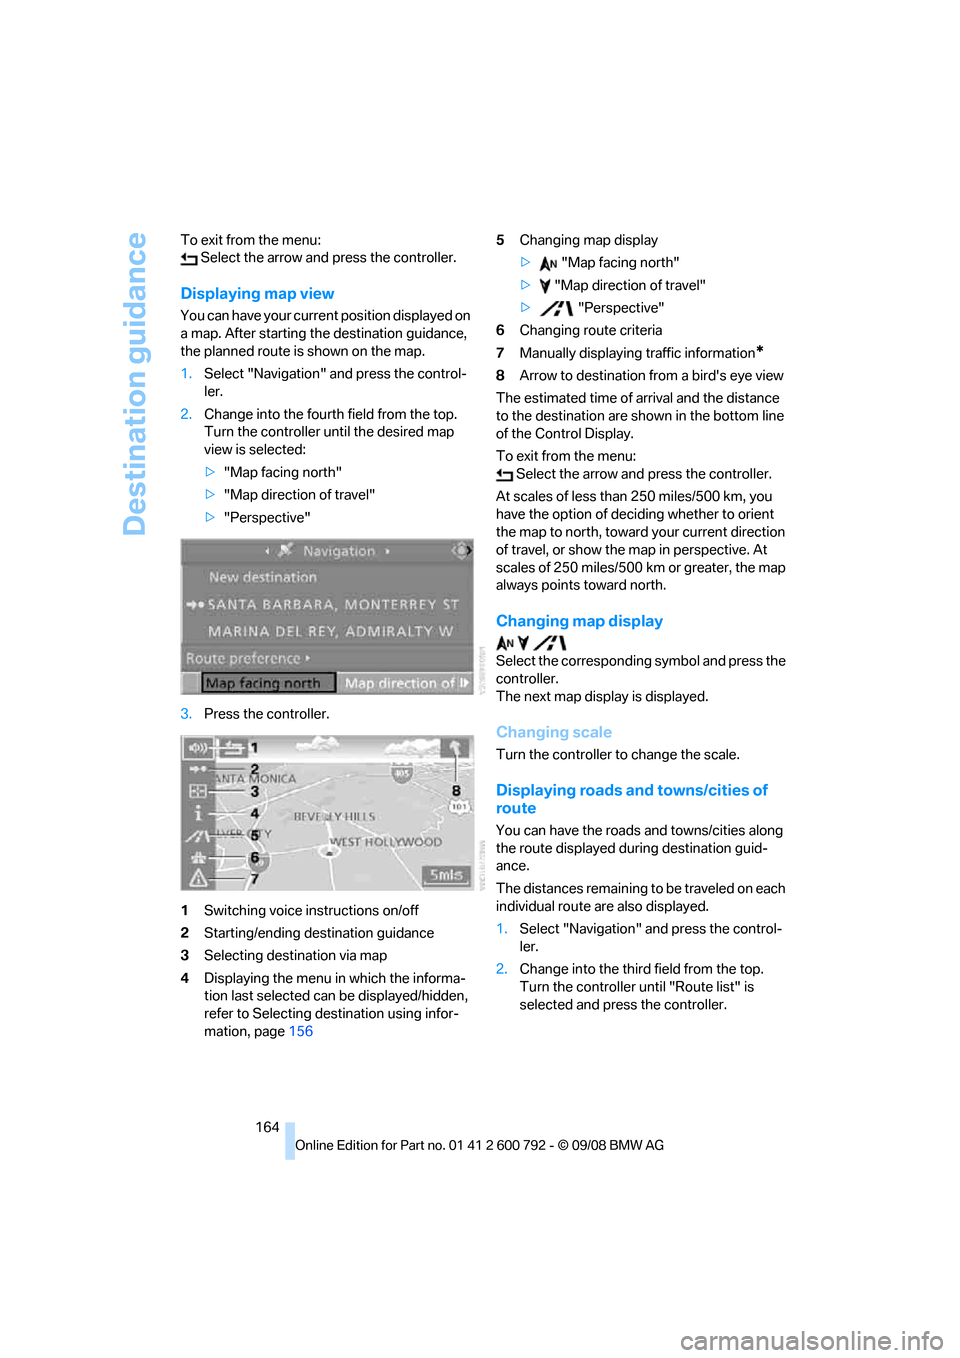
3. Press the controller.
1 Switching voice instructions on/off
2 Starting/ending destination guidance
3 Selecting destination via map
4 Displaying the menu in which the informa-
tion last selected can be displayed/hidden,
refer to Selecting destination using infor-
mation, page 156 5
Changing map display
> "Map facing north"
> "Map direction of travel"
> "Perspective"
6 Changing route criteria
7 Manually displaying traffic information
*
8Arrow to destination from a bird's eye view
The estimated time of arrival and the distance
to the destination are shown in the bottom line
of the Control Display.
To exit from the menu: Select the arrow and press the controller.
At scales of less than 250 miles/500 km, you
have the option of deciding whether to orient
the map to north, toward your current direction
of travel, or show the map in perspective. At
scales of 250 miles/500 km or greater, the map
always points toward north.
Changing map display
Select the corresponding symbol and press the
controller.
The next map display is displayed.
Changing scale
Turn the controller to change the scale.
Displaying roads an d towns/cities of
route
You can have the roads and towns/cities along
the route displayed during destination guid-
ance.
The distances remaining to be traveled on each
individual route are also displayed.
1. Select "Navigation" and press the control-
ler.
2. Change into the third field from the top.
Turn the controller until "Route list" is
selected and press the controller.
Page 171 of 317
Navigation
Driving tips
169Reference
At a glance
Controls
Communications
Entertainment
Mobility
Traffic information during destination
guidance
If there are traffic obstructions on the planned
route, the traffic information symbols are dis-
played with a red border.
System response will vary depending on
whether or not "Dynamic route" is selected,
refer to page 160.
Displaying traffic obstructions
If a traffic obstruction is reported to the naviga-
tion system and "Dynamic route" is not
selected, then you will be provided with certain
information from a distance of approx. 25 miles/
40 km, e.g. the length of the traffic jam.
The last possible junction will be displayed
shortly before this.
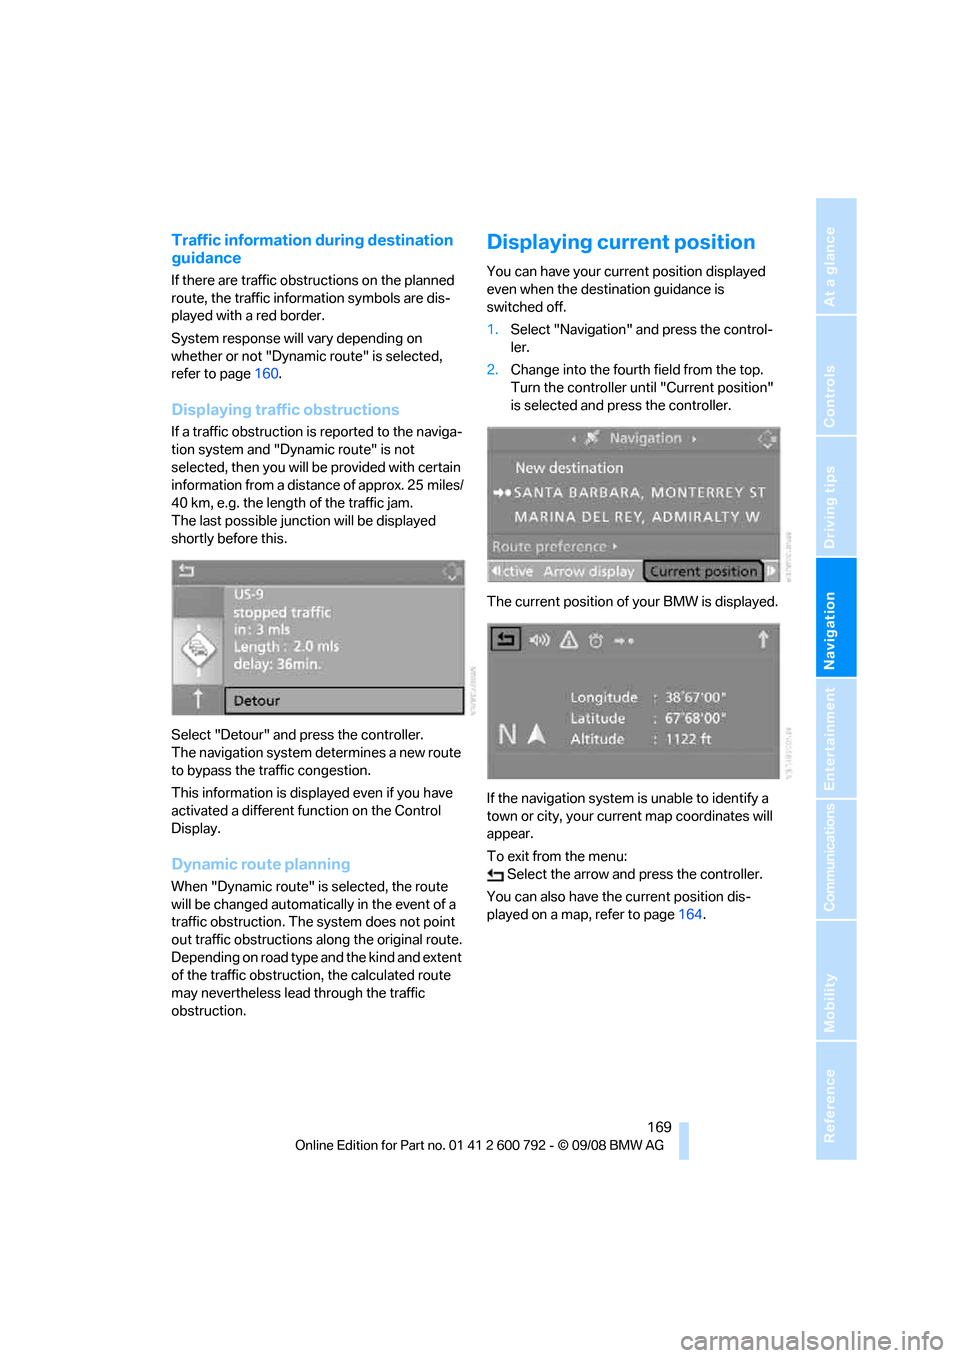
Select "Detour" and press the controller.
The navigation system determines a new route
to bypass the traffic congestion.
This information is disp layed even if you have
activated a different fu nction on the Control
Display.
Dynamic route planning
When "Dynamic route" is selected, the route
will be changed automatica lly in the event of a
traffic obstruction. The system does not point
out traffic obstructions along the original route.
Depending on road type and the kind and extent
of the traffic obstruction, the calculated route
may nevertheless lead through the traffic
obstruction.
Displaying current position
You can have your current position displayed
even when the destination guidance is
switched off.
1. Select "Navigation" and press the control-
ler.
2. Change into the fourth field from the top.
Turn the controller until "Current position"
is selected and pr ess the controller.
The current position of your BMW is displayed.
If the navigation system is unable to identify a
town or city, your current map coordinates will
appear.
To exit from the menu: Select the arrow an d press the controller.
You can also have the current position dis-
played on a map, refer to page 164.
Page 180 of 317
Radio
178
Radio
Your radio provides reception of the FM and AM
wavebands.
Listening to radio
Press the knob if the sound output is switched
off.
iDrive, for operating principle refer to page16.
1. Press the button.
This opens the start menu.
2. Move the controller backwards to open
"Entertainment".
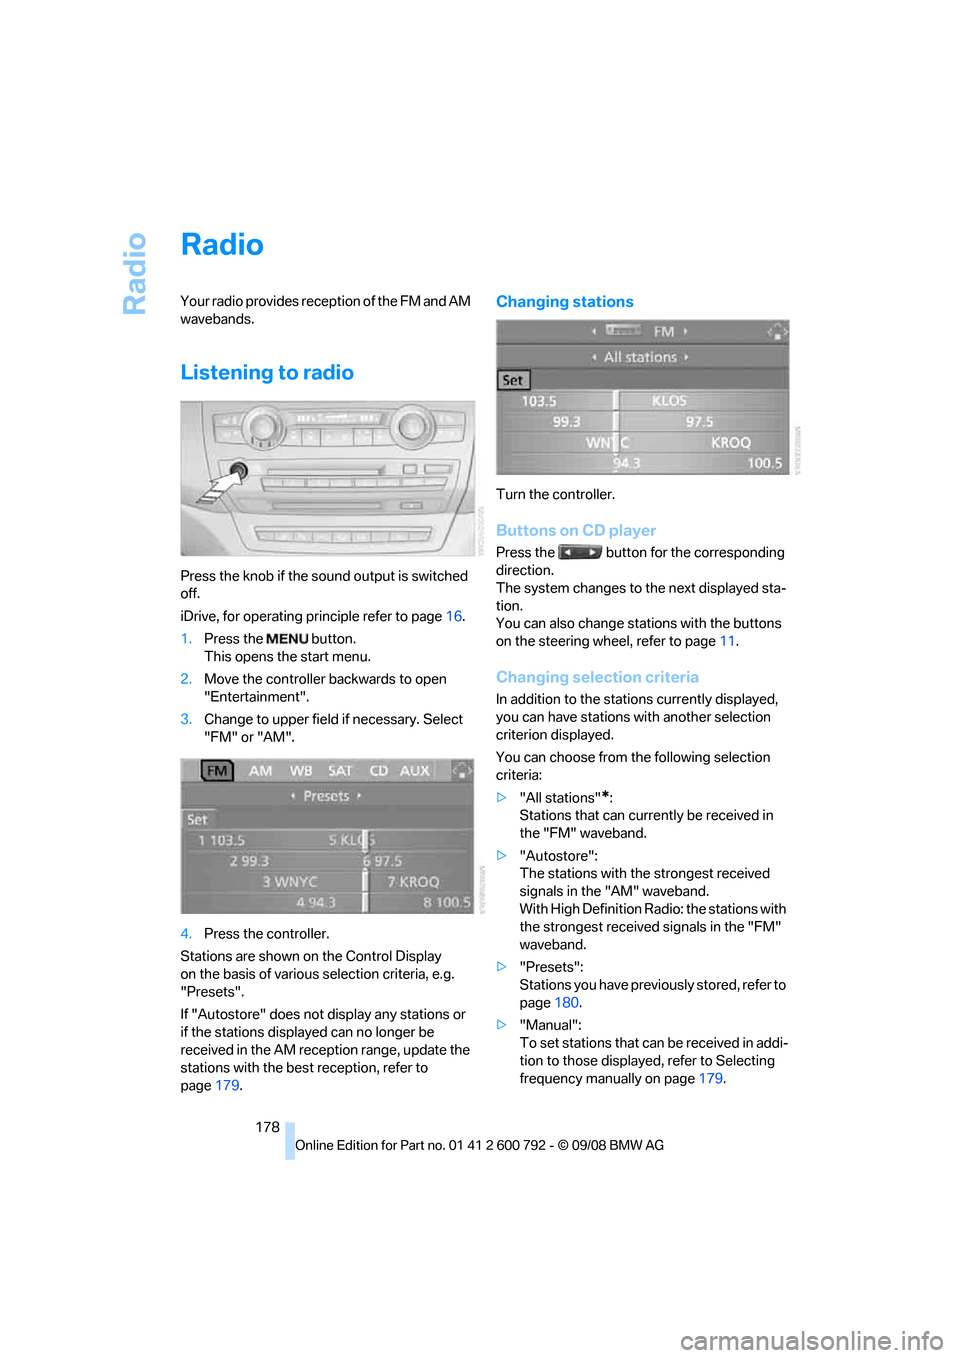
3. Change to upper field if necessary. Select
"FM" or "AM".
4. Press the controller.
Stations are shown on the Control Display
on the basis of various selection criteria, e.g.
"Presets".
If "Autostore" does not display any stations or
if the stations displayed can no longer be
received in the AM reception range, update the
stations with the best reception, refer to
page 179.
Changing stations
Turn the controller.
Buttons on CD player
Press the button for the corresponding
direction.
The system changes to the next displayed sta-
tion.
You can also change stat ions with the buttons
on the steering wheel, refer to page 11.
Changing selection criteria
In addition to the stations currently displayed,
you can have stations with another selection
criterion displayed.
You can choose from the following selection
criteria:
> "All stations"
*:
Stations that can currently be received in
the "FM" waveband.
> "Autostore":
The stations with the strongest received
signals in the "AM" waveband.
With High Definition Radio: the stations with
the strongest received signals in the "FM"
waveband.
> "Presets":
Stations you have previously stored, refer to
page 180.
> "Manual":
To set stations that ca n be received in addi-
tion to those displayed, refer to Selecting
frequency manually on page 179.
Page 181 of 317
Navigation
Entertainment
Driving tips
179Reference
At a glance
Controls
Communications
Mobility
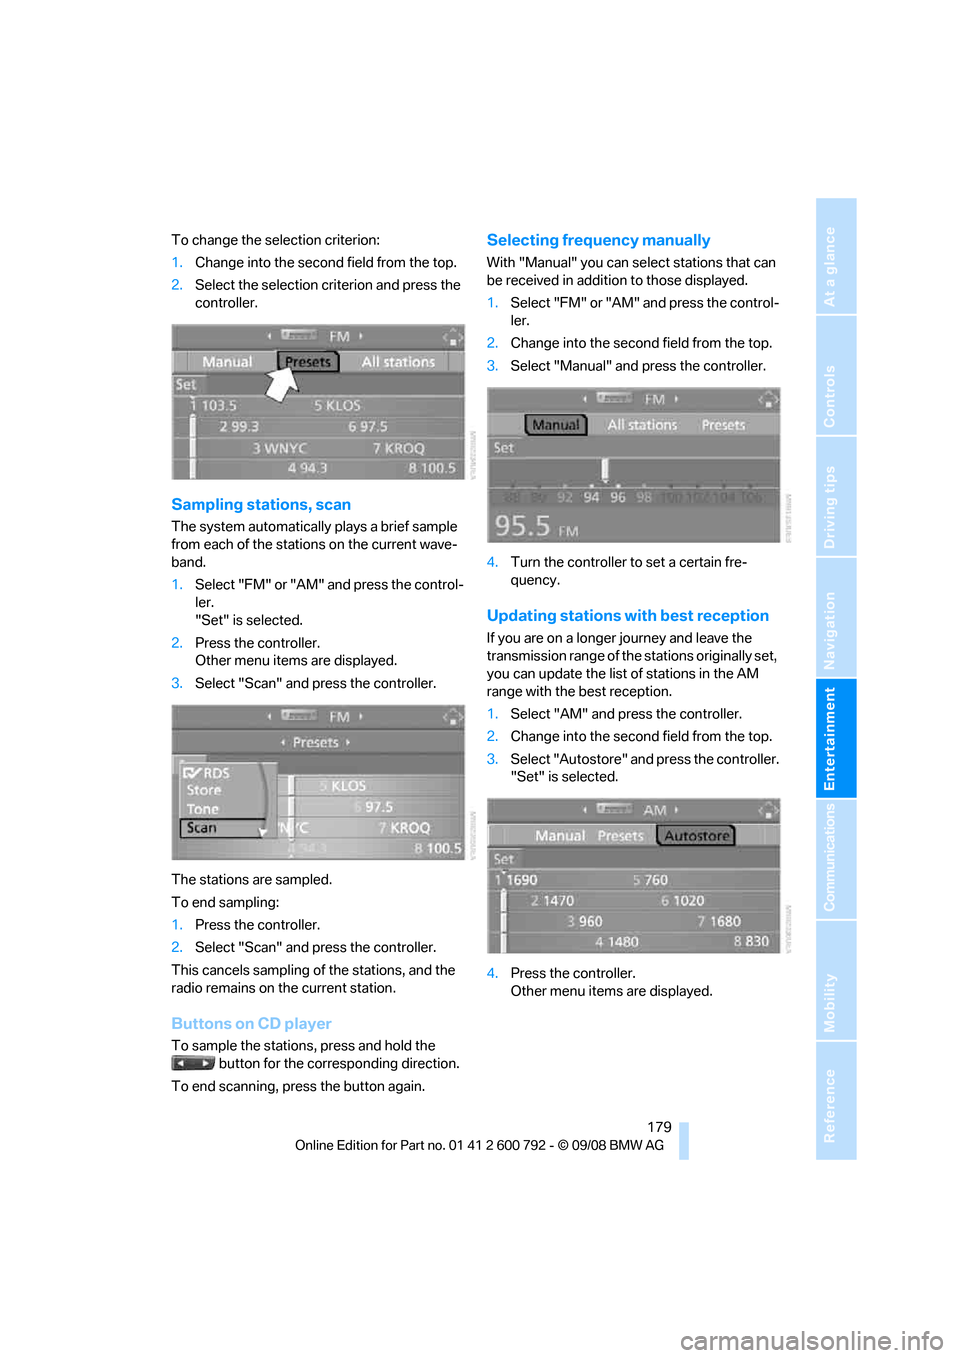
To change the selection criterion:
1.Change into the second field from the top.
2. Select the selection criterion and press the
controller.
Sampling stations, scan
The system automatically plays a brief sample
from each of the stations on the current wave-
band.
1.Select "FM" or "AM" and press the control-
ler.
"Set" is selected.
2. Press the controller.
Other menu items are displayed.
3. Select "Scan" and press the controller.
The stations are sampled.
To end sampling:
1. Press the controller.
2. Select "Scan" and press the controller.
This cancels sampling of the stations, and the
radio remains on the current station.
Buttons on CD player
To sample the stations, press and hold the button for the corresponding direction.
To end scanning, press the button again.
Selecting frequency manually
With "Manual" you can se lect stations that can
be received in additi on to those displayed.
1. Select "FM" or "AM" and press the control-
ler.
2. Change into the second field from the top.
3. Select "Manual" and press the controller.
4. Turn the controller to set a certain fre-
quency.
Updating stations with best reception
If you are on a longer journey and leave the
transmission range of the stations originally set,
you can update the list of stations in the AM
range with the best reception.
1.Select "AM" and pr ess the controller.
2. Change into the second field from the top.
3. Select "Autostore" and press the controller.
"Set" is selected.
4. Press the controller.
Other menu items are displayed.
Page 188 of 317
Satellite radio
186
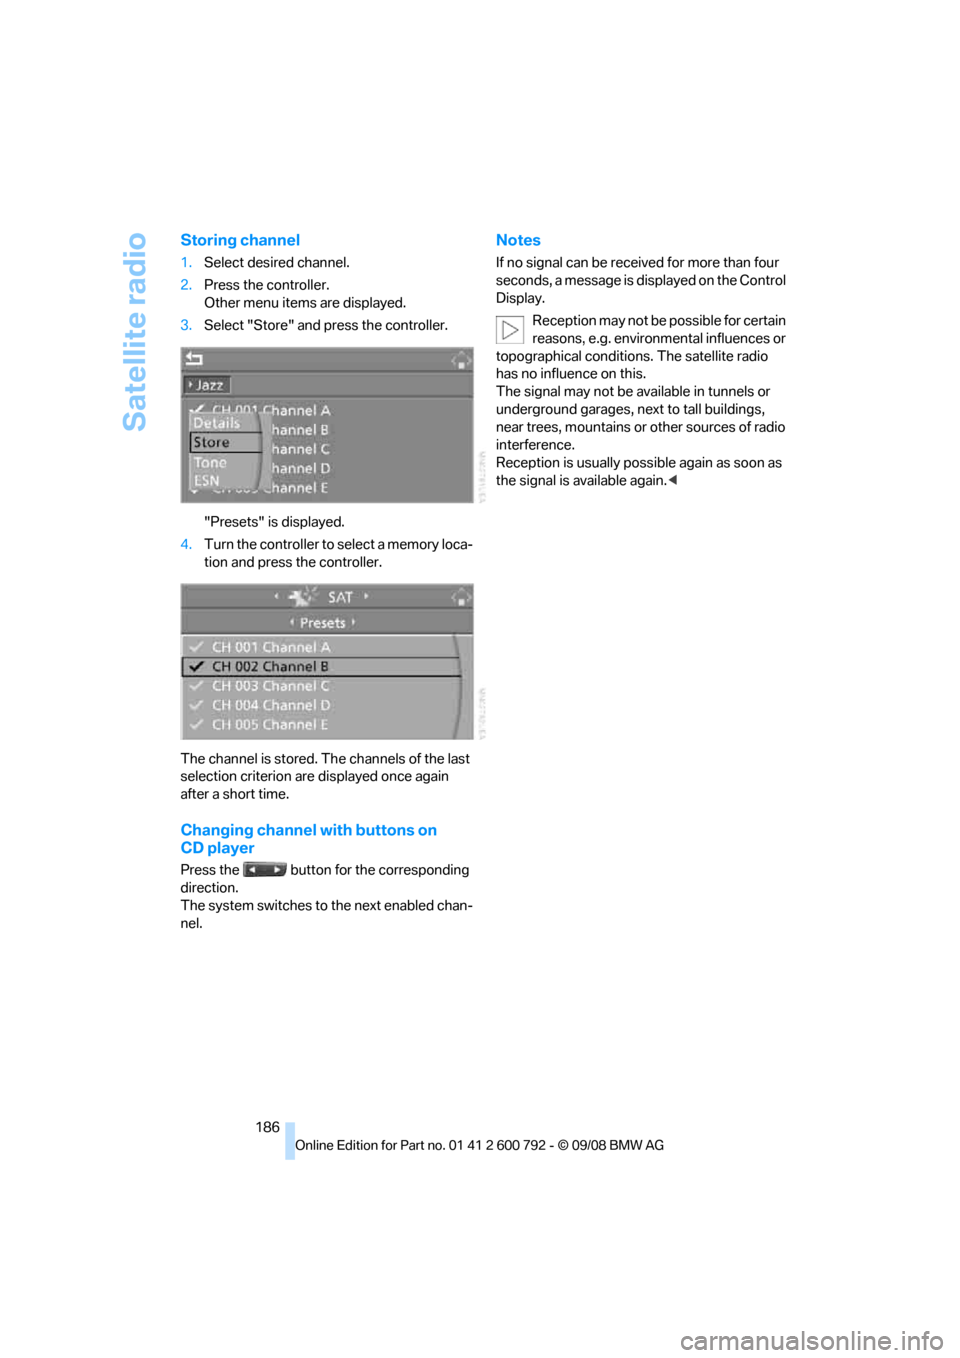
Storing channel
1.Select desired channel.
2. Press the controller.
Other menu items are displayed.
3. Select "Store" and press the controller.
"Presets" is displayed.
4. Turn the controller to select a memory loca-
tion and press the controller.
The channel is stored. Th e channels of the last
selection criterion are displayed once again
after a short time.
Changing channel with buttons on
CD player
Press the button for the corresponding
direction.
The system switches to the next enabled chan-
nel.
Notes
If no signal can be rece ived for more than four
seconds, a message is displayed on the Control
Display.
Reception may not be possible for certain
reasons, e.g. environmental influences or
topographical conditions. The satellite radio
has no influence on this.
The signal may not be av ailable in tunnels or
underground garages, ne xt to tall buildings,
near trees, mountains or other sources of radio
interference.
Reception is usually poss ible again as soon as
the signal is available again. <
Page 190 of 317
CD player and CD changer
188
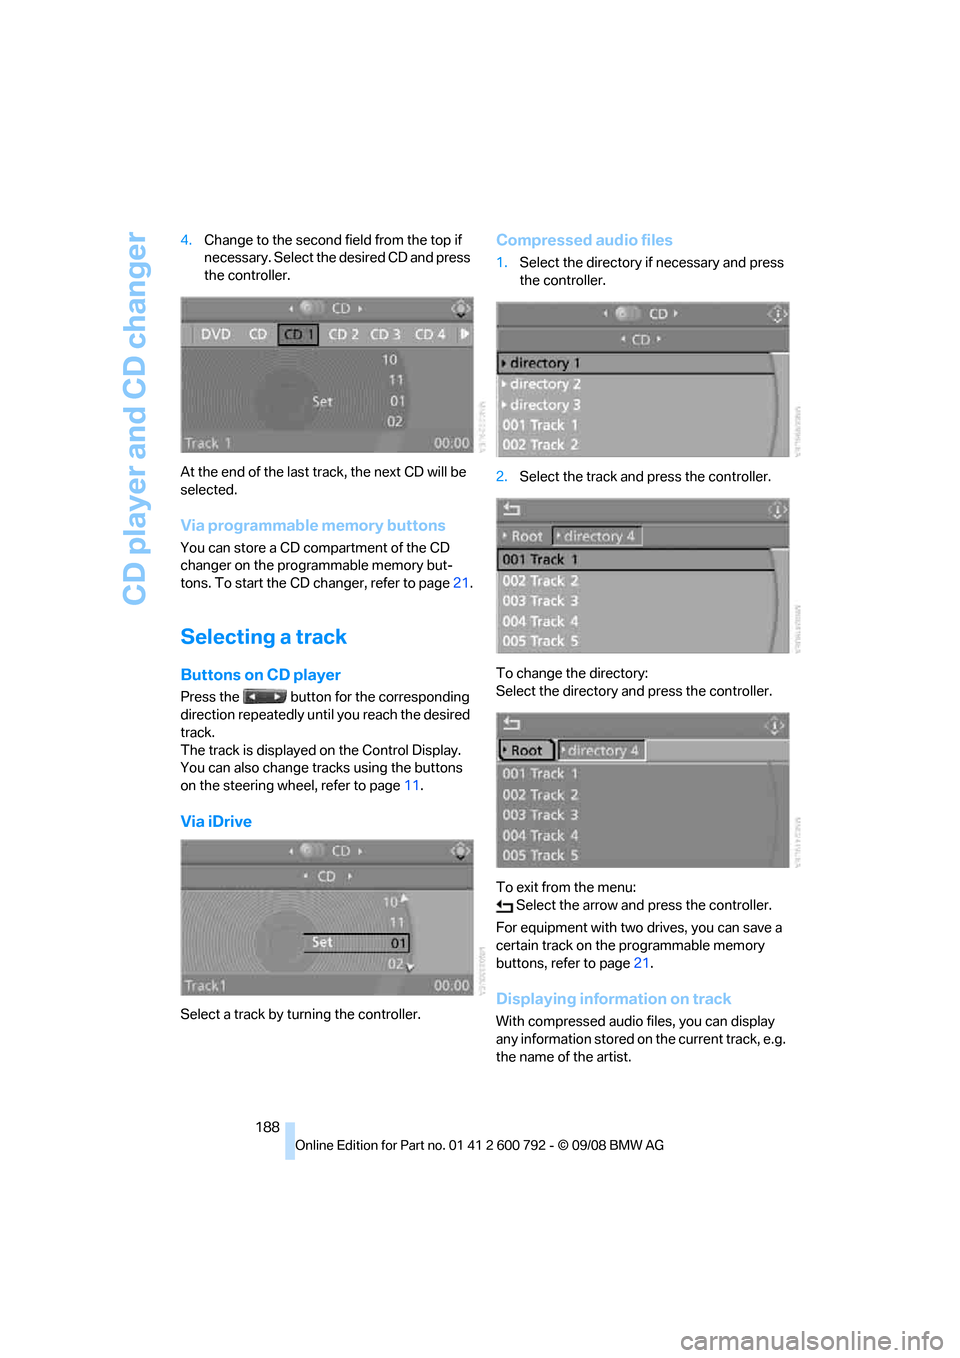
4.
Change to the second field from the top if
necessary. Select the desired CD and press
the controller.
At the end of the last tr ack, the next CD will be
selected.
Via programmable memory buttons
You can store a CD compartment of the CD
changer on the programmable memory but-
tons. To start the CD changer, refer to page 21.
Selecting a track
Buttons on CD player
Press the button for the corresponding
direction repeatedly until you reach the desired
track.
The track is displayed on the Control Display.
You can also change tracks using the buttons
on the steering wheel, refer to page 11.
Via iDrive
Select a track by turning the controller.
Compressed audio files
1.Select the directory if necessary and press
the controller.
2. Select the track and press the controller.
To change the directory:
Select the directory and press the controller.
To exit from the menu: Select the arrow and press the controller.
For equipment with two drives, you can save a
certain track on the programmable memory
buttons, refer to page 21.
Displaying information on track
With compressed audio files, you can display
any information stored on the current track, e.g.
the name of the artist.
Page 199 of 317
Navigation
Entertainment
Driving tips
197Reference
At a glance
Controls
Communications
Mobility
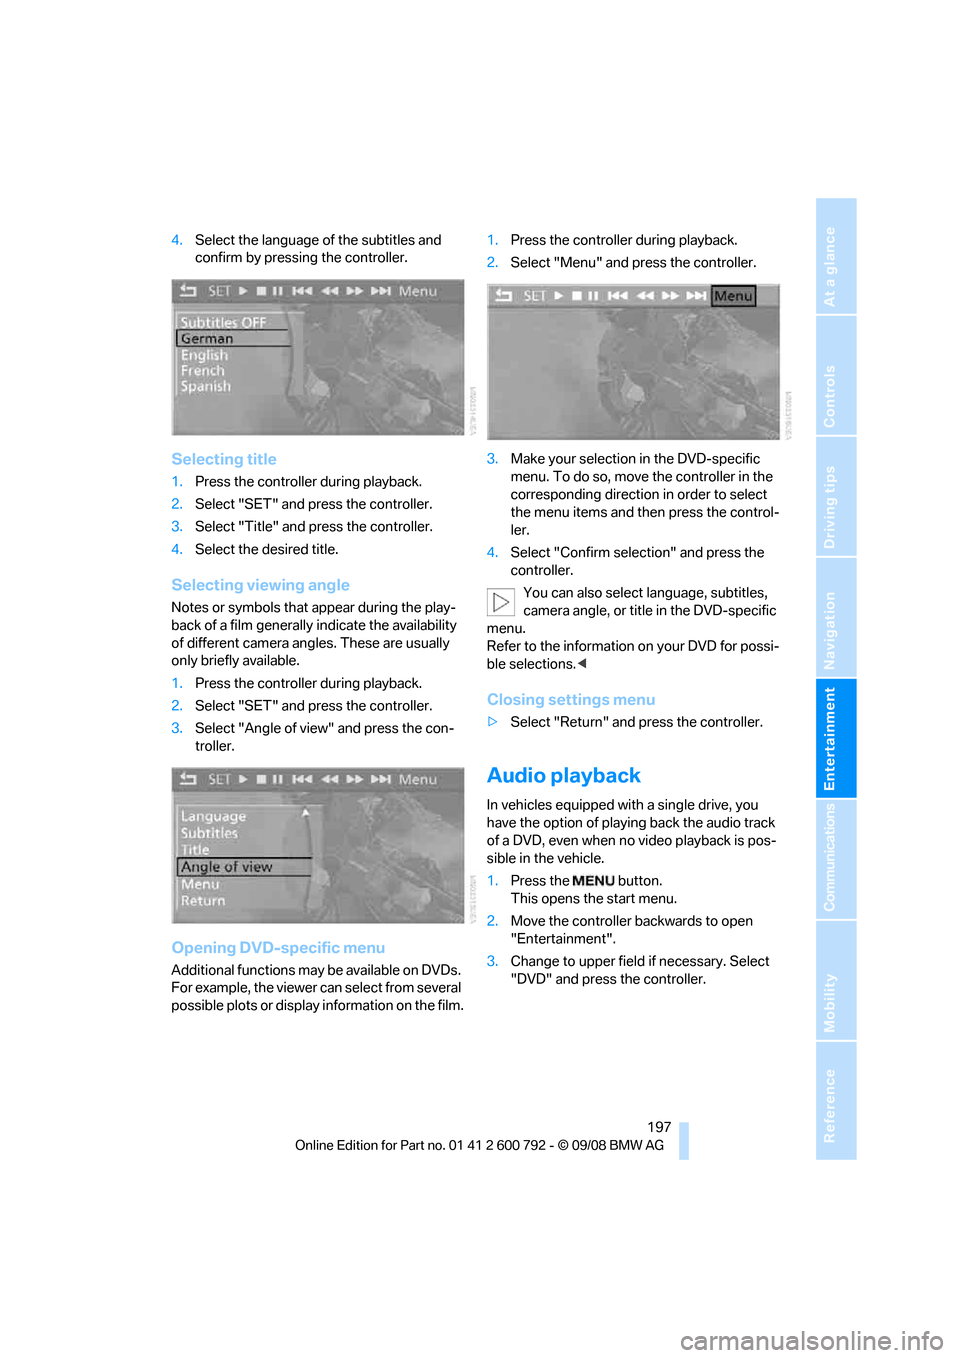
4.Select the language of the subtitles and
confirm by pressing the controller.
Selecting title
1. Press the controller during playback.
2. Select "SET" and press the controller.
3. Select "Title" and press the controller.
4. Select the desired title.
Selecting viewing angle
Notes or symbols that a ppear during the play-
back of a film generally indicate the availability
of different camera angles. These are usually
only briefly available.
1. Press the controller during playback.
2. Select "SET" and press the controller.
3. Select "Angle of view" and press the con-
troller.
Opening DVD-specific menu
Additional functions may be available on DVDs.
For example, the viewer can select from several
possible plots or display information on the film. 1.
Press the controller during playback.
2. Select "Menu" and press the controller.
3. Make your selection in the DVD-specific
menu. To do so, move the controller in the
corresponding direction in order to select
the menu items and th en press the control-
ler.
4. Select "Confirm selection" and press the
controller.
You can also select language, subtitles,
camera angle, or title in the DVD-specific
menu.
Refer to the information on your DVD for possi-
ble selections. <
Closing settings menu
>Select "Return" and press the controller.
Audio playback
In vehicles equipped with a single drive, you
have the option of playing back the audio track
of a DVD, even when no video playback is pos-
sible in the vehicle.
1. Press the button.
This opens the start menu.
2. Move the controller backwards to open
"Entertainment".
3. Change to upper field if necessary. Select
"DVD" and press the controller.
Page 200 of 317
DVD changer
198
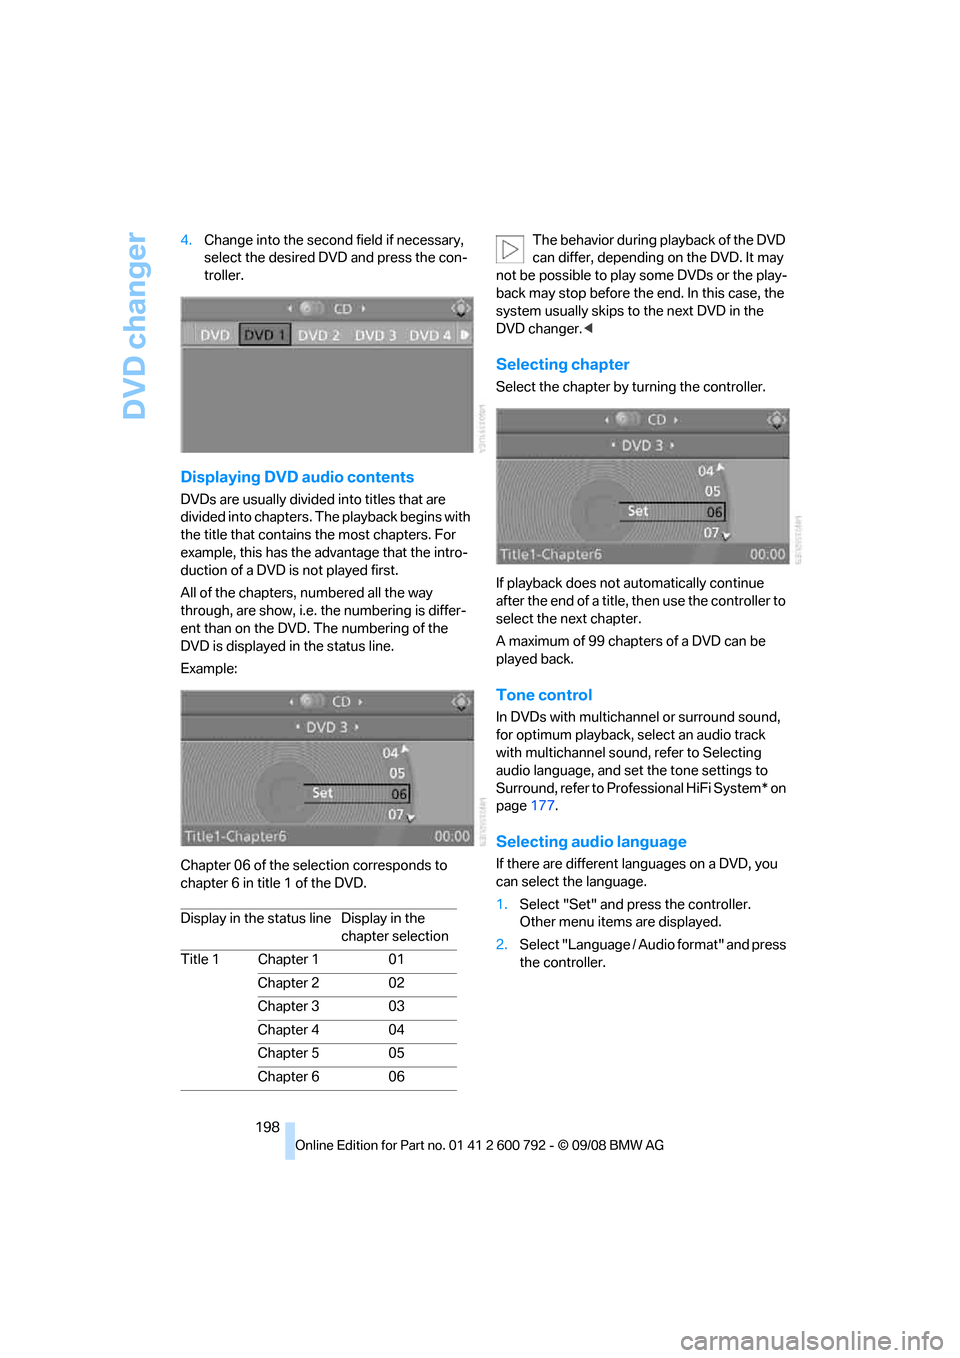
4.
Change into the second field if necessary,
select the desired DVD and press the con-
troller.
Displaying DVD audio contents
DVDs are usually divided into titles that are
divided into chapters. Th e playback begins with
the title that contains the most chapters. For
example, this has the advantage that the intro-
duction of a DVD is not played first.
All of the chapters, numbered all the way
through, are show, i.e. the numbering is differ-
ent than on the DVD. The numbering of the
DVD is displayed in the status line.
Example:
Chapter 06 of the sele ction corresponds to
chapter 6 in title 1 of the DVD. The behavior during playback of the DVD
can differ, depending on the DVD. It may
not be possible to play some DVDs or the play-
back may stop before the end. In this case, the
system usually skips to the next DVD in the
DVD changer. <
Selecting chapter
Select the chapter by turning the controller.
If playback does not automatically continue
after the end of a title, then use the controller to
select the next chapter.
A maximum of 99 chapters of a DVD can be
played back.
Tone control
In DVDs with multichannel or surround sound,
for optimum playback, select an audio track
with multichannel sound, refer to Selecting
audio language, and set the tone settings to
Surround, refer to Professional HiFi System* on
page 177.
Selecting audio language
If there are different languages on a DVD, you
can select the language.
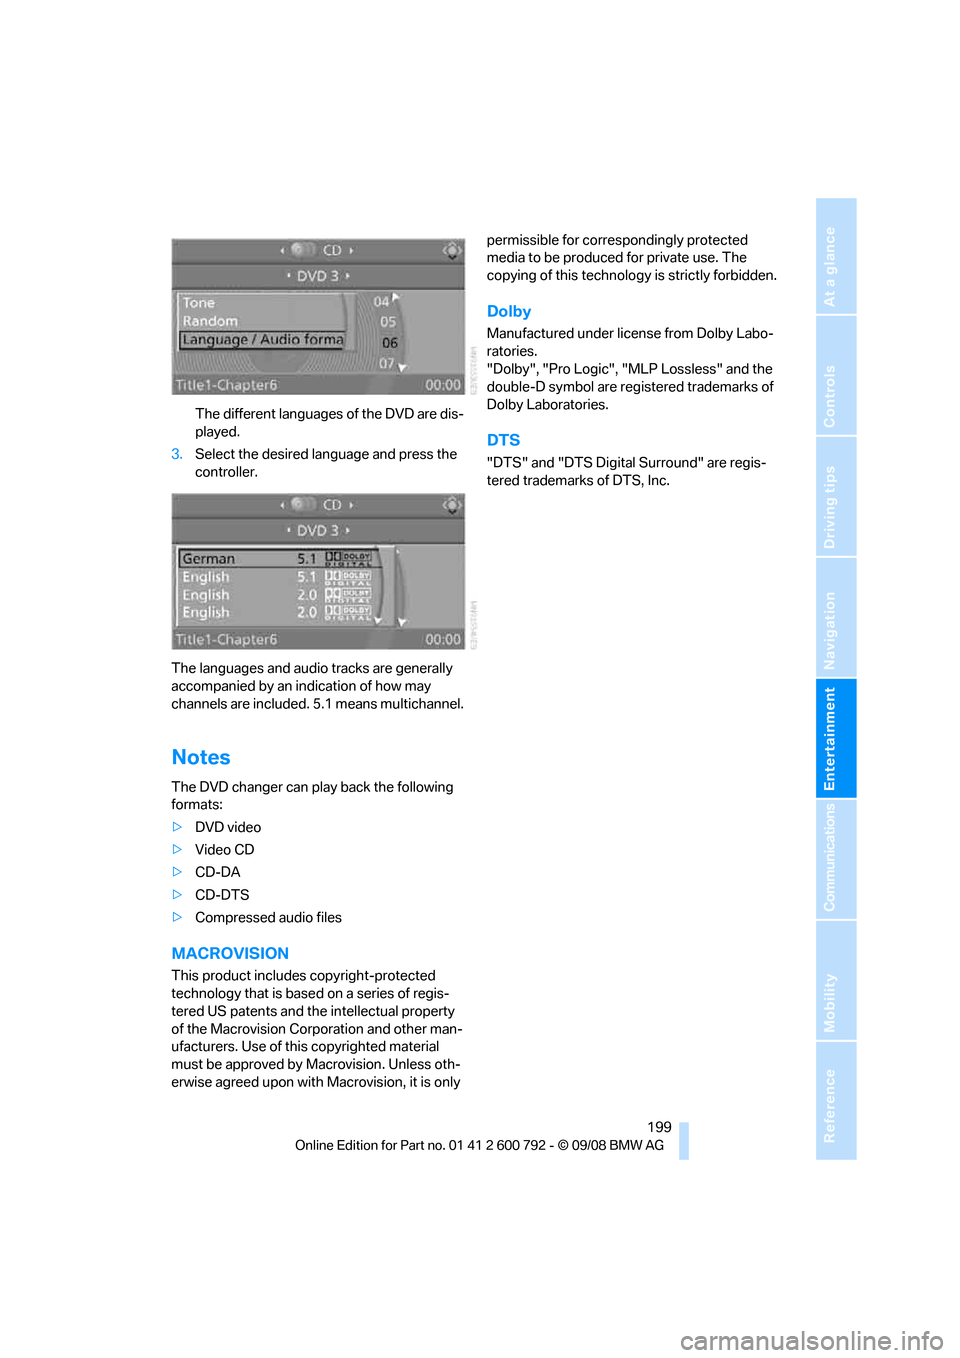
1.Select "Set" and press the controller.
Other menu items are displayed.
2. Select "Language / Audio format" and press
the controller.
Display in the status line Display in the
chapter selection
Title 1 Chapter 1 01
Chapter 2 02
Chapter 3 03
Chapter 4 04
Chapter 5 05
Chapter 6 06
Page 201 of 317
Navigation
Entertainment
Driving tips
199Reference
At a glance
Controls
Communications
Mobility
The different languages of the DVD are dis-
played.
3. Select the desired language and press the
controller.
The languages and audio tracks are generally
accompanied by an indication of how may
channels are included. 5.1 means multichannel.
Notes
The DVD changer can play back the following
formats:
>DVD video
> Video CD
> CD-DA
> CD-DTS
> Compressed audio files
MACROVISION
This product includes copyright-protected
technology that is base d on a series of regis-
tered US patents and th e intellectual property
of the Macrovision Corporation and other man-
ufacturers. Use of this copyrighted material
must be approved by Macrovision. Unless oth-
erwise agreed upon with Macrovision, it is only permissible for correspondingly protected
media to be produced for private use. The
copying of this technology
is strictly forbidden.
Dolby
Manufactured under license from Dolby Labo-
ratories.
"Dolby", "Pro Logic", "MLP Lossless" and the
double-D symbol are registered trademarks of
Dolby Laboratories.
DTS
"DTS" and "DTS Digita l Surround" are regis-
tered trademarks of DTS, Inc.