ECU BMW X6 2008 User Guide
[x] Cancel search | Manufacturer: BMW, Model Year: 2008, Model line: X6, Model: BMW X6 2008Pages: 288, PDF Size: 8.08 MB
Page 124 of 288
Practical interior accessories
122
Loading
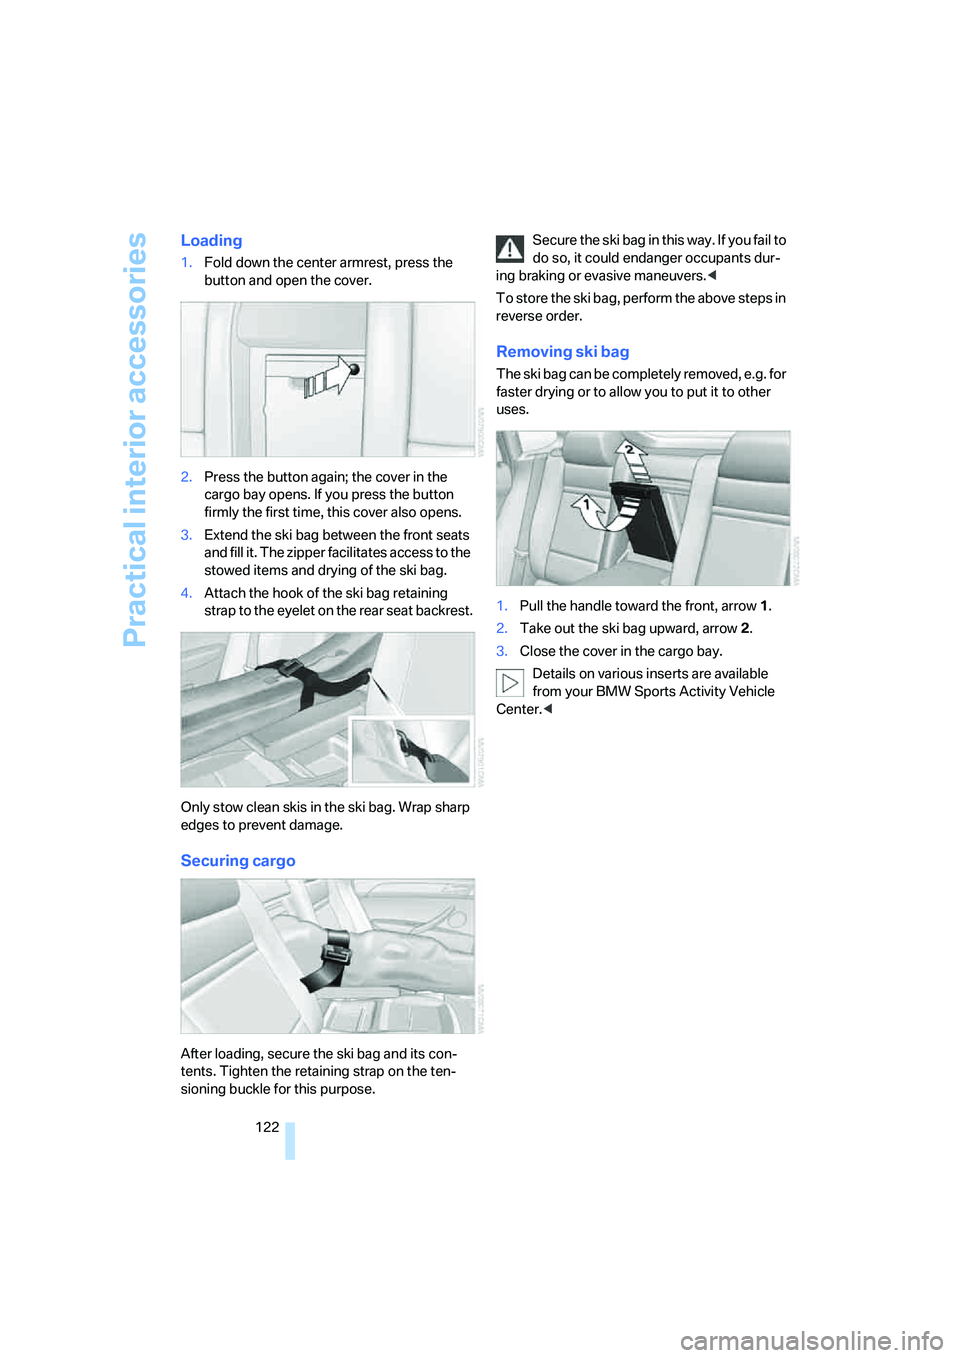
1.Fold down the center armrest, press the
button and open the cover.
2.Press the button again; the cover in the
cargo bay opens. If you press the button
firmly the first time, this cover also opens.
3.Extend the ski bag between the front seats
and fill it. The zipper facilitates access to the
stowed items and drying of the ski bag.
4.Attach the hook of the ski bag retaining
strap to the eyelet on the rear seat backrest.
Only stow clean skis in the ski bag. Wrap sharp
edges to prevent damage.
Securing cargo
After loading, secure the ski bag and its con-
tents. Tighten the retaining strap on the ten-
sioning buckle for this purpose.Secure the ski bag in this way. If you fail to
do so, it could endanger occupants dur-
ing braking or evasive maneuvers.<
To store the ski bag, perform the above steps in
reverse order.
Removing ski bag
The ski bag can be completely removed, e.g. for
faster drying or to allow you to put it to other
uses.
1.Pull the handle toward the front, arrow1.
2.Take out the ski bag upward, arrow2.
3.Close the cover in the cargo bay.
Details on various inserts are available
from your BMW Sports Activity Vehicle
Center.<
Page 131 of 288
Driving tips
129Reference
At a glance
Controls
Communications
Navigation
Entertainment
Mobility
Make sure that no fluids leak in the cargo
bay; otherwise the vehicle could be dam-
aged.<
Determining loading limit
1.Locate the following statement on your
vehicle's placard
*:
The combined weight of occupants
and cargo should never exceed
XXX lbs. or YYY kg. Otherwise, this could
damage the vehicle and produce unstable
vehicle operating conditions.<
2.Determine the combined weight of the
driver and passengers that will be riding in
your vehicle.
3.Subtract the combined weight of the driver
and passengers from XXX lbs. or YYY kg.
4.The resulting figure equals the available
amount of cargo and luggage load capacity.
For example, if the XXX amount equals
1,400 lbs. and there will be five 150 lbs.
passengers in your vehicle, then the
amount of available cargo and luggage load
capacity is 650 lbs.:
1,400 lbs. minus 750 lbs. = 650 lbs.
5.Determine the combined weight of luggage
and cargo being loaded on the vehicle. That
weight may not safely exceed the available
cargo and luggage load capacity calculated
in step 4.
6.If your vehicle will be towing a trailer, part of
the load from your trailer will be transferred
to your vehicle. Consult the manual for
transporting a trailer to determine how this
may reduce the available cargo and luggage
load capacity of your vehicle.
Load
The permissible load is the total of the weight of
occupants and cargo/luggage. The greater the
weight of occupants, the less cargo/luggage
can be transported.
Stowing cargo
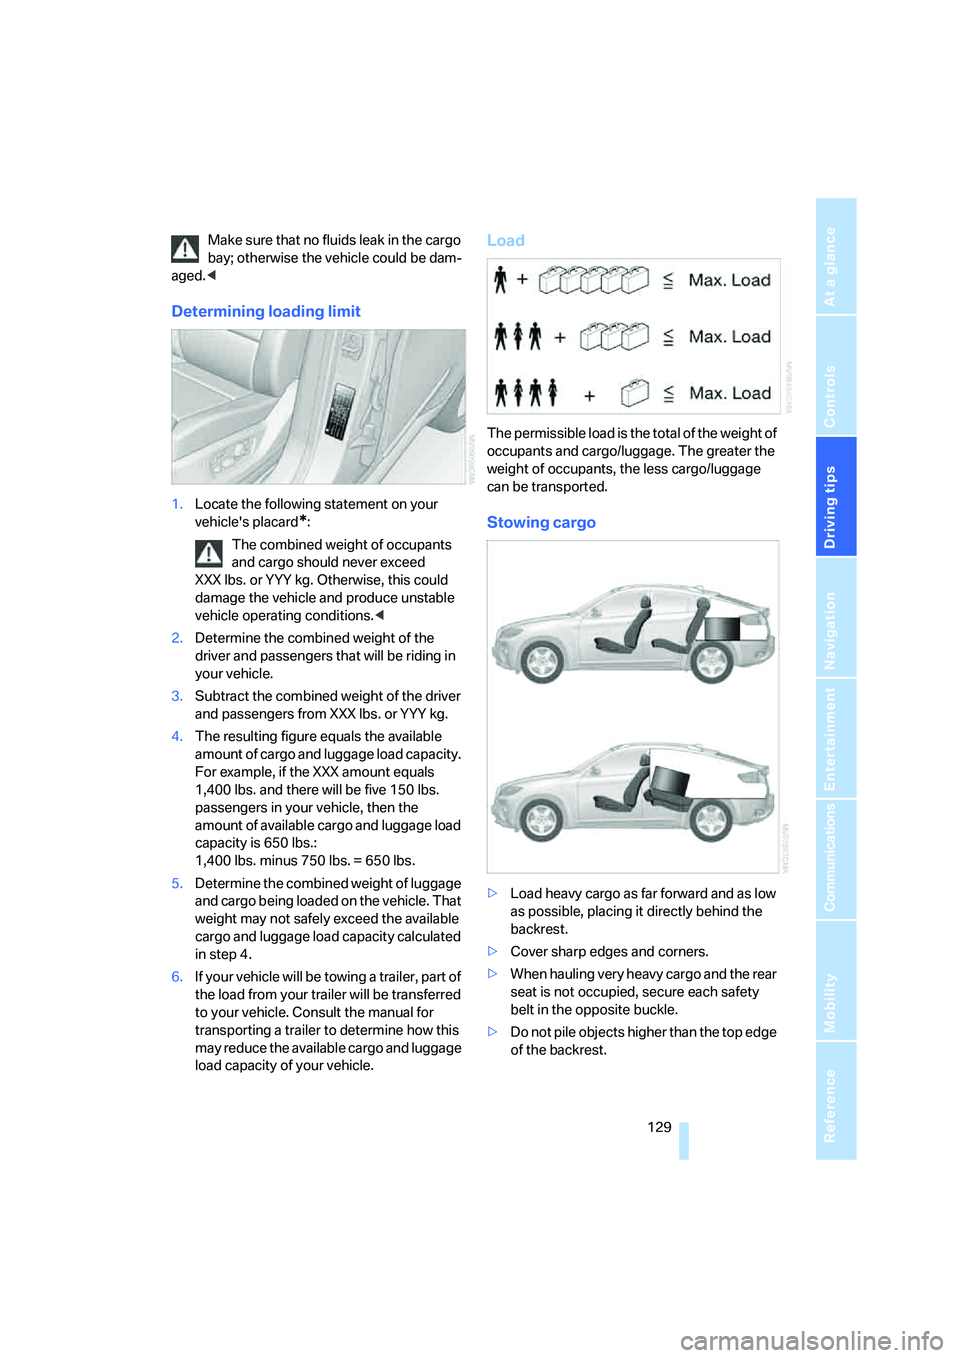
>Load heavy cargo as far forward and as low
as possible, placing it directly behind the
backrest.
>Cover sharp edges and corners.
>When hauling very heavy cargo and the rear
seat is not occupied, secure each safety
belt in the opposite buckle.
>Do not pile objects higher than the top edge
of the backrest.
Page 132 of 288
Things to remember when driving
130 >Wrap sharp-edged or pointed objects
which could strike the rear window while
driving.
Securing cargo
>Use the luggage net*, retaining straps*, or
securing straps to hold down small and
lightweight luggage and cargo.
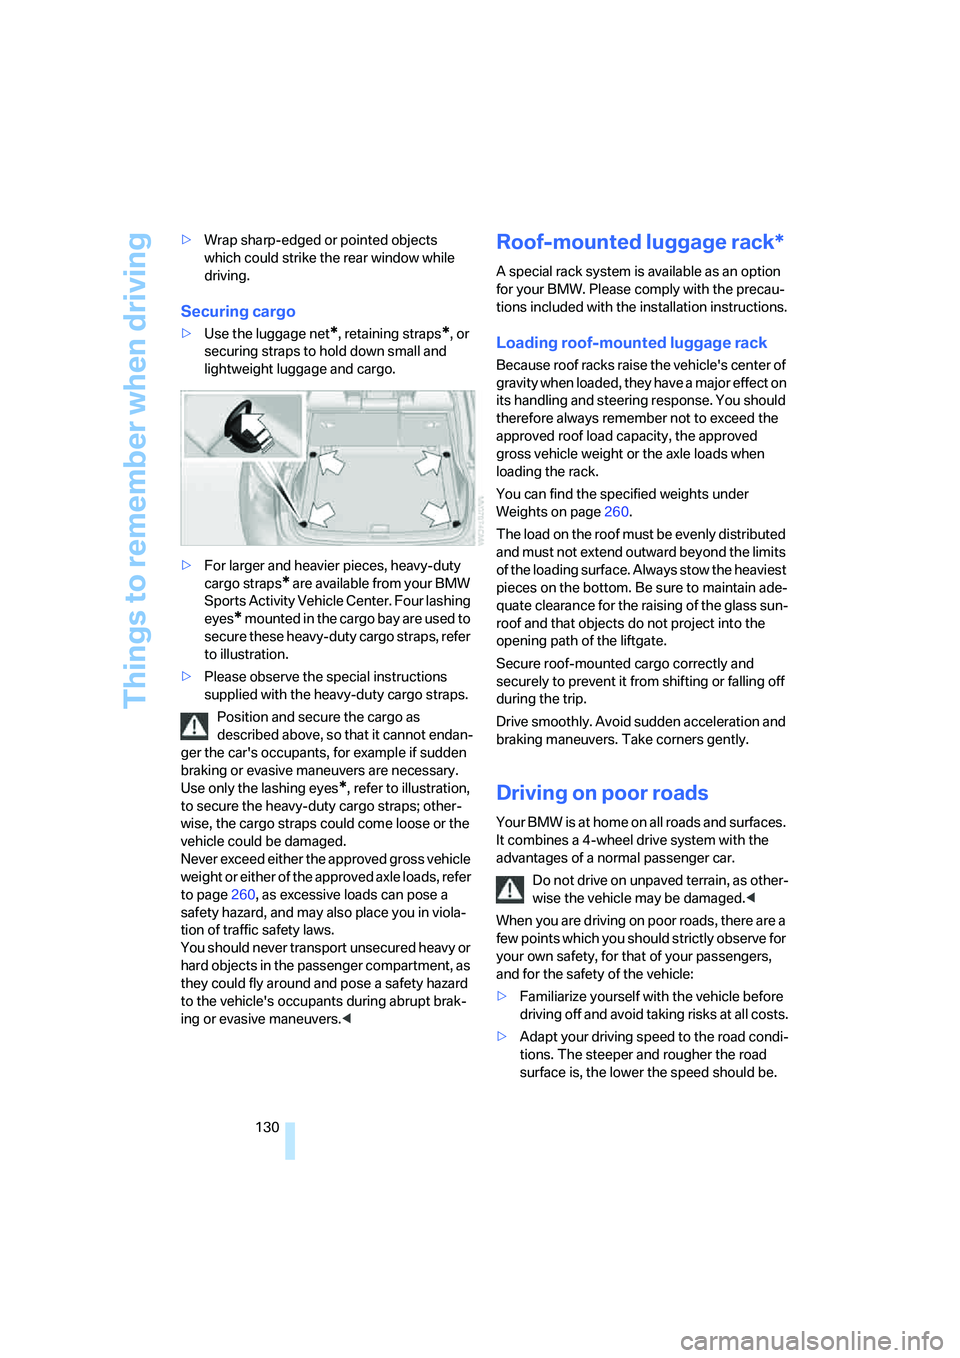
>For larger and heavier pieces, heavy-duty
cargo straps
* are available from your BMW
Sports Activity Vehicle Center. Four lashing
eyes
* mounted in the cargo bay are used to
secure these heavy-duty cargo straps, refer
to illustration.
>Please observe the special instructions
supplied with the heavy-duty cargo straps.
Position and secure the cargo as
described above, so that it cannot endan-
ger the car's occupants, for example if sudden
braking or evasive maneuvers are necessary.
Use only the lashing eyes
*, refer to illustration,
to secure the heavy-duty cargo straps; other-
wise, the cargo straps could come loose or the
vehicle could be damaged.
Never exceed either the approved gross vehicle
weight or either of the approved axle loads, refer
to page260, as excessive loads can pose a
safety hazard, and may also place you in viola-
tion of traffic safety laws.
You should never transport unsecured heavy or
hard objects in the passenger compartment, as
they could fly around and pose a safety hazard
to the vehicle's occupants during abrupt brak-
ing or evasive maneuvers.<
Roof-mounted luggage rack*
A special rack system is available as an option
for your BMW. Please comply with the precau-
tions included with the installation instructions.
Loading roof-mounted luggage rack
Because roof racks raise the vehicle's center of
gravity when loaded, they have a major effect on
its handling and steering response. You should
therefore always remember not to exceed the
approved roof load capacity, the approved
gross vehicle weight or the axle loads when
loading the rack.
You can find the specified weights under
Weights on page260.
The load on the roof must be evenly distributed
and must not extend outward beyond the limits
of the loading surface. Always stow the heaviest
pieces on the bottom. Be sure to maintain ade-
quate clearance for the raising of the glass sun-
roof and that objects do not project into the
opening path of the liftgate.
Secure roof-mounted cargo correctly and
securely to prevent it from shifting or falling off
during the trip.
Drive smoothly. Avoid sudden acceleration and
braking maneuvers. Take corners gently.
Driving on poor roads
Your BMW is at home on all roads and surfaces.
It combines a 4-wheel drive system with the
advantages of a normal passenger car.
Do not drive on unpaved terrain, as other-
wise the vehicle may be damaged.<
When you are driving on poor roads, there are a
few points which you should strictly observe for
your own safety, for that of your passengers,
and for the safety of the vehicle:
>Familiarize yourself with the vehicle before
driving off and avoid taking risks at all costs.
>Adapt your driving speed to the road condi-
tions. The steeper and rougher the road
surface is, the lower the speed should be.
Page 199 of 288
Navigation
Entertainment
Driving tips
197Reference
At a glance
Controls
Communications
Mobility
Selecting a track
Buttons on CD/DVD player
Press the button for the corresponding
direction repeatedly until you reach the desired
track.
Playback begins at the start of the track.
Via the remote control
Press the button for the corresponding
direction repeatedly or turn the knurled wheel
until you reach the desired track.
Playback begins at the start of the track.
Settings and playback functions for
audio CDs/DVDs
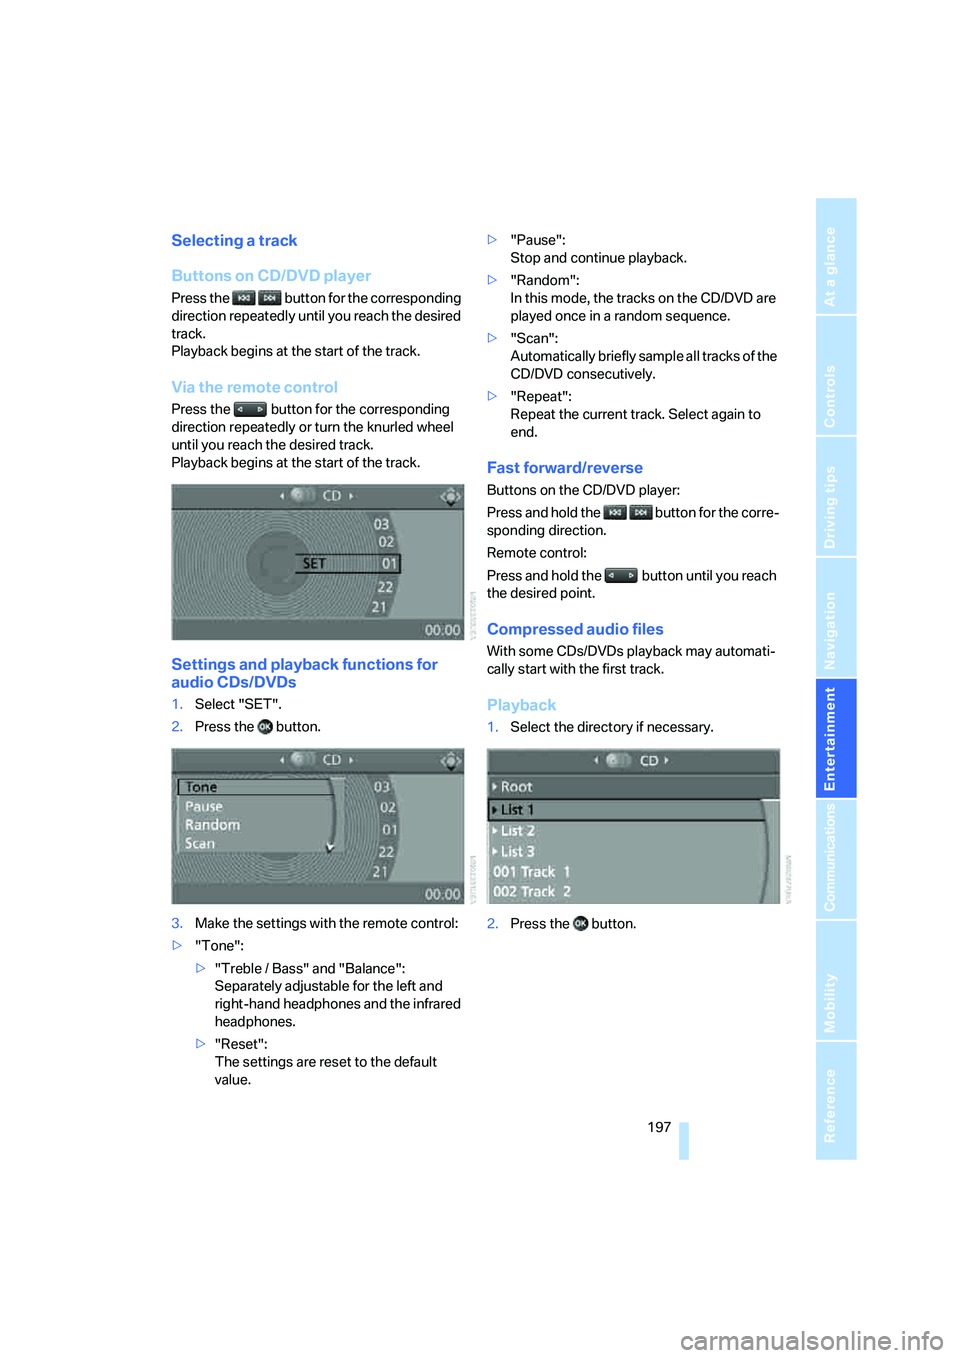
1.Select "SET".
2.Press the button.
3.Make the settings with the remote control:
>"Tone":
>"Treble / Bass" and "Balance":
Separately adjustable for the left and
right-hand headphones and the infrared
headphones.
>"Reset":
The settings are reset to the default
value.>"Pause":
Stop and continue playback.
>"Random":
In this mode, the tracks on the CD/DVD are
played once in a random sequence.
>"Scan":
Automatically briefly sample all tracks of the
CD/DVD consecutively.
>"Repeat":
Repeat the current track. Select again to
end.
Fast forward/reverse
Buttons on the CD/DVD player:
Press and hold the button for the corre-
sponding direction.
Remote control:
Press and hold the button until you reach
the desired point.
Compressed audio files
With some CDs/DVDs playback may automati-
cally start with the first track.
Playback
1.Select the directory if necessary.
2.Press the button.
Page 210 of 288
Telephoning
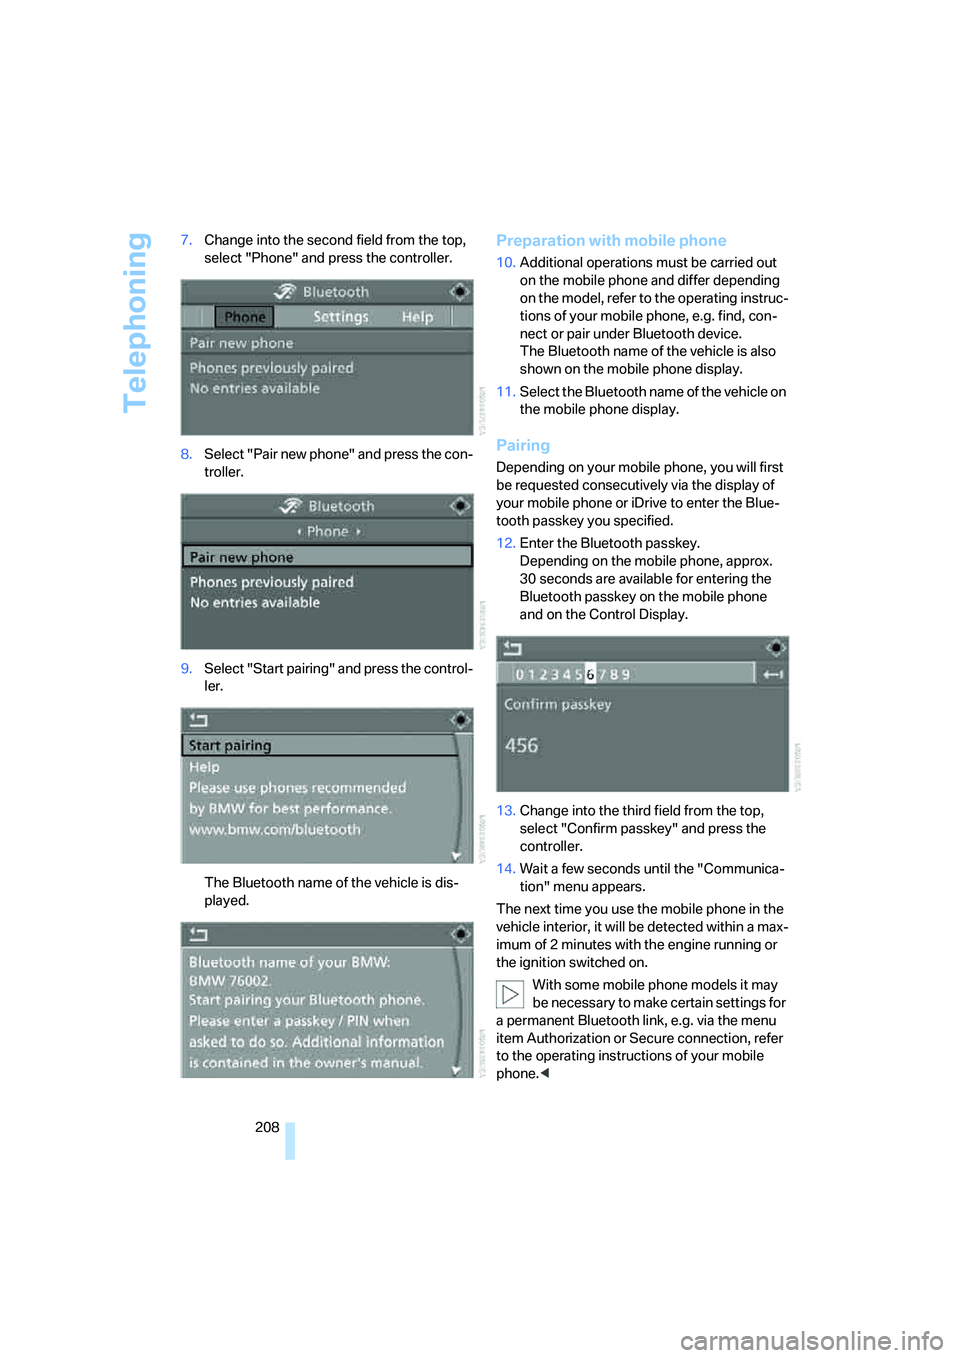
208 7.Change into the second field from the top,
select "Phone" and press the controller.
8.Select "Pair new phone" and press the con-
troller.
9.Select "Start pairing" and press the control-
ler.
The Bluetooth name of the vehicle is dis-
played.
Preparation with mobile phone
10.Additional operations must be carried out
on the mobile phone and differ depending
on the model, refer to the operating instruc-
tions of your mobile phone, e.g. find, con-
nect or pair under Bluetooth device.
The Bluetooth name of the vehicle is also
shown on the mobile phone display.
11.Select the Bluetooth name of the vehicle on
the mobile phone display.
Pairing
Depending on your mobile phone, you will first
be requested consecutively via the display of
your mobile phone or iDrive to enter the Blue-
tooth passkey you specified.
12.Enter the Bluetooth passkey.
Depending on the mobile phone, approx.
30 seconds are available for entering the
Bluetooth passkey on the mobile phone
and on the Control Display.
13.Change into the third field from the top,
select "Confirm passkey" and press the
controller.
14.Wait a few seconds until the "Communica-
tion" menu appears.
The next time you use the mobile phone in the
vehicle interior, it will be detected within a max-
imum of 2 minutes with the engine running or
the ignition switched on.
With some mobile phone models it may
be necessary to make certain settings for
a permanent Bluetooth link, e.g. via the menu
item Authorization or Secure connection, refer
to the operating instructions of your mobile
phone.<
Page 241 of 288
Mobility
239Reference
At a glance
Controls
Driving tips
Communications
Navigation
Entertainment
Under the hood
Never attempt to perform any service or
repair operations on your vehicle without
the required professional technical training. If
you do not know what repair procedures to fol-
low, have work on your vehicle done only by
your BMW Sports Activity Vehicle Center or a
workshop that works according to BMW repair
procedures with correspondingly trained per-
sonnel. If this work is not carried out properly,
there is a danger of subsequent damage and
related safety hazards.<
Hood
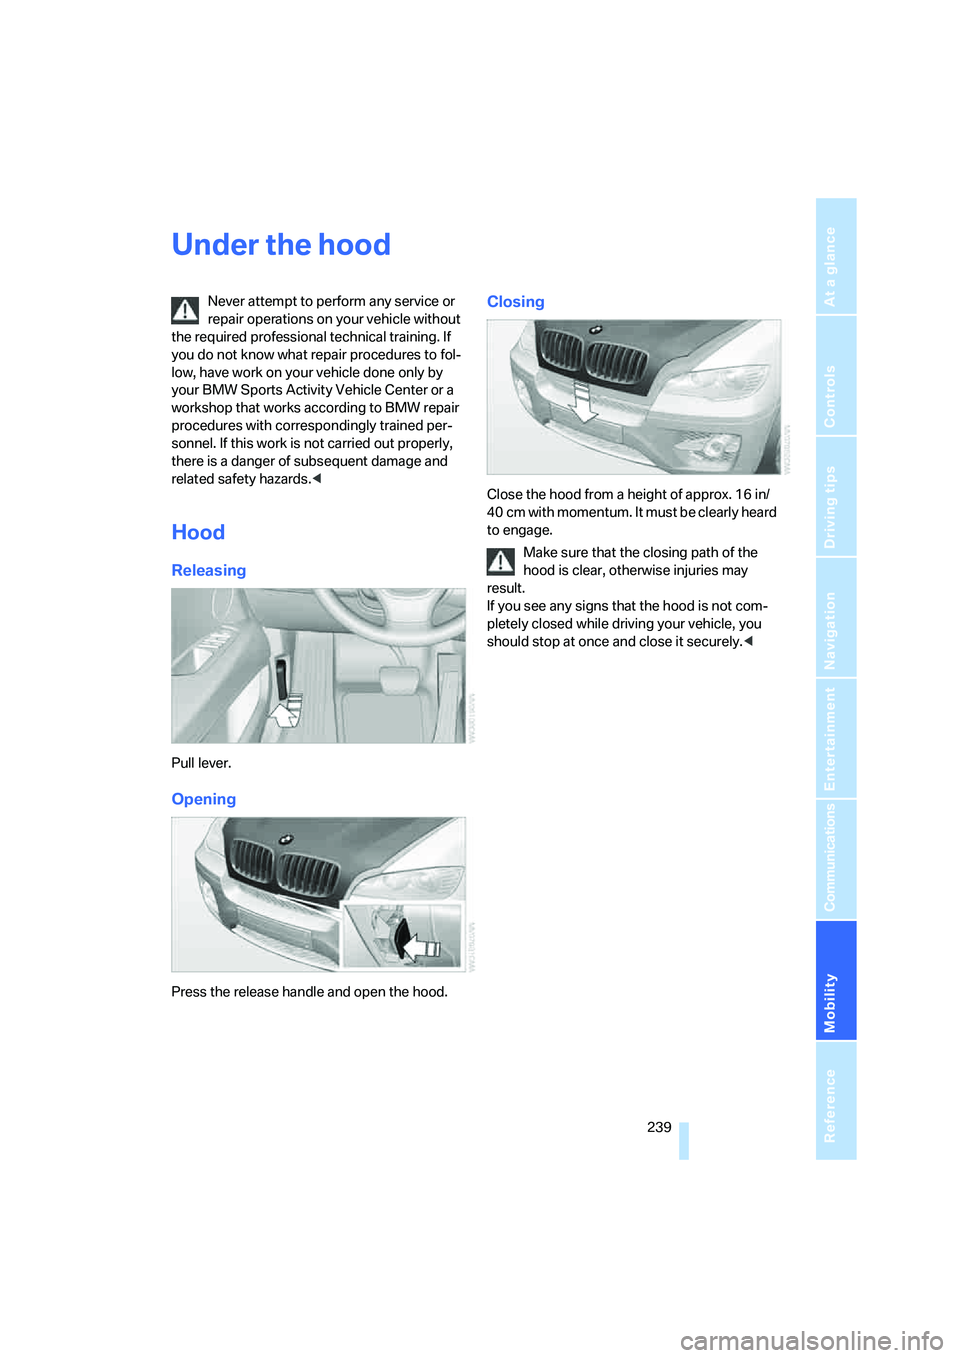
Releasing
Pull lever.
Opening
Press the release handle and open the hood.
Closing
Close the hood from a height of approx. 16 in/
40 cm with momentum. It must be clearly heard
to engage.
Make sure that the closing path of the
hood is clear, otherwise injuries may
result.
If you see any signs that the hood is not com-
pletely closed while driving your vehicle, you
should stop at once and close it securely.<
Page 252 of 288
Replacing components
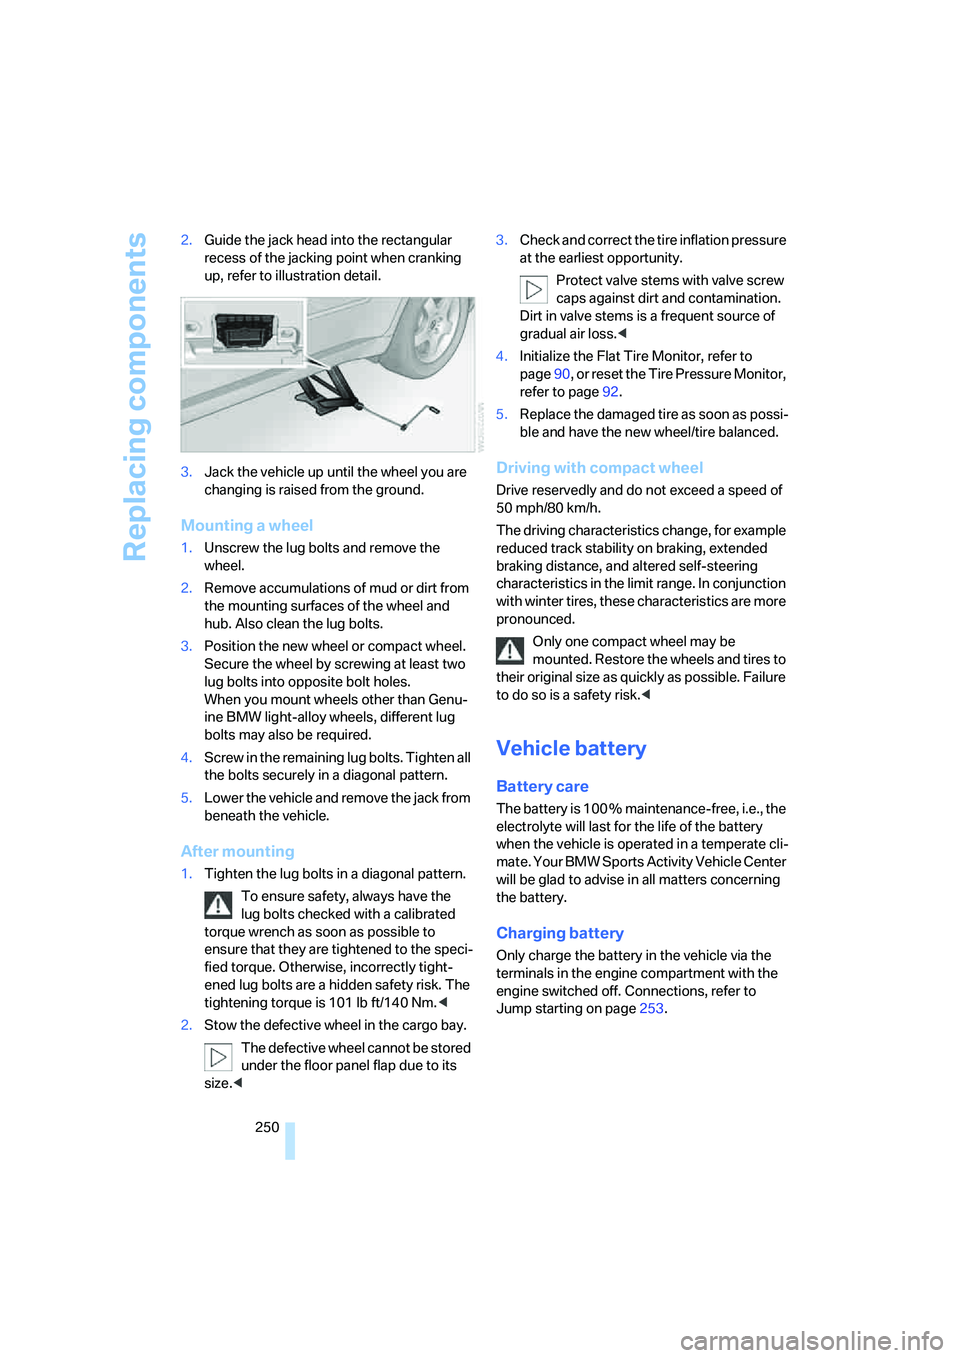
250 2.Guide the jack head into the rectangular
recess of the jacking point when cranking
up, refer to illustration detail.
3.Jack the vehicle up until the wheel you are
changing is raised from the ground.
Mounting a wheel
1.Unscrew the lug bolts and remove the
wheel.
2.Remove accumulations of mud or dirt from
the mounting surfaces of the wheel and
hub. Also clean the lug bolts.
3.Position the new wheel or compact wheel.
Secure the wheel by screwing at least two
lug bolts into opposite bolt holes.
When you mount wheels other than Genu-
ine BMW light-alloy wheels, different lug
bolts may also be required.
4.Screw in the remaining lug bolts. Tighten all
the bolts securely in a diagonal pattern.
5.Lower the vehicle and remove the jack from
beneath the vehicle.
After mounting
1.Tighten the lug bolts in a diagonal pattern.
To ensure safety, always have the
lug bolts checked with a calibrated
torque wrench as soon as possible to
ensure that they are tightened to the speci-
fied torque. Otherwise, incorrectly tight-
ened lug bolts are a hidden safety risk. The
tightening torque is 101 lb ft/140 Nm.<
2.Stow the defective wheel in the cargo bay.
The defective wheel cannot be stored
under the floor panel flap due to its
size.<3.Check and correct the tire inflation pressure
at the earliest opportunity.
Protect valve stems with valve screw
caps against dirt and contamination.
Dirt in valve stems is a frequent source of
gradual air loss.<
4.Initialize the Flat Tire Monitor, refer to
page90, or reset the Tire Pressure Monitor,
refer to page92.
5.Replace the damaged tire as soon as possi-
ble and have the new wheel/tire balanced.
Driving with compact wheel
Drive reservedly and do not exceed a speed of
50 mph/80 km/h.
The driving characteristics change, for example
reduced track stability on braking, extended
braking distance, and altered self-steering
characteristics in the limit range. In conjunction
with winter tires, these characteristics are more
pronounced.
Only one compact wheel may be
mounted. Restore the wheels and tires to
their original size as quickly as possible. Failure
to do so is a safety risk.<
Vehicle battery
Battery care
The battery is 100 % maintenance-free, i.e., the
electrolyte will last for the life of the battery
when the vehicle is operated in a temperate cli-
mate. Your BMW Sports Activity Vehicle Center
will be glad to advise in all matters concerning
the battery.
Charging battery
Only charge the battery in the vehicle via the
terminals in the engine compartment with the
engine switched off. Connections, refer to
Jump starting on page253.
Page 253 of 288
Mobility
251Reference
At a glance
Controls
Driving tips
Communications
Navigation
Entertainment
Disposal
Have old batteries disposed of following
replacement at your BMW Sports Activity
Vehicle Center or bring them to a collection
point. Maintain the battery in an upright position
for transport and storage. Always restrain the
battery to prevent it from tipping over during
transport.<
Power failure
After a temporary power loss, the functioning of
some equipment may be limited and require
reinitialization. Individual settings are also lost
and must be updated:
>Seat, mirror and steering wheel memory
The positions must be stored again, refer to
page44.
>Time and Date
The values must be updated, refer to
pages78, 79.
>Radio
Stations must be stored again if necessary,
refer to page166.
>Navigation system
Wait until the system starts, refer to
page156.
Fuses
Never attempt to repair a blown fuse and
do not replace a defective fuse with a sub-
stitute of another color or amperage rating, as
this could lead to a circuit overload, ultimately
resulting in a fire in the vehicle.<
Spare fuses, a pair of plastic tweezers and infor-
mation on the fuse assignment are located near
the fuses in the cargo bay.
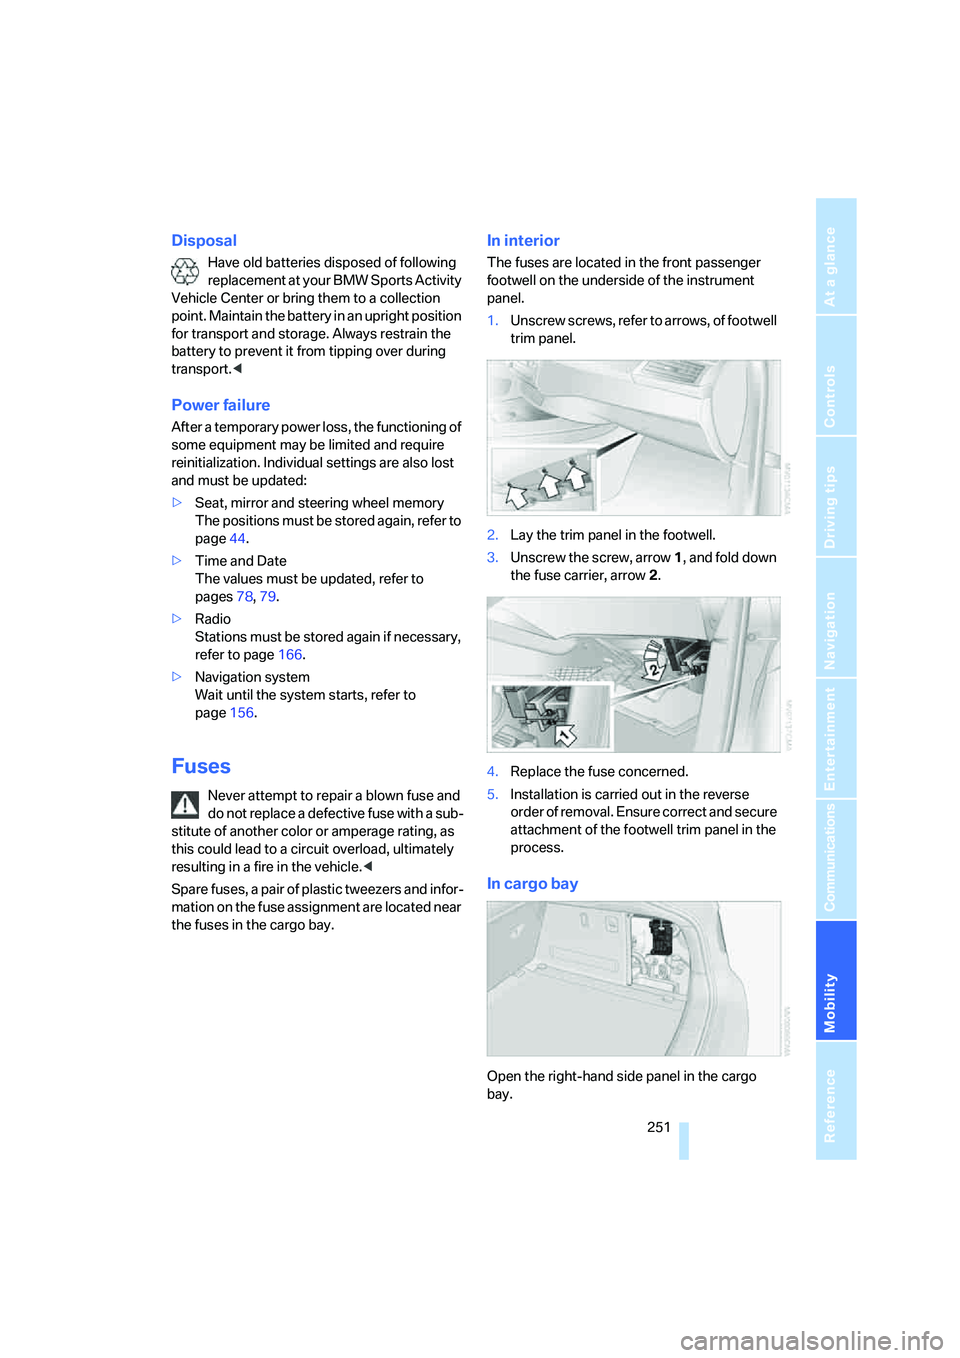
In interior
The fuses are located in the front passenger
footwell on the underside of the instrument
panel.
1.Unscrew screws, refer to arrows, of footwell
trim panel.
2.Lay the trim panel in the footwell.
3.Unscrew the screw, arrow1, and fold down
the fuse carrier, arrow2.
4.Replace the fuse concerned.
5.Installation is carried out in the reverse
order of removal. Ensure correct and secure
attachment of the footwell trim panel in the
process.
In cargo bay
Open the right-hand side panel in the cargo
bay.
Page 270 of 288
Everything from A to Z
268 BMW maintenance
system243
"BMW Service settings"227
BMW website4
Bottle holder, refer to Cup
holders117
Brake assistant86
Brake force display94
Brake lamps
– brake force display94
– replacing bulbs246
Brake rotors128
Brakes
– ABS Antilock Brake
System85
– brake assistant86
– brake force display94
– breaking-in126
– CBC Cornering Brake
Control85
– electronic brake-force
distribution85
– parking brake57
– refer to Braking safely127
– warning lamp13
Brake system126
– brake pads126
– breaking-in126
– disk brakes128
Braking safely127
Breakdown, Flat Tire
Monitor89
Breakdown services, refer to
Roadside Assistance253
Breaking-in brake pads126
Breaking-in differential126
Break-in period126
"Brightness"79
– DVD changer182
– DVD system in rear194
Brightness
– of Control Display79
– of the rear view camera85
– on Head-Up Display97
"Brightness / Position"98
Button for starting engine56
Buttons on steering wheel11
Bypassing traffic
congestion155
C
Calibrating driver's seat47
California Proposition 65
Warning6
"Call"214,225
Call
– accepting212
– displaying accepted215
– ending213
– in absence215
– starting213
Calling
– from phone book214
– from Top 8 list215
– redialing215
– refer to telephone operating
instructions
Camera, refer to Rear view
camera83
"Camera picture and PDC"85
"Camera view: full screen"85
"Camera view: main
window"85
Can holder, refer to Cup
holders117
Capacities261
Capacity of cargo bay260
Car battery, refer to Vehicle
battery250
Car care, refer to Caring for
your vehicle brochure
Car-care products, refer to
Caring for your vehicle
brochure
"Car Data"70
Care244
– refer to Caring for your
vehicle brochure
Cargo
– refer to Loading128
– securing130
– securing with ski bag122
Cargo area, refer to Cargo
bay119Cargo bay
– capacity260
– emergency operation, refer
to Opening manually33
– expanding120
– opening/closing, refer to
Liftgate33
– opening from inside33
– opening from outside33
– opening with remote
control30
Caring for artificial leather,
refer to Caring for your
vehicle brochure
Caring for leather, refer to
Caring for your vehicle
brochure
Caring for light-alloy wheels,
refer to Caring for your
vehicle brochure
Caring for the carpet, refer to
Caring for your vehicle
brochure
Caring for the vehicle finish,
refer to Caring for your
vehicle brochure
Car key, refer to Keys/remote
control28
Car phone206
– installation location, refer to
Center armrest, front116
– refer to Mobile phone206
– refer to separate operating
instructions
Car radio, refer to Radio164
Car wash128
– also refer to Caring for your
vehicle brochure
– before driving in57
– with comfort access38
Catalytic converter, refer to
Hot exhaust system127
"Categories" on satellite
radio171
CBC Cornering Brake
Control85
CBS Condition Based
Service243
Page 275 of 288
Reference 273
At a glance
Controls
Driving tips
Communications
Navigation
Entertainment
Mobility
Front seat adjustment43
FTM Flat Tire Monitor89
– false alarms90
– indicating a flat tire90
– initializing the system90
– malfunction94
– snow chains238
– system limits90
– warning lamp90
Fuel231
– capacity261
– display69
– high-quality brands231
– quality231
– saving126
– specifications231
Fuel clock, refer to Fuel
gauge69
Fuel consumption display
– computer, average fuel
consumption70
Fuel display, refer to Fuel
gauge69
Fuel filler door230
– closing230
– opening230
– releasing manually230
Fuses251
G
Garage door opener, refer to
Integrated universal remote
control112
Gasoline, refer to Required
fuel231
Gasoline display, refer to Fuel
gauge69
Gear changes, automatic
transmission with
Steptronic62
General driving
notes126,127Glass sunroof, electric39
– convenience operation from
outside32
– convenience operation with
comfort access37
– moving manually41
– opening, closing40
– power interruption40
– raising39
– remote control30
Glove compartment115
– lighting115
– opening manually115
GPS navigation, refer to
Navigation system134
Grills, refer to Ventilation107
Grills of the automatic climate
control103
Gross vehicle weight, refer to
Weights260
H
Handbrake, refer to Parking
brake57
– Automatic Hold58
Hands-free system, refer to
Microphone14
Hazard warning flashers15
HDC Hill Descent Control87
"HD radio"167
HD radio, refer to High
Definition Radio167
Head airbags95
Headlamp control,
automatic99
Headlamp flasher64
Headlamps99
– care, refer to Caring for your
vehicle brochure
– cleaning, refer to Washer/
wiper system64
– replacing bulbs245
Head Light, refer to Adaptive
Head Light101
Head restraints46
– sitting safely42
"Head-Up Display"97
Head-Up Display97Heated
– mirrors50
– rear window105
– seats48
– steering wheel51
Heating103
– exterior mirrors50
– interior103
– rear window105
– residual heat107
– seats48
– steering wheel51
Heating with engine switched
off, refer to Residual
heat107
Heavy cargo, refer to Securing
cargo130
Height, refer to
Dimensions259
Height adjustment
– seats43
– steering wheel51
High beams64,101
– headlamp flasher64
– indicator lamp13
High Definition Radio167
Highs, refer to Treble and
bass161
High water, refer to Driving
through water127
Highway, refer to Route
criteria146
Hill Descent Control HDC87
Hills128
Holder for cups117
Home address146
"Home address" for
navigation146
Homepage4
Hood239
Horn10
Hot exhaust system127
"Hour memo"79
"House number" for
destination entry139
Hydraulic brake assistant,
refer to Brake assistant86
Hydroplaning127