light BMW X6 2008 Owner's Manual
[x] Cancel search | Manufacturer: BMW, Model Year: 2008, Model line: X6, Model: BMW X6 2008Pages: 288, PDF Size: 8.08 MB
Page 68 of 288
Driving
66
Capacity
approx. 6.3USquarts/6liters.
Cruise control*
The concept
The cruise control with a braking function is
available for use at speeds of approx. 20 mph/
30 km/h and higher. The vehicle stores and
maintains the speed that you set using the lever
mounted on the steering column. To keep the
specified speed constant, the system brakes if
the engine braking effect is not sufficient on a
downhill grade.
Do not use the cruise control under driv-
ing conditions that do not permit a con-
stant speed, e.g. when driving on winding
roads , in heavy traffic o r in poor roa d co nditions
such as snow, rain, ice, and loose road surface.
Otherwise you could lose control of the vehicle
and cause an accident.<
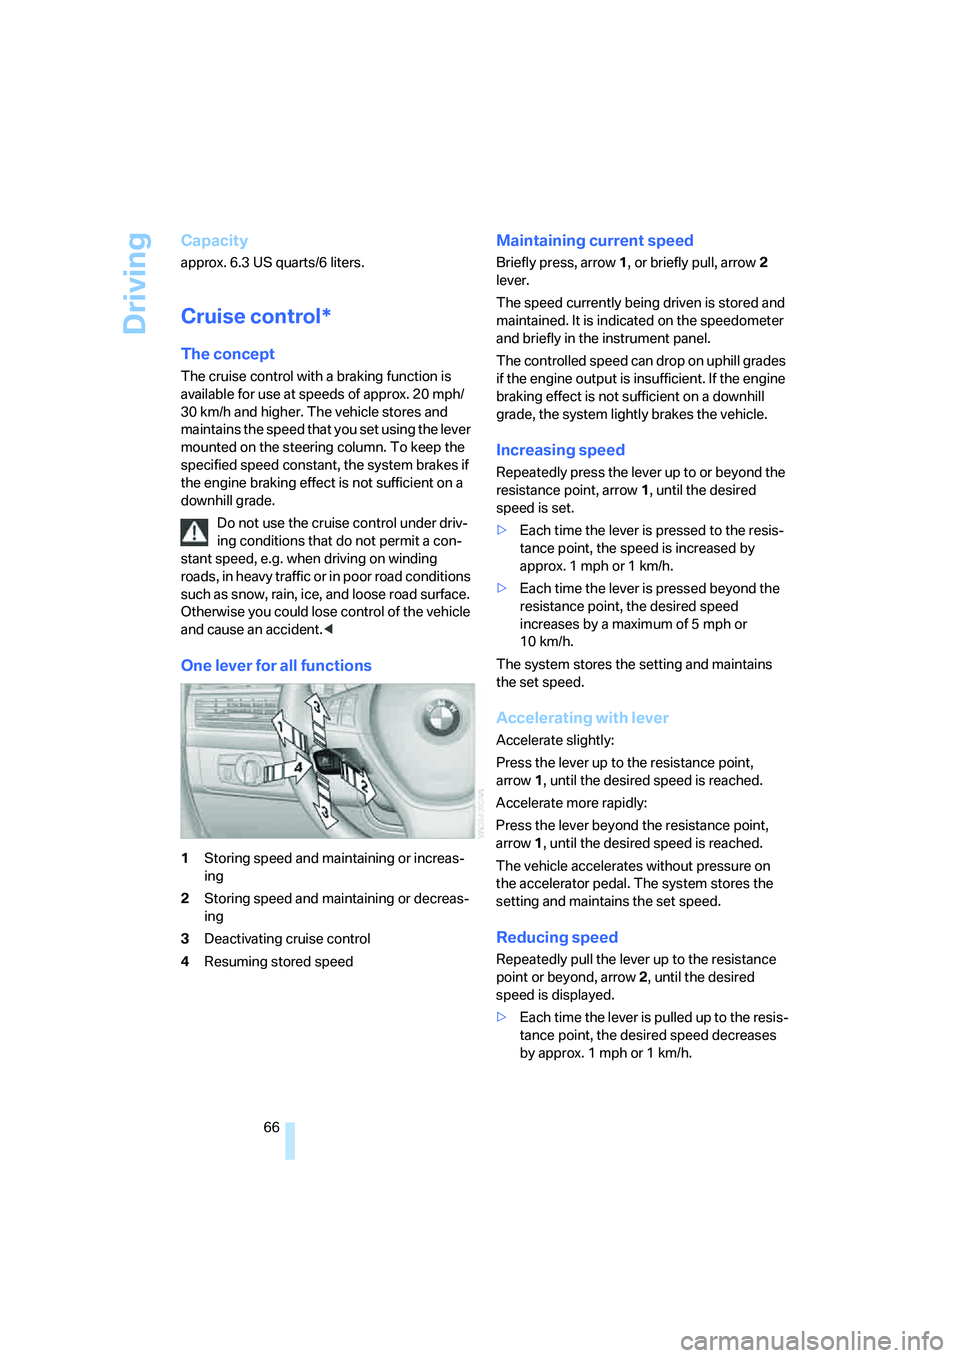
One lever for all functions
1Storing speed and maintaining or increas-
ing
2Storing speed and maintaining or decreas-
ing
3Deactivating cruise control
4Resuming stored speed
Maintaining current speed
Briefly press, arrow1, or briefly pull, arrow2
lever.
The speed currently being driven is stored and
maintained. It is indicated on the speedometer
and briefly in the instrument panel.
The controlled speed can drop on uphill grades
if the engine output is insufficient. If the engine
braking effect is not sufficient on a downhill
grade, the system lightly brakes the vehicle.
Increasing speed
Repeatedly press the lever up to or beyond the
resistance point, arrow1, until the desired
speed is set.
>Each time the lever is pressed to the resis-
tance point, the speed is increased by
approx. 1 mph or 1 km/h.
>Each time the lever is pressed beyond the
resistance point, the desired speed
increases by a maximum of 5 mph or
10 km/h.
The system stores the setting and maintains
the set speed.
Accelerating with lever
Accelerate slightly:
Press the lever up to the resistance point,
arrow1, until the desired speed is reached.
Accelerate more rapidly:
Press the lever beyond the resistance point,
arrow1, until the desired speed is reached.
The vehicle accelerates without pressure on
the accelerator pedal. The system stores the
setting and maintains the set speed.
Reducing speed
Repeatedly pull the lever up to the resistance
point or beyond, arrow2, until the desired
speed is displayed.
>Each time the lever is pulled up to the resis-
tance point, the desired speed decreases
by approx. 1 mph or 1 km/h.
Page 69 of 288
Controls
67Reference
At a glance
Driving tips
Communications
Navigation
Entertainment
Mobility
>Each time the lever is pulled beyond the
resistance point, the desired speed is
decreased by a maximum of 5 mph or
10 km/h until the minimum speed of
20 mph or 30 km/h is reached.
The system stores the setting and maintains
the set speed.
Deactivating cruise control
Briefly press the lever up or down, arrow3.
The displays in the speedometer go out.
In addition, the system is automatically deacti-
vated:
>when braking
>when transmission position N is engaged
>when DTC is activated or DSC is deacti-
vated
>when HDC is activated
>when the parking brake is set
>when driving stability control systems inter-
vene
Accelerating does not deactivate the cruise
control. After releasing the accelerator pedal,
the stored speed is reached and maintained
again.
Warning lamp
The warning lamp lights up if the
cruise control has been deactivated
automatically, e.g. by a control inter-
vention of the DSC. A message appears on the
Control Display.
Resuming stored speed
Briefly press the button, arrow4. The stored
speed is resumed and maintained.
With the ignition switched off, the stored speed
value is deleted and cannot be resumed again.
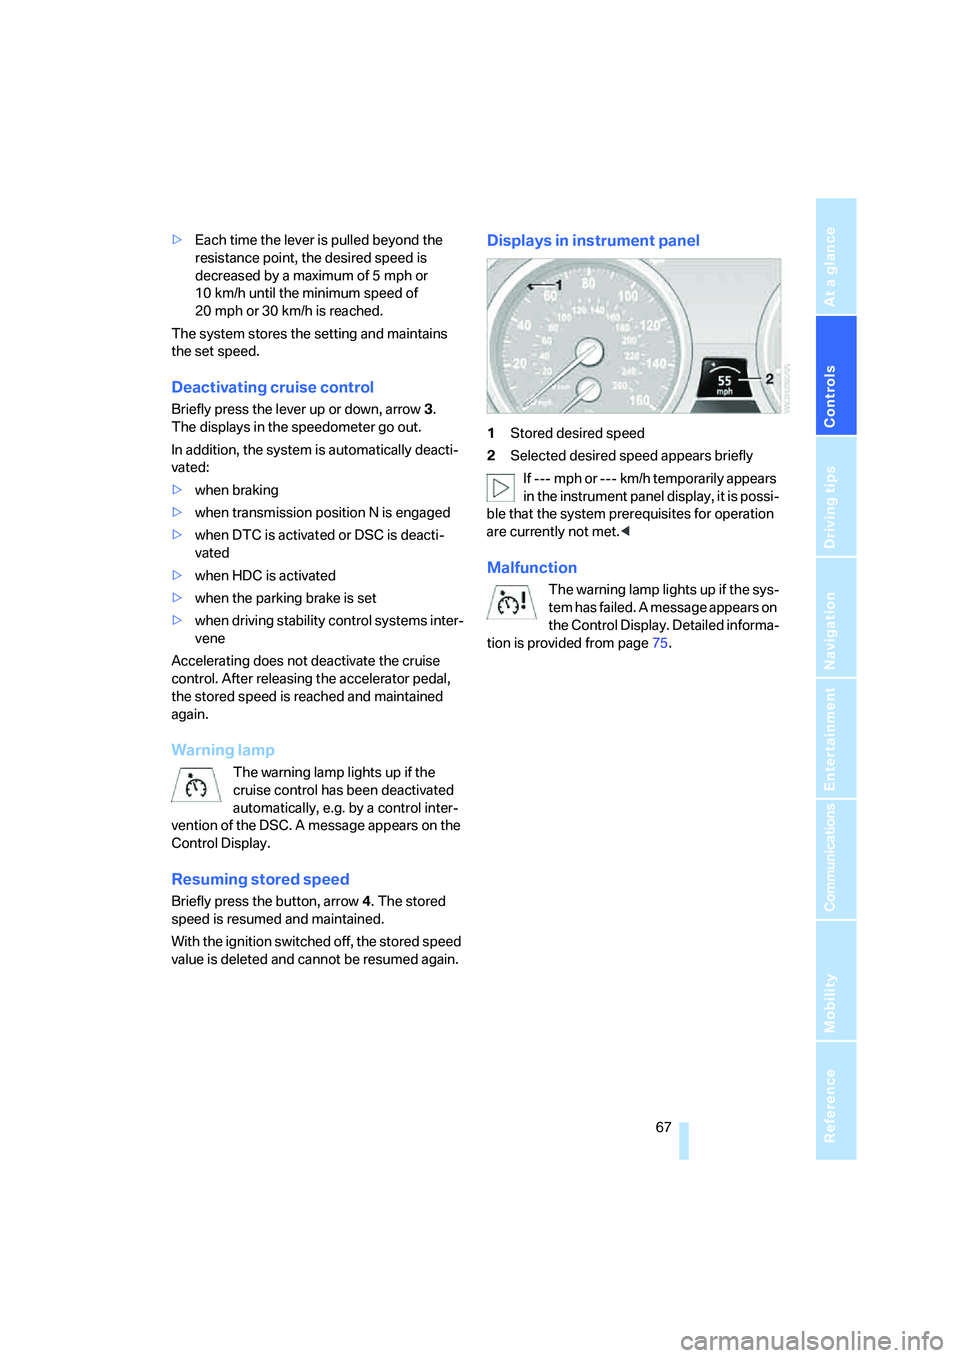
Displays in instrument panel
1Stored desired speed
2Selected desired speed appears briefly
If --- mph or --- km/h temporarily appears
in the instrument panel display, it is possi-
ble that the system prerequisites for operation
are currently not met.<
Malfunction
The warning lamp lights up if the sys-
tem has failed. A message appears on
the Control Display. Detailed informa-
tion is provided from page75.
Page 70 of 288
Everything under control
68
Everything under control
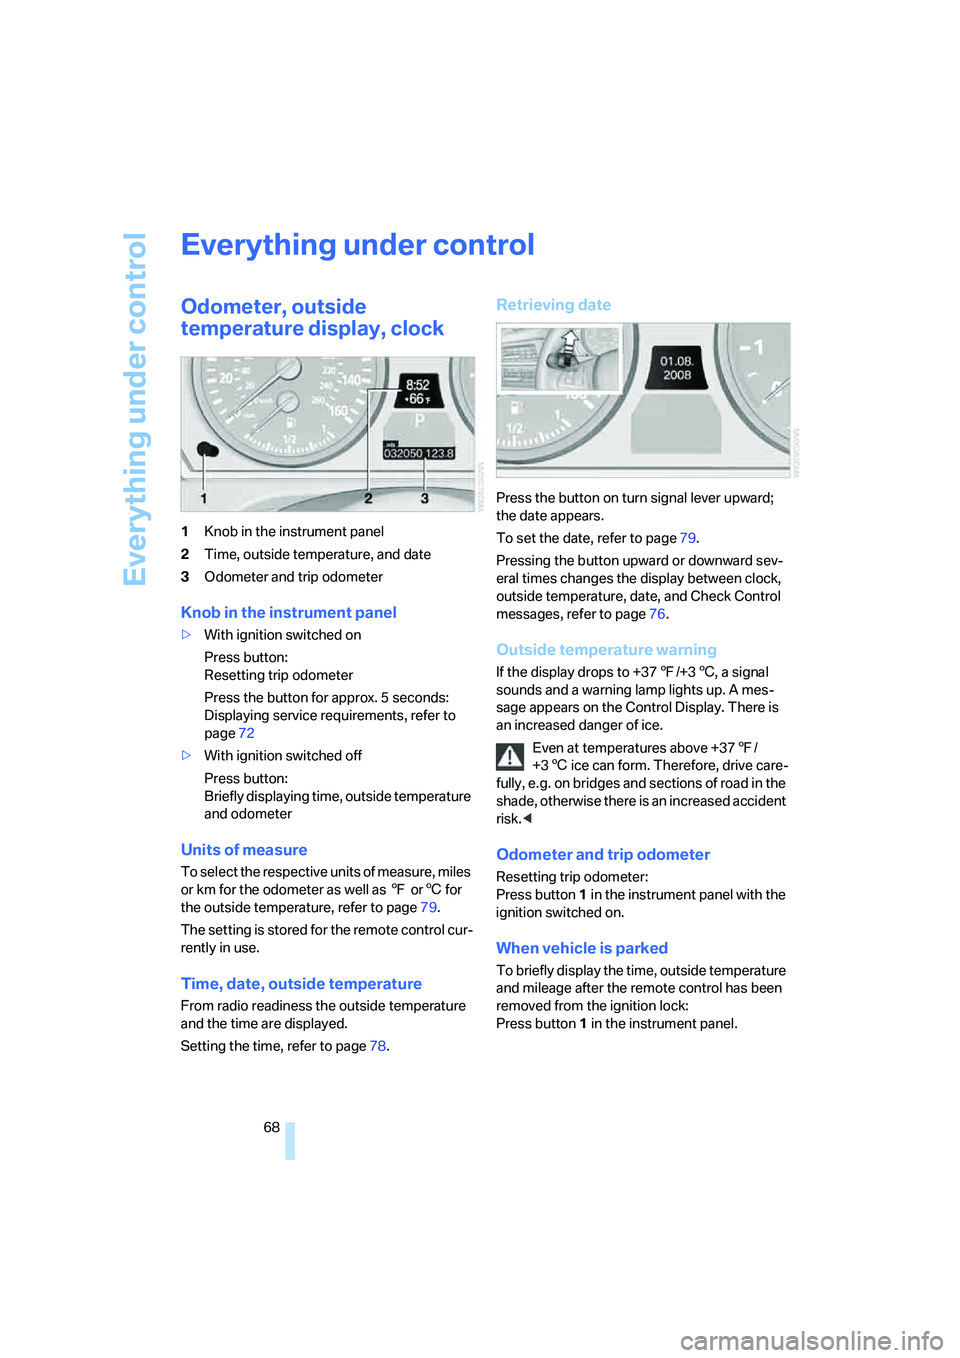
Odometer, outside
temperature display, clock
1Knob in the instrument panel
2Time, outside temperature, and date
3Odometer and trip odometer
Knob in the instrument panel
>With ignition switched on
Press button:
Resetting trip odometer
Press the button for approx. 5 seconds:
Displaying service requirements, refer to
page72
>With ignition switched off
Press button:
Briefly displaying time, outside temperature
and odometer
Units of measure
To select the respective units of measure, miles
or km for the odometer as well as 7 or6 for
the outside temperature, refer to page79.
The setting is stored for the remote control cur-
rently in use.
Time, date, outside temperature
From radio readiness the outside temperature
and the time are displayed.
Setting the time, refer to page78.
Retrieving date
Press the button on turn signal lever upward;
the date appears.
To set the date, refer to page79.
Pressing the button upward or downward sev-
eral times changes the display between clock,
outside temperature, date, and Check Control
messages, refer to page76.
Outside temperature warning
If the display drops to +377/+36, a signal
sounds and a warning lamp lights up. A mes-
sage appears on the Control Display. There is
an increased danger of ice.
Even at temperatures above +377/
+36 ice can form. Therefore, drive care-
fully, e.g. on bridges and sections of road in the
shade, otherwise there is an increased accident
risk.<
Odometer and trip odometer
Resetting trip odometer:
Press button 1 in the instrument panel with the
ignition switched on.
When vehicle is parked
To briefly display the time, outside temperature
and mileage after the remote control has been
removed from the ignition lock:
Press button1 in the instrument panel.
Page 71 of 288
Controls
69Reference
At a glance
Driving tips
Communications
Navigation
Entertainment
Mobility
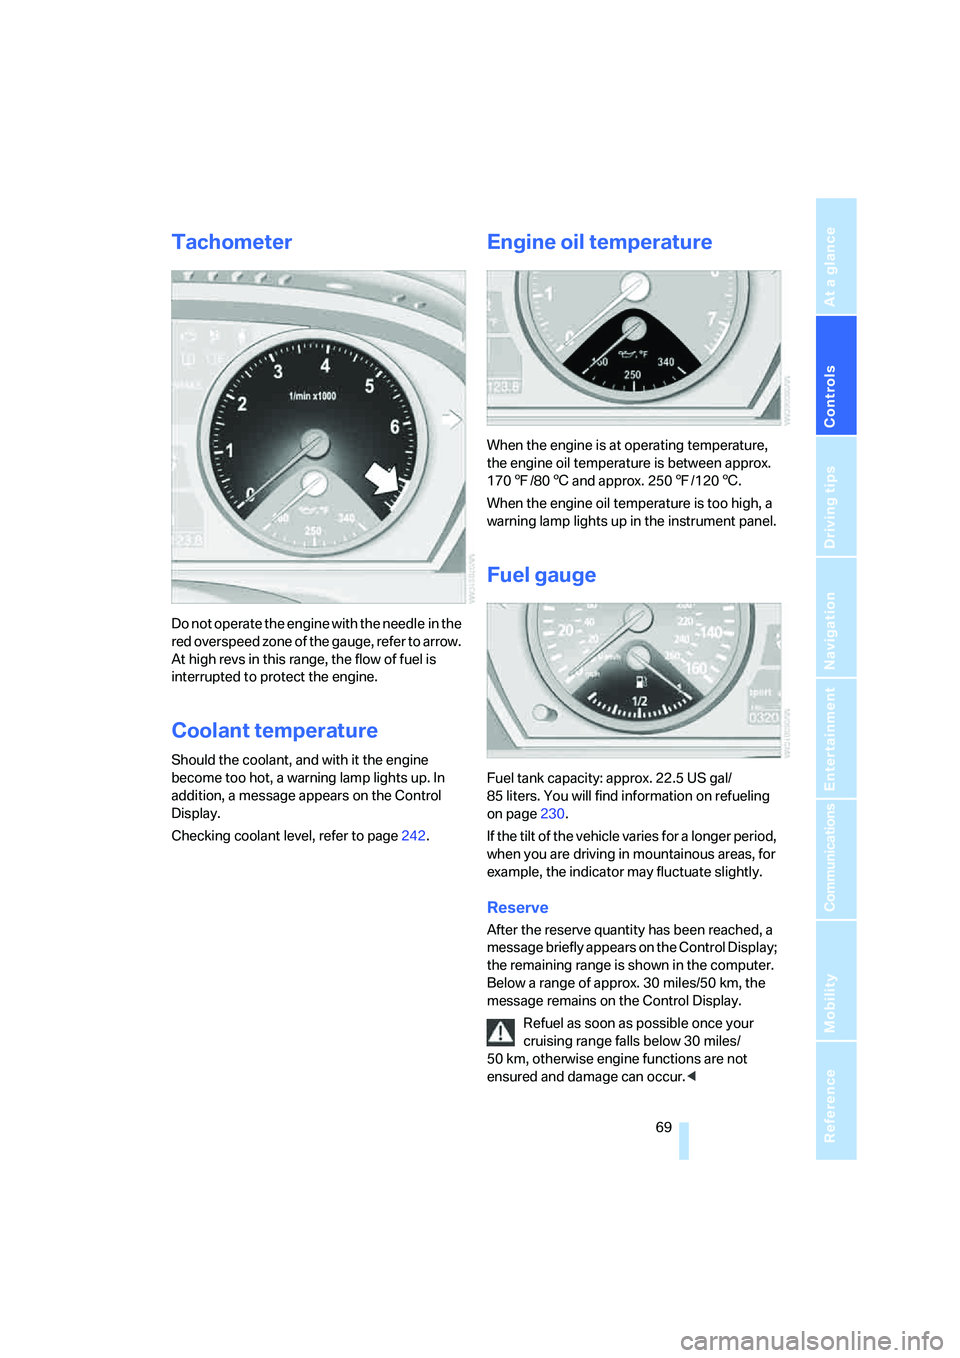
Tachometer
Do not operate the engine with the needle in the
red overspeed zone of the gauge, refer to arrow.
At high revs in this range, the flow of fuel is
interrupted to protect the engine.
Coolant temperature
Should the coolant, and with it the engine
become too hot, a warning lamp lights up. In
addition, a message appears on the Control
Display.
Checking coolant level, refer to page242.
Engine oil temperature
When the engine is at operating temperature,
the engine oil temperature is between approx.
1707/806 and approx. 2507/1206.
When the engine oil temperature is too high, a
warning lamp lights up in the instrument panel.
Fuel gauge
Fuel tank capacity: approx. 22.5 US gal/
85 liters. You will find information on refueling
on page230.
If the tilt of the vehicle varies for a longer period,
when you are driving in mountainous areas, for
example, the indicator may fluctuate slightly.
Reserve
After the reserve quantity has been reached, a
message briefly appears on the Control Display;
the remaining range is shown in the computer.
Below a range of approx. 30 miles/50 km, the
message remains on the Control Display.
Refuel as soon as possible once your
cruising range falls below 30 miles/
50 km, otherwise engine functions are not
ensured and damage can occur.<
Page 76 of 288
Everything under control
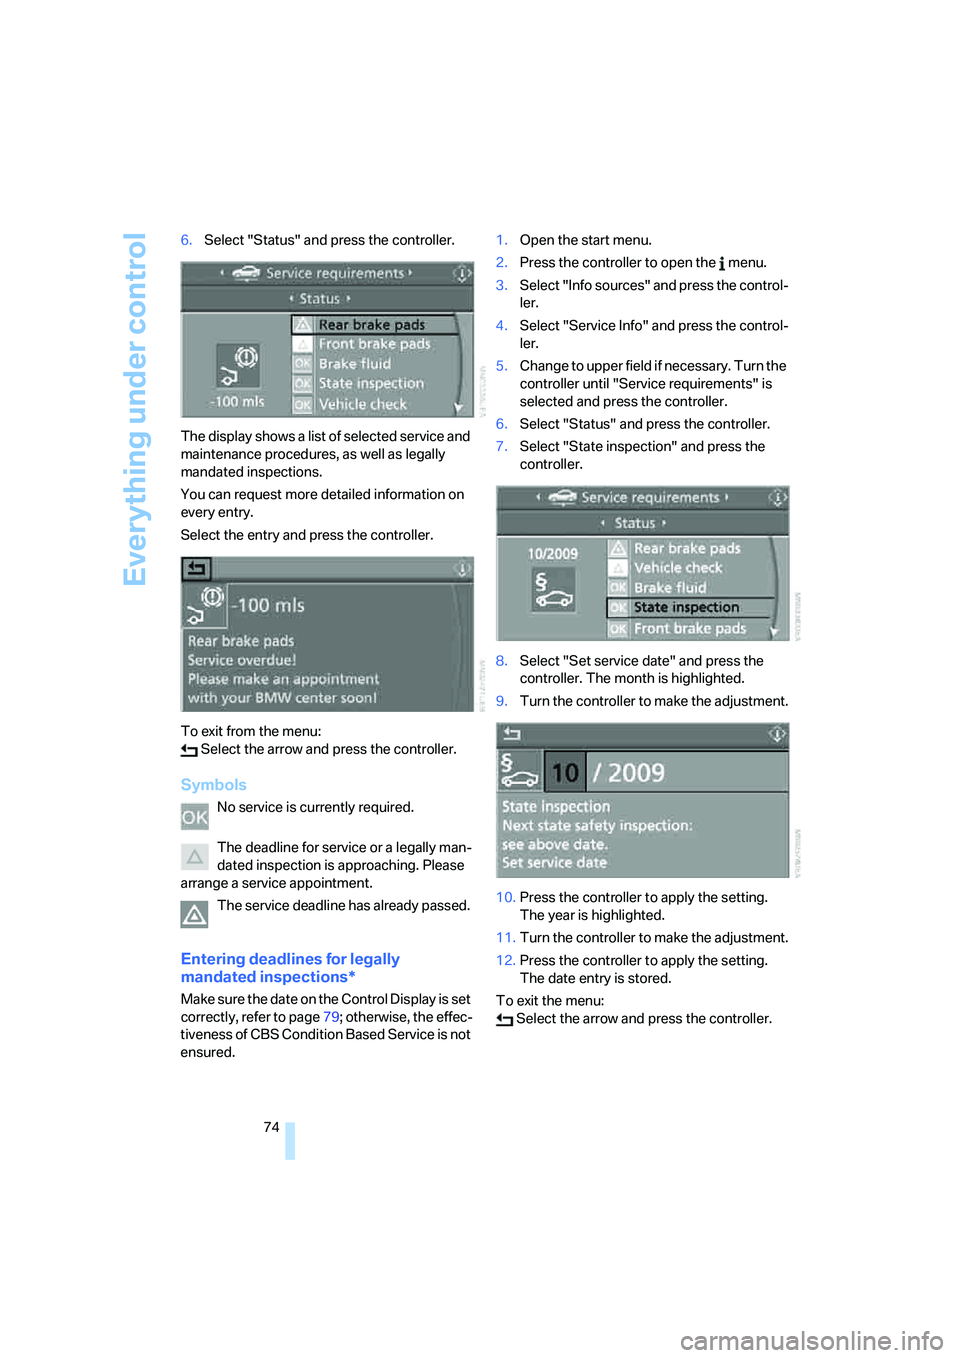
74 6.Select "Status" and press the controller.
The display shows a list of selected service and
maintenance procedures, as well as legally
mandated inspections.
You can request more detailed information on
every entry.
Select the entry and press the controller.
To exit from the menu:
Select the arrow and press the controller.
Symbols
No service is currently required.
The deadline for service or a legally man-
dated inspection is approaching. Please
arrange a service appointment.
The service deadline has already passed.
Entering deadlines for legally
mandated inspections*
Make sure the date on the Control Display is set
correctly, refer to page79; otherwise, the effec-
tiveness of CBS Condition Based Service is not
ensured.1.Open the start menu.
2.Press the controller to open the menu.
3.Select "Info sources" and press the control-
ler.
4.Select "Service Info" and press the control-
ler.
5.Change to upper field if necessary. Turn the
controller until "Service requirements" is
selected and press the controller.
6.Select "Status" and press the controller.
7.Select "State inspection" and press the
controller.
8.Select "Set service date" and press the
controller. The month is highlighted.
9.Turn the controller to make the adjustment.
10.Press the controller to apply the setting.
The year is highlighted.
11.Turn the controller to make the adjustment.
12.Press the controller to apply the setting.
The date entry is stored.
To exit the menu:
Select the arrow and press the controller.
Page 77 of 288
Controls
75Reference
At a glance
Driving tips
Communications
Navigation
Entertainment
Mobility
Check Control
The concept
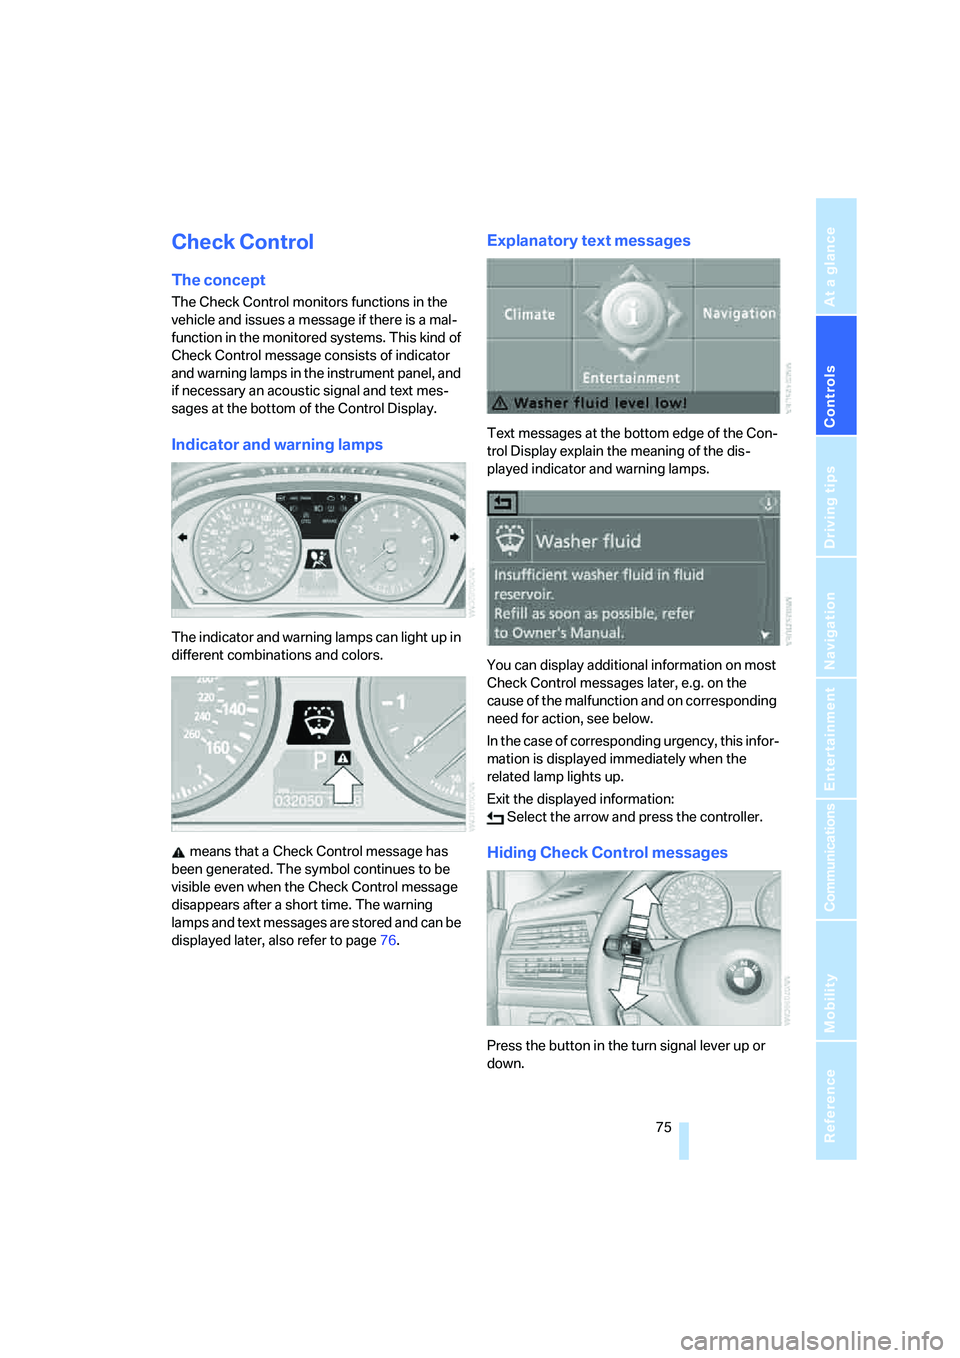
The Check Control monitors functions in the
vehicle and issues a message if there is a mal-
function in the monitored systems. This kind of
Check Control message consists of indicator
and warning lamps in the instrument panel, and
if necessary an acoustic signal and text mes-
sages at the bottom of the Control Display.
Indicator and warning lamps
The indicator and warning lamps can light up in
different combinations and colors.
means that a Check Control message has
been generated. The symbol continues to be
visible even when the Check Control message
disappears after a short time. The warning
lamps and text messages are stored and can be
displayed later, also refer to page76.
Explanatory text messages
Text messages at the bottom edge of the Con-
trol Display explain the meaning of the dis-
played indicator and warning lamps.
You can display additional information on most
Check Control messages later, e.g. on the
cause of the malfunction and on corresponding
need for action, see below.
In the case of corresponding urgency, this infor-
mation is displayed immediately when the
related lamp lights up.
Exit the displayed information:
Select the arrow and press the controller.
Hiding Check Control messages
Press the button in the turn signal lever up or
down.
Page 81 of 288
Controls
79Reference
At a glance
Driving tips
Communications
Navigation
Entertainment
Mobility
Switching on hour signal*
You will hear tones just before each full hour.
Select "Hour memo" and press the controller.
The hour signal is activated.
The setting is stored for the remote control cur-
rently in use.
Setting time format
1.Select "Time format" and press the control-
ler.
2.Select the desired format and press the
controller.
The setting is stored for the remote control cur-
rently in use.
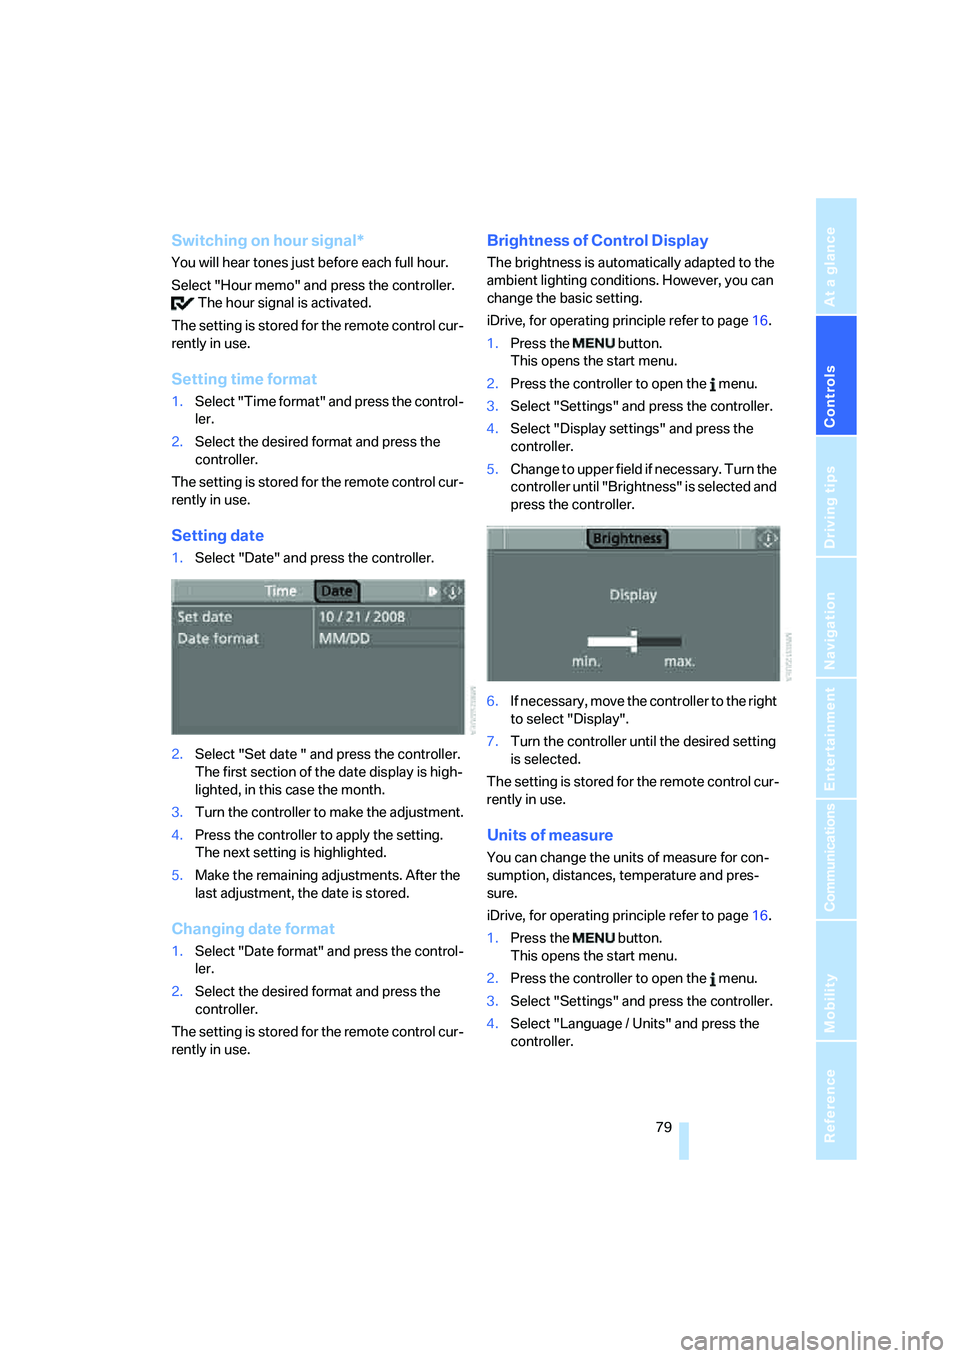
Setting date
1.Select "Date" and press the controller.
2.Select "Set date " and press the controller.
The first section of the date display is high-
lighted, in this case the month.
3.Turn the controller to make the adjustment.
4.Press the controller to apply the setting.
The next setting is highlighted.
5.Make the remaining adjustments. After the
last adjustment, the date is stored.
Changing date format
1.Select "Date format" and press the control-
ler.
2.Select the desired format and press the
controller.
The setting is stored for the remote control cur-
rently in use.
Brightness of Control Display
The brightness is automatically adapted to the
ambient lighting conditions. However, you can
change the basic setting.
iDrive, for operating principle refer to page16.
1.Press the button.
This opens the start menu.
2.Press the controller to open the menu.
3.Select "Settings" and press the controller.
4.Select "Display settings" and press the
controller.
5.Change to upper field if necessary. Turn the
controller until "Brightness" is selected and
press the controller.
6.If necessary, move the controller to the right
to select "Display".
7.Turn the controller until the desired setting
is selected.
The setting is stored for the remote control cur-
rently in use.
Units of measure
You can change the units of measure for con-
sumption, distances, temperature and pres-
sure.
iDrive, for operating principle refer to page16.
1.Press the button.
This opens the start menu.
2.Press the controller to open the menu.
3.Select "Settings" and press the controller.
4.Select "Language / Units" and press the
controller.
Page 83 of 288
Controls
81Reference
At a glance
Driving tips
Communications
Navigation
Entertainment
Mobility
Technology for comfort, convenience and
safety
PDC Park Distance Control*
The concept
The PDC assists you when you are parking.
Acoustic signals and an optical display
* alert
you to the approach of an object from behind
your vehicle. To measure the distance, there
are four ultrasonic sensors in each bumper.
The range of these sensors is approx. 7 ft/2 m.
However, an acoustic warning first sounds for
the sensors at the front and at the two rear cor-
ners at approx. 24 in/60 cm, and for the center
rear sensors at approx. 5 ft/1.50 m.
PDC is a parking aid that can indicate
objects when they are approached
slowly, as is usually the case when parking.
Avoid approaching an object at high speed, oth-
erwise the physical circumstances would mean
that the system warning was too late.<
Automatic activation
Whenever the engine is running or the ignition
is on, each time you move the selector lever into
position R, the PDC system is activated after
approx. 1 second.
Wait this short period before driving off.
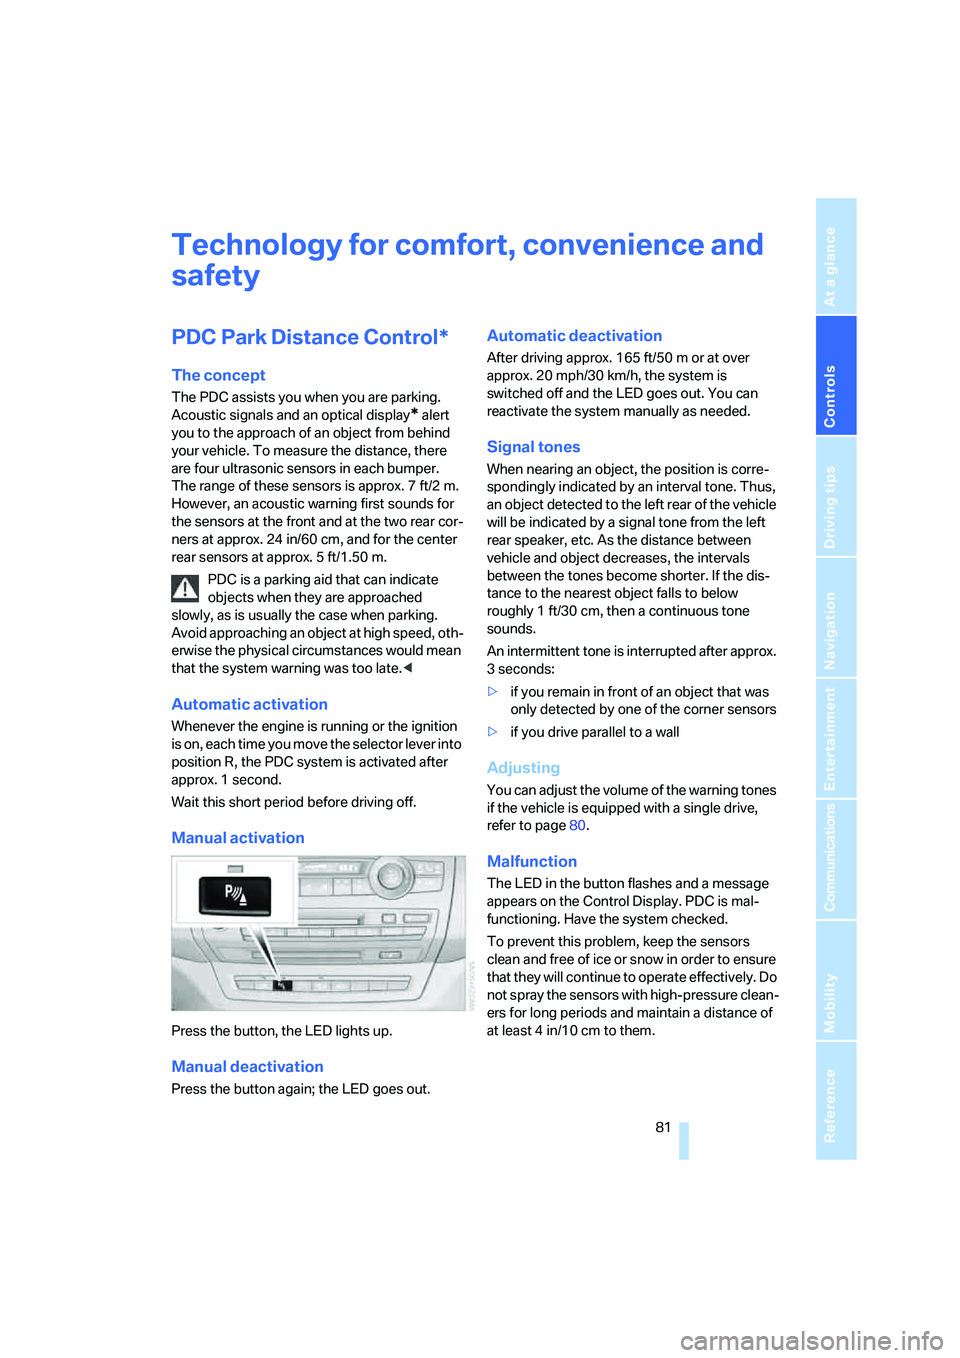
Manual activation
Press the button, the LED lights up.
Manual deactivation
Press the button again; the LED goes out.
Automatic deactivation
After driving approx. 165 ft/50 m or at over
approx. 20 mph/30 km/h, the system is
switched off and the LED goes out. You can
reactivate the system manually as needed.
Signal tones
When nearing an object, the position is corre-
spondingly indicated by an interval tone. Thus,
an object detected to the left rear of the vehicle
will be indicated by a signal tone from the left
rear speaker, etc. As the distance between
vehicle and object decreases, the intervals
between the tones become shorter. If the dis-
tance to the nearest object falls to below
roughly 1 ft/30 cm, then a continuous tone
sounds.
An intermittent tone is interrupted after approx.
3seconds:
>if you remain in front of an object that was
only detected by one of the corner sensors
>if you drive parallel to a wall
Adjusting
You can adjust the volume of the warning tones
if the vehicle is equipped with a single drive,
refer to page80.
Malfunction
The LED in the button flashes and a message
appears on the Control Display. PDC is mal-
functioning. Have the system checked.
To prevent this problem, keep the sensors
clean and free of ice or snow in order to ensure
that they will continue to operate effectively. Do
not spray the sensors with high-pressure clean-
ers for long periods and maintain a distance of
at least 4 in/10 cm to them.
Page 88 of 288
Technology for comfort, convenience and safety
86
Brake assistant
When you apply the brakes rapidly, this system
automatically produces the maximum braking
force boost and thus helps to achieve the short-
est possible braking distance during full brak-
ing. This system exploits all of the benefits pro-
vided by ABS.
Do not reduce the pressure on the brake pedal
for the duration of the full braking.
DSC Dynamic Stability Control
DSC prevents traction loss in the driving wheels
when starting off and accelerating. The system
also identifies unstable driving conditions, such
as a loss of traction at the rear of the vehicle or
sliding of the vehicle in its front wheels. In these
cases, DSC helps the vehicle maintain a safe
course within physical limits by reducing engine
output and through braking actions in the indi-
vidual wheels.
The laws of physics cannot be repealed,
even with DSC. An appropriate driving
style remains the responsibility of the driver.
Therefore, do not restrict the additional safety
margin with a risky driving style, as otherwise
there is a risk of an accident.<
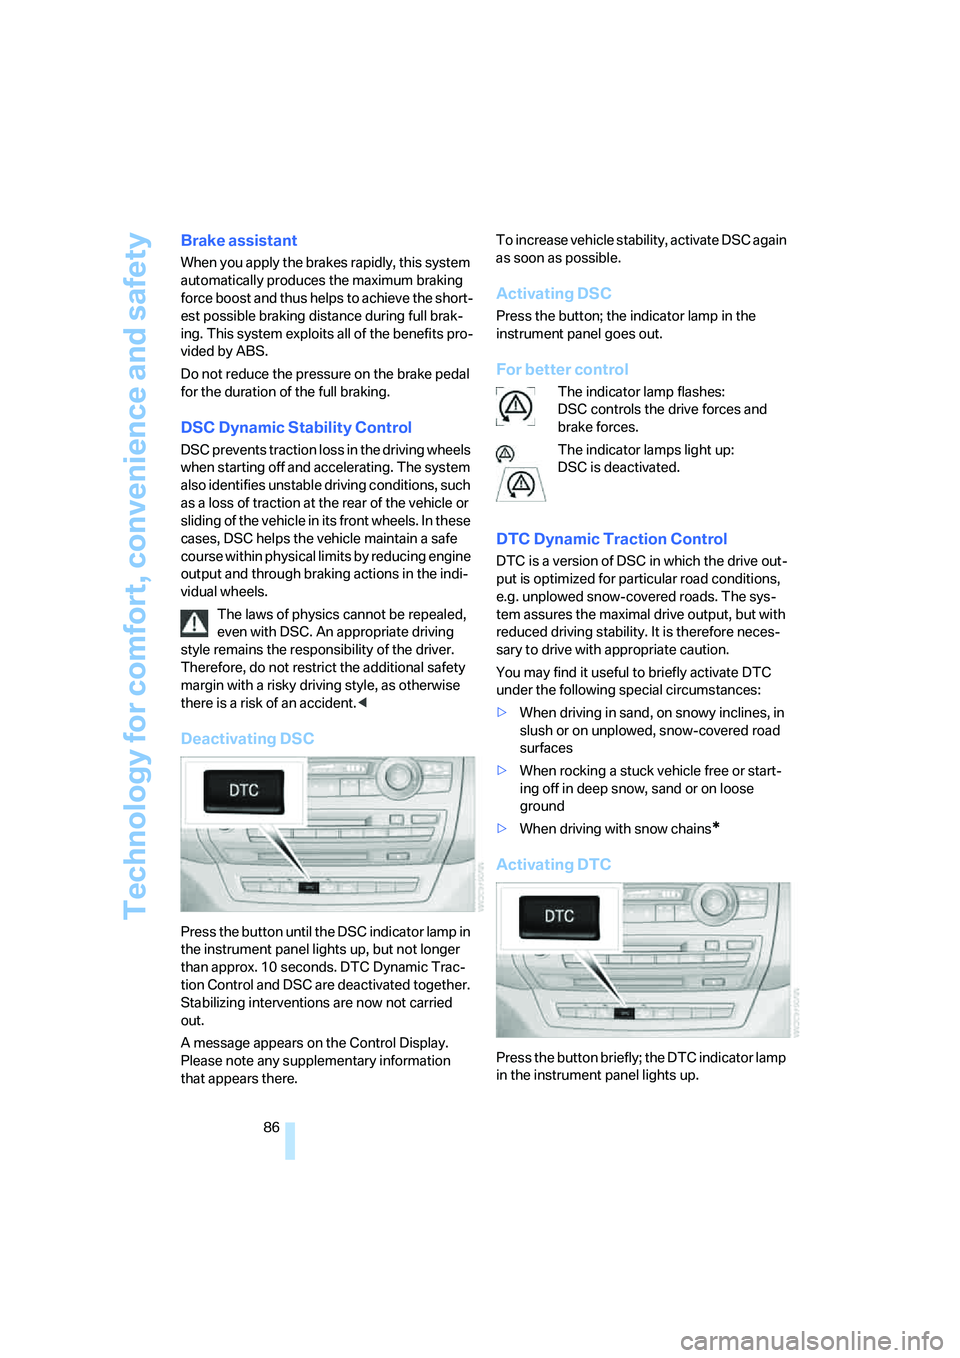
Deactivating DSC
Press the button until the DSC indicator lamp in
the instrument panel lights up, but not longer
than approx. 10 seconds. DTC Dynamic Trac-
tion Control and DSC are deactivated together.
Stabilizing interventions are now not carried
out.
A message appears on the Control Display.
Please note any supplementary information
that appears there.To increase vehicle stability, activate DSC again
as soon as possible.
Activating DSC
Press the button; the indicator lamp in the
instrument panel goes out.
For better control
The indicator lamp flashes:
DSC controls the drive forces and
brake forces.
The indicator lamps light up:
DSC is deactivated.
DTC Dynamic Traction Control
DTC is a version of DSC in which the drive out-
put is optimized for particular road conditions,
e.g. unplowed snow-covered roads. The sys-
tem assures the maximal drive output, but with
reduced driving stability. It is therefore neces-
sary to drive with appropriate caution.
You may find it useful to briefly activate DTC
under the following special circumstances:
>When driving in sand, on snowy inclines, in
slush or on unplowed, snow-covered road
surfaces
>When rocking a stuck vehicle free or start-
ing off in deep snow, sand or on loose
ground
>When driving with snow chains
*
Activating DTC
Press the button briefly; the DTC indicator lamp
in the instrument panel lights up.
Page 89 of 288
Controls
87Reference
At a glance
Driving tips
Communications
Navigation
Entertainment
Mobility
For better control
The indicator lamp flashes:
DTC controls the drive forces and
brake forces.
The indicator lamps light up:
DTC is activated.
Deactivating DTC
Press the button again; the DTC indicator lamp
in the instrument panel goes out.
xDrive
xDrive is the 4-wheel drive system of your
BMW. The combined effects of xDrive and DSC
further optimize the traction and dynamic driv-
ing characteristics. The 4-wheel drive system
xDrive variably distributes the drive forces to
the front and rear axle depending on the driving
situation and prevailing road conditions.
Dynamic Performance Control
The concept
Dynamic Performance Control optimizes the
handling characteristics of your BMW when
starting off, cornering, and during evasive
maneuvers. To achieve this, the system variably
distributes the drive torque of the rear axle to
the two rear wheels. This further increases the
steering precision and tracking stability of your
vehicle.
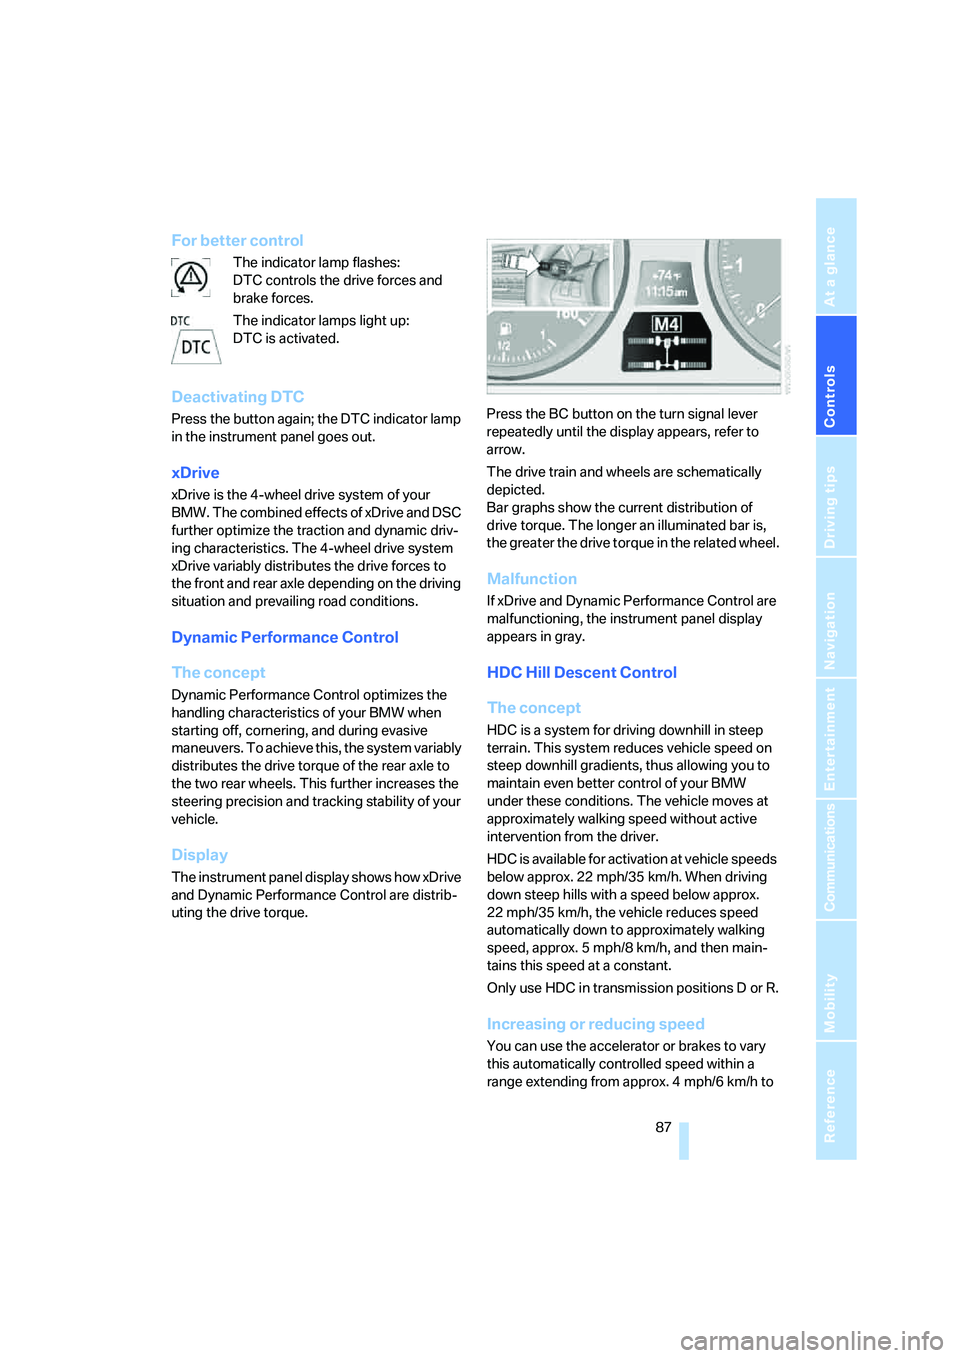
Display
The instrument panel display shows how xDrive
and Dynamic Performance Control are distrib-
uting the drive torque.Press the BC button on the turn signal lever
repeatedly until the display appears, refer to
arrow.
The drive train and wheels are schematically
depicted.
Bar graphs show the current distribution of
drive torque. The longer an illuminated bar is,
the greater the drive torque in the related wheel.
Malfunction
If xDrive and Dynamic Performance Control are
malfunctioning, the instrument panel display
appears in gray.
HDC Hill Descent Control
The concept
HDC is a system for driving downhill in steep
terrain. This system reduces vehicle speed on
steep downhill gradients, thus allowing you to
maintain even better control of your BMW
under these conditions. The vehicle moves at
approximately walking speed without active
intervention from the driver.
HDC is available for activation at vehicle speeds
below approx. 22 mph/35 km/h. When driving
down steep hills with a speed below approx.
22 mph/35 km/h, the vehicle reduces speed
automatically down to approximately walking
speed, approx. 5 mph/8 km/h, and then main-
tains this speed at a constant.
Only use HDC in transmission positions D or R.
Increasing or reducing speed
You can use the accelerator or brakes to vary
this automatically controlled speed within a
range extending from approx. 4 mph/6 km/h to