remote start BMW X6 2008 Owner's Manual
[x] Cancel search | Manufacturer: BMW, Model Year: 2008, Model line: X6, Model: BMW X6 2008Pages: 288, PDF Size: 8.08 MB
Page 87 of 288
Controls
85Reference
At a glance
Driving tips
Communications
Navigation
Entertainment
Mobility
Displays
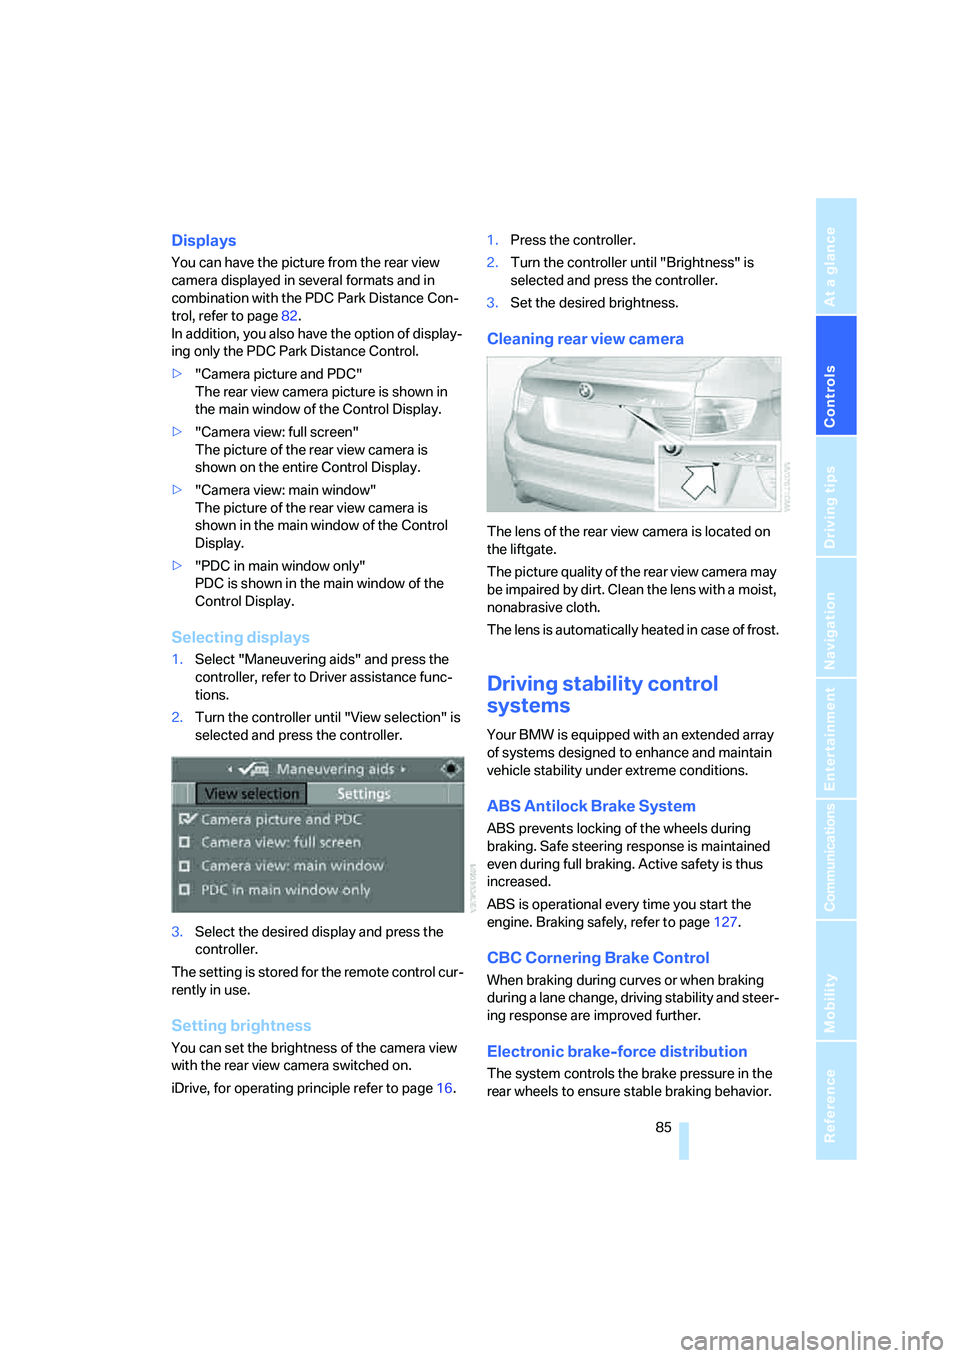
You can have the picture from the rear view
camera displayed in several formats and in
combination with the PDC Park Distance Con-
trol, refer to page82.
In addition, you also have the option of display-
ing only the PDC Park Distance Control.
>"Camera picture and PDC"
The rear view camera picture is shown in
the main window of the Control Display.
>"Camera view: full screen"
The picture of the rear view camera is
shown on the entire Control Display.
>"Camera view: main window"
The picture of the rear view camera is
shown in the main window of the Control
Display.
>"PDC in main window only"
PDC is shown in the main window of the
Control Display.
Selecting displays
1.Select "Maneuvering aids" and press the
controller, refer to Driver assistance func-
tions.
2.Turn the controller until "View selection" is
selected and press the controller.
3.Select the desired display and press the
controller.
The setting is stored for the remote control cur-
rently in use.
Setting brightness
You can set the brightness of the camera view
with the rear view camera switched on.
iDrive, for operating principle refer to page16.1.Press the controller.
2.Turn the controller until "Brightness" is
selected and press the controller.
3.Set the desired brightness.
Cleaning rear view camera
The lens of the rear view camera is located on
the liftgate.
The picture quality of the rear view camera may
be impaired by dirt. Clean the lens with a moist,
nonabrasive cloth.
The lens is automatically heated in case of frost.
Driving stability control
systems
Your BMW is equipped with an extended array
of systems designed to enhance and maintain
vehicle stability under extreme conditions.
ABS Antilock Brake System
ABS prevents locking of the wheels during
braking. Safe steering response is maintained
even during full braking. Active safety is thus
increased.
ABS is operational every time you start the
engine. Braking safely, refer to page127.
CBC Cornering Brake Control
When braking during curves or when braking
during a lane change, driving stability and steer-
ing response are improved further.
Electronic brake-force distribution
The system controls the brake pressure in the
rear wheels to ensure stable braking behavior.
Page 91 of 288
Controls
89Reference
At a glance
Driving tips
Communications
Navigation
Entertainment
Mobility
Chassis and suspension tuning
You can choose between two types of chassis
and suspension tuning.
>Normal:
The comfortable basic setting offers opti-
mum comfort when traveling.
>Sport:
The sporty basic setting offers increased
driving agility.
Selecting chassis and suspension
tuning
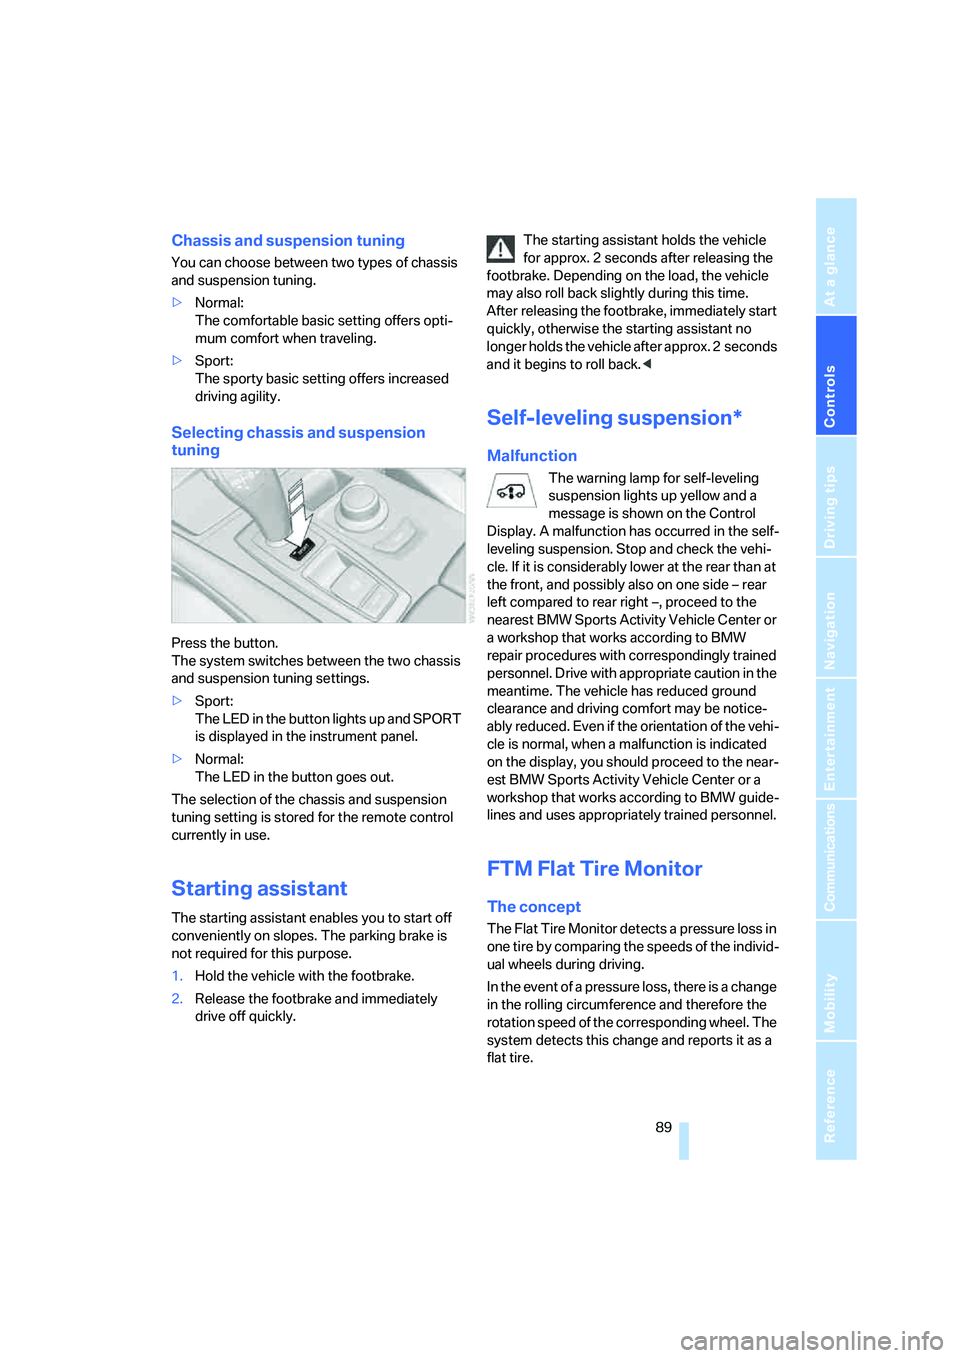
Press the button.
The system switches between the two chassis
and suspension tuning settings.
>Sport:
The LED in the button lights up and SPORT
is displayed in the instrument panel.
>Normal:
The LED in the button goes out.
The selection of the chassis and suspension
tuning setting is stored for the remote control
currently in use.
Starting assistant
The starting assistant enables you to start off
conveniently on slopes. The parking brake is
not required for this purpose.
1.Hold the vehicle with the footbrake.
2.Release the footbrake and immediately
drive off quickly.The starting assistant holds the vehicle
for approx. 2 seconds after releasing the
footbrake. Depending on the load, the vehicle
may also roll back slightly during this time.
After releasing the footbrake, immediately start
quickly, otherwise the starting assistant no
longer holds the vehicle after approx. 2 seconds
and it begins to roll back.<
Self-leveling suspension*
Malfunction
The warning lamp for self-leveling
suspension lights up yellow and a
message is shown on the Control
Display. A malfunction has occurred in the self-
leveling suspension. Stop and check the vehi-
cle. If it is considerably lower at the rear than at
the front, and possibly also on one side – rear
left compared to rear right –, proceed to the
nearest BMW Sports Activity Vehicle Center or
a workshop that works according to BMW
repair procedures with correspondingly trained
personnel. Drive with appropriate caution in the
meantime. The vehicle has reduced ground
clearance and driving comfort may be notice-
ably reduced. Even if the orientation of the vehi-
cle is normal, when a malfunction is indicated
on the display, you should proceed to the near-
est BMW Sports Activity Vehicle Center or a
workshop that works according to BMW guide-
lines and uses appropriately trained personnel.
FTM Flat Tire Monitor
The concept
The Flat Tire Monitor detects a pressure loss in
one tire by comparing the speeds of the individ-
ual wheels during driving.
In the event of a pressure loss, there is a change
in the rolling circumference and therefore the
rotation speed of the corresponding wheel. The
system detects this change and reports it as a
flat tire.
Page 99 of 288
Controls
97Reference
At a glance
Driving tips
Communications
Navigation
Entertainment
Mobility
Head-Up Display*
The concept
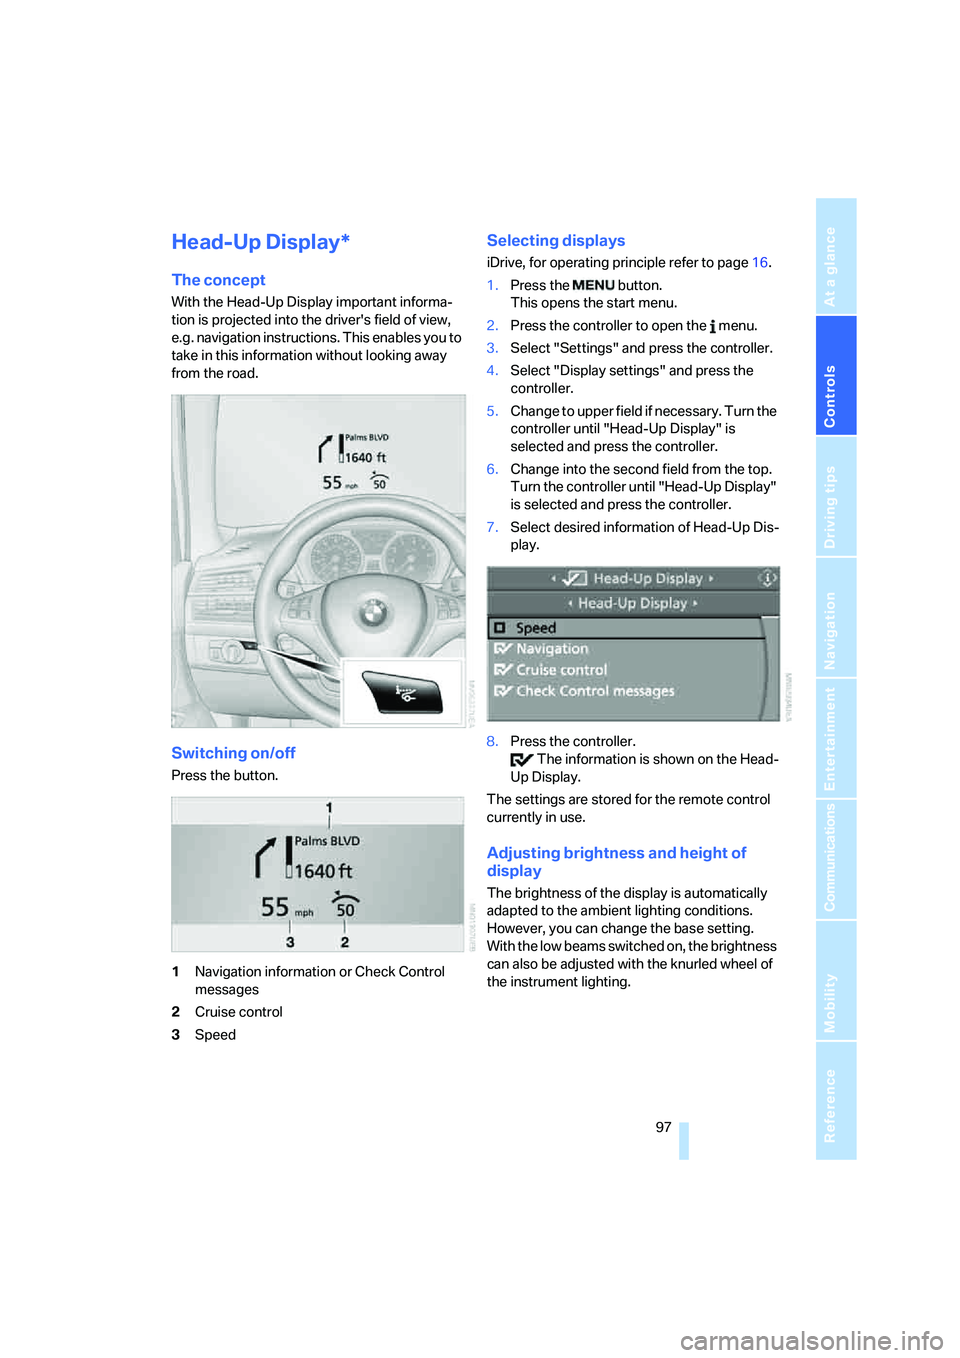
With the Head-Up Display important informa-
tion is projected into the driver's field of view,
e.g. navigation instructions. This enables you to
take in this information without looking away
from the road.
Switching on/off
Press the button.
1Navigation information or Check Control
messages
2Cruise control
3Speed
Selecting displays
iDrive, for operating principle refer to page16.
1.Press the button.
This opens the start menu.
2.Press the controller to open the menu.
3.Select "Settings" and press the controller.
4.Select "Display settings" and press the
controller.
5.Change to upper field if necessary. Turn the
controller until "Head-Up Display" is
selected and press the controller.
6.Change into the second field from the top.
Turn the controller until "Head-Up Display"
is selected and press the controller.
7.Select desired information of Head-Up Dis-
play.
8.Press the controller.
The information is shown on the Head-
Up Display.
The settings are stored for the remote control
currently in use.
Adjusting brightness and height of
display
The brightness of the display is automatically
adapted to the ambient lighting conditions.
However, you can change the base setting.
With the low beams switched on, the brightness
can also be adjusted with the knurled wheel of
the instrument lighting.
Page 100 of 288
Technology for comfort, convenience and safety
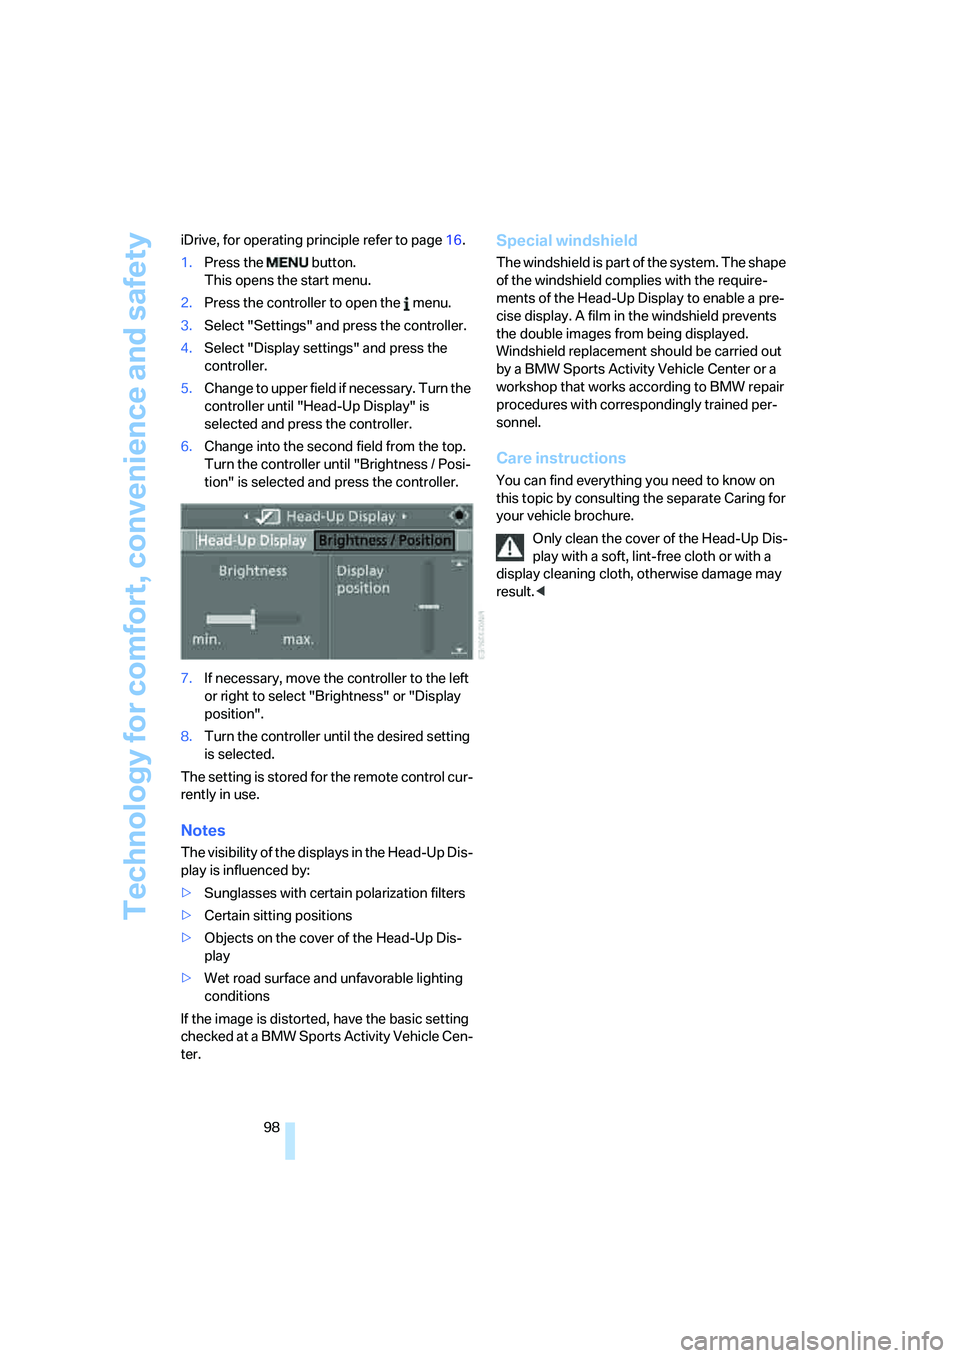
98 iDrive, for operating principle refer to page16.
1.Press the button.
This opens the start menu.
2.Press the controller to open the menu.
3.Select "Settings" and press the controller.
4.Select "Display settings" and press the
controller.
5.Change to upper field if necessary. Turn the
controller until "Head-Up Display" is
selected and press the controller.
6.Change into the second field from the top.
Turn the controller until "Brightness / Posi-
tion" is selected and press the controller.
7.If necessary, move the controller to the left
or right to select "Brightness" or "Display
position".
8.Turn the controller until the desired setting
is selected.
The setting is stored for the remote control cur-
rently in use.
Notes
The visibility of the displays in the Head-Up Dis-
play is influenced by:
>Sunglasses with certain polarization filters
>Certain sitting positions
>Objects on the cover of the Head-Up Dis-
play
>Wet road surface and unfavorable lighting
conditions
If the image is distorted, have the basic setting
checked at a BMW Sports Activity Vehicle Cen-
ter.
Special windshield
The windshield is part of the system. The shape
of the windshield complies with the require-
ments of the Head-Up Display to enable a pre-
cise display. A film in the windshield prevents
the double images from being displayed.
Windshield replacement should be carried out
by a BMW Sports Activity Vehicle Center or a
workshop that works according to BMW repair
procedures with correspondingly trained per-
sonnel.
Care instructions
You can find everything you need to know on
this topic by consulting the separate Caring for
your vehicle brochure.
Only clean the cover of the Head-Up Dis-
play with a soft, lint-free cloth or with a
display cleaning cloth, otherwise damage may
result.<
Page 102 of 288
Lamps
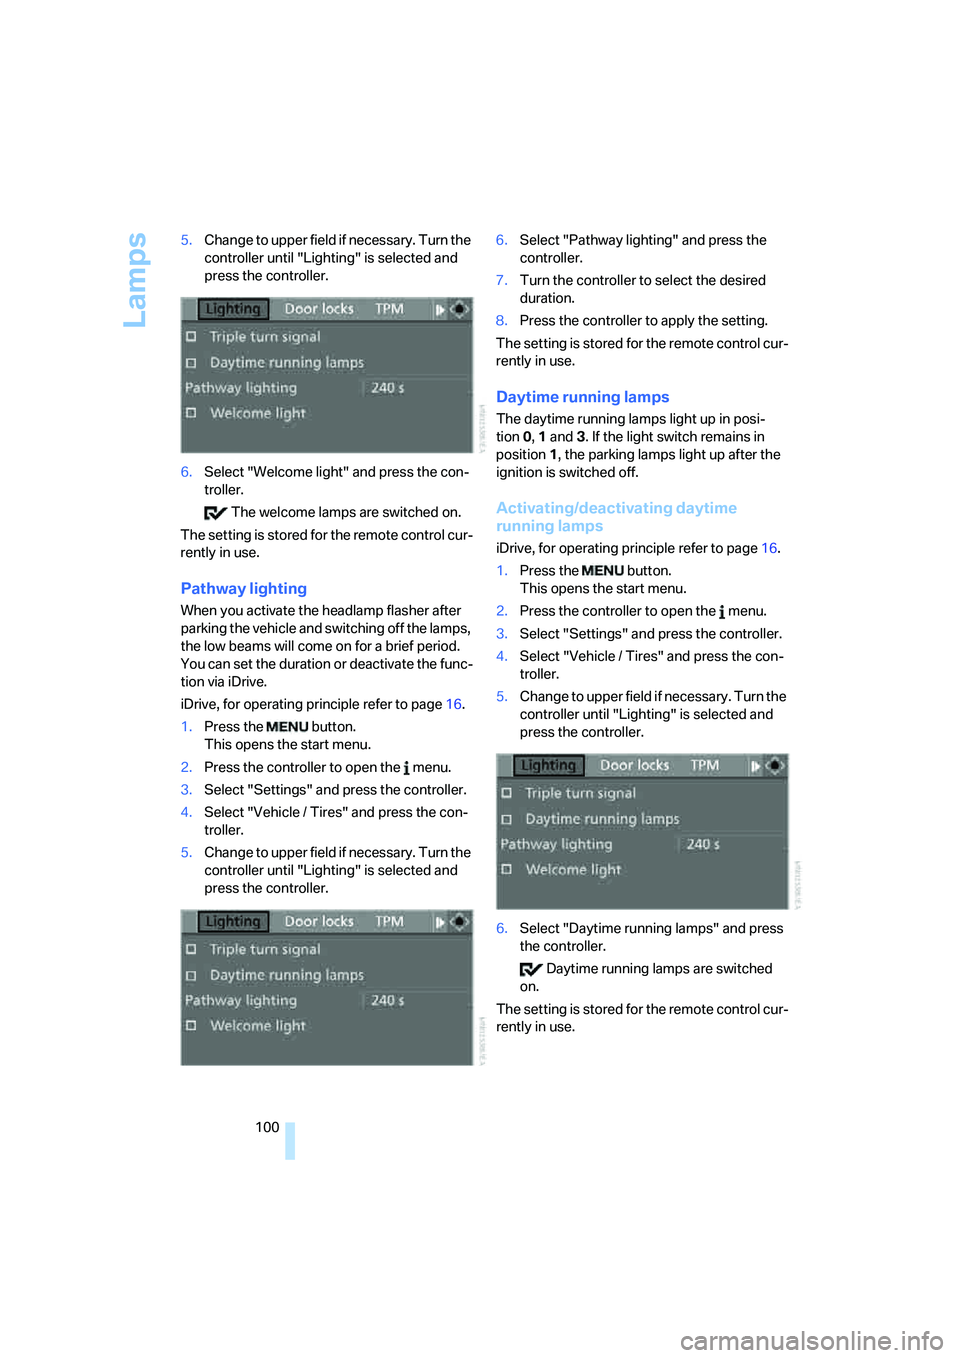
100 5.Change to upper field if necessary. Turn the
controller until "Lighting" is selected and
press the controller.
6.Select "Welcome light" and press the con-
troller.
The welcome lamps are switched on.
The setting is stored for the remote control cur-
rently in use.
Pathway lighting
When you activate the headlamp flasher after
parking the vehicle and switching off the lamps,
the low beams will come on for a brief period.
You can set the duration or deactivate the func-
tion via iDrive.
iDrive, for operating principle refer to page16.
1.Press the button.
This opens the start menu.
2.Press the controller to open the menu.
3.Select "Settings" and press the controller.
4.Select "Vehicle / Tires" and press the con-
troller.
5.Change to upper field if necessary. Turn the
controller until "Lighting" is selected and
press the controller.6.Select "Pathway lighting" and press the
controller.
7.Turn the controller to select the desired
duration.
8.Press the controller to apply the setting.
The setting is stored for the remote control cur-
rently in use.
Daytime running lamps
The daytime running lamps light up in posi-
tion0, 1 and 3. If the light switch remains in
position1, the parking lamps light up after the
ignition is switched off.
Activating/deactivating daytime
running lamps
iDrive, for operating principle refer to page16.
1.Press the button.
This opens the start menu.
2.Press the controller to open the menu.
3.Select "Settings" and press the controller.
4.Select "Vehicle / Tires" and press the con-
troller.
5.Change to upper field if necessary. Turn the
controller until "Lighting" is selected and
press the controller.
6.Select "Daytime running lamps" and press
the controller.
Daytime running lamps are switched
on.
The setting is stored for the remote control cur-
rently in use.
Page 106 of 288
Climate
104
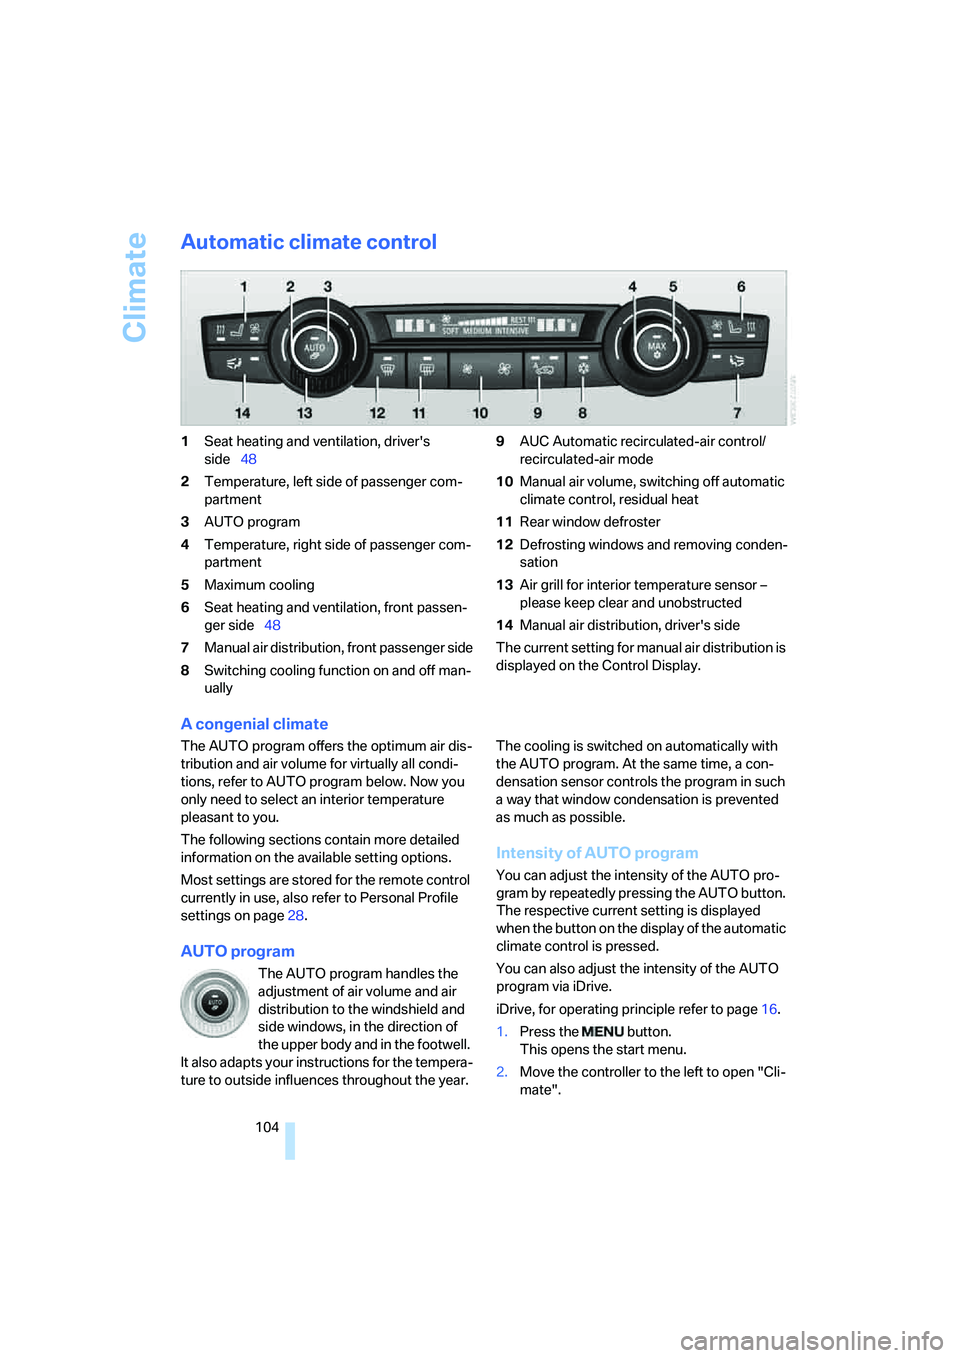
Automatic climate control
1Seat heating and ventilation, driver's
side48
2Temperature, left side of passenger com-
partment
3AUTO program
4Temperature, right side of passenger com-
partment
5Maximum cooling
6Seat heating
and ventilation, front passen-
ger side48
7Manual air distribution, front passenger side
8Switching cooling function on and off man-
ually9AUC Automatic recirculated-air control/
recirculated-air mode
10Manual air volume, switching off automatic
climate control, residual heat
11Rear window defroster
12Defrosting windows and removing conden-
sation
13Air grill for interior temperature sensor –
please keep clear and unobstructed
14Manual air distribution, driver's side
The current setting for manual air distribution is
displayed on the Control Display.
A congenial climate
The AUTO program offers the optimum air dis-
tribution and air volume for virtually all condi-
tions, refer to AUTO program below. Now you
only need to select an interior temperature
pleasant to you.
The following sections contain more detailed
information on the available setting options.
Most settings are stored for the remote control
currently in use, also refer to Personal Profile
settings on page28.
AUTO program
The AUTO program handles the
adjustment of air volume and air
distribution to the windshield and
side windows, in the direction of
the upper body and in the footwell.
It also adapts your instructions for the tempera-
ture to outside influences throughout the year.The cooling is switched on automatically with
the AUTO program. At the same time, a con-
densation sensor controls the program in such
a way that window condensation is prevented
as much as possible.
Intensity of AUTO program
You can adjust the intensity of the AUTO pro-
gram by repeatedly pressing the AUTO button.
The respective current setting is displayed
when the button on the display of the automatic
climate control is pressed.
You can also adjust the intensity of the AUTO
program via iDrive.
iDrive, for operating principle refer to page16.
1.Press the button.
This opens the start menu.
2.Move the controller to the left to open "Cli-
mate".
Page 114 of 288
Practical interior accessories
112
Practical interior accessories
Integrated universal remote
control*
The concept
The integrated universal remote control can
replace as many as three hand-held transmit-
ters for various remote-controlled accessories,
such as garage and gate or lighting systems.
The integrated universal remote control regis-
ters and stores signals from the original hand-
held transmitters.
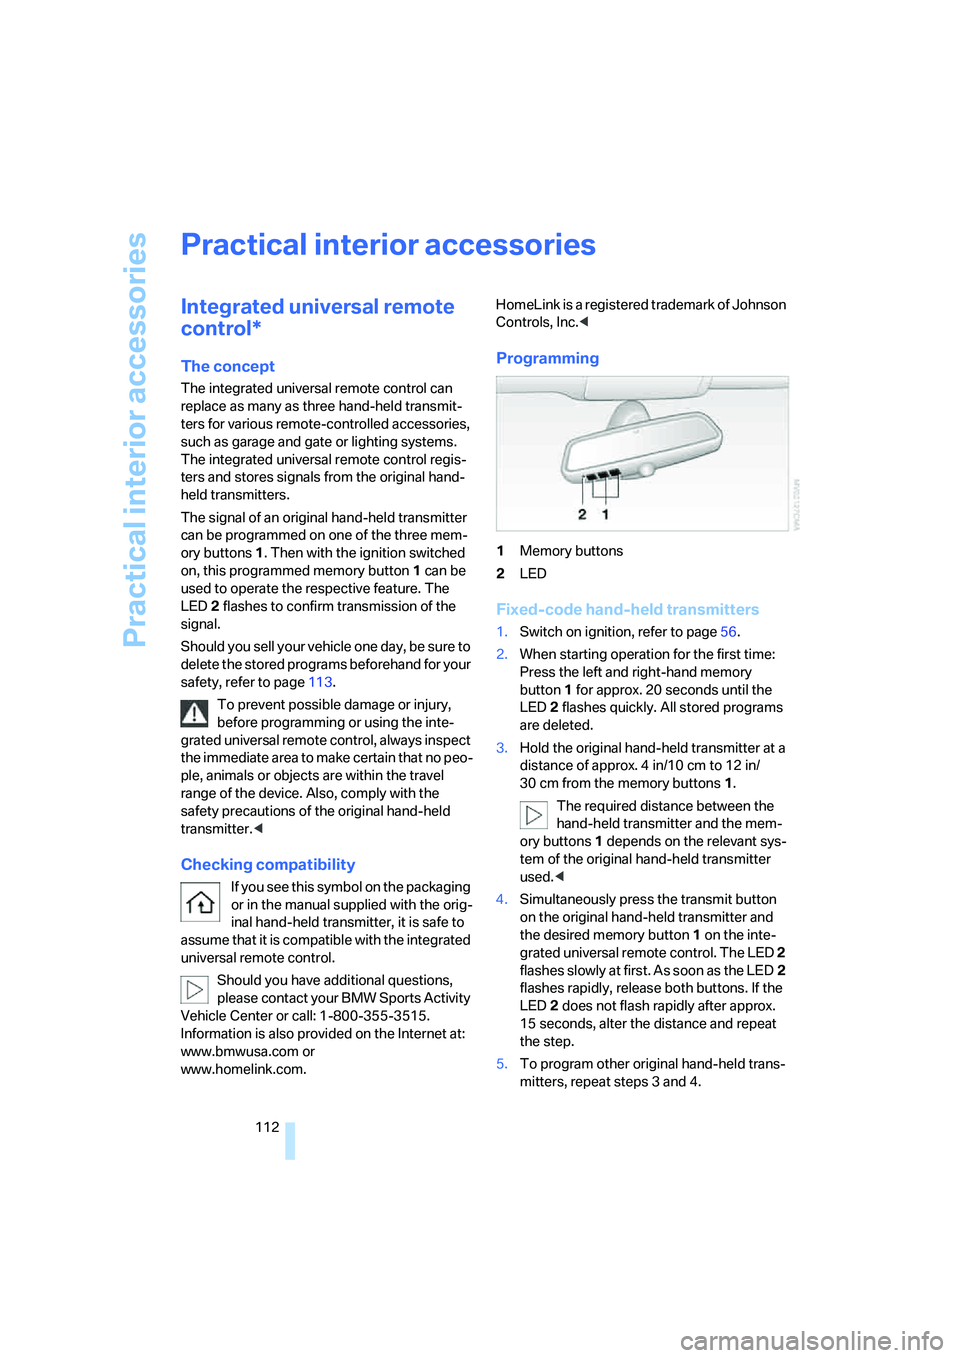
The signal of an original hand-held transmitter
can be programmed on one of the three mem-
ory buttons1. Then with the ignition switched
on, this programmed memory button1 can be
used to operate the respective feature. The
LED2 flashes to confirm transmission of the
signal.
Should you sell your vehicle one day, be sure to
delete the stored programs beforehand for your
safety, refer to page113.
To prevent possible damage or injury,
before programming or using the inte-
grated universal remote control, always inspect
the immediate area to make certain that no peo-
ple, animals or objects are within the travel
range of the device. Also, comply with the
safety precautions of the original hand-held
transmitter.<
Checking compatibility
If you see this symbol on the packaging
or in the manual supplied with the orig-
inal hand-held transmitter, it is safe to
assume that it is compatible with the integrated
universal remote control.
Should you have additional questions,
please contact your BMW Sports Activity
Vehicle Center or call: 1-800-355-3515.
Information is also provided on the Internet at:
www.bmwusa.com or
www.homelink.com.HomeLink is a registered trademark of Johnson
Controls, Inc.<
Programming
1Memory buttons
2LED
Fixed-code hand-held transmitters
1.Switch on ignition, refer to page56.
2.When starting operation for the first time:
Press the left and right-hand memory
button1 for approx. 20 seconds until the
LED2 flashes quickly. All stored programs
are deleted.
3.Hold the original hand-held transmitter at a
distance of approx. 4 in/10 cm to 12 in/
30 cm from the memory buttons1.
The required distance between the
hand-held transmitter and the mem-
ory buttons1 depends on the relevant sys-
tem of the original hand-held transmitter
used.<
4.Simultaneously press the transmit button
on the original hand-held transmitter and
the desired memory button 1 on the inte-
grated universal remote control. The LED 2
flashes slowly at first. As soon as the LED2
flashes rapidly, release both buttons. If the
LED2 does not flash rapidly after approx.
15 seconds, alter the distance and repeat
the step.
5.To program other original hand-held trans-
mitters, repeat steps 3 and 4.
Page 154 of 288
Destination guidance
152
Setting volume of voice instructions
The volume can only be adjusted while a voice
instruction is being output.
1.Repeat the last voice instruction, if neces-
sary.
2.Turn the knob during the voice instruction
to select the desired volume.
This volume is independent of the volume of the
audio sources.
The setting is stored for the remote control cur-
rently in use.
Changing route
During destination guidance, you can revise the
navigation system's route recommendations to
avoid particular stretches of road. Enter the
number of miles/kilometers that you want to
travel before returning to the original route.
1.Select "Navigation" and press the control-
ler.
2.Change into the third field from the top.
Turn the controller until "New route" is
selected and press the controller.
3.Turn the controller to enter the desired
number and press the controller.The route is recalculated.
To exit from the menu without changing the
route:
Select the arrow and press the controller.
Traffic information*
In many congested areas, you can receive traf-
fic information transmitted by radio stations.
The traffic conditions are monitored by traffic
management centers and the traffic information
is periodically updated.
During destination guidance, the traffic infor-
mation relevant to your planned route is auto-
matically displayed and, if you wish, taken into
account in the route planning. Whether destina-
tion guidance is active or not, you can have the
traffic information displayed in the map view or
in the traffic info list.
Switching reception of traffic
information on/off
iDrive, for operating principle refer to page16.
1.Press the button.
This opens the start menu.
2.Press the controller to open the menu.
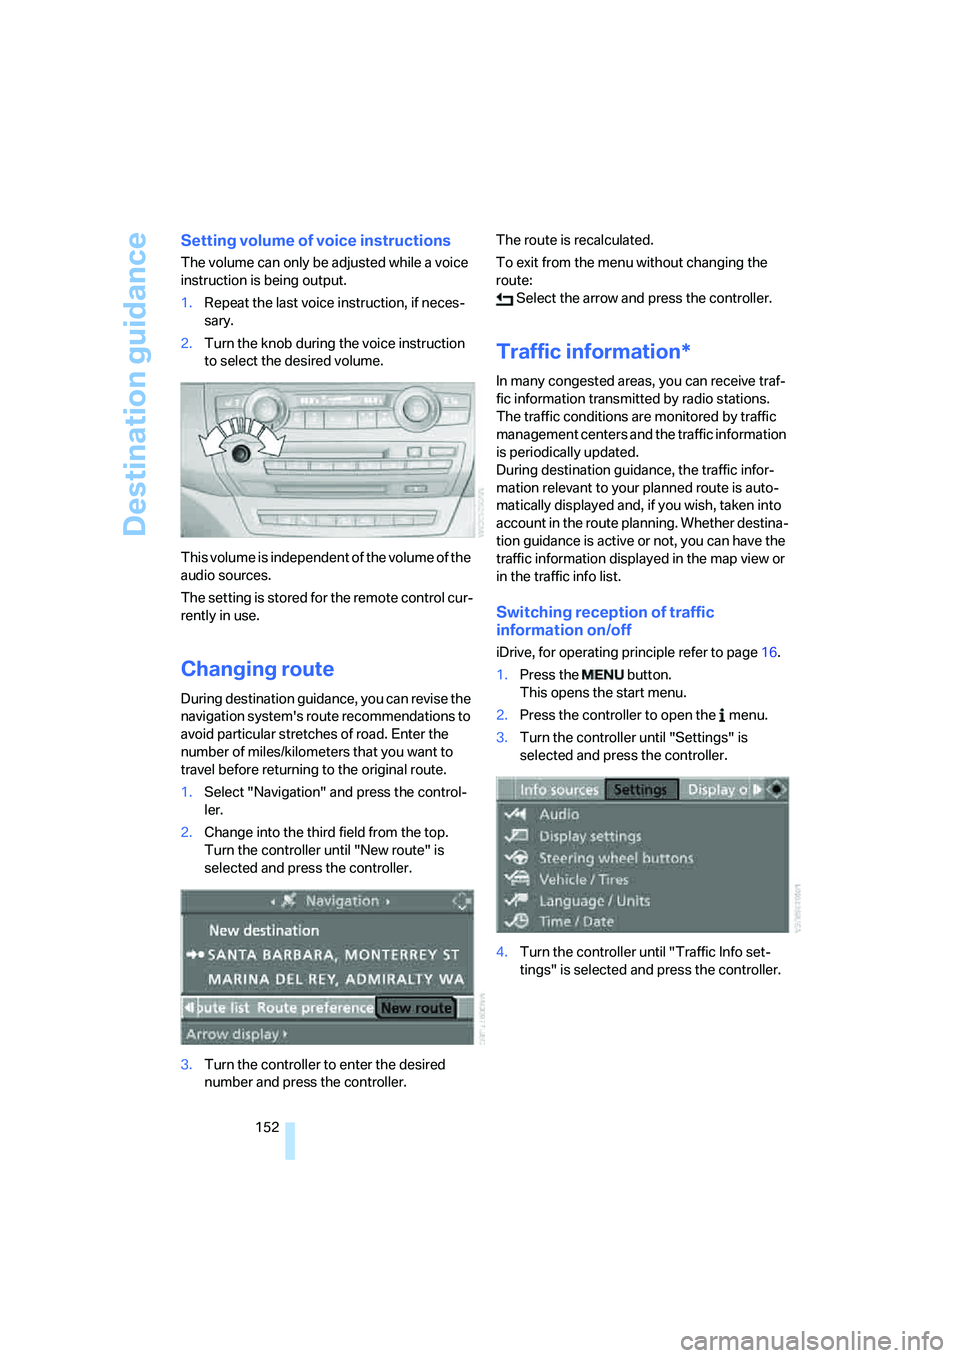
3.Turn the controller until "Settings" is
selected and press the controller.
4.Turn the controller until "Traffic Info set-
tings" is selected and press the controller.
Page 163 of 288
Navigation
Entertainment
Driving tips
161Reference
At a glance
Controls
Communications
Mobility
You have the following choices:
>"FM" and "AM": radio reception
>"WB": Weather Band station
>"SAT": satellite radio
*
>"CD": CD player or changer*
>"AUX": AUX-In connection, USB audio
interface
*
>"Set": depending on the audio source,
other adjustments can be made, e.g. with
the radio: update station with strongest
reception, store station, tone control, sam-
ple stations.
From another menu, you can change
directly to the screen last displayed,
refer to Comfort opening of menu items on
page18.<
From radio readiness, the selected audio
source is stored for the remote control currently
in use.
Switching on/off
To switch the Entertainment sound output on
and off:
Press knob1 on the CD player.
This symbol on the Control Display indi-
cates that sound output is switched off.
For equipment with a single drive, the sound
output is available for approx. 20 minutes with
the ignition switched off.
Switch on the sound output again for this pur-
pose.
Adjusting volume
Turn knob1 on the CD player until the desired
volume is set.
You can also adjust the volume with buttons on
the steering wheel, refer to page11.
From radio readiness, the setting is stored for
the remote control currently in use.
Tone control
You can alter various tone settings, e. g. treble
and bass, or the speed-dependent volume
increase.
The tone settings are set for all audio sources at
once.
From radio readiness, the settings are stored
for the remote control currently in use.
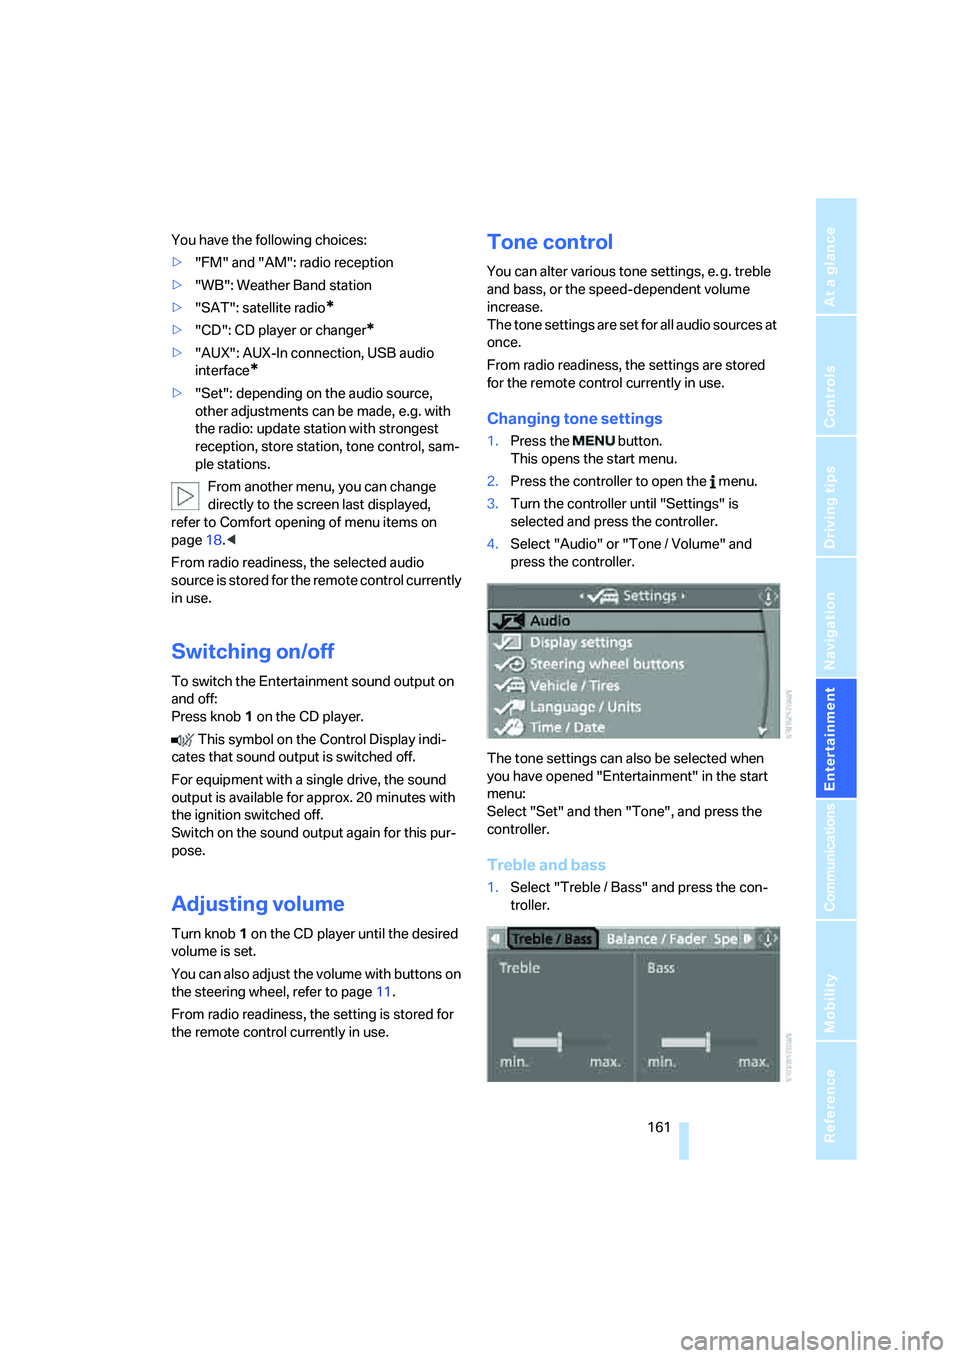
Changing tone settings
1.Press the button.
This opens the start menu.
2.Press the controller to open the menu.
3.Turn the controller until "Settings" is
selected and press the controller.
4.Select "Audio" or "Tone / Volume" and
press the controller.
The tone settings can also be selected when
you have opened "Entertainment" in the start
menu:
Select "Set" and then "Tone", and press the
controller.
Treble and bass
1.Select "Treble / Bass" and press the con-
troller.
Page 169 of 288
Navigation
Entertainment
Driving tips
167Reference
At a glance
Controls
Communications
Mobility
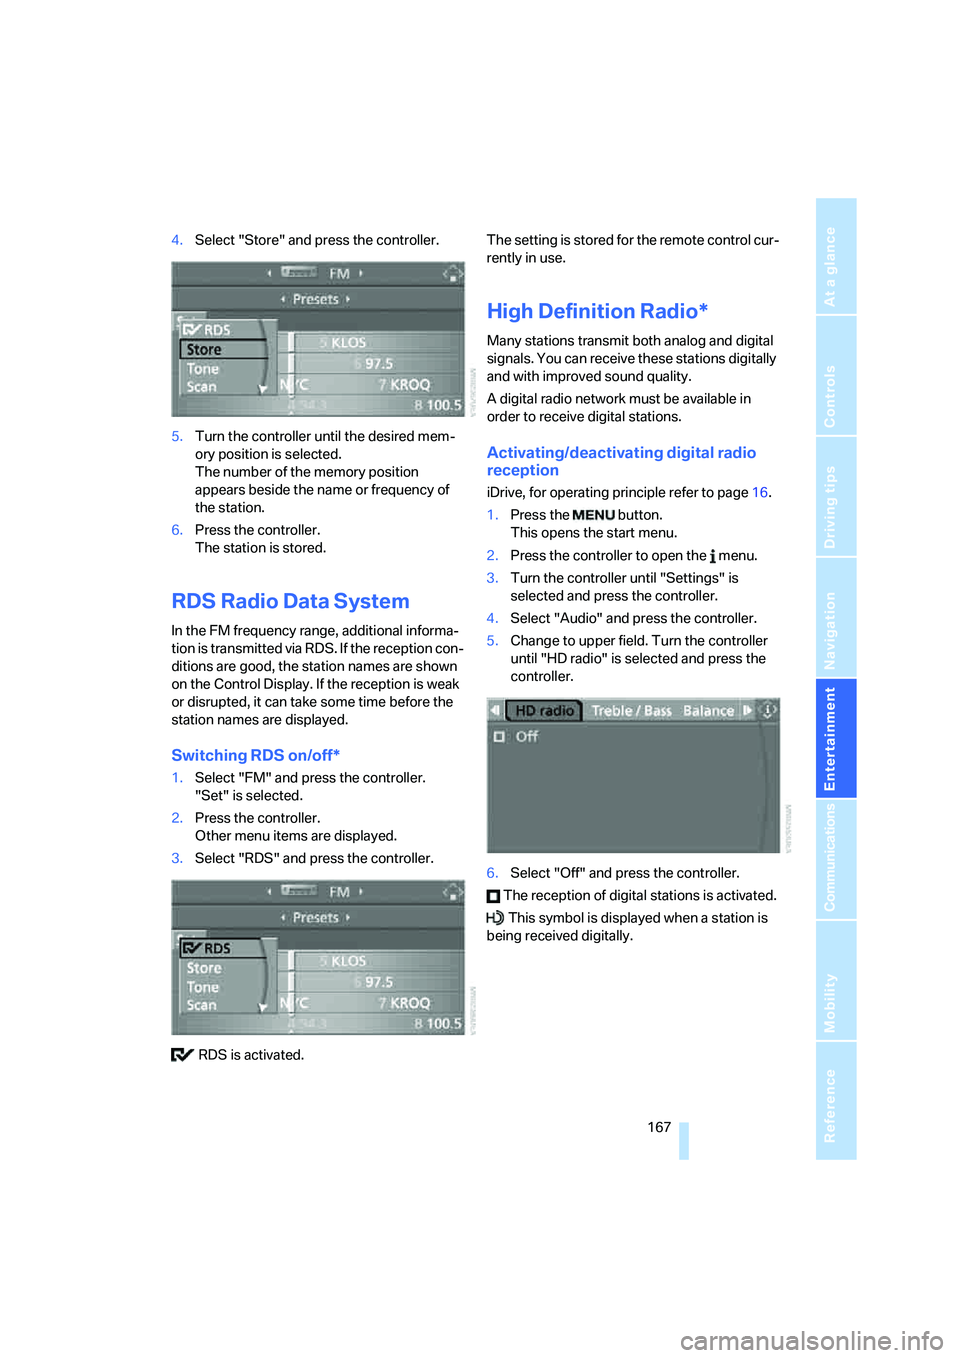
4.Select "Store" and press the controller.
5.Turn the controller until the desired mem-
ory position is selected.
The number of the memory position
appears beside the name or frequency of
the station.
6.Press the controller.
The station is stored.
RDS Radio Data System
In the FM frequency range, additional informa-
tion is transmitted via RDS. If the reception con-
ditions are good, the station names are shown
on the Control Display. If the reception is weak
or disrupted, it can take some time before the
station names are displayed.
Switching RDS on/off*
1.Select "FM" and press the controller.
"Set" is selected.
2.Press the controller.
Other menu items are displayed.
3.Select "RDS" and press the controller.
RDS is activated.The setting is stored for the remote control cur-
rently in use.
High Definition Radio*
Many stations transmit both analog and digital
signals. You can receive these stations digitally
and with improved sound quality.
A digital radio network must be available in
order to receive digital stations.
Activating/deactivating digital radio
reception
iDrive, for operating principle refer to page16.
1.Press the button.
This opens the start menu.
2.Press the controller to open the menu.
3.Turn the controller until "Settings" is
selected and press the controller.
4.Select "Audio" and press the controller.
5.Change to upper field. Turn the controller
until "HD radio" is selected and press the
controller.
6.Select "Off" and press the controller.
The reception of digital stations is activated.
This symbol is displayed when a station is
being received digitally.