center console BMW X6 2008 Owners Manual
[x] Cancel search | Manufacturer: BMW, Model Year: 2008, Model line: X6, Model: BMW X6 2008Pages: 288, PDF Size: 8.08 MB
Page 16 of 288
Cockpit
14
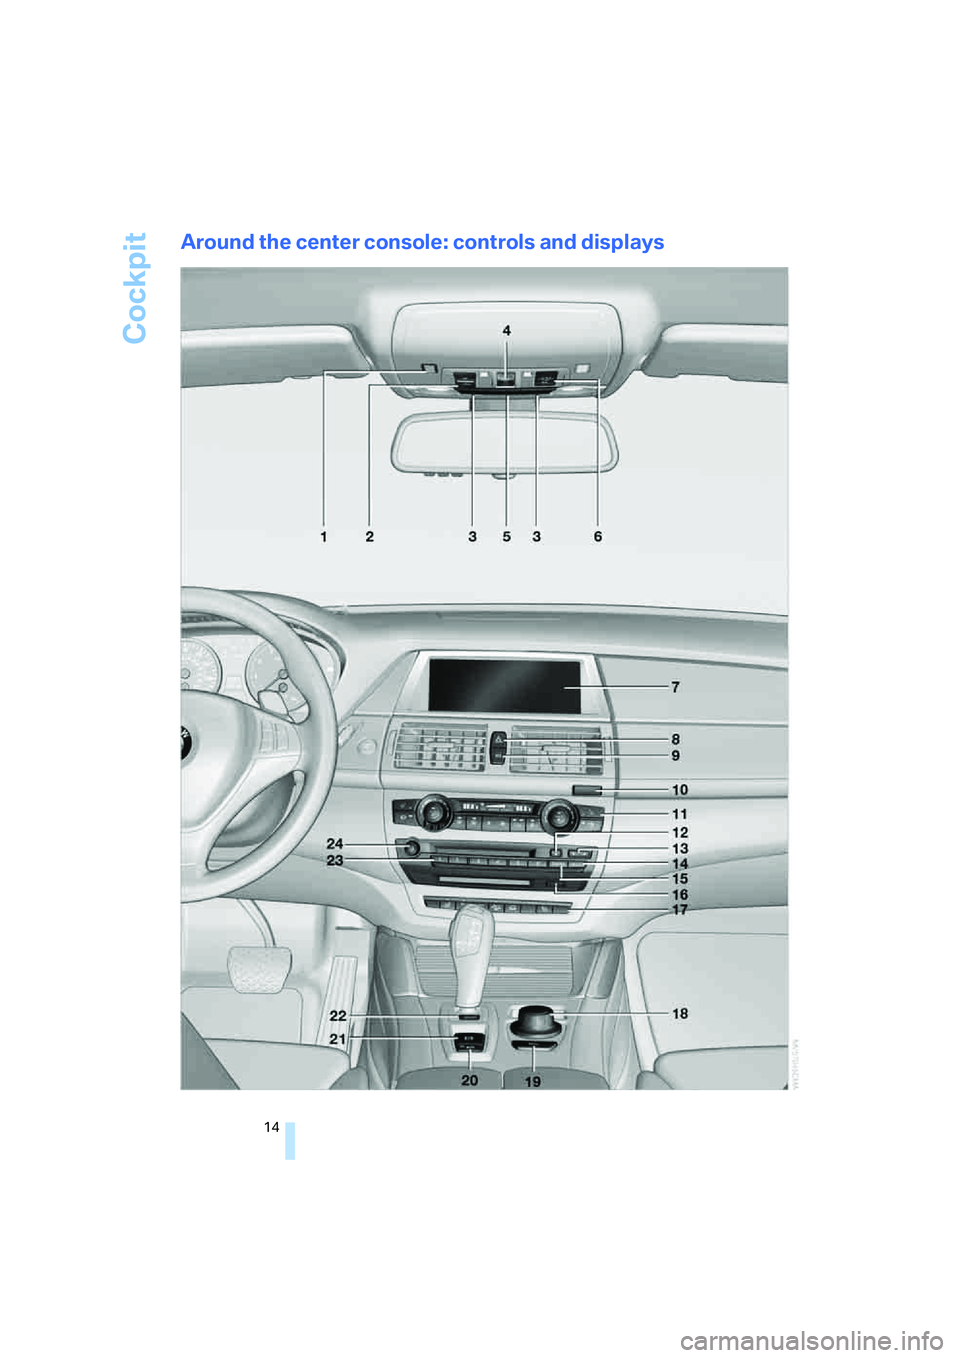
Around the center console: controls and displays
Page 36 of 288
Opening and closing
34 2.Push the catch 2 in the direction of the
arrow.
3.Open the liftgate and press the cover back
into place.
The liftgate is locked again as soon as it is
closed.
Closing
Make sure that the closing path of the lift-
gate is clear, otherwise injuries may
result.<
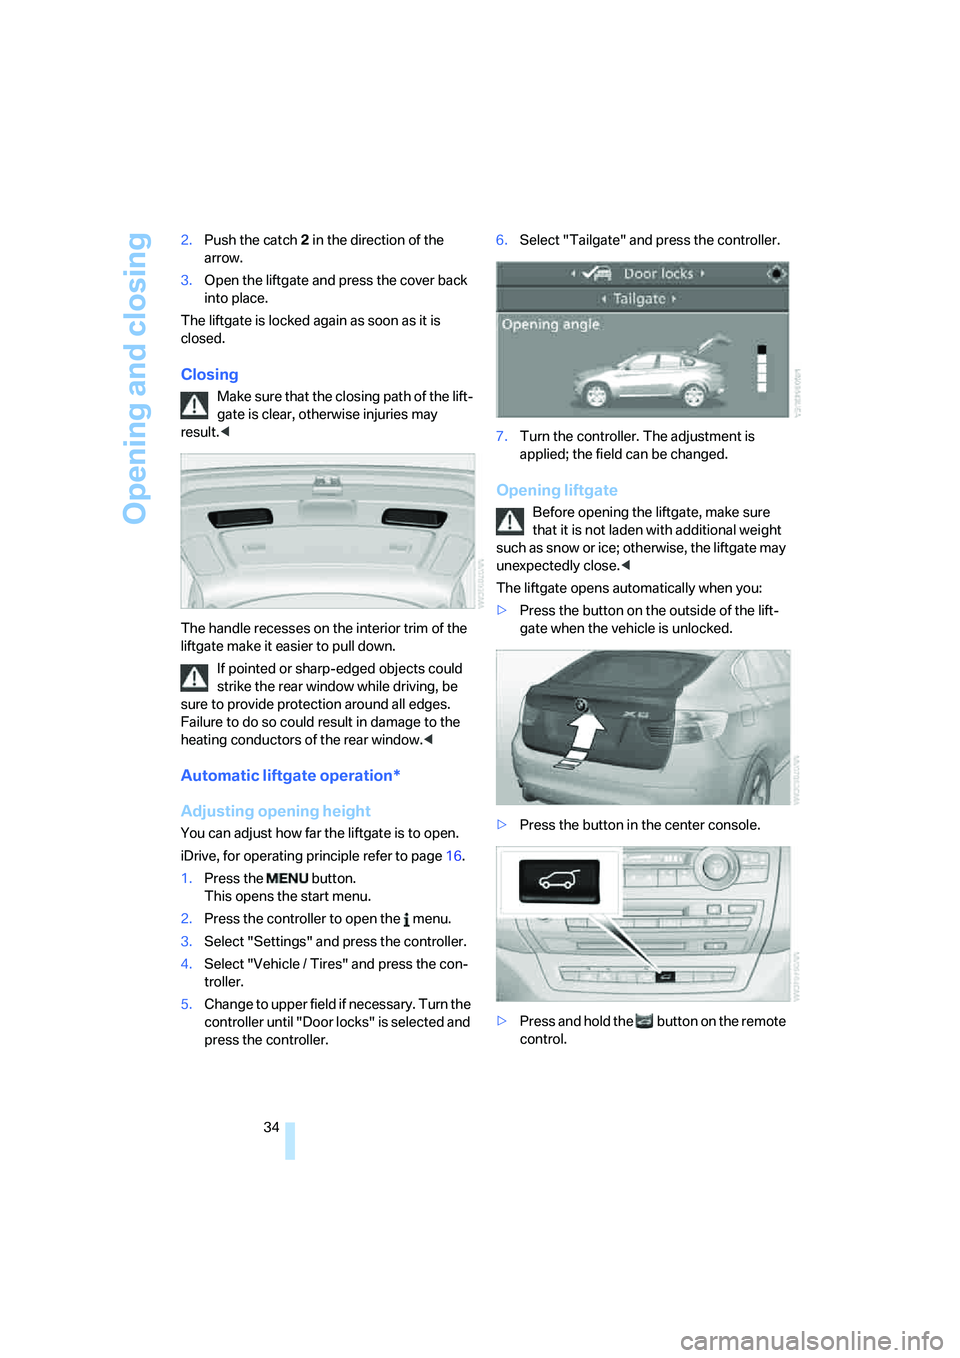
The handle recesses on the interior trim of the
liftgate make it easier to pull down.
If pointed or sharp-edged objects could
strike the rear window while driving, be
sure to provide protection around all edges.
Failure to do so could result in damage to the
heating conductors of the rear window.<
Automatic liftgate operation*
Adjusting opening height
You can adjust how far the liftgate is to open.
iDrive, for operating principle refer to page16.
1.Press the button.
This opens the start menu.
2.Press the controller to open the menu.
3.Select "Settings" and press the controller.
4.Select "Vehicle / Tires" and press the con-
troller.
5.Change to upper field if necessary. Turn the
controller until "Door locks" is selected and
press the controller.6.Select "Tailgate" and press the controller.
7.Turn the controller. The adjustment is
applied; the field can be changed.
Opening liftgate
Before opening the liftgate, make sure
that it is not laden with additional weight
such as snow or ice; otherwise, the liftgate may
unexpectedly close.<
The liftgate opens automatically when you:
>Press the button on the outside of the lift-
gate when the vehicle is unlocked.
>Press the button in the center console.
>Press and hold the button on the remote
control.
Page 37 of 288
Controls
35Reference
At a glance
Driving tips
Communications
Navigation
Entertainment
Mobility
To stop the opening process:
>Press the button on the outside of the lift-
gate.
>Press and hold the button on the remote
control.
>Press the button on the inside of the lift-
gate.
>Press the button on the center console
again.
The opening process is interrupted if you
set the vehicle in motion.<
Closing liftgate
Make sure that the closing path of the lift-
gate is clear, otherwise injuries may
result.<
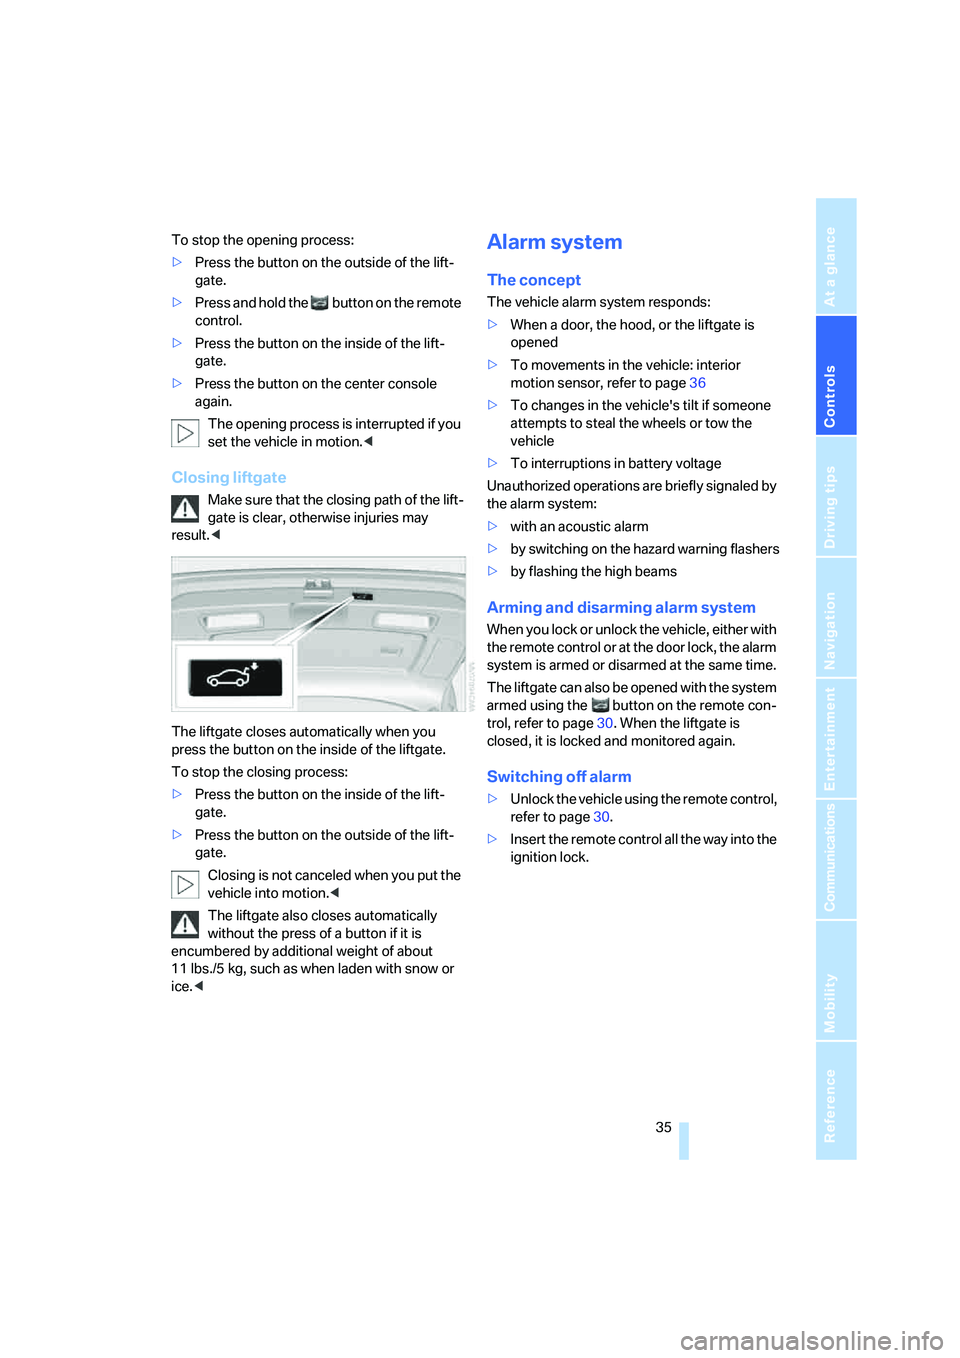
The liftgate closes automatically when you
press the button on the inside of the liftgate.
To stop the closing process:
>Press the button on the inside of the lift-
gate.
>Press the button on the outside of the lift-
gate.
Closing is not canceled when you put the
vehicle into motion.<
The liftgate also closes automatically
without the press of a button if it is
encumbered by additional weight of about
11 lbs./5 kg, such as when laden with snow or
ice.<
Alarm system
The concept
The vehicle alarm system responds:
>When a door, the hood, or the liftgate is
opened
>To movements in the vehicle: interior
motion sensor, refer to page36
>To changes in the vehicle's tilt if someone
attempts to steal the wheels or tow the
vehicle
>To interruptions in battery voltage
Unauthorized operations are briefly signaled by
the alarm system:
>with an acoustic alarm
>by switching on
the hazard warning flashers
>by flashing the high beams
Arming and disarming alarm system
When you lock or unlock the vehicle, either with
the remote control or at the door lock, the alarm
system is armed or disarmed at the same time.
The liftgate can also be opened with the system
armed using the button on the remote con-
trol, refer to page30. When the liftgate is
closed, it is locked and monitored again.
Switching off alarm
>Unlock the vehicle using the remote control,
refer to page30.
>Insert the remote control all the way into the
ignition lock.
Page 110 of 288
Climate
108
Ventilation in rear
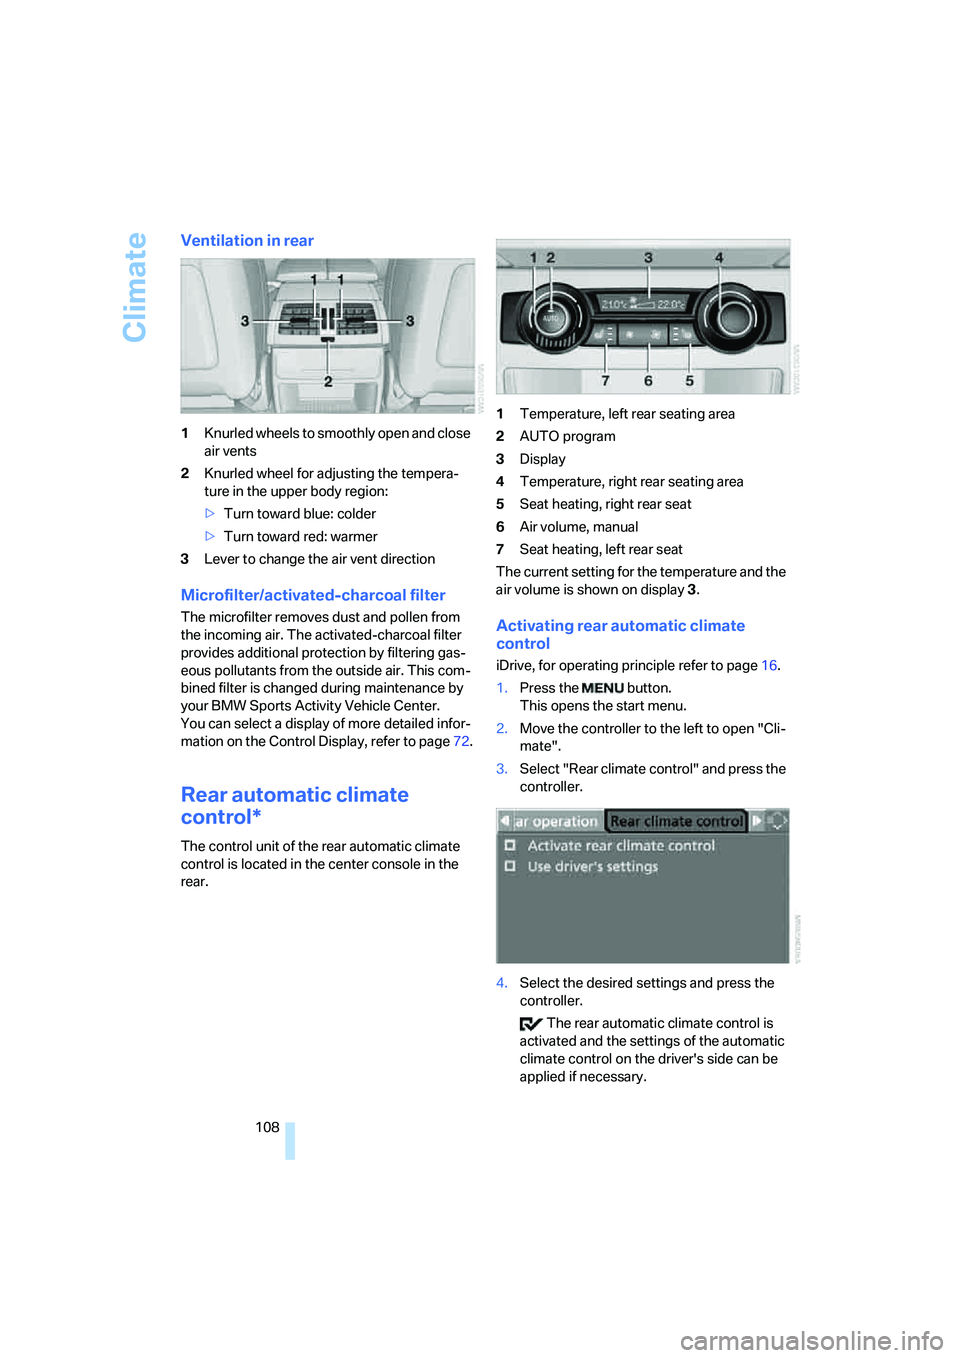
1Knurled wheels to smoothly open and close
air vents
2Knurled wheel for adjusting the tempera-
ture in the upper body region:
>Turn toward blue: colder
>Turn toward red: warmer
3Lever to change the air vent direction
Microfilter/activated-charcoal filter
The microfilter removes dust and pollen from
the incoming air. The activated-charcoal filter
provides additional protection by filtering gas-
eous pollutants from the outside air. This com-
bined filter is changed during maintenance by
your BMW Sports Activity Vehicle Center.
You can select a display of more detailed infor-
mation on the Control Display, refer to page72.
Rear automatic climate
control*
The control unit of the rear automatic climate
control is located in the center console in the
rear.1Temperature, left rear seating area
2AUTO program
3Display
4Temperature, right rear seating area
5Seat heating, right rear seat
6Air volume, manual
7Seat heating, left rear seat
The current setting for the temperature and the
air volume is shown on display3.
Activating rear automatic climate
control
iDrive, for operating principle refer to page16.
1.Press the button.
This opens the start menu.
2.Move the controller to the left to open "Cli-
mate".
3.Select "Rear climate control" and press the
controller.
4.Select the desired settings and press the
controller.
The rear automatic climate control is
activated and the settings of the automatic
climate control on the driver's side can be
applied if necessary.
Page 118 of 288
Practical interior accessories
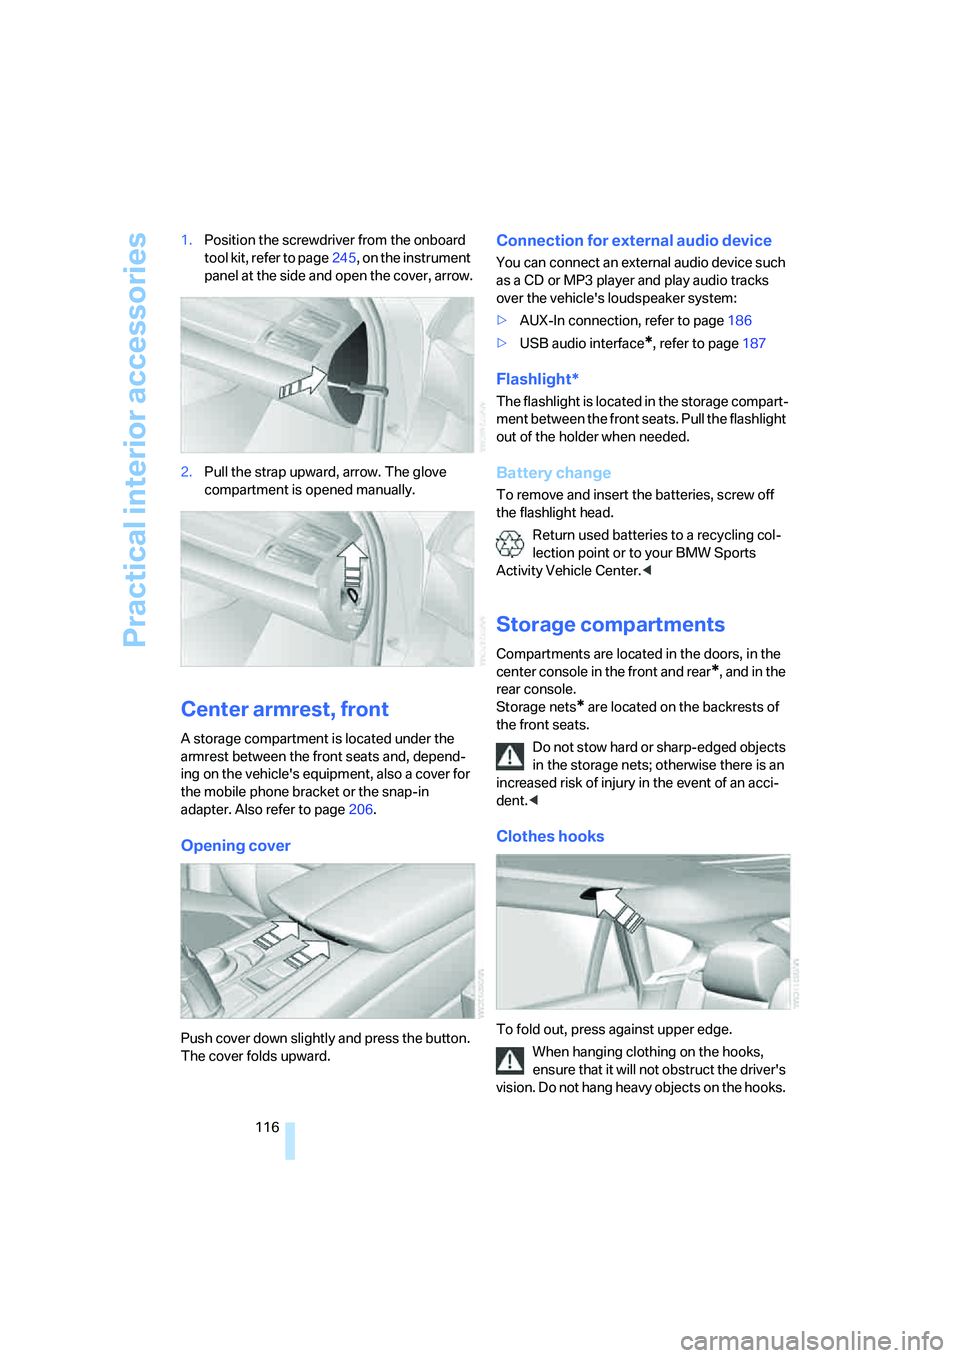
116 1.Position the screwdriver from the onboard
tool kit, refer to page245, on the instrument
panel at the side and open the cover, arrow.
2.Pull the strap upward, arrow. The glove
compartment is opened manually.
Center armrest, front
A storage compartment is located under the
armrest between the front seats and, depend-
ing on the vehicle's equipment, also a cover for
the mobile phone bracket or the snap-in
adapter. Also refer to page206.
Opening cover
Push cover down slightly and press the button.
The cover folds upward.
Connection for external audio device
You can connect an external audio device such
as a CD or MP3 player and play audio tracks
over the vehicle's loudspeaker system:
>AUX-In connection, refer to page186
>USB audio interface
*, refer to page187
Flashlight*
The flashlight is located in the storage compart-
ment between the front seats. Pull the flashlight
out of the holder when needed.
Battery change
To remove and insert the batteries, screw off
the flashlight head.
Return used batteries to a recycling col-
lection point or to your BMW Sports
Activity Vehicle Center.<
Storage compartments
Compartments are located in the doors, in the
center console in the front and rear
*, and in the
rear console.
Storage nets
* are located on the backrests of
the front seats.
Do not stow hard or sharp-edged objects
in the storage nets; otherwise there is an
increased risk of injury in the event of an acci-
dent.<
Clothes hooks
To fold out, press against upper edge.
When hanging clothing on the hooks,
ensure that it will not obstruct the driver's
vision. Do not hang heavy objects on the hooks.
Page 120 of 288
Practical interior accessories
118
Lighter
Front
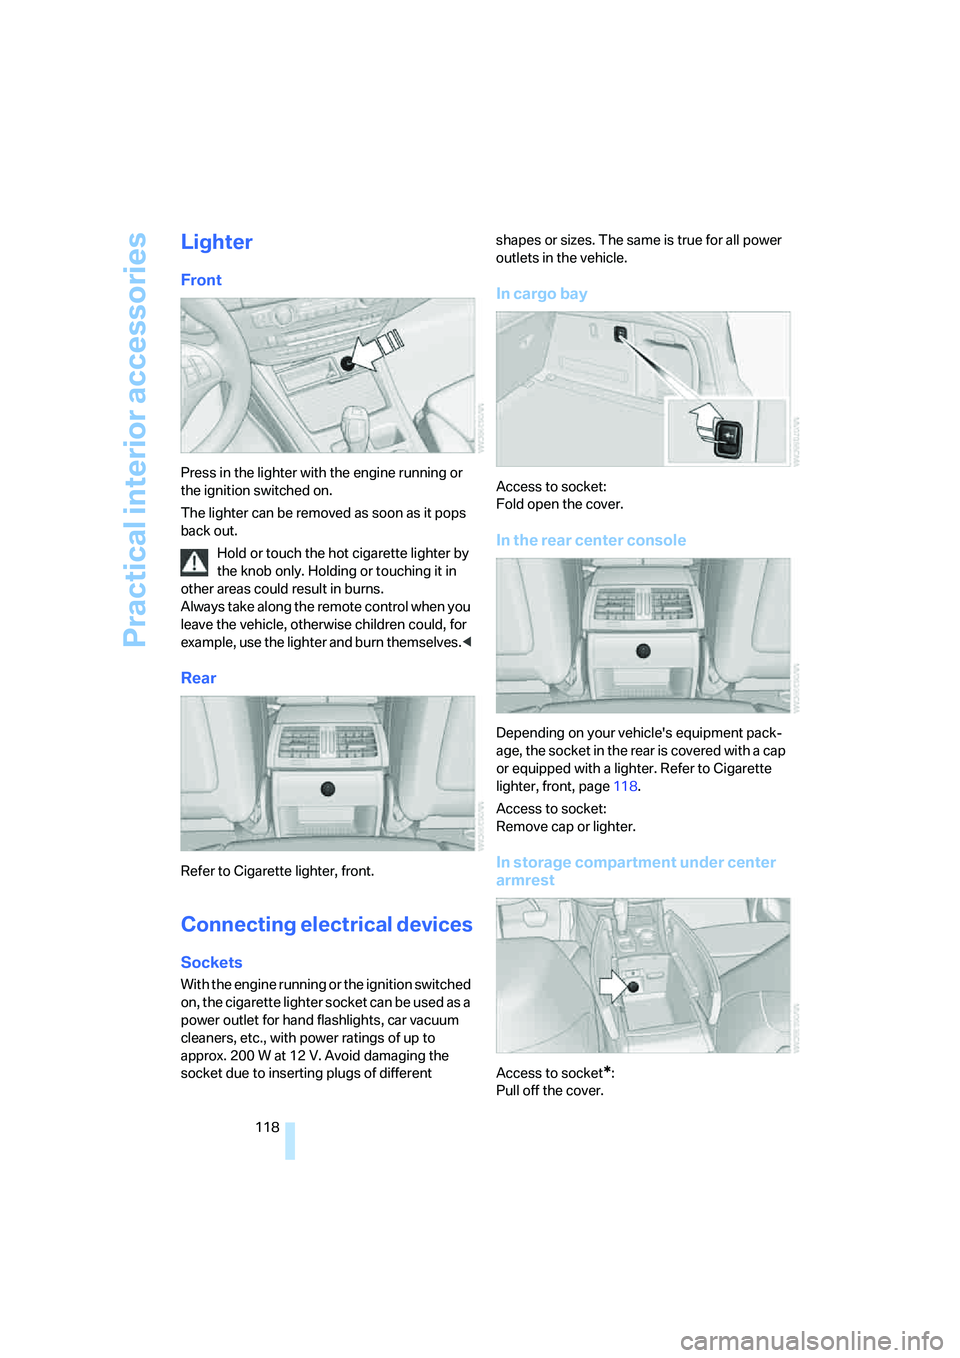
Press in the lighter with the engine running or
the ignition switched on.
The lighter can be removed as soon as it pops
back out.
Hold or touch the hot cigarette lighter by
the knob only. Holding or touching it in
other areas could result in burns.
Always take along the remote control when you
leave the vehicle, otherwise children could, for
example, use the lighter and burn themselves.<
Rear
Refer to Cigarette lighter, front.
Connecting electrical devices
Sockets
With the engine running or the ignition switched
on, the cigarette lighter socket can be used as a
power outlet for hand flashlights, car vacuum
cleaners, etc., with power ratings of up to
approx. 200 W at 12 V. Avoid damaging the
socket due to inserting plugs of different shapes or sizes. The same is true for all power
outlets in the vehicle.
In cargo bay
Access to socket:
Fold open the cover.
In the rear center console
Depending on your vehicle's equipment pack-
age, the socket in the rear is covered with a cap
or equipped with a lighter. Refer to Cigarette
lighter, front, page118.
Access to socket:
Remove cap or lighter.
In storage compartment under center
armrest
Access to socket*:
Pull off the cover.
Page 121 of 288
Controls
119Reference
At a glance
Driving tips
Communications
Navigation
Entertainment
Mobility
In the rear console
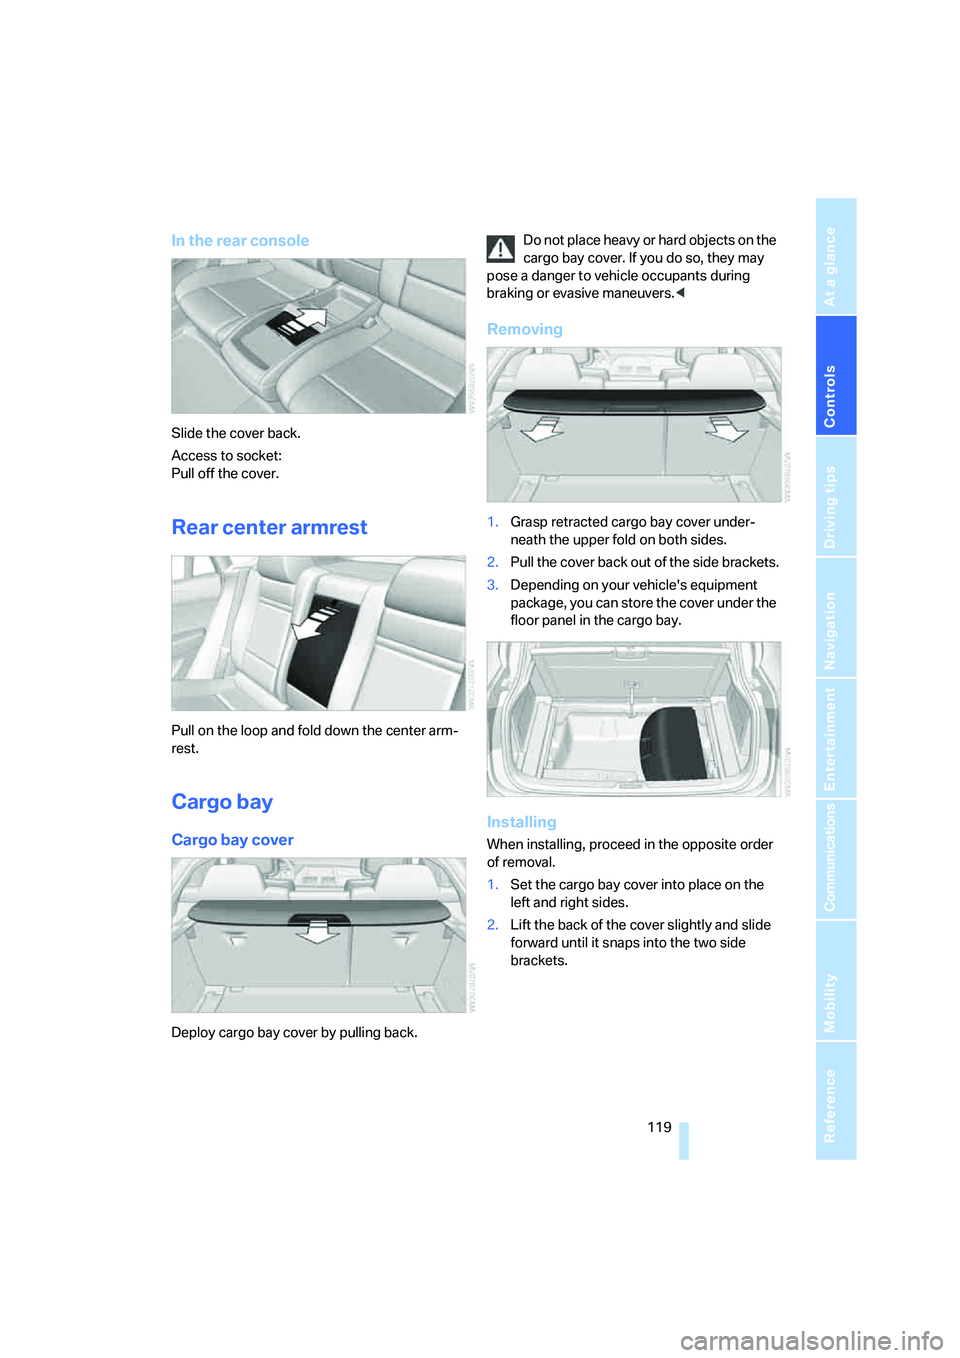
Slide the cover back.
Access to socket:
Pull off the cover.
Rear center armrest
Pull on the loop and fold down the center arm-
rest.
Cargo bay
Cargo bay cover
Deploy cargo bay cover by pulling back.Do not place heavy or hard objects on the
cargo bay cover. If you do so, they may
pose a danger to vehicle occupants during
braking or evasive maneuvers.<
Removing
1.Grasp retracted cargo bay cover under-
neath the upper fold on both sides.
2.Pull the cover back out of the side brackets.
3.Depending on your vehicle's equipment
package, you can store the cover under the
floor panel in the cargo bay.
Installing
When installing, proceed in the opposite order
of removal.
1.Set the cargo bay cover into place on the
left and right sides.
2.Lift the back of the cover slightly and slide
forward until it snaps into the two side
brackets.
Page 194 of 288
DVD system in rear
192 >Press the button:
Activating menu item.
Changing batteries
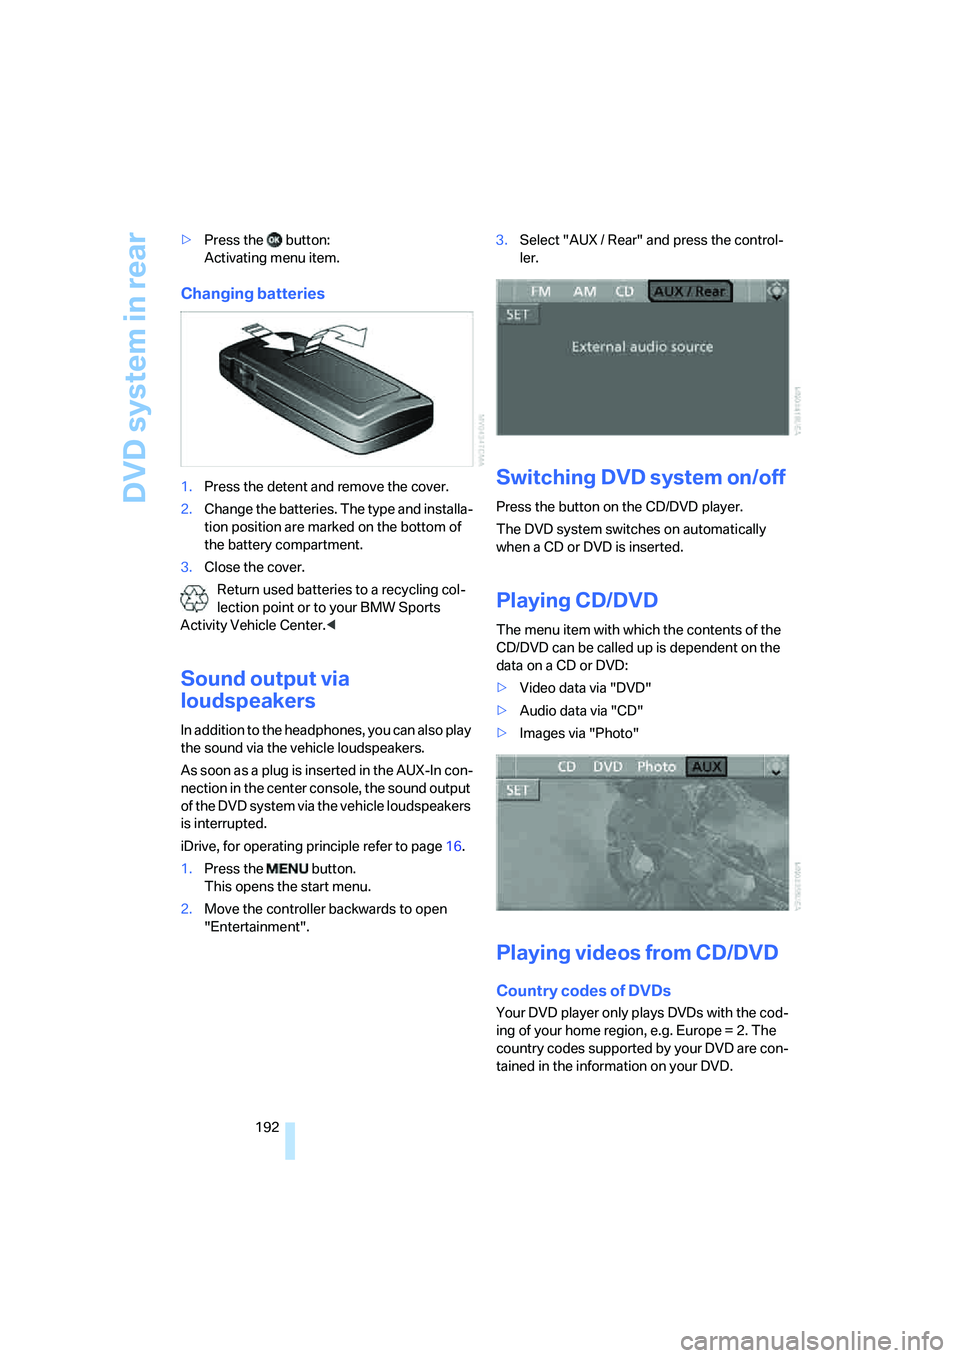
1.Press the detent and remove the cover.
2.Change the batteries. The type and installa-
tion position are marked on the bottom of
the battery compartment.
3.Close the cover.
Return used batteries to a recycling col-
lection point or to your BMW Sports
Activity Vehicle Center.<
Sound output via
loudspeakers
In addition to the headphones, you can also play
the sound via the vehicle loudspeakers.
As soon as a plug is inserted in the AUX-In con-
nection in the center console, the sound output
of the DVD system via the vehicle loudspeakers
is interrupted.
iDrive, for operating principle refer to page16.
1.Press the button.
This opens the start menu.
2.Move the controller backwards to open
"Entertainment".3.Select "AUX / Rear" and press the control-
ler.
Switching DVD system on/off
Press the button on the CD/DVD player.
The DVD system switches on automatically
when a CD or DVD is inserted.
Playing CD/DVD
The menu item with which the contents of the
CD/DVD can be called up is dependent on the
data on a CD or DVD:
>Video data via "DVD"
>Audio data via "CD"
>Images via "Photo"
Playing videos from CD/DVD
Country codes of DVDs
Your DVD player only plays DVDs with the cod-
ing of your home region, e.g. Europe = 2. The
country codes supported by your DVD are con-
tained in the information on your DVD.
Page 268 of 288
Everything from A to Z
266
Everything from A to Z
Index
"..." Identifies Control Display
texts used to select
individual functions, and
indicates where to find them
in the text.
A
ABS Antilock Brake
System85
Accessories6
Acoustic signal, refer to Check
Control75
Activated-charcoal filter108
"Activation time" for parked
car ventilation110
Active seat49
Active seat ventilation48
Active steering94
– warning lamp94
Adaptive brake lamps, refer to
Brake force display94
Adaptive Drive88
Adaptive fastening
system120
Adaptive Head Light101
"Add digits" for mobile
phone214
"Address book" for
navigation144
Address for navigation
– deleting145
– entering137,144
– selecting144
– storing144
– storing current position144
"Add to destination list"139
Adjusting confirmation signals
for locking and unlocking31
Adjusting temperature with
expanded-scope automatic
climate control105Adjusting the tone during
audio operation, refer to
Tone control161
Adjusting thigh
support43,44
"After door opened"45
"After unlocking"45
Airbags95
– sitting safely42
– warning lamp96
Air distribution
– automatic104,109
– manual105
Airing, refer to Ventilation107
Air recirculation106
– AUC Automatic
recirculated-air control106
– recirculated-air mode106
"Air recirculation on / off"52
Air vents103
– refer to Ventilation107
Air vents of automatic climate
control
103
Air volume105,109
AKI, refer to Fuel
specifications231
Alarm system35
– avoiding unintentional
alarms36
– interior motion sensor36
– switching off alarm35
– switching off tilt alarm
sensor and interior motion
sensor36
– tilt alarm sensor36
"All channels" on satellite
radio171
"All doors"30
All-season tires, refer to
Winter tires238
"All stations", displaying on
radio164All-wheel drive, refer to
xDrive87
Alterations, technical, refer to
For your own safety5
"AM", reception
range161,164
"Angle of view"
– DVD changer183
– DVD system in rear195
Antenna for mobile phone206
Antifreeze
– coolant242
– washer fluid65
Antilock Brake System
ABS85
Anti-theft system
– refer to Alarm system35
– refer to Central locking
system29
Approved axle loads, refer to
Weights260
Approved engine oils241
Approved gross vehicle
weight, refer to Weights260
Armrest, refer to Center
armrest, front116
Around the center console14
Around the steering wheel10
Arrival time
– refer to Computer70
– refer to Starting destination
guidance148
"Arrow display" for
navigation149
Arrow view for navigation
system149
Ashtray
– front117
– rear117
Assist, refer to separate
operating instructions
Page 271 of 288
Reference 269
At a glance
Controls
Driving tips
Communications
Navigation
Entertainment
Mobility
"CD"161,173
– for DVD system in rear192
CD, refer to Playing audio
tracks, DVD system in
rear196
CD/DVD player, DVD system
in rear191
CD changer173
– compressed audio files173
– controls160
– fast forward/reverse176
– random sequence176
– repeating a track175
– sampling tracks175
– selecting a CD173
– selecting a track174
– switching on/off160
– tone control161
– volume161
CD player173
– compressed audio files173
– controls160
– fast forward/reverse176
– random sequence176
– repeating a track175
– sampling tracks175
– selecting a track174
– switching on/off160
– tone control161
– volume161
Cell phone, refer to Mobile
phone
Center armrest
– front116
– rear119
Center brake lamp248
Center console14
"Central locking"30
Central locking system29
– comfort access36
– from inside vehicle32
Changes, technical
– refer to For your own
safety5
– refer to Parts and
accessories6
Changing language on
Control Display80Changing tires237
Changing units of measure on
Control Display79
Changing wheels248
Check Control75
"Check Control
messages"76
Checking the air pressure,
refer to Tire inflation
pressure232
Children, transporting53
Child restraint fixing system
LATCH54
Child restraint systems53
Child-safety locks55
Child seats53
Chime, refer to Check
Control75
Chrome parts, care, refer to
Caring for your vehicle
brochure
Cigarette lighter, refer to
Lighter118
Cleaning, refer to Caring for
your vehicle brochure
"Climate"48
Clock68
– 12h/24h mode79
– setting time78
Closing
– from inside32
– using remote control29
Closing fuel filler cap230
Clothes hooks116
Cockpit10
Cold start, refer to Starting
engine57
"Color" for DVD system in
rear194
Comfort access36
– observe in car wash38
– replacing battery38
Comfort area, refer to Around
the center console14
Comfort start, refer to Starting
engine57
"Communica-
tion"212,222,223,224Compact Disc
– refer to CD changer173
– refer to CD player173
Compact wheel, wheel
change248
Compartment for remote
control, refer to Ignition
lock56
Compartments, refer to
Storage compartments116
Compass, digital114
Computer70
– displays in instrument
panel70
– displays on Control
Display70
– trip computer71
"Concierge"224
Concierge service224
Condition Based Service
CBS243
"Confirmation"31
Connecting car vacuum
cleaner, refer to Connecting
electrical devices118
Connecting headphones191
Consumption, refer to
Average fuel
consumption70
Consumption statistics, refer
to Average fuel
consumption70
"Continue guidance to
destination?"149
"Contrast"
– DVD changer182
– DVD system in rear194
Control Center, refer to
iDrive16
Control Display, refer to
iDrive16
– setting brightness79
Controller, refer to iDrive16
Controls
– DVD changer179
– DVD system in rear190
– refer to Cockpit10