111 BMW X6 2012 E71 Owner's Manual
[x] Cancel search | Manufacturer: BMW, Model Year: 2012, Model line: X6, Model: BMW X6 2012 E71Pages: 312, PDF Size: 8.91 MB
Page 5 of 312
Reference
At a glance
Controls
Driving tips
Communications
Navigation
Entertainment
Mobility
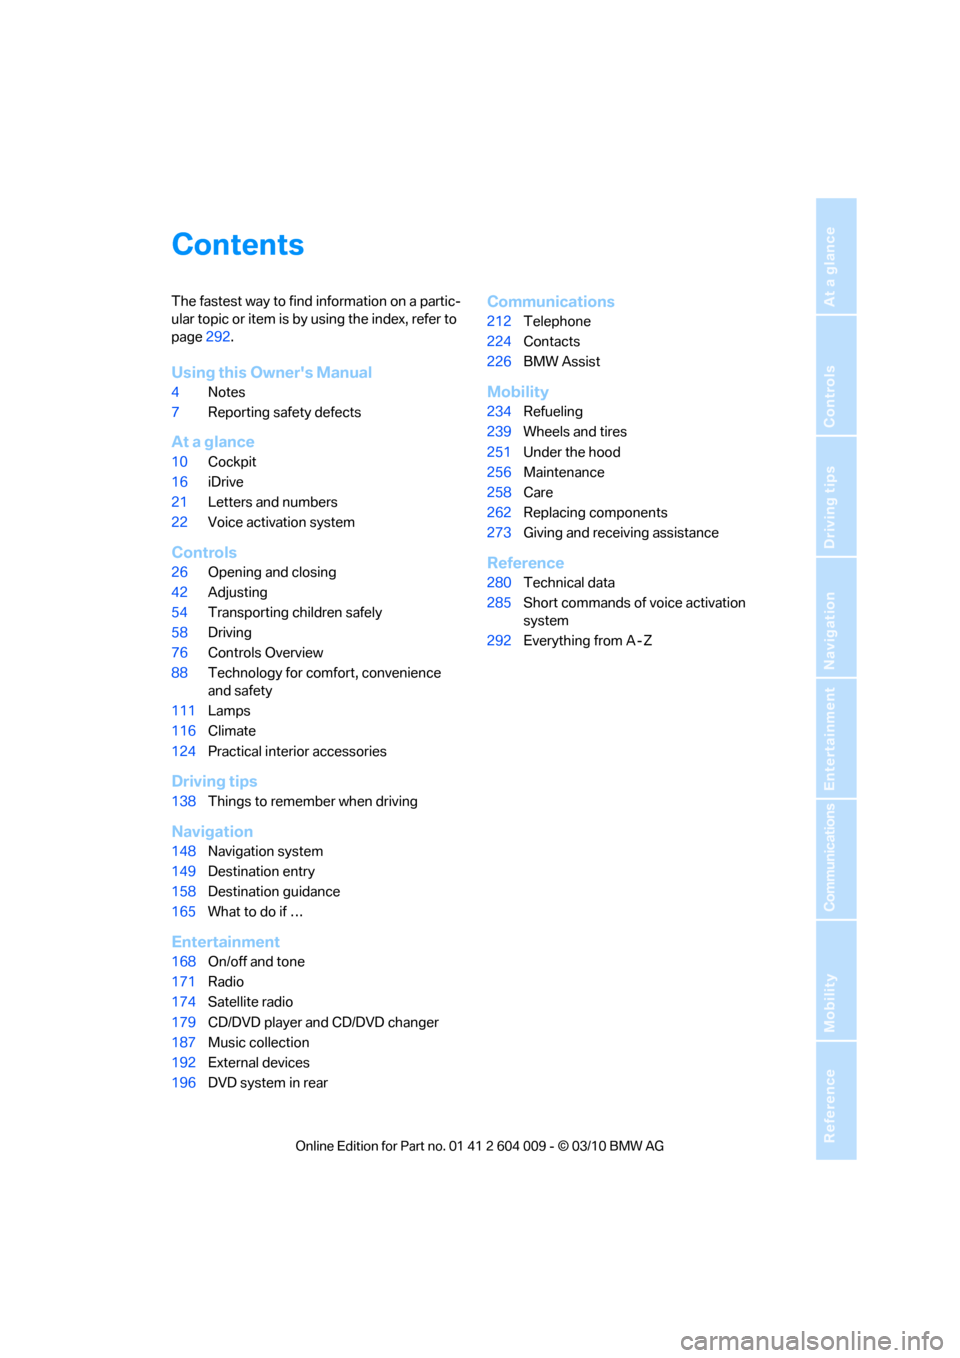
Contents
The fastest way to find information on a partic-
ular topic or item is by using the index, refer to
page292.
Using this Owner's Manual
4Notes
7Reporting safety defects
At a glance
10Cockpit
16iDrive
21Letters and numbers
22Voice activation system
Controls
26Opening and closing
42Adjusting
54Transporting children safely
58Driving
76Controls Overview
88Technology for comfort, convenience
and safety
111Lamps
116Climate
124Practical interior accessories
Driving tips
138Things to remember when driving
Navigation
148Navigation system
149Destination entry
158Destination guidance
165What to do if …
Entertainment
168On/off and tone
171Radio
174Satellite radio
179CD/DVD player and CD/DVD changer
187Music collection
192External devices
196DVD system in rear
Communications
212Telephone
224Contacts
226BMW Assist
Mobility
234Refueling
239Wheels and tires
251Under the hood
256Maintenance
258Care
262Replacing components
273Giving and receiving assistance
Reference
280Technical data
285Short commands of voice activation
system
292Everything from A - Z
Page 9 of 312
7Reference
At a glance
Controls
Driving tips
Communications
Navigation
Entertainment
Mobility
Reporting safety defects
For US customers
The following applies only to vehicles owned
and operated in the US.
If you believe that your vehicle has a defect
which could cause a crash or could cause injury
or death, you should immediately inform the
National Highway Traffic Safety Administration,
NHTSA, in addition to notifying BMW of North
America, LLC, P.O. Box 1227, Westwood, New
Jersey 07675-1227, Telephone 1-800-831-
1117.
If NHTSA receives similar complaints, it may
open an investigation, and if it finds that a safety
defect exists in a group of vehicles, it may order
a recall and remedy campaign. However,
NHTSA cannot become involved in individual
problems between you, your center, or BMW of
North America, LLC.
To contact NHTSA, you may call the Vehicle
Safety Hotline toll-free at 1-888-327-4236
(TTY: 1-800-424-9153); go to
http://www.safercar.gov; or write to: administra-
tor, NHTSA, 400 Seventh Street, SW., Wash-
ington, DC 20590. You can also obtain other
information about motor vehicle safety from
http://www.safercar.gov
For Canadian customers
Canadian customers who wish to report a
safety-related defect to Transport Canada,
Defect Investigations and Recalls, may call
1-800-333-0510 toll-free from anywhere in
Canada or 1-613-993-9851 from the Ottawa
region and from other countries, or contact
Transport Canada by mail at: transport Canada,
ASFAD, Place de Ville, Tower C, 330 Sparks
Street, Ottawa, ON, K1A 0N5.
You can also obtain other information about
motor vehicle safety from http://www.tc.gc.ca
Page 13 of 312
At a glance
11Reference
Controls
Driving tips
Communications
Navigation
Entertainment
Mobility
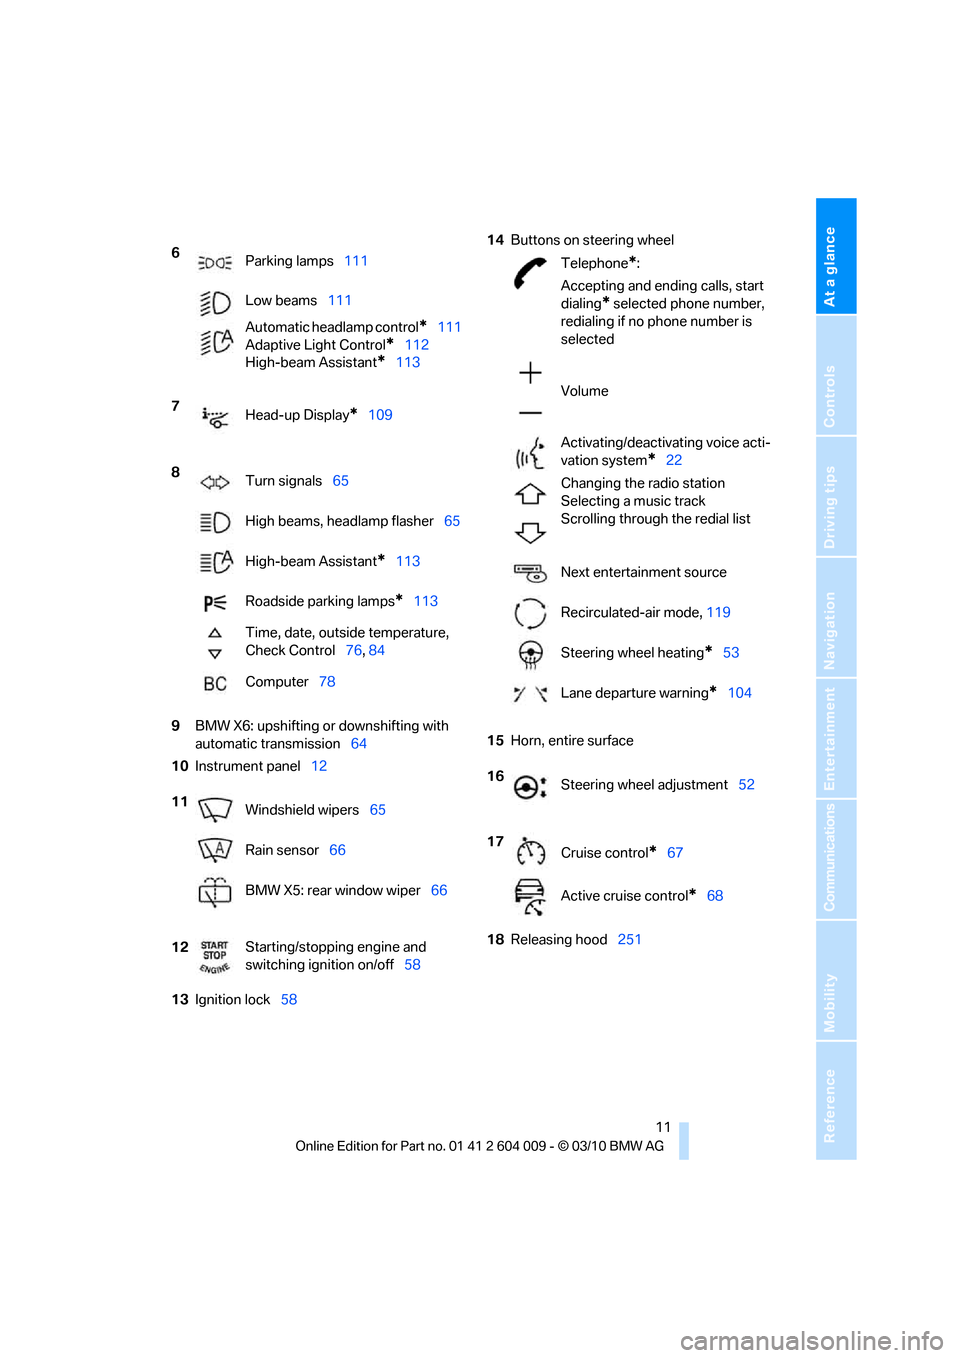
9BMW X6: upshifting or downshifting with
automatic transmission64
10Instrument panel12
13Ignition lock5814Buttons on steering wheel
15Horn, entire surface
18Releasing hood251 6
Parking lamps111
Low beams111
Automatic headlamp control
*111
Adaptive Light Control
*112
High-beam Assistant
*113
7
Head-up Display
*109
8
Turn signals65
High beams, headlamp flasher65
High-beam Assistant
*113
Roadside parking lamps
*113
Time, date, outside temperature,
Check Control76, 84
Computer78
11
Windshield wipers65
Rain sensor66
BMW X5: rear window wiper66
12Starting/stopping engine and
switching ignition on/off58
Telephone*:
Accepting and ending calls, start
dialing
* selected phone number,
redialing if no phone number is
selected
Volume
Activating/deactivating voice acti-
vation system
*22
Changing the radio station
Selecting a music track
Scrolling through the redial list
Next entertainment source
Recirculated-air mode, 119
Steering wheel heating
*53
Lane departure warning
*104
16
Steering wheel adjustment52
17
Cruise control
*67
Active cruise control
*68
Page 29 of 312
Controls
27Reference
At a glance
Driving tips
Communications
Navigation
Entertainment
Mobility
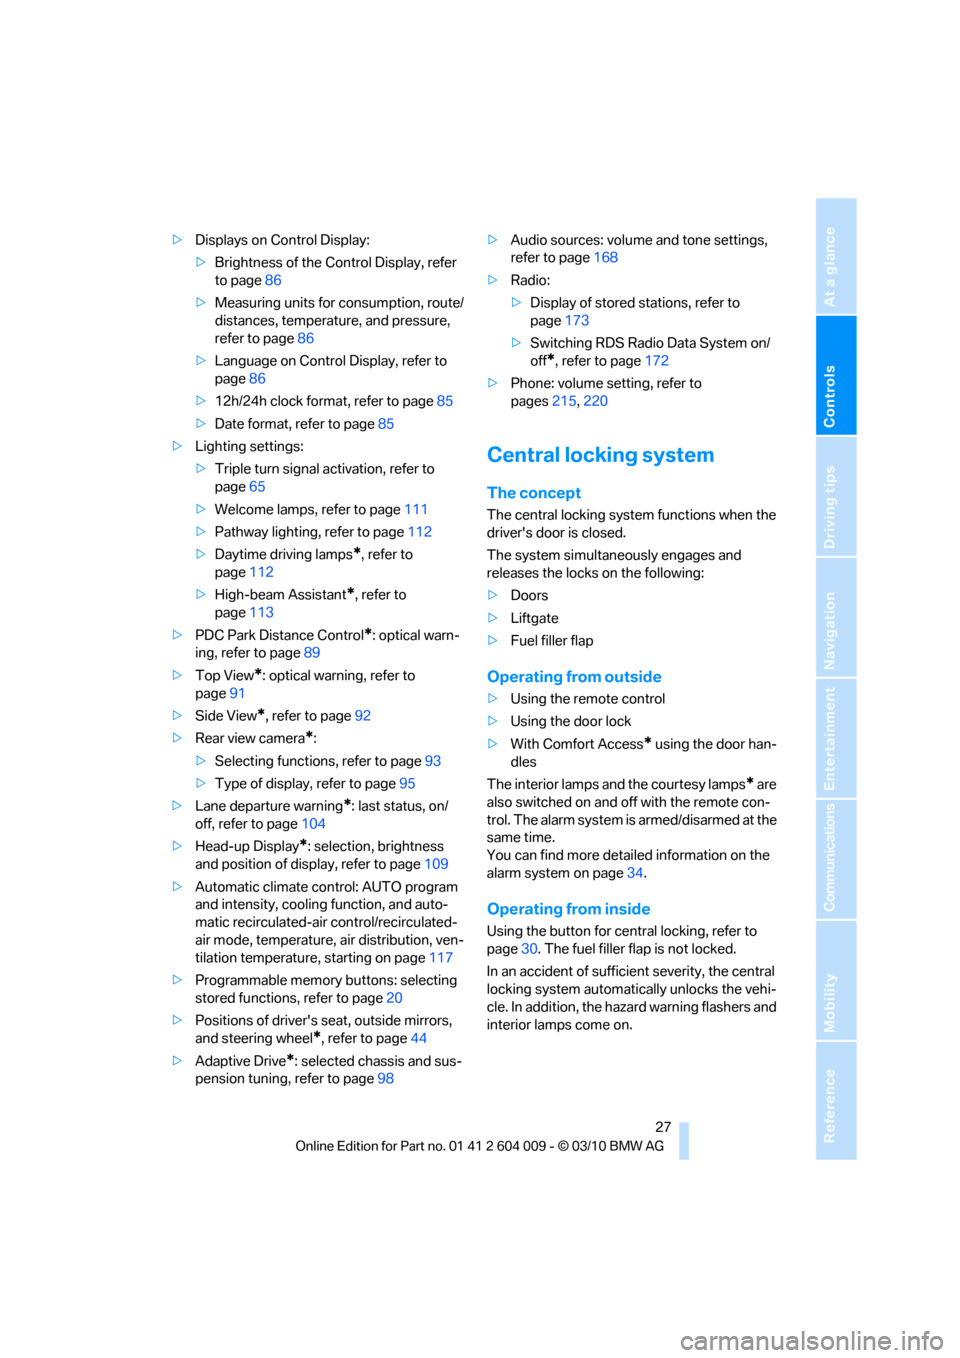
>Displays on Control Display:
>Brightness of the Control Display, refer
to page86
>Measuring units for consumption, route/
distances, temperature, and pressure,
refer to page86
>Language on Control Display, refer to
page86
>12h/24h clock format, refer to page85
>Date format, refer to page85
>Lighting settings:
>Triple turn signal activation, refer to
page65
>Welcome lamps, refer to page111
>Pathway lighting, refer to page112
>Daytime driving lamps
*, refer to
page112
>High-beam Assistant
*, refer to
page113
>PDC Park Distance Control
*: optical warn-
ing, refer to page89
>Top View
*: optical warning, refer to
page91
>Side View
*, refer to page92
>Rear view camera
*:
>Selecting functions, refer to page93
>Type of display, refer to page95
>Lane departure warning
*: last status, on/
off, refer to page104
>Head-up Display
*: selection, brightness
and position of display, refer to page109
>Automatic climate control: AUTO program
and intensity, cooling function, and auto-
matic recirculated-air control/recirculated-
air mode, temperature, air distribution, ven-
tilation temperature, starting on page117
>Programmable memory buttons: selecting
stored functions, refer to page20
>Positions of driver's seat, outside mirrors,
and steering wheel
*, refer to page44
>Adaptive Drive
*: selected chassis and sus-
pension tuning, refer to page98>Audio sources: volume and tone settings,
refer to page168
>Radio:
>Display of stored stations, refer to
page173
>Switching RDS Radio Data System on/
off
*, refer to page172
>Phone: volume setting, refer to
pages215,220
Central locking system
The concept
The central locking system functions when the
driver's door is closed.
The system simultaneously engages and
releases the locks on the following:
>Doors
>Liftgate
>Fuel filler flap
Operating from outside
>Using the remote control
>Using the door lock
>With Comfort Access
* using the door han-
dles
The interior lamps and the courtesy lamps
* are
also switched on and off with the remote con-
trol. The alarm system
is armed/disarmed at the
same time.
You can find more detailed information on the
alarm system
on page34.
Operating from inside
Using the button for central locking, refer to
page30. The fuel filler flap is not locked.
In an accident of sufficient severity, the central
locking system automatically unlocks the vehi-
cle. In addition, the hazard warning flashers and
interior lamps come on.
Page 113 of 312
Controls
111Reference
At a glance
Driving tips
Communications
Navigation
Entertainment
Mobility
Lamps
Parking lamps/low beams
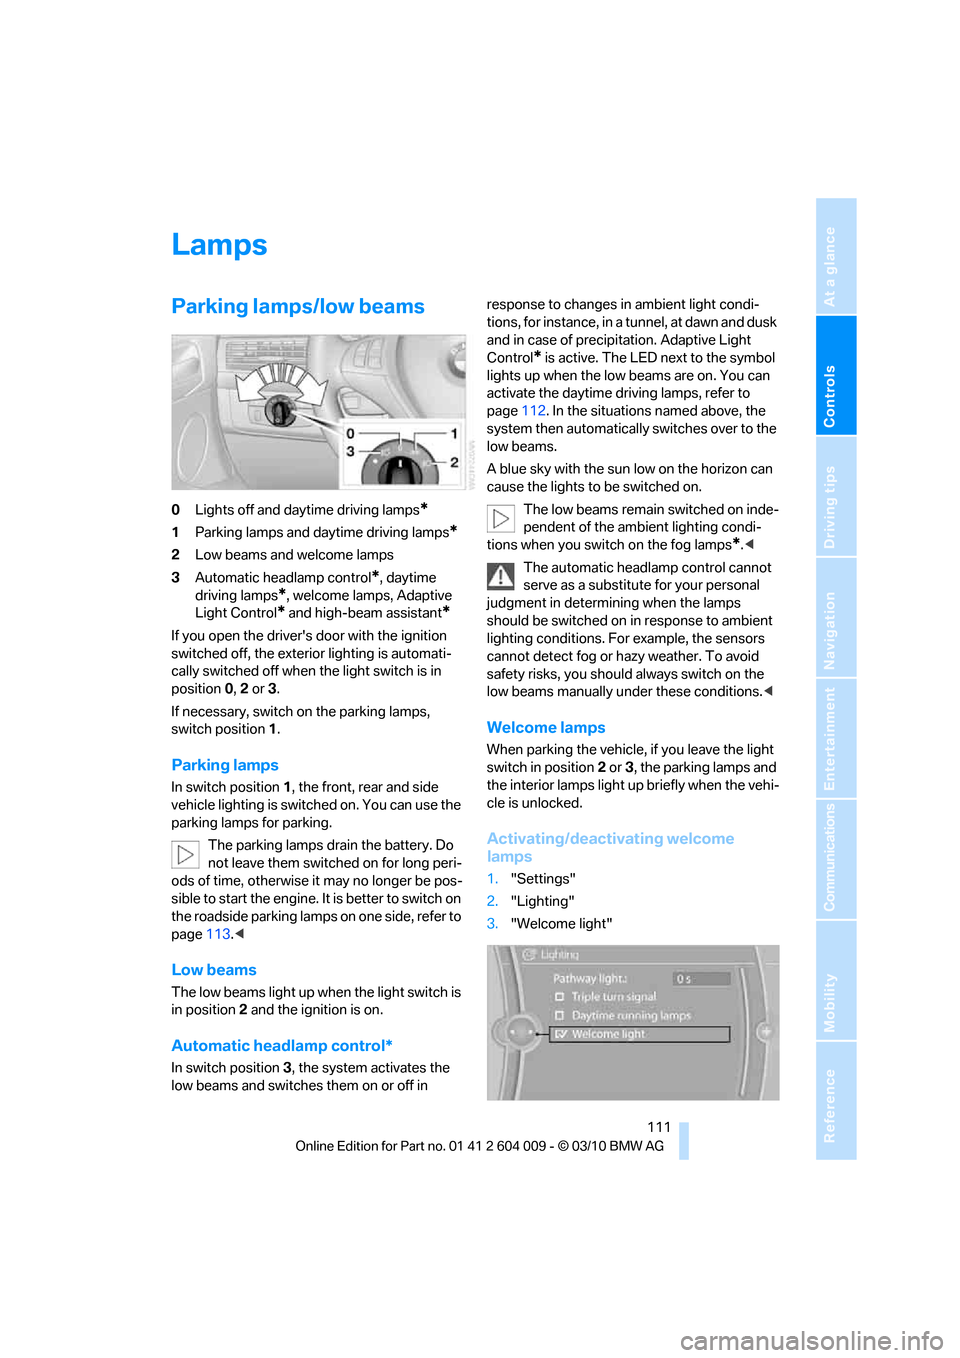
0Lights off and daytime driving lamps*
1Parking lamps and daytime driving lamps*
2Low beams and welcome lamps
3Automatic headlamp control
*, daytime
driving lamps
*, welcome lamps, Adaptive
Light Control
* and high-beam assistant*
If you open the driver's door with the ignition
switched off, the exterior lighting is automati-
cally switched off when the light switch is in
position0, 2 or 3.
If necessary, switch on the parking lamps,
switch position1.
Parking lamps
In switch position1, the front, rear and side
vehicle lighting is switched on. You can use the
parking lamps for parking.
The parking lamps drain the battery. Do
not leave them switched on for long peri-
ods of time, otherwise it may no longer be pos-
sible to start the engine. It is better to switch on
the roadside parking lamps on one side, refer to
page113.<
Low beams
The low beams light up when the light switch is
in position 2 and the ignition is on.
Automatic headlamp control*
In switch position3, the system activates the
low beams and switches them on or off in response to changes in ambient light condi-
tions, for instance, in a tunnel, at dawn and dusk
and in case of precipitation. Adaptive Light
Control
* is active. The LED next to the symbol
lights up when the low beams are on. You can
activate the daytime driving lamps, refer to
page112. In the situations named above, the
system then automatically switches over to the
low beams.
A blue sky with the sun low on the horizon can
cause the lights to be switched on.
The low beams remain switched on inde-
pendent of the ambient lighting condi-
tions when you switch on the fog lamps
*.<
The automatic headlamp control cannot
serve as a substitute for your personal
judgment in determining when the lamps
should be switched on in response to ambient
lighting conditions. For example, the sensors
cannot detect fog or hazy weather. To avoid
safety risks, you should always switch on the
low beams manually under these conditions.<
Welcome lamps
When parking the vehicle, if you leave the light
switch in position2 or3, the parking lamps and
the interior lamps light up briefly when the vehi-
cle is unlocked.
Activating/deactivating welcome
lamps
1."Settings"
2."Lighting"
3."Welcome light"
Page 114 of 312
Lamps
112 Welcome lamps are activated and are
stored for the remote control currently in use.
Pathway lighting
If you activate the headlamp flasher after
switching off the ignition with the lamps
switched off, the low beams come on and
remain on for a certain time.
Setting the duration or deactivating
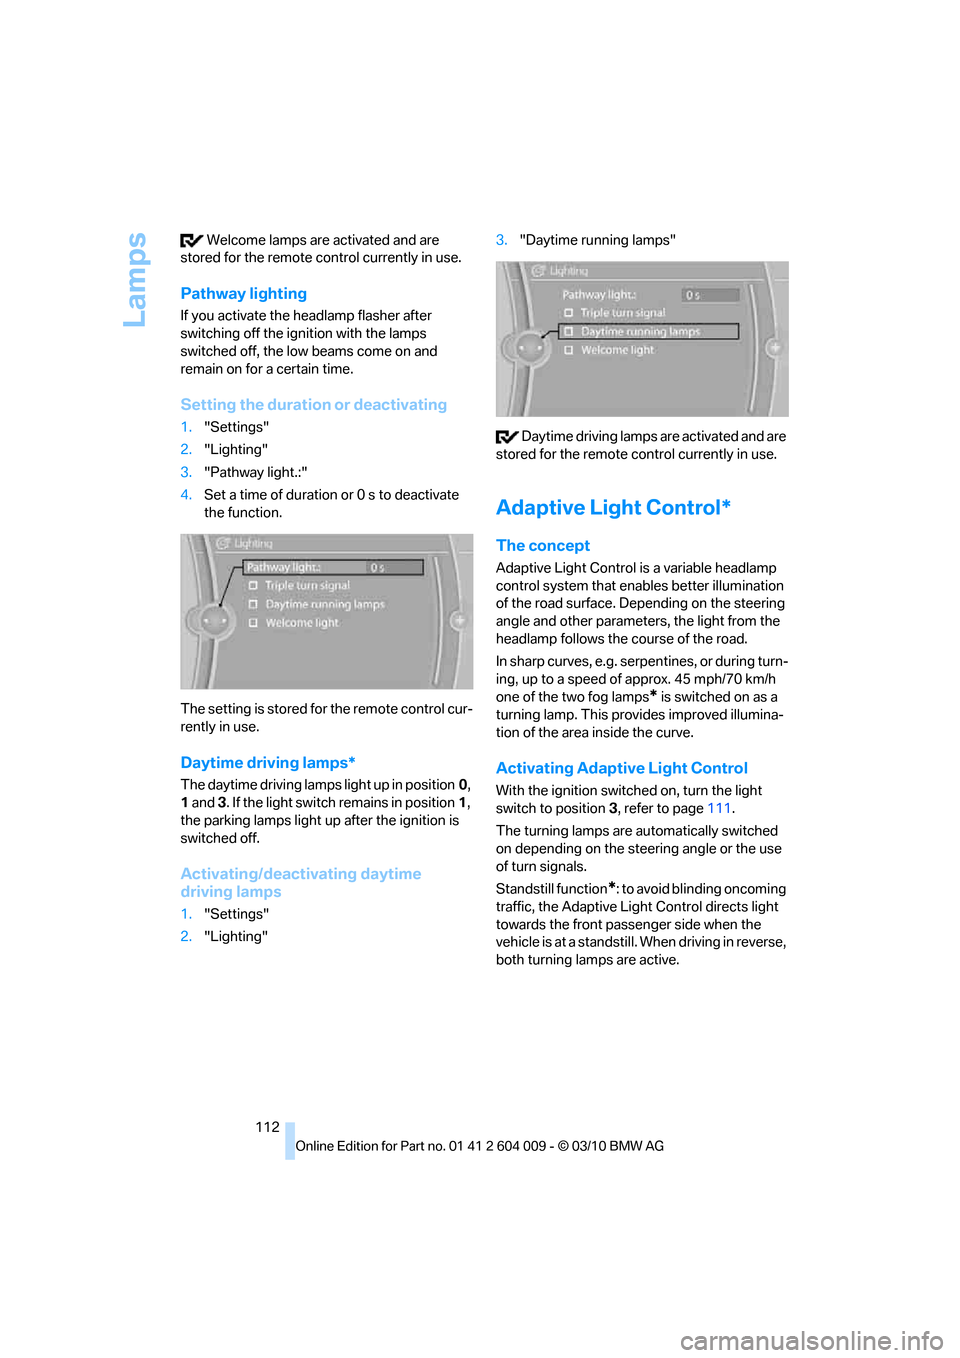
1."Settings"
2."Lighting"
3."Pathway light.:"
4.Set a time of duration or 0 s to deactivate
the function.
The setting is stored for the remote control cur-
rently in use.
Daytime driving lamps*
The daytime driving lamps light up in position0,
1 and 3. If the light switch remains in position1,
the parking lamps light up after the ignition is
switched off.
Activating/deactivating daytime
driving lamps
1."Settings"
2."Lighting"3."Daytime running lamps"
Daytime driving lamps are activated and are
stored for the remote control currently in use.
Adaptive Light Control*
The concept
Adaptive Light Control is a variable headlamp
control system that enables better illumination
of the road surface. Depending on the steering
angle and other parameters, the light from the
headlamp follows the course of the road.
In sharp curves, e.g. serpentines, or during turn-
ing, up to a speed of approx. 45 mph/70 km/h
one of the two fog lamps
* is switched on as a
turning lamp. This provides improved illumina-
tion of the area inside the curve.
Activating Adaptive Light Control
With the ignition switched on, turn the light
switch to position 3, refer to page111.
The turning lamps are automatically switched
on depending on the steering angle or the use
of turn signals.
Standstill function
*: to avoid blinding oncoming
traffic, the Adaptive Light Control directs light
towards the front passenger side when the
vehicle is at a standstill. When driving in reverse,
both turning lamps are active.
Page 115 of 312
Controls
113Reference
At a glance
Driving tips
Communications
Navigation
Entertainment
Mobility
High beams/
roadside parking lamps
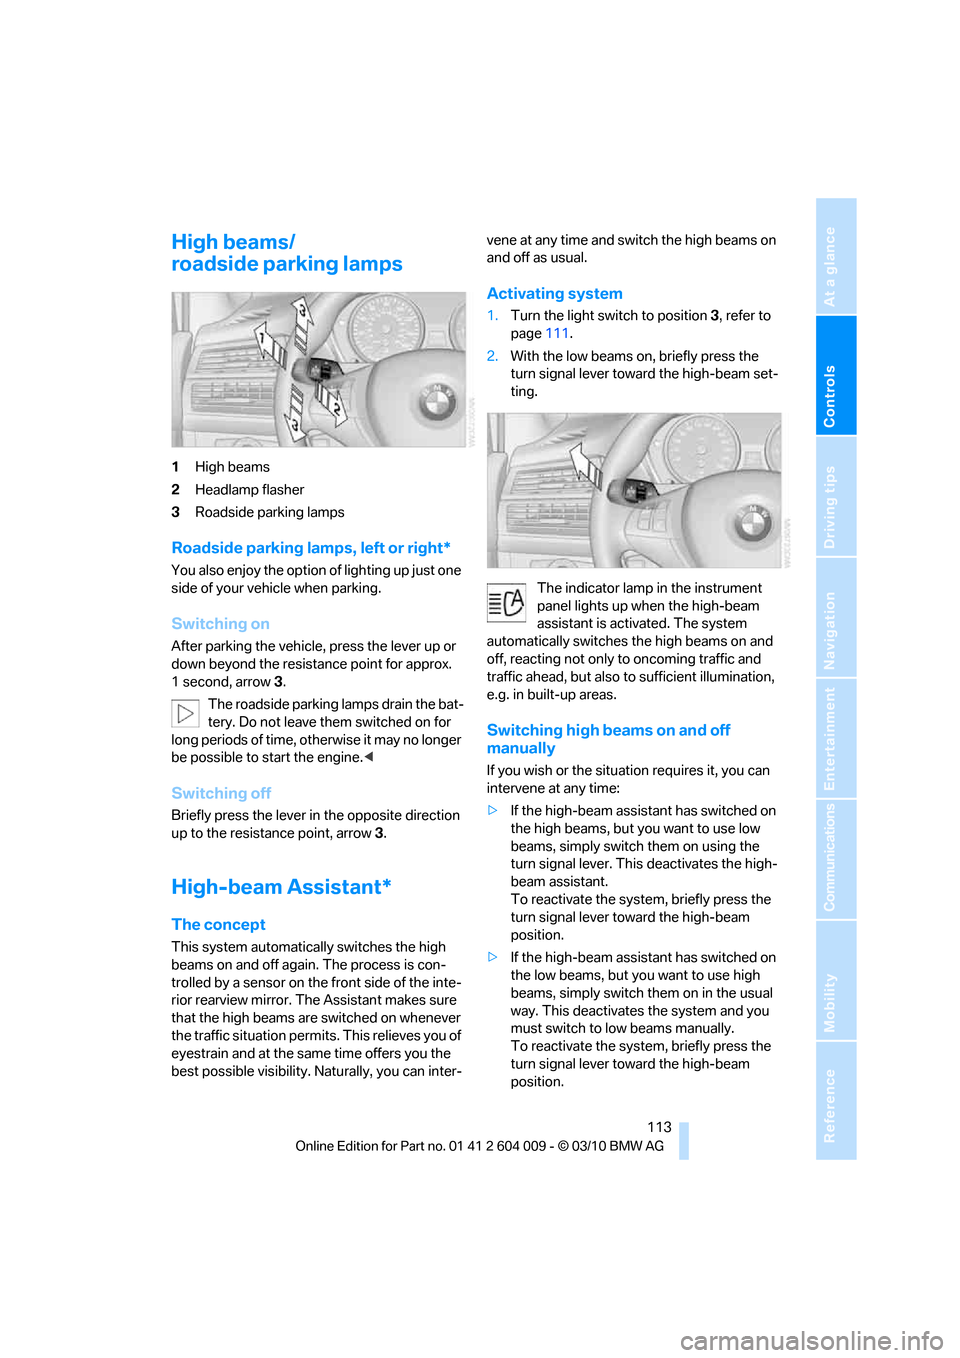
1High beams
2Headlamp flasher
3Roadside parking lamps
Roadside parking lamps, left or right*
You also enjoy the option of lighting up just one
side of your vehicle when parking.
Switching on
After parking the vehicle, press the lever up or
down beyond the resistance point for approx.
1 second, arrow3.
The roadside parking lamps drain the bat-
tery. Do not leave them switched on for
long periods of time, otherwise it may no longer
be possible to start the engine.<
Switching off
Briefly press the lever in the opposite direction
up to the resistance point, arrow 3.
High-beam Assistant*
The concept
This system automatically switches the high
beams on and off again. The process is con-
trolled by a sensor on the front side of the inte-
rior rearview mirror. The Assistant makes sure
that the high beams are switched on whenever
the traffic situation permits. This relieves you of
eyestrain and at the same time offers you the
best possible visibility. Naturally, you can inter-vene at any time and switch the high beams on
and off as usual.
Activating system
1.Turn the light switch to position3, refer to
page111.
2.With the low beams on, briefly press the
turn signal lever toward the high-beam set-
ting.
The indicator lamp in the instrument
panel lights up when the high-beam
assistant is activated. The system
automatically switches the high beams on and
off, reacting not only to oncoming traffic and
traffic ahead, but also to sufficient illumination,
e.g. in built-up areas.
Switching high beams on and off
manually
If you wish or the situation requires it, you can
intervene at any time:
>If the high-beam assistant has switched on
the high beams, but you want to use low
beams, simply switch them on using the
turn signal lever. This deactivates the high-
beam assistant.
To reactivate the system, briefly press the
turn signal lever toward the high-beam
position.
>If the high-beam assistant has switched on
the low beams, but you want to use high
beams, simply switch them on in the usual
way. This deactivates the system and you
must switch to low beams manually.
To reactivate the system, briefly press the
turn signal lever toward the high-beam
position.
Page 243 of 312
Mobility
241Reference
At a glance
Controls
Driving tips
Communications
Navigation
Entertainment
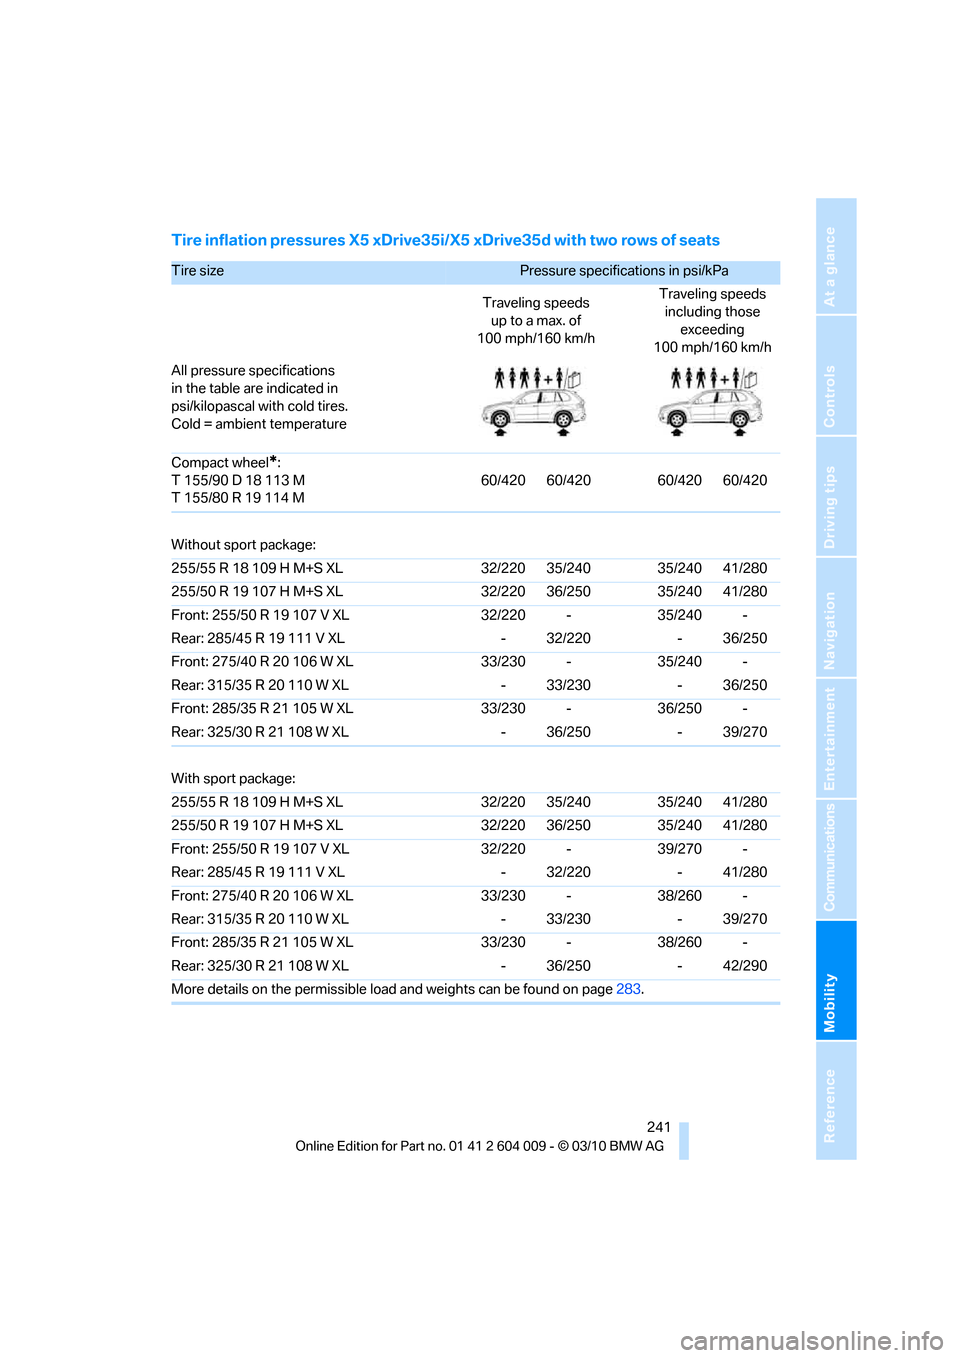
Tire inflation pressures X5 xDrive35i/X5 xDrive35d with two rows of seats
Tire size Pressure specifications in psi/kPa
Traveling speeds
up to a max. of
100 mph/160 km/hTraveling speeds
including those
exceeding
100 mph/160 km/h
All pressure specifications
in the table are indicated in
psi/kilopascal with cold tires.
Cold = ambient temperature
Compact wheel
*:
T 155/90 D 18 113 M
T 155/80 R 19 114 M60/420 60/420 60/420 60/420
Without sport package:
255/55 R 18 109 H M+S XL 32/220 35/240 35/240 41/280
255/50 R 19 107 H M+S XL 32/220 36/250 35/240 41/280
Front: 255/50 R 19 107 V XL 32/220 - 35/240 -
Rear: 285/45 R 19 111 V XL - 32/220 - 36/250
Front: 275/40 R 20 106 W XL 33/230 - 35/240 -
Rear: 315/35 R 20 110 W XL - 33/230 - 36/250
Front: 285/35 R 21 105 W XL 33/230 - 36/250 -
Rear: 325/30 R 21 108 W XL - 36/250 - 39/270
With sport package:
255/55 R 18 109 H M+S XL 32/220 35/240 35/240 41/280
255/50 R 19 107 H M+S XL 32/220 36/250 35/240 41/280
Front: 255/50 R 19 107 V XL 32/220 - 39/270 -
Rear: 285/45 R 19 111 V XL - 32/220 - 41/280
Front: 275/40 R 20 106 W XL 33/230 - 38/260 -
Rear: 315/35 R 20 110 W XL - 33/230 - 39/270
Front: 285/35 R 21 105 W XL 33/230 - 38/260 -
Rear: 325/30 R 21 108 W XL - 36/250 - 42/290
More details on the permissible load and weights can be found on page283.
Page 244 of 312
Wheels and tires
242
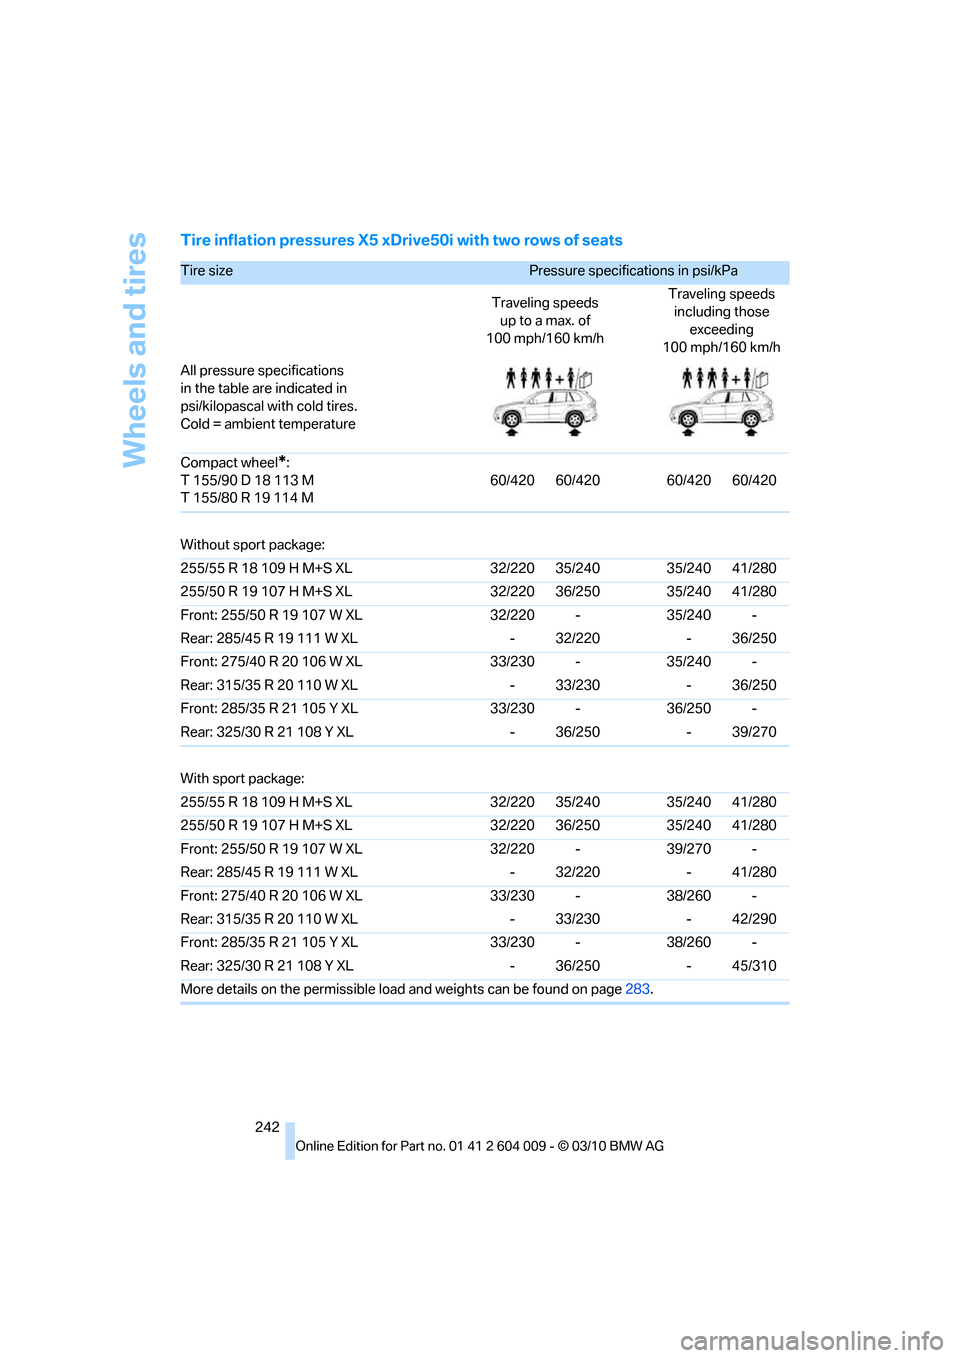
Tire inflation pressures X5 xDrive50i with two rows of seats
Tire size Pressure specifications in psi/kPa
Traveling speeds
up to a max. of
100 mph/160 km/hTraveling speeds
including those
exceeding
100 mph/160 km/h
All pressure specifications
in the table are indicated in
psi/kilopascal with cold tires.
Cold = ambient temperature
Compact wheel
*:
T 155/90 D 18 113 M
T 155/80 R 19 114 M60/420 60/420 60/420 60/420
Without sport package:
255/55 R 18 109 H M+S XL 32/220 35/240 35/240 41/280
255/50 R 19 107 H M+S XL 32/220 36/250 35/240 41/280
Front: 255/50 R 19 107 W XL 32/220 - 35/240 -
Rear: 285/45 R 19 111 W XL - 32/220 - 36/250
Front: 275/40 R 20 106 W XL 33/230 - 35/240 -
Rear: 315/35 R 20 110 W XL - 33/230 - 36/250
Front: 285/35 R 21 105 Y XL 33/230 - 36/250 -
Rear: 325/30 R 21 108 Y XL - 36/250 - 39/270
With sport package:
255/55 R 18 109 H M+S XL 32/220 35/240 35/240 41/280
255/50 R 19 107 H M+S XL 32/220 36/250 35/240 41/280
Front: 255/50 R 19 107 W XL 32/220 - 39/270 -
Rear: 285/45 R 19 111 W XL - 32/220 - 41/280
Front: 275/40 R 20 106 W XL 33/230 - 38/260 -
Rear: 315/35 R 20 110 W XL - 33/230 - 42/290
Front: 285/35 R 21 105 Y XL 33/230 - 38/260 -
Rear: 325/30 R 21 108 Y XL - 36/250 - 45/310
More details on the permissible load and weights can be found on page283.
Page 245 of 312
Mobility
243Reference
At a glance
Controls
Driving tips
Communications
Navigation
Entertainment
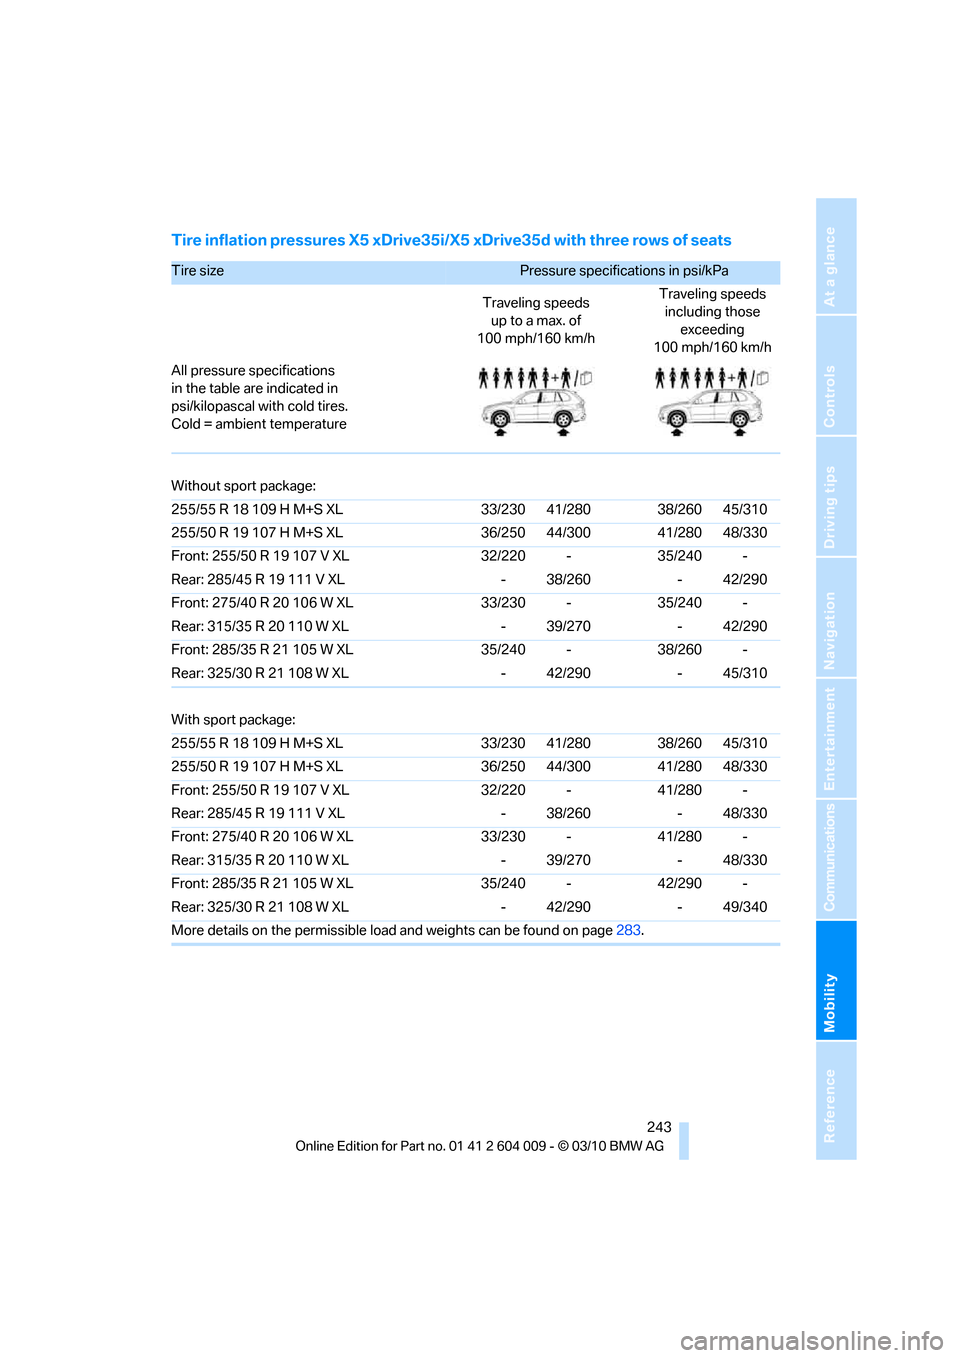
Tire inflation pressures X5 xDrive35i/X5 xDrive35d with three rows of seats
Tire size Pressure specifications in psi/kPa
Traveling speeds
up to a max. of
100 mph/160 km/hTraveling speeds
including those
exceeding
100 mph/160 km/h
All pressure specifications
in the table are indicated in
psi/kilopascal with cold tires.
Cold = ambient temperature
Without sport package:
255/55 R 18 109 H M+S XL 33/230 41/280 38/260 45/310
255/50 R 19 107 H M+S XL 36/250 44/300 41/280 48/330
Front: 255/50 R 19 107 V XL 32/220 - 35/240 -
Rear: 285/45 R 19 111 V XL - 38/260 - 42/290
Front: 275/40 R 20 106 W XL 33/230 - 35/240 -
Rear: 315/35 R 20 110 W XL - 39/270 - 42/290
Front: 285/35 R 21 105 W XL 35/240 - 38/260 -
Rear: 325/30 R 21 108 W XL - 42/290 - 45/310
With sport package:
255/55 R 18 109 H M+S XL 33/230 41/280 38/260 45/310
255/50 R 19 107 H M+S XL 36/250 44/300 41/280 48/330
Front: 255/50 R 19 107 V XL 32/220 - 41/280 -
Rear: 285/45 R 19 111 V XL - 38/260 - 48/330
Front: 275/40 R 20 106 W XL 33/230 - 41/280 -
Rear: 315/35 R 20 110 W XL - 39/270 - 48/330
Front: 285/35 R 21 105 W XL 35/240 - 42/290 -
Rear: 325/30 R 21 108 W XL - 42/290 - 49/340
More details on the permissible load and weights can be found on page283.