battery BMW X6 2013 E71 User Guide
[x] Cancel search | Manufacturer: BMW, Model Year: 2013, Model line: X6, Model: BMW X6 2013 E71Pages: 327, PDF Size: 7.71 MB
Page 87 of 327
Controls
Activating Switch position
with the ignition switched
on.
The turning lamps are automatically switched
on depending on the steering angle or the use
of turn signals.
To avoid blinding oncoming traffic, the Adap‐
tive Light Control does not swivel to the driv‐
er's side when the vehicle is at a standstill.
When driving in reverse, both turning lamps
are active.
Malfunction
A message is displayed.
Adaptive Light Control is malfunctioning or has
failed. Have the system checked as soon as
possible.
High beams/roadside
parking lamps
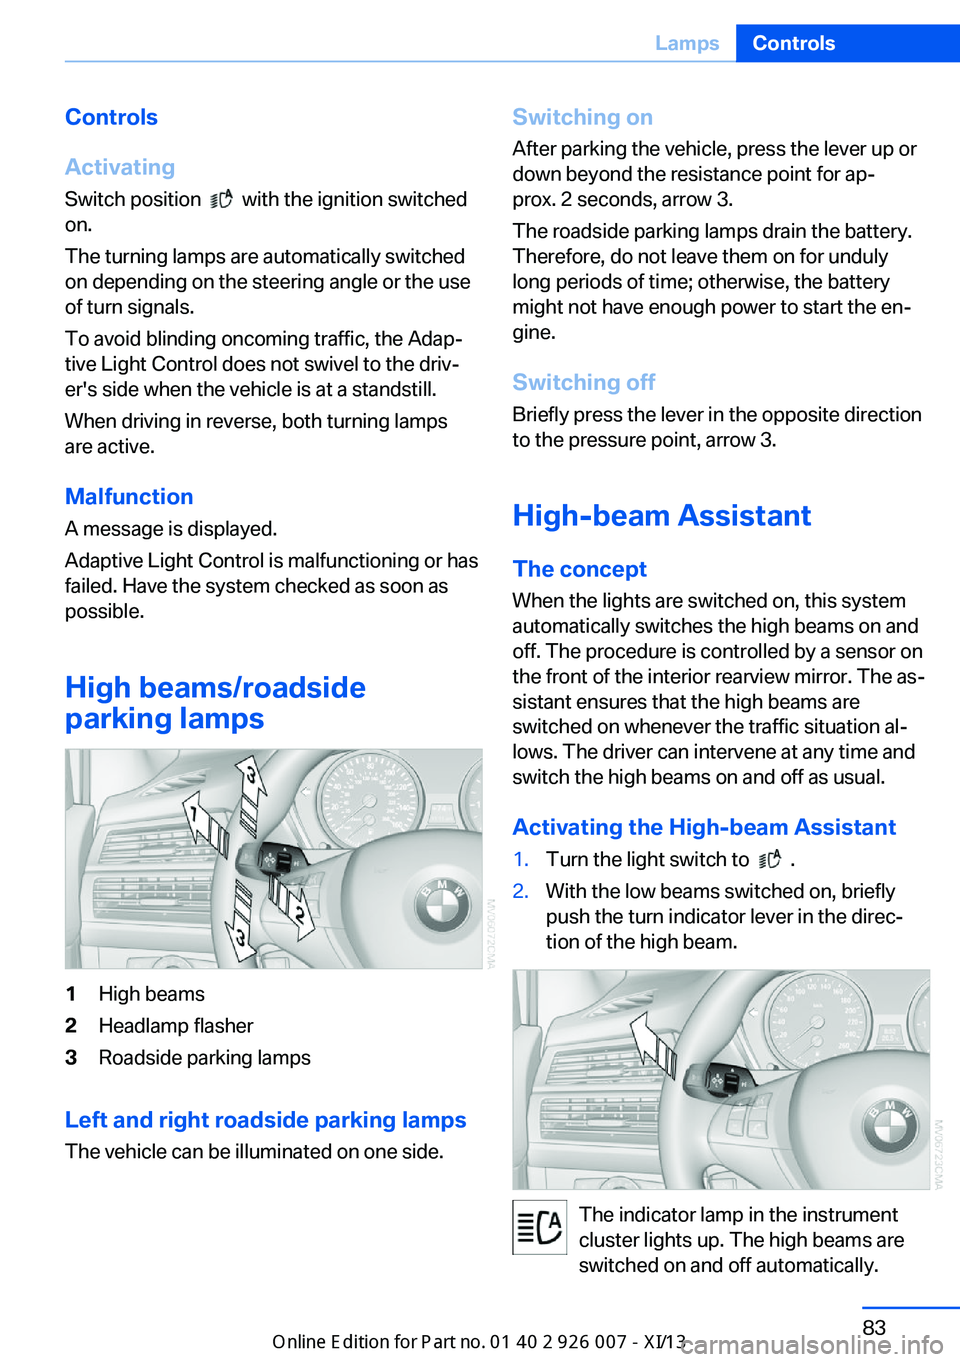
1High beams2Headlamp flasher3Roadside parking lamps
Left and right roadside parking lamps
The vehicle can be illuminated on one side.
Switching onAfter parking the vehicle, press the lever up ordown beyond the resistance point for ap‐
prox. 2 seconds, arrow 3.
The roadside parking lamps drain the battery.
Therefore, do not leave them on for unduly
long periods of time; otherwise, the battery
might not have enough power to start the en‐
gine.
Switching off
Briefly press the lever in the opposite direction
to the pressure point, arrow 3.
High-beam Assistant
The concept When the lights are switched on, this systemautomatically switches the high beams on and
off. The procedure is controlled by a sensor on
the front of the interior rearview mirror. The as‐
sistant ensures that the high beams are
switched on whenever the traffic situation al‐
lows. The driver can intervene at any time and
switch the high beams on and off as usual.
Activating the High-beam Assistant1.Turn the light switch to .2.With the low beams switched on, briefly
push the turn indicator lever in the direc‐
tion of the high beam.
The indicator lamp in the instrument
cluster lights up. The high beams are
switched on and off automatically.
Seite 83LampsControls83
Online Edition for Part no. 01 40 2 910 876 - VII/13
Page 89 of 327
Instrument lighting
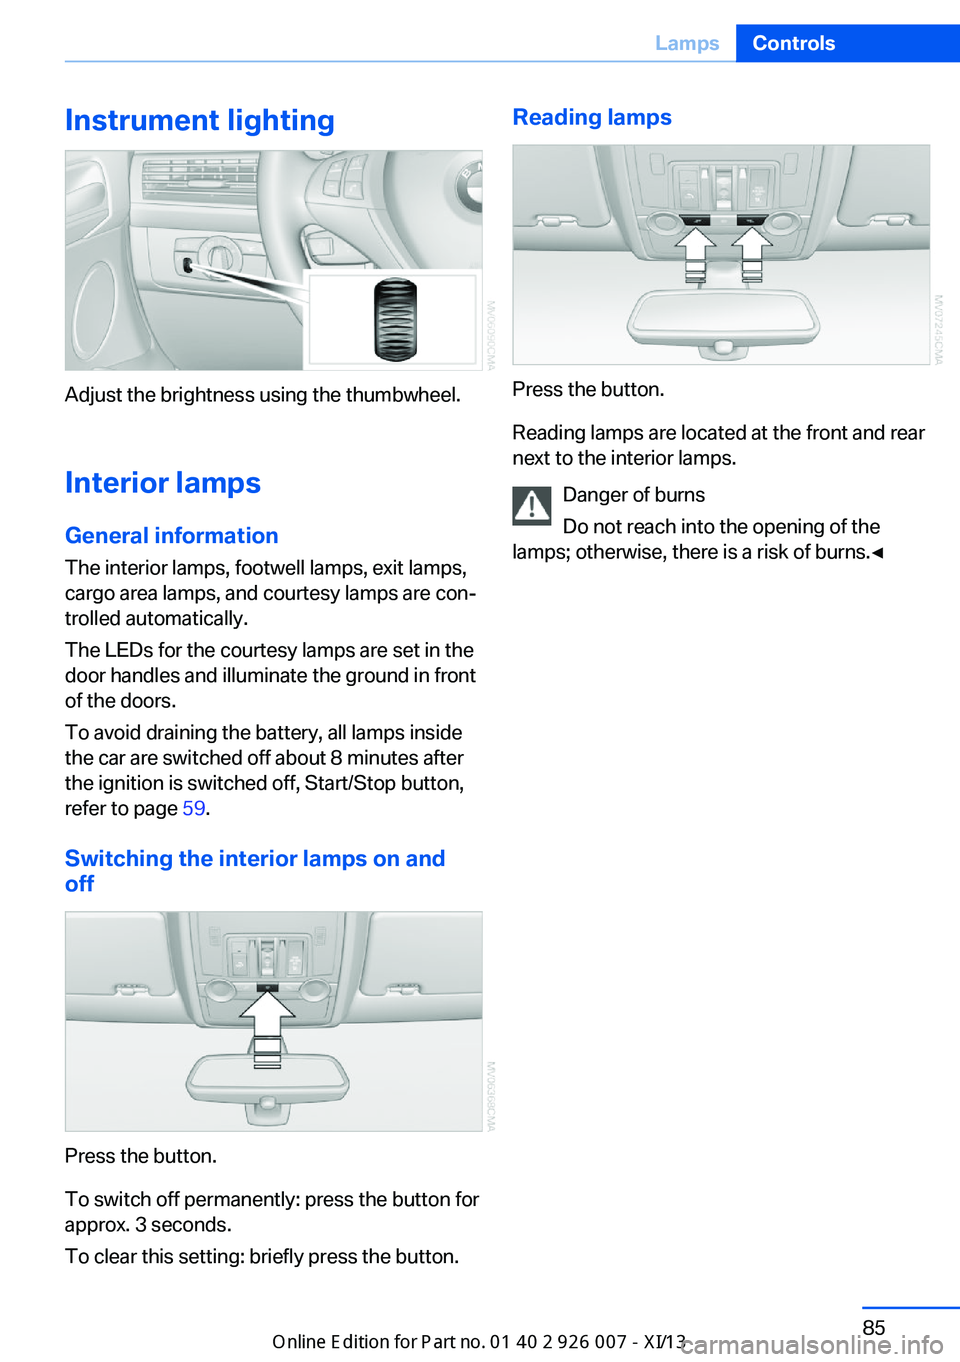
Adjust the brightness using the thumbwheel.Interior lamps
General information
The interior lamps, footwell lamps, exit lamps,
cargo area lamps, and courtesy lamps are con‐
trolled automatically.
The LEDs for the courtesy lamps are set in the
door handles and illuminate the ground in front
of the doors.
To avoid draining the battery, all lamps inside
the car are switched off about 8 minutes after
the ignition is switched off, Start/Stop button,
refer to page 59.
Switching the interior lamps on and
off
Press the button.
To switch off permanently: press the button for
approx. 3 seconds.
To clear this setting: briefly press the button.
Reading lamps
Press the button.
Reading lamps are located at the front and rear
next to the interior lamps.
Danger of burns
Do not reach into the opening of the
lamps; otherwise, there is a risk of burns.◀
Seite 85LampsControls85
Online Edition for Part no. 01 40 2 910 876 - VII/13
Page 129 of 327
▷Right LED on, recirculated air mode: the
supply of outside air into the vehicle is per‐
manently blocked.
If the windows are fogged over, switch off the
recirculated-air mode and press the AUTO
button to utilize the condensation sensor.
Make sure that air can flow onto the wind‐
shield.
Continuous recirculated-air mode
The recirculated air mode should not be
used for an extended period of time, as the air
quality inside the vehicle deteriorates stead‐
ily.◀
Residual heat
The heat stored in the engine is used to heat
the interior.
Functional requirement
▷Up to 15 minutes after the engine has been
switched off.▷Warm engine.▷The battery is sufficiently charged.▷External temperature below 77 ℉/25 ℃.
Switching on
1.Switch off the ignition.2.Press the right-hand button.
REST appears on the display of the automatic
climate control when the residual heat utiliza‐
tion is switched on.
From radio readiness the interior temperature,
the air volume and the air distribution can be
set.
Switching off
You can select the lowest blower speed by
pressing and holding the left side. Pressing
again switches off the residual heat utilization.
REST disappears from the display of the auto‐
matic climate control.
Switching on/off the automatic
climate control
Switching off With the blower at its lowest setting,
press the left side of the button to
switch off the automatic climate control.
Switching on Press any button to switch the automatic cli‐mate control back on.
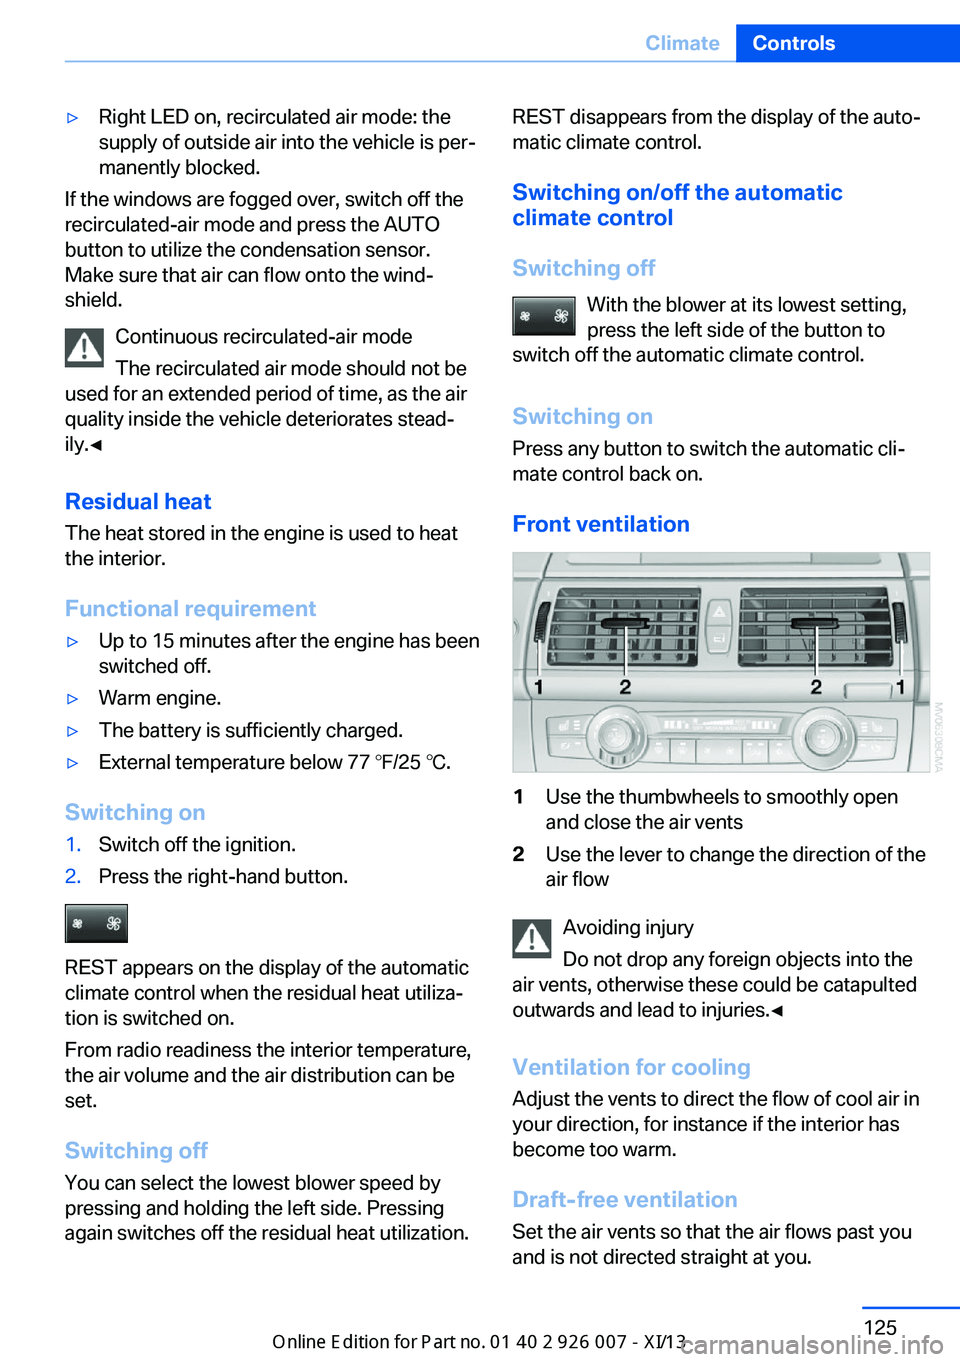
Front ventilation1Use the thumbwheels to smoothly open
and close the air vents2Use the lever to change the direction of the
air flow
Avoiding injury
Do not drop any foreign objects into the
air vents, otherwise these could be catapulted
outwards and lead to injuries.◀
Ventilation for cooling
Adjust the vents to direct the flow of cool air in
your direction, for instance if the interior has
become too warm.
Draft-free ventilation Set the air vents so that the air flows past you
and is not directed straight at you.
Seite 125ClimateControls125
Online Edition for Part no. 01 40 2 910 876 - VII/13
Page 137 of 327
Ashtray/cigarette lighterOpening
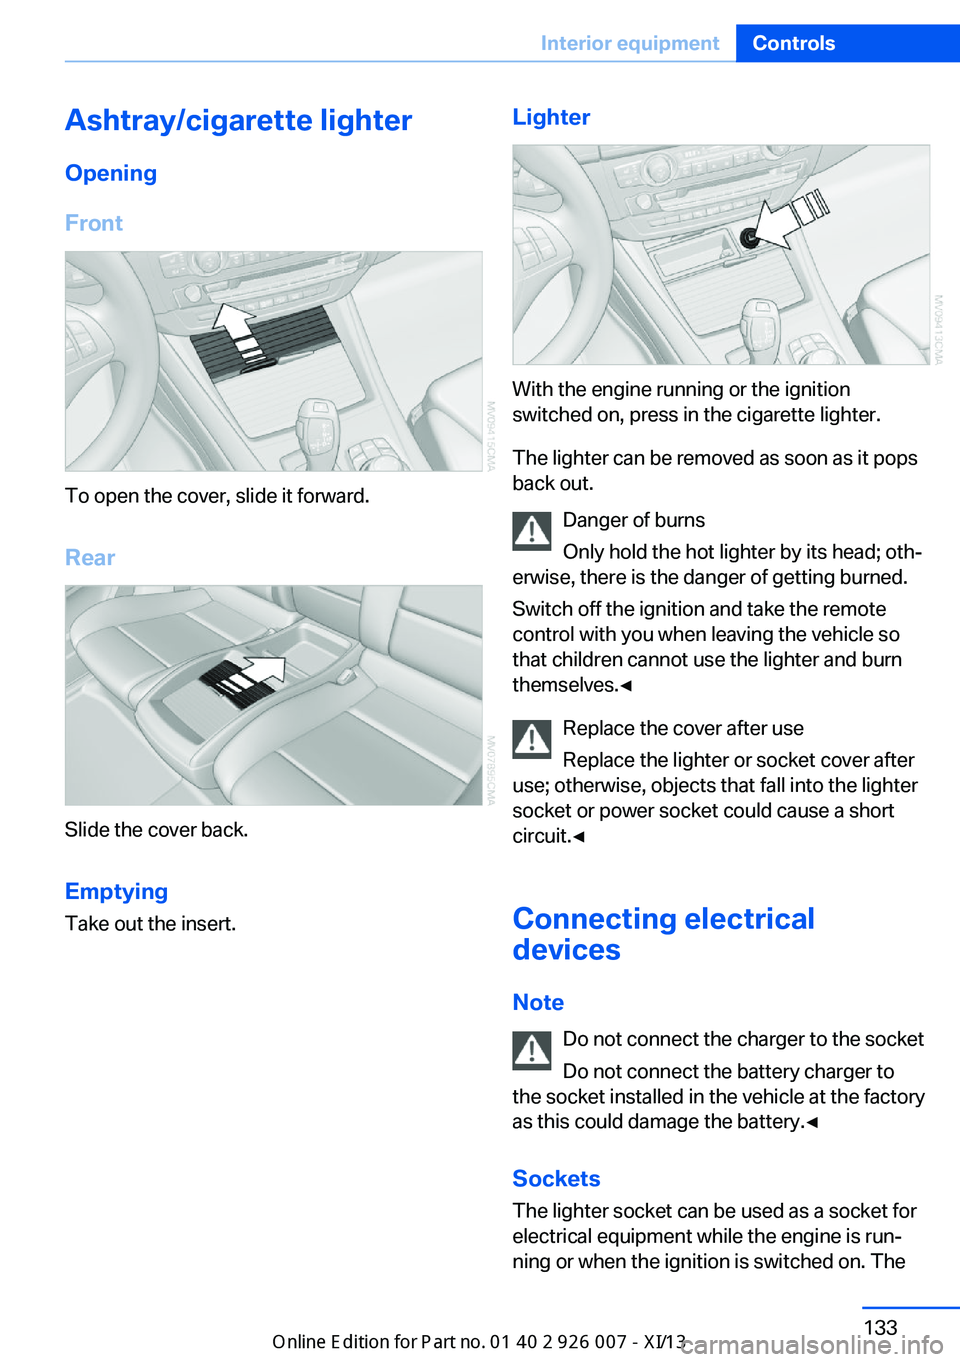
Front
To open the cover, slide it forward.
Rear
Slide the cover back.
Emptying Take out the insert.
Lighter
With the engine running or the ignition
switched on, press in the cigarette lighter.
The lighter can be removed as soon as it pops
back out.
Danger of burns
Only hold the hot lighter by its head; oth‐
erwise, there is the danger of getting burned.
Switch off the ignition and take the remote
control with you when leaving the vehicle so
that children cannot use the lighter and burn
themselves.◀
Replace the cover after use
Replace the lighter or socket cover after
use; otherwise, objects that fall into the lighter
socket or power socket could cause a short
circuit.◀
Connecting electrical
devices
Note Do not connect the charger to the socket
Do not connect the battery charger to
the socket installed in the vehicle at the factory
as this could damage the battery.◀
Sockets
The lighter socket can be used as a socket for
electrical equipment while the engine is run‐
ning or when the ignition is switched on. The
Seite 133Interior equipmentControls133
Online Edition for Part no. 01 40 2 910 876 - VII/13
Page 162 of 327
Navigation systemVehicle equipmentThis chapter describes all series equipment as
well as country-specific and special equipment
offered for this model series.Therefore, it also
describes equipment that may not be found in
your vehicle, for instance due to the selected
special equipment or the country version. This
also applies to safety-related functions and
systems.
General information
The navigation system can determine the pre‐
cise position of the vehicle, with the aid of sat‐
ellites and vehicle sensors, and can reliably
guide you to every entered destination.
Entries in stationary vehicle
Enter data only when the vehicle is sta‐
tionary, and always give priority to the applica‐
ble traffic regulations in the event of any con‐
tradiction between traffic and road conditions
and the instructions issued by the navigation
system. Failure to take to this precaution can
place you in violation of the law and put vehicle
occupants and other road users in danger.◀
Opening the navigation system1. Press the button on the controller.2."Navigation"
The navigation system can also be called
up directly using the button on the con‐
troller.
Navigation data
Information on navigation data
1."Navigation"2.Open "Options".3."Navigation system version"
Information is displayed on the data ver‐
sion.
Updating the navigation data
General information
Navigation data are stored in the vehicle and
can be updated.
Current navigation data and the authorization
code are available from your service center.
▷Depending on the data volume, a data up‐
date may take several hours.▷Update during the trip to preserve battery.▷During the update, only the basic functions
of the navigation system are available.▷The status of the update can be viewed.▷After the updating process is complete, the
system restarts.▷Remove the medium with the navigation
data after the update.
Performing an update
1.Insert the navigation DVD into the DVD
player with the labeled side facing up.2.Follow the instructions on the Control Dis‐
play.3.Enter the authorization code of the naviga‐
tion DVD.4.Change the DVD if necessary.
After the trip is interrupted, follow the instruc‐
tions on the Control Display.
Viewing the status
1.Open "Options".2."Navigation update"Seite 158NavigationNavigation system158
Online Edition for Part no. 01 40 2 910 876 - VII/13
Page 216 of 327
Menu navigation
You can use the thumbwheel and buttons 1 to
navigate through the menus.▷Turn the thumbwheel: select a menu item.▷Press the arrow buttons: change between
fields.▷ Press the button: activate the menu
item.
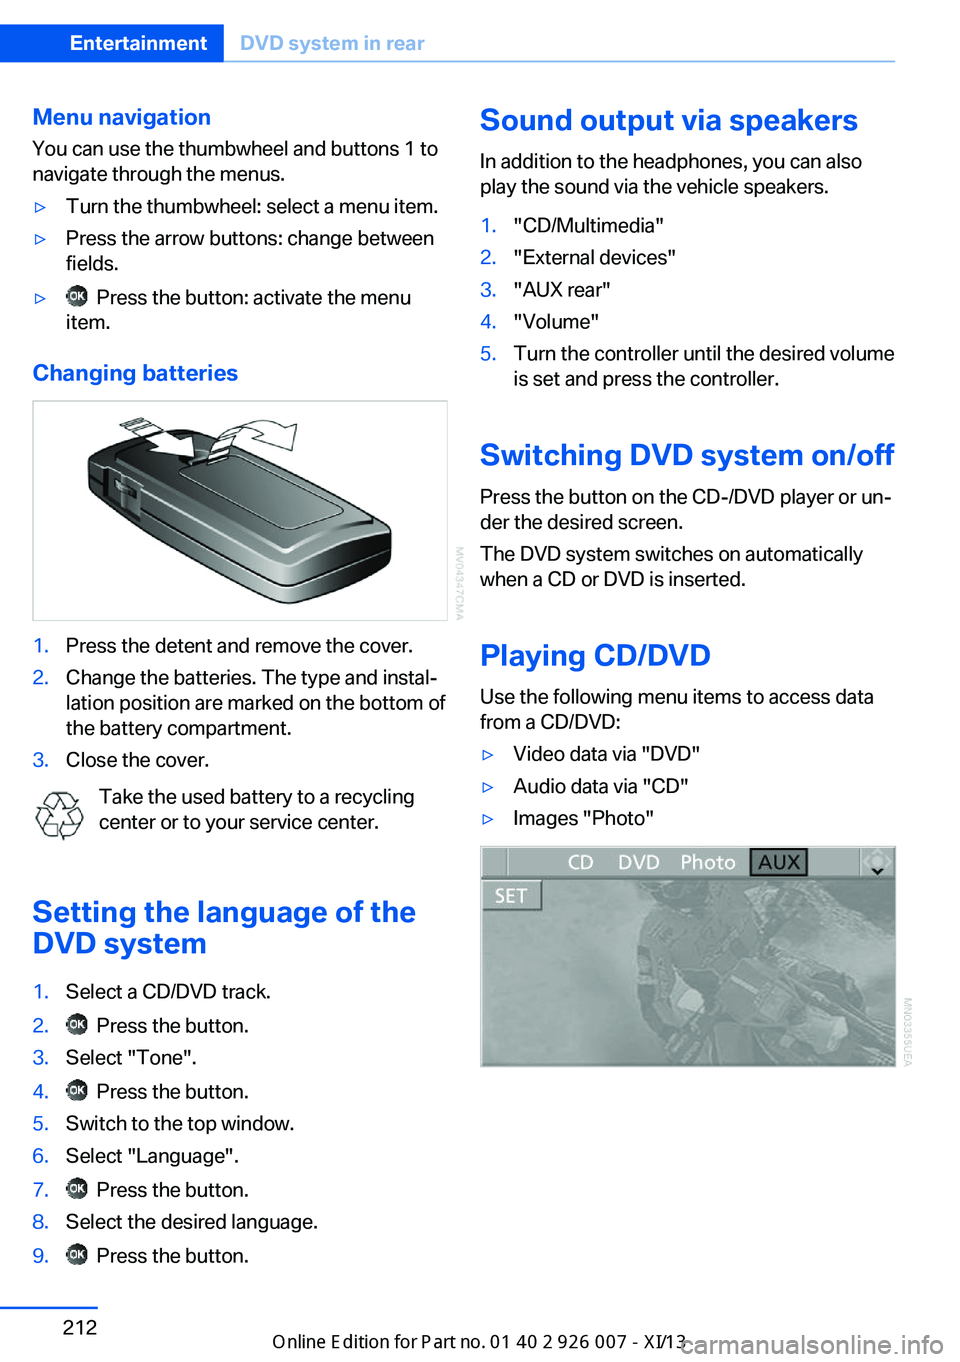
Changing batteries
1.Press the detent and remove the cover.2.Change the batteries. The type and instal‐
lation position are marked on the bottom of
the battery compartment.3.Close the cover.
Take the used battery to a recycling
center or to your service center.
Setting the language of the
DVD system
1.Select a CD/DVD track.2. Press the button.3.Select "Tone".4. Press the button.5.Switch to the top window.6.Select "Language".7. Press the button.8.Select the desired language.9. Press the button.Sound output via speakers
In addition to the headphones, you can also
play the sound via the vehicle speakers.1."CD/Multimedia"2."External devices"3."AUX rear"4."Volume"5.Turn the controller until the desired volume
is set and press the controller.
Switching DVD system on/off
Press the button on the CD-/DVD player or un‐
der the desired screen.
The DVD system switches on automatically
when a CD or DVD is inserted.
Playing CD/DVD
Use the following menu items to access data
from a CD/DVD:
▷Video data via "DVD"▷Audio data via "CD"▷Images "Photo"Seite 212EntertainmentDVD system in rear212
Online Edition for Part no. 01 40 2 910 876 - VII/13
Page 230 of 327
TelephoneVehicle equipmentThis chapter describes all series equipment as
well as country-specific and special equipment
offered for this model series.Therefore, it also
describes equipment that may not be found in
your vehicle, for instance due to the selected
special equipment or the country version. This
also applies to safety-related functions and
systems.
At a glance
The concept Mobile phones or other external devices such
as audio players can be connected to the vehi‐
cle via Bluetooth.
Bluetooth® is a registered trademark of Blue‐
tooth® SIG, Inc.
After these devices are paired once, they are
recognized automatically when the ignition is
switched on as soon as they are in the vehicle
and can then be operated via iDrive, the but‐
tons on the steering wheel, and via voice acti‐
vation.
Depending on their functionality, external devi‐
ces can be used via the vehicle as a telephone
or as an audio source. The telephone functions
are described in the following. Operating the
audio functions, refer to page 205.
Up to four external devices can be paired.
Certain functions may need to be enabled by
the mobile phone provider or service provider.
Using the mobile phone while driving
Make entries only when traffic and road
conditions allow. Do not hold the mobile phone
in your hand while you are driving; use the
hands-free system instead. If you do not ob‐
serve this precaution, you can endanger the
vehicle occupants and other road users.◀Snap-in adapter
The snap-in adapter is used to:▷Hold the mobile phone.▷Recharge the battery.▷Connect the mobile phone to an outside
antenna of the vehicle.
This provides for better network reception
and consistent sound quality.
Approved mobile phones
Details on which mobile phones and external
devices with a Bluetooth interface are sup‐
ported by the mobile phone preparation pack‐
age can be obtained at www.bmwusa.com/
bluetooth.
Displaying the vehicle identification
number and software part number
The vehicle identification number and software part number are needed to determine which
mobile phones are supported by the mobile
phone preparation package. The software ver‐
sion of the mobile phone may also be required.
1."Telephone"2.Open "Options".3."Bluetooth® info"4."Display system information"
These approved mobile phones with a certain
software version, support the vehicle functions
described below.
Malfunctions may occur with other mobile
phones or software versions.
Do not operate a mobile phone that is con‐
nected to the vehicle on the mobile phone key‐
pad, as this may lead to a malfunction.
A software update, refer to page 208, can be
performed if necessary.
Seite 226CommunicationTelephone226
Online Edition for Part no. 01 40 2 910 876 - VII/13
Page 241 of 327
Snap-in adapter
General information More information on compatible snap-in
adapters that support the functions of the mo‐
bile phone is available at the service center.
Notes At high temperatures, the charging function of
the mobile phone may be limited and functions
may not be executed.
When using the mobile phone via the vehicle,
note the operating instructions of the mobile
phone.
Installation position
In the center armrest.
Inserting/removing the snap-in
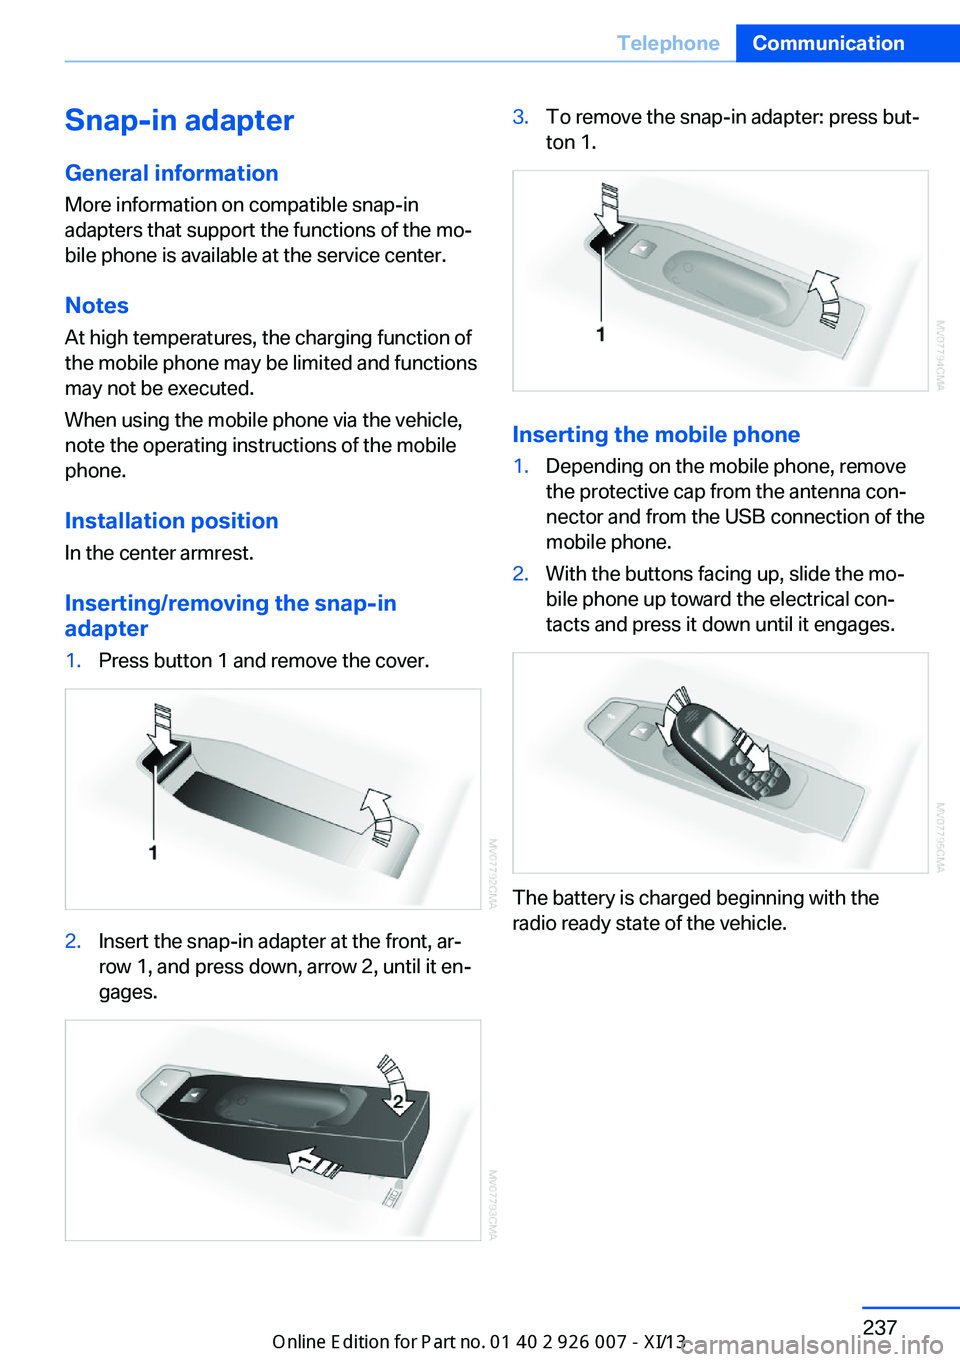
adapter1.Press button 1 and remove the cover.2.Insert the snap-in adapter at the front, ar‐
row 1, and press down, arrow 2, until it en‐
gages.3.To remove the snap-in adapter: press but‐
ton 1.
Inserting the mobile phone
1.Depending on the mobile phone, remove
the protective cap from the antenna con‐
nector and from the USB connection of the
mobile phone.2.With the buttons facing up, slide the mo‐
bile phone up toward the electrical con‐
tacts and press it down until it engages.
The battery is charged beginning with the
radio ready state of the vehicle.
Seite 237TelephoneCommunication237
Online Edition for Part no. 01 40 2 910 876 - VII/13
Page 287 of 327
Driving with compact wheelDo not exceed a speed of
50 mph/80 km/h.
Drive conservatively and do not exceed a
speed of 50 mph/80 km/h. Otherwise, changes
in the driving characteristics could result, for
example reduced track stability on braking, ex‐ tended braking distance, and altered self-
steering characteristics in the limit range. In
conjunction with winter tires, these character‐
istics are more pronounced.◀
Only mount one compact wheel
Only one compact wheel may be
mounted. Restore the wheels and tires to their
original size as quickly as possible. Failure to
do so is a safety risk.◀
Vehicle battery Maintenance
The battery is maintenance-free, i.e., the elec‐
trolyte will last for the life of the battery.
Your service center will be glad to advise you
on questions regarding the battery.
Battery replacement Use approved vehicle batteries
Only use vehicle batteries that have been
approved for your vehicle by the manufacturer;
otherwise, the vehicle could be damaged and
systems or functions may not be fully availa‐
ble.◀
After a battery replacement, have the battery
registered on the vehicle by your service cen‐
ter to ensure that all comfort functions are fully
available.Charging the battery
Note Do not connect the charger to the socket
Do not connect the battery charger to
the socket installed in the vehicle at the factory
as this could damage the battery.◀
General information Ensure that the battery is sufficiently charged
to achieve the full battery life.
It may be necessary to charge the battery in
the following cases:▷When the vehicle is frequently used to
drive short distances.▷When the vehicle has not been driven for
more than one month.
Starting aid terminals
Only charge using the starting aid terminals,
refer to page 288, in the engine compartment
while the engine is switched off.
Power failure
After a temporary power loss, some equipment
needs to be reinitialized.
Individual settings need to be reprogrammed:
▷Seat and mirror memory: store the posi‐
tions again, refer to page 50.▷Time: update, refer to page 78.▷Date: update, refer to page 78.▷Radio station: save again, refer to
page 182.▷Navigation system: wait for the navigation
system to be operational.▷Glass sunroof: it may only be possible to
tilt the roof. Have the system initialized by
the service center.▷Digital compass: recalibrate, refer to
page 131.Seite 283Replacing componentsMobility283
Online Edition for Part no. 01 40 2 910 876 - VII/13
Page 288 of 327
▷Active steering: the system automatically
initializes for a short time as you drive. Dur‐
ing this time, the system is deactivated, re‐
fer to page 101.▷xDrive: the system automatically initializes
as you drive. During this time, indicator
lamps light up. If the lamps do not disap‐
pear during the current trip, have the sys‐
tem checked.
Disposing of old batteries
Have old batteries disposed of by your
service center or bring them to a recy‐
cling center.
Maintain the battery in an upright position for
transport and storage. Secure the battery so
that it does not tip over during transport.
Fuses Replacing fuses
Never attempt to repair a blown fuse and
do not replace a defective fuse with a substi‐
tute of another color or amperage rating; this
could lead to a circuit overload, ultimately re‐
sulting in a fire in the vehicle.◀
In interior
The fuses are located in the front passenger
footwell on the underside of the instrument
cluster.1.Unscrew screws, refer to arrows, of foot‐
well trim panel.2.Lay the trim panel in the footwell.3.Release the screw, arrow 1, and fold the
fuse carrier down, arrow 2.4.Replace the fuse concerned.5.Installation is carried out in the reverse or‐
der of removal. Ensure correct and secure
attachment of the footwell trim panel in the
process.Seite 284MobilityReplacing components284
Online Edition for Part no. 01 40 2 910 876 - VII/13