engine BMW X6 2013 E71 Owner's Manual
[x] Cancel search | Manufacturer: BMW, Model Year: 2013, Model line: X6, Model: BMW X6 2013 E71Pages: 327, PDF Size: 7.71 MB
Page 7 of 327
Addendum
term “Recommended” should be
read in its place. In addition, the
text of that section should be
disregarded and the following text
should be read in lieu thereof:
The manufacturer of your vehicle
strongly suggests that you use
wheels and tires that have been
recommended by the vehicle
manufacturer for your vehicle type;
otherwise, for example, despite
having the same official size ratings,
variations can lead to body contact
and with it, the risk of severe
accidents.
The manufacturer of your vehicle
does not evaluate non-
recommended wheels and tires to
determine if they are suitable for
use on your vehicle.
14.At page 269, under the heading:
“Snow Chains,” the text should be
disregarded and the following text
should be read in lieu thereof:
Only certain types of fine-link snow
chains have been tested by the
manufacturer of your vehicle and
are determined by the manufacturer
of your vehicle to be road safe and
are recommended by the
manufacturer of your vehicle.
Information about recommended
snow chains is available from a
service center.
15.At page 270, under the heading
“Hood,” the sentence beginning, “If
you are unfamiliar” should be
disregarded.
16.At page 272, under the heading:
“Approved oil types,” the references
to “Approved” should be read as
“Suitable.” Immediately preceding
the “Gasoline engine” chart, the
following sentence should be
inserted: “Add engine oils that meet
the following oil rating
standards: . . .” The reference to
“BMW High Performance SAE 5W-
30” should be disregarded.
17.At page 273, under the heading:
“Alternative oil types,” the text
preceding the chart should be
disregarded, and in lieu thereof
should be read as follows: “If an
engine oil suitable for continuous
use is not available, up to 1 US
quart/liter of an engine oil with the
following oil rating can be
added: . . .” The reference to
“specification” should be read as
“rating.”
18.At page 273, under the heading:
“Engine oil change,” the text should
be disregarded and in lieu thereof
should be read as follows:
BMW recommends that you have
the oil changed at your BMW
dealer’s service center or at another
service center that has trained
personnel that can perform the work
in accordance with BMW
specifications
19.At page 274 and page 275, under
the heading: “Service and Warranty
Information Booklet for US models
and Warranty and Service Guide
Booklet for Canadian models,” the
second paragraph should be
Page 9 of 327
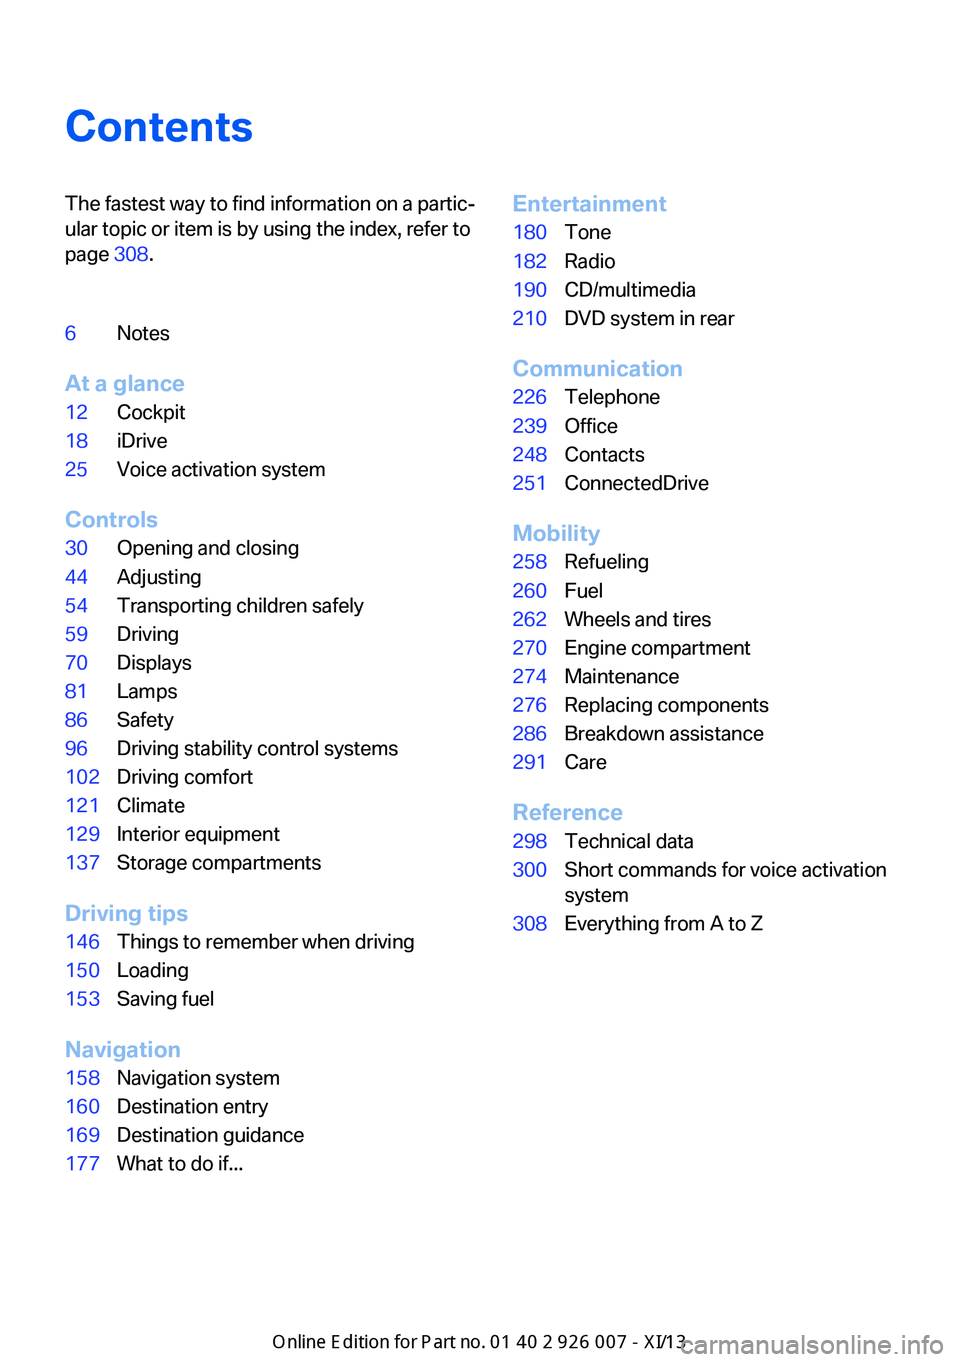
ContentsThe fastest way to find information on a partic‐
ular topic or item is by using the index, refer to
page 308.6Notes
At a glance
12Cockpit18iDrive25Voice activation system
Controls
30Opening and closing44Adjusting54Transporting children safely59Driving70Displays81Lamps86Safety96Driving stability control systems102Driving comfort121Climate129Interior equipment137Storage compartments
Driving tips
146Things to remember when driving150Loading153Saving fuel
Navigation
158Navigation system160Destination entry169Destination guidance177What to do if...Entertainment180Tone182Radio190CD/multimedia210DVD system in rear
Communication
226Telephone239Office248Contacts251ConnectedDrive
Mobility
258Refueling260Fuel262Wheels and tires270Engine compartment274Maintenance276Replacing components286Breakdown assistance291Care
Reference
298Technical data300Short commands for voice activation
system308Everything from A to Z
Online Edition for Part no. 01 40 2 910 876 - VII/13
Page 11 of 327
sary to adapt your vehicle to potentially differ‐
ing operating conditions and permit
requirements. If your vehicle does not comply
with the homologation requirements in a cer‐
tain country you cannot lodge warranty claims
for your vehicle there. Further information can
be obtained from your Service Centre.
Maintenance and repairs
Advanced technology, e.g., the use of modern
materials and high-performance electronics,
requires suitable maintenance and repair
methods.
Therefore, have this work performed only by a
BMW center or a workshop that works accord‐
ing to BMW repair procedures with appropri‐
ately trained personnel.
If this work is not carried out properly, there is
the danger of subsequent damage and related
safety hazards.
Parts and accessories
California Proposition 65 Warning
California laws require us to state the following
warning:
Engine exhaust and a wide variety of automo‐
bile components and parts, including compo‐
nents found in the interior furnishings in a vehi‐
cle, contain or emit chemicals known to the
State of California to cause cancer and birth
defects and reproductive harm. In addition,
certain fluids contained in vehicles and certain
products of component wear contain or emit
chemicals known to the State of California to
cause cancer and birth defects or other repro‐
ductive harm. Battery posts, terminals and re‐
lated accessories contain lead and lead com‐
pounds. Wash your hands after handling. Used
engine oil contains chemicals that have caused
cancer in laboratory animals. Always protect
your skin by washing thoroughly with soap and
water.
Service and warranty
We recommend that you read this publication
thoroughly. Your vehicle is covered by the fol‐
lowing warranties:
▷New Vehicle Limited Warranty▷Rust Perforation Limited Warranty▷Federal Emissions System Defect War‐
ranty
Seite 7Notes7
Online Edition for Part no. 01 40 2 910 876 - VII/13
BMW recommends using parts and
accessories approved by BMW for this
purpose.
Your BMW center is the right contact for
genuine BMW parts and accessories, other
products approved by BMW and related
qualified advice.
BMW has tested these products for safety and
suitability in relation to BMW vehicles.
BMW can assume responsibility for them.
However, we cannot assume any responsibility
whatsoever for parts and accessories that have
not been specifically approved by BMW.
BMW cannot evaluate whether each individual
product from another manufacturer can be
used with BMW vehicles without presenting a
safety hazard. This guarantee is also not
applicable when country-specific government
approval has been granted. Testing of this kind
may fail to embrace the entire range of
potential operating conditions to which
components might be exposed on BMW
vehicles. Such products could conceivably fail
to comply with BMW's own stringent quality
standards.
Page 17 of 327
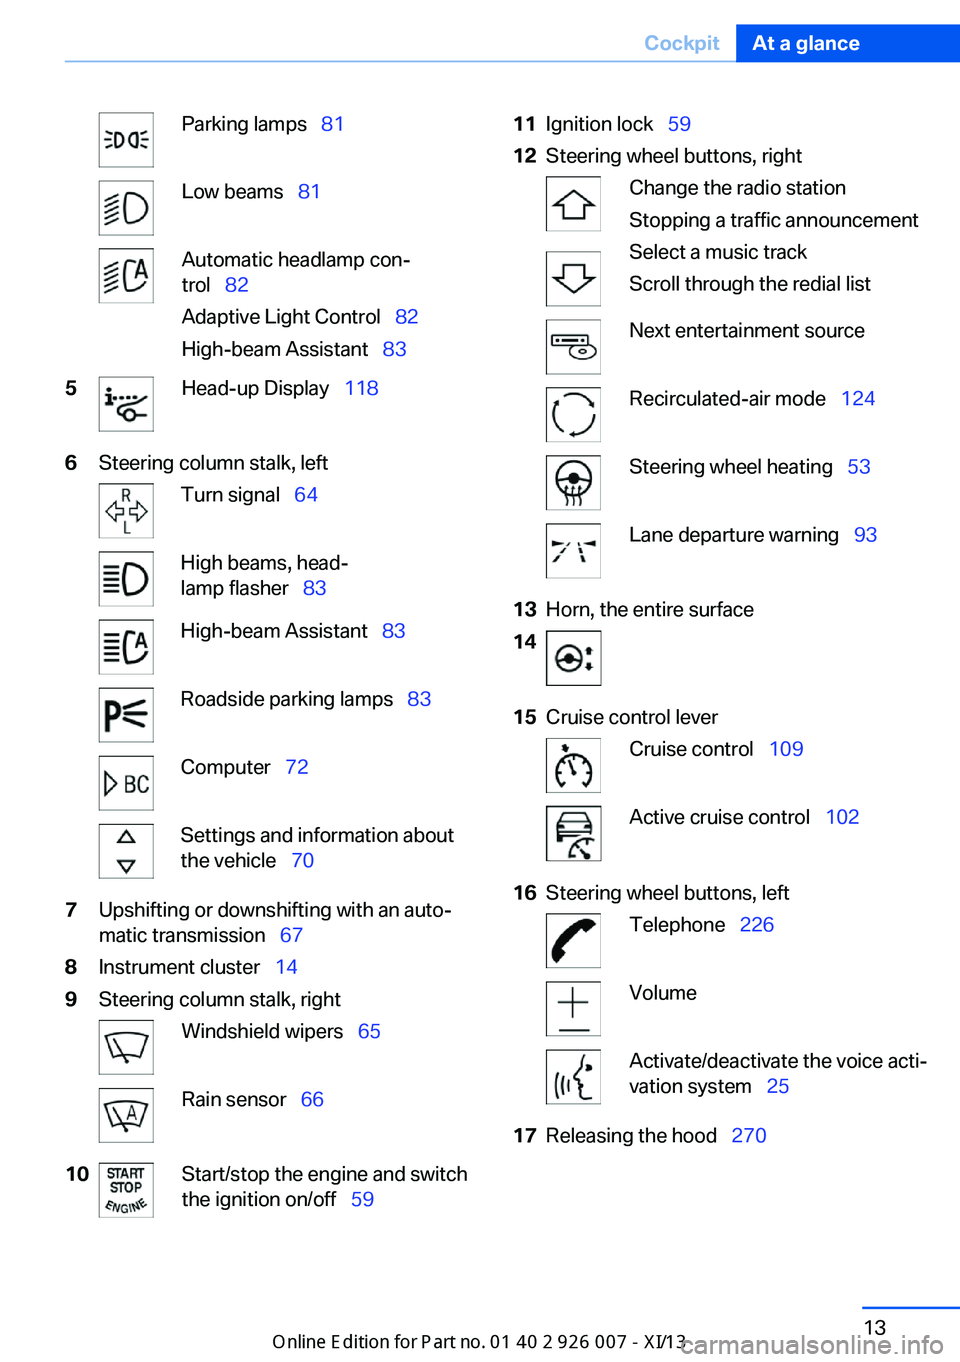
Parking lamps 81Low beams 81Automatic headlamp con‐
trol 82
Adaptive Light Control 82
High-beam Assistant 835Head-up Display 1186Steering column stalk, leftTurn signal 64High beams, head‐
lamp flasher 83High-beam Assistant 83Roadside parking lamps 83Computer 72Settings and information about
the vehicle 707Upshifting or downshifting with an auto‐
matic transmission 678Instrument cluster 149Steering column stalk, rightWindshield wipers 65Rain sensor 6610Start/stop the engine and switch
the ignition on/off 5911Ignition lock 5912Steering wheel buttons, rightChange the radio station
Stopping a traffic announcement
Select a music track
Scroll through the redial listNext entertainment sourceRecirculated-air mode 124Steering wheel heating 53Lane departure warning 9313Horn, the entire surface1415Cruise control leverCruise control 109Active cruise control 10216Steering wheel buttons, leftTelephone 226VolumeActivate/deactivate the voice acti‐
vation system 2517Releasing the hood 270Seite 13CockpitAt a glance13
Online Edition for Part no. 01 40 2 910 876 - VII/13
Page 18 of 327
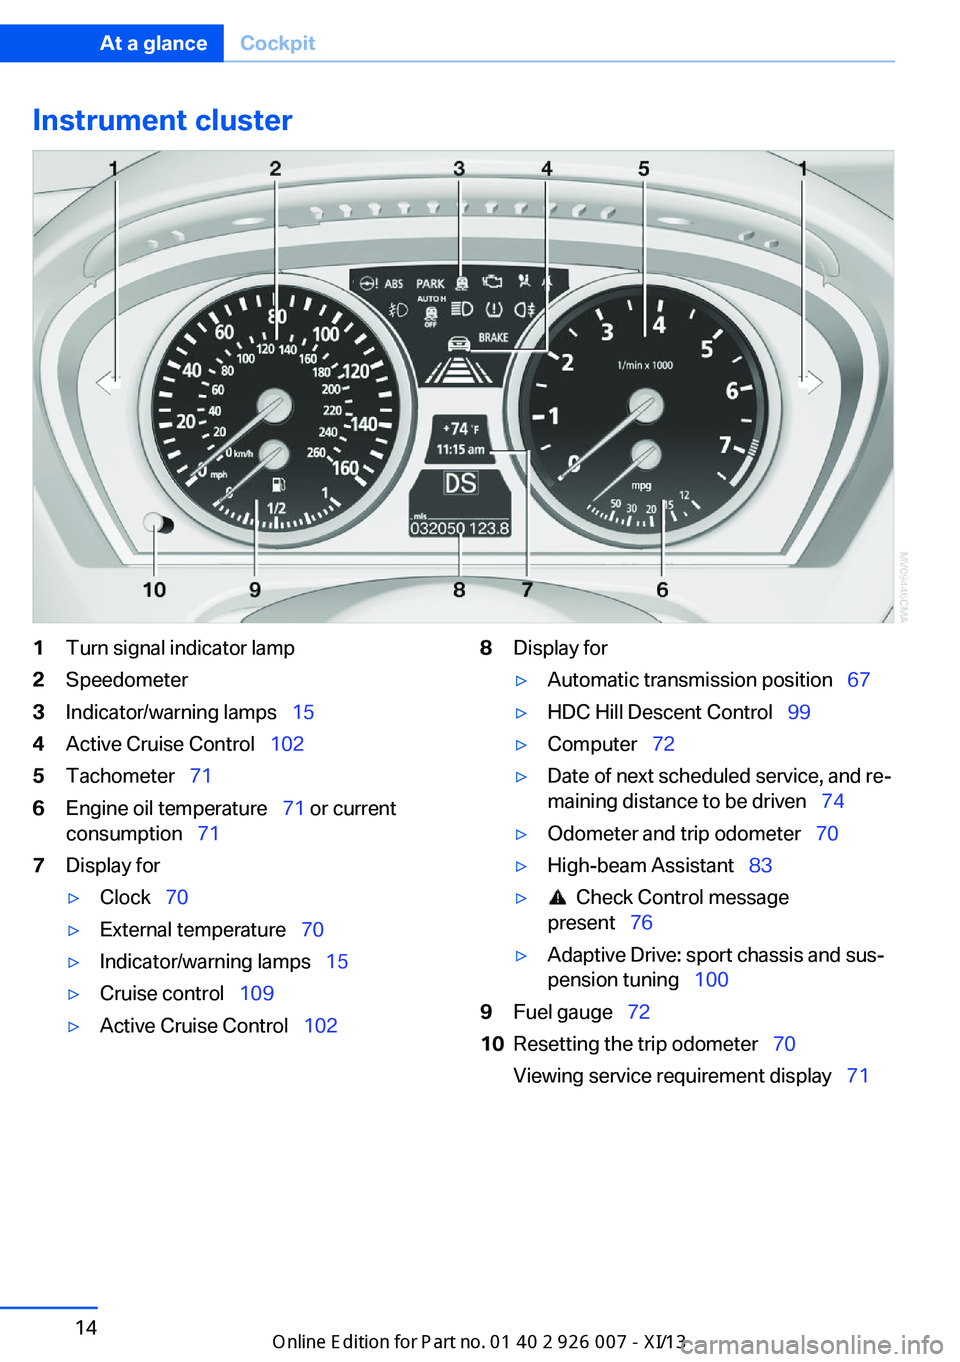
Instrument cluster1Turn signal indicator lamp2Speedometer3Indicator/warning lamps 154Active Cruise Control 1025Tachometer 716Engine oil temperature 71 or current
consumption 717Display for▷Clock 70▷External temperature 70▷Indicator/warning lamps 15▷Cruise control 109▷Active Cruise Control 1028Display for▷Automatic transmission position 67▷HDC Hill Descent Control 99▷Computer 72▷Date of next scheduled service, and re‐
maining distance to be driven 74▷Odometer and trip odometer 70▷High-beam Assistant 83▷ Check Control message
present 76▷Adaptive Drive: sport chassis and sus‐
pension tuning 1009Fuel gauge 7210Resetting the trip odometer 70
Viewing service requirement display 71Seite 14At a glanceCockpit14
Online Edition for Part no. 01 40 2 910 876 - VII/13
Page 19 of 327
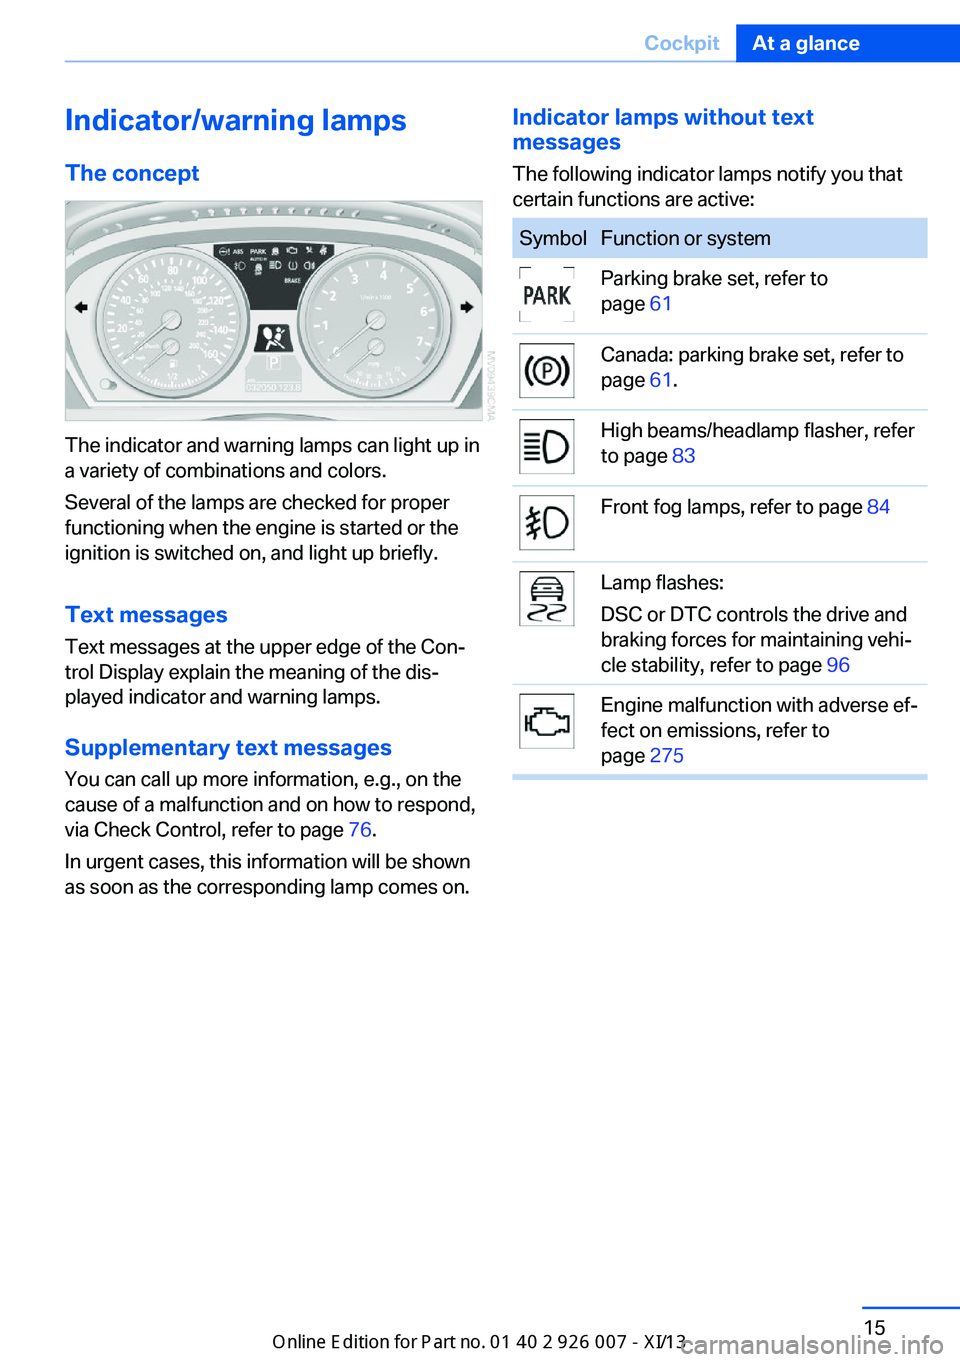
Indicator/warning lampsThe concept
The indicator and warning lamps can light up in
a variety of combinations and colors.
Several of the lamps are checked for proper
functioning when the engine is started or the
ignition is switched on, and light up briefly.
Text messages Text messages at the upper edge of the Con‐
trol Display explain the meaning of the dis‐
played indicator and warning lamps.
Supplementary text messages
You can call up more information, e.g., on the
cause of a malfunction and on how to respond,
via Check Control, refer to page 76.
In urgent cases, this information will be shown
as soon as the corresponding lamp comes on.
Indicator lamps without text
messages
The following indicator lamps notify you that
certain functions are active:SymbolFunction or systemParking brake set, refer to
page 61Canada: parking brake set, refer to
page 61.High beams/headlamp flasher, refer
to page 83Front fog lamps, refer to page 84Lamp flashes:
DSC or DTC controls the drive and
braking forces for maintaining vehi‐
cle stability, refer to page 96Engine malfunction with adverse ef‐
fect on emissions, refer to
page 275Seite 15CockpitAt a glance15
Online Edition for Part no. 01 40 2 910 876 - VII/13
Page 40 of 327
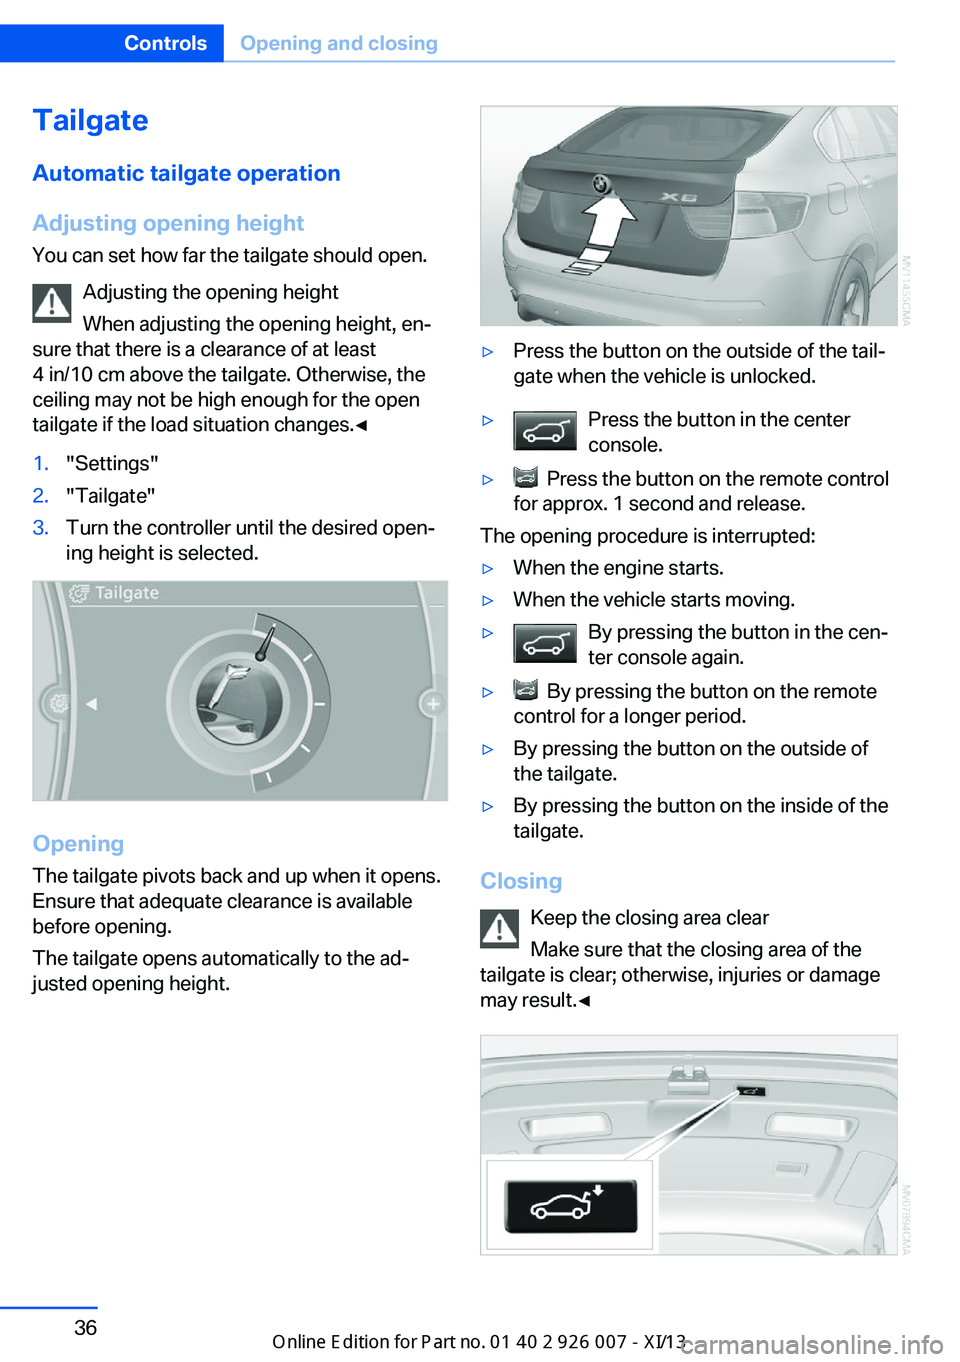
TailgateAutomatic tailgate operation
Adjusting opening height
You can set how far the tailgate should open.
Adjusting the opening height
When adjusting the opening height, en‐
sure that there is a clearance of at least
4 in/10 cm above the tailgate. Otherwise, the
ceiling may not be high enough for the open
tailgate if the load situation changes.◀1."Settings"2."Tailgate"3.Turn the controller until the desired open‐
ing height is selected.
Opening
The tailgate pivots back and up when it opens.
Ensure that adequate clearance is available
before opening.
The tailgate opens automatically to the ad‐
justed opening height.
▷Press the button on the outside of the tail‐
gate when the vehicle is unlocked.▷Press the button in the center
console.▷ Press the button on the remote control
for approx. 1 second and release.
The opening procedure is interrupted:
▷When the engine starts.▷When the vehicle starts moving.▷By pressing the button in the cen‐
ter console again.▷ By pressing the button on the remote
control for a longer period.▷By pressing the button on the outside of
the tailgate.▷By pressing the button on the inside of the
tailgate.
Closing
Keep the closing area clear
Make sure that the closing area of the
tailgate is clear; otherwise, injuries or damage
may result.◀
Seite 36ControlsOpening and closing36
Online Edition for Part no. 01 40 2 910 876 - VII/13
Page 41 of 327
The tailgate closes automatically when the
button on the inside of the tailgate is pressed.
To stop the closing procedure:▷Press the button on the inside of the tail‐
gate.▷Press the button on the exterior of the tail‐
gate.
The closing procedure is also stopped:
▷When the engine starts.▷If the vehicle jerks while driving away.
Closing is not canceled when you put the vehi‐
cle into motion.
Automatic closing
The tailgate closes automatically without
button operation if it is weighed down by an
additional weight of approx. 11 lbs/5 kg, such
as snow or ice.◀
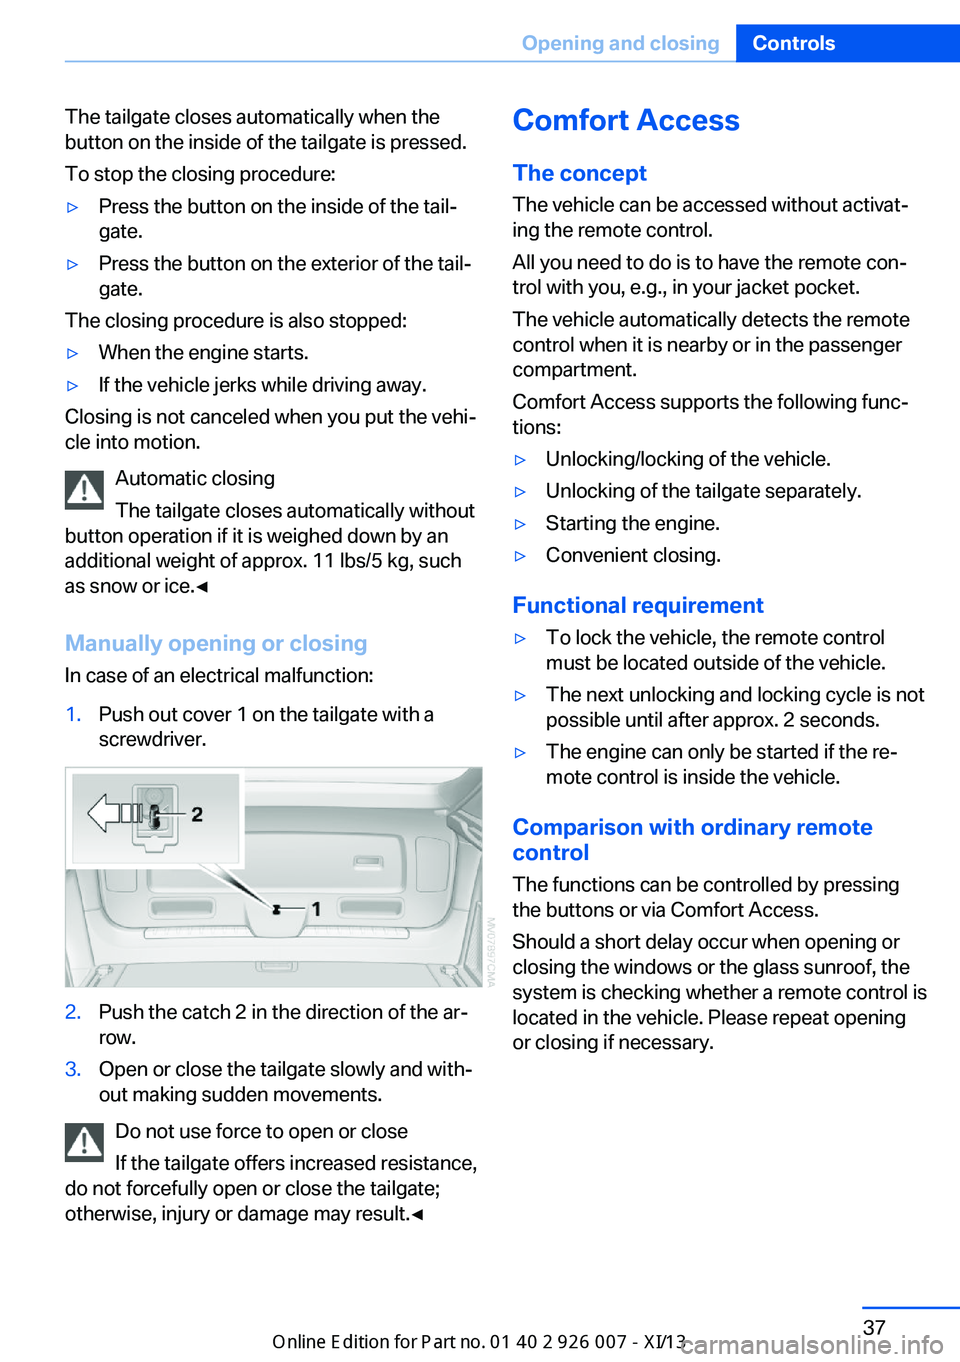
Manually opening or closing
In case of an electrical malfunction:
1.Push out cover 1 on the tailgate with a
screwdriver.2.Push the catch 2 in the direction of the ar‐
row.3.Open or close the tailgate slowly and with‐
out making sudden movements.
Do not use force to open or close
If the tailgate offers increased resistance,
do not forcefully open or close the tailgate;
otherwise, injury or damage may result.◀
Comfort Access
The concept
The vehicle can be accessed without activat‐
ing the remote control.
All you need to do is to have the remote con‐
trol with you, e.g., in your jacket pocket.
The vehicle automatically detects the remote
control when it is nearby or in the passenger
compartment.
Comfort Access supports the following func‐
tions:▷Unlocking/locking of the vehicle.▷Unlocking of the tailgate separately.▷Starting the engine.▷Convenient closing.
Functional requirement
▷To lock the vehicle, the remote control
must be located outside of the vehicle.▷The next unlocking and locking cycle is not
possible until after approx. 2 seconds.▷The engine can only be started if the re‐
mote control is inside the vehicle.
Comparison with ordinary remote
control
The functions can be controlled by pressing the buttons or via Comfort Access.
Should a short delay occur when opening or
closing the windows or the glass sunroof, the
system is checking whether a remote control is
located in the vehicle. Please repeat opening
or closing if necessary.
Seite 37Opening and closingControls37
Online Edition for Part no. 01 40 2 910 876 - VII/13
Page 42 of 327
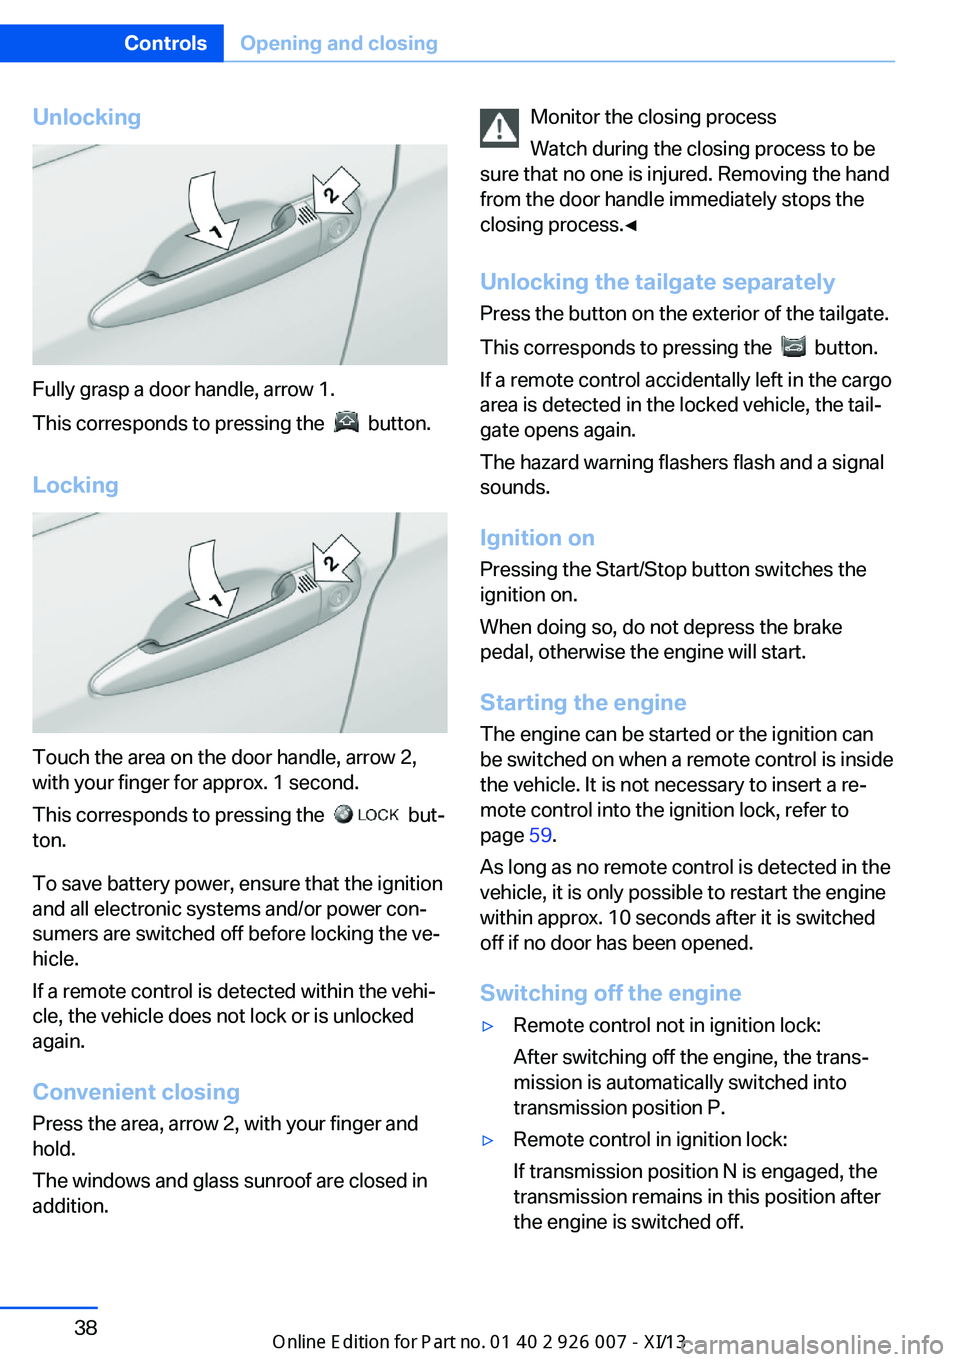
Unlocking
Fully grasp a door handle, arrow 1.
This corresponds to pressing the
button.
Locking
Touch the area on the door handle, arrow 2,
with your finger for approx. 1 second.
This corresponds to pressing the
but‐
ton.
To save battery power, ensure that the ignition
and all electronic systems and/or power con‐
sumers are switched off before locking the ve‐
hicle.
If a remote control is detected within the vehi‐
cle, the vehicle does not lock or is unlocked
again.
Convenient closing Press the area, arrow 2, with your finger and
hold.
The windows and glass sunroof are closed in
addition.
Monitor the closing process
Watch during the closing process to be
sure that no one is injured. Removing the hand
from the door handle immediately stops the closing process.◀
Unlocking the tailgate separately
Press the button on the exterior of the tailgate.
This corresponds to pressing the
button.
If a remote control accidentally left in the cargo
area is detected in the locked vehicle, the tail‐
gate opens again.
The hazard warning flashers flash and a signal
sounds.
Ignition on Pressing the Start/Stop button switches the
ignition on.
When doing so, do not depress the brake
pedal, otherwise the engine will start.
Starting the engine
The engine can be started or the ignition can
be switched on when a remote control is inside
the vehicle. It is not necessary to insert a re‐
mote control into the ignition lock, refer to
page 59.
As long as no remote control is detected in the
vehicle, it is only possible to restart the engine
within approx. 10 seconds after it is switched
off if no door has been opened.
Switching off the engine
▷Remote control not in ignition lock:
After switching off the engine, the trans‐
mission is automatically switched into
transmission position P.▷Remote control in ignition lock:
If transmission position N is engaged, the
transmission remains in this position after
the engine is switched off.Seite 38ControlsOpening and closing38
Online Edition for Part no. 01 40 2 910 876 - VII/13
Page 43 of 327
Malfunction
The Comfort Access functions can be distur‐
bed by local radio waves, such as by a mobile
phone in the immediate vicinity of the remote
control or when a mobile phone is being
charged in the vehicle.
If this occurs, open or close the vehicle using
the buttons on the remote control or use the
integrated key in the door lock.
To start the engine afterward, insert the re‐
mote control into the ignition switch.
Warning lamps The warning lamp in the instrument
cluster lights up when you attempt to
start the engine: the engine cannot
be started.
The remote control is not in the vehicle or has
a malfunction. Take the remote control with
you inside the vehicle or have it checked. If
necessary, insert another remote control into
the ignition switch.
The warning lamp in the instrument
cluster lights up while the engine is
running: the remote control is no lon‐
ger inside the vehicle.
After switching off the engine, the engine can
only be started again within approx. 10 sec‐ onds if no door has been opened.
The indicator lamp in the instrument
cluster comes on and a message ap‐ pears on the Control Display: replace
the remote control battery.Replacing the battery
The remote control for Comfort Access con‐
tains a battery that will need to be replaced
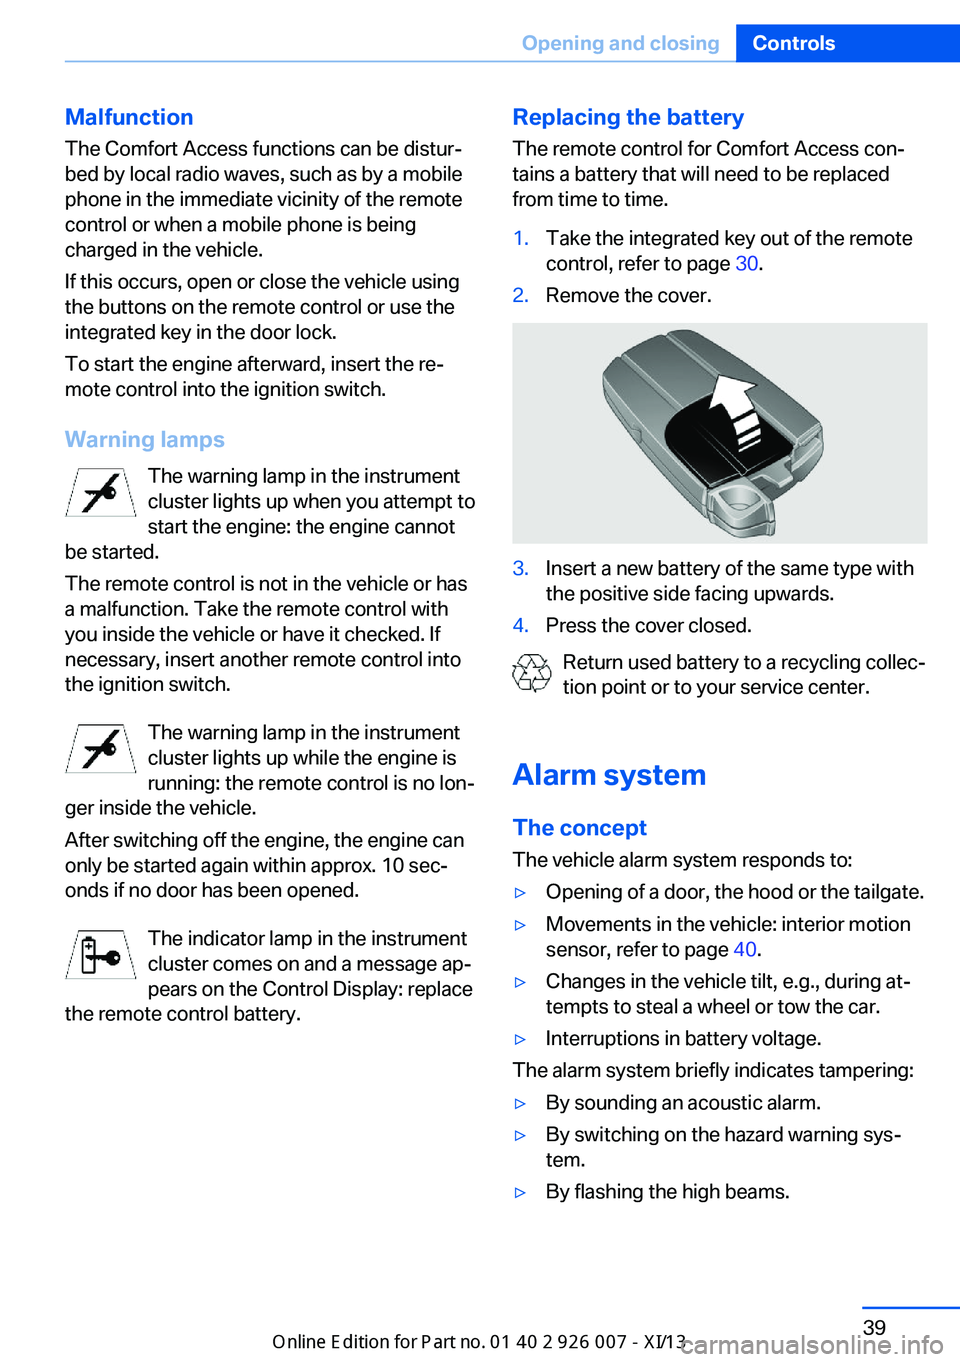
from time to time.1.Take the integrated key out of the remote
control, refer to page 30.2.Remove the cover.3.Insert a new battery of the same type with
the positive side facing upwards.4.Press the cover closed.
Return used battery to a recycling collec‐
tion point or to your service center.
Alarm system The conceptThe vehicle alarm system responds to:
▷Opening of a door, the hood or the tailgate.▷Movements in the vehicle: interior motion
sensor, refer to page 40.▷Changes in the vehicle tilt, e.g., during at‐
tempts to steal a wheel or tow the car.▷Interruptions in battery voltage.
The alarm system briefly indicates tampering:
▷By sounding an acoustic alarm.▷By switching on the hazard warning sys‐
tem.▷By flashing the high beams.Seite 39Opening and closingControls39
Online Edition for Part no. 01 40 2 910 876 - VII/13