temperature BMW X6 2013 E71 User Guide
[x] Cancel search | Manufacturer: BMW, Model Year: 2013, Model line: X6, Model: BMW X6 2013 E71Pages: 345, PDF Size: 9.45 MB
Page 81 of 345
▷Hot engine: the pointer is at the high tem‐
perature end. Switch off the engine imme‐
diately and allow it to cool down.
If the engine oil temperature is too high, a mes‐
sage appears on the Control Display.
Check the oil level, refer to page 290.
Fuel gauge
The vehicle inclination may cause the display
to vary.
Notes on refueling, refer to page 268.
Range
After the reserve range is reached:
▷A message is briefly displayed on the Con‐
trol Display.▷The remaining range is shown on the com‐
puter.▷When a dynamic driving style is used, such
as when corners are taken rapidly, engine
functions are not ensured.
The message appears continuously below a
range of approx. 30 miles/50 km.
Refuel promptly
At the latest, refuel at a range below
30 miles/50 km; otherwise, the engine function
is not ensured and damage may occur.◀
Computer
Displaying information on the
instrument panel
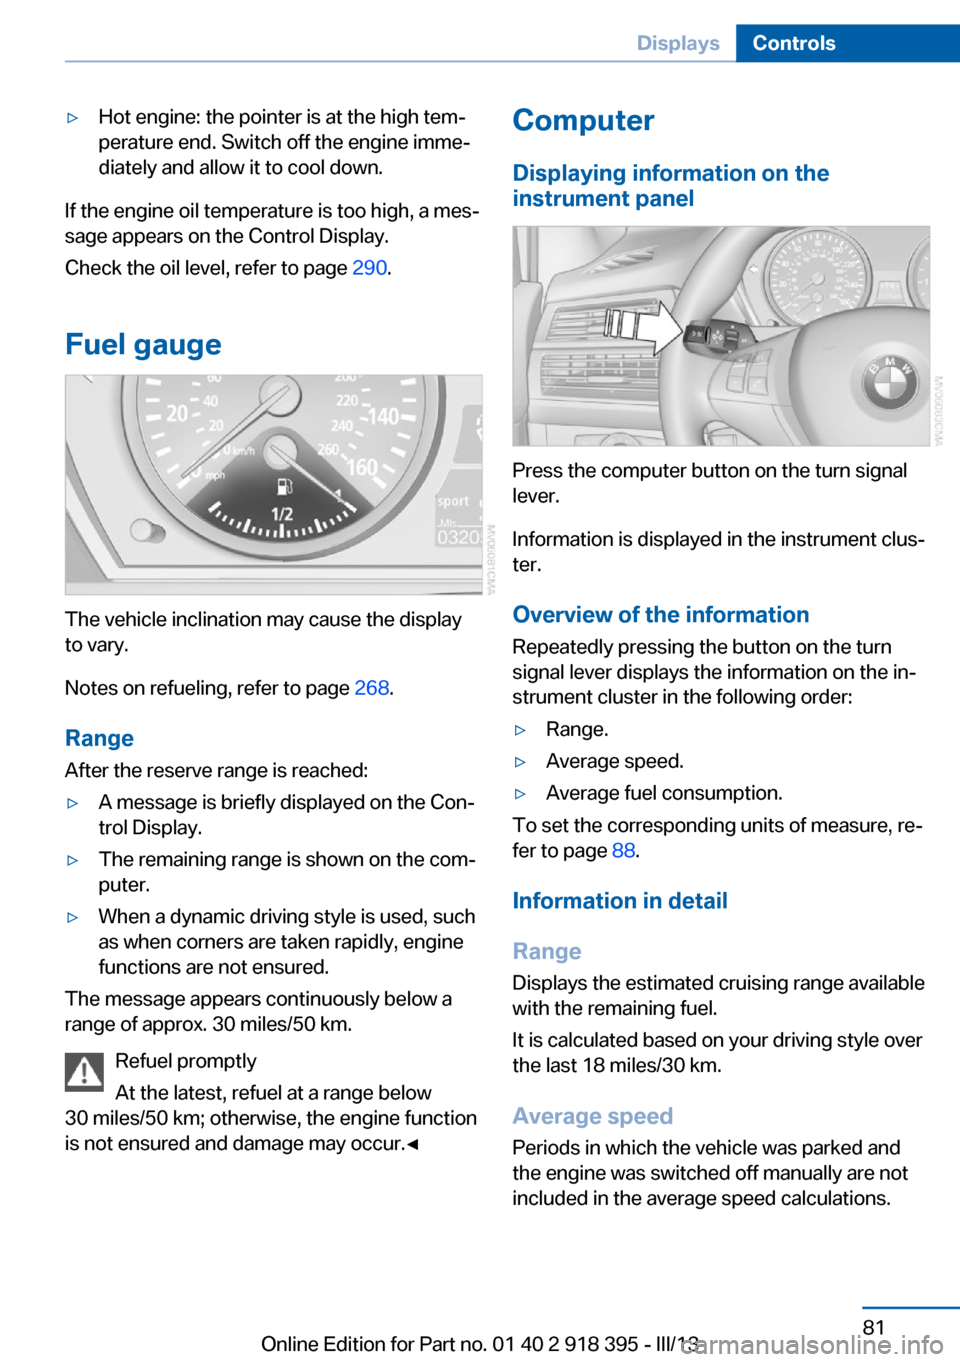
Press the computer button on the turn signal
lever.
Information is displayed in the instrument clus‐
ter.
Overview of the information Repeatedly pressing the button on the turn
signal lever displays the information on the in‐
strument cluster in the following order:
▷Range.▷Average speed.▷Average fuel consumption.
To set the corresponding units of measure, re‐
fer to page 88.
Information in detail
Range
Displays the estimated cruising range available
with the remaining fuel.
It is calculated based on your driving style over
the last 18 miles/30 km.
Average speed
Periods in which the vehicle was parked and
the engine was switched off manually are not
included in the average speed calculations.
Seite 81DisplaysControls81
Online Edition for Part no. 01 40 2 918 395 - III/13
Page 86 of 345
They are stored and can be displayed
again later.
Viewing stored Check Control
messages
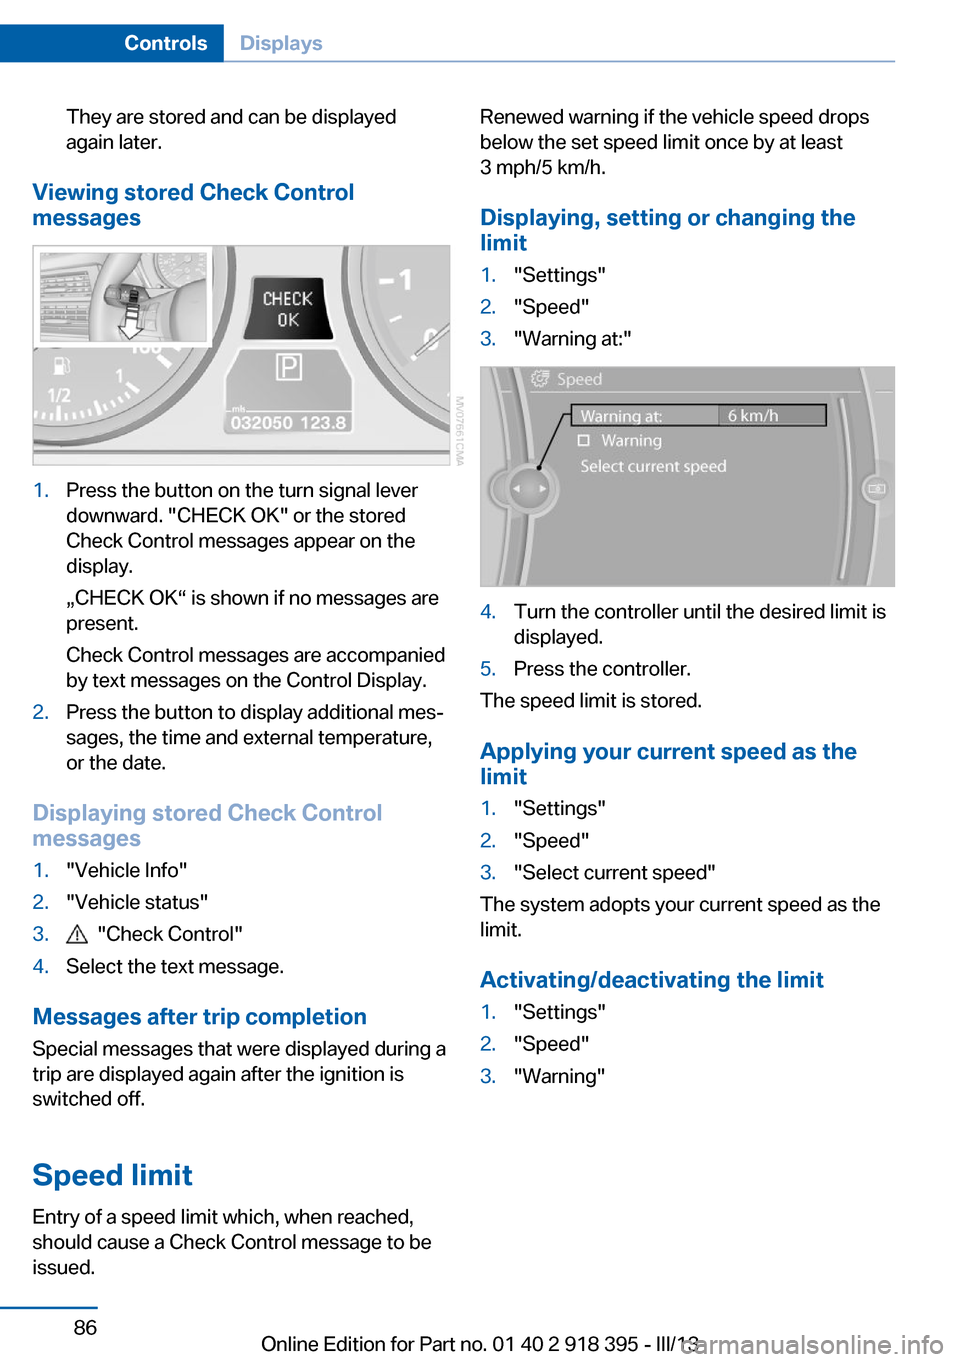
1.Press the button on the turn signal lever
downward. "CHECK OK" or the stored
Check Control messages appear on the
display.
„CHECK OK“ is shown if no messages are
present.
Check Control messages are accompanied
by text messages on the Control Display.2.Press the button to display additional mes‐
sages, the time and external temperature,
or the date.
Displaying stored Check Control
messages
1."Vehicle Info"2."Vehicle status"3. "Check Control"4.Select the text message.
Messages after trip completion
Special messages that were displayed during a
trip are displayed again after the ignition is
switched off.
Speed limit
Entry of a speed limit which, when reached,
should cause a Check Control message to be
issued.
Renewed warning if the vehicle speed drops
below the set speed limit once by at least
3 mph/5 km/h.
Displaying, setting or changing the
limit1."Settings"2."Speed"3."Warning at:"4.Turn the controller until the desired limit is
displayed.5.Press the controller.
The speed limit is stored.
Applying your current speed as the
limit
1."Settings"2."Speed"3."Select current speed"
The system adopts your current speed as the
limit.
Activating/deactivating the limit
1."Settings"2."Speed"3."Warning"Seite 86ControlsDisplays86
Online Edition for Part no. 01 40 2 918 395 - III/13
Page 88 of 345
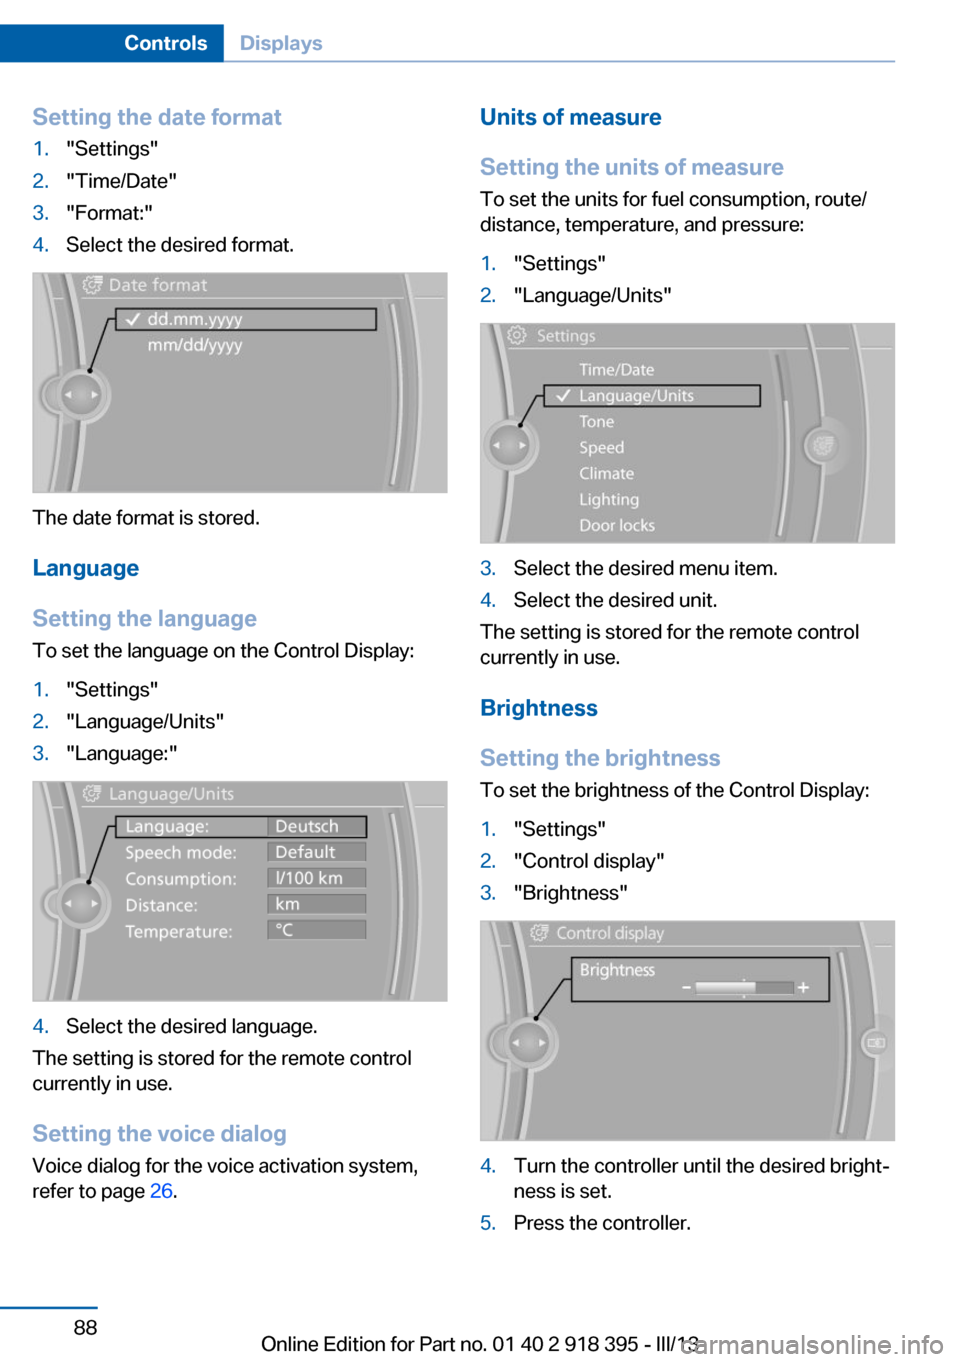
Setting the date format1."Settings"2."Time/Date"3."Format:"4.Select the desired format.
The date format is stored.
Language
Setting the language
To set the language on the Control Display:
1."Settings"2."Language/Units"3."Language:"4.Select the desired language.
The setting is stored for the remote control
currently in use.
Setting the voice dialog
Voice dialog for the voice activation system,
refer to page 26.
Units of measure
Setting the units of measure
To set the units for fuel consumption, route/
distance, temperature, and pressure:1."Settings"2."Language/Units"3.Select the desired menu item.4.Select the desired unit.
The setting is stored for the remote control
currently in use.
Brightness
Setting the brightness
To set the brightness of the Control Display:
1."Settings"2."Control display"3."Brightness"4.Turn the controller until the desired bright‐
ness is set.5.Press the controller.Seite 88ControlsDisplays88
Online Edition for Part no. 01 40 2 918 395 - III/13
Page 99 of 345
Actions in the event of a flat tire
Run-flat tires Maximum speed
You can continue driving with a damaged tire
at speeds up to 50 mph/80 km/h.
Continued driving with a flat tire
If continuing to drive with a damaged tire:1.Avoid sudden braking and steering maneu‐
vers.2.Do not exceed a speed of 50 mph/80 km/h.
If the defective tire continues to lose pres‐
sure, its position will be indicated to you on
the Control Display.3.At the next opportunity, check the inflation
pressure in all four tires.
If the tire inflation pressure in all four tires
is correct, the Flat Tire Monitor may not
have been initialized. In this case, initialize
the system.
Possible driving distance with complete loss of
tire inflation pressure:
The possible driving distance after a loss of tire
inflation pressure depends on the cargo load
and the driving style and conditions.
For a vehicle containing an average load, the
possible driving distance is ap‐
prox. 50 miles/80 km.
When the vehicle is driven with a damaged tire,
its handling characteristics change, e.g., re‐
duced lane stability during braking, a longer
braking distance, and altered self-steering
properties. Adjust your driving style accord‐
ingly. Avoid abrupt steering maneuvers or driv‐
ing over obstacles, e. g., curbs, potholes, etc.
Because the possible driving distance de‐
pends on how the vehicle is used during the
trip, the actual distance may be smaller or
greater depending on the driving speed, road
conditions, external temperature, cargo load,
etc.
Continued driving with a flat tire
Drive moderately and do not exceed a
speed of 50 mph/80 km/h.
A loss of tire inflation pressure results in a
change in the handling characteristics, e.g., re‐
duced lane stability during braking, a longer
braking distance and altered self-steering
properties.◀
Final tire failure
Vibrations or loud noises while driving
can indicate the final failure of the tire. Reduce
speed and stop; otherwise, pieces of the tire
could come loose and cause an accident. Do
not continue driving, and contact your service
center.◀
Tire Pressure Monitor TPMThe concept
The tire inflation pressure is measured in the
four mounted tires. The system notifies you if
there is a significant loss of pressure in one or
more tires.
Functional requirements The system must have been reset while the in‐
flation pressure was correct; otherwise, reliable
signaling of a flat tire is not ensured.
Always use wheels with TPM electronics to
ensure that the system will operate properly.
Reset the system after each correction of the
tire inflation pressure and after every tire or
wheel change.
System limits Sudden tire damage
Sudden serious tire damage caused by
external influences cannot be indicated in ad‐
vance.◀
The system does not operate correctly if it has
not been reset. For example, a flat tire may beSeite 99SafetyControls99
Online Edition for Part no. 01 40 2 918 395 - III/13
Page 101 of 345
▷There is a flat tire or a major loss in tire in‐
flation pressure.▷The system was not reset after a wheel
change and thus issues warnings based on
the inflation pressures initialized last.
Reduce your speed and stop cautiously. Avoid
sudden braking and steering maneuvers.
Do not continue driving without run-flat
tires
If the vehicle is not equipped with run-flat tires
as provided at the factory, do not continue
driving. Continuing to drive could cause severe
accidents.◀
When a low inflation pressure is indicated,
DSC Dynamic Stability Control is switched on
if necessary.
Actions in the event of a flat tire Run-flat tires Maximum speed
You can continue driving with a damaged tire
at speeds up to 50 mph/80 km/h.
Continued driving with a flat tire
If continuing to drive with a damaged tire:
1.Avoid sudden braking and steering maneu‐
vers.2.Do not exceed a speed of 50 mph/80 km/h.3.Check the air pressure in all four tires at
the next opportunity.
If the tire inflation pressure in all four tires
is correct, the Tire Pressure Monitor may
not have been reset. Reset the system.
Possible driving distance with complete loss of
tire inflation pressure:
The possible driving distance after a loss of tire
inflation pressure depends on the cargo load
and the driving style and conditions.
For a vehicle containing an average load, the
possible driving distance is ap‐
prox. 50 miles/80 km.
When the vehicle is driven with a damaged tire,
its handling characteristics change, e.g., re‐
duced lane stability during braking, a longer
braking distance, and altered self-steering
properties. Adjust your driving style accord‐
ingly. Avoid abrupt steering maneuvers or driv‐
ing over obstacles, e. g., curbs, potholes, etc.
Because the possible driving distance de‐
pends on how the vehicle is used during the
trip, the actual distance may be smaller or
greater depending on the driving speed, road
conditions, external temperature, cargo load,
etc.
Continued driving with a flat tire
Drive moderately and do not exceed a
speed of 50 mph/80 km/h.
A loss of tire inflation pressure results in a
change in the handling characteristics, e.g., re‐
duced lane stability during braking, a longer
braking distance and altered self-steering
properties.◀
Final tire failure
Vibrations or loud noises while driving
can indicate the final failure of the tire. Reduce
speed and stop; otherwise, pieces of the tire
could come loose and cause an accident. Do
not continue driving, and contact your service
center.◀
Message when the system was not
reset
The yellow warning lamp lights up. A
message appears on the Control Dis‐
play.
The system detected a wheel change but was
not reset.
Warnings regarding the current tire inflation
pressure are not reliable.Seite 101SafetyControls101
Online Edition for Part no. 01 40 2 918 395 - III/13
Page 109 of 345
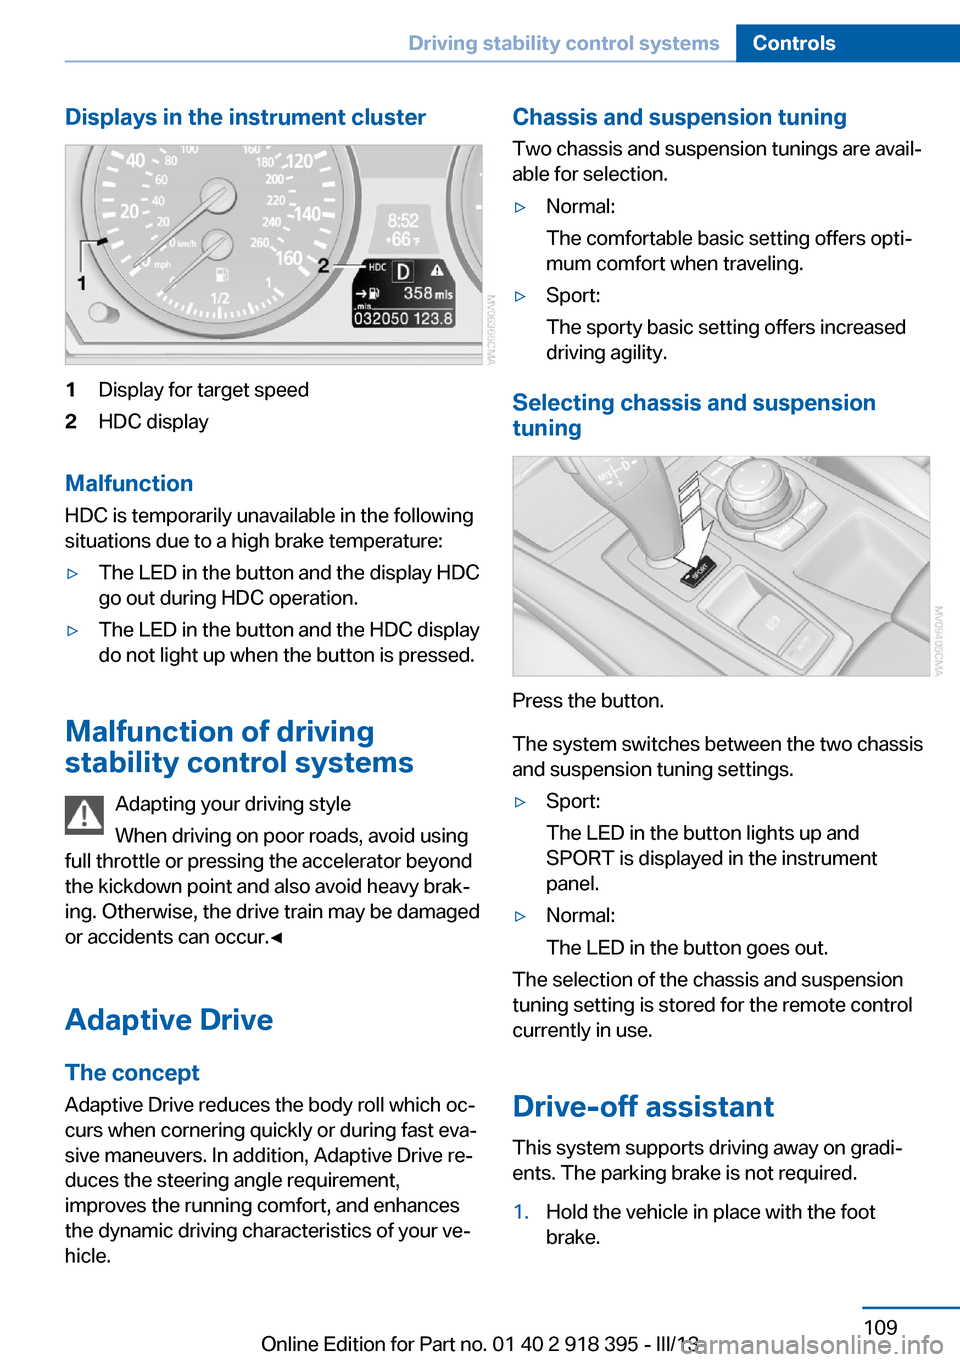
Displays in the instrument cluster1Display for target speed2HDC display
Malfunction
HDC is temporarily unavailable in the following
situations due to a high brake temperature:
▷The LED in the button and the display HDC
go out during HDC operation.▷The LED in the button and the HDC display
do not light up when the button is pressed.
Malfunction of driving
stability control systems
Adapting your driving style
When driving on poor roads, avoid using
full throttle or pressing the accelerator beyond
the kickdown point and also avoid heavy brak‐
ing. Otherwise, the drive train may be damaged
or accidents can occur.◀
Adaptive Drive The concept
Adaptive Drive reduces the body roll which oc‐
curs when cornering quickly or during fast eva‐
sive maneuvers. In addition, Adaptive Drive re‐
duces the steering angle requirement,
improves the running comfort, and enhances
the dynamic driving characteristics of your ve‐
hicle.
Chassis and suspension tuning
Two chassis and suspension tunings are avail‐
able for selection.▷Normal:
The comfortable basic setting offers opti‐
mum comfort when traveling.▷Sport:
The sporty basic setting offers increased
driving agility.
Selecting chassis and suspension
tuning
Press the button.
The system switches between the two chassis
and suspension tuning settings.
▷Sport:
The LED in the button lights up and
SPORT is displayed in the instrument
panel.▷Normal:
The LED in the button goes out.
The selection of the chassis and suspension
tuning setting is stored for the remote control
currently in use.
Drive-off assistant This system supports driving away on gradi‐
ents. The parking brake is not required.
1.Hold the vehicle in place with the foot
brake.Seite 109Driving stability control systemsControls109
Online Edition for Part no. 01 40 2 918 395 - III/13
Page 131 of 345
Automatic climate control with 4-zone con‐
trol 135
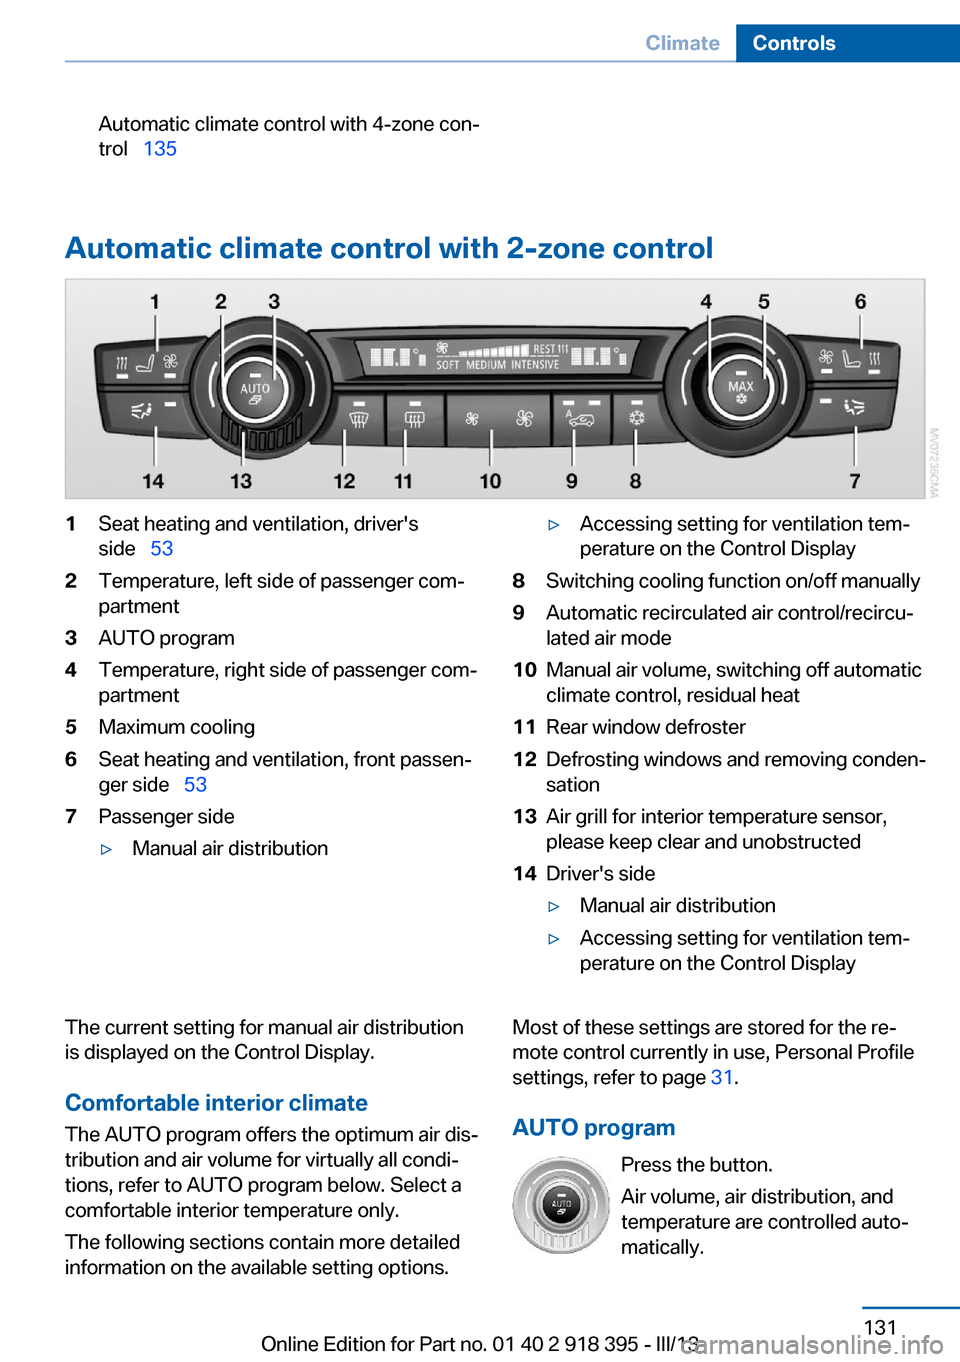
Automatic climate control with 2-zone control
1Seat heating and ventilation, driver's
side 532Temperature, left side of passenger com‐
partment3AUTO program4Temperature, right side of passenger com‐
partment5Maximum cooling6Seat heating and ventilation, front passen‐
ger side 537Passenger side▷Manual air distribution▷Accessing setting for ventilation tem‐
perature on the Control Display8Switching cooling function on/off manually9Automatic recirculated air control/recircu‐
lated air mode10Manual air volume, switching off automatic
climate control, residual heat11Rear window defroster12Defrosting windows and removing conden‐
sation13Air grill for interior temperature sensor,
please keep clear and unobstructed14Driver's side▷Manual air distribution▷Accessing setting for ventilation tem‐
perature on the Control DisplayThe current setting for manual air distribution
is displayed on the Control Display.
Comfortable interior climate The AUTO program offers the optimum air dis‐
tribution and air volume for virtually all condi‐
tions, refer to AUTO program below. Select a
comfortable interior temperature only.
The following sections contain more detailed
information on the available setting options.Most of these settings are stored for the re‐
mote control currently in use, Personal Profile
settings, refer to page 31.
AUTO program Press the button.
Air volume, air distribution, and
temperature are controlled auto‐
matically.Seite 131ClimateControls131
Online Edition for Part no. 01 40 2 918 395 - III/13
Page 132 of 345
Depending on the selected temperature,
AUTO intensity, and outside influences, the air
is directed to the windshield, side windows,
upper body, and into the footwell.
The cooling function is switched on automati‐
cally with the AUTO program.
At the same time, a condensation sensor con‐
trols the program in such a way that window
condensation is prevented as much as possi‐
ble.
To switch off the program: press the button
again or manually adjust the air distribution.
Intensity of the AUTO program
Pressing the AUTO button repeatedly adjusts
the intensity of the AUTO program. The se‐
lected intensity, SOFT, MEDIUM or INTEN‐
SIVE, appears on the display of the automatic
climate control.
Temperature Turn the wheel to set the desired
temperature.
The automatic climate control
achieves this temperature as
quickly as possible, if necessary with the maxi‐
mum cooling or heating capacity, and then
keeps it constant.
Avoid rapidly switching between different tem‐
perature settings. The automatic climate con‐
trol will not have sufficient time to adjust the set temperature.
Maximum heating power can be obtained with
the highest setting, regardless of the external
temperature.
At the lowest setting, cooling is continuous, re‐
gardless of the external temperature.Adjusting the ventilation temperature
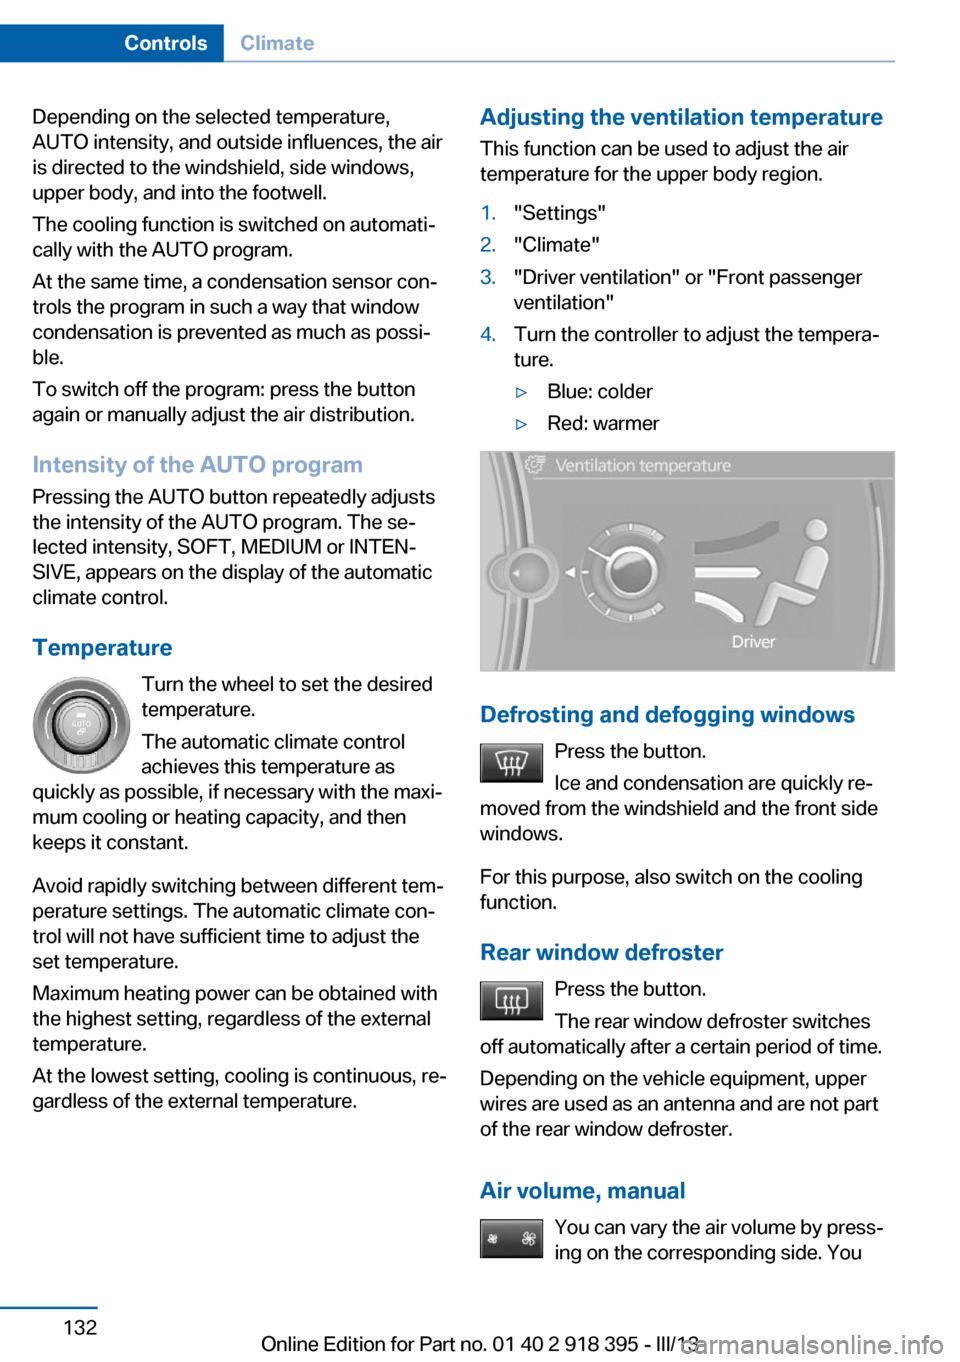
This function can be used to adjust the air
temperature for the upper body region.1."Settings"2."Climate"3."Driver ventilation" or "Front passenger
ventilation"4.Turn the controller to adjust the tempera‐
ture.▷Blue: colder▷Red: warmer
Defrosting and defogging windows
Press the button.
Ice and condensation are quickly re‐
moved from the windshield and the front side
windows.
For this purpose, also switch on the cooling
function.
Rear window defroster Press the button.
The rear window defroster switches
off automatically after a certain period of time.
Depending on the vehicle equipment, upper
wires are used as an antenna and are not part
of the rear window defroster.
Air volume, manual You can vary the air volume by press‐
ing on the corresponding side. You
Seite 132ControlsClimate132
Online Edition for Part no. 01 40 2 918 395 - III/13
Page 133 of 345
can reactivate the automatic mode for the air
volume with the AUTO button.
Manual air distribution
The air flow can be guided into the vehicle in‐
terior, separately for the driver's and front pas‐
senger side, using one of the following pro‐
grams:▷Upper body region.▷Upper body region and footwell.▷Footwell.▷Driver's side: in addition, the windshield,
side windows, and footwell.
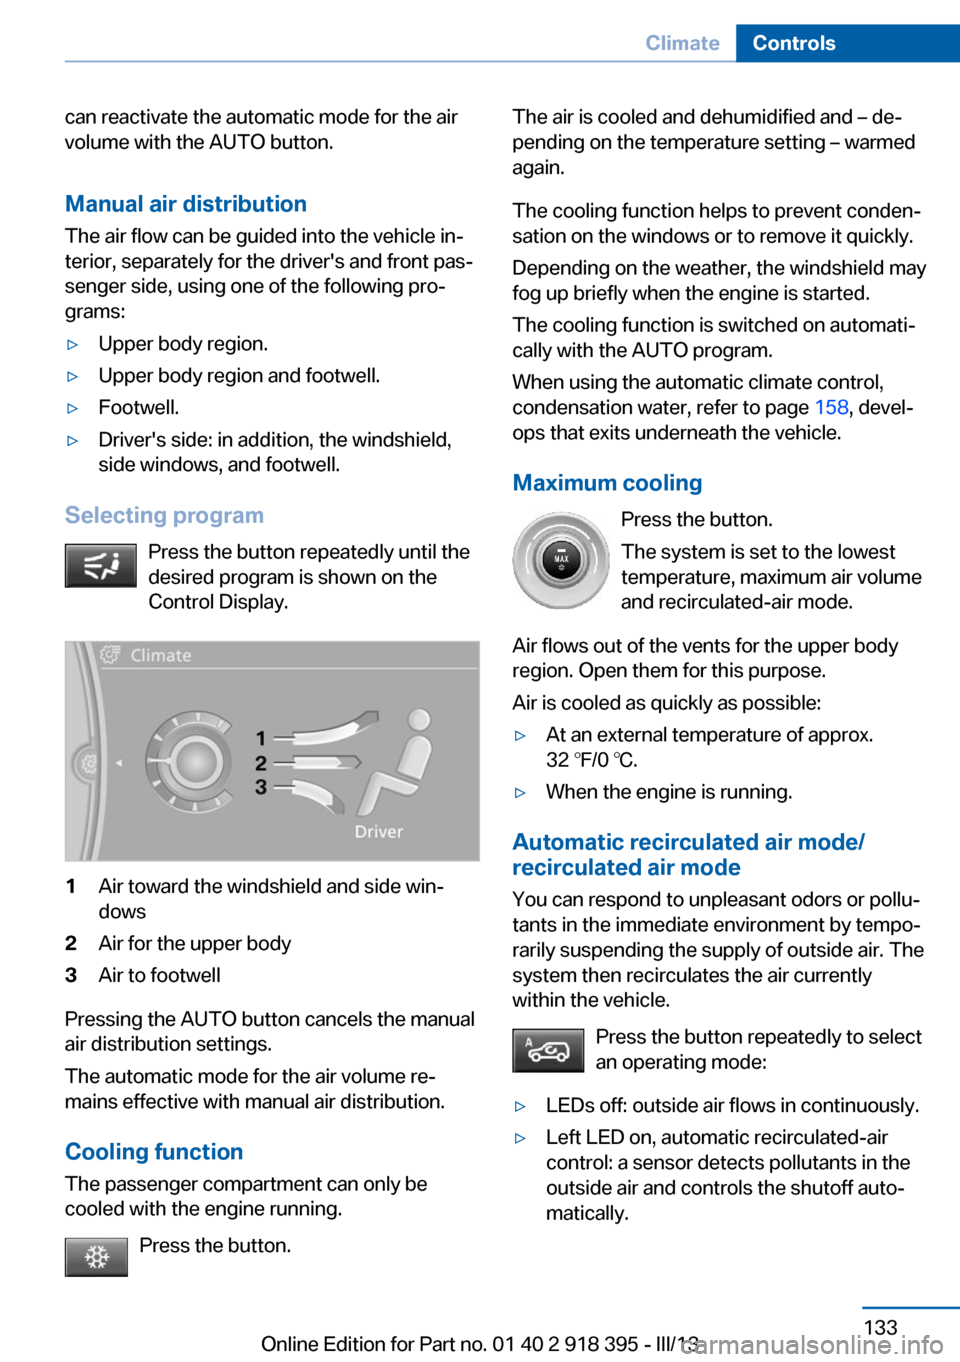
Selecting program
Press the button repeatedly until the
desired program is shown on the
Control Display.
1Air toward the windshield and side win‐
dows2Air for the upper body3Air to footwell
Pressing the AUTO button cancels the manual
air distribution settings.
The automatic mode for the air volume re‐
mains effective with manual air distribution.
Cooling function
The passenger compartment can only be
cooled with the engine running.
Press the button.
The air is cooled and dehumidified and – de‐
pending on the temperature setting – warmed
again.
The cooling function helps to prevent conden‐
sation on the windows or to remove it quickly.
Depending on the weather, the windshield may
fog up briefly when the engine is started.
The cooling function is switched on automati‐
cally with the AUTO program.
When using the automatic climate control,
condensation water, refer to page 158, devel‐
ops that exits underneath the vehicle.
Maximum cooling Press the button.
The system is set to the lowest
temperature, maximum air volume
and recirculated-air mode.
Air flows out of the vents for the upper body
region. Open them for this purpose.
Air is cooled as quickly as possible:▷At an external temperature of approx.
32 ℉/0 ℃.▷When the engine is running.
Automatic recirculated air mode/
recirculated air mode
You can respond to unpleasant odors or pollu‐
tants in the immediate environment by tempo‐
rarily suspending the supply of outside air. The
system then recirculates the air currently
within the vehicle.
Press the button repeatedly to select
an operating mode:
▷LEDs off: outside air flows in continuously.▷Left LED on, automatic recirculated-air
control: a sensor detects pollutants in the
outside air and controls the shutoff auto‐
matically.Seite 133ClimateControls133
Online Edition for Part no. 01 40 2 918 395 - III/13
Page 134 of 345
▷Right LED on, recirculated air mode: the
supply of outside air into the vehicle is per‐
manently blocked.
If the windows are fogged over, switch off the
recirculated-air mode and press the AUTO
button to utilize the condensation sensor.
Make sure that air can flow onto the wind‐
shield.
Continuous recirculated-air mode
The recirculated air mode should not be
used for an extended period of time, as the air
quality inside the vehicle deteriorates stead‐
ily.◀
Residual heat
The heat stored in the engine is used to heat
the interior.
Functional requirement
▷Up to 15 minutes after the engine has been
switched off.▷Warm engine.▷The battery is sufficiently charged.▷External temperature below 77 ℉/25 ℃.
Switching on
1.Switch off the ignition.2.Press the right-hand button.
REST appears on the display of the automatic
climate control when the residual heat utiliza‐
tion is switched on.
From radio readiness the interior temperature,
the air volume and the air distribution can be
set.
Switching off
You can select the lowest blower speed by
pressing and holding the left side. Pressing
again switches off the residual heat utilization.
REST disappears from the display of the auto‐
matic climate control.
Switching on/off the automatic
climate control
Switching off With the blower at its lowest setting,
press the left side of the button to
switch off the automatic climate control.
Switching on Press any button to switch the automatic cli‐mate control back on.
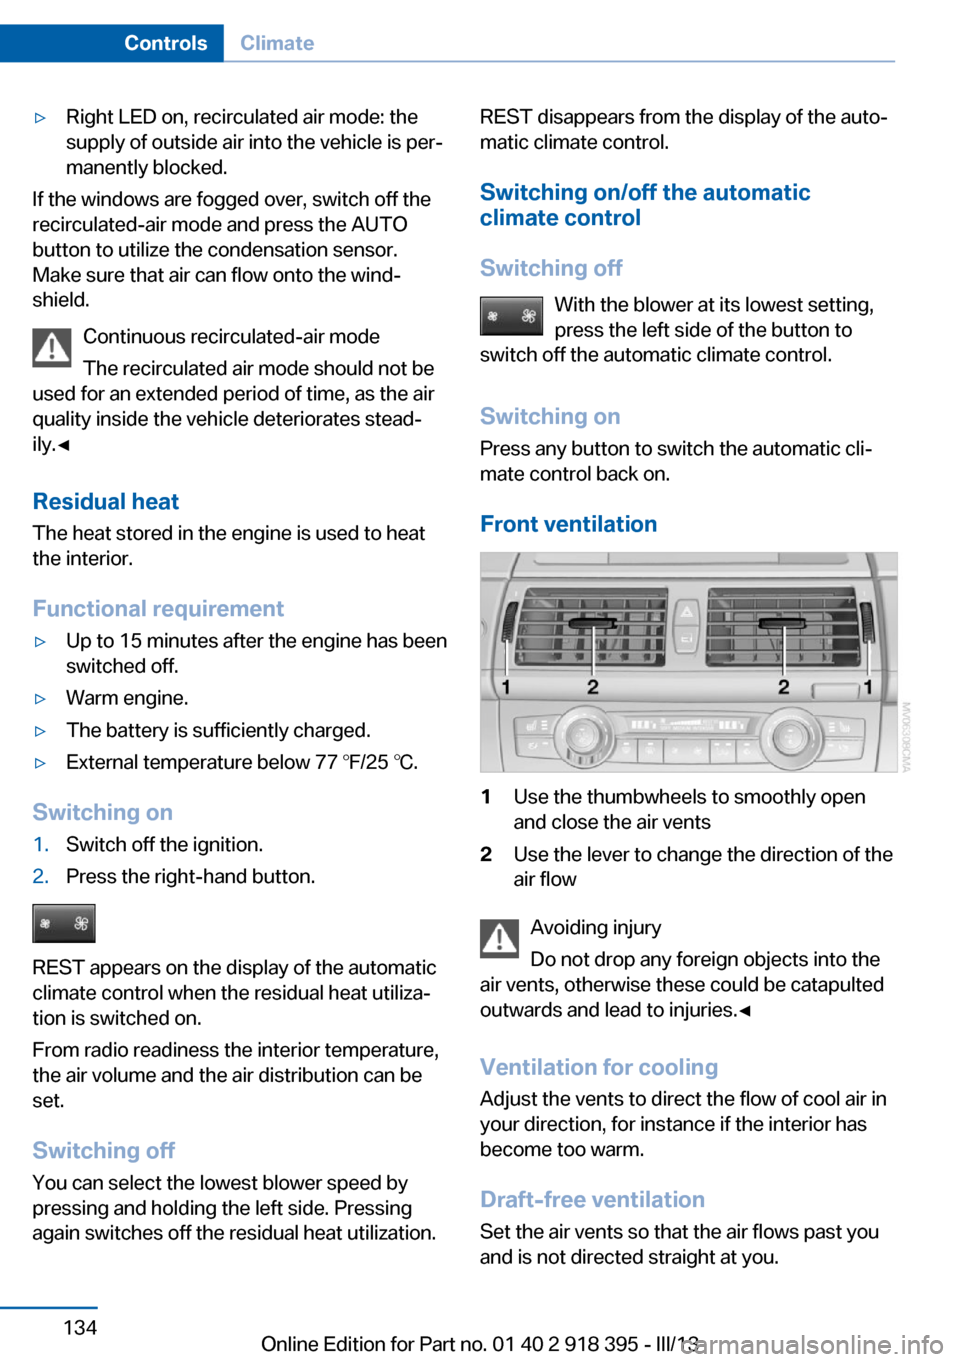
Front ventilation1Use the thumbwheels to smoothly open
and close the air vents2Use the lever to change the direction of the
air flow
Avoiding injury
Do not drop any foreign objects into the
air vents, otherwise these could be catapulted
outwards and lead to injuries.◀
Ventilation for cooling
Adjust the vents to direct the flow of cool air in
your direction, for instance if the interior has
become too warm.
Draft-free ventilation Set the air vents so that the air flows past you
and is not directed straight at you.
Seite 134ControlsClimate134
Online Edition for Part no. 01 40 2 918 395 - III/13