lock BMW X6 2013 E71 Owner's Guide
[x] Cancel search | Manufacturer: BMW, Model Year: 2013, Model line: X6, Model: BMW X6 2013 E71Pages: 345, PDF Size: 9.45 MB
Page 69 of 345
Engine stop
General information Take the remote control with you
Take the remote control with you when
leaving the vehicle so that children, for exam‐
ple, cannot operate the windows and injure
themselves.◀
Set the parking brake and further secure
the vehicle as required
Set the parking brake firmly when parking; oth‐
erwise, the vehicle could roll. On steep upward
and downward inclines, further secure the ve‐
hicle, for example, by turning the steering
wheel in the direction of the curb.◀
Before driving into a car wash
To make it possible for the vehicle to roll in an
automatic car wash, follow the information on
Washing in automatic car washes, refer to
page 312.
Switching off the engine
Procedure1.Engage transmission position P with the
vehicle stopped.2.Press the Start/Stop button.3.Set the parking brake.4.Remove the remote control from the igni‐
tion lock, refer to page 67.
Parking brake
The concept The parking brake is primarily intended to pre‐
vent the vehicle from rolling while parked; it
brakes the rear wheels.
The parking brake can be set manually or auto‐
matically:
▷Manual: by pulling and pushing the switch.▷Automatic: by activating Automatic Hold.
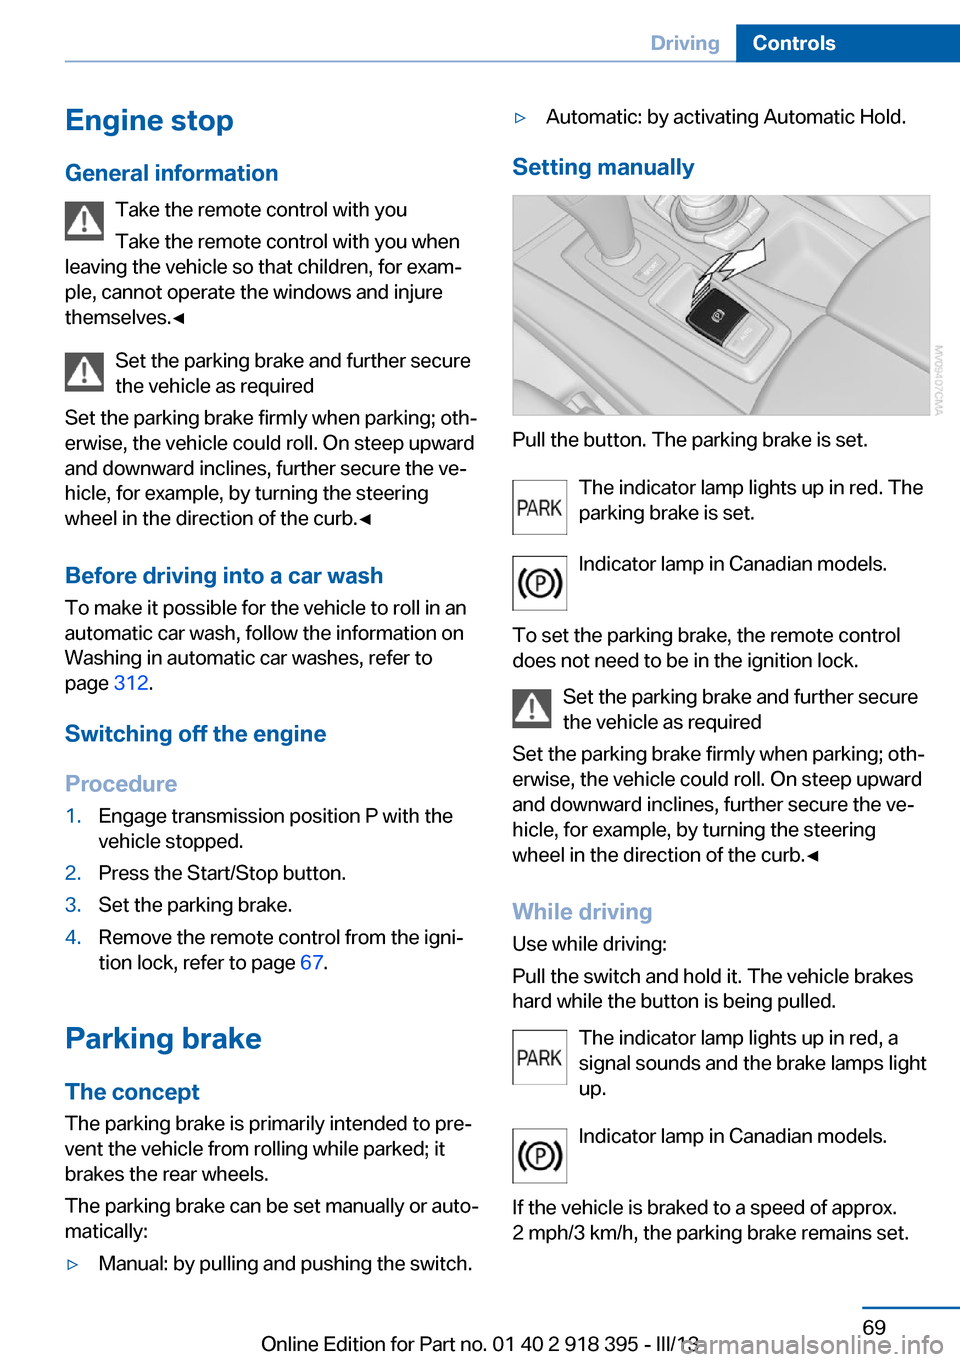
Setting manually
Pull the button. The parking brake is set.
The indicator lamp lights up in red. The
parking brake is set.
Indicator lamp in Canadian models.
To set the parking brake, the remote control
does not need to be in the ignition lock.
Set the parking brake and further secure
the vehicle as required
Set the parking brake firmly when parking; oth‐
erwise, the vehicle could roll. On steep upward
and downward inclines, further secure the ve‐
hicle, for example, by turning the steering
wheel in the direction of the curb.◀
While driving
Use while driving:
Pull the switch and hold it. The vehicle brakes
hard while the button is being pulled.
The indicator lamp lights up in red, a
signal sounds and the brake lamps light
up.
Indicator lamp in Canadian models.
If the vehicle is braked to a speed of approx.
2 mph/3 km/h, the parking brake remains set.
Seite 69DrivingControls69
Online Edition for Part no. 01 40 2 918 395 - III/13
Page 71 of 345
Automatic Hold is deactivated.
If the vehicle is being held by Automatic Hold,
then press on the brake pedal to deactivate it.
When the parking brake is set manually, refer
to page 69, Automatic Hold is deactivated au‐
tomatically.
Driving Automatic Hold is activated: the vehicle is au‐
tomatically secured against rolling when it
stops.
The indicator lamp lights up in green.
Indicator lamp in Canadian models.
Step on the accelerator pedal to drive off.
The brake is released automatically.
The indicator lamp goes out.
Before driving into a car wash
Deactivate Automatic Hold; otherwise,
the parking brake will be set when the vehicle
is stationary and the vehicle will no longer be
able to roll.◀
Parking
The parking brake is automatically set if the
engine is switched off while the vehicle is be‐
ing held by Automatic Hold.
The indicator lamp changes from green
to red.
Indicator lamp in Canadian models.
The parking brake is not set if the engine is
switched off while the vehicle is coasting to a
halt. Automatic Hold is deactivated.Take the remote control with you
Take the remote control with you when
leaving the vehicle so that children, for exam‐
ple, cannot release the parking brake.◀
Malfunction
In the event of a failure or malfunction of the
parking brake, secure the vehicle against roll‐
ing using a wheel chock, for example, when
leaving it.
Releasing the parking brake manually In the event of an electrical power loss or elec‐
trical malfunction, you can release the parking
brake manually.
Secure the vehicle against rolling
Before releasing the parking brake man‐
ually, and whenever you park the vehicle with
the parking brake released, ensure that posi‐
tion P of the automatic transmission is en‐
gaged. Note the display in the instrument clus‐
ter.
In addition, secure the vehicle against rolling,
e.g. with a wheel chock. Otherwise there is a
danger that the vehicle could roll if parked on a
steep slope.◀
Jump-starting and towing, refer to page 309.
Unlocking1.Open the left-hand side panel in the cargo
area.2.Remove the first aid kit and the warning tri‐
angle. Close the bracket of the warning tri‐
angle.3.Insert the screwdriver, which is contained
in the onboard vehicle tool kit under theSeite 71DrivingControls71
Online Edition for Part no. 01 40 2 918 395 - III/13
Page 72 of 345
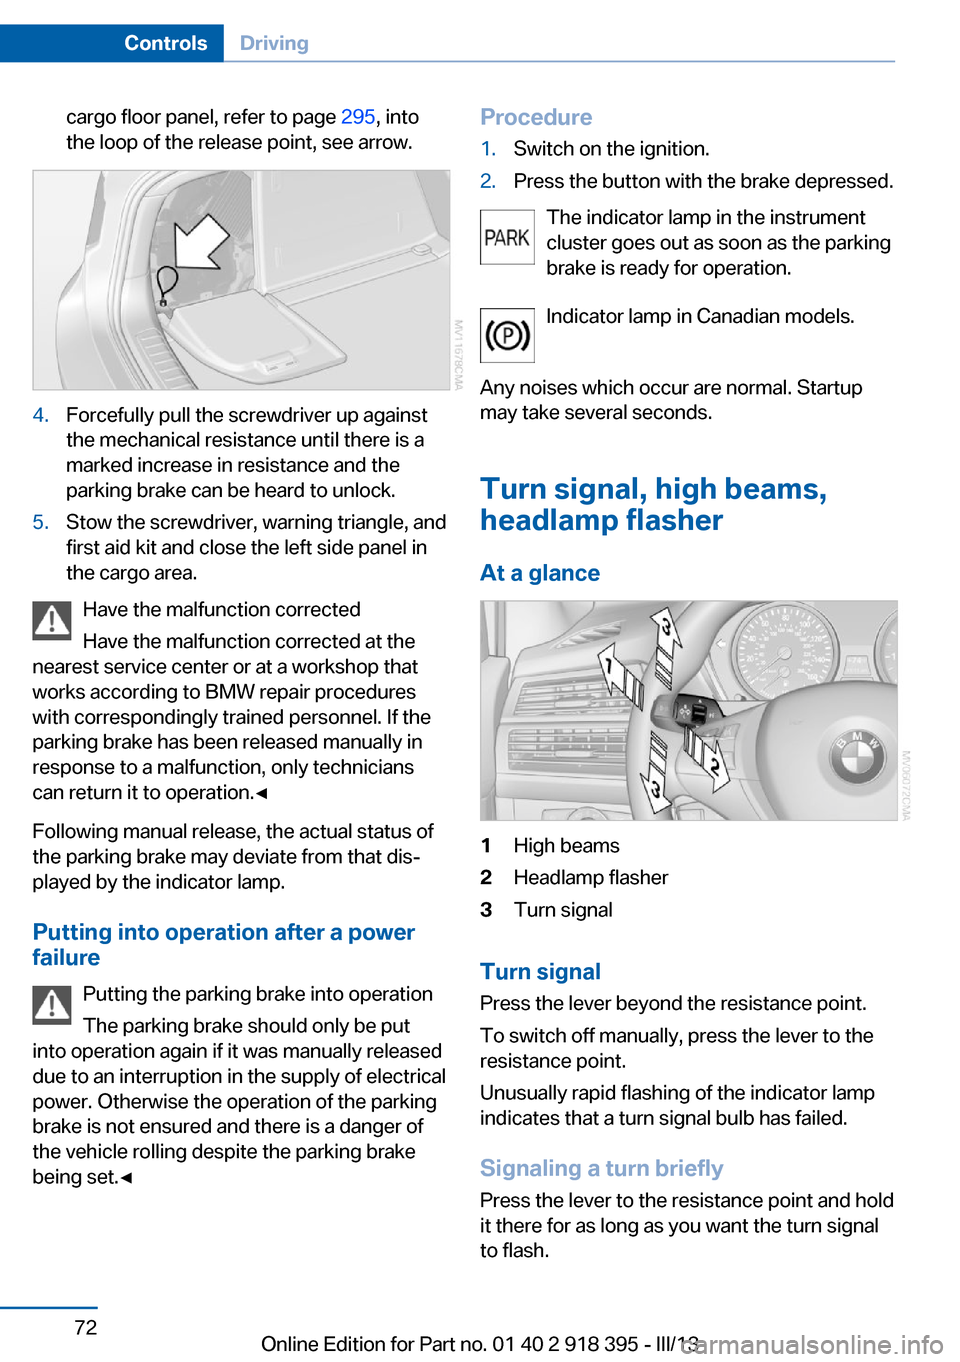
cargo floor panel, refer to page 295, into
the loop of the release point, see arrow.4.Forcefully pull the screwdriver up against
the mechanical resistance until there is a
marked increase in resistance and the
parking brake can be heard to unlock.5.Stow the screwdriver, warning triangle, and
first aid kit and close the left side panel in
the cargo area.
Have the malfunction corrected
Have the malfunction corrected at the
nearest service center or at a workshop that
works according to BMW repair procedures
with correspondingly trained personnel. If the
parking brake has been released manually in
response to a malfunction, only technicians
can return it to operation.◀
Following manual release, the actual status of
the parking brake may deviate from that dis‐
played by the indicator lamp.
Putting into operation after a power failure
Putting the parking brake into operation
The parking brake should only be put
into operation again if it was manually released
due to an interruption in the supply of electrical
power. Otherwise the operation of the parking
brake is not ensured and there is a danger of
the vehicle rolling despite the parking brake
being set.◀
Procedure1.Switch on the ignition.2.Press the button with the brake depressed.
The indicator lamp in the instrument
cluster goes out as soon as the parking
brake is ready for operation.
Indicator lamp in Canadian models.
Any noises which occur are normal. Startup
may take several seconds.
Turn signal, high beams,
headlamp flasher
At a glance
1High beams2Headlamp flasher3Turn signal
Turn signal
Press the lever beyond the resistance point.
To switch off manually, press the lever to the
resistance point.
Unusually rapid flashing of the indicator lamp
indicates that a turn signal bulb has failed.
Signaling a turn briefly
Press the lever to the resistance point and hold
it there for as long as you want the turn signal
to flash.
Seite 72ControlsDriving72
Online Edition for Part no. 01 40 2 918 395 - III/13
Page 75 of 345
Washer fluid
General information Antifreeze for washer fluid
Antifreeze is flammable and can cause
injuries if used improperly.
Therefore, keep it away from sources of igni‐
tion.
Only keep it in the closed original container
and inaccessible to children.
Follow the notes and instructions on the con‐
tainer.
United States: The washer fluid mixture ratio is
regulated by the U.S. EPA and many individual
states; do not exceed the allowable washer
fluid dilution ratios limits that apply. Follow the
usage instructions on the washer fluid con‐
tainer. Use BMW's Windshield Washer Con‐
centrate or the equivalent.◀
Washer fluid reservoir Adding washer fluid
Only add washer fluid when the engine is
cool, and then close the cover completely to
avoid contact between the washer fluid and
hot engine parts.
Otherwise, there is the danger of fire and a risk
to personal safety if the fluid is spilled.◀
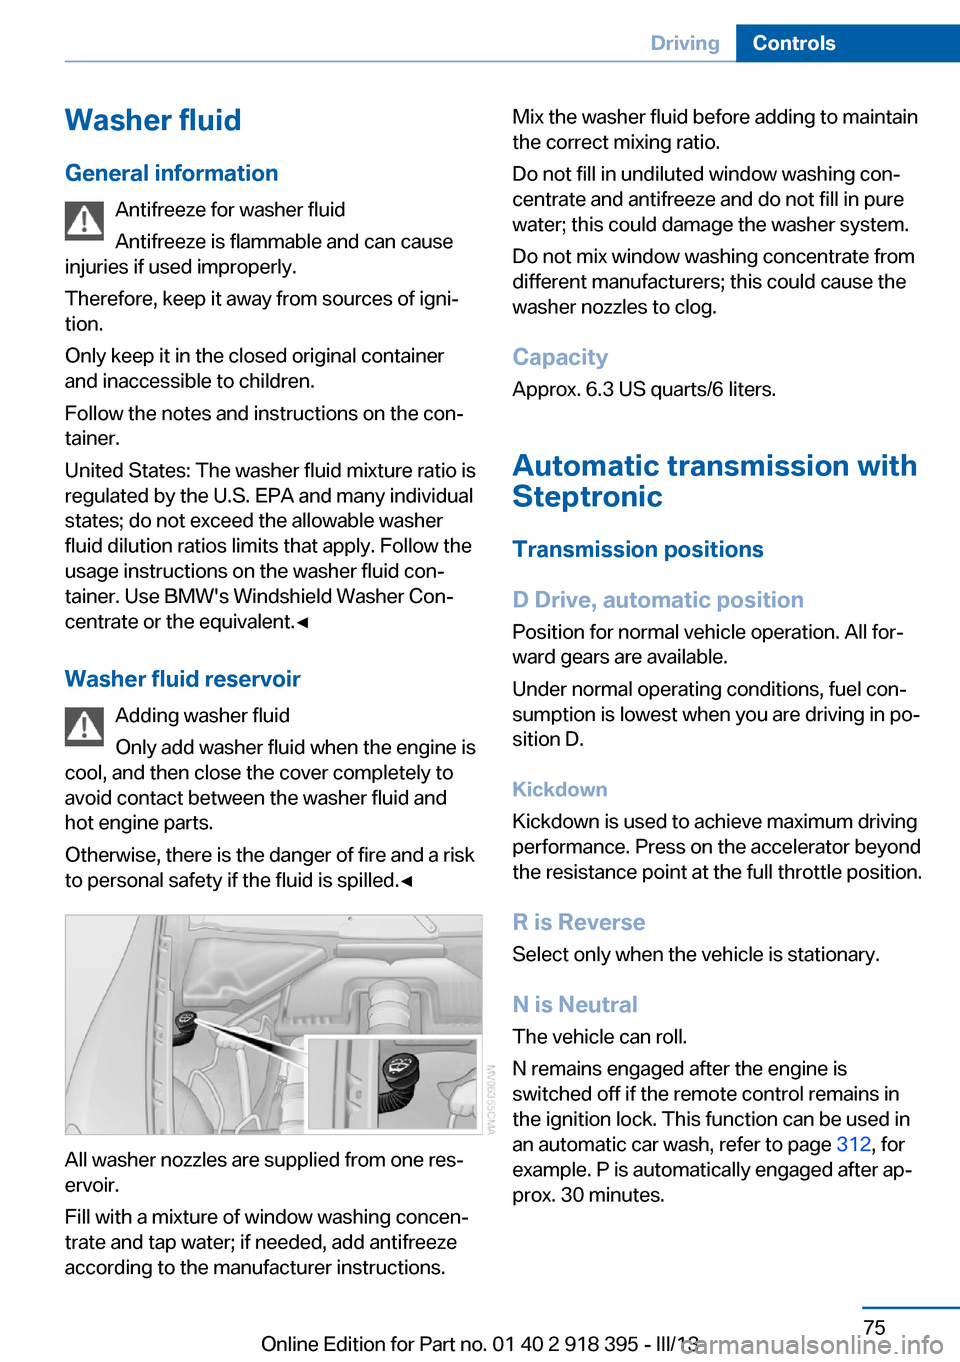
All washer nozzles are supplied from one res‐
ervoir.
Fill with a mixture of window washing concen‐
trate and tap water; if needed, add antifreeze
according to the manufacturer instructions.
Mix the washer fluid before adding to maintain
the correct mixing ratio.
Do not fill in undiluted window washing con‐
centrate and antifreeze and do not fill in pure
water; this could damage the washer system.
Do not mix window washing concentrate from
different manufacturers; this could cause the
washer nozzles to clog.
Capacity Approx. 6.3 US quarts/6 liters.
Automatic transmission with
Steptronic
Transmission positions
D Drive, automatic position Position for normal vehicle operation. All for‐
ward gears are available.
Under normal operating conditions, fuel con‐
sumption is lowest when you are driving in po‐
sition D.
Kickdown
Kickdown is used to achieve maximum driving
performance. Press on the accelerator beyond
the resistance point at the full throttle position.
R is Reverse
Select only when the vehicle is stationary.
N is Neutral The vehicle can roll.
N remains engaged after the engine is
switched off if the remote control remains in
the ignition lock. This function can be used in
an automatic car wash, refer to page 312, for
example. P is automatically engaged after ap‐
prox. 30 minutes.Seite 75DrivingControls75
Online Edition for Part no. 01 40 2 918 395 - III/13
Page 76 of 345
P ParkThe drive wheels are blocked.
P is engaged automatically when the following
conditions are met:▷The driver's door is opened while the en‐
gine is running, the safety belt is not fas‐
tened and neither the brake pedal nor the
accelerator is activated.▷The engine is switched off unless N is en‐
gaged and the remote control is in the igni‐
tion lock.▷The remote control is removed from the ig‐
nition lock.
Before leaving the vehicle, ensure that the
transmission position P is engaged; otherwise,
the vehicle may begin to roll.
Engaging transmission position
▷Transmission position P can only be disen‐
gaged if the engine is running and the
brake pedal is pressed.▷With the vehicle stationary, press on the
brake pedal before shifting out of P or N;
otherwise, the shift command will not be
executed: shift lock.
Press on the brake pedal until you start
driving
To prevent the vehicle from creeping after you
select a driving position, maintain pressure on
the brake pedal until you are ready to start.◀
Engaging transmission positions D, R,
N
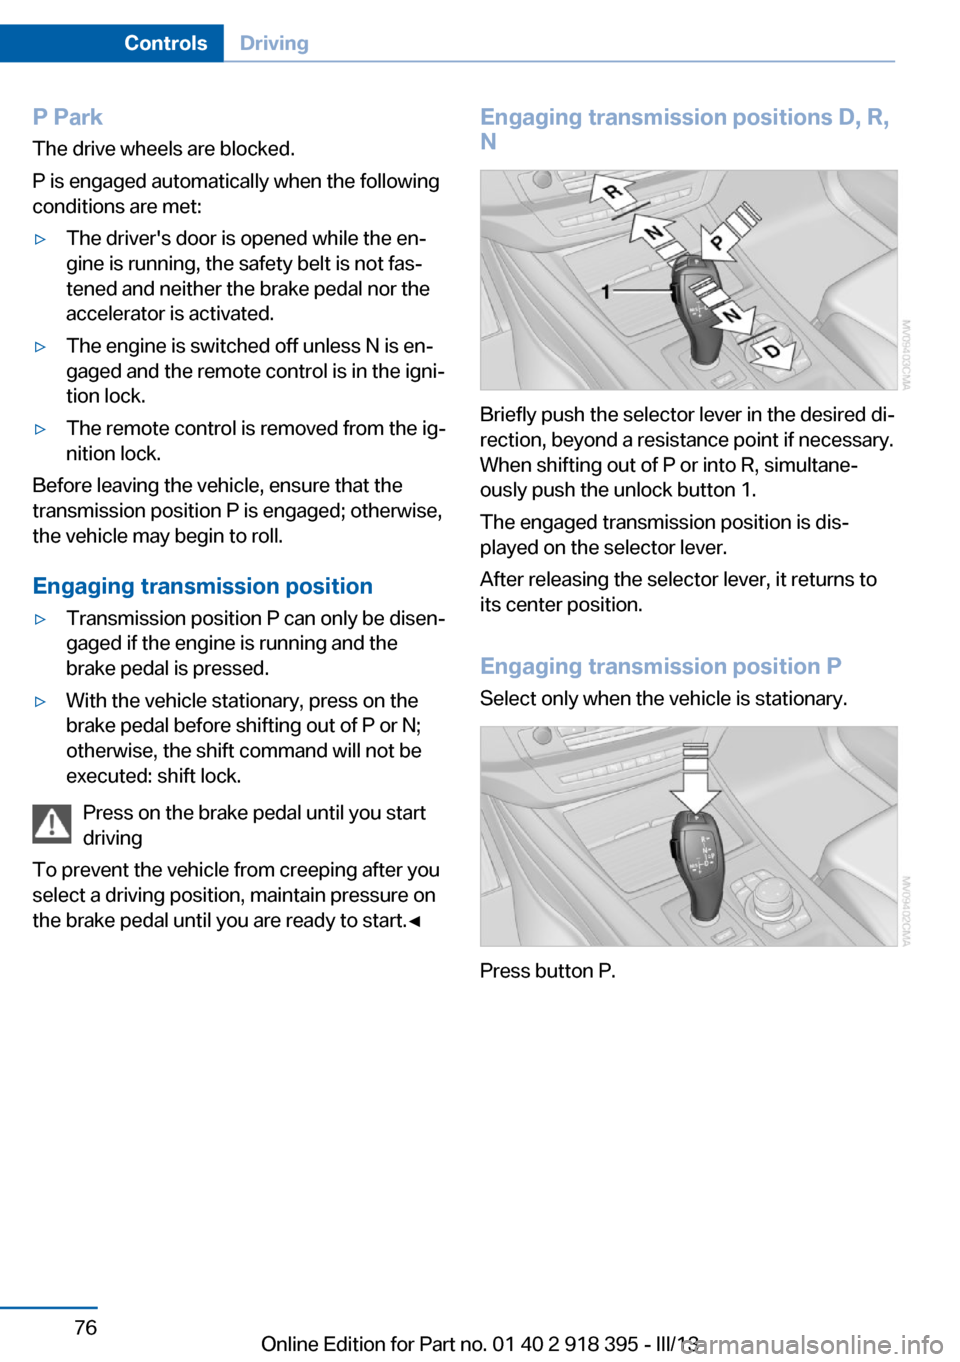
Briefly push the selector lever in the desired di‐
rection, beyond a resistance point if necessary.
When shifting out of P or into R, simultane‐
ously push the unlock button 1.
The engaged transmission position is dis‐
played on the selector lever.
After releasing the selector lever, it returns to
its center position.
Engaging transmission position P Select only when the vehicle is stationary.
Press button P.
Seite 76ControlsDriving76
Online Edition for Part no. 01 40 2 918 395 - III/13
Page 79 of 345
DisplaysVehicle equipmentThis chapter describes all series equipment as
well as country-specific and special equipment
offered for this model series.Therefore, it also
describes equipment that may not be found in
your vehicle, for instance due to the selected
special equipment or the country version. This
also applies to safety-related functions and
systems.
Odometer, external
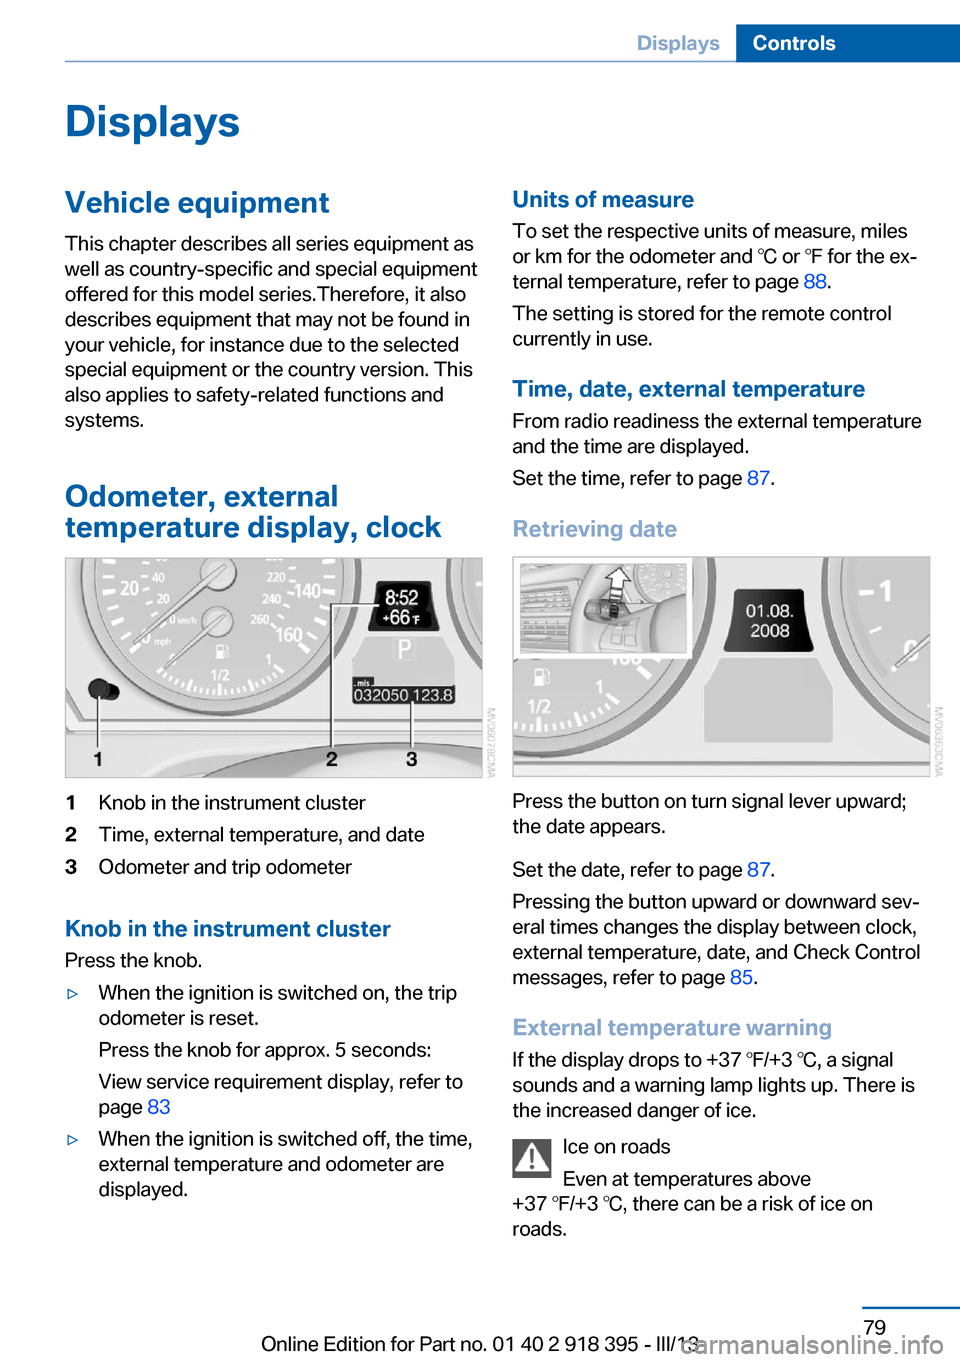
temperature display, clock1Knob in the instrument cluster2Time, external temperature, and date3Odometer and trip odometer
Knob in the instrument cluster
Press the knob.
▷When the ignition is switched on, the trip
odometer is reset.
Press the knob for approx. 5 seconds:
View service requirement display, refer to
page 83▷When the ignition is switched off, the time,
external temperature and odometer are
displayed.Units of measure
To set the respective units of measure, miles
or km for the odometer and ℃ or ℉ for the ex‐
ternal temperature, refer to page 88.
The setting is stored for the remote control
currently in use.
Time, date, external temperature From radio readiness the external temperature
and the time are displayed.
Set the time, refer to page 87.
Retrieving date
Press the button on turn signal lever upward;
the date appears.
Set the date, refer to page 87.
Pressing the button upward or downward sev‐
eral times changes the display between clock,
external temperature, date, and Check Control
messages, refer to page 85.
External temperature warning If the display drops to +37 ℉/+3 ℃, a signal
sounds and a warning lamp lights up. There is
the increased danger of ice.
Ice on roads
Even at temperatures above
+37 ℉/+3 ℃, there can be a risk of ice on
roads.
Seite 79DisplaysControls79
Online Edition for Part no. 01 40 2 918 395 - III/13
Page 80 of 345
Therefore, drive carefully on bridges and shady
roads, for example, to avoid the increased dan‐
ger of an accident.◀
Odometer and trip odometer
Resetting trip odometer:
With the ignition switched on, press button 1 in
the instrument cluster.
When the vehicle is parked If you still want to view the time, external tem‐
perature and odometer reading briefly after the
remote control has been taken out of the igni‐
tion lock:
Press button 1 in the instrument cluster.
Tachometer
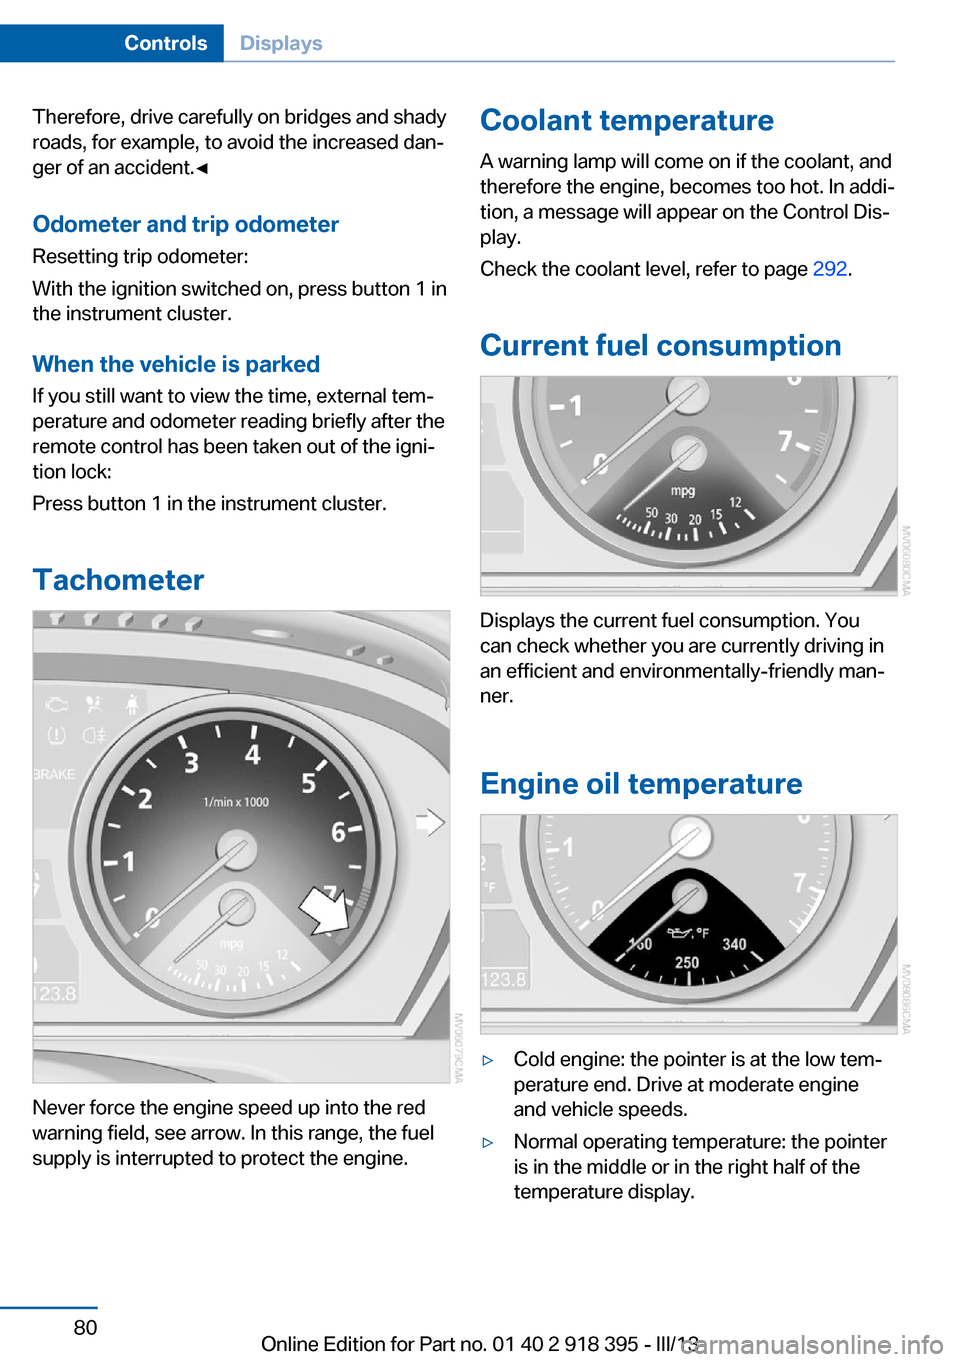
Never force the engine speed up into the red
warning field, see arrow. In this range, the fuel
supply is interrupted to protect the engine.
Coolant temperature
A warning lamp will come on if the coolant, and
therefore the engine, becomes too hot. In addi‐
tion, a message will appear on the Control Dis‐
play.
Check the coolant level, refer to page 292.
Current fuel consumption
Displays the current fuel consumption. You
can check whether you are currently driving in
an efficient and environmentally-friendly man‐
ner.
Engine oil temperature
▷Cold engine: the pointer is at the low tem‐
perature end. Drive at moderate engine
and vehicle speeds.▷Normal operating temperature: the pointer
is in the middle or in the right half of the
temperature display.Seite 80ControlsDisplays80
Online Edition for Part no. 01 40 2 918 395 - III/13
Page 90 of 345
LampsVehicle equipment
This chapter describes all series equipment as
well as country-specific and special equipment
offered for this model series.Therefore, it also
describes equipment that may not be found in
your vehicle, for instance due to the selected
special equipment or the country version. This
also applies to safety-related functions and
systems.
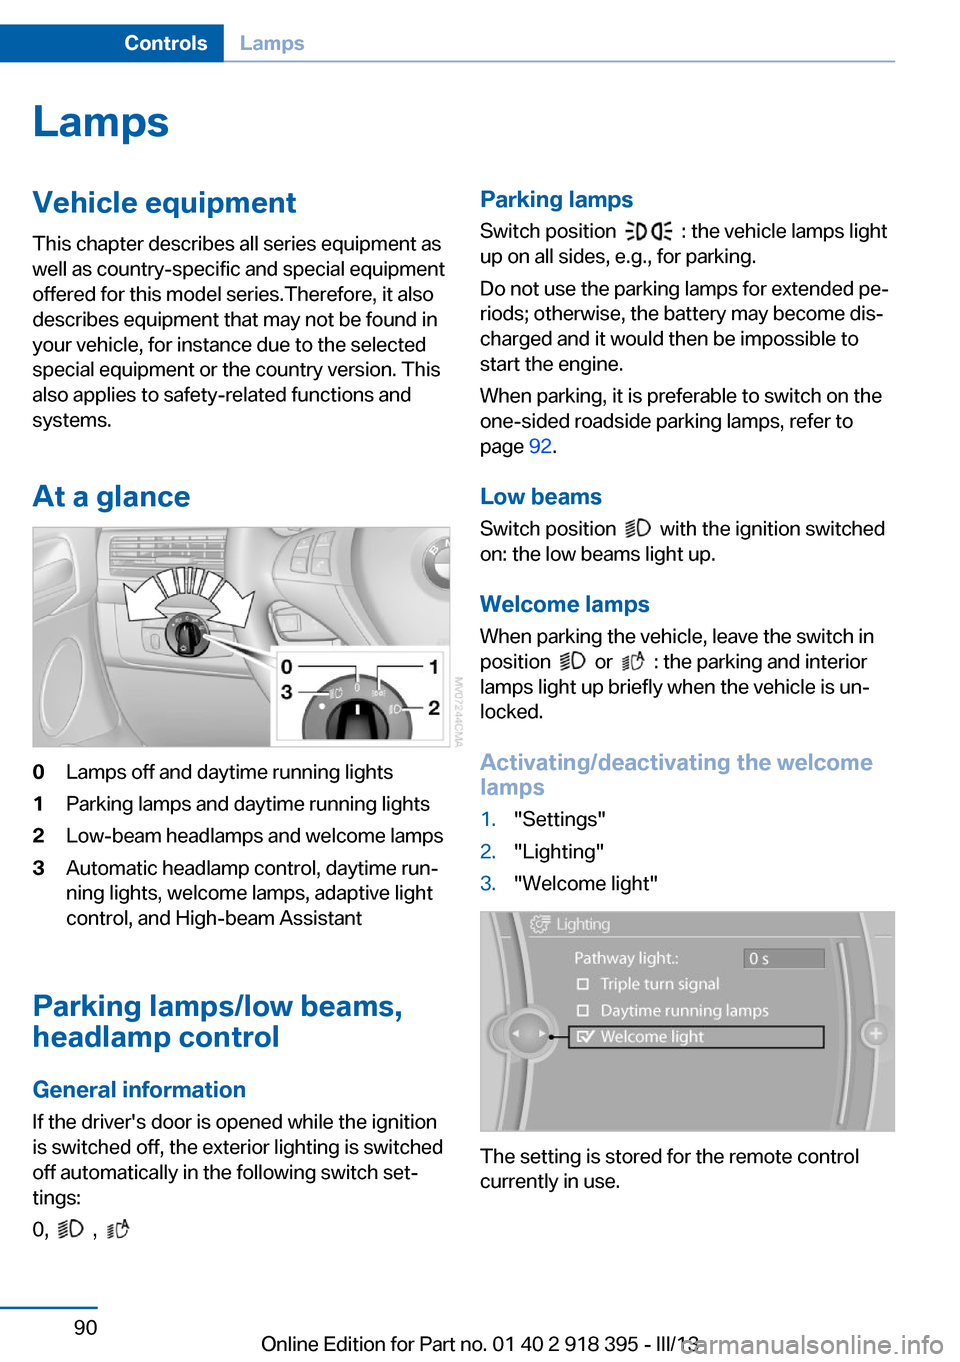
At a glance0Lamps off and daytime running lights1Parking lamps and daytime running lights2Low-beam headlamps and welcome lamps3Automatic headlamp control, daytime run‐
ning lights, welcome lamps, adaptive light
control, and High-beam Assistant
Parking lamps/low beams,
headlamp control
General information If the driver's door is opened while the ignition
is switched off, the exterior lighting is switched
off automatically in the following switch set‐
tings:
0,
,
Parking lamps
Switch position
: the vehicle lamps light
up on all sides, e.g., for parking.
Do not use the parking lamps for extended pe‐
riods; otherwise, the battery may become dis‐
charged and it would then be impossible to
start the engine.
When parking, it is preferable to switch on the
one-sided roadside parking lamps, refer to
page 92.
Low beams Switch position
with the ignition switched
on: the low beams light up.
Welcome lamps When parking the vehicle, leave the switch in
position
or : the parking and interior
lamps light up briefly when the vehicle is un‐
locked.
Activating/deactivating the welcome
lamps
1."Settings"2."Lighting"3."Welcome light"
The setting is stored for the remote control
currently in use.
Seite 90ControlsLamps90
Online Edition for Part no. 01 40 2 918 395 - III/13
Page 95 of 345
SafetyVehicle equipment
This chapter describes all series equipment as
well as country-specific and special equipment
offered for this model series.Therefore, it alsodescribes equipment that may not be found in
your vehicle, for instance due to the selected
special equipment or the country version. This
also applies to safety-related functions and
systems.
Airbags
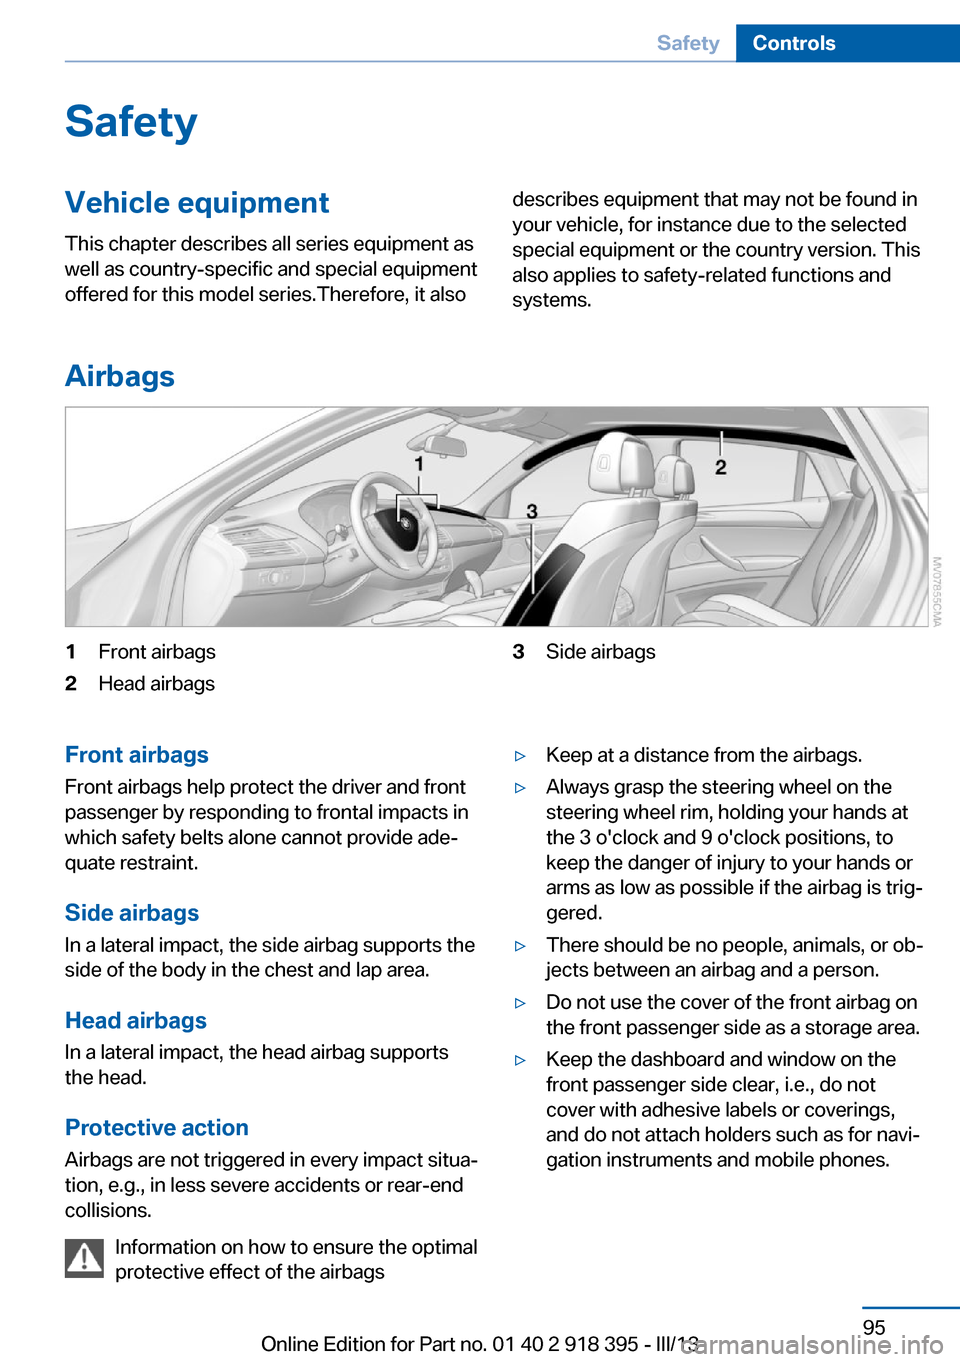
1Front airbags2Head airbags3Side airbagsFront airbags
Front airbags help protect the driver and front
passenger by responding to frontal impacts in
which safety belts alone cannot provide ade‐
quate restraint.
Side airbags
In a lateral impact, the side airbag supports the
side of the body in the chest and lap area.
Head airbags
In a lateral impact, the head airbag supports
the head.
Protective action
Airbags are not triggered in every impact situa‐
tion, e.g., in less severe accidents or rear-end
collisions.
Information on how to ensure the optimal
protective effect of the airbags▷Keep at a distance from the airbags.▷Always grasp the steering wheel on the
steering wheel rim, holding your hands at
the 3 o'clock and 9 o'clock positions, to
keep the danger of injury to your hands or
arms as low as possible if the airbag is trig‐
gered.▷There should be no people, animals, or ob‐
jects between an airbag and a person.▷Do not use the cover of the front airbag on
the front passenger side as a storage area.▷Keep the dashboard and window on the
front passenger side clear, i.e., do not
cover with adhesive labels or coverings,
and do not attach holders such as for navi‐
gation instruments and mobile phones.Seite 95SafetyControls95
Online Edition for Part no. 01 40 2 918 395 - III/13
Page 105 of 345
Driving stability control systemsVehicle equipmentThis chapter describes all series equipment as
well as country-specific and special equipment
offered for this model series.Therefore, it also
describes equipment that may not be found in
your vehicle, for instance due to the selected
special equipment or the country version. This
also applies to safety-related functions and
systems.
Antilock Brake System ABS
ABS prevents locking of the wheels during
braking.
The vehicle remains steerable even during full
brake applications, thus increasing active
safety.
ABS is operational every time you start the en‐
gine.
CBC Cornering Brake
Control
When braking during curves or when braking
during a lane change, driving stability and
steering response are improved further.
Electronic brake-force
distribution
The system controls the brake pressure in the
rear wheels to ensure stable braking behavior.
Brake assistantWhen you apply the brakes rapidly, this system
automatically produces the maximum braking
force boost. It thus helps to achieve the short‐
est possible braking distance during full brak‐ing. This system utilizes all of the benefits pro‐
vided by ABS.
Do not reduce the pressure on the brake pedal
for the duration of the full braking.
Dynamic Stability Control DSC
The concept
DSC prevents traction loss in the driving
wheels when driving away and accelerating.
DSC also recognizes unstable vehicle condi‐
tions, such as fishtailing or nose-diving. Sub‐
ject to physical limits, DSC helps to keep the
vehicle on a steady course by reducing engine
speed and by applying brakes to the individual
wheels.
Adjust your driving style to the situation
An appropriate driving style is always the
responsibility of the driver.
The laws of physics cannot be repealed, even
with DSC.
Do not reduce the additional safety margin
with a risky driving style, as otherwise there is
a risk of an accident.◀
Deactivating DSC: DSC OFF
When DSC is deactivated, driving stability is
reduced during acceleration and when driving
in bends.
To increase vehicle stability, activate DSC
again as soon as possible.Seite 105Driving stability control systemsControls105
Online Edition for Part no. 01 40 2 918 395 - III/13