ESP BMW X6 2013 E71 Repair Manual
[x] Cancel search | Manufacturer: BMW, Model Year: 2013, Model line: X6, Model: BMW X6 2013 E71Pages: 345, PDF Size: 9.45 MB
Page 292 of 345
Further information on approved oil types can
be obtained from the service center.
Alternative oil types If the approved engine oils are not available, up
to 1 US quart/liter of an oil with the following
specification can be used:Gasoline engineAPI SM or a higher quality standardDiesel engineAPI ILSAC GF-5
Oil change
An oil change should be carried out by the
service center only.
Coolant
General information Danger of burns from hot engine
Do not open the cooling system while
the engine is hot; otherwise, escaping coolant
may cause burns.◀
Suitable additives
Only use suitable additives; otherwise,
engine damage may occur. The additives are
harmful to your health.◀
Coolant consists of water and additives.
Not all commercially available additives are
suitable for your vehicle. Ask your service cen‐
ter for suitable additives.
Checking the coolant level1.Do not open the hood until the engine has
cooled down.2.Turn the expansion tank cap counterclock‐
wise slightly to allow any accumulated
pressure to escape; then continue turning
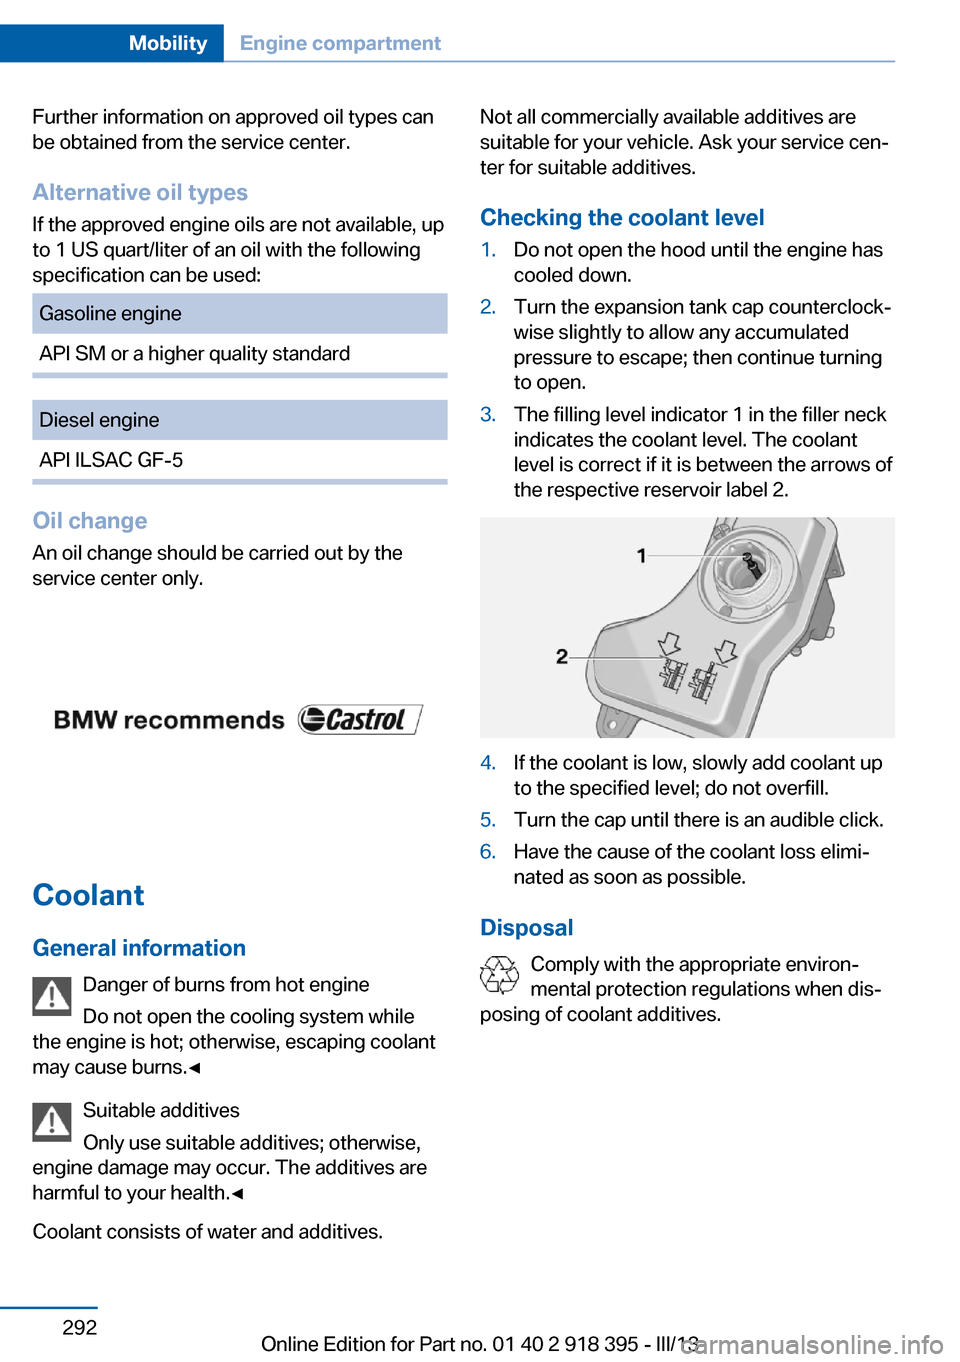
to open.3.The filling level indicator 1 in the filler neck
indicates the coolant level. The coolant
level is correct if it is between the arrows of
the respective reservoir label 2.4.If the coolant is low, slowly add coolant up
to the specified level; do not overfill.5.Turn the cap until there is an audible click.6.Have the cause of the coolant loss elimi‐
nated as soon as possible.
Disposal
Comply with the appropriate environ‐
mental protection regulations when dis‐
posing of coolant additives.
Seite 292MobilityEngine compartment292
Online Edition for Part no. 01 40 2 918 395 - III/13
Page 296 of 345
The manufacturer of the vehicle recommends
that you entrust corresponding procedures to
the service center if you are unfamiliar with
them or they are not described here.
You can obtain a selection of replacement
bulbs at the service center.
Danger of burns
Only change bulbs when they are cool;
otherwise, there is the danger of getting
burned.◀
Working on the lighting system
When working on the lighting system,
you should always switch off the lights af‐
fected to prevent short circuits.
To avoid possible injury or equipment damage
when replacing bulbs, observe any instructions
provided by the bulb manufacturer.◀
Do not perform work/bulb replacement
on xenon headlamps
Have any work on the xenon lighting system,
including bulb replacement, performed only by
a service center.
Due to the high voltage present in the system,
there is the danger of fatal injuries if work is
carried out improperly.◀
Do not touch the bulbs
Do not touch the glass of new bulbs with
your bare hands, as even minute amounts of
contamination will burn into the bulb's surface
and reduce its service life.
Use a clean tissue, cloth or something similar,
or hold the bulb by its base.◀
Light-emitting diodes LED
Light-emitting diodes installed behind translu‐
cent lenses serve as the light source for many
of the controls, displays and other equipment
in your vehicle.
These light-emitting diodes, which operate us‐
ing a concept similar to that applied in conven‐tional lasers, are officially designated as
Class 1 light-emitting diodes.
Do not remove the covers
Do not remove the covers, and never
stare into the unfiltered light for several hours;
otherwise, irritation of the retina could result.◀
Headlamp glass
Condensation can form on the inside of the
headlamps in cool or humid weather. When
you drive with the lights switched on, the con‐
densation evaporates after a short time. The
headlamps do not need to be changed.
If the condensation in the headlamps does not
evaporate after trips with the lights switched
on, and the amount of moisture in the head‐
lamps increases, for example if water droplets
form, have them checked by your service cen‐
ter.
BMW X5: bulb replacementXenon headlamps
Notes
Because of the long life of these bulbs, the
likelihood of failure is very low. Switching the
lamps on and off frequently shortens their life.
If a xenon bulb fails, switch on the front fog
lamps and continue the trip with great care.
Comply with local regulations.
Do not perform work/bulb replacement
on xenon headlamps
Have any work on the xenon lighting system,
including bulb replacement, performed only by
a service center.
Due to the high voltage present in the system,
there is the danger of fatal injuries if work is
carried out improperly.◀
Follow the general instructions on lamps and
bulbs, refer to page 295.Seite 296MobilityReplacing components296
Online Edition for Part no. 01 40 2 918 395 - III/13
Page 307 of 345
Breakdown assistanceVehicle equipment
This chapter describes all series equipment as
well as country-specific and special equipment
offered for this model series.Therefore, it also
describes equipment that may not be found in
your vehicle, for instance due to the selected
special equipment or the country version. This
also applies to safety-related functions and
systems.
Hazard warning flashers
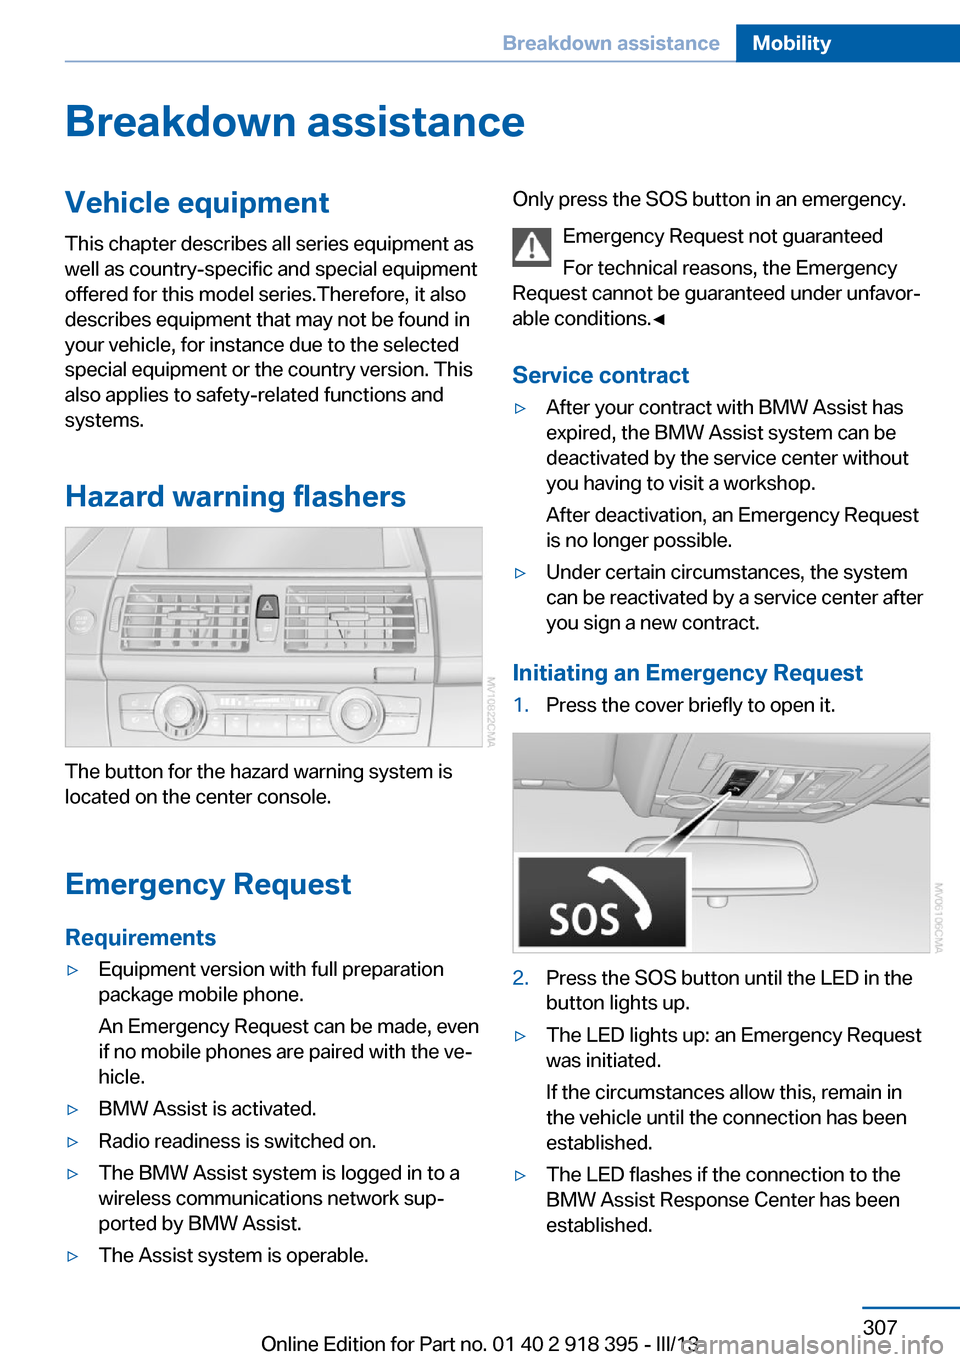
The button for the hazard warning system is
located on the center console.
Emergency RequestRequirements
▷Equipment version with full preparation
package mobile phone.
An Emergency Request can be made, even
if no mobile phones are paired with the ve‐
hicle.▷BMW Assist is activated.▷Radio readiness is switched on.▷The BMW Assist system is logged in to a
wireless communications network sup‐
ported by BMW Assist.▷The Assist system is operable.Only press the SOS button in an emergency.
Emergency Request not guaranteed
For technical reasons, the Emergency
Request cannot be guaranteed under unfavor‐
able conditions.◀
Service contract▷After your contract with BMW Assist has
expired, the BMW Assist system can be
deactivated by the service center without
you having to visit a workshop.
After deactivation, an Emergency Request
is no longer possible.▷Under certain circumstances, the system
can be reactivated by a service center after
you sign a new contract.
Initiating an Emergency Request
1.Press the cover briefly to open it.2.Press the SOS button until the LED in the
button lights up.▷The LED lights up: an Emergency Request
was initiated.
If the circumstances allow this, remain in
the vehicle until the connection has been
established.▷The LED flashes if the connection to the
BMW Assist Response Center has been
established.Seite 307Breakdown assistanceMobility307
Online Edition for Part no. 01 40 2 918 395 - III/13
Page 308 of 345
Once the BMW Response Center has re‐
ceived your Emergency Request, the BMW
Response Center contacts you and takes
further steps to help you.
Even if you are unable to respond, the
BMW Response Center can take further
steps to help you under certain circum‐
stances.
For this purpose, data that are used to de‐
termine the necessary rescue measures,
such as the current position of the vehicle
if it can be established, are transmitted to
the BMW Response Center.▷If the LED is flashing but the BMW Re‐
sponse Center cannot be heard on the
hands-free system, the hands-free system
may be malfunctioning. However, the
BMW Response Center may still be able to
hear you.
Initiating an Emergency Request
automatically
Under certain conditions, an Emergency Re‐
quest is automatically initiated immediately af‐
ter a severe accident. Automatic Collision Noti‐
fication is not affected by pressing the SOS
button.
Roadside Assistance
Service availability Roadside Assistance can be reached around
the clock in many countries. You can obtain as‐
sistance there in the event of a vehicle break‐
down.
Roadside Assistance The Roadside Assistance, refer to page 262,
phone number can be viewed on the iDrive or a
connection to Roadside Assistance can be es‐
tablished directly.
Warning triangle
The warning triangle is located in the cargo
area.
First aid kit
The first aid kit is located in a storage compart‐
ment on the right side in the cargo area.
Some of the articles contained in the first aid
pouch have a limited service life.
Check the expiration dates of the contents
regularly and replace any items promptly.
Jump-starting
Notes
If the battery is discharged, an engine can be started using the battery of another vehicle
and two jumper cables. Only use jumper ca‐ bles with fully insulated clamp handles.
To prevent personal injury or damage to both
vehicles, adhere strictly to the following proce‐
dure.
Do not touch live parts
To avoid the risk of potentially fatal in‐
jury, always avoid all contact with electrical
components while the engine is running.◀
Preparation1.Check whether the battery of the other ve‐
hicle has a voltage of 12 volts and approxi‐
mately the same capacitance in Ah. This
information can be found on the battery.2.Switch off the engine of the assisting vehi‐
cle.3.Switch off any electronic systems/power
consumers in both vehicles.Seite 308MobilityBreakdown assistance308
Online Edition for Part no. 01 40 2 918 395 - III/13
Page 309 of 345
Bodywork contact between vehicles
There must not be any contact between
the bodies of the two vehicles, otherwise there
is a danger of shorting.◀
Starting aid terminals Connecting order
Connect the jumper cables in the correct
order; otherwise, there is the danger of injury
from sparking.◀
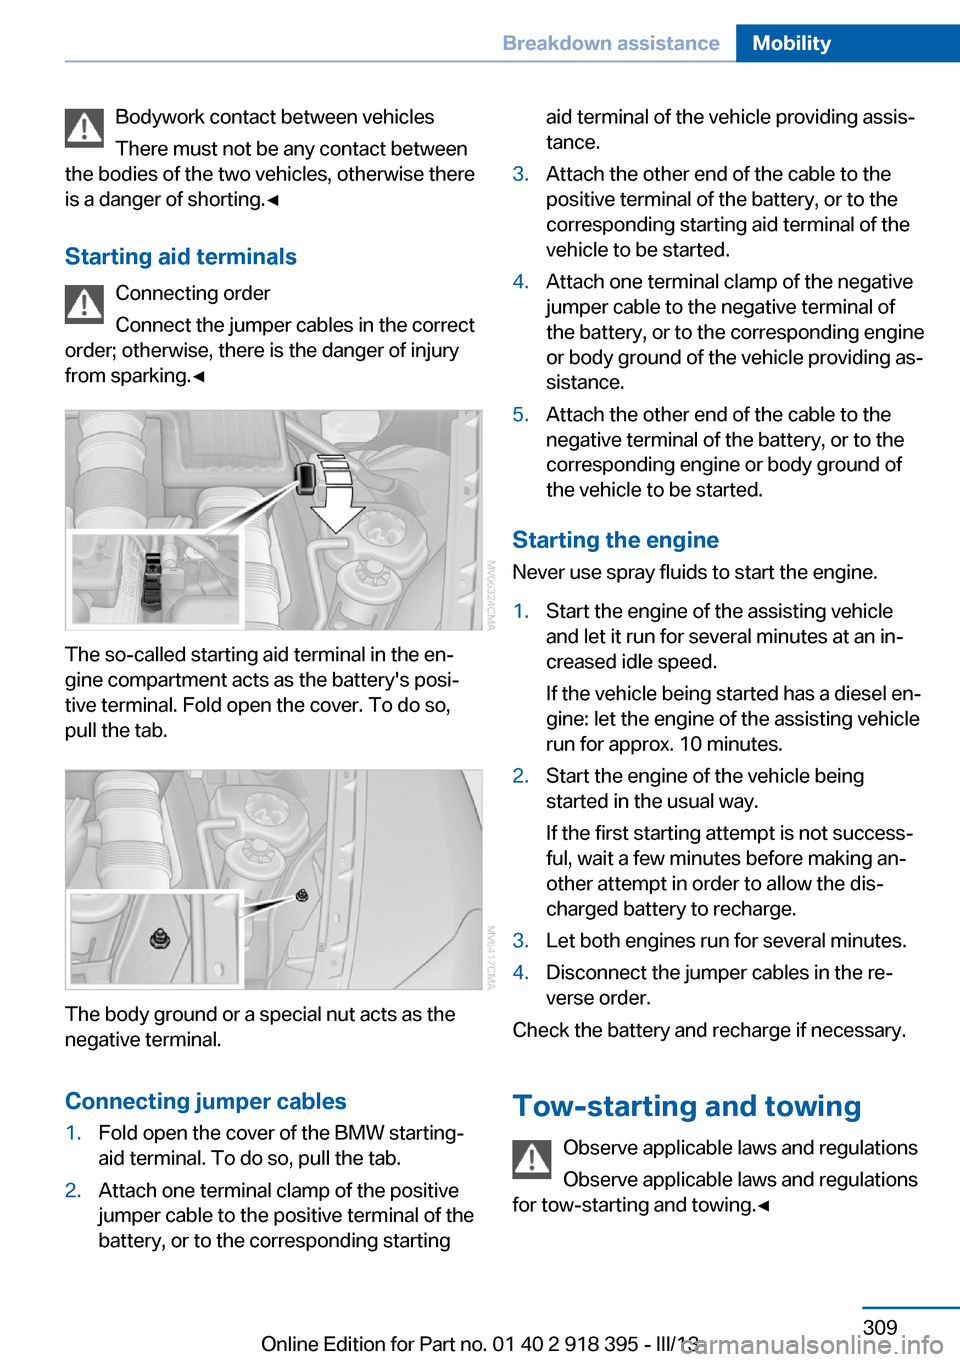
The so-called starting aid terminal in the en‐
gine compartment acts as the battery's posi‐
tive terminal. Fold open the cover. To do so,
pull the tab.
The body ground or a special nut acts as the
negative terminal.
Connecting jumper cables
1.Fold open the cover of the BMW starting-
aid terminal. To do so, pull the tab.2.Attach one terminal clamp of the positive
jumper cable to the positive terminal of the
battery, or to the corresponding startingaid terminal of the vehicle providing assis‐
tance.3.Attach the other end of the cable to the
positive terminal of the battery, or to the
corresponding starting aid terminal of the
vehicle to be started.4.Attach one terminal clamp of the negative
jumper cable to the negative terminal of
the battery, or to the corresponding engine
or body ground of the vehicle providing as‐
sistance.5.Attach the other end of the cable to the
negative terminal of the battery, or to the
corresponding engine or body ground of
the vehicle to be started.
Starting the engine
Never use spray fluids to start the engine.
1.Start the engine of the assisting vehicle
and let it run for several minutes at an in‐
creased idle speed.
If the vehicle being started has a diesel en‐
gine: let the engine of the assisting vehicle
run for approx. 10 minutes.2.Start the engine of the vehicle being
started in the usual way.
If the first starting attempt is not success‐
ful, wait a few minutes before making an‐
other attempt in order to allow the dis‐
charged battery to recharge.3.Let both engines run for several minutes.4.Disconnect the jumper cables in the re‐
verse order.
Check the battery and recharge if necessary.
Tow-starting and towing Observe applicable laws and regulations
Observe applicable laws and regulations
for tow-starting and towing.◀
Seite 309Breakdown assistanceMobility309
Online Edition for Part no. 01 40 2 918 395 - III/13
Page 310 of 345
No additional passengers
Do not transport any passengers other
than the driver in a vehicle that is being
towed.◀
Transporting your vehicle
Note Your vehicle is not permitted to be towed.
Therefore, contact a service center in the
event of a breakdown.
Do not have the vehicle towed
Have your vehicle transported on a load‐
ing platform only; otherwise, damage may oc‐
cur.◀
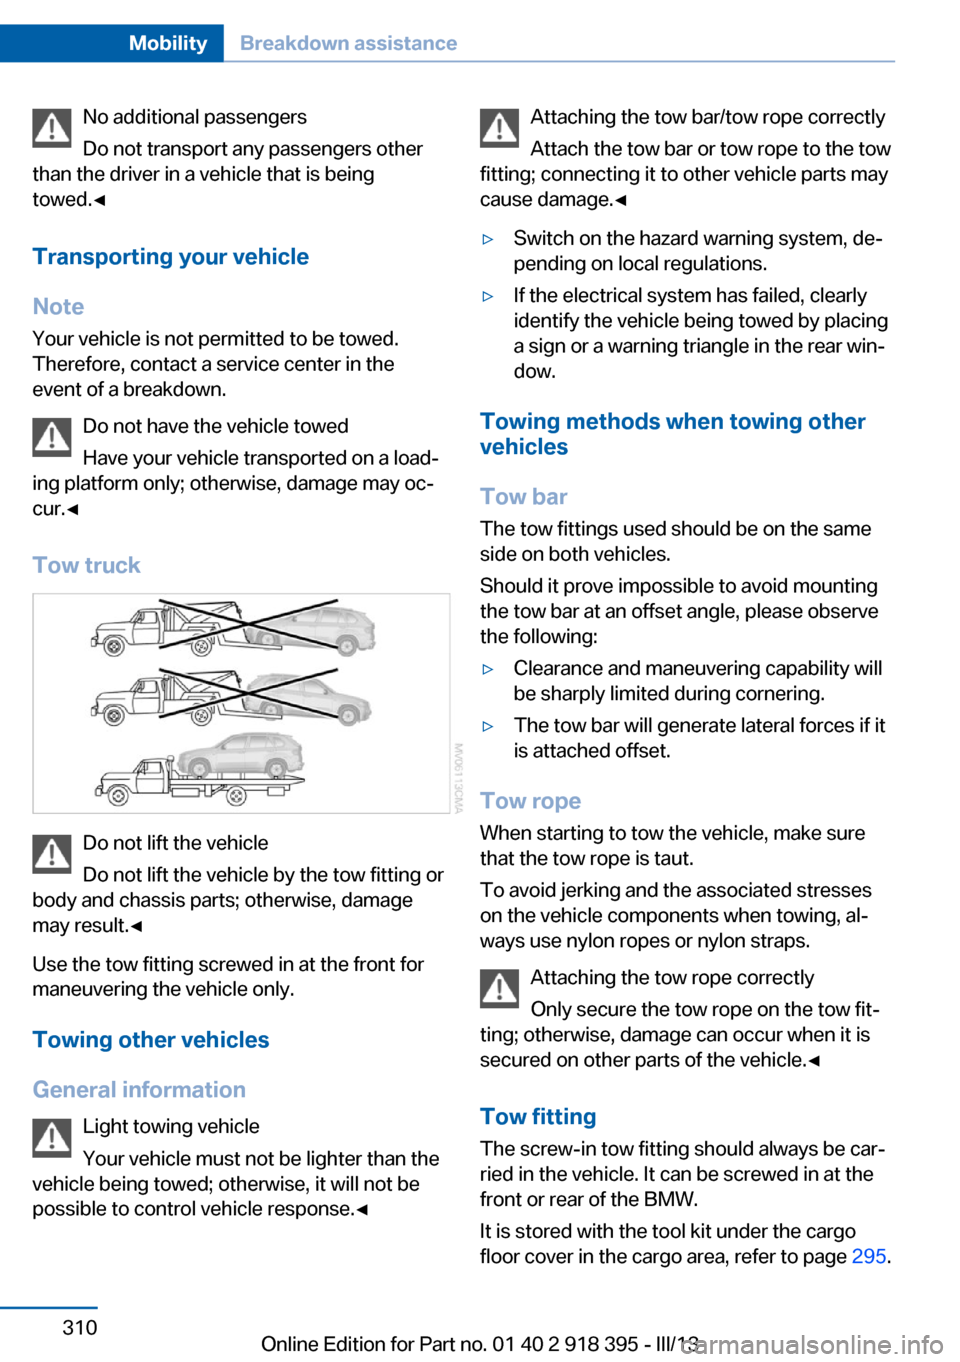
Tow truck
Do not lift the vehicle
Do not lift the vehicle by the tow fitting or
body and chassis parts; otherwise, damage
may result.◀
Use the tow fitting screwed in at the front for
maneuvering the vehicle only.
Towing other vehicles
General information Light towing vehicle
Your vehicle must not be lighter than the
vehicle being towed; otherwise, it will not be
possible to control vehicle response.◀
Attaching the tow bar/tow rope correctly
Attach the tow bar or tow rope to the tow
fitting; connecting it to other vehicle parts may
cause damage.◀▷Switch on the hazard warning system, de‐
pending on local regulations.▷If the electrical system has failed, clearly
identify the vehicle being towed by placing
a sign or a warning triangle in the rear win‐
dow.
Towing methods when towing other
vehicles
Tow bar The tow fittings used should be on the same
side on both vehicles.
Should it prove impossible to avoid mounting
the tow bar at an offset angle, please observe
the following:
▷Clearance and maneuvering capability will
be sharply limited during cornering.▷The tow bar will generate lateral forces if it
is attached offset.
Tow rope
When starting to tow the vehicle, make sure
that the tow rope is taut.
To avoid jerking and the associated stresses
on the vehicle components when towing, al‐
ways use nylon ropes or nylon straps.
Attaching the tow rope correctly
Only secure the tow rope on the tow fit‐
ting; otherwise, damage can occur when it is
secured on other parts of the vehicle.◀
Tow fitting
The screw-in tow fitting should always be car‐
ried in the vehicle. It can be screwed in at the
front or rear of the BMW.
It is stored with the tool kit under the cargo
floor cover in the cargo area, refer to page 295.
Seite 310MobilityBreakdown assistance310
Online Edition for Part no. 01 40 2 918 395 - III/13
Page 334 of 345
Divided screen view, splitscreen 22
Door key, refer to Remote control with integrated
key 30
Door lock 34
Doors, manual operation 34
Doors, unlocking and locking– Confirmation signals 33– From the inside 35– From the outside 32
DOT Quality Grades 283
Downhill control 108
Draft-free ventilation 134
Drive-off assistant 109
Driver's seat, calibrating 55
Driving away on inclines, refer to Drive-off assistant 109
Driving notes, breaking in 156
Driving notes, general 156
Driving on poor roads 158
Driving stability control sys‐ tems 105
Driving through water 157
Driving tips, refer to Driving notes 156
Dry air, refer to Cooling func‐ tion 133
DSC Dynamic Stability Con‐ trol 105
DTC Dynamic Traction Con‐ trol 106
DTMF suffix dialing 242
DVD/CD 200
DVDs, storing 207
DVD system in rear 220
DVD, video 202
Dynamic destination guid‐ ance 186
Dynamic Performance Con‐ trol 107
Dynamic Stability Control DSC 105
Dynamic Traction Control DTC 106
E
Easy entry/exit 60
EfficientDynamics, refer to Saving fuel 164
Electrical malfunction– Door lock 34– Driver's door 34– Fuel filler flap 268
Electrical malfunction of up‐
per tailgate 36
Electrical malfunction, park‐ ing brake 71
Electric seat adjustment 50
Electric steering wheel ad‐ justment 60
Electronic brake-force distri‐ bution 105
Electronic engine oil level check 290
Electronic Stability Program ESP, refer to Dynamic Sta‐
bility Control DSC 105
Emergency operation
– Door lock, refer to Manual
operation 34
Emergency operation, fuel
filler flap, unlocking man‐
ually 268
Emergency Request 307
Emergency service, refer to Roadside Assistance 308
Energy-conscious driving, re‐ fer to Current fuel consump‐
tion 80
Energy, saving, refer to Sav‐ ing fuel 164
Engine, breaking in 156
Engine compartment 288
Engine coolant, refer to Cool‐ ant 292
Engine oil, adding 291
Engine oil, additives, refer to Approved engine oils 291
Engine oil, alternative oil types 292
Engine oil, BMW maintenance
system 293
Engine oil change intervals, refer to Service require‐
ments 83
Engine oil, checking the level 290
Engine oil, filling ca‐ pacity 321
Engine oil temperature 80
Engine oil types, alterna‐ tive 291
Engine oil types, ap‐ proved 291
Engine, overheating, refer to Coolant temperature 80
Engine start, assistance 308
Engine, starting 68
Engine, starting– Comfort Access 40
Engine, starting, Start/Stop
button 67
Engine, stopping, Start/Stop
button 67
Engine, switching off 69
Environmentally friendly driv‐ ing, refer to Current fuel
consumption 80
Equalizer 190
Equipment, interior 139
ESP Electronic Stability Pro‐ gram, refer to Dynamic Sta‐
bility Control DSC 105
Exchanging wheels/tires 285
Exhaust system 157
Exterior mirrors 58
Exterior mirrors, adjusting 58
Exterior mirrors, automatic dimming 59
Exterior mirrors, automatic heating 59
Exterior mirrors, folding in and out 59
External audio device 148
External devices 212
External temperature dis‐ play 79
Seite 334ReferenceEverything from A to Z334
Online Edition for Part no. 01 40 2 918 395 - III/13