Transmission BMW X6 M 2012 Owners Manual
[x] Cancel search | Manufacturer: BMW, Model Year: 2012, Model line: X6 M, Model: BMW X6 M 2012Pages: 317, PDF Size: 8.83 MB
Page 13 of 317
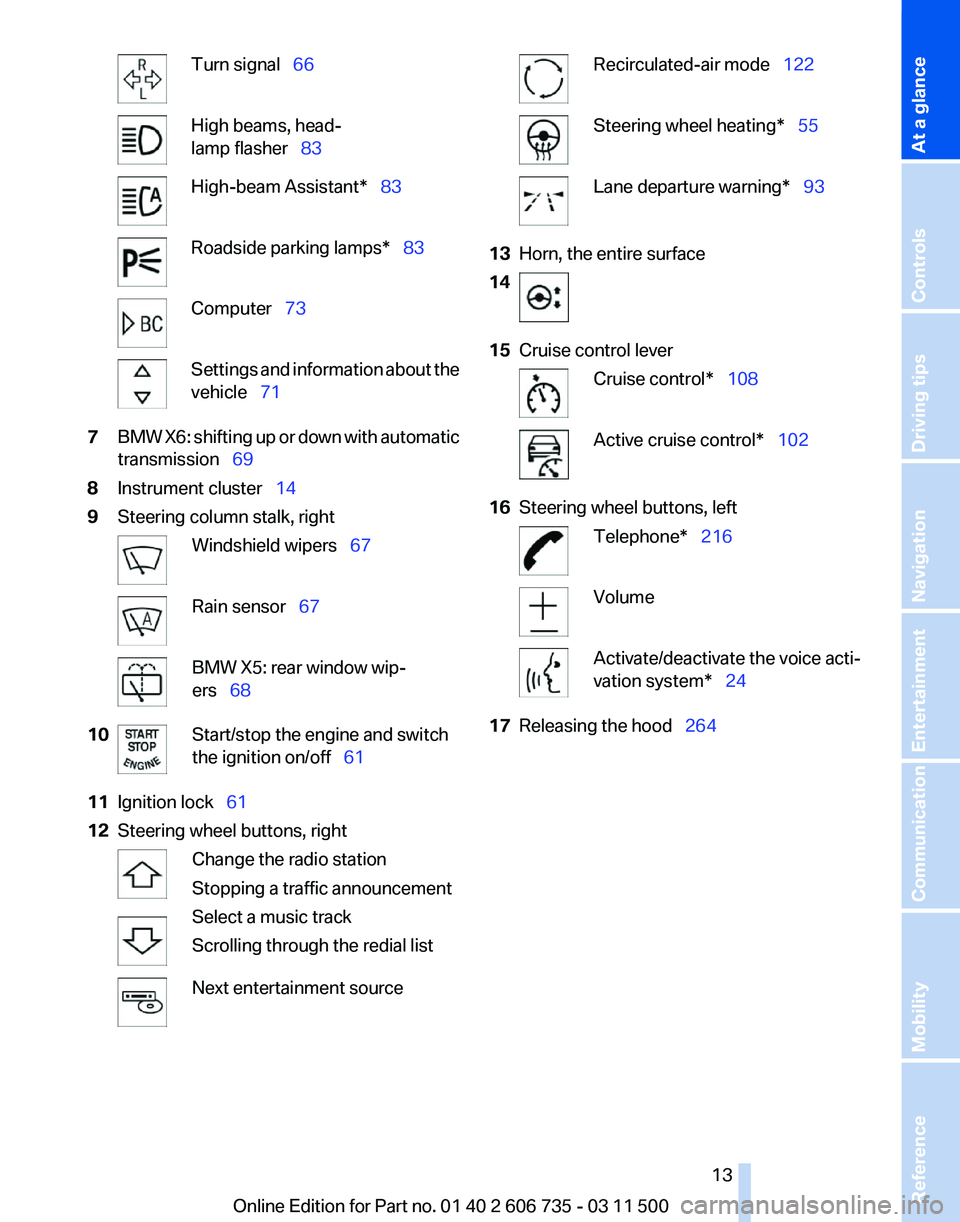
Turn signal 66
High beams, head‐
lamp flasher 83
High-beam Assistant* 83
Roadside parking lamps* 83
Computer 73
Settings and information about the
vehicle 71
7 BMW X6: shifting up or down with automatic
transmission 69
8 Instrument cluster 14
9 Steering column stalk, right Windshield wipers 67
Rain sensor
67 BMW X5: rear window wip‐
ers 68
10 Start/stop the engine and switch
the ignition on/off 61
11 Ignition lock 61
12 Steering wheel buttons, right Change the radio station
Stopping a traffic announcement
Select a music track
Scrolling through the redial list
Next entertainment source Recirculated-air mode 122
Steering wheel heating* 55
Lane departure warning* 93
13 Horn, the entire surface
14 15
Cruise control lever Cruise control*
108 Active cruise control*
102
16 Steering wheel buttons, left Telephone* 216
Volume
Activate/deactivate the voice acti‐
vation system* 24
17 Releasing the hood 264
Seite 13
13Online Edition for Part no. 01 40 2 606 735 - 03 11 500
Reference Mobility Communication Entertainment Navigation Driving tips Controls
At a glance
Page 14 of 317
Instrument cluster
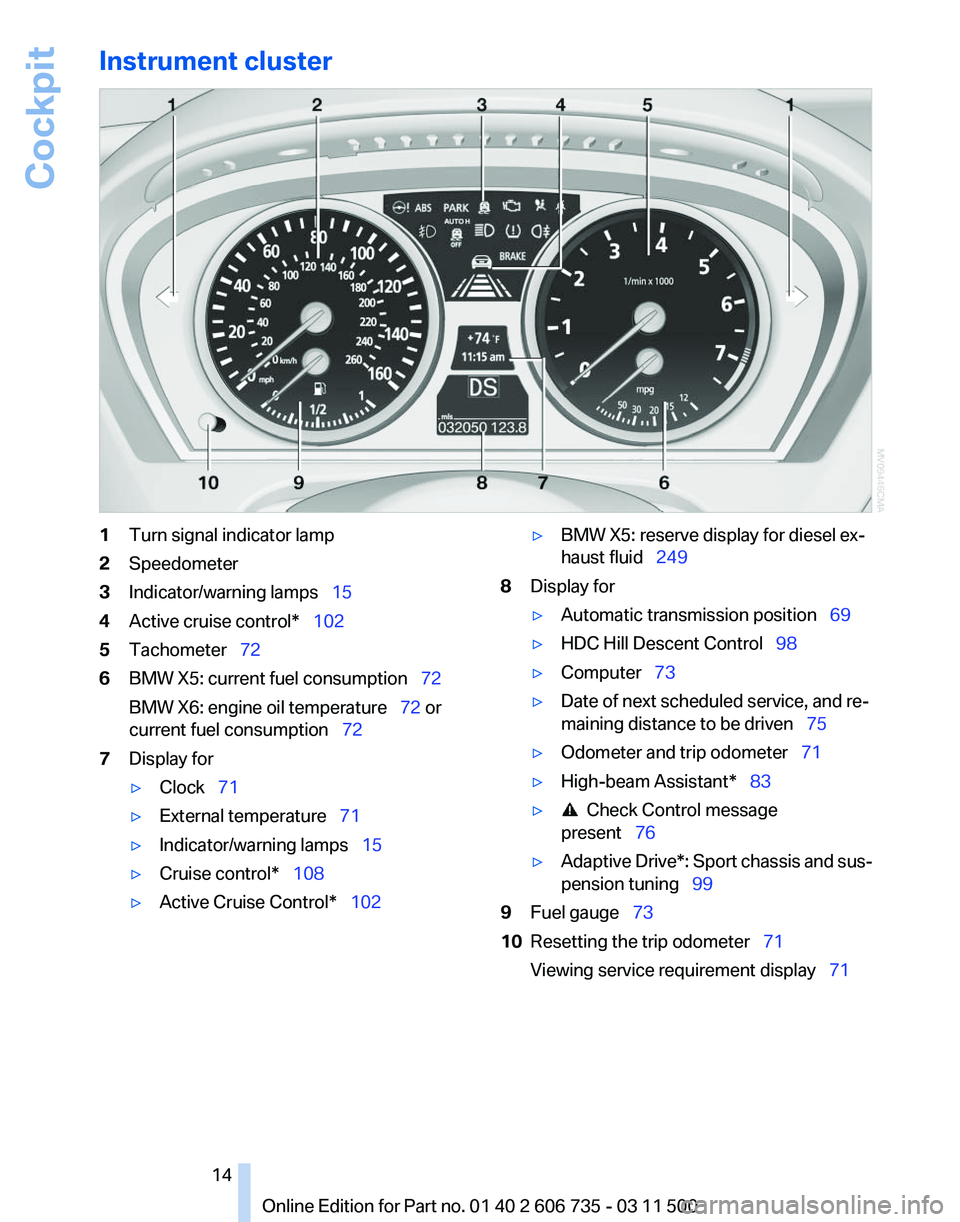
1
Turn signal indicator lamp
2 Speedometer
3 Indicator/warning lamps 15
4 Active cruise control* 102
5 Tachometer 72
6 BMW X5: current fuel consumption 72
BMW X6: engine oil temperature
72 or
current fuel consumption 72
7 Display for
▷Clock 71
▷ External temperature 71
▷ Indicator/warning lamps 15
▷ Cruise control* 108
▷ Active Cruise Control* 102 ▷
BMW X5: reserve display for diesel ex‐
haust fluid 249
8 Display for
▷Automatic transmission position 69
▷ HDC Hill Descent Control 98
▷ Computer 73
▷ Date of next scheduled service, and re‐
maining distance to be driven
75
▷ Odometer and trip odometer 71
▷ High-beam Assistant* 83
▷ Check Control message
present 76
▷ Adaptive Drive*:
Sport chassis and sus‐
pension tuning 99
9 Fuel gauge 73
10 Resetting the trip odometer 71
Viewing service requirement display 71
Seite 14
14 Online Edition for Part no. 01 40 2 606 735 - 03 11 500
Cockpit
Page 38 of 317
Unlocking
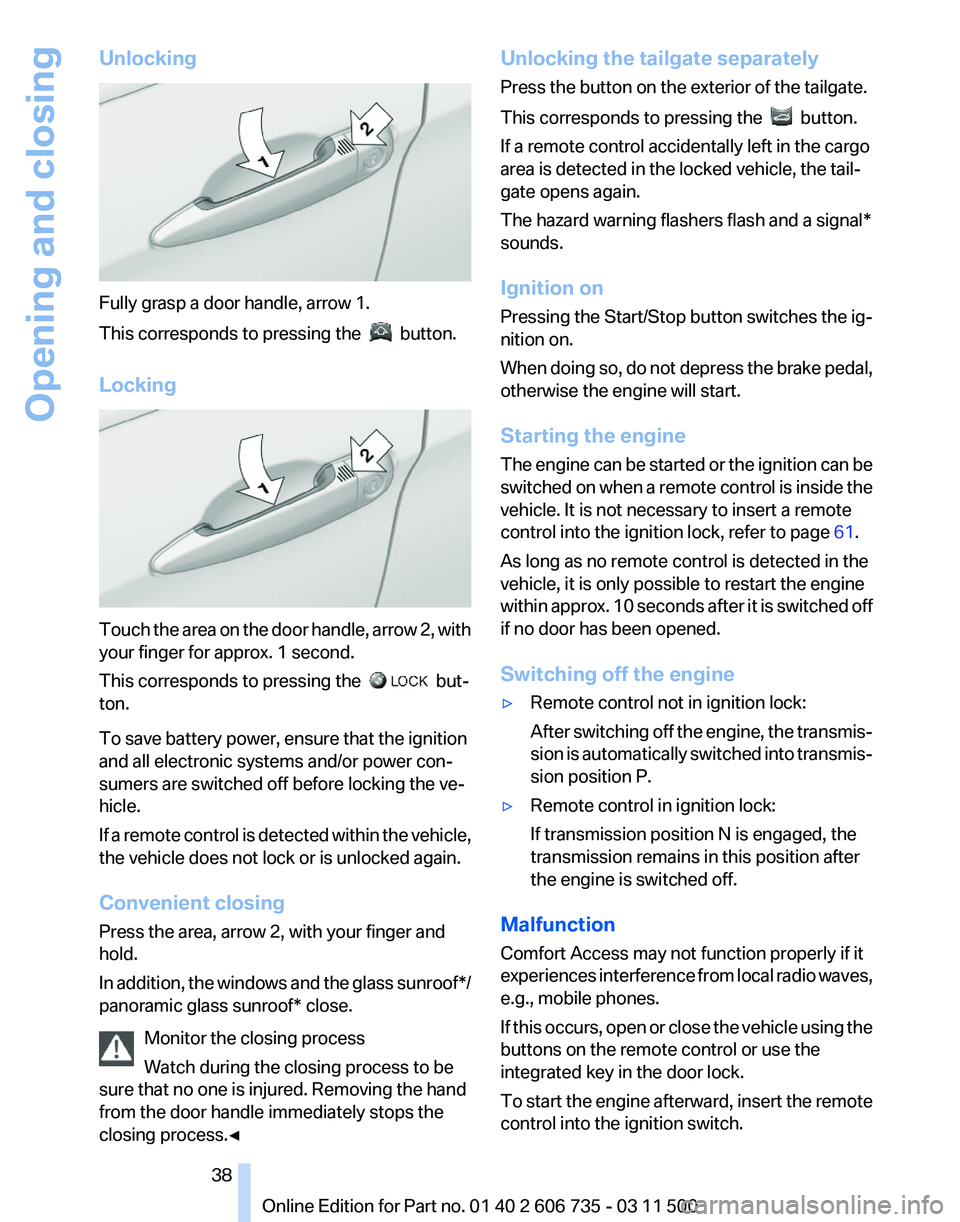
Fully grasp a door handle, arrow 1.
This corresponds to pressing the
button.
Locking Touch the area on the door handle, arrow 2, with
your finger for approx. 1 second.
This corresponds to pressing the
but‐
ton.
To save battery power, ensure that the ignition
and all electronic systems and/or power con‐
sumers are switched off before locking the ve‐
hicle.
If
a remote control is detected within the vehicle,
the vehicle does not lock or is unlocked again.
Convenient closing
Press the area, arrow 2, with your finger and
hold.
In addition, the windows and the glass sunroof*/
panoramic glass sunroof* close.
Monitor the closing process
Watch during the closing process to be
sure that no one is injured. Removing the hand
from the door handle immediately stops the
closing process.◀ Unlocking the tailgate separately
Press the button on the exterior of the tailgate.
This corresponds to pressing the
button.
If a remote control accidentally left in the cargo
area is detected in the locked vehicle, the tail‐
gate opens again.
The hazard warning flashers flash and a signal*
sounds.
Ignition on
Pressing the Start/Stop button switches the ig‐
nition on.
When
doing so, do not depress the brake pedal,
otherwise the engine will start.
Starting the engine
The engine can be started or the ignition can be
switched on when a remote control is inside the
vehicle. It is not necessary to insert a remote
control into the ignition lock, refer to page 61.
As long as no remote control is detected in the
vehicle, it is only possible to restart the engine
within approx. 10 seconds after it is switched off
if no door has been opened.
Switching off the engine
▷ Remote control not in ignition lock:
After
switching off the engine, the transmis‐
sion is automatically switched into transmis‐
sion position P.
▷ Remote control in ignition lock:
If transmission position N is engaged, the
transmission remains in this position after
the engine is switched off.
Malfunction
Comfort Access may not function properly if it
experiences
interference from local radio waves,
e.g., mobile phones.
If this occurs, open or close the vehicle using the
buttons on the remote control or use the
integrated key in the door lock.
To start the engine afterward, insert the remote
control into the ignition switch.
Seite 38
38 Online Edition for Part no. 01 40 2 606 735 - 03 11 500
Opening and closing
Page 61 of 317
Driving
Ignition lock
Insert the remote control into the
ignition lock
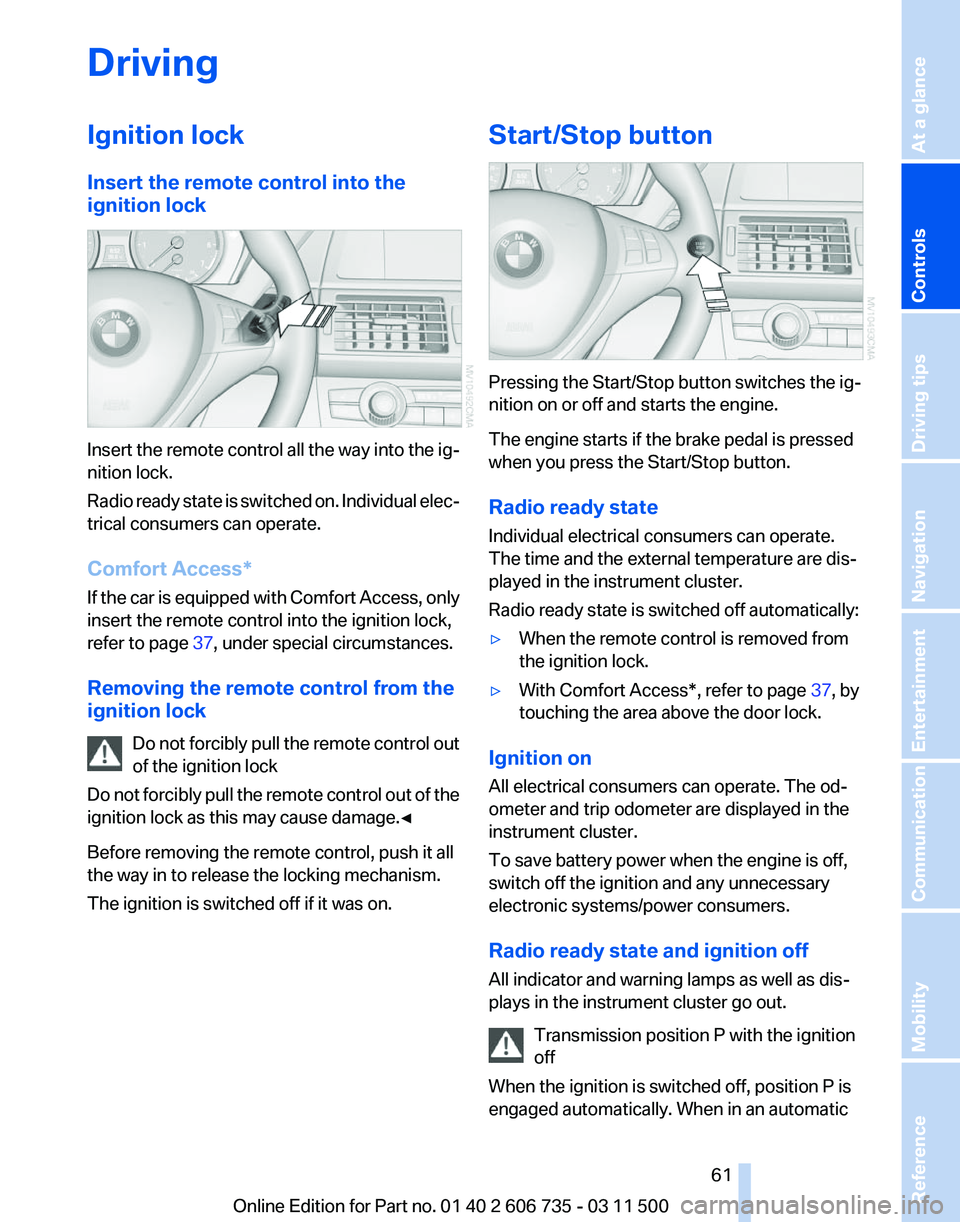
Insert the remote control all the way into the ig‐
nition lock.
Radio
ready state is switched on. Individual elec‐
trical consumers can operate.
Comfort Access*
If the car is equipped with Comfort Access, only
insert the remote control into the ignition lock,
refer to page 37, under special circumstances.
Removing the remote control from the
ignition lock Do not forcibly pull the remote control out
of the ignition lock
Do not forcibly pull the remote control out of the
ignition lock as this may cause damage.◀
Before removing the remote control, push it all
the way in to release the locking mechanism.
The ignition is switched off if it was on. Start/Stop button
Pressing the Start/Stop button switches the ig‐
nition on or off and starts the engine.
The engine starts if the brake pedal is pressed
when you press the Start/Stop button.
Radio ready state
Individual electrical consumers can operate.
The time and the external temperature are dis‐
played in the instrument cluster.
Radio ready state is switched off automatically:
▷
When the remote control is removed from
the ignition lock.
▷ With Comfort Access*, refer to page 37, by
touching the area above the door lock.
Ignition on
All electrical consumers can operate. The od‐
ometer and trip odometer are displayed in the
instrument cluster.
To save battery power when the engine is off,
switch off the ignition and any unnecessary
electronic systems/power consumers.
Radio ready state and ignition off
All indicator and warning lamps as well as dis‐
plays in the instrument cluster go out. Transmission position P with the ignition
off
When the ignition is switched off, position P is
engaged automatically. When in an automatic Seite 61
61Online Edition for Part no. 01 40 2 606 735 - 03 11 500
Reference Mobility Communication Entertainment Navigation Driving tips
Controls At a glance
Page 62 of 317
car wash, for example, ensure that the ignition is
not switched off accidentally.◀
For example, the ignition is not switched off in
the following situations:
▷
The brake is applied.
▷ The low beams are switched on
Starting the engine
General information Enclosed areas
Do not let the engine run in enclosed
areas; otherwise, breathing of exhaust fumes
may lead to loss of consciousness and death.
The
exhaust gases contain carbon monoxide, an
odorless and colorless but highly toxic gas.◀
Unattended vehicle
Do not leave the car unattended with the
engine running; otherwise, it presents a poten‐
tial source of danger.
Before leaving the car with the engine running,
set the parking brake and place the transmission
in position P or neutral to prevent the car from
moving.◀
Frequent starting in quick succession
Avoid repeated futile attempts at starting
the car and avoid starting the car frequently in
quick succession. Otherwise, the fuel is not
burned or is inadequately burned, and there is
the danger of overheating and damaging the
catalytic converter.◀
Do not wait for the engine to warm up while the
vehicle remains stationary. Start driving right
away, but at moderate engine speeds. Starting the engine
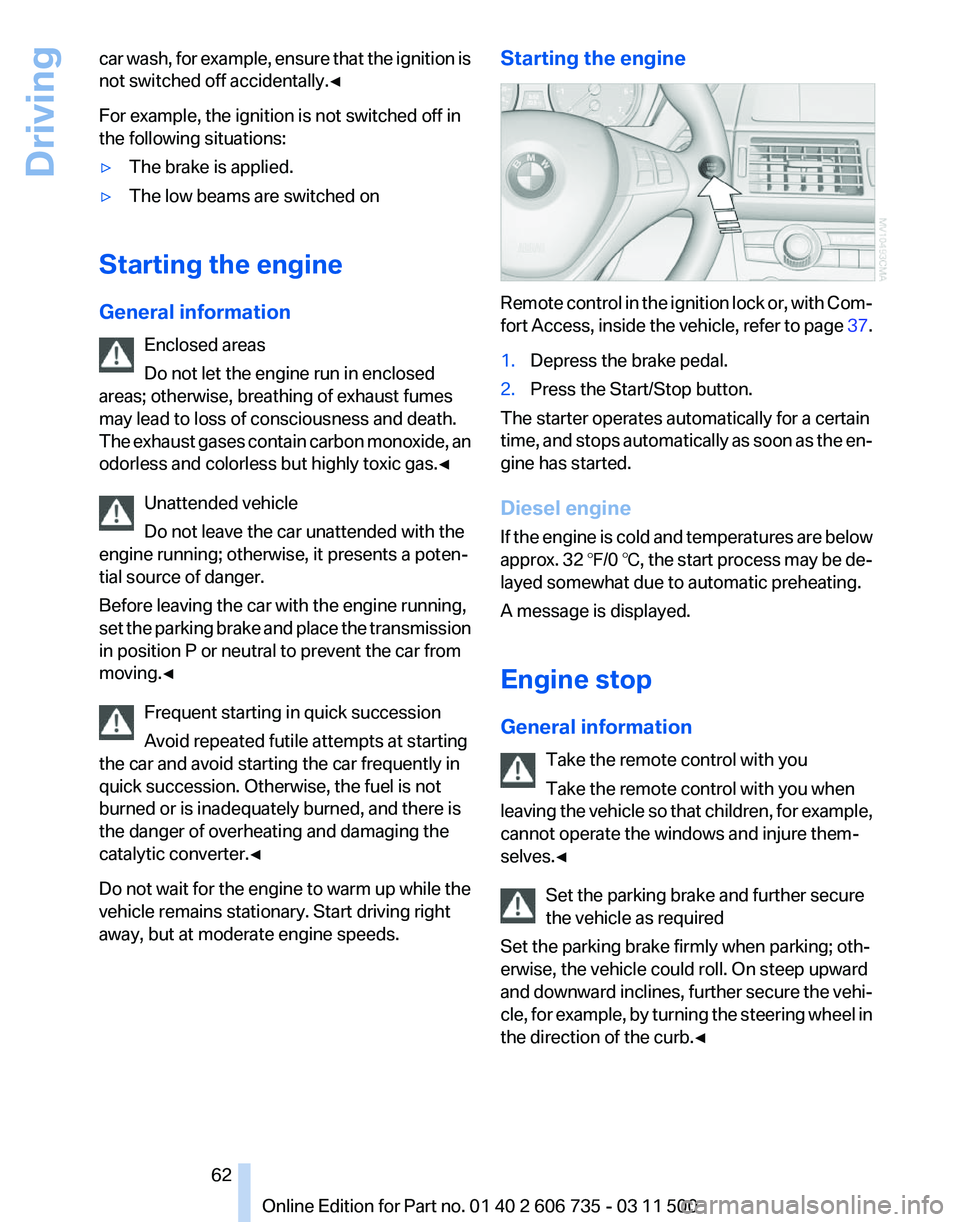
Remote control in the ignition lock or, with Com‐
fort
Access, inside the vehicle, refer to page 37.
1. Depress the brake pedal.
2. Press the Start/Stop button.
The starter operates automatically for a certain
time,
and stops automatically as soon as the en‐
gine has started.
Diesel engine
If the engine is cold and temperatures are below
approx. 32 ℉/0 ℃, the start process may be de‐
layed somewhat due to automatic preheating.
A message is displayed.
Engine stop
General information
Take the remote control with you
Take the remote control with you when
leaving the vehicle so that children, for example,
cannot operate the windows and injure them‐
selves.◀
Set the parking brake and further secure
the vehicle as required
Set the parking brake firmly when parking; oth‐
erwise, the vehicle could roll. On steep upward
and downward inclines, further secure the vehi‐
cle, for example, by turning the steering wheel in
the direction of the curb.◀ Seite 62
62 Online Edition for Part no. 01 40 2 606 735 - 03 11 500
Driving
Page 63 of 317
Switching off the engine
Procedure
1.
Engage transmission position P with the ve‐
hicle stopped.
2. Press the Start/Stop button.
3. Set the parking brake.
4. Remove the remote control from the ignition
lock, refer to page 61.
Before driving into a car wash
The vehicle is able to roll when the following
steps are adhered to:
1. With Comfort Access*: insert the remote
control in the ignition lock.
2. Depress the brake pedal.
3. Engage transmission position N.
4. Release the parking brake or deactivate Au‐
tomatic Hold.
5. Switch the engine off.
Transmission position P will be engaged:
▷ Automatically after approx. 30 minutes.
▷ If you remove the remote control from the
ignition lock.
Parking brake
The concept
The parking brake is primarily intended to pre‐
vent the vehicle from rolling while parked; it
brakes the rear wheels.
The parking brake can be set manually or auto‐
matically:
▷ Manual: by pulling and pushing the switch.
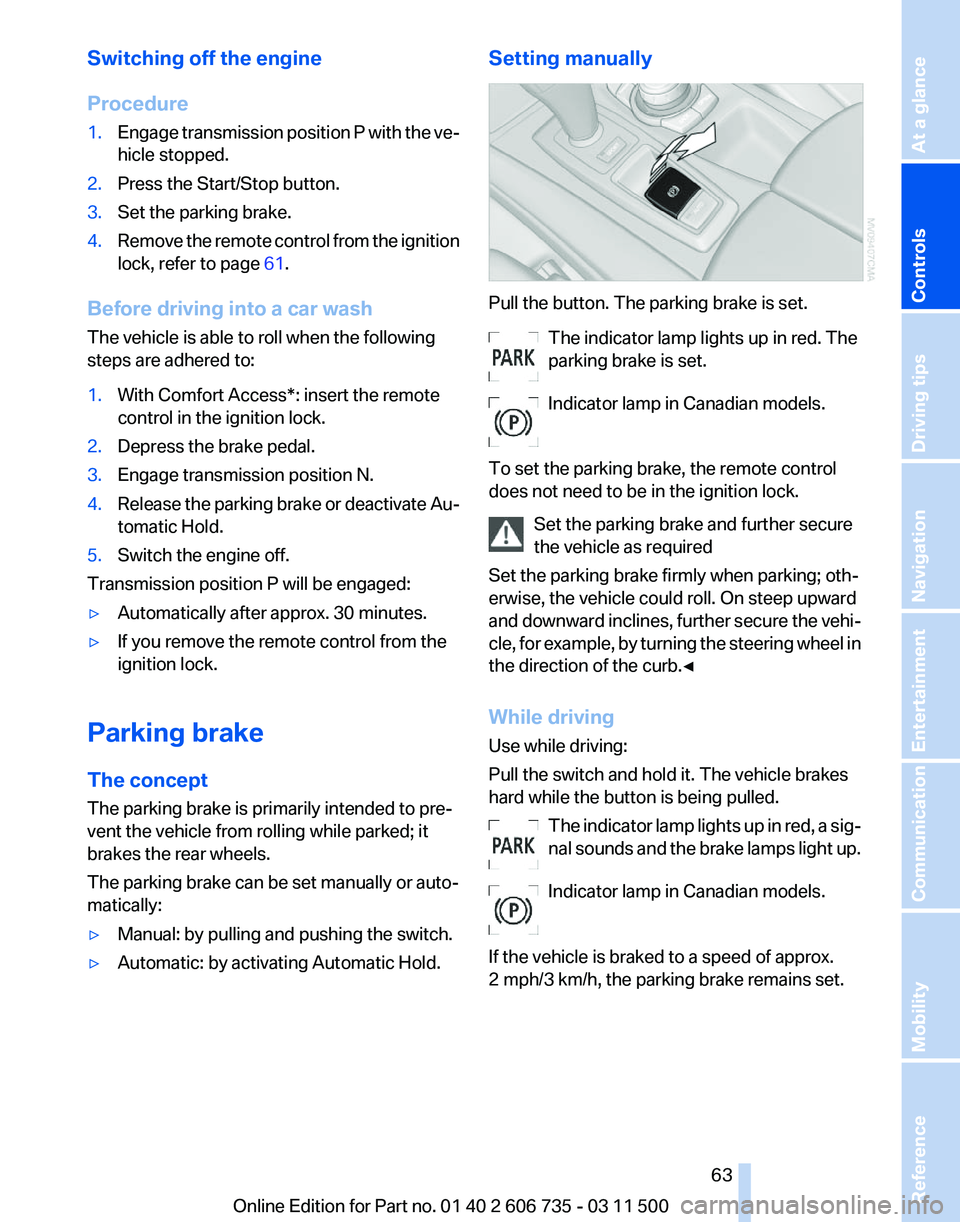
▷ Automatic: by activating Automatic Hold. Setting manually Pull the button. The parking brake is set.
The indicator lamp lights up in red. The
parking brake is set.
Indicator lamp in Canadian models.
To set the parking brake, the remote control
does not need to be in the ignition lock. Set the parking brake and further secure
the vehicle as required
Set the parking brake firmly when parking; oth‐
erwise, the vehicle could roll. On steep upward
and
downward inclines, further secure the vehi‐
cle, for example, by turning the steering wheel in
the direction of the curb.◀
While driving
Use while driving:
Pull the switch and hold it. The vehicle brakes
hard while the button is being pulled.
The indicator lamp lights up in red, a sig‐
nal sounds and the brake lamps light up.
Indicator lamp in Canadian models.
If the vehicle is braked to a speed of approx.
2 mph/3 km/h, the parking brake remains set. Seite 63
63Online Edition for Part no. 01 40 2 606 735 - 03 11 500
Reference Mobility Communication Entertainment Navigation Driving tips
Controls At a glance
Page 65 of 317
Driving
Automatic
Hold is activated: the vehicle is auto‐
matically secured against rolling when it stops.
The indicator lamp lights up in green.
Indicator lamp in Canadian models.
Step on the accelerator pedal to drive off.
The brake is released automatically.
The indicator lamp goes out. Before driving into a car wash
Deactivate Automatic Hold; otherwise, the
parking brake will be set when the vehicle is sta‐
tionary and the vehicle will no longer be able to
roll.◀
Parking
The parking brake is automatically set if the en‐
gine is switched off while the vehicle is being
held by Automatic Hold.
The indicator lamp changes from green
to red.
Indicator lamp in Canadian models.
The parking brake is not set if the engine is
switched off while the vehicle is coasting to a
halt. Automatic Hold is deactivated. Take the remote control with you
Take the remote control with you when
leaving the vehicle so that children, for example,
cannot release the parking brake.◀
Malfunction
In the event of a failure or malfunction of the
parking brake, secure the vehicle against rolling
using a wheel chock, for example, when leaving
it. Releasing the parking brake manually
In the event of an electrical power loss or elec‐
trical malfunction, you can release the parking
brake manually.
Secure the vehicle against rolling
Before releasing the parking brake man‐
ually,
and whenever you park the vehicle with the
parking brake released, ensure that position P of
the automatic transmission is engaged. Note
the display in the instrument cluster.
In addition, secure the vehicle against rolling,
e.g. with a wheel chock. Otherwise there is a
danger that the vehicle could roll if parked on a
steep slope.◀
Jump-starting and towing, refer to page 282.
Unlocking
1. Open the left-hand side panel in the cargo
area.
2. Remove the first aid kit* and the warning tri‐
angle*.
Close the bracket of the warning tri‐
angle.
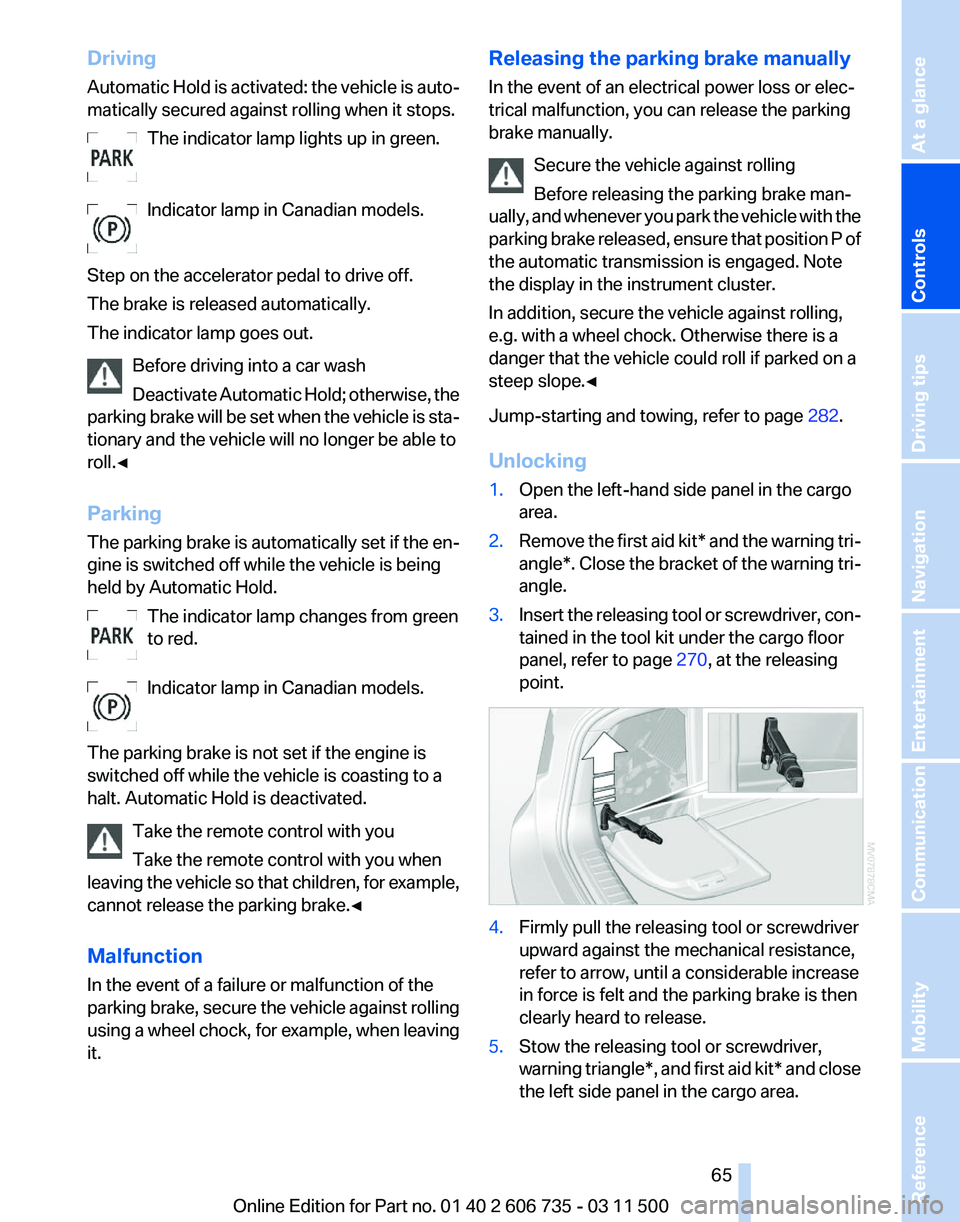
3. Insert the releasing tool or screwdriver, con‐
tained in the tool kit under the cargo floor
panel, refer to page 270, at the releasing
point. 4.
Firmly pull the releasing tool or screwdriver
upward against the mechanical resistance,
refer to arrow, until a considerable increase
in force is felt and the parking brake is then
clearly heard to release.
5. Stow the releasing tool or screwdriver,
warning
triangle*, and first aid kit* and close
the left side panel in the cargo area. Seite 65
65Online Edition for Part no. 01 40 2 606 735 - 03 11 500
Reference Mobility Communication Entertainment Navigation Driving tips
Controls At a glance
Page 69 of 317
Automatic transmission with
Steptronic
Transmission positions
D Drive, automatic position
Position for normal vehicle operation. All for‐
ward gears are available.
Under normal operating conditions, fuel con‐
sumption is lowest when you are driving in po‐
sition D.
Kickdown
Kickdown is used to achieve maximum driving
performance. Press on the accelerator beyond
the resistance point at the full throttle position.
R is Reverse
Select only when the vehicle is stationary.
N is Neutral
Use in automatic car washes, for example. The
vehicle can roll.
When the ignition is switched off, refer to
page
61, position P is engaged automatically.
P Park
Select only when the vehicle is stationary. The
drive wheels are blocked.
P is engaged automatically as soon as the en‐
gine
is switched off unless N is engaged and, in
vehicles with Comfort Access, the remote con‐
trol is inserted in the ignition lock, refer to
page 61. Before leaving the vehicle, ensure that
the transmission position P is engaged; other‐
wise, the vehicle may begin to roll.
Engaging transmission position
▷ Transmission position P can only be disen‐
gaged
if the engine is running and the brake
pedal is pressed.
▷ With the vehicle stationary, press on the
brake pedal before shifting out of P or N;
otherwise, the shift command will not be
executed: shift lock. Press on the brake pedal until you start
driving
To prevent the vehicle from creeping after you
select a driving position, maintain pressure on
the brake pedal until you are ready to start.
◀
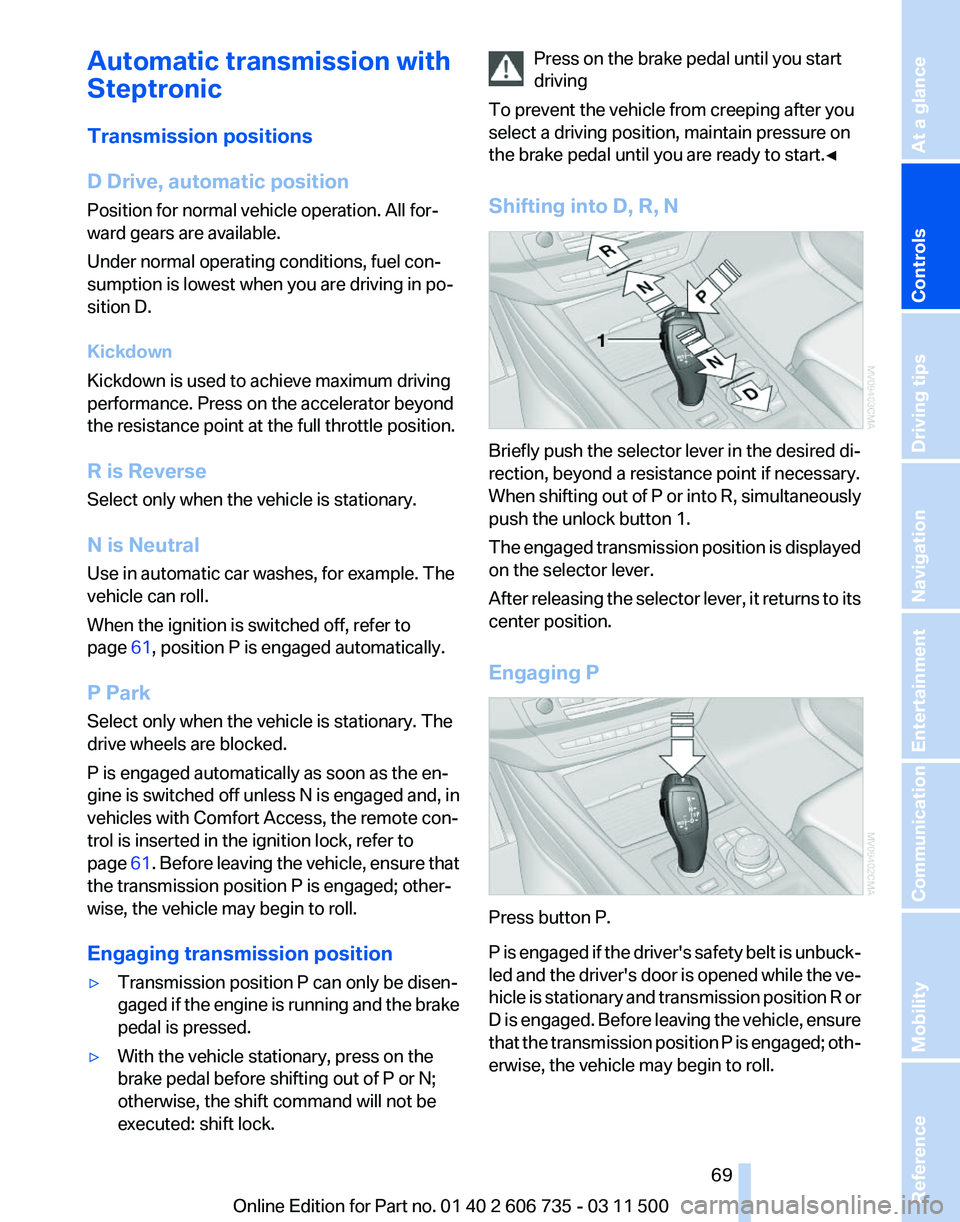
Shifting into D, R, N Briefly push the selector lever in the desired di‐
rection, beyond a resistance point if necessary.
When
shifting out of P or into R, simultaneously
push the unlock button 1.
The engaged transmission position is displayed
on the selector lever.
After releasing the selector lever, it returns to its
center position.
Engaging P Press button P.
P
is engaged if the driver's safety belt is unbuck‐
led and the driver's door is opened while the ve‐
hicle is stationary and transmission position R or
D is engaged. Before leaving the vehicle, ensure
that the transmission position P is engaged; oth‐
erwise, the vehicle may begin to roll. Seite 69
69Online Edition for Part no. 01 40 2 606 735 - 03 11 500
Reference Mobility Communication Entertainment Navigation Driving tips
Controls At a glance
Page 70 of 317
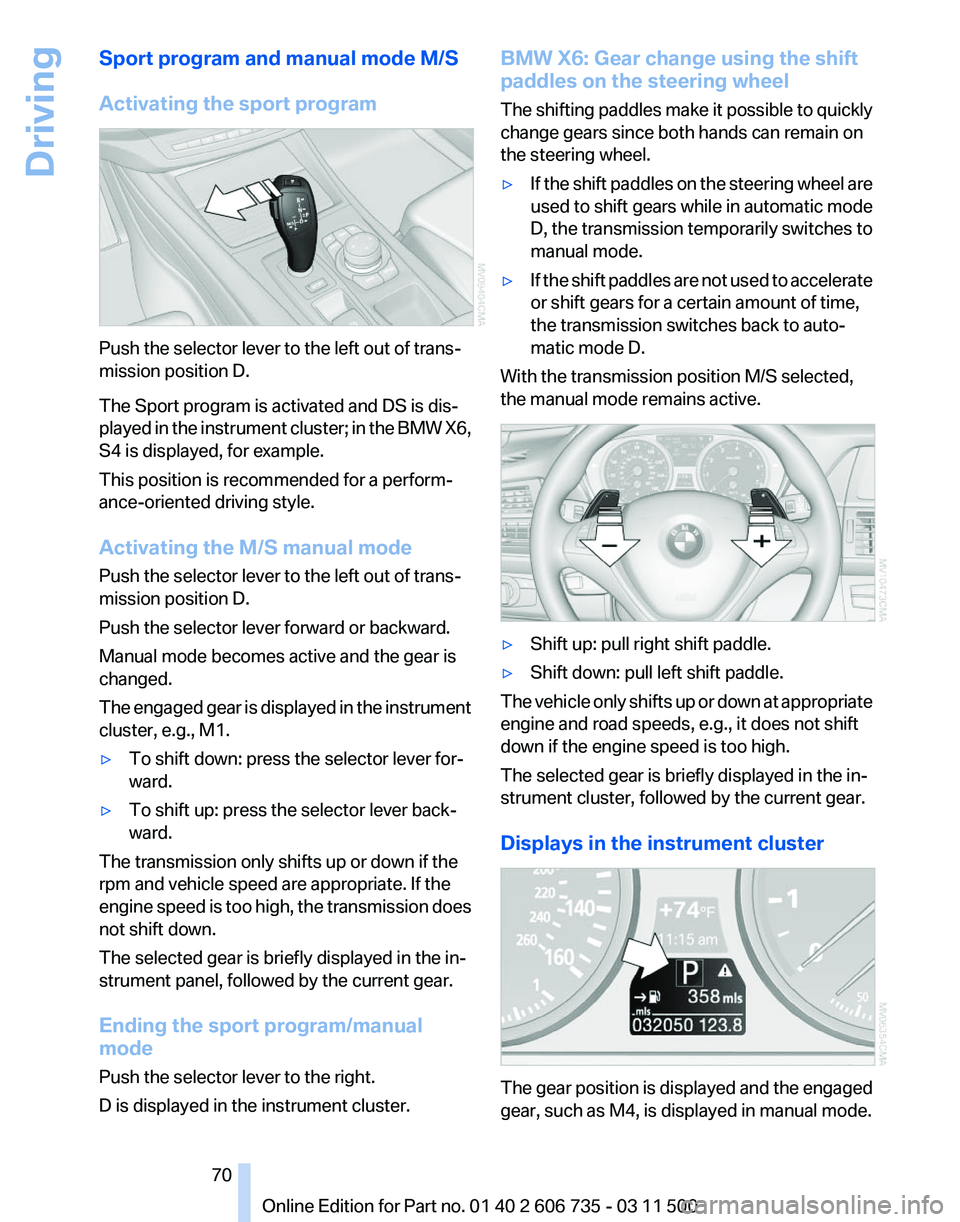
Sport program and manual mode M/S
Activating the sport program
Push the selector lever to the left out of trans‐
mission position D.
The Sport program is activated and DS is dis‐
played
in the instrument cluster; in the BMW X6,
S4 is displayed, for example.
This position is recommended for a perform‐
ance-oriented driving style.
Activating the M/S manual mode
Push the selector lever to the left out of trans‐
mission position D.
Push the selector lever forward or backward.
Manual mode becomes active and the gear is
changed.
The engaged gear is displayed in the instrument
cluster, e.g., M1.
▷ To shift down: press the selector lever for‐
ward.
▷ To shift up: press the selector lever back‐
ward.
The transmission only shifts up or down if the
rpm and vehicle speed are appropriate. If the
engine
speed is too high, the transmission does
not shift down.
The selected gear is briefly displayed in the in‐
strument panel, followed by the current gear.
Ending the sport program/manual
mode
Push the selector lever to the right.
D is displayed in the instrument cluster. BMW X6: Gear change using the shift
paddles on the steering wheel
The
shifting paddles make it possible to quickly
change gears since both hands can remain on
the steering wheel.
▷ If the shift paddles on the steering wheel are
used
to shift gears while in automatic mode
D, the transmission temporarily switches to
manual mode.
▷ If the shift paddles are not used to accelerate
or shift gears for a certain amount of time,
the transmission switches back to auto‐
matic mode D.
With the transmission position M/S selected,
the manual mode remains active. ▷
Shift up: pull right shift paddle.
▷ Shift down: pull left shift paddle.
The vehicle only shifts up or down at appropriate
engine and road speeds, e.g., it does not shift
down if the engine speed is too high.
The selected gear is briefly displayed in the in‐
strument cluster, followed by the current gear.
Displays in the instrument cluster The gear position is displayed and the engaged
gear, such as M4, is displayed in manual mode.
Seite 70
70 Online Edition for Part no. 01 40 2 606 735 - 03 11 500Driving
Page 98 of 317
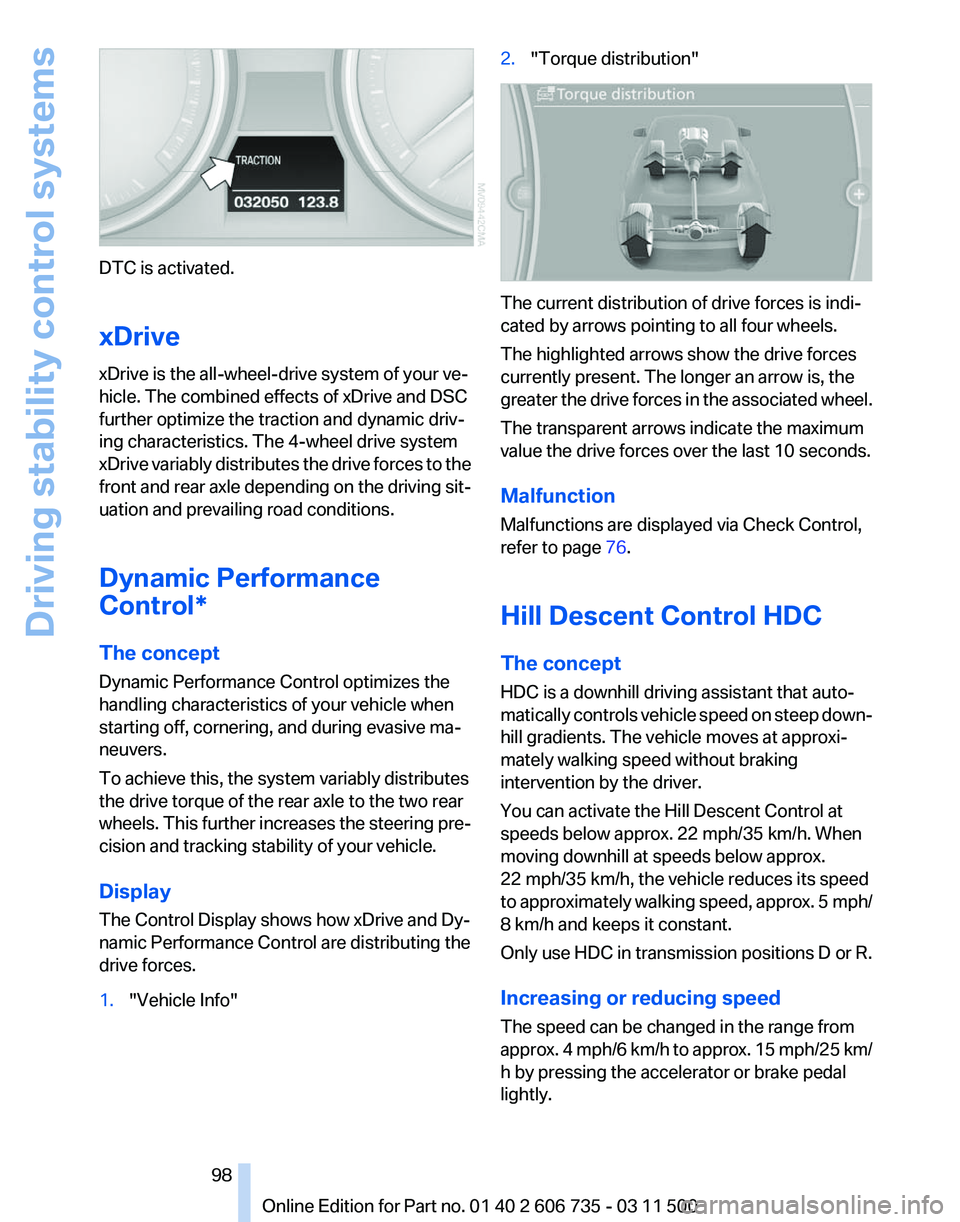
DTC is activated.
xDrive
xDrive is the all-wheel-drive system of your ve‐
hicle. The combined effects of xDrive and DSC
further optimize the traction and dynamic driv‐
ing characteristics. The 4-wheel drive system
xDrive
variably distributes the drive forces to the
front and rear axle depending on the driving sit‐
uation and prevailing road conditions.
Dynamic Performance
Control*
The concept
Dynamic Performance Control optimizes the
handling characteristics of your vehicle when
starting off, cornering, and during evasive ma‐
neuvers.
To achieve this, the system variably distributes
the drive torque of the rear axle to the two rear
wheels. This further increases the steering pre‐
cision and tracking stability of your vehicle.
Display
The Control Display shows how xDrive and Dy‐
namic Performance Control are distributing the
drive forces.
1. "Vehicle Info" 2.
"Torque distribution" The current distribution of drive forces is indi‐
cated by arrows pointing to all four wheels.
The highlighted arrows show the drive forces
currently present. The longer an arrow is, the
greater
the drive forces in the associated wheel.
The transparent arrows indicate the maximum
value the drive forces over the last 10 seconds.
Malfunction
Malfunctions are displayed via Check Control,
refer to page 76.
Hill Descent Control HDC
The concept
HDC is a downhill driving assistant that auto‐
matically controls vehicle speed on steep down‐
hill gradients. The vehicle moves at approxi‐
mately walking speed without braking
intervention by the driver.
You can activate the Hill Descent Control at
speeds below approx. 22 mph/35 km/h. When
moving downhill at speeds below approx.
22 mph/35 km/h, the vehicle reduces its speed
to approximately walking speed, approx. 5 mph/
8 km/h and keeps it constant.
Only use HDC in transmission positions D or R.
Increasing or reducing speed
The speed can be changed in the range from
approx. 4 mph/6 km/h to approx. 15 mph/25 km/
h by pressing the accelerator or brake pedal
lightly.
Seite 98
98 Online Edition for Part no. 01 40 2 606 735 - 03 11 500
Driving stability control systems