Condition BMW X6 XDRIVE 2009 E71 Owner's Manual
[x] Cancel search | Manufacturer: BMW, Model Year: 2009, Model line: X6 XDRIVE, Model: BMW X6 XDRIVE 2009 E71Pages: 317, PDF Size: 9.57 MB
Page 18 of 317
iDrive
16
iDrive
iDrive combines the functions of a large number
of switches. This allows these functions to be
operated from a central position. The following
section provides an introduction to basic menu navigation. The control of the individual func-
tions is described in co
nnection with the rele-
vant equipment.
Controls
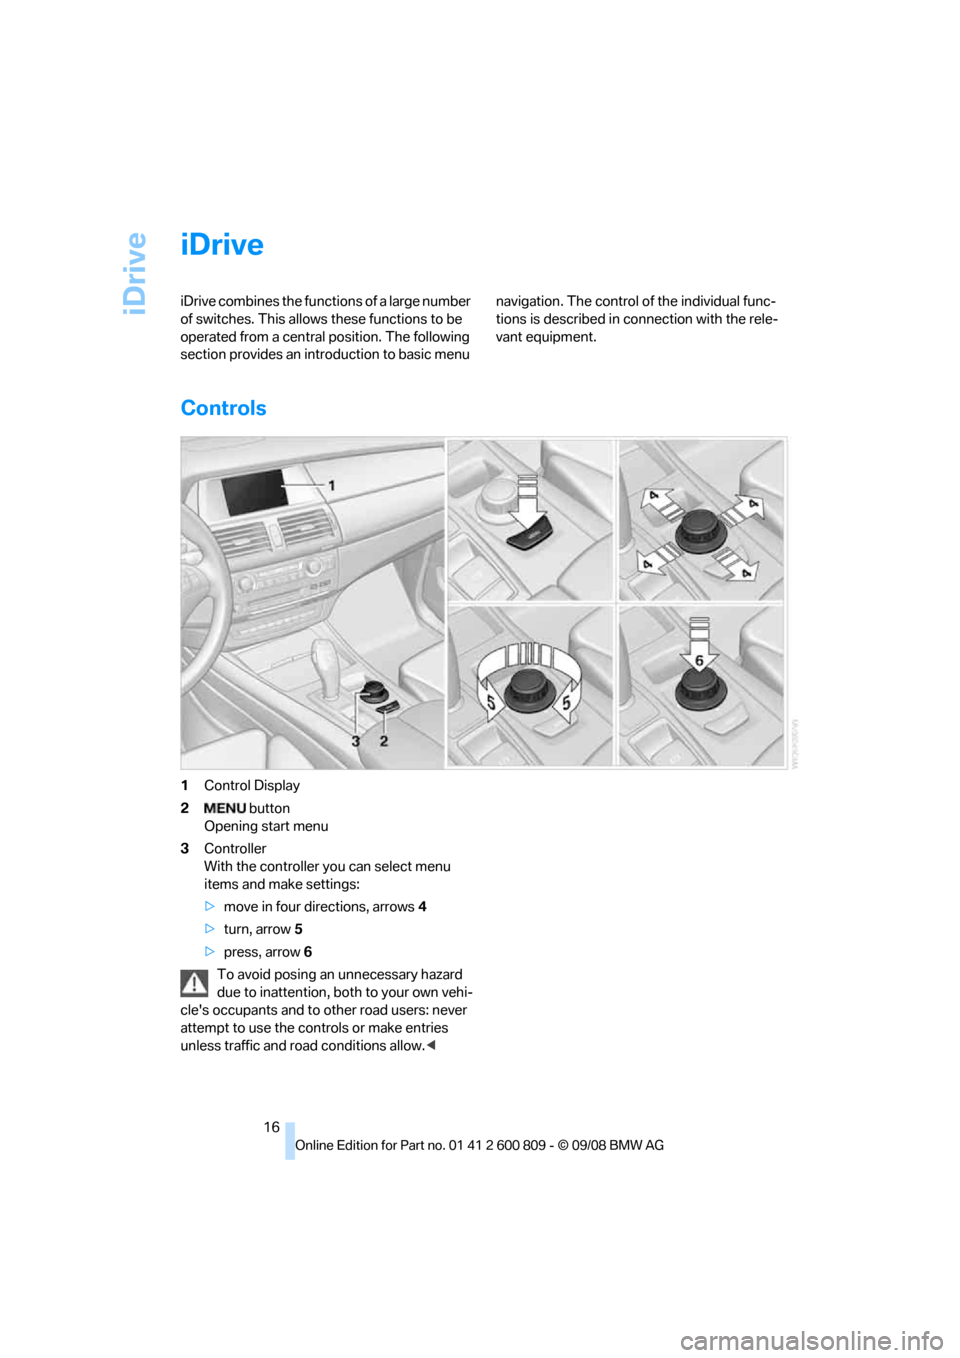
1 Control Display
2 button
Opening start menu
3 Controller
With the controller you can select menu
items and make settings:
>move in four directions, arrows 4
> turn, arrow 5
> press, arrow 6
To avoid posing an unnecessary hazard
due to inattention, bo th to your own vehi-
cle's occupants and to other road users: never
attempt to use the cont rols or make entries
unless traffic and road conditions allow. <
Page 25 of 317
At a glance
23Reference
Controls
Driving tips
Communications
Navigation
Entertainment
Mobility
Voice activation system
The concept
The voice activation system allows you to con-
trol operation of various vehicle systems with-
out ever removing your hands from the steering
wheel.
Individual menu items on the Control Display
can be spoken as commands. This frees you of
having to use the controller.
The voice activation system transforms your
oral commands into control signals for the
selected systems and provides support in the
form of instructions or questions.
The voice activation system uses a special
microphone located in th e area of the interior
rearview mirror, refer to page 14.
Precondition
Via iDrive, set the langua ge that applies for the
voice activation system in order to enable iden-
tification of the spoken commands. To set the
language of iDrive, refer to page 90.
Symbols in Owner's Manual
Voice commands
Activating voice command system
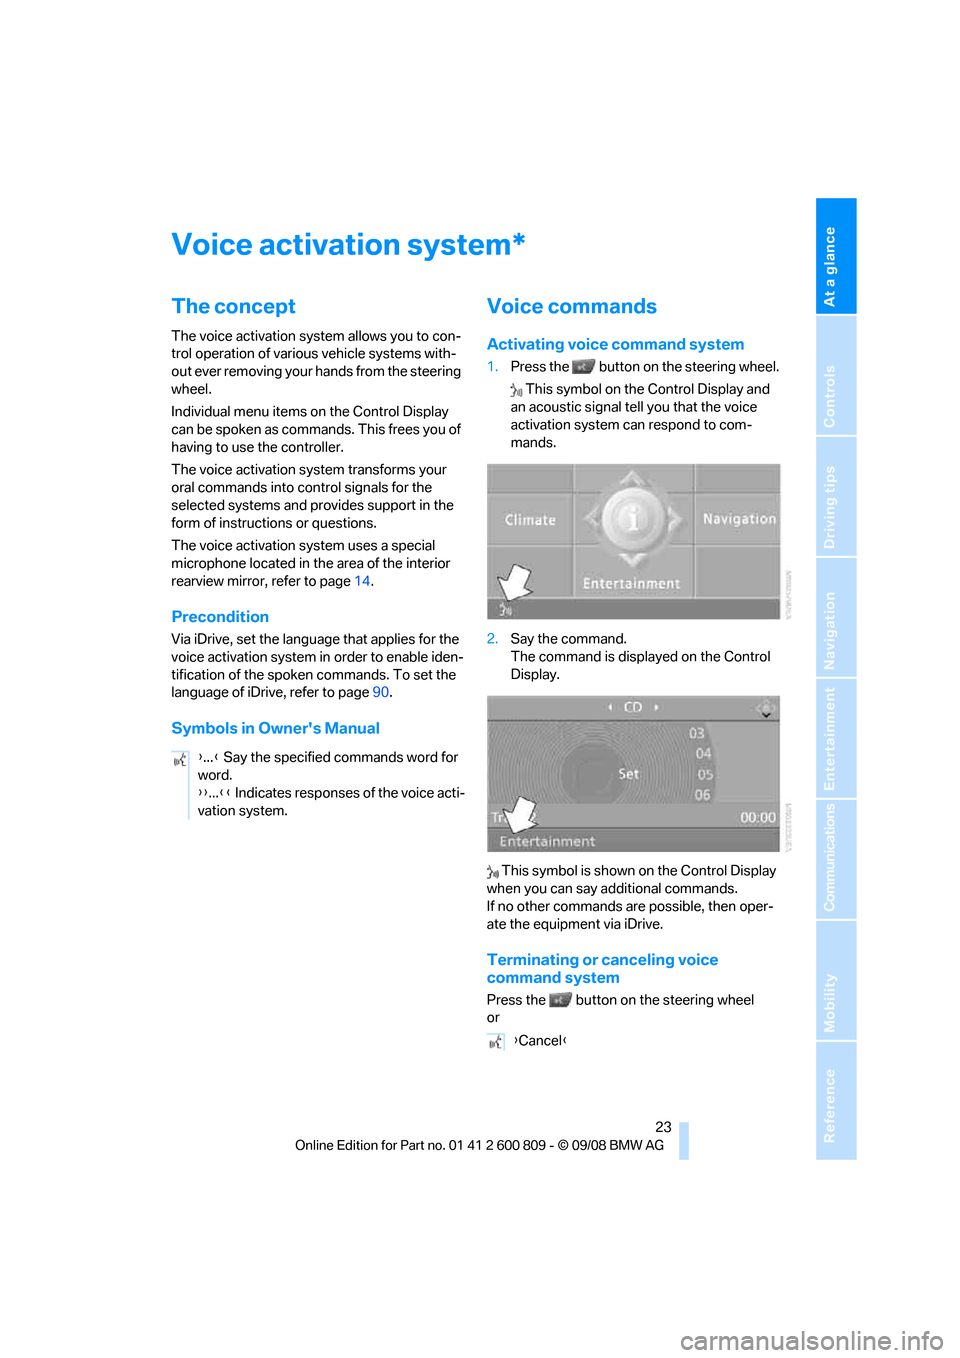
1.Press the button on the steering wheel.
This symbol on the Control Display and
an acoustic signal tell you that the voice
activation system can respond to com-
mands.
2. Say the command.
The command is displayed on the Control
Display.
This symbol is shown on the Control Display
when you can say a dditional commands.
If no other commands are possible, then oper-
ate the equipment via iDrive.
Terminating or canceling voice
command system
Press the button on the steering wheel
or
*
{ ...} Say the specified commands word for
word.
{{ ...}} Indicates responses of the voice acti-
vation system.
{ Cancel }
Page 33 of 317
Controls
31Reference
At a glance
Driving tips
Communications
Navigation
Entertainment
Mobility
During opening, the liftgate pivots back
and up. Ensure that adequate clearance is
available before opening.
To prevent accidentally locking yourself out,
never lay the remo te control in the cargo bay.
A previously locked liftgate is also locked again
after closing. <
If pointed or sharp- edged objects could
strike the rear window while driving, be
sure to provide protecti on around all edges.
Failure to do so could re sult in damage to the
heating conductors of the rear window.<
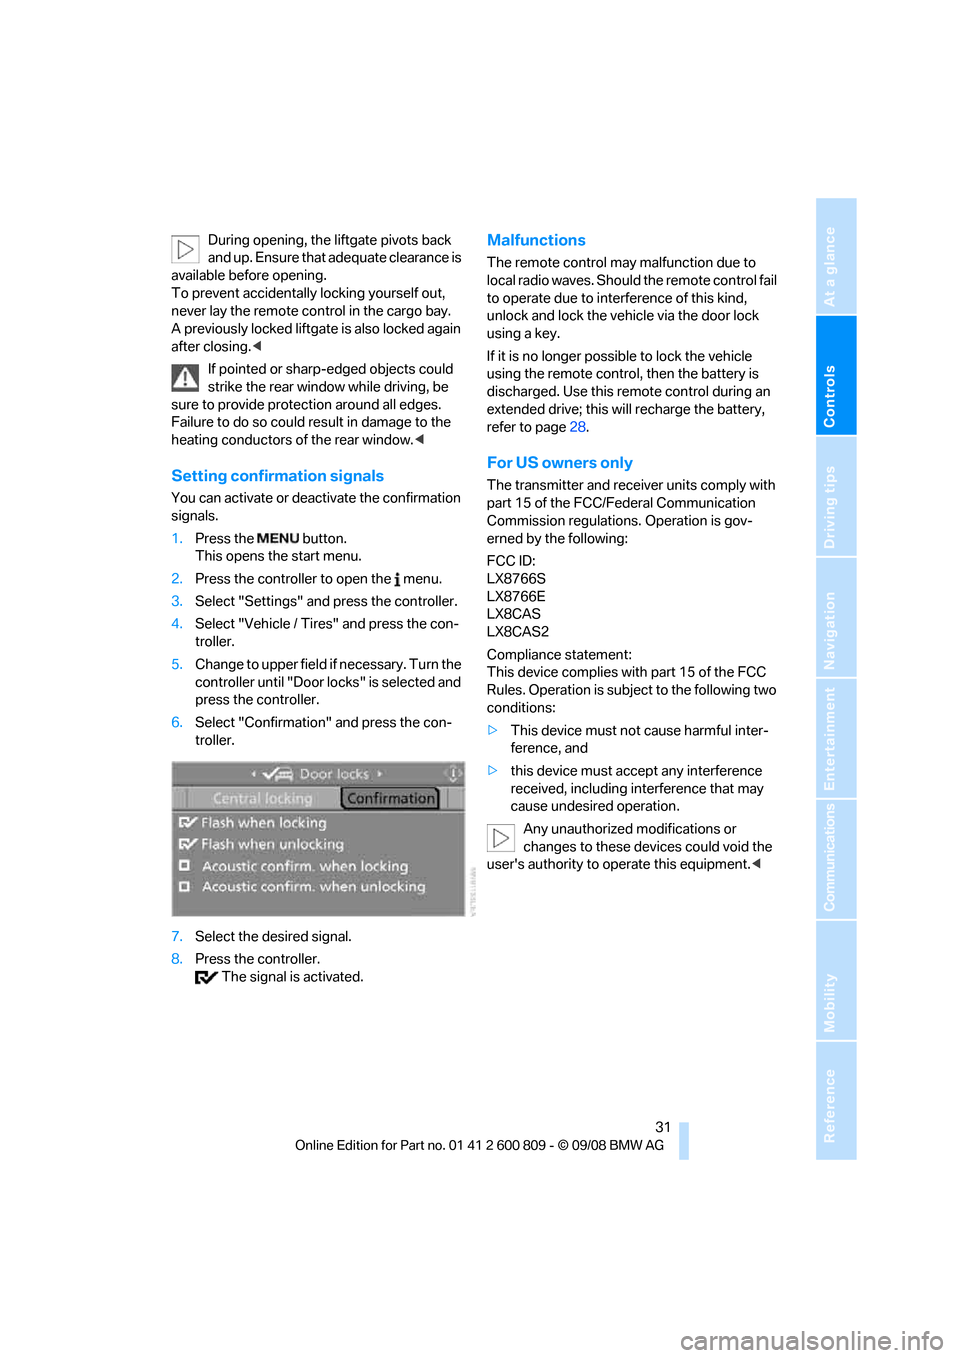
Setting confirmation signals
You can activate or deac tivate the confirmation
signals.
1. Press the button.
This opens the start menu.
2. Press the controller to open the menu.
3. Select "Settings" and press the controller.
4. Select "Vehicle / Tire s" and press the con-
troller.
5. Change to upper field if necessary. Turn the
controller until "Door locks" is selected and
press the controller.
6. Select "Confirmation" and press the con-
troller.
7. Select the desired signal.
8. Press the controller.
The signal is activated.
Malfunctions
The remote control may malfunction due to
local radio waves. Should the remote control fail
to operate due to interference of this kind,
unlock and lock the vehicle via the door lock
using a key.
If it is no longer possible to lock the vehicle
using the remote control, then the battery is
discharged. Use this remote control during an
extended drive; this w ill recharge the battery,
refer to page 28.
For US owners only
The transmitter and receiver units comply with
part 15 of the FCC/Federal Communication
Commission regulations. Operation is gov-
erned by the following:
FCC ID:
LX8766S
LX8766E
LX8CAS
LX8CAS2
Compliance statement:
This device complies with part 15 of the FCC
Rules. Operation is subject to the following two
conditions:
> This device must not cause harmful inter-
ference, and
> this device must accept any interference
received, including in terference that may
cause undesired operation.
Any unauthorized modifications or
changes to these devices could void the
user's authority to operate this equipment. <
Page 73 of 317
Controls
71Reference
At a glance
Driving tips
Communications
Navigation
Entertainment
Mobility
The transmission automatically shifts into
park if you release the driver's safety belt
and open the driver's door with the engine run-
ning while in re verse or drive.
The picture from the rear view camera
* and
PDC Park Distance Control
* on the Control
Display is hidden. <
R Reverse
Select only with the vehicle stationary.
An interlock prevents inadvertent gearshifts
into transmission position R. To deactivate the
interlock, press the release button 1.
P Park
Select only with the vehicle stationary. The rear
wheels are locked.
P is engaged automatically as soon as
you switch off the engine unless N is
engaged and on vehicles with comfort access
the remote control is inserted in the ignition
lock, refer to page 65.<
N Neutral
Can, for example, be engaged in automatic car
washes. The vehicle can roll.
N remains engaged even after the engine
is switched off whenever you leave the
remote control in the ignition lock. This function
is used, for example, in a car wash, refer to
page 66. After approx. 30 minutes P is auto-
matically engaged. <
D Drive, automatic position
Position for normal vehi cle operation. All for-
ward gears are available.
Under normal operating conditions, the fuel
consumption is lowest when driving in posi-
tion D.
Kick-down
The kick-down mode provides maximum accel-
eration.
Press the accelerato r pedal beyond the
increased resistance at full throttle.
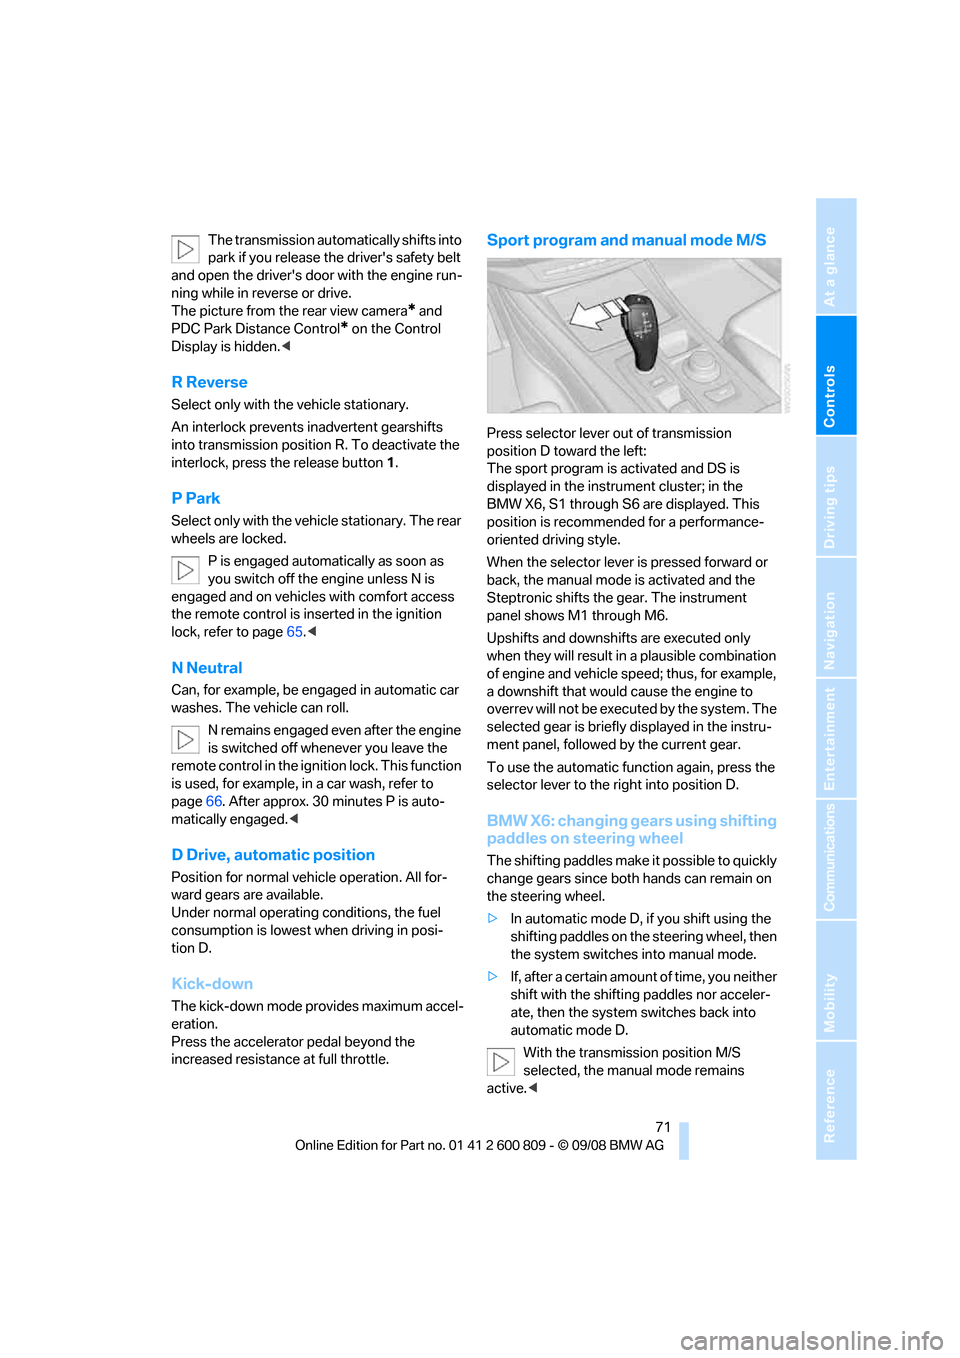
Sport program and manual mode M/S
Press selector lever out of transmission
position D toward the left:
The sport program is activated and DS is
displayed in the instru ment cluster; in the
BMW X6, S1 through S6 are displayed. This
position is recommend ed for a performance-
oriented driving style.
When the selector lever is pressed forward or
back, the manual mode is activated and the
Steptronic shifts the gear. The instrument
panel shows M1 through M6.
Upshifts and downshifts are executed only
when they will result in a plausible combination
of engine and vehicle speed; thus, for example,
a downshift that would cause the engine to
overrev will not be executed by the system. The
selected gear is briefly displayed in the instru-
ment panel, followed by the current gear.
To use the automatic func tion again, press the
selector lever to the right into position D.
BMW X6: changing gears using shifting
paddles on steering wheel
The shifting paddles make it possible to quickly
change gears since both hands can remain on
the steering wheel.
> In automatic mode D, if you shift using the
shifting paddles on the steering wheel, then
the system switches into manual mode.
> If, after a certain amount of time, you neither
shift with the shifting paddles nor acceler-
ate, then the system switches back into
automatic mode D.
With the transmission position M/S
selected, the manual mode remains
active.<
Page 77 of 317
Controls
75Reference
At a glance
Driving tips
Communications
Navigation
Entertainment
Mobility
Windshield washer nozzles
Both windshield washer nozzles are automati-
cally heated with the engine running or the igni-
tion switched on.
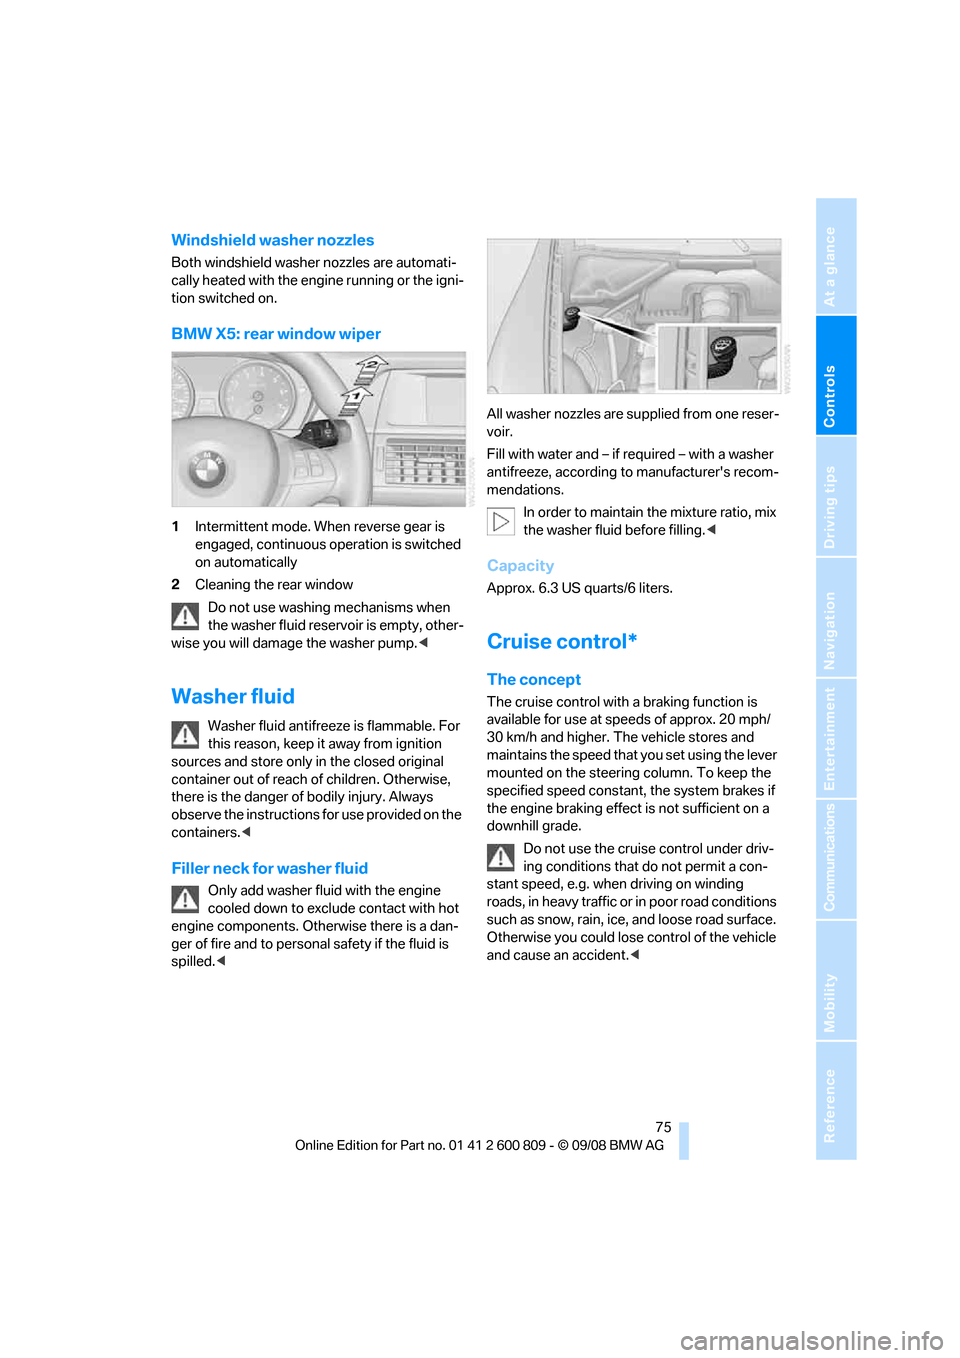
BMW X5: rear window wiper
1Intermittent mode. When reverse gear is
engaged, continuous operation is switched
on automatically
2 Cleaning the rear window
Do not use washing mechanisms when
the washer fluid reservoir is empty, other-
wise you will damage the washer pump. <
Washer fluid
Washer fluid antifreeze is flammable. For
this reason, keep it away from ignition
sources and store only in the closed original
container out of reach of children. Otherwise,
there is the danger of bodily injury. Always
observe the instructions for use provided on the
containers. <
Filler neck for washer fluid
Only add washer fluid with the engine
cooled down to excl ude contact with hot
engine components. Otherwise there is a dan-
ger of fire and to personal safety if the fluid is
spilled. < All washer nozzles are supplied from one reser-
voir.
Fill with water and – if re
quired – with a washer
antifreeze, according to manufacturer's recom-
mendations.
In order to maintain the mixture ratio, mix
the washer fluid before filling. <
Capacity
Approx. 6.3 US quarts/6 liters.
Cruise control*
The concept
The cruise control with a braking function is
available for use at speeds of approx. 20 mph/
30 km/h and higher. The vehicle stores and
maintains the speed that you set using the lever
mounted on the steering column. To keep the
specified speed constant, the system brakes if
the engine braking effect is not sufficient on a
downhill grade.
Do not use the cruise control under driv-
ing conditions that do not permit a con-
stant speed, e.g. when driving on winding
roads, in heavy traffic or in poor road conditions
such as snow, rain, ice, and loose road surface.
Otherwise you could lose control of the vehicle
and cause an accident. <
Page 86 of 317
Everything under control
84
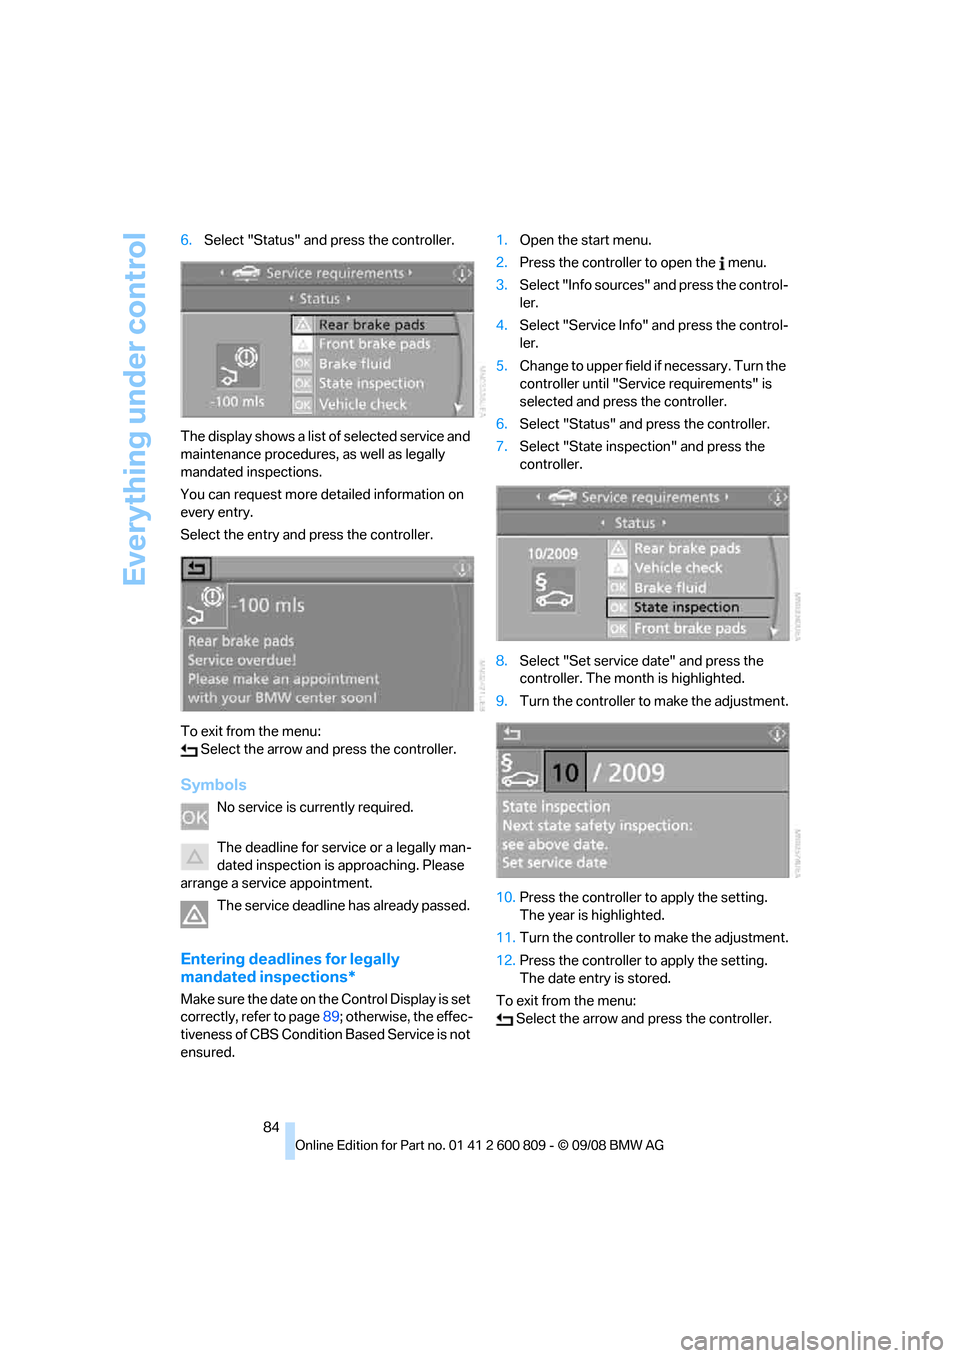
6.
Select "Status" and press the controller.
The display shows a list of selected service and
maintenance procedures , as well as legally
mandated inspections.
You can request more detailed information on
every entry.
Select the entry and press the controller.
To exit from the menu: Select the arrow and press the controller.
Symbols
No service is currently required.
The deadline for service or a legally man-
dated inspection is approaching. Please
arrange a service appointment.
The service deadline has already passed.
Entering deadlines for legally
mandated inspections*
Make sure the date on the Control Display is set
correctly, refer to page 89; otherwise, the effec-
tiveness of CBS Condition Based Service is not
ensured. 1.
Open the start menu.
2. Press the controller to open the menu.
3. Select "Info sources" and press the control-
ler.
4. Select "Service Info" and press the control-
ler.
5. Change to upper field if necessary. Turn the
controller until "Service requirements" is
selected and press the controller.
6. Select "Status" and press the controller.
7. Select "State inspection" and press the
controller.
8. Select "Set service date" and press the
controller. The mont h is highlighted.
9. Turn the controller to make the adjustment.
10. Press the controller to apply the setting.
The year is highlighted.
11. Turn the controller to make the adjustment.
12. Press the controller to apply the setting.
The date entry is stored.
To exit from the menu: Select the arrow and press the controller.
Page 91 of 317
Controls
89Reference
At a glance
Driving tips
Communications
Navigation
Entertainment
Mobility
Setting time format
1.Select "Time format" and press the control-
ler.
2. Select the desired format and press the
controller.
The setting is stored for the remote control cur-
rently in use.
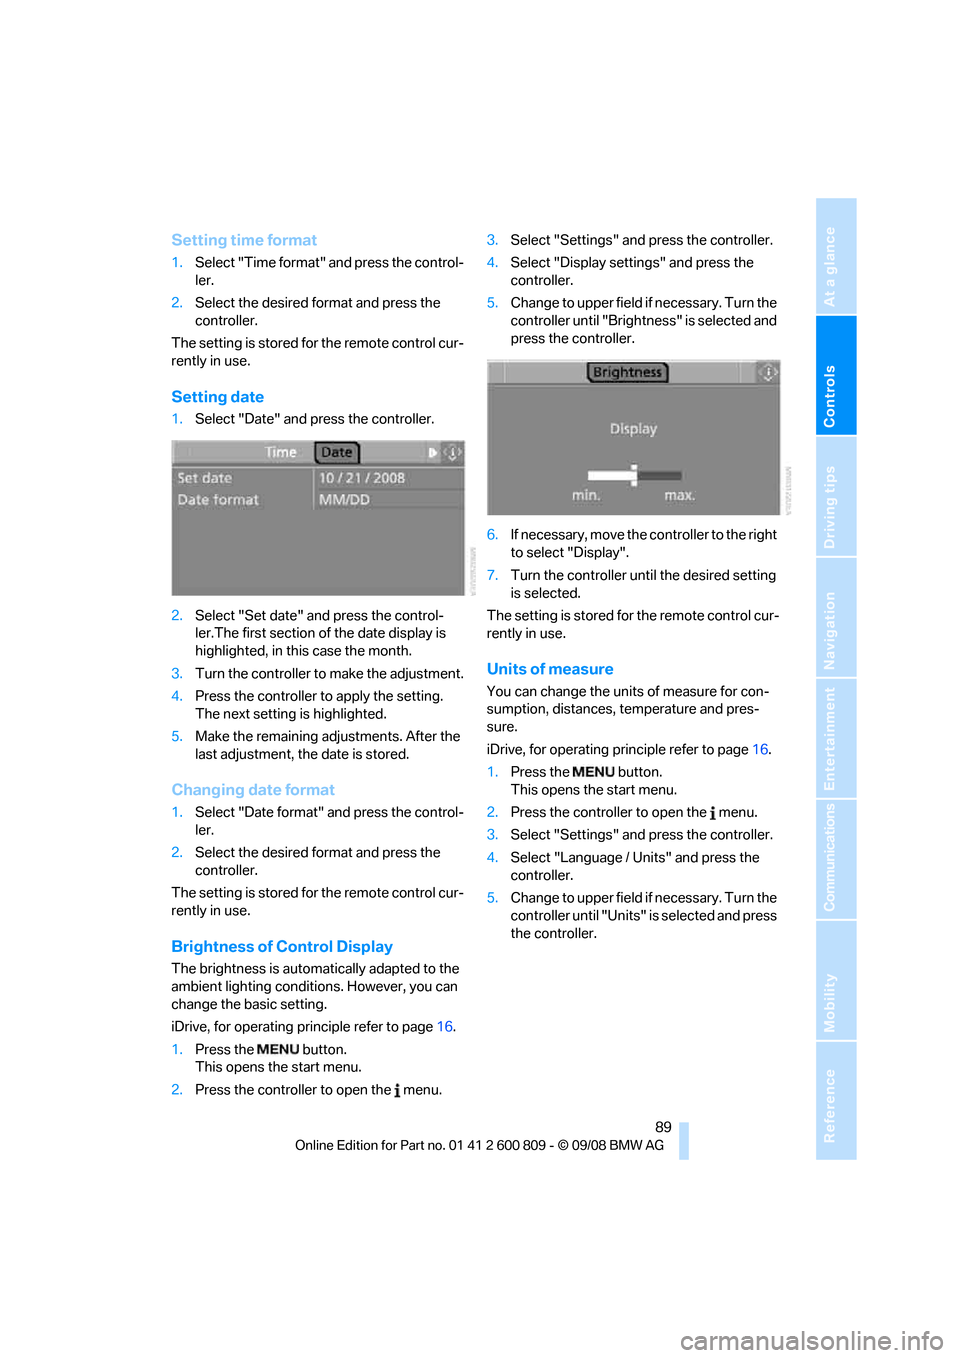
Setting date
1. Select "Date" and press the controller.
2. Select "Set date" and press the control-
ler.The first section of the date display is
highlighted, in this case the month.
3. Turn the controller to make the adjustment.
4. Press the controller to apply the setting.
The next setting is highlighted.
5. Make the remaining ad justments. After the
last adjustment, the date is stored.
Changing date format
1. Select "Date format" and press the control-
ler.
2. Select the desired format and press the
controller.
The setting is stored for the remote control cur-
rently in use.
Brightness of Control Display
The brightness is automatically adapted to the
ambient lighting conditions. However, you can
change the basic setting.
iDrive, for operating principle refer to page 16.
1. Press the button.
This opens the start menu.
2. Press the controller to open the menu. 3.
Select "Settings" and press the controller.
4. Select "Display settings" and press the
controller.
5. Change to upper field if necessary. Turn the
controller until "Brightn ess" is selected and
press the controller.
6. If necessary, move the controller to the right
to select "Display".
7. Turn the controller until the desired setting
is selected.
The setting is stored for the remote control cur-
rently in use.
Units of measure
You can change the units of measure for con-
sumption, distances, temperature and pres-
sure.
iDrive, for operating pr inciple refer to page16.
1. Press the button.
This opens the start menu.
2. Press the controller to open the menu.
3. Select "Settings" and press the controller.
4. Select "Language / Units" and press the
controller.
5. Change to upper field if necessary. Turn the
controller until "Units" is selected and press
the controller.
Page 98 of 317
Technology for comfort, convenience and safety
96
Cleaning rear view camera
The lens of the rear view camera is located on
the liftgate.
The picture quality of the rear view camera may
be impaired by dirt. Clean the lens with a moist,
nonabrasive cloth.
The lens is automatically heated in case of frost.
Driving stability control
systems
Your BMW is equipped wi th an extended array
of systems designed to enhance and maintain
vehicle stability under extreme conditions.
ABS Antilock Brake System
ABS prevents locking of the wheels during
braking. Safe steering response is maintained
even during full braking. Active safety is thus
increased.
ABS is operational every time you start the
engine. Braking safely, refer to page 140.
CBC Cornering Brake Control
When braking during curves or when braking
during a lane change, dr iving stability and steer-
ing response are improved further.
Electronic brake-force distribution
The system controls the brake pressure in the
rear wheels to ensure st able braking behavior.
Brake assistant
When you apply the brakes rapidly, this system
automatically produces the maximum braking
force boost and thus helps to achieve the short- est possible braking distance during full brak-
ing. This system exploits all of the benefits pro-
vided by ABS.
Do not reduce th
e pressure on the brake pedal
for the duration of the full braking.
DSC Dynamic Stability Control
DSC prevents traction lo ss in the driving wheels
when starting off and accelerating. The system
also identifies unstable driving conditions, such
as a loss of traction at the rear of the vehicle or
sliding of the vehicle in its front wheels. In these
cases, DSC helps the vehicle maintain a safe
course within physical lim its by reducing engine
output and through braking actions in the indi-
vidual wheels.
The laws of physics cannot be repealed,
even with DSC. An appropriate driving
style remains the responsibility of the driver.
Therefore, do not restrict the additional safety
margin with a risky driving style, as otherwise
there is a risk of an accident. <
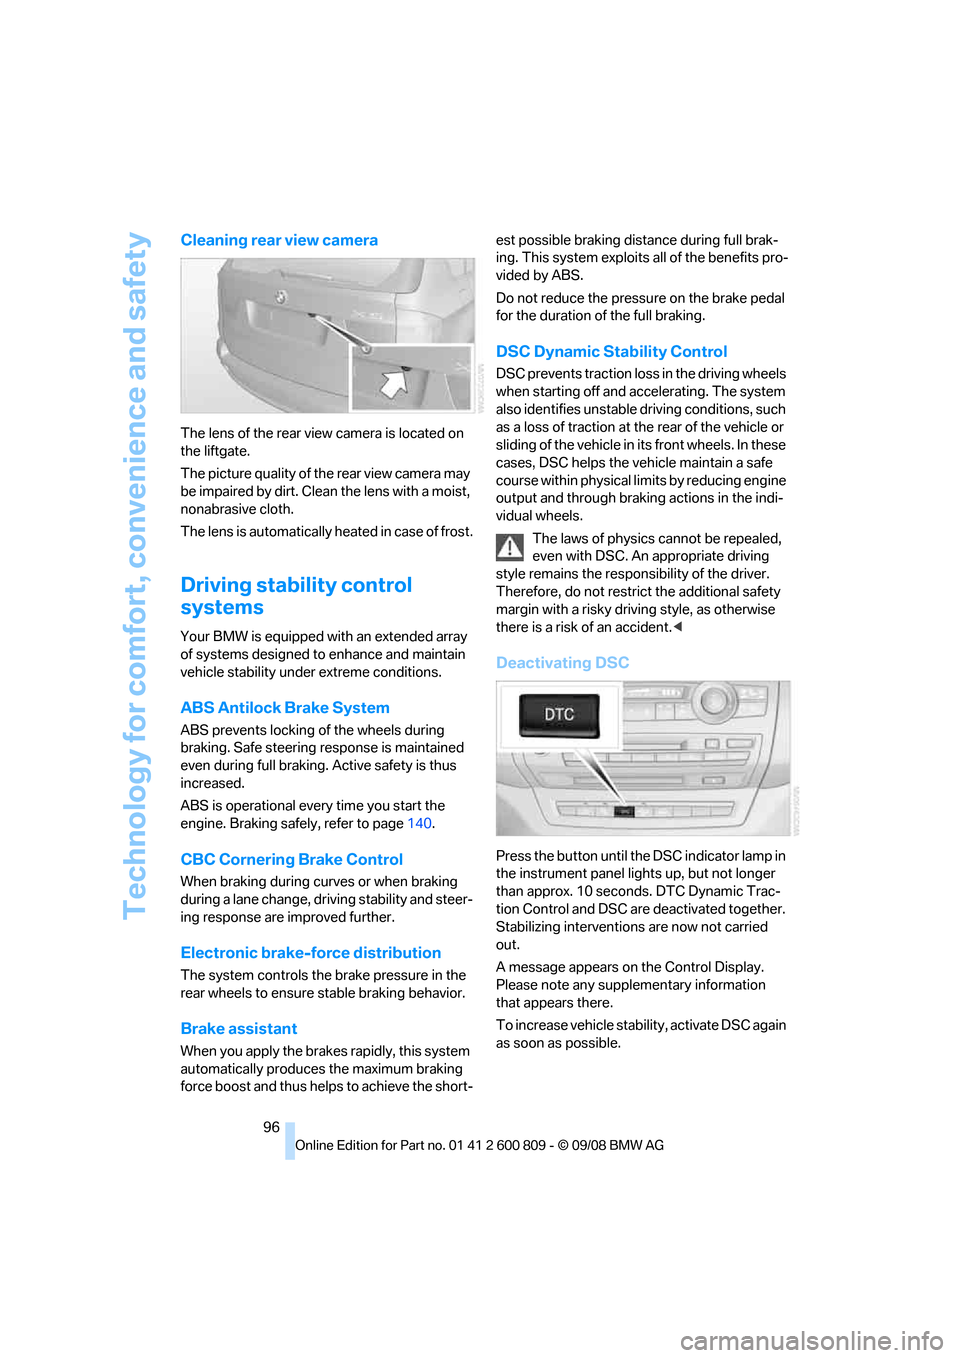
Deactivating DSC
Press the button until the DSC indicator lamp in
the instrument panel lights up, but not longer
than approx. 10 seconds. DTC Dynamic Trac-
tion Control and DSC ar e deactivated together.
Stabilizing intervention s are now not carried
out.
A message appears on the Control Display.
Please note any supplementary information
that appears there.
To increase vehicle stability, activate DSC again
as soon as possible.
Page 99 of 317
Controls
97Reference
At a glance
Driving tips
Communications
Navigation
Entertainment
Mobility
Activating DSC
Press the button; the indicator lamp in the
instrument panel goes out.
For better control
The indicator lamp flashes:
DSC controls the drive forces and
brake forces.
The indicator lamps light up:
DSC is deactivated.
DTC Dynamic Traction Control
DTC is a version of DSC in which the drive out-
put is optimized for particular road conditions,
e.g. unplowed snow-covered roads. The sys-
tem assures the maximal drive output, but with
reduced driving stability. It is therefore neces-
sary to drive with appropriate caution.
You may find it useful to briefly activate DTC
under the following special circumstances:
> When driving in sand, on snowy inclines, in
slush or on unplowed, snow-covered road
surfaces
> When rocking a stuck vehicle free or start-
ing off in deep snow, sand or on loose
ground
> When driving with snow chains
*
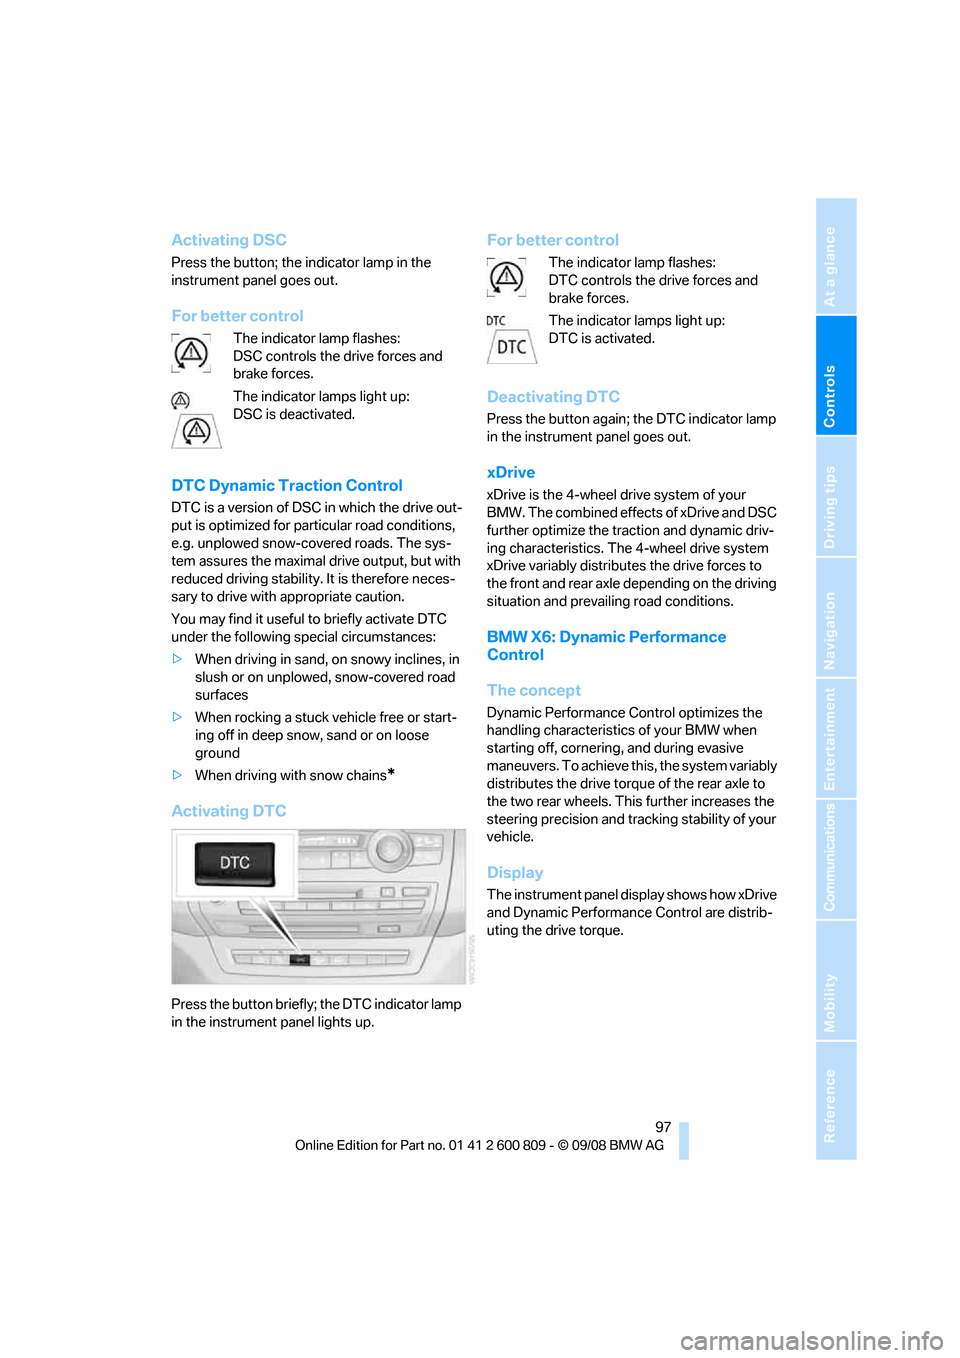
Activating DTC
Press the button briefly; the DTC indicator lamp
in the instrument panel lights up.
For better control
The indicator lamp flashes:
DTC controls the drive forces and
brake forces.
The indicator lamps light up:
DTC is activated.
Deactivating DTC
Press the button again; the DTC indicator lamp
in the instrument panel goes out.
xDrive
xDrive is the 4-wheel drive system of your
BMW. The combined effects of xDrive and DSC
further optimize the traction and dynamic driv-
ing characteristics. The 4-wheel drive system
xDrive variably distributes the drive forces to
the front and rear axle depending on the driving
situation and prevailing road conditions.
BMW X6: Dynamic Performance
Control
The concept
Dynamic Performance Control optimizes the
handling characteristic s of your BMW when
starting off, cornering, and during evasive
maneuvers. To achieve this, the system variably
distributes the drive torque of the rear axle to
the two rear wheels. This further increases the
steering precision and tracking stability of your
vehicle.
Display
The instrument panel display shows how xDrive
and Dynamic Performanc e Control are distrib-
uting the drive torque.
Page 100 of 317
Technology for comfort, convenience and safety
98
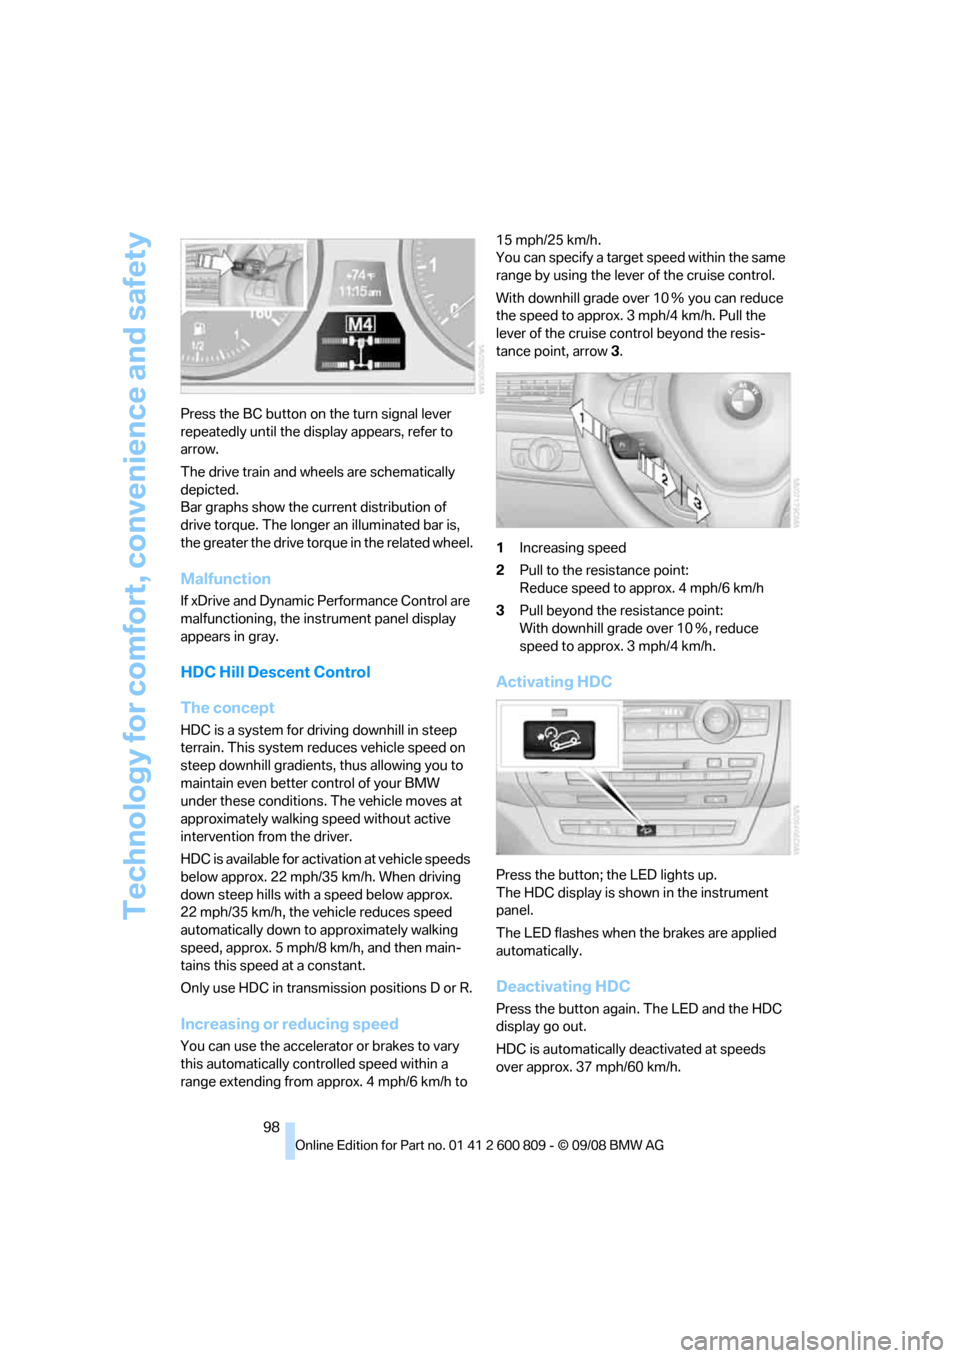
Press the BC button on the turn signal lever
repeatedly until the disp
lay appears, refer to
arrow.
The drive train and wheels are schematically
depicted.
Bar graphs show the cu rrent distribution of
drive torque. The longer an illuminated bar is,
the greater the drive torq ue in the related wheel.
Malfunction
If xDrive and Dynamic Performance Control are
malfunctioning, the instrument panel display
appears in gray.
HDC Hill Descent Control
The concept
HDC is a system for driving downhill in steep
terrain. This system reduces vehicle speed on
steep downhill gradients, thus allowing you to
maintain even better control of your BMW
under these conditions. The vehicle moves at
approximately walking speed without active
intervention from the driver.
HDC is available for activation at vehicle speeds
below approx. 22 mph/35 km/h. When driving
down steep hills with a speed below approx.
22 mph/35 km/h, the vehicle reduces speed
automatically down to approximately walking
speed, approx. 5 mph/8 km/h, and then main-
tains this speed at a constant.
Only use HDC in transmission positions D or R.
Increasing or reducing speed
You can use the accelerator or brakes to vary
this automatically cont rolled speed within a
range extending from approx. 4 mph/6 km/h to 15 mph/25 km/h.
You can specify a target
speed within the same
range by using the lever of the cruise control.
With downhill grade over 10 Ξ you can reduce
the speed to approx. 3mph/4km/h. Pull the
lever of the cruise control beyond the resis-
tance point, arrow 3.
1 Increasing speed
2 Pull to the resistance point:
Reduce speed to approx. 4 mph/6 km/h
3 Pull beyond the re sistance point:
With downhill grade over 10 Ξ, reduce
speed to approx. 3 mph/4 km/h.
Activating HDC
Press the button; the LED lights up.
The HDC display is shown in the instrument
panel.
The LED flashes when the brakes are applied
automatically.
Deactivating HDC
Press the button again. The LED and the HDC
display go out.
HDC is automatically deactivated at speeds
over approx. 37 mph/60 km/h.