radio controls BMW X6 XDRIVE 35I 2014 User Guide
[x] Cancel search | Manufacturer: BMW, Model Year: 2014, Model line: X6 XDRIVE 35I, Model: BMW X6 XDRIVE 35I 2014Pages: 323, PDF Size: 8.36 MB
Page 125 of 323
▷Right LED on, recirculated air mode: the
supply of outside air into the vehicle is per‐
manently blocked.
If the windows are fogged over, switch off the
recirculated-air mode and press the AUTO
button to utilize the condensation sensor.
Make sure that air can flow onto the wind‐
shield.
Continuous recirculated-air mode
The recirculated air mode should not be
used for an extended period of time, as the air
quality inside the vehicle deteriorates stead‐
ily.◀
Residual heat
The heat stored in the engine is used to heat
the interior.
Functional requirement
▷Up to 15 minutes after the engine has been
switched off.▷Warm engine.▷The battery is sufficiently charged.▷External temperature below 77 ℉/25 ℃.
Switching on
1.Switch off the ignition.2.Press the right-hand button.
REST appears on the display of the automatic
climate control when the residual heat utiliza‐
tion is switched on.
From radio readiness the interior temperature,
the air volume and the air distribution can be
set.
Switching off
You can select the lowest blower speed by
pressing and holding the left side. Pressing
again switches off the residual heat utilization.
REST disappears from the display of the auto‐
matic climate control.
Switching on/off the automatic
climate control
Switching off With the blower at its lowest setting,
press the left side of the button to
switch off the automatic climate control.
Switching on Press any button to switch the automatic cli‐mate control back on.
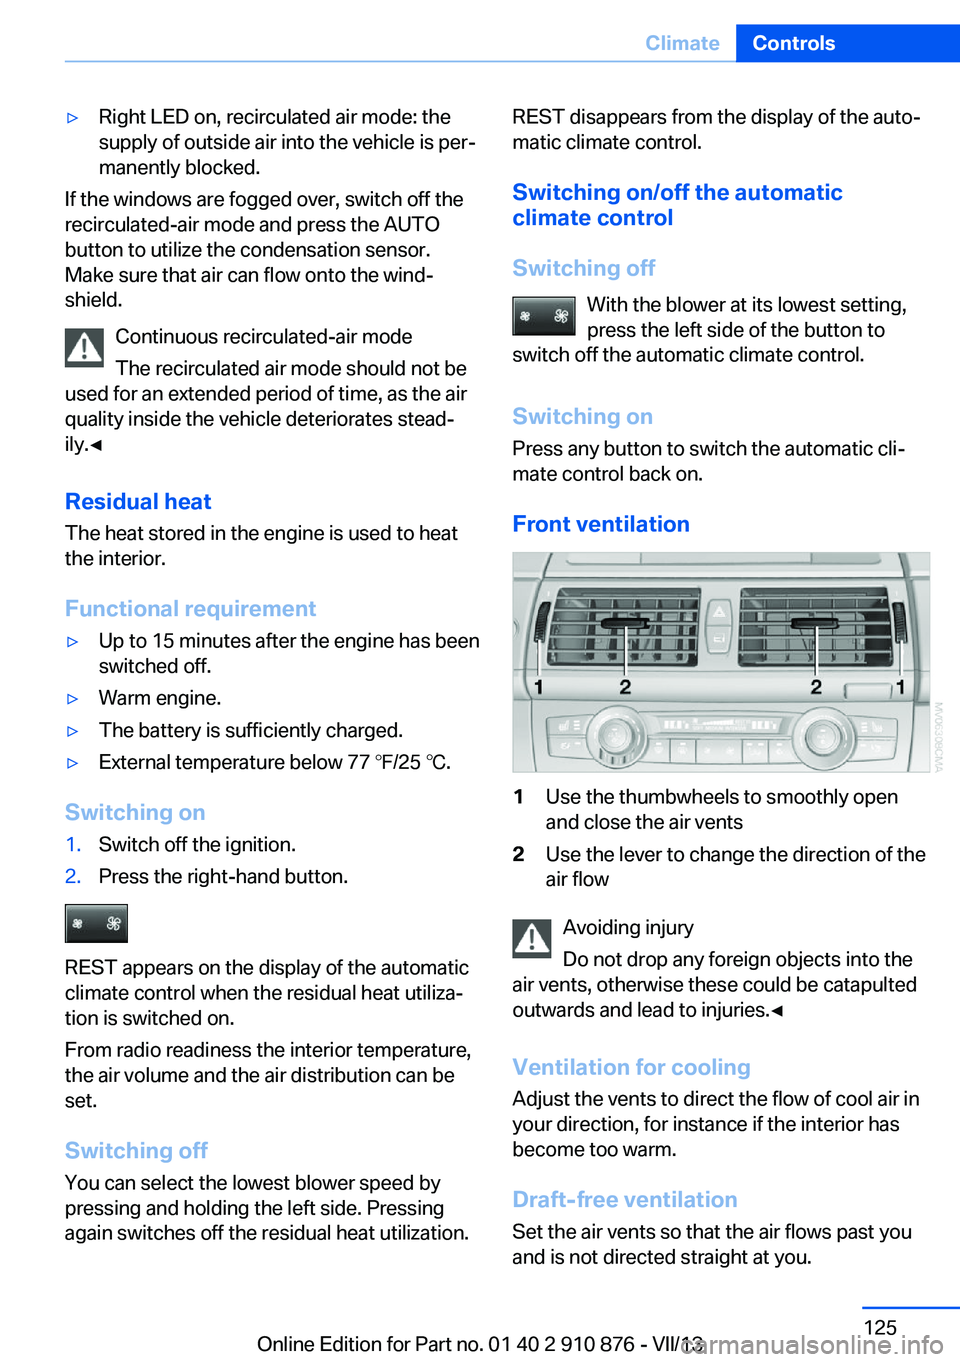
Front ventilation1Use the thumbwheels to smoothly open
and close the air vents2Use the lever to change the direction of the
air flow
Avoiding injury
Do not drop any foreign objects into the
air vents, otherwise these could be catapulted
outwards and lead to injuries.◀
Ventilation for cooling
Adjust the vents to direct the flow of cool air in
your direction, for instance if the interior has
become too warm.
Draft-free ventilation Set the air vents so that the air flows past you
and is not directed straight at you.
Seite 125ClimateControls125
Online Edition for Part no. 01 40 2 910 876 - VII/13
Page 130 of 323
on the interior rearview mirror. The re‐
quired distance depends on the particular
hand-held transmitter.4.Press the button of the desired function on
the hand-held transmitter and the button
being programmed on the interior rearview
mirror simultaneously and hold. The LED
on the interior rearview mirror flashes
slowly at first.5.When the LED flashes more rapidly, re‐
lease both buttons. Rapid flashing indi‐
cates that the button on the interior rear‐
view mirror has been programmed.
If the LED does not flash faster after
60 seconds, change the distance between
the interior rearview mirror and the hand-
held transmitter and repeat the step. Multi‐
ple trials at different distances may be nec‐
essary. Wait at least 15 seconds between
trials.6.To program additional functions on other
buttons, repeat steps 3 to 5.
The systems can be operated with the buttons
on the interior rearview mirror.
Special characteristics of alternating-
code radio systems
If the system cannot be operated after re‐
peated programming, check whether the sys‐
tem to be operated uses an alternating-code
system.
Read the operating instructions of the system
or press and hold the programmed button on
the interior rearview mirror. If the LED on the
interior rearview mirror flashes rapidly at first
and then lights up continuously for 2 seconds,
the system is equipped with an alternating-
code system. This flashing LED pattern re‐
peats itself for approx. 20 seconds.
In systems with an alternating-code system,
the Universal Garage Door Opener and the
system must be additionally synchronized.
Please obtain additional information on syn‐
chronization in the operating instructions of
the system being set up.
The systems will be easier to synchronize with
the aid of a second person.
Synchronization:1.Park the vehicle within range of the re‐
mote-controlled system.2.Program the corresponding button on the
interior rearview mirror as described.3.Identify and press the synchronization but‐
ton on the system being set up. You have
approx. 30 seconds for the next step.4.Press and hold the button on the interior
rearview mirror for approx. 3 seconds and
then release it. Repeat this step up to three
times if necessary to complete the syn‐
chronization procedure. When synchroni‐
zation is completed, the programmed func‐
tion is executed.
Reprogramming individual buttons
1.Switch on the ignition.2.Hold the hand-held transmitter at a dis‐
tance of approx. 1 to 3 in/2.5 to 8 cm from
the memory buttons.
The required distance depends on the par‐
ticular hand-held transmitter.3.Press the memory button of the Universal
Garage Door Opener.4.If the LED flashes slowly after approx.
20 seconds, press the transmit button on
the hand-held transmitter.5.Release both buttons when the LED
flashes rapidly.
If the LED does not flash rapidly after ap‐
prox. 60 seconds, change the distance and
repeat the step.
Canada: if the LED does not flash rapidly
after approx. 60 seconds, change the dis‐
tance and repeat the step. If programmingSeite 130ControlsInterior equipment130
Online Edition for Part no. 01 40 2 910 876 - VII/13
Page 131 of 323
was aborted by the hand-held transmitter,
hold down the memory button and press
and release the button on the hand-held
transmitter several times for 2 seconds.
Controls
Prior to operation
Before operating a unit with the Universal
Garage Door Opener, ensure that there are no
people, animals, or objects in the range of
movement of the system; otherwise, there is a
risk of injury or damage.
Also follow the safety instructions of the hand-
held transmitter.◀
The system, such as the garage door, can be
operated using the button on the interior rear‐
view mirror with the engine running or the igni‐
tion switched on. When you are within the re‐
ception range of the system, press and hold
the button until the function is initiated. The
LED on the interior rearview mirror lights up
continuously while the radio signal is being
transmitted.
Deleting stored functions Press the right and left buttons on the interior
rearview mirror simultaneously for approx.
20 seconds until the LED flashes rapidly. All
stored functions are deleted. The functions
cannot be deleted individually.
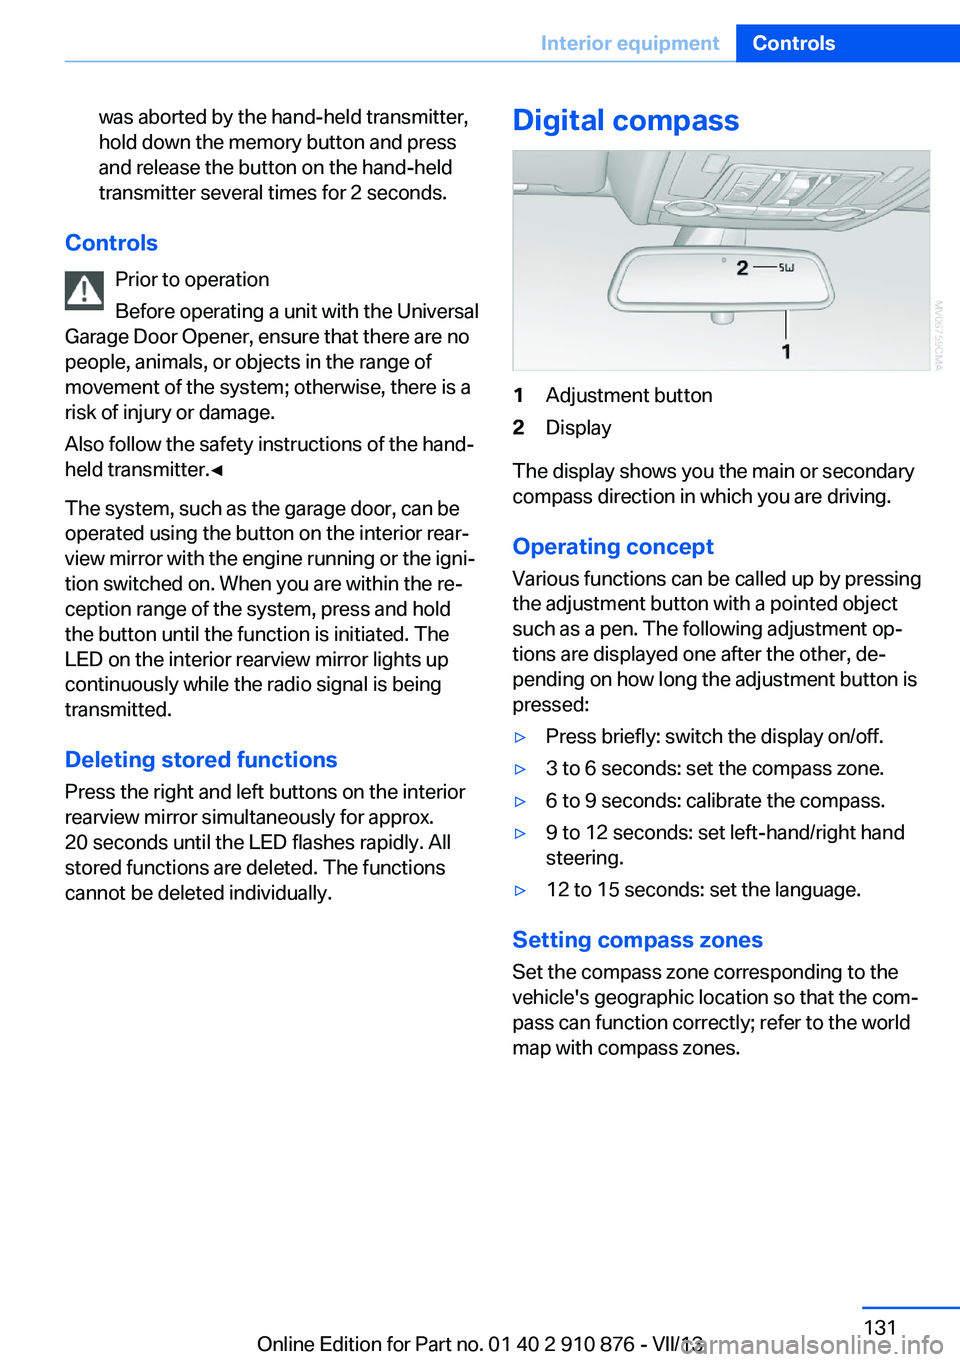
Digital compass1Adjustment button2Display
The display shows you the main or secondary
compass direction in which you are driving.
Operating concept
Various functions can be called up by pressing
the adjustment button with a pointed object
such as a pen. The following adjustment op‐
tions are displayed one after the other, de‐
pending on how long the adjustment button is
pressed:
▷Press briefly: switch the display on/off.▷3 to 6 seconds: set the compass zone.▷6 to 9 seconds: calibrate the compass.▷9 to 12 seconds: set left-hand/right hand
steering.▷12 to 15 seconds: set the language.
Setting compass zones
Set the compass zone corresponding to the
vehicle's geographic location so that the com‐
pass can function correctly; refer to the world
map with compass zones.
Seite 131Interior equipmentControls131
Online Edition for Part no. 01 40 2 910 876 - VII/13
Page 182 of 323
RadioVehicle equipment
This chapter describes all series equipment as
well as country-specific and special equipment
offered for this model series.Therefore, it also
describes equipment that may not be found in
your vehicle, for instance due to the selected
special equipment or the country version. This
also applies to safety-related functions and
systems.
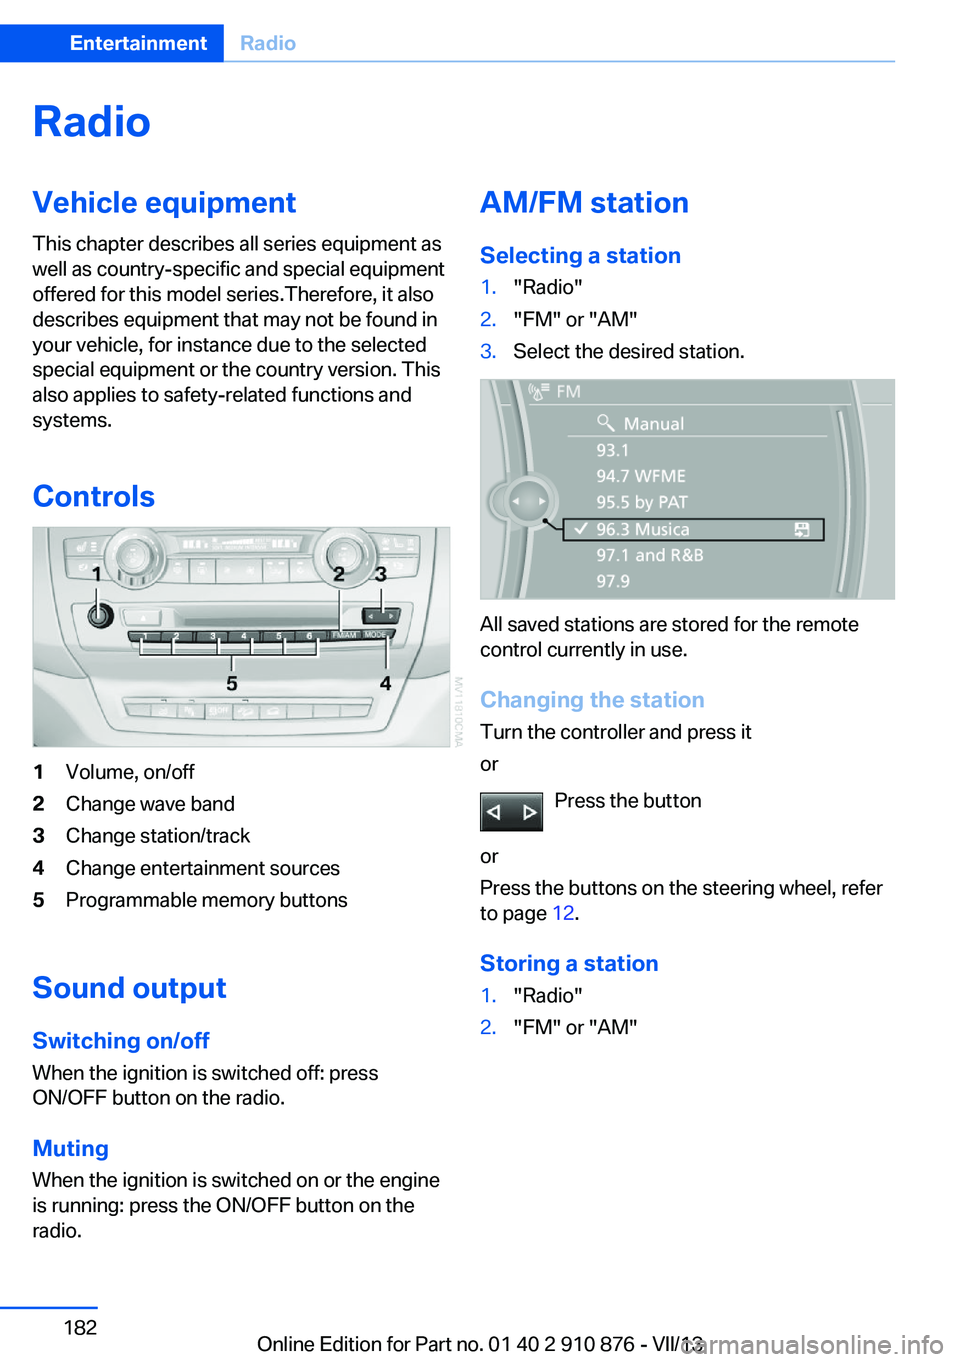
Controls1Volume, on/off2Change wave band3Change station/track4Change entertainment sources5Programmable memory buttons
Sound outputSwitching on/offWhen the ignition is switched off: press
ON/OFF button on the radio.
Muting
When the ignition is switched on or the engine
is running: press the ON/OFF button on the
radio.
AM/FM station
Selecting a station1."Radio"2."FM" or "AM"3.Select the desired station.
All saved stations are stored for the remote
control currently in use.
Changing the station
Turn the controller and press it
or
Press the button
or
Press the buttons on the steering wheel, refer
to page 12.
Storing a station
1."Radio"2."FM" or "AM"Seite 182EntertainmentRadio182
Online Edition for Part no. 01 40 2 910 876 - VII/13
Page 190 of 323
CD/multimediaVehicle equipmentThis chapter describes all series equipment as
well as country-specific and special equipment
offered for this model series.Therefore, it also
describes equipment that may not be found in
your vehicle, for instance due to the selected
special equipment or the country version. This
also applies to safety-related functions and
systems.
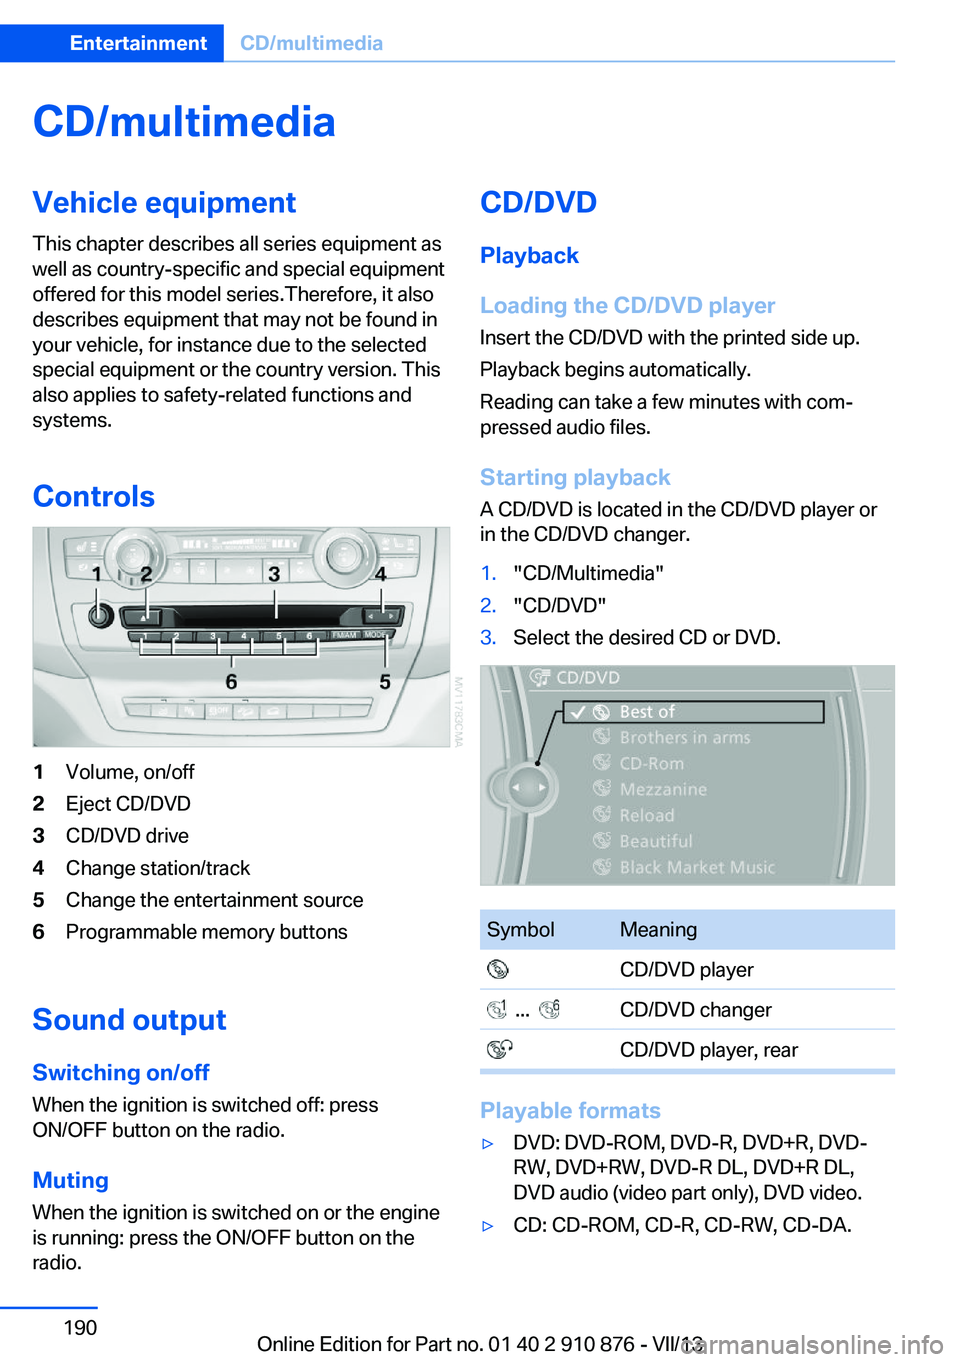
Controls1Volume, on/off2Eject CD/DVD3CD/DVD drive4Change station/track5Change the entertainment source6Programmable memory buttons
Sound outputSwitching on/offWhen the ignition is switched off: press
ON/OFF button on the radio.
Muting
When the ignition is switched on or the engine
is running: press the ON/OFF button on the
radio.
CD/DVD
Playback
Loading the CD/DVD player
Insert the CD/DVD with the printed side up.
Playback begins automatically.
Reading can take a few minutes with com‐
pressed audio files.
Starting playback A CD/DVD is located in the CD/DVD player or
in the CD/DVD changer.1."CD/Multimedia"2."CD/DVD"3.Select the desired CD or DVD.SymbolMeaning CD/DVD player ... CD/DVD changer CD/DVD player, rear
Playable formats
▷DVD: DVD-ROM, DVD-R, DVD+R, DVD-
RW, DVD+RW, DVD-R DL, DVD+R DL,
DVD audio (video part only), DVD video.▷CD: CD-ROM, CD-R, CD-RW, CD-DA.Seite 190EntertainmentCD/multimedia190
Online Edition for Part no. 01 40 2 910 876 - VII/13
Page 311 of 323
Concierge service 251
Condensation on windows, removing 123
Condensation under the vehi‐ cle 148
Condition Based Service CBS 274
Confirmation signals for lock‐ ing/unlocking the vehicle 33
Connecting, mobile phone, refer to Pairing the mobile
phone 227
Consumption, refer to Aver‐ age fuel consumption 73
Contacts 240, 248
Control Display 19
Control Display, care 294
Control Display, setting the brightness 79
Controller, refer to Con‐ trols 18
Controls and displays 12
Controls, rear DVD sys‐ tem 210
Control systems, driving sta‐ bility 96
Convenient operation– Glass sunroof 33– Window 33
Coolant 273
Coolant, checking the level 273
Coolant temperature 71
Cooling function, switching on and off 124
Cooling, maximum 124
Cooling system, refer to Cool‐ ant 273
Cornering Brake Control CBC 96
Corrosion on brake discs 148
Courtesy lamps, refer to Inte‐ rior lamps 85
Cradle for telephone or mo‐ bile phone, refer to Snap-in
adapter 237
Cruise control 109
Cruise control– Malfunction 110
Cruise control, active 102
Cupholder 139
Curb weight, refer to Weights 298
Current fuel consumption 71
Current location, storing 162
Curve lights, refer to Adaptive Light Control 82
D
Dashboard lighting, refer to Instrument lighting 85
Dashboard, refer to Cock‐ pit 12
Data, technical 298
Date 70
Date, display format 79
Date, retrieving 70
Date, setting 78
Daytime running lights 82
Defroster, rear window 123
Defrosting windows 123
Defrost setting, refer to De‐ frosting windows 123
Destination entry via the ad‐ dress book 162
Destination guidance 169
Destination guidance with in‐ termediate destinations 167
Destination input, naviga‐ tion 160
Digital clock 70
Digital compass 131
Digital radio 183
Dimming mirrors 52
Directional indicators, refer to Turn signals 64
Display in front wind‐ shield 118
Display lighting, refer to In‐ strument lighting 85
Displays and controls 12
Displays, care 294
Displays, cleaning 294
Displays, refer to Instrument
cluster 14
Disposal, coolant 273
Disposal, vehicle battery 284
Distance control, refer to Ac‐ tive Cruise Control 102
Distance, selecting, with Ac‐ tive Cruise Control 104
Distance warning, refer to Park Distance Control
PDC 111
Divided screen view, split screen 22
Door key, refer to Remote control with integrated
key 30
Door lock 34
Doors, manual operation 34
Doors, unlocking and locking– Confirmation signals 33– From the inside 35– From the outside 32
DOT Quality Grades 265
Downhill control 99
Draft-free ventilation 125
Drive-off assistant 100
Driver's seat, calibrating 49
Driving away on inclines, refer to Drive-off assistant 100
Driving notes, breaking in 146
Driving notes, general 146
Driving on poor roads 148
Driving stability control sys‐ tems 96
Driving through water 147
Driving tips, refer to Driving notes 146
Dry air, refer to Cooling func‐ tion 124
DSC Dynamic Stability Con‐ trol 96
DTC Dynamic Traction Con‐ trol 97
DTMF suffix dialing 232
DVD/CD 190
DVDs, storing 197
Seite 311Everything from A to ZReference311
Online Edition for Part no. 01 40 2 910 876 - VII/13
Page 317 of 323
Pressure warning, tires 88
Profile depth, refer to Mini‐ mum tread depth 266
Profile, tires 266
Programmable memory but‐ tons, iDrive 23
Protection function, refer to Pinch protection 43
Protective function, refer to
Pinch protection– Windows 41
Push-and-turn switch, refer to
Controls 18
R Radiator fluid, refer to Cool‐ ant 273
Radio-operated key, refer to Remote control with
integrated key 30
Radio ready state 59
Radio ready state, switched off 60
Radio ready state, switched on 59
Radio setting, refer to Radio ready state 59
Rain sensor 66
Random 191
Random playback 191
Range 72
RDS 183
Reading lamps 85
Reading out loud 246
Rear entertainment, refer to DVD system in rear 210
Rear lamps, refer to Tail lamps 279
Rear seat backrest, folda‐ ble 135
Rear seats, adjusting the head restraints 50
Rear seats, heating 46
Rear socket 134
Rear ventilation 126
Rear ventilation, automatic
climate control in rear 126
Rearview camera, clean‐ ing 115
Rearview mirror, refer to Mir‐ rors 51
Rear window defroster 123
Recirculated air mode 124
Recommended tire brands 268
Redialing 233
Refueling 258
Remaining distance to desti‐ nation, refer to Com‐
puter 73
Remaining range for service, refer to Service require‐
ments 74
Remaining range, refer to Range 72
Reminders 246
Remote control– Battery replacement 39– Comfort Access 37– Garage door opener 129– Malfunction 34, 39– Tailgate 33– Universal 129
Remote control, rear DVD
system 211
Remote control, removing from the ignition lock 59
Remote control, service data 274
Remote inquiry 232
Replacement fuse 284
Replacement remote con‐ trol 30
Replacing wheels/tires 267
Reporting safety defects 9
Reserve warning, refer to Fuel gauge 72
Reservoir for washer fluid, re‐ fer to Washer fluid reser‐
voir 67
Resetting, Tire Pressure Monitor TPM 91
Residual heat 125
Restraining systems– Refer to Safety belts 47
Restraint systems for chil‐
dren 54
Retaining straps, securing cargo 151
Retreaded tires 268
Rim cleaner, care 293
Road, avoiding 169
Road detour 169
Roadside Assistance 252
Roadside parking lamps 83
Roller sunblinds 42
RON gasoline quality 260
RON, refer to Fuel qual‐ ity 260
Roof load capacity 298
Roof-mounted luggage rack 152
Rope, refer to Towing 289
Route 170
Route criteria, route 169
Route, displaying 170
Route section, bypass‐ ing 170
RSC Runflat System Compo‐ nent, refer to Run-flat
tires 268
Rubber components, care 293
Run-flat tires 268
Run-flat tires, tire inflation pressure 262
Running lights, refer to Park‐ ing lamps/low beams 81
S Safe braking 147
Safety 6
Safety belts 47
Safety belts
– Damage 48
Safety belts, care 293
Safety belts, indicator/warn‐ ing lamp 48
Seite 317Everything from A to ZReference317
Online Edition for Part no. 01 40 2 910 876 - VII/13